Erbauer ELMP170SP51 User manual
V10820 / BX220IM
EAN: 5059340124438
ORIGINAL INSTRUCTIONS
ELMP170SP51

Product description
Safety instructions
Assembly
Use
Guarantee
Declaration of conformity
Care & maintenance
4
9
20
22
31
39
40
WARNING! Please read all safety
warnings carefully and be sure that
they are fully understood before
handling the tool.
1
PRODUCT DESCRIPTION
1. Brake clutch
2. Handle
a. Transportation handle
3. Drive bar
4. Upper handle bar
5. Speed lever
6. Lower handle bar
7. Drive wire
8. Brake wire
9. Side lever (x2)
a. Washer *
b. Nut *
10. Wire clip
11. Fuel tank cap
12. Airltercase
a. Filter *
b. Cover *
13. Spark plug connector
14. Wheel
15. Muer
16. Sidedeectorguard
a. Lock buckle
17. Oil tank cap with dipstick
18. Lever for cutting height adjustment
19. Lower handle bar knob (x2)
a. Bolt *
20. Reardeectorguard
21. Grass catcher
a. Handle
b. Hatch
22. Starter wire
23. Recoil starter handle
a. Hook
24. Mulching insert
a. Unlock button
25. Side discharge attachment
26. Spark plug wrench
27. Cutting means (blade)
a. Spindle
b. Ring
c. Washer
d. Lockingange
e. Hex bolt
28. Oil drain screw
29. Rear discharge chute
30. Fuelshut-ovalve
31. Water hose connector
32. Engine operator’s manual *
Parts marked with * are not shown in this overview. Refer to the
respective section in the instruction manual.

4
Product description
7
8
9a
9b
1
2
3
4
5
6
11
2a
12
13
14
15
16a
16
18
17
19
20
10
21a
21
22
23
24a
24 25
26
9
21b
23a
30
31
5
1
19
6
19a
2
6
4
3
9
9a
9b
4
6
4
20
21
51
2
24
20
6
2
24a
1
27
27a
27b
27c
27d
27e
272829

6
7
25
16a
16
8
9
11
10
5 mm
11 12
13
1 cm
max
min
17
14
7
15 16 1
2
17
2
3
18
5
19
23a
23
4
20 4
23
23a
21 21b 22
21b

8
23
1
2
18
24
2
25 26
1
3
27 28
31
9
Safety instructions
PETROL POWERED LAWNMOWERS SAFETY WARNINGS
WARNING Read all safety warnings, instructions, illustrations and
specicationsprovidedwiththisproduct.Failuretofollowallinstructions
listedbelowmayresultinelectricshock,reand/orseriousinjury.
Save all warnings and instructions for future reference.
1) TRAINING
a) Read the instructions carefully. Be familiar with the controls and the proper
use of the product.
b) Never allow children or people unfamiliar with these instructions to use the
product. Local regulations can restrict the age of the operator.
c) Never mow while people, especially children or pets, are nearby.
d) Keep in mind that the operator or user is responsible for accidents or hazards
occurring to other people or their property.
e) The operators must receive a proper training in the use, adjustment and
operation of the product, including prohibited operations.
2) PREPARATION
a) While mowing, always wear protective footwear and long trousers. Do not
operate the product when barefoot or wearing open sandals.
b) Thoroughly inspect the area where the product is to be used and remove
all stones, sticks, wires, bones, and other foreign objects.
c) WARNING-Petrolishighlyammable.
• Storefuelincontainersspecicallydesignedforthispurpose.
• Refuel outdoors only and do not smoke while refuelling.
• Add fuel before starting the engine. Never remove the fuel tank cap or add
petrol while the engine is running or when the engine is hot.
• If petrol is spilt, do not attempt to start the engine. Move the product away
from the area of spillage and avoid creating any source of ignition until
fuel vapours have dissipated.
• Replace all fuel tank and container caps securely.
d) Replace faulty silencers.

10
e) Before using, always visually inspect to see that the blades, blade bolts
and cutter assembly are not worn or damaged. Replace worn or damaged
blades and bolts in sets to preserve balance.
f) CAUTION! Do not touch rotating cutting means.
g) Engine brake (brake clutch): Use the brake clutch to stop the engine. When
you release the clutch, the engine and the blade stop automatically in a
few seconds. To mow, hold the bar in the working position. Before you start
to mow, check the brake clutch several times to be sure that it is working
correctly. Ensure that the brake wire can be smoothly operated (e.g. is not
catching or kinking in any way).
3) OPERATION
a) Donotoperatetheengineinaconnedspacewheredangerouscarbon
monoxide fumes can accumulate.
b) Mowonlyindaylightoringoodarticiallight.
c) Donotoperatetheproductwhilebeingtired,illorundertheinuenceof
alcohol or drugs.
d) Avoid operating the product in wet grass, where feasible.
e) Always be sure of your footing on slopes.
f) Walk, never run.
g) Mow across the face of slopes, never up and down.
h) Exercise extreme caution when changing direction on slopes.
i) Donotmowexcessivelysteepslopes,neardrop-os,ditchesorembankments.
j) Avoid using the product in bad weather conditions especially when there is
a risk of lightning.
k) Use extreme caution when reversing or pulling the product towards you.
l) Stop the blade(s) if the product has to be tilted for transportation when
crossing surfaces other than grass, and when transporting the product to
and from the area to be mowed.
m) Never operate the product with defective guards, shields, or without safety
devices,forexamplemulchinginsert,deectorsand/orgrasscatchers,in
place.
n) Do not change the engine governor settings or overspeed the engine.
o) Do not alter or tamper with any sealed adjustments for the engine speed control.
p) Do not tamper or disable any product’s safety systems or features.
q) Ensure and regularly check that all starting interlocks and operator presence
controls are functioning correctly.
r) Stop the product according to instructions in this manual before leaving the
operator’s position and park it in a safe location.
s) Start the engine carefully according to instructions and with feet well away
from the blades.
11
t) Do not tilt the product when starting the engine or switching on the engine,
except if the product has to be tilted for starting. In this case, do not tilt it
more than necessary and lift only the part which is away from the operator.
Always ensure that both hands are in the operating position before returning
the product to the ground.
u) Keep hands and feet away from the cutting means at all times and especially
when switching on the engine.
v) Do not put hands or feet near or under rotating parts. Keep clear of the
discharge opening at all times.
w) Never pick up or carry a product while the engine is running.
x) In case of any situation mentioned below, stop the engine and disconnect
the spark plug connector. Make sure that all moving parts have come to a
complete stop:
• before clearing a blockage or unclogging chute,
• before checking, cleaning or working on the product,
• after striking a foreign object. Inspect the product for damage and make
repairs as necessary
• if the product starts to vibrate abnormally (check immediately)
> inspect for damage
> replace or repair any damaged parts
> check for and tighten any loose parts
• whenever you leave the product
• before refuelling
y) Nevertouchtheexhaust,exhaustguardorcoolingnswhentheengineis
hot.
z) Never carelessly touch hot parts of the product. While the product is in
operation and shortly after that, its parts such as the exhaust, engine, and
other surfaces are extremely hot! Risk of burns! Pay attention to the markings
on the product.
za) Make sure that the air vents of the combustion engine are clear. Keep the
air vents free of dust, dirt particles, gases and fumes.
zb) Never start or run the engine indoors. The exhaust fumes are dangerous,
containing carbon monoxide, an odourless and deadly gas. Operate this
product only in well ventilated outdoor areas.
4) MAINTENANCE AND STORAGE
a) Follow the maintenance and repair instructions of this product. Never carry
outanymodicationsoftheproduct.Neverchangethepresetgovernor
speed or the engine and product settings. Information about maintenance
and repair are provided in this instruction manual.

12
b) Keep all nuts, bolts and screws tight to be sure that the product is in safe
working condition.
c) Improper maintenance or using non-genuine parts not recommended by the
manufacturer may lead to malfunction/failure of the product. Many accidents
are caused by poorly maintained products.
d) Never store the product with petrol in the tank inside a building where fumes
canreachanopenameorspark.
e) Toreducetherehazard,keeptheengine,silencerandpetrolstoragearea
free of vegetative material and excessive grease.
f) Allow the engine to cool before storing in any enclosure.
g) Clean and maintain the product before storage.
h) Check the grass catcher frequently for wear or deterioration.
i) If the fuel tank has to be drained, this should be done outdoors.
j) Wear protective gloves when removing and re-assembling the cutting means.
k) Replace worn or damaged parts for safety. Only use replacement blades
and spare parts recommended by the manufacturer.
l) Ensure that only replacement cutting means of the right type are used.
5) FUEL HANDLING
a) Before refuelling, stop the engine, disconnect the spark plug connector
andlettheproductcool.Fuelandfuelvapoursarehighlyammable.Take
care when handling fuel. Never smoke when you are refuelling the product.
Donotrefueltheproduct,ifthereisanopenreinthevicinity!
b) Alwaysusesuitableaidssuchasfunnelsandllernecks.Donotspillany
fuel on the product or its exhaust system. There is a risk of ignition. Remove
spilt fuel carefully from all parts of the product. Any residue which may be
present must be completely removed before the product is operated!
c) Fuel fumes can ignite. Never use the product in environments where there
is a risk of explosion.
d) Petrol engines produce toxic carbon monoxide exhaust fumes. Breathing
carbon monoxide can cause nausea, fainting or even death.
e) Never breathe in any fuel fumes, when you are refuelling the product. Never
llthefueltankinenclosedspaces,suchasbasementsorsheds.Thereis
a risk of poisoning and explosion!
f) Avoid skin contact with petrol.
g) Do not eat or drink, while you are refuelling the product. If you have swallowed
petrol or oil, or if petrol or oil has got into your eyes, then seek medical advice
immediately.
h) Closethefueltankcapimmediatelyafterllingthefueltank.Makesurethat
it is properly closed.
i) Neverusetheproductwithoutanairlter.
13
j) Fuel vapour pressure may build up inside the fuel tank depending on the
fuel used, weather conditions and the venting system. To reduce the risk
of burns and other personal injuries, remove the fuel tank cap carefully to
allow any pressure build-up to release slowly.
k) Beawareofrerisks,explosionandinhalationrisks.
l) Do not smoke while operating the product, handling fuel or near fuel.
m) Ensure the spark plug connector is securely attached. A loose connector
may cause electrical arcing that could ignite combustible fumes and cause
areorexplosion.
n) Check regularly for leaks from the fuel tank cap and fuel lines.
o) Tightenthefueltankcapthoroughlyafterrellingthefueltank.
p) Do not operate the product if it is leaking fuel. Do not remove the fuel tank
cap while the engine is running.
q) Usecautionwhenhandlingfuel.Toavoidanyaccidentalres,movethe
product at least 3 metres from the fuelling point before starting the engine.
r) Donotstorecontainerslledwithfuelorrellthefueltankinanyplace
wherethereisaboiler,stove,woodre,electricalsparks,weldingsparks,
orothersourcesofheatorrewhichmightignitethefuel.
s) If any fuel spillage occurs during refuelling, use a dry rag to wipe spills and
allow remaining fuel to evaporate before starting the engine again.
t) If you have spilt fuel on yourself or on your clothes, change your clothes
and wash any part of your body that has come in contact with fuel before
starting the engine again.
u) Iffuelisignited,putouttherewithadrypowderreextinguisher.
v) Storefuelincontainersspecicallydesignedforthispurpose.
6) VIBRATION AND NOISE REDUCTION
To reduce the impact of noise and vibration emission, limit the time of operation, use low-
vibration and low-noise operating modes as well as wear personal protective equipment.
Take the following points into account to minimise the vibration and noise exposure risks:
a) Only use the product as intended by its design and these instructions.
b) Ensure that the product is in good condition and well maintained.
c) Use correct attachments for the product and ensure they are in good condition.
d) Keep tight grip on the handles/grip surface.
e) Maintain this product in accordance with these instructions and keep it well
lubricated (where appropriate).
f) Plan your work schedule to spread any high vibration tool use across a
longer period of time.

14
7) EMERGENCY
Familiarise yourself with the use of this product by means of this instruction manual.
Memorise the safety directions and follow them to the letter. This will help to prevent
risks and hazards.
a) Always be alert when using this product, so that you can recognise and
handle risks early. Fast intervention can prevent serious injury and damage
to property.
b) Stop the engine and disconnect the spark plug connector if there are
malfunctions.Havetheproductcheckedbyaqualiedprofessionaland
repaired, if necessary, before you operate it again.
c) Incaseofrestoptheengineanddisconnectthesparkplugconnector.Take
re-extinguishingmeasuresimmediatelyiftheproductswitchisnolonger
accessible.
WARNING!Neverusewatertoextinguishtheproductonre.Burningfuel
must be extinguished with special extinguishing agents! We recommend
thatyoukeepasuitablereextinguisherwithinreachinyourworkarea!
Werecommendtohavedrypowderreextinguisheralwaysavailable.
8) RESIDUAL RISKS
Even if you are operating this product in accordance with all the safety requirements,
potential risks of injury and damage remain. The following dangers can arise in connection
with the structure and design of this product:
a) Health defects resulting from vibration emission if the product is being used
over long periods of time or not adequately managed and properly maintained.
b) Injuries and damage to property due to broken attachments or the sudden
impact of hidden objects during use.
c) Dangerofinjuryandpropertydamagecausedbyyingobjects.
d) Burns, if touching hot surfaces.
WARNING!Thisproductproducesanelectromagneticeldduring
operation!Thiseldmayundersomecircumstancesinterferewithactive
or passive medical implants! To reduce the risk of serious or fatal injury,
we recommend persons with medical implants to consult their doctor and
the medical implant manufacturer before operating this product!
15
01 Technical specications
General
Dimensions: approx. 166 x 54 x 110 cm
Product mass with empty tanks and in the normal
operating conguration: approx. 33 kg
Fuel tank capacity: 910 ml (cm³)
Petrol type: #95, unleaded
Engine oil capacity: 400 ml (cm³)
Engine oil type: 4-stroke engine oil
(e.g. SAE 10W-30)
Specic fuel consumption at max. engine power: 368 g/kWh
Fuel consumption at max. engine power: 1.24 kg/h
Cutting means: blade type: 40 MnB
blade thickness: 3 mm
Cutting width: 51 cm
Cutting height: 25 - 75 mm
Grass catcher volume: 65 l
Engine
Engine model: HONDA GCV170
Engine type: air cooled, 4-stroke engine
Engine displacement: 167 cm3
Maximum operating engine speed
(rotational frequency): 2800 min-1
Nominal power: 3.1 kW
Spark plug type: BPR5ES
Spark plug gap: 0.7-0.8 mm
Carburettor: SE475
Sound level
Sound pressure level at operator’s position LpA:85.8 dB(A)
Uncertainty K: 3 dB(A)
Sound power level LWA:96.5 dB(A)
Uncertainty K: 1.86 dB(A)
Guaranteed sound power level LWA
(acc. to 2000/14/EC amended by 2005/88/EC): 98 dB(A)
Vibration level
Hand-arm vibration ahw:5.213 m/s2
Uncertainty K: 1.5 m/s2
16
The sound values have been determined according to noise test code given in
EN ISO 5395-1 and EN ISO 5395-2, using the basic standards ISO 3744 and ISO 11094.
Wear hearing protection, especially when sound pressure is over 80 dB(A).
The declared vibration value has been measured in accordance with a standard test
method (according to EN ISO 5395-1 and EN ISO 5395-2) and may be used for
comparing one product with another. The declared vibration value may also be used
to evaluate the exposure for the user caused by vibration in advance.
WARNING!Depending on the actual use of the product the vibration values
can from the declared total. Adopt proper measures to protect yourself
against vibration exposures. Take the whole work process including times
the product is running under no load or switched into consideration!
Proper measures include among others regular maintenance and care
of the product and accessories, keeping hands warm, periodical breaks
and proper planning of work processes!
02 Symbols
On the product, the rating label and within these instructions you will among others
the following symbols and abbreviations. Familiarize yourself with them to reduce
hazards like personal injuries and damage to property.
kW Kilowatt ml Millilitre
cm3Cubic centimetre g/kWh Gram per kilowatt per hour
/min or min-1 Per minute kg/h Kilogram per hour
mm Millimetre °C Degree Celsius
cm Centimetre dB(A) Decibel (A-rated)
kg Kilogram m/s2Metres per second squared
l Litre
yyWxx
17
Description of signal words:
DANGER! The signal word that indicates a hazard with a high level of risk
which, if not avoided, will result in death or serious injury.
WARNING! The signal word that indicates a hazard with a medium level of
risk which, if not avoided, could result in death or serious injury.
CAUTION! The signal word that indicates a hazard with a low level of risk
which, if not avoided, could result in minor or moderate injury.
NOTE! Indicates a practical tip, advice or practice not related to personal
injury.
Lock/to tighten or secure.
Unlock/to loosen.
Note/Remark.
Caution/Warning.
Read the instruction manual.
Mow across the face of slopes, never up and down.
Do not expose the product to rain or wet conditions.
Open in the work area, around the product and in the vicinity of
materials are prohibited!
Do not smoke in the work area, around the product and in the vicinity of
materials!
Risk of materials.
Wear respiratory protection.
Wear hearing protection.
Wear eye protection.
Wear protective gloves
(compliant to EN ISO 21420)
Wear protective, slip-resistant
safety footwear
(compliant to EN ISO 20345)
Wear protective clothing
(compliant to EN ISO 13688)
Manufacturing date code; year of manufacturing (yy) and week of manufacturing
(Wxx)
18
Hot surface, do not touch! High temperatures on the product’s
surfaces and structural parts that could cause burns, if they are
touched. The product can also stay hot for a longer period of time
after the operation!
Petrol engines produce toxic carbon monoxide exhaust fumes.
Breathing carbon monoxide can cause nausea, fainting or even
death. Do not operate the engine indoors!
Only refuel unleaded petrol!
Add engine oil.
Checkandrelloil.
Stop the engine before refuelling the fuel tank. Flammable material.
Keepawayfromre.Donotaddfuelwitharunningengine.
Inspect the area where the product is to be used and remove all
objects which can be thrown by the product. If objects are hidden
while operating, stop the engine and remove the objects.
Cutting means continues to rotate after the engine is stopped.
Wait until all components have completely stopped before touching
the product.
Pay particular attention when working on the blades!
Keep hands and feet away from sharp rotating parts – risk of injury!
When cleaning, repairing or inspecting, make sure the cutting
means and all moving parts have stopped. Disconnect the spark
plug connector, and keep the cap away from the plug to prevent
accidental starting.
Objects thrown by the product could hit the operator or other
bystanders. Always ensure that other people and pets remain
at a safe distance from the product when it is in operation. In
general, children must not come near the area where the product
is operating.
19
Release the brake clutch to stop the engine and the cutting means.
Pull the drive bar to engage the wheels.
Switchtheproductoanddisconnectthesparkplugconnector
before assembly, cleaning, adjustments, maintenance, storage and
transportation.
Keep hands and feet away.
Engine manual start; recoil starter.
GO STOP
The grass catcher hatch open (GO) and close (STOP)
position.
Guaranteed sound power level value in dB.
ELMP170SP51
E_Erbauer, LMP_Petrol lawnmower, 170_ Engine model,
SP_Self-propelled,51_Cutting width 51cm
The product complies with the applicable European directives and
an evaluation method of conformity for these directives was done.

20
Assembly
01 Unpacking
The product is heavy, ask another person for assistance if required.
1. Unpackallpartsandlaythemonaat,stablesurface.
2. Remove all packing materials and shipping devices, if applicable.
3. Makesurethedeliverycontentsarecompleteandfreeofanydamage.Ifyound
that parts are missing or show damage do not use the product but contact your
dealer. Using an incomplete or damaged product represents a hazard to people
and property.
4. Ensure that you have all the accessories and tools needed for assembly and
operation. This also includes suitable personal protective equipment.
WARNING! The product and the packaging are not children’s toys!
Children must not play with plastic bags, sheets and small parts! There
isadangerofchokingandsuocation!
02 You will need
(items not supplied)
> Suitable personal protective
equipment
> Fuelfunnelwithlter
> Suitable engine oil (SAE10W-30)
> Suitable fuel (unleaded petrol)
> Container to collect fuel
> Container to collect oil
> Lubrication oil/grease
> Foamairlteroil
> Torque wrench (40-45 Nm)
> First aid kit
> Drypowderreextinguisherreadily
available
(items supplied)
> Spark plug wrench (26)
> Engine operator’s manual (32)
21
03 Assembly
WARNING! The product must be fully assembled before the operation!
Do not use a product that is only partly assembled or assembled with
damaged parts!
Follow the assembly instructions step-by-step and use the pictures
provided as a visual guide to assemble the product easily!
Disconnect the spark plug connector (13) from the spark plug! Reconnect
it after assembly.
NOTE: Take care of small parts that are removed during assembly or
when making adjustments. Keep them secure to avoid loss.
Handle bars
1. Unfold the lower handle bar (6) to the desired height. Align the holes of the lower
handle bar (6) and one of the 3 mounting holes of the main unit (Fig. 1).
2. Secure the lower handle bar position with the lower handle bar knob (19) and the
bolt (19a) (Fig. 1). Repeat on the other side.
3. Unfold the upper handle bar (4) and hold it with the brake clutch (1) facing upwards
(Fig. 2). Align the mounting holes of the upper handle bar (4) and the lower handle
bar (6).
4. Fix the upper handle bar (4) to the lower handle bar (6) with the side levers (9) ,
washers (9a) and nuts (9b) through the mounting holes (Fig. 3). If the side lever (9)
cannot be folded, loosen it by 2 or 3 turns, then fold again.
5. Attach the drive wire (7) and brake wire (8) to the lower handle bar (6) with the
wire clip (10).
Grass catcher installation
1. Liftthereardeectorguard(20)andholditinplace(Fig.4).
2. Align the hooks of the grass catcher (21) with the rods and hang them onto (Fig. 4).
3. Carefullyreleasethereardeectorguard(20)afterwards.
Mulching insert installation
1. Openthereardeectorguard(20),holditinpositionandinsertthemulching
insert (24) into the rear discharge chute (29) (Fig. 5). Ensure the unlock button (24a)
snaps in place.
2. Press the unlock button (24a) to release and remove the mulching insert (24) (Fig. 6).

22
Side discharge attachment installation
1. Liftandholdthelockbuckle(16a)upwardstounlockthesidedeectorguard(16)
(Fig. 7).
2. Openthesidedeectorguard(16)andholditintheopenposition(Fig.7).
3. Hook the side discharge attachment (25) underneath the rods. Release the side
deectorguard(16)(Fig.8).
Use
Intended use
This petrol lawnmower ELMP170SP51 is designated with a power output of 3.1 kW.
1. The product is intended for mowing grass in domestic gardens only. It must not be
used to mow unusually high, dry or wet grass (e.g. pasture grass) or for shredding
leaves.
2. For safety reasons it is essential to read the entire instruction manual before the
rstoperationandtoobservealltheinstructionstherein.
3. This product is intended for private domestic use only, not for any commercial use.
It must not be used for any purposes other than those described.
Before you start
01 Protection
02 Fuel and engine oil
This product is equipped with a 4-stroke engine. Before operation, it is necessary to
add suitable fuel and engine oil separately.
23
WARNING! This product contains a separate operator’s manual for the
engine. Service the engine with proper petrol and engine oil as instructed
in the separate engine operator’s manual (32).
It is important to read and understand these instructions of the engine
and the equipment.
SAVE THESE ORIGINAL INSTRUCTIONS FOR FUTURE REFERENCE.
WARNING!Fuelandoilarehighlyinammable!Fumeswillexplodeif
lit!Ensurethattherearenonakedamesaroundtheproduct!Donot
smokewhilellingfuelandoil!.
>Useproperfunnels.Avoidspillingandoverllingthetanks.
> Always dispose of fuel, used oil and objects contaminated with them in accordance
with local regulations.
Fuel
NOTE: Take care of small parts that are removed during assembly or
when making adjustments. Keep them secure to avoid loss.
> Always use clean, fresh unleaded petrol. Purchase fuel in quantities that can be
used up within 30 days.
> Avoid getting dirt, dust or water in the fuel tank.
1. Placetheproductonastable,levelsurface.Werecommendlayinganon-ammable
sheet under the product.
2. Unscrew and remove the fuel tank cap (11) (Fig. 9).
3. Add suitable fuel into the fuel tank. Leave a minimum 5 mm of space between the
top of the fuel and the inside edge of the tank to allow for expansion (Fig. 10).
4. Wipe any spilt fuel with a soft cloth and reattach the fuel tank cap (11).
24
NOTE:Petroldeterioratesovertime.Itmaybediculttostarttheengine
if you use petrol which has been kept for more than few days. Empty the
fuel after every use. Run the product dry of fuel in idle before storage.
NOTE:Fuelcandamagepaintandplastic.Whenllingthetank,take
care not to spill any fuel. Damages caused by spills are not covered by
the guarantee.
Fuel shut-o valve
Thisproductisequippedwithafuelshut-ovalve(30).
1. To open the valve, turn it anti-clockwise (Fig. 11).
2. To close the valve, turn it clockwise (Fig. 12).
NOTE: Close the valve (30) after operation, and before storage and
maintenance.
Engine oil
WARNING! This product is not supplied with oil. However, for manufacturing
reasons, it is possible that a small quantity may be in the engine! Before
operatingthisproduct,itisessentialtollitwithoil(4-strokeengineoil,
e.g. SAE 10W-30)!
Engineoilhasasignicantinuenceonengineperformanceandservice
life. Non-detergent or 2-cycle engine oils will damage the engine and
should not be used - see the separate engine operator’s manual (32).
1. Placetheproductonaatandevensurface.
2. Unscrew and remove the oil tank cap (17).
3. Gradually add good-quality engine oil (SAE 10W-30). Allow the oil to settle.
4. Checktheoillevelfrequentlywhilelling.Wipeooildipstick(17)andinsertitinto
the tank opening without tightening the cap, and then remove the dipstick again.
5. The oil level must be between the oil level markings (approx. 400 ml). Add more
oilifnecessary.Donotoverll(Fig.13).
6. Afterllingoil,wait1minuteandthenrechecktheoillevel.
7. Wipe the spilt oil with a soft cloth and reattach the oil tank cap (17).
25
Product functions
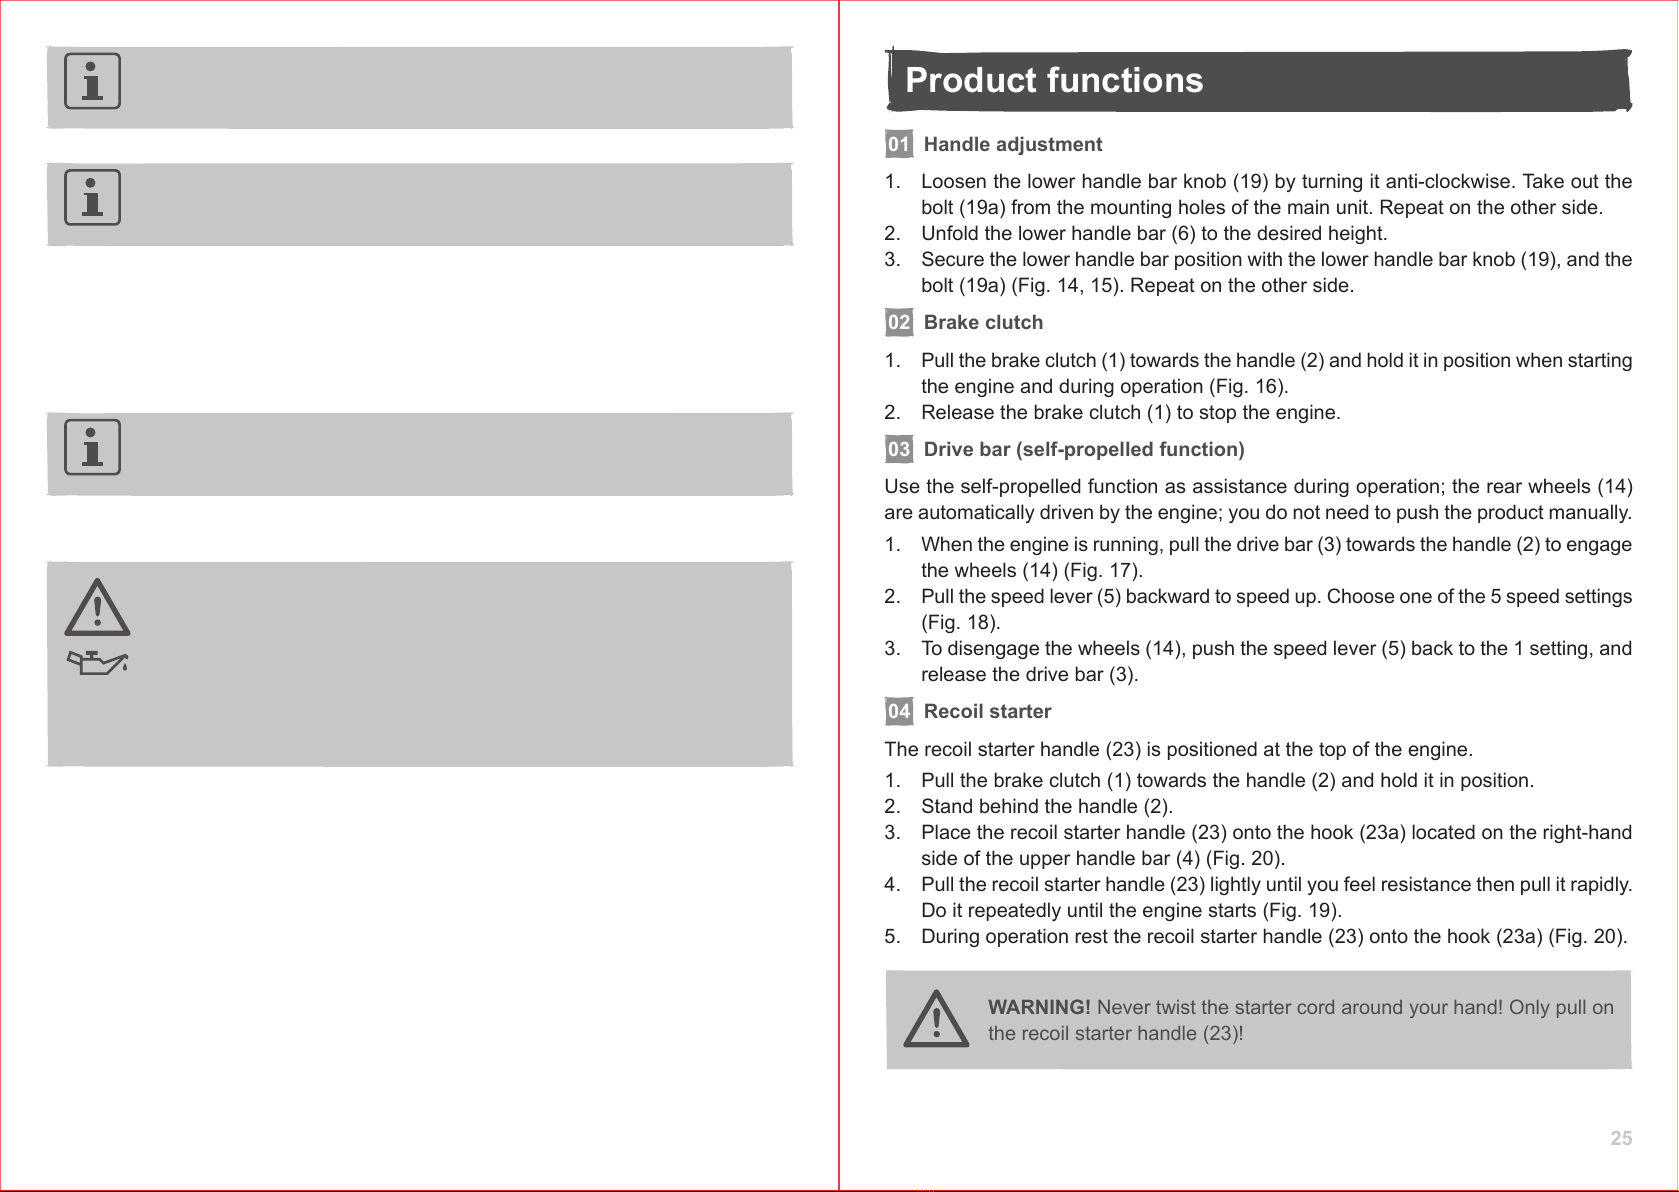
01 Handle adjustment
1. Loosen the lower handle bar knob (19) by turning it anti-clockwise. Take out the
bolt (19a) from the mounting holes of the main unit. Repeat on the other side.
2. Unfold the lower handle bar (6) to the desired height.
3. Secure the lower handle bar position with the lower handle bar knob (19), and the
bolt (19a) (Fig. 14, 15). Repeat on the other side.
02 Brake clutch
1. Pull the brake clutch (1) towards the handle (2) and hold it in position when starting
the engine and during operation (Fig. 16).
2. Release the brake clutch (1) to stop the engine.
03 Drive bar (self-propelled function)
Use the self-propelled function as assistance during operation; the rear wheels (14)
are automatically driven by the engine; you do not need to push the product manually.
1. When the engine is running, pull the drive bar (3) towards the handle (2) to engage
the wheels (14) (Fig. 17).
2. Pull the speed lever (5) backward to speed up. Choose one of the 5 speed settings
(Fig. 18).
3. To disengage the wheels (14), push the speed lever (5) back to the 1 setting, and
release the drive bar (3).
04 Recoil starter
The recoil starter handle (23) is positioned at the top of the engine.
1. Pull the brake clutch (1) towards the handle (2) and hold it in position.
2. Stand behind the handle (2).
3. Place the recoil starter handle (23) onto the hook (23a) located on the right-hand
side of the upper handle bar (4) (Fig. 20).
4. Pull the recoil starter handle (23) lightly until you feel resistance then pull it rapidly.
Do it repeatedly until the engine starts (Fig. 19).
5. During operation rest the recoil starter handle (23) onto the hook (23a) (Fig. 20).
WARNING! Never twist the starter cord around your hand! Only pull on
the recoil starter handle (23)!
26
WARNING! Do not suddenly release the recoil starter handle (23)! Allow
the rope to return slowly and in a controlled manner each time it is pulled!
05 Grass catcher
Thegrasscatcher(21)isequippedwithahatch(21b)thatindicatesthellingvolume
during operation.
1. When the hatch (21b) is opened the grass catcher (21) has enough volume left to
collect grass (Fig. 21).
2. When the hatch (21b) is closed the grass catcher (21) is full and must be emptied
(Fig. 22).
WARNING! Attach the grass catcher (21) when using this product
(it is allowed to use the product without the grass catcher (21) only
whenmulching)-dangerofyingobjects!Alwayscarrythegrass
catcher by its handle (21a).
Emptying
WARNING! Before removing the grass catcher (21) stop the engine and
wait until the blade (27) comes to a complete stop.
Empty the grass catcher (21) frequently during use. Do not wait until it is full. We
recommend emptying when it is 90% full.
1. Liftthereardeectorguard(20)andholditinplace.
2. Liftthegrasscatcherhooksotherodsandplacethegrasscatcher(21)onthe
ground.
3. Remove the grass clippings from the rear discharge chute (29) into the grass
catcher (21). Use a proper tool such as a brush.
WARNING! Never use your hands or feet to remove grass clippings from
the rear discharge chute (29)!
4. Empty the grass clippings onto a compost heap.
5. Re-tthegrasscatcherhooksontotherods.
27
Grass catcher inspection
During use the grass catcher (21) material is subjected to normal wear and tear.
An excessively worn grass catcher may allow the objects to be thrown towards the
operator. Replace a worn grass catcher to prevent possible injury.
06 Mulching insert
NOTE: Mulching means cutting and returning the grass clippings to the
lawninonestep:thegrassclippingsarecutveryneandthendistributed
evenly back onto the lawn. Under normal conditions, the mulched grass
will biodegrade quickly to provide nutrients to the lawn.
1. Openthereardeectorguard(20),holditinpositionandinsertthemulching
insert (24) into the rear discharge chute (29) (Fig. 5). Ensure the unlock button (24a)
snaps in place.
2. Press the unlock button (24a) to release and remove the mulching insert (24) (Fig. 6).
07 Side deector guard
1. Liftandholdthelockbuckle(16a)upwardstounlockthesidedeectorguard(16)
(Fig. 7).
2. Openthesidedeectorguard(16)andholditintheopenposition(Fig.7).
3. Hook the side discharge attachment (25) underneath the rods. Release the side
deectorguard(16)(Fig.8).
Operation
01 General operation tips
1. Before each use:
> Check the product and accessories for damage and whether they are properly
xed.Donotusetheproductifitisdamagedorshowsandsignsofwearand
tear.Takecareofanyproblemyoundorhavetheproductcheckedbyqualied
specialist.
>Checkthefuelandoillevel.Rellifnecessary.
> Look around and underneath the product for signs of oil or fuel spill.
> Check each control for proper operation.
> Check blades (27) for wear.
> Make sure that all bolts and screws are tightened.
>Checkiftheairlter(12a)isclean.
2. Always push the product using the handle (2). Keep the handle bar dry and free
from lubricant to ensure safe support.

28
3. Ensure that the air vents are always unobstructed and clear. Clean them if necessary
with a soft brush. Blocked air vents may lead to overheating and damage the
product - refer to the engine operator’s manual (32).
4. Stop the engine immediately if you are disturbed while working by other people
entering the working area. Always let the blades (27) come to a complete stop
before leaving the product unattended.
02 Cutting height adjustment
WARNING! Before adjusting the cutting height, stop the engine
and wait until the blade (27) comes to a complete stop.
Thisproductcanbeadjustedto7dierentheightsettings.Neworthickgrassmay
require a higher cutting height and a narrower cutting path.
1. Push the lever for cutting height adjustment (18) towards the wheel (14) (Fig. 23,
step 1), and then move it forward or backward to the desired cutting height
(Fig. 23, step 2).
2. Release the lever (18) and ensure it engages into place properly.
NOTE: If you are not sure what cutting height should be selected, start
with a maximum height and check the appearance of the lawn after
mowing a small area. Adjust the setting if necessary.
WARNING! Ensure that the lever (18) engages between two of the
grooves!
03 Starting
WARNING! Before starting, place the product on a stable, level surface
free of high grass! Clean the underside of the product!
Start the engine carefully according to instructions. Keep your feet well
away from the blade (27).
Stay ready. The product starts moving forward once you pull the drive
bar (3) towards the handle (2).
Do not tilt the product when starting the engine.
29
1. Pull the brake clutch (1) towards the handle (2) and hold it in position.
2. Stand behind the handle (2).
3. Place the recoil starter handle (23) onto the hook (23a) located on the right-hand
side of the upper handle bar (4) (Fig. 20).
4. Pull the recoil starter handle (23) lightly until you feel resistance then pull it rapidly.
Do it repeatedly until the engine starts (Fig. 19).
5. During operation rest the recoil starter handle (23) onto the hook (23a) (Fig. 20).
6. Hold the brake clutch (1) and pull the drive bar (3) towards the handle (2) (Fig. 18).
The product moves forward and starts mowing.
WARNING! The starting position should be as described in the instruction
manual.Fig.24illustratesthedenedstartingposition.Theoperator
should start the engine behind the handle (2). Do not start the engine
while standing on the side of the product as shown on Fig. 25.
NOTE:Iftheenginedoesnotstart,itmaybeooded.Floodingiscaused
by too much fuel injected into the combustion chamber and can prevent
theenginefromstarting.Toresolveoodingfollowthebelowprocedure:
1. Remove the spark plug located under the spark plug connector (13)
and dry it - see the separate engine operator’s manual (32).
2.Waitfor10minutesuntilfuelvapoursandretthesparkplug.Clean
up any spilt fuel and move the product at least 3 metres away before
startingtheenginetoavoidanyaccidentalre.
3. Start the engine.
04 Stopping
1. Push the speed lever (5) back to the 1 setting, and release the drive bar (3) (Fig. 26).
2. Release the brake clutch (1) to stop the engine and blade (27) (Fig. 26).
05 Mowing
NOTE: Avoid mowing when the grass is wet from rain or dew. Wet grass
may form clumps which interfere with the mulching action and reduce
runtime. The best time to mow grass is late afternoon when the grass is
dry and the newly cut area will not be exposed to direct sunlight.

30
Preparing the product according to required application
Function Grass catcher (21) Mulching
insert (24)
Side discharge
attachment (25)
Grass collection installed removed removed
Mulching removed installed removed
Side discharge removed installed installed
Self-propelled function
Use the self-propelled function as assistance during operation; the rear wheels (14)
are automatically driven by the engine; you do not need to push the product manually.
1. When the engine is running, pull the drive bar (3) towards the handle (2) to engage
the wheels (14) (Fig. 17).
2. Pull the speed lever (5) backward to speed up. Choose one of the 5 speed settings
(Fig. 18).
3. To disengage the wheels (14), push the speed lever (5) back to the 1 setting, and
release the drive bar (3).
General tips
1. Make sure that the lawn is clear of stones, sticks, wires or other objects that could
damage the product or its engine.
2. Do not cut wet grass because it tends to stick to the underbody of the product,
preventing the proper discharge of grass clippings, and it could also cause you to
slip and fall.
3. Nevercutomorethanone-thirdofthetotallengthofthegrassforahealthylawn.
In the autumn, lawns should only be cut as long as there is growth.
4. Slowly push the product forward. If needed, use the self-propelled function for
assistance.
5. Mowinslightlyoverlappingrows.Themosteectivepatternformowinglawnsis
straight lines along one of the sides. This keeps the rows even and ensures that
all the lawn is cut without missing any spots (Fig. 27).
6. Circlearoundowerbeds.Whenreachingaowerbedinthemiddleofthelawn,
cut a row or two around the circumference of the bed.
7. Pay particular attention when changing direction.
8. Empty the grass catcher (21) regularly.
WARNING! Extensive vibration of the product during operation is an
indication of damage! Stop the engine immediately. The product should
be promptly inspected and repaired!
31
Care & maintenance
01 The golden rules of care
DANGER! Proper maintenance is essential for safe and trouble free
operation. Improper maintenance, or failure to address a problem instantly
can cause a malfunction which can result in serious injury or even death.
WARNING! Stop the engine, disconnect the spark plug connector (13)
and let the product cool before performing inspection, maintenance and
cleaning work!
Do not touch the rotating blade (27).
1. Keep the product clean. Remove debris after each use and before storage.
2. Regular and proper cleaning helps to ensure safe operation and prolongs the life
of the product.
3. Inspect the product before each use for worn and damaged parts. Do not operate
itifyoundbrokenandwornparts.Replacewornpartsasnecessaryorcontact
an authorised service centre for repair before using the product again.
WARNING! Only perform repairs and maintenance work according to
theseinstructions!Allfurtherworksmustbeperformedbyaqualied
specialist!.
02 Cleaning
1. Clean the product with a slightly damp cloth and mild soap. Use a brush for areas
that are hard to reach.
2. In particular, clean the air vents after every use with a cloth and brush - refer to
the engine operator’s manual (32).
3. Remove stubborn dirt with high pressure air (max. 3 bar).
4. Clean the underbody and cutting means (27) using the water hose connector (31).
NOTE: Do not use chemical, alkaline, abrasive or other aggressive
detergents or disinfectants to clean this product as they might be harmful
to its surfaces.

32
03 Maintenance
Before and after each use, check the product and accessories for wear and damage.
If required, exchange them for new ones as described in this instruction manual.
Observe the technical requirements.
WARNING! It is required to tip the product when performing the
maintenance. The fuel tank must be empty, or fuel can leak which could
resultinreorexplosion.
NOTE: Always empty the fuel tank and keep the spark plug upside down.
Otherwise,thefuelorengineoilmightcontaminatetheairlter(12a)/
sparkplugandmightmakeitdicultstarttheengine.
04 Spare parts/Replacement parts
The parts of this product mentioned in the maintenance table may be replaced by the
consumer. Spare parts are available at an authorised dealer or through our customer
service.
05 Engine maintenance
Refer to the engine operator’s manual (32) for maintaining below parts:
Airlter Engine oil Valve play
Spark plug Carburettor Muer
Fuel
06 Repair
This product does not contain any parts that can be repaired by the consumer. Contact
anauthorisedservicecentreorasimilarlyqualiedspecialisttohaveitcheckedand
repaired.
07 After use
1. Stop the engine, disconnect the spark plug connector (13) and let the product cool.
2. Check, clean and store the product as described in the maintenance table.
33
Maintenance table
Part To do Before/
after
each
use
First
month
or
5 hours
Every
3 months
or 25 hours
Every
6 months
or
50 hours
Every year
or
100 hours
Every
2 years
or
250 hours
Engine oil check x
replace x
Airlter
check x
clean x
replace x
Spark plug
check/
adjust x
clean x
replace x
Spark plug cap clean x
Fuel tank clean x
Fuel tube clean Every 2 years (replace if necessary)
Cutting means replace Replace the cutting means (27) after 50 hours of mowing, or 2 years
whichever is sooner regardless of condition.
34
08 Underbody and cutting means
WARNING! Wear protective gloves when working on the cutting
means (27) and close to it! Use proper tools to remove debris, e.g. a
wooden stick! Never use your bare hands!
Always use original spare parts for replacement. The cutting means
must be replaced by an identical type with the reference number
DAYE 2105200348. Do not attach any other type of cutting means (27)!
The replacement of the cutting means (27) should be done by an
experienced operator! Rework or sharpening blades is not recommended
unless it is done by a repair service or a similarly specialist!
NOTE:We strongly recommend jacking the product when performing
inspection and work on the cutting means (27). Avoid tilting the product
in order to prevent fuel and oil leakages.
1. Keep the underbody and cutting means (27) clean and free of debris. Remove
clippings from the rear discharge chute (29).
2. Check all nuts and bolts periodically for tightness before the operation. After
prolonged use, especially in sandy soil conditions, the cutting means (27) will
become worn and lose some of the original shape. The cutting will be
reduced, and the cutting means (27) should be replaced.
3. Keep the cutting means (27) sharp to ensure a good cutting performance. Replace
a worn or damaged cutting means with a new one of the same type or have it
sharpened by a specialist.
4. If jacking the product is not possible, tilt it to the right side so that the fuel tank
cap (11) side is up. This helps to prevent fuel leakage and harder starting due to
of the carburettor.
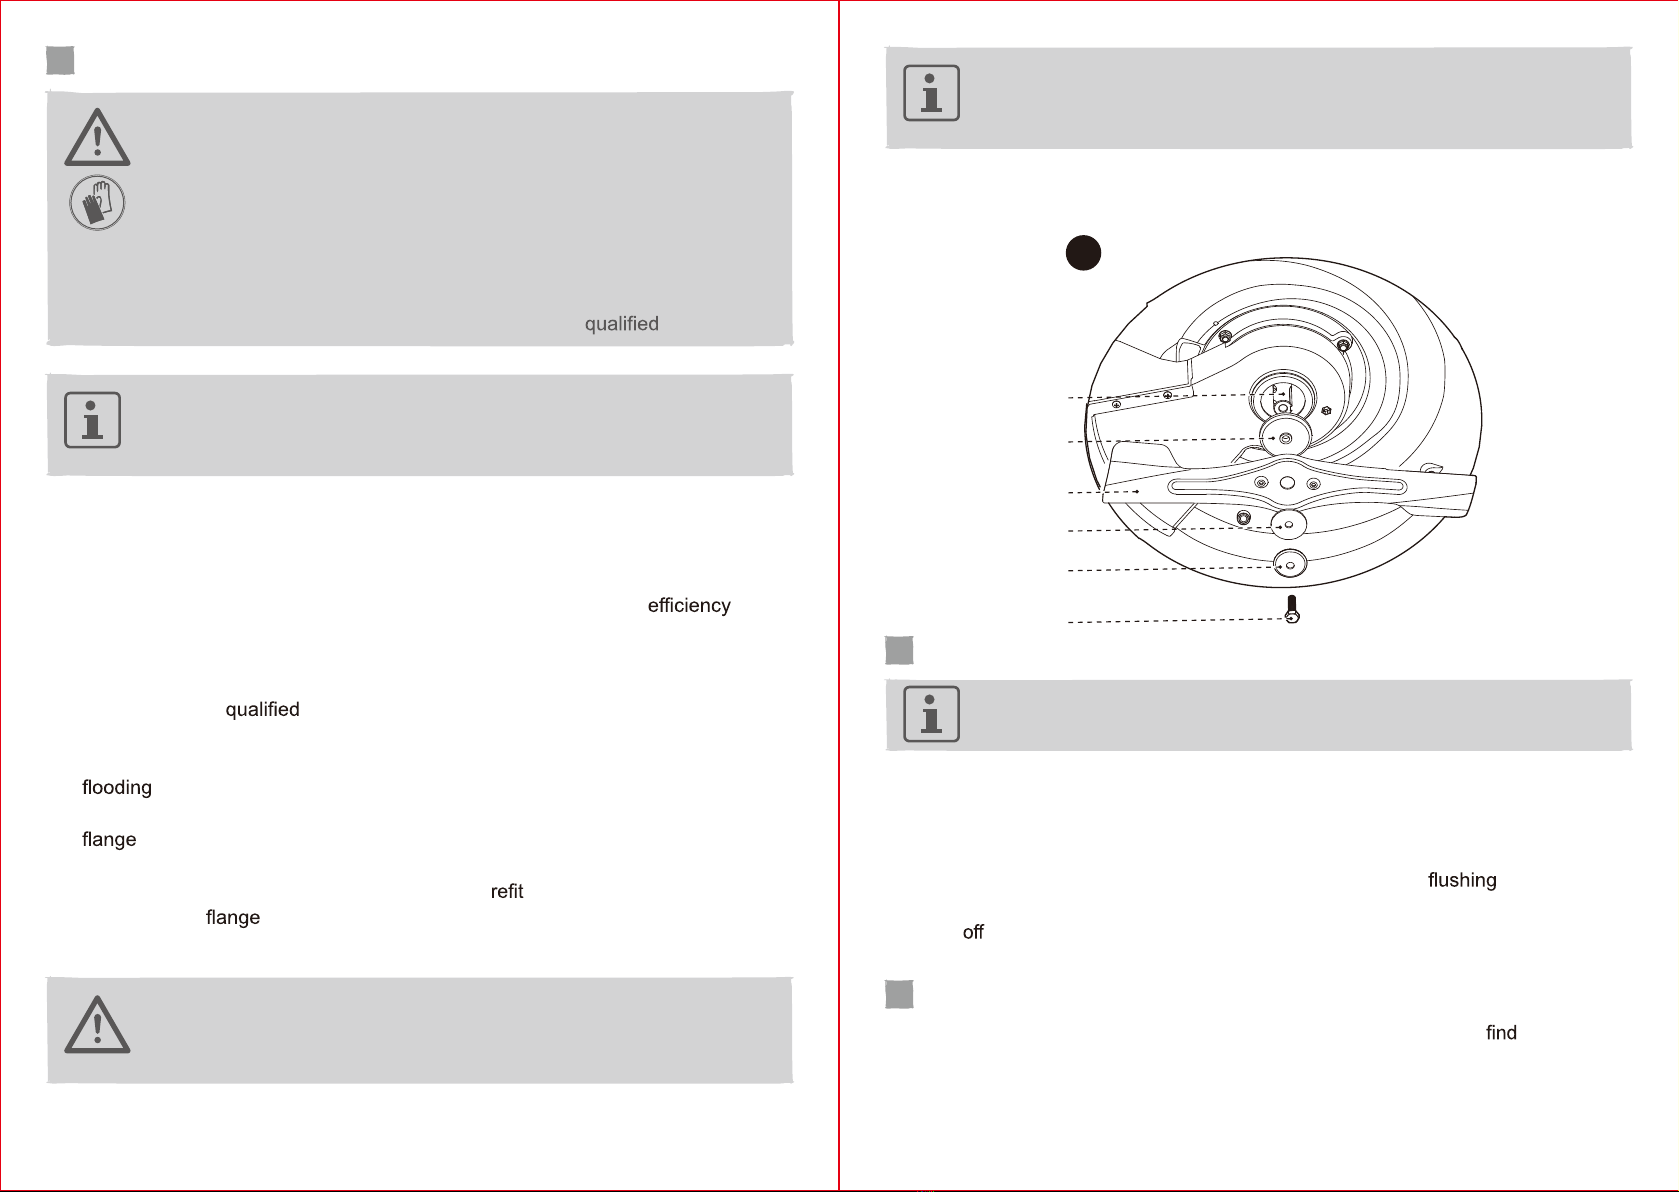
5. Loosen the hex bolt (27e) anti-clockwise and remove it together with the locking
(27d), washer (27c) cutting means (27), and ring (27b) (Fig. A).
6. Replace the cutting means (27) with a new one of the same type. Slide the ring
(27b) into the slot on the spindle (27a) and then the cutting means (29), washer
(27c), locking (27d) and hex bolt (27e). Tighten the hex bolt clockwise with
40-45 Nm force to ensure safe operation of the product (Fig. A).
DANGER! If the cutting means (27) are not torqued properly, they could
become loose and be thrown from the product and seriously hurt or kill
the operator or bystanders.
35
NOTE:Replace the cutting means (27) after 50 hours of mowing,
or 2 years whichever is sooner regardless of condition. If the cutting
means (27) is cracked or damaged, replace it immediately.
7. Lubricate the cutting means (27) after each use to prolong their life span. Apply
lubrication oil/grease along the edges of the cutting means (27).
27a
27b
27d
27e
27
27c
A
09 Underbody and cutting means cleaning
NOTE: Do not use pressure washer for cleaning. It may force water to
enter the vital areas of the product.
1. Set the cutting height to the lowest position using the lever (18).
2. Connect a water hose with a quick connector to the water hose connector (31)
(Fig. 28). Turn on the water supply.
3. Start the engine.
4. Pullthe brake clutch (1) to engage the blades (27). Keep for 1 minute.
5. When the grass clippings stop coming out of the underbody, stop the engine.
6. Turnthe water supply and detach the water hose from the water hose connector (31).
7. Start the engine and let it run for 2 minutes to dry the underbody.
10 Grass catcher
1. Inspectthe grass catcher (21) before each use. Do not use it if you any damage.
2. Clean the grass catcher (21) after operation using water.
3. Let the grass catcher (21) dry thoroughly before storing.

36
11 Brake and drive wires
Check the performance of the brake wire (8) and the drive wire (7) before each use.
Askaqualiedspecialisttoadjustitifnecessary.
WARNING! Do not use the product with a defective or loose wires!
12 Transportation
1. Stop the engine and disconnect the spark plug connector (13).
2. Adjust the height to the highest position as described in the “Cutting height
adjustment” section.
3. Attach transportation guards, if applicable.
4. Always move the product by the handle (2).
5. If a suitable loading ramp is not available, ask another person for assistance when
loading the product on a vehicle.
6. Protect the product from any heavy impacts or strong vibrations which may occur
during transportation in vehicles.
7. Secure the product with tie-down straps to prevent it from slipping or or falling over,
loss of fuel, damage and injury.
13 Storage
NOTE: Good storage conditions are important for keeping your product
trouble-free.
1. Stop the engine and disconnect the spark plug connector (13).
2. Closethefuelshut-ovalve(30)byturningitclockwise.
3. Clean the product as described in the “Cleaning” section.
4. Loosen the side levers (9). Loosen the lower handle bar knob (19) by turning it
anti-clockwise. Take out the bolt (19a). Repeat on the other side.
5. Fold the lower (6) and the upper handle bars (4).
6. Store the product and its accessories in a well-ventilated dry storage area.
7. Always store the product in a place that is inaccessible to children. The ideal storage
temperature is between 10 °C and 30 °C.
8. We recommend using the original package for storage or covering the product with
a suitable cover or enclosure to protect it against dust.
9. For long-term storage (more than 5 days), drain the fuel tank as described in engine
operator’s manual (32).
37
14 Troubleshooting
Suspectedmalfunctionsareoftenonesthattheuserscanxthemselves.Therefore
check the product using this section. In most cases the problem can be solved quickly.
WARNING! Only perform the steps described within these instructions!
All further inspection, maintenance and repair work must be performed
byanauthorisedservicecentreorasimilarlyqualiedspecialistifyou
cannot solve the problem yourself!
Problem Possible cause Solution
1. Engine does
not start
1.1 Not enough fuel in the
fuel tank
1.1 Add fuel
1.2 Spark plug is wet 1.2 Dry spark plug
1.3 Spark plug is damaged 1.3 Replace spark plug
1.4 Spark plug connector is
loose
1.4 Attach properly
1.5 Lever for cutting height
adjustment is not in the
correct position for the
prevailing conditions
1.5 Move the lever to
correct position
1.6 Airlterisdirty 1.6 Cleantheairlter
1.7 Spark plug is loose 1.7 Tighten the spark plug
(25 to 30 Nm)
1.8 Spark plug gap is
incorrect
1.8 Set gap between
electrodes between
0.7-0.8 mm
1.9 Faulty ignition module 1.9 Contact an authorised
service centre
1.10Fuelshut-ovalveis
closed
1.10Openthefuelshut-o
valve
2. Engine stops 2.1 Not enough fuel in the
fuel tank
2.1 Fill fuel
2.2 Cutting mean is blocked 2.2 Remove blockage

38
Problem Possible cause Solution
3. Enginedicult
to start or loses
power
3.1 Dirt, water or stale fuel
in the fuel tank
3.1 Drain fuel and clean
tank. Fill the tank with
clean, fresh fuel
3.2 Vent hole in fuel tank
cap is clogged
3.2 Clean or replace the
fuel tank cap
3.3 Airlterisdirty 3.3 Cleanairlter
4. Engine
operates
erratically
4.1 Spark plug is defective 4.1 Install new, correctly
gapped plug
4.2 Spark plug gap is
incorrect
4.2 Set gap between
0.7-0.8 mm
4.3 Airlterisdirty 4.3 Cleanairlter
5. Engine idles
poorly
5.1 Airlterisdirty 5.1 Cleanairlter
5.2 Air vents are clogged 5.2 Remove debris from
vents
5.3 Cylindernsare
blocked
5.3 Remove debris from
cylinderns
6. Engine skips at
high speed
6.1 Gap between electrodes
of the spark plug is too
close
6.1 Set gap between
0.7-0.8 mm
7. Engine
overheats
7.1 Air vents are clogged 7.1 Remove debris from
vents
7.2 Incorrect spark plug 7.2 Install the correct spark
plug
8. Unsatisfactory
results
8.1 Cutting mean is dull 8.1 Replace with a new one
8.2 Cutting height is
incorrect
8.2 Adjust cutting height
9. Excessive
vibration/noise
or exhaust
9.1 Cutting mean is dull/
damaged
9.1 Replace with a new one
9.2 Bolts are loose 9.2 Tighten all bolts
9.3 Incorrect petrol type 9.3 Drainthefuelandllthe
correct type
39
Recycling and disposal
1. Old products are potentially recyclable and do not, therefore, belong in your
household rubbish. You are requested to assist us and our contribution to saving
resources and protecting the environment by handing in this product at an equipped
collection centre (if there is one available).
2. Petrol, oil, used oil, a mixture of oil and petrol and objects soiled with oil e. g. cleaning
cloths do not belong in the household rubbish. Dispose of oil-contaminated items
in accordance with the local guidelines and hand them in at recycling centres.
3. The product comes in a package that protects it against damage during shipping.
Keep the package until you are sure that all parts have been delivered and the
product is function properly. Recycle the package afterwards.
Guarantee
This product carries a guarantee of 36 months (45 days trade) starting from the day of
purchase. Please retain your receipt as a proof.
Thisguaranteespecicallyexcludeslossesdueto:
• Normal wear and tear, including accessory wear
• Overload, misuse or neglect
• Failure of consumable items (such as batteries)
• Repairs attempted by anyone other than an authorized agent
• Accidental damage caused by foreign objects or substances
• Lack of routine maintenance
• Failure to follow manufacturer’s guidelines
• Loss of use of the goods
Due to continuous product improvement, we reserve the
righttochangetheproductspecicationwithoutpriornotice.
Thisguaranteedoesnotaectyourstatutoryrights.
For any inquiries relating to the guarantee please contact
your retailer: If you purchased this product in B&Q store or
website then call 0333 0143101. If you bought this product
in SFX outlet or website then call 03330 112 112.
This manual suits for next models
1
Table of contents
Other Erbauer Lawn Mower manuals

Popular Lawn Mower manuals by other brands

Metalcraft
Metalcraft SCAG POWER EQUIPMENT SWZU Series Operator's manual

Mac allister
Mac allister MLM1737 Original instructions

Lawn-Boy
Lawn-Boy GoldPro Series Operator's manual

Cozy Cab
Cozy Cab A-11271 Mounting instructions

GAMA
GAMA GLM-32E-2 Instruction manual & recipes

Euro Systems
Euro Systems M250 EVO Translation of original user instructions


