Ergo Elite 2 User manual
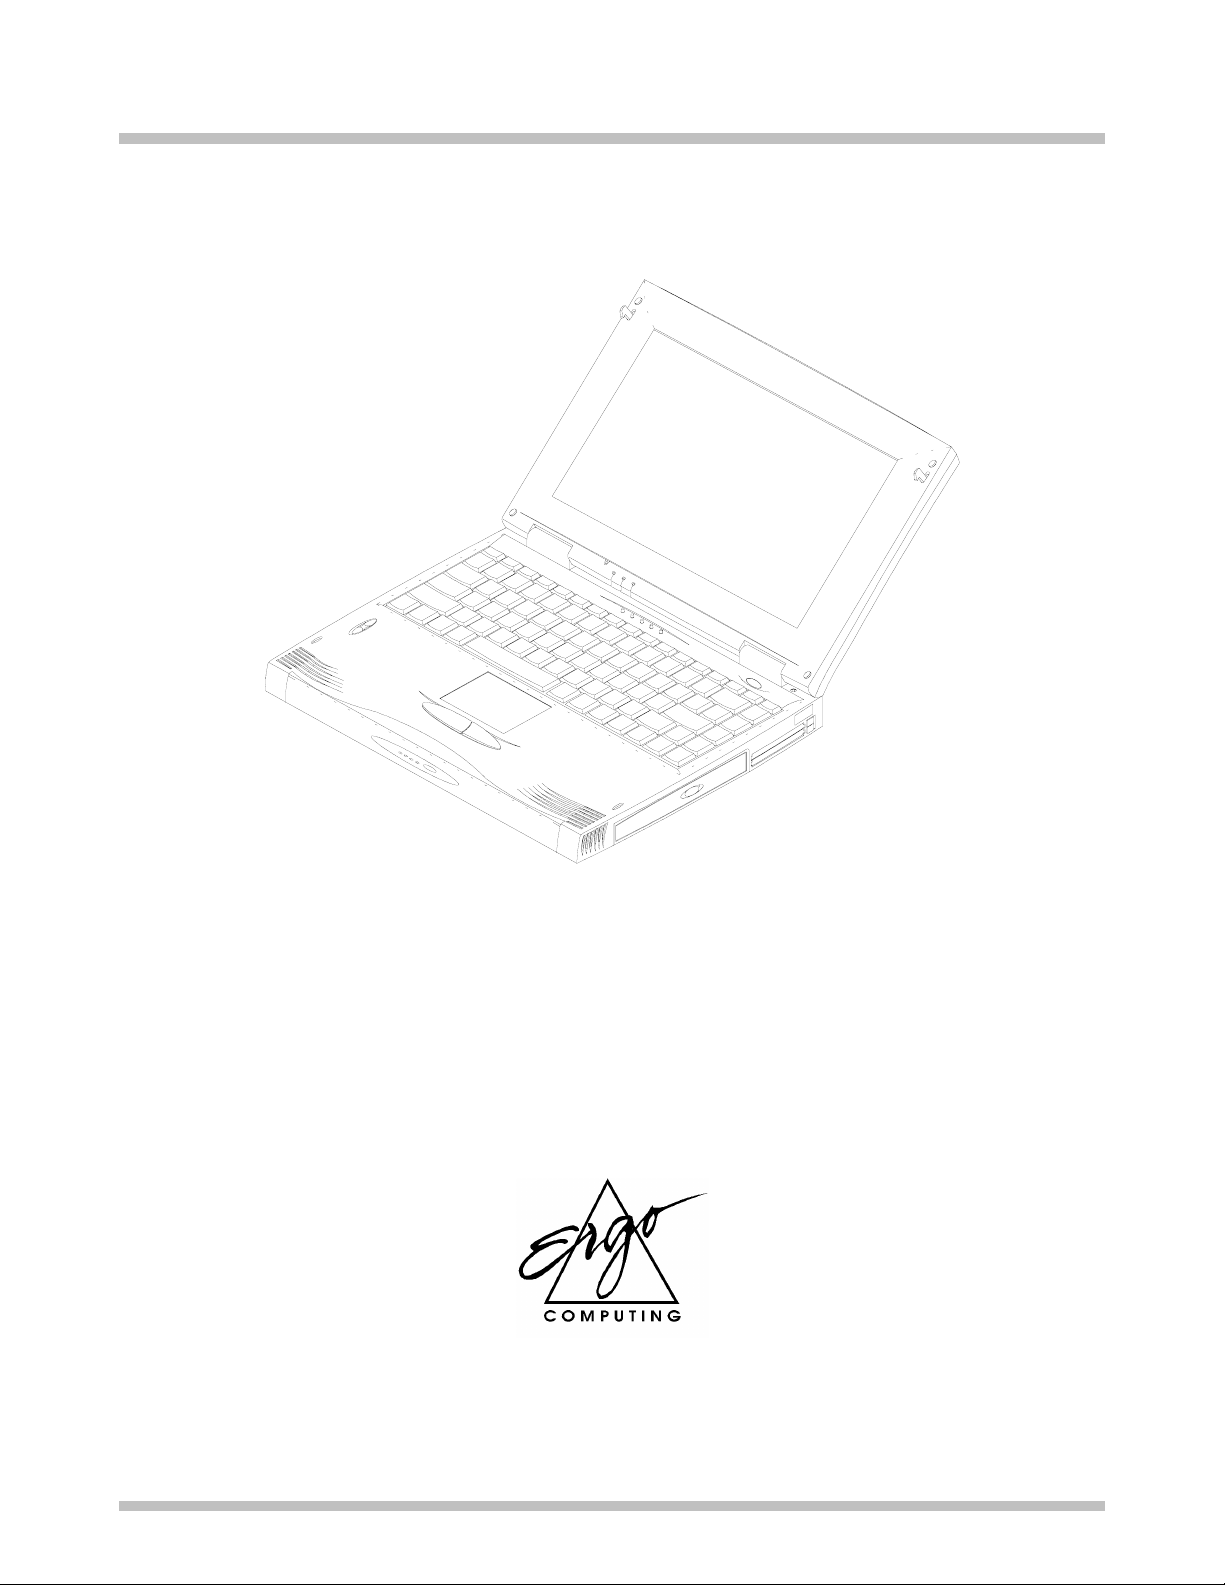
Ergo Elite 2
User's Manual
www.ergo.co.uk

Page II
Ergo Elite 2 User Manual
Third Edition
ã1998-2000 Ergo Computing UK Ltd
Elite 2 User's Manual
Page III
Dear Customer,
Thank you for purchasing Ergo’s latest state-of-the-art Multimedia notebook
computer!
You are now in possession of one of the most powerful, feature-rich and expandable
notebooks ever made. We encourage you to read this manual and familiarize yourself
with all the capabilities that your machine has to offer. For those of you who just cannot
wait to get started, please take time to read the Safety Instructions at the very beginning
of this manual, the Overview in this chapter, the basic operations in Chapter 2, and
Configuring Your System as explained in Chapter 11. Then you can go ahead and get
started with your new Elite 2!
If you have any difficulties with your Elite 2, and you cannot find the solution within
this manual, please take advantage of your free lifetime telephone support. Our
qualified engineers are here to help you - use them !! We also have a comprehensive
website which contains all the latest drivers for all Ergo products
(http://www.ergo.co.uk)
Contact Details:-
Ergo Computing UK Ltd
Unit 7 Wheatcroft Business Park
Edwalton, Nottingham NG12 4DG
Tel: 00 44 (0) 1159 144144 Fax: 00 44 (0) 1159 144155
email: [email protected]
Yours faithfully,
Managing Director
Ergo Computing UK Ltd

Elite 2 User's Manual
Page IV
Specifications and information found in this manual are subject to change
without notice. Any changes therefore will be incorporated in future
editions. Ergo Computing assumes no responsibility for errors or
omissions in this document.
MS-DOS, Windows 95, Windows 98, Windows NT and Windows
2000 are trademarks of Microsoft Corporation.
Pentium® is a trademark of Intel Corporation.
Sound Blaster Pro is a trademark of Creative Technology Ltd.
Other trademarks are properties of their respective owners.
NOTICE
TRADEMARKS

Elite 2 User's Manual
Page V
l. Please read these safety instructions carefully.
2. Please keep this User's Manual for future reference.
3. Please disconnect this equipment from AC outlet before cleaning. DO NOT
use liquid or sprayed detergent for cleaning. Use a clean moistened cloth.
4. The wall socket used should be positioned near the equipment and should be
easily accessible.
5. Please keep this equipment free from humidity.
6. Place the equipment on a reliable surface at all times. A drop or fall can
cause severe damage.
7. The openings on the enclosure are for air ventilation and are designed to
protect the equipment from overheating. DO NOT COVER THE
VENTILATION OPENINGS.
8. Verify the voltage of the power source before connecting the unit to any
power outlet.
9. DO NOT step on or place anything over the power cord.
10. All cautions and warnings on the equipment should be noted.
11. WARNING! If the equipment is not used for a long period of time,
disconnect the equipment from the power source to avoid damage from
power spikes.
12. NEVER pour any liquid into any openings; a fire or electrical shock is
possible.
13. For safety reasons; other than pre-designated ports and doors, the equipment
should be opened only by qualified service personnel.
SAFETY INSTRUCTIONS

Elite 2 User's Manual
Page VI
14. If one of the following situations should arise, the equipment should be
checked by an authorized technician:
a. The power cord or plug is damaged.
b. Liquid has penetrated into the equipment.
c. The equipment has been exposed to excessive moisture.
d. The equipment does not work well or you can not get it to work
according to user's manual.
e. The equipment has been dropped or damaged.
f. The equipment has obvious signs of breakage.
15. DO NOT LEAVE THIS EQUIPMENT IN TEMPERATURES BELOW
-20ºC(-4ºF) OR ABOVE 60ºC(140ºF). IT MAY CAUSE DAMAGE TO
THE EQUIPMENT.
16. To reduce the risk of electrical shock, always ensure that the modem line is
disconnected from the telephone network while installing your system or
when opening the equipment’s enclosure.
17. Never install modem/telephone wiring during a lightning storm.
18. Never install modem/telephone jacks in wet locations unless the jack is
specially designed for wet locations.
19. Never touch non-insulated modem/telephone wires or terminals unless the
modem/telephone line has been disconnected at the network interface.
20. Use caution when installing or modifying modem/telephone lines.
21. Avoid using a modem/telephone (other than a cordless type) during an
electrical storm. There may be a remote risk of electric shock from lightning.

Elite 2 User's Manual
Page VII
22. THE CD-ROM/DVD-ROM IN THIS NOTEBOOK EMPLOYS A LASER
SYSTEM.
a. To ensure proper use of this product, please read the relevant
instructions carefully and retain for future reference.
b. Should the unit ever require maintenance, contact your local dealer.
c. Use of controls, adjustments or the performance of procedures other
than those specified may result in hazardous radiation exposure.
d. To prevent direct exposure to Laser Beam, do no try to open the
enclosure.
The internal CD-ROM/DVD-ROM drive is classified as a CLASS 1 LASER
PRODUCT. These labels are located on the outside of the CD-ROM/DVD-
ROM drive:
CAUTION
CLASS 1 LASER PRODUCT
KLASSE 1 LASER PRODUKT

Elite 2 User's Manual
Page VIII
The following standards are adopted throughout this manual:
•Boldface type is used to highlight important information in this
document.
•The messages which appear on the Notebook screen will be boxed
when they are referenced.
•Where extra caution is called for, the information will be boxed in a dark
frame preceded by "Note:" or "Warning:"
•Usually after performing a step-by-step instruction, you will be asked to:
Press the Esc key
Which means you should press the key located at the upper left-
hand corner of the keyboard.
Standards

Elite 2 User's Manual
Page IX
This equipment has been tested and found to comply with the limits for a class B digital
device, pursuant to part 15 of the FCC Rules. These limitations are designed to provide
reasonable protection against harmful interference in a residential installation. This
equipment generates, uses and can radiate radio frequency energy and, if not installed
and used in accordance with the instructions, may cause harmful interference to radio
communications. However, there is no guarantee that interference will not occur in a
particular installation. If this equipment does cause harmful interference to radio or
television reception, which can be determined by turning the equipment off and on, the
user is encouraged to try to correct the interference by one or more of the following
measures:
•Reorient or relocate the receiving antenna.
•Increase the separation between the equipment and receiver.
•Connect the equipment into an outlet on a circuit different from that to
which the receiver is connected.
•Consult Technical Support or a Radio/TV technician for help.
A shielded-type power cord is required in order to meet FCC emission limits and also to
prevent interference to the nearby radio and TV reception. It is essential that only the
supplied power cord be used.
Use only shielded I/O cables to connect I/O devices to this equipment. You are
cautioned that changes or modifications not expressly approved by the party responsible
for compliance could void your authority to operate the equipment.
FCC NOTICE

Elite 2 User's Manual
Page X
This page is left blank intentionally.

Elite 2 User's Manual Contents
Page XI
CHAPTER 1 INTRODUCTION ...................................................... 1-1
1.1 STANDARD FEATURES........................................................................................1-2
1.2 SPECIAL FEATURES ............................................................................................1-6
CHAPTER 2 BEFORE YOU BEGIN ............................................... 2-1
2.1 CHECKING WHAT YOU RECEIVED......................................................................2-1
2.2 EXAMINING YOUR COMPUTER ...........................................................................2-2
2.3 THE THREE POWER LEDS..................................................................................2-5
2.4 THE FIVE SYSTEM LEDS....................................................................................2-6
CHAPTER 3 KEYBOARD ................................................................ 3-1
3.1 GENERAL VIEW ..................................................................................................3-2
3.2 THE EMBEDDED NUMERIC KEYPAD ...................................................................3-3
3.3 OTHER KEYS ......................................................................................................3-3
CHAPTER 4 FDD/HDD DRIVES..................................................... 4-1
4.1 THE FLOPPY DISKETTE DRIVE (FDD) ................................................................4-1
4.2 REMOVAL HARD DISK DRIVE (HDD).................................................................4-2
4.3 REMOVING THE HARD DISK DRIVE ....................................................................4-3
CHAPTER 5 THE LCD SCREEN .................................................... 5-1
5.1 ADJUSTING SCREEN BRIGHTNESS .......................................................................5-1
5.2 LCD TO CRT TO SIMULTANEOUS DISPLAY .......................................................5-1
5.3 RESOLUTIONS AND COLORS ...............................................................................5-2
CHAPTER 6 BATTERIES ................................................................ 6-1
6.1 BATTERY PACKS ................................................................................................6-1
6.2 BATTERY SLOTS.................................................................................................6-1
6.3 RECHARGING THE BATTERY PACKS ...................................................................6-2
6.4 QUESTIONS AND ANSWERS: ...............................................................................6-2
CONTENTS

Contents Elite 2 User's Manual
Page XII
6.5 BATTERY BUTTON, LEDS AND ALARM..............................................................6-4
6.6 BATTERY MAINTENANCE ...................................................................................6-5
6.7 POWER CONSUMPTION .......................................................................................6-6
6.8 REDUCING POWER CONSUMPTION......................................................................6-7
6.9 REMOVING BATTERY PACK IN SLOT A...............................................................6-9
6.10 INSERTING BATTERY PACK IN SLOT B..............................................................6-10
CHAPTER 7 MEMORY.................................................................... 7-1
CHAPTER 8 THE CD/DVD ROM DRIVE...................................... 8-1
8.1 THE CD/DVD-ROM DRIVE PANEL ...................................................................8-1
8.2 DISC LOADING/EJECTION..................................................................................8-2
8.3 ROM DISC MAINTENANCE ................................................................................8-3
CHAPTER 9 PERIPHERALS........................................................... 9-1
9.1 PS/2 KEYBOARD CONNECTOR............................................................................9-1
9.2 PARALLEL PORT .................................................................................................9-1
9.3 COM PORT ........................................................................................................9-1
9.4 USB CONNECTOR ..............................................................................................9-2
9.5 VGA CONNECTOR .............................................................................................9-2
9.6 TV-OUT CONNECTOR ........................................................................................9-2
9.7 AUDIO JACKS AND VOLUME BUTTON.................................................................9-2
9.8 PCMCIA PORT ..................................................................................................9-3
9.9 FIR PORT ...........................................................................................................9-3
CHAPTER 10 THE CD-ROM DISC .............................................. 10-1
10.1 DOS UTILITIES .............................................................................................10-1
10.2 WINDOWS 95/98 DRIVERS ............................................................................10-2
10.3 WINDOWS NT 4.0 DRIVERS.........................................................................10-2
10.4 WINDOWS NT 2000 DRIVERS...................................................................10-2

Elite 2 User's Manual Contents
Page XIII
CHAPTER 11 CONFIGURING YOUR SYSTEM ........................ 11-1
11.1 CONFIGURATION SOFTWARE ..........................................................................11-1
11.2 RUNNING THE SETUP UTILITY ........................................................................11-2
11.3 STANDARD CMOS SETUP ..............................................................................11-3
11.4 ADVANCED CMOS SETUP .............................................................................11-5
11.5 POWER MANAGEMENT SETUP ........................................................................11-7
11.6 PERIPHERAL SETUP ......................................................................................11-10
11.7 CHANGE USER PASSWORD ...........................................................................11-11
11.8 AUTO CONFIGURATION WITH OPTIMAL SETTINGS........................................11-11
11.9 SAVE SETTINGS AND EXIT............................................................................11-11
11.10 EXIT WITHOUT SAVING................................................................................11-11
APPENDIX A - CONNECTORS AND PIN ASSIGNMENTS..... A-1
APPENDIX B - HOT-KEYS .......................................................... B-1
APPENDIX C - GLOSSARY.......................................................... C-1
APPENDIX D - TROUBLESHOOTING GUIDE......................... D-1
APPENDIX E - PORT REPLICATOR......................................... E-1
APPENDIX F - MODEM INFORMATION .................................F-1
APPENDIX G - WARRANTY INFORMATION ......................... G-1

Contents Elite 2 User's Manual
Page XIV
This page is left blank intentionally.

Elite 2 User's Manual Introduction
Page 1-1
Chapter 1 Introduction
Overview
Internally, the Elite 2 uses the Intel’s latest generation of Intel Mobile Pentium®
processors, and high speed PCI/Host-Bridge interface. Together with its powerful ATI
video system, advanced audio chip, and MPEG II playback ability, this notebook is an
ideal choice for today’s multimedia intensive applications. Externally, the Elite 2
provides a wide choice of external ports and connectivity; such as two PCMCIA
sockets, two USB ports, Fast Infrared Port, internal fax/modem (optional), external
CRT, Television (NTSC/PAL), and many others. This will definitely make the life of a
traveling executive a lot easier, off-site, at home, and in the office.
With the Elite 2, upgrades have never been easier. The machine supports a range of
Intel Pentium® II, Celeron® and Pentium® III processors running at speeds from
300Mhz to 700Mhz. System memory is easily upgradeable from 32MB to 256MB. The
hard disk system can handle most of the 12.7mm IDE industry standard drives, giving
you virtually unlimited storage capability.
Battery life (or more appropriately the duration of which the machine may function
without an AC outlet) is an important issue. Knowing this, we have not simply
incorporated the latest Advanced Power Management (APM) for energy saving, we
have also decided to add a second battery (optional) to further boost your portable
operating time when an AC outlet is not available.
While we hope that this overview has made you aware of some the most exciting
features of your new computer, there is still much more to the Elite 2. The remainder of
this manual is dedicated to helping you get the most out of your new Elite 2 notebook
computer. Please read each chapter carefully and we recommend you to explore each of
the explained functions.
Now, read on to find out more about what the amazing Elite 2 can do for you!

Introduction Elite 2 User's Manual
Page 1-2
1.1 Standard Features
SYSTEM
•Intel Celeron®, Pentium® II or Pentium® III. Microprocessor is upgradeable via
IMM (Intel Mobile Module) with MMC2 (Mobile Module Connector 2).
•The IMM module contains an internal (CPU embedded) 32KB L1 cache memory,
and 128k (Celeron) or 256K (Pentium II/III) L2 cache.
•32MB SDRAM expandable to 256MB, in increments of 16MB, 32MB, or 64MB.
•256KB Flash ROM containing user upgradeable system BIOS.
•ROM BIOS and Video BIOS shadowing for superior performance.
•Removable Hard Disk drive.
DISPLAY
•AGP Local Bus, and embedded 8MB SGRAM for superior performance.
•LCD only, CRT only, TV only, TV/CRT simultaneous, and LCD/CRT
simultaneous.
•The LCD can display 12.1” 800x600 (SVGA) resolution; or 14.1” 1024x768
(XGA) resolution; Video CRT output can display 640x480, 800x600, and
1024x768 resolution; Video TV output support PAL and NTSC standard.
•LCD physical screen size is either 12.1”, 13.3” or 14.1”.
•LCD will automatically shut down when system enters Suspend-To-DRAM mode.

Elite 2 User's Manual Introduction
Page 1-3
STORAGE DEVICE
•Upgradeable hard disk subsystem: 4.1GB, 6GB, 10GB and 18GB Ultra DMA.
•Industry standard 3.5 inch 1.44MB floppy disk drive.
ROM DRIVE
•Support 24x (max) CD-ROM, or 2x DVD-ROM.
KEYBOARD
•87 full keys, with 2 Win95 keys, an embedded numerical keypad, indicators for
CapsLock and NumLock.
•External PS/2 keyboard connector located on the rear.
CONNECTIVITY and EXPANSION
•Built-in TouchPad, IBM PS/2 mouse compatible.
•One serial D-type 9-pin COM1 connector.
•One 6-pin mini DIN external keyboard, or PS/2 mouse connector.
•One 15-pin D-type connector for external VGA monitor support.
•One parallel port 25-pin D-type for printer, or pocket LAN. High-speed bi-
directional port under either hardware or software control (EPP/ECP compliance).
•Two type 2 PCMCIA slots.
•Two USB connectors.
•One Audio Line In connector.
•One Audio Line Out connector.
•One Earphone connector.
•One External Microphone In connector (mono).

Introduction Elite 2 User's Manual
Page 1-4
•One TV-out RCA jack (PAL/NTSC).
•FIR port for wireless InfraRed connections (IrDA Compliance).
•One Modem socket for Internal V90 Fax/Modem Module.
POWER
•Two battery slots to support Lithium Ion (Li-Ion) battery packs.
•Offline battery charging time for one Li-Ion, or NiMH battery pack of around two
hours.
•Full range 100 to 240V auto-switching International AC adapter .
PHYSICAL
Weight (TFT colour) : 3.1 kg including one Li-Ion battery pack.
Length : 320.0 mm
Width : 255.0 mm
Height (DSTN, TFT colour) : 38 - 44 mm
Note: Weight and height might change due to different configurations and model
variations.
ENVIRONMENT
Operating Temperature : 10°C to 35°C (50 to 95°F)
Non-Operating Temperature : -20°C to 60°C (-4°F to 140°F)
Humidity : 20 to 80% non-condensing
Shock : 5G operating, 60G non-operating
Vibration : 3-200Hz @ 1.0G operating
: 3-200Hz @ 1.5G non-operating
Elite 2 User's Manual Introduction
Page 1-5
Warning: Do not expose your Elite 2 to excessive heat or coldness (frost). Do
no drop, spill fluids or open the exterior of the case. This can damage
the Elite 2 and void the warranty.
OPTIONS
•Standard SDRAM S.O. DIMM self-refresh 32/64/128MB Memory Modules for
expansion from 32MB up to 256MB.
•Additional Battery Pack - Lithium Ion.
•Port Replicator.
•Internal Fax/Modem. (K56Flex/V90 compatible)
Note: Please contact your supplier for upgrade/option pricing and
availability.

Introduction Elite 2 User's Manual
Page 1-6
1.2 Special Features
Power Management
•Power Saving can be switched to Customized or Disabled in the BIOS Setup.
•System will enter Suspend-to-DRAM mode (with the LCD panel automatically
turned off), when the cover is closed.
•Advanced Power Management (APM) and ACPI support.
•Depending on user’s setup, system enters Suspend Mode (Suspend-To-
DRAM or Suspend-To-Disk) when no device activity occurs after an user
selected time duration.
•In Suspend-To-DRAM mode, all major devices and components (including
VGA controller and LCD panel) are shutdown to save energy.
•In Suspend-To-Disk mode, system is completely shutdown for energy saving.
Low Battery Activity allow system to save memory contents and system
activities into a Suspend-To-Disk file (refer to Chapter 10). When you power
on the system again, the system will return to exactly where you left off.
Memory Expansion
System Memory, upgradeable from 32MB to 256MB. For more information, refer to
Chapter 7.
Hot Keys
Please see Appendix B for all available Hot Key functions; such as Contrast and
Brightness adjustment, and Suspend-To-DRAM and Suspend-To-Disk etc.
Table of contents
Other Ergo Laptop manuals


