Esatto EBTDWW User manual

Version
V1.2 0223
Everything you need
for your Benchtop
Dishwsher is in
this User Mnul
Model/s
EBTDWW
EBTDWS

User Manual
02
Welcome
Congrtultions on purchsing your new Dishwsher.
The Estto brnd is proudly distributed within Austrli by
Residenti Group Pty Ltd.
Plese refer to the wrrnty crd t the rer of this mnul for
informtion regrding your product’s prts nd lbour wrrnty,
or visit us online t: www.residenti.group
At Residenti Group, we re customer obsessed nd our Support
Tem re there to ensure you get the most out of your pplince.
Should you wnt to lern more bout your new dishwsher, it's
fetures or importntly tking cre of the pplince, our Support
Tem re here to help.
You cn use our online Support Centre t nytime by visiting:
http://support.residentigroup.com.u
Or you cn contct us vi phone by diling: 1300 11 HELP (4357).
It is importnt tht you red through the following use nd cre
mnul thoroughly to fmilirise yourself with the instlltion
nd opertion requirements of your pplince to ensure the most
optimum performnce.
Agin, thnk you for choosing n Estto pplince nd we look
forwrd to being of service to you.
Kind Regrds,
The Residenti Tem
Residenti roup
—
Head Office
165 Brkly Avenue
Burnley, Victori
Austrli 3121
—
ACN
600 546 656
—
Online
residenti.group
www.estto.house
@estto.house
—
Postage
PO Box 5177
Burnley, Victori
Austrli 3121
—
Telephone
1300 11 4357
www.estto.house

esatto.house
03
Pge 04
Sfety Informtion
Pge 06
Product Overview
Pge 07
Quick Strt Guide
Pge 09
Instlltion
Instructions
Pge 14
Opertion
Instructions
Pge 16
Prepring
Loding Dishes
Pge 22
Mintennce
Clening
Pge 24
Troubleshooting
Tips
Pge 26
Error Codes
Pge 27
Technicl
Informtion
Contents
Pge 28
Wrrnty
Pge 31
Purchse Detils

User Manual
04
Sfety Informtion
When using your dishwsher, follow the precutions listed below:
SAFETY INFORMATION
• Instlltion nd repir cn only be crried out
by qulied technicin
• This pplince is intended to be used in
household nd similr pplictions such s:
— st kitchen res in shops, oces nd
other working environments;
— frm houses;
— by clients in hotels, motels nd other
residentil type environments;
— bed nd brekfst type environments.
• This pplince cn be used by children
ged from 8 yers nd bove nd persons
with reduced physicl, sensory or mentl
cpbilities or lck of experience nd
knowledge if they hve been given supervision
or instruction concerning use of the pplince
in sfe wy nd understnd the hzrds
involved.
• Children shll not ply with the pplince.
Clening nd user mintennce shll not be
done by children without supervision. (For
EN60335-1) This pplince is not intended
for use by persons (including children )
with reduced physicl, sensory ormentl
cpbilities, or lck of experience nd
knowledge, unless they hve been given
supervision or instruction concerning use of
the pplince by person responsible for their
sfety. (For IEC60335-1 ) Pckging mteril
could be dngerous for children!
• This pplince is for indoor household use
only. To protect ginst the risk of electricl
shock, do not immerse the unit, cord or plug
in wter or other liquid. Plese unplug before
clening nd performing mintennce on the
pplince.
• Use soft cloth moistened with mild sop, nd
then use dry cloth to wipe it gin.
Disposal
For disposing of package and the
appliance please go to a recycling center.
Therefore cut off the power supply cable
and make the door closing device
unusable.
Cardboard packaging is manufactured from recycled
paper and should be disposed in the waste paper
collection for recycling.
By ensuring this product is disposed of correctly, you
will help prevent potential negative consequences
for the environment and human health, which could
otherwise be caused by inappropriate waste
handling of this product.
For more detailed information about recycling of this
product, please contact your local city office and
your household waste disposal service.
DISPOSAL: Do not dispose this product as
unsorted municipal waste. Collection of such
waste separately for special treatment is
necessary.
7
DISPOSAL
• For disposing of pckge nd the pplince
plese go to recycling center. Therefore cut
o the power supply cble nd mke the door
closing device unusble.
• Crdbord pckging is mnufctured from
recycled pper nd should be disposed in the
wste pper collection for recycling.
• By ensuring this product is disposed of
correctly, you will help prevent potentil
negtive consequences for the environment
nd humn helth, which could otherwise be
cused by inpproprite wste hndling of
this product.
• For more detiled informtion bout recycling
of this product, plese contct your locl city
oce nd your household wste disposl
service.
• DISPOSAL: Do not dispose this product s
unsorted municipl wste. Collection of such
wste seprtely for specil tretment is
necessry.

esatto.house
05
EARTHING INSTRUCTIONS
• This pplince must be erthed. In the event
of mlfunction or brekdown, erthing
will reduce the risk of n electric shock by
providing pth of lest resistnce of electric
current. This pplince is equipped with n
erthing conductor plug.
• The plug must be plugged into n pproprite
outlet tht is instlled nd erthed in
ccordnce with ll locl codes nd
ordinnces.
• Improper connection of the equipment-
erthing conductor cn result in the risk of
n electric shock. Check with qulied
electricin or service representtive if you re
in doubt whether the pplince is properly
grounded.
• Do not modify the plug provided with the
pplince; If it does not t the outlet.
• Hve proper outlet instlled by qulied
electricin.
• Do not buse, sit on, or stnd on the door or
dish rck of the dishwsher.
• Do not operte your dishwsher unless ll
enclosure pnels re properly in plce.
• Open the door very crefully if the dishwsher
is operting, there is risk of wter squirting
out.
• Do not plce ny hevy objects on or stnd on
the door when it is open. The pplince could
tip forwrd.
• When loding items to be wshed:
1. Locte shrp items so tht they re not
likely to dmge the door sel;
2. Wrning: Knives nd other utensils with
shrp points must be loded in the bsket
with their points fcing down or plced in
horizontl position.
Sfety Informtion
When using your dishwsher, follow the precutions listed below:
• Some dishwsher detergents re strongly
lkline. They cn be extremely dngerous
if swllowed. Avoid contct with the skin
nd eyes nd keep children wy from the
dishwsher when the door is open.
• Check tht the detergent powder is empty
fter completion of the wsh cycle.
• Do not wsh plstic items unless they re
mrked “dishwsher sfe” or the equivlent.
• For unmrked plstic items not so mrked,
check the mnufcturer's recommendtions.
• Use only detergent nd rinse gents
recommended for use in n utomtic
dishwsher.
• Never use sop, lundry detergent, or hnd
wshing detergent in your dishwsher.
• The door should not be left open, since this
could increse the risk of tripping. If the supply
cord is dmged, it must be replced by the
mnufcturer or its service gent or similrly
qulied person in order to void hzrd.
• During instlltion, the power supply must
not be excessively or dngerously bent or
ttened.
• Do not tmper with controls.
• The pplince needs to be connected to the
min wter vlve using new hose sets. Old sets
should not be reused.
• To sve energy, in stnd by mode , the
pplince will switch o utomticlly while
there is no ny opertion in 30 minutes .

User Manual
06
Product Overview
PRODUCT OVERVIEW
To get the best performance from your dishwasher, read all operating instructions
before using it for the first time.
IMPORTANT:
Pictures are only for reference, different models may be different.
Please prevail in kind.
NOTE:
8
Filter assembly
Spray arm
Dispenser
Cutlery rack
Basket
Cup rack
IMPORTANT:
To get the best performnce from your
dishwsher, red ll operting instructions
before using it for the rst time.
NOTE:
Pictures within this user mnul re for
instructionl purposes only, your pplince my
pper dierently.
PRODUCT OVERVIEW
To get the best performance from your dishwasher, read all operating instructions
before using it for the first time.
IMPORTANT:
Pictures are only for reference, different models may be different.
Please prevail in kind.
NOTE:
8
Filter assembly
Spray arm
Dispenser
Cutlery rack
Basket
Cup rack
Dispenser
Cup Rck Cup Rck
Bsket Cutlery Rck
Spry Arm
Filter Assembly

esatto.house
07
Quick Strt Guide
For more detils on opertion, plese red the relevnt content in this mnul.
5
QUICK USER GUIDE
Please read the corresponding content on the instruction manual for detailed
operating method.
2Removing the larger residue on the
cutlery
3Loading the baskets
4Filling the dispenser Selecting a program and running
the dishwasher
Inside Outside
3
1Install the dishwasher
(Please check the section 5 “INSTALLATION INSTRUCTION ”
of PART Ⅰ: Generic Version.)
Instll the dishwsher (plese check pge 09)
5
QUICK USER GUIDE
Please read the corresponding content on the instruction manual for detailed
operating method.
2Removing the larger residue on the
cutlery
3Loading the baskets
4Filling the dispenser Selecting a program and running
the dishwasher
Inside Outside
3
1Install the dishwasher
(Please check the section 5 “INSTALLATION INSTRUCTION ”
of PART Ⅰ: Generic Version.)
Fill the dispenser Select progrm nd strt
running the dishwsher
5
QUICK USER GUIDE
Please read the corresponding content on the instruction manual for detailed
operating method.
2Removing the larger residue on the
cutlery
3Loading the baskets
4Filling the dispenser Selecting a program and running
the dishwasher
Inside Outside
3
1Install the dishwasher
(Please check the section 5 “INSTALLATION INSTRUCTION ”
of PART Ⅰ: Generic Version.)
Remove lrger residue from
the cutlery
Lod the bskets crefully

User Manual
08
This pge is intentionlly blnk
But if you wnt to drw something, mke notes or even write
recipe... it’s ll yours!

esatto.house
09
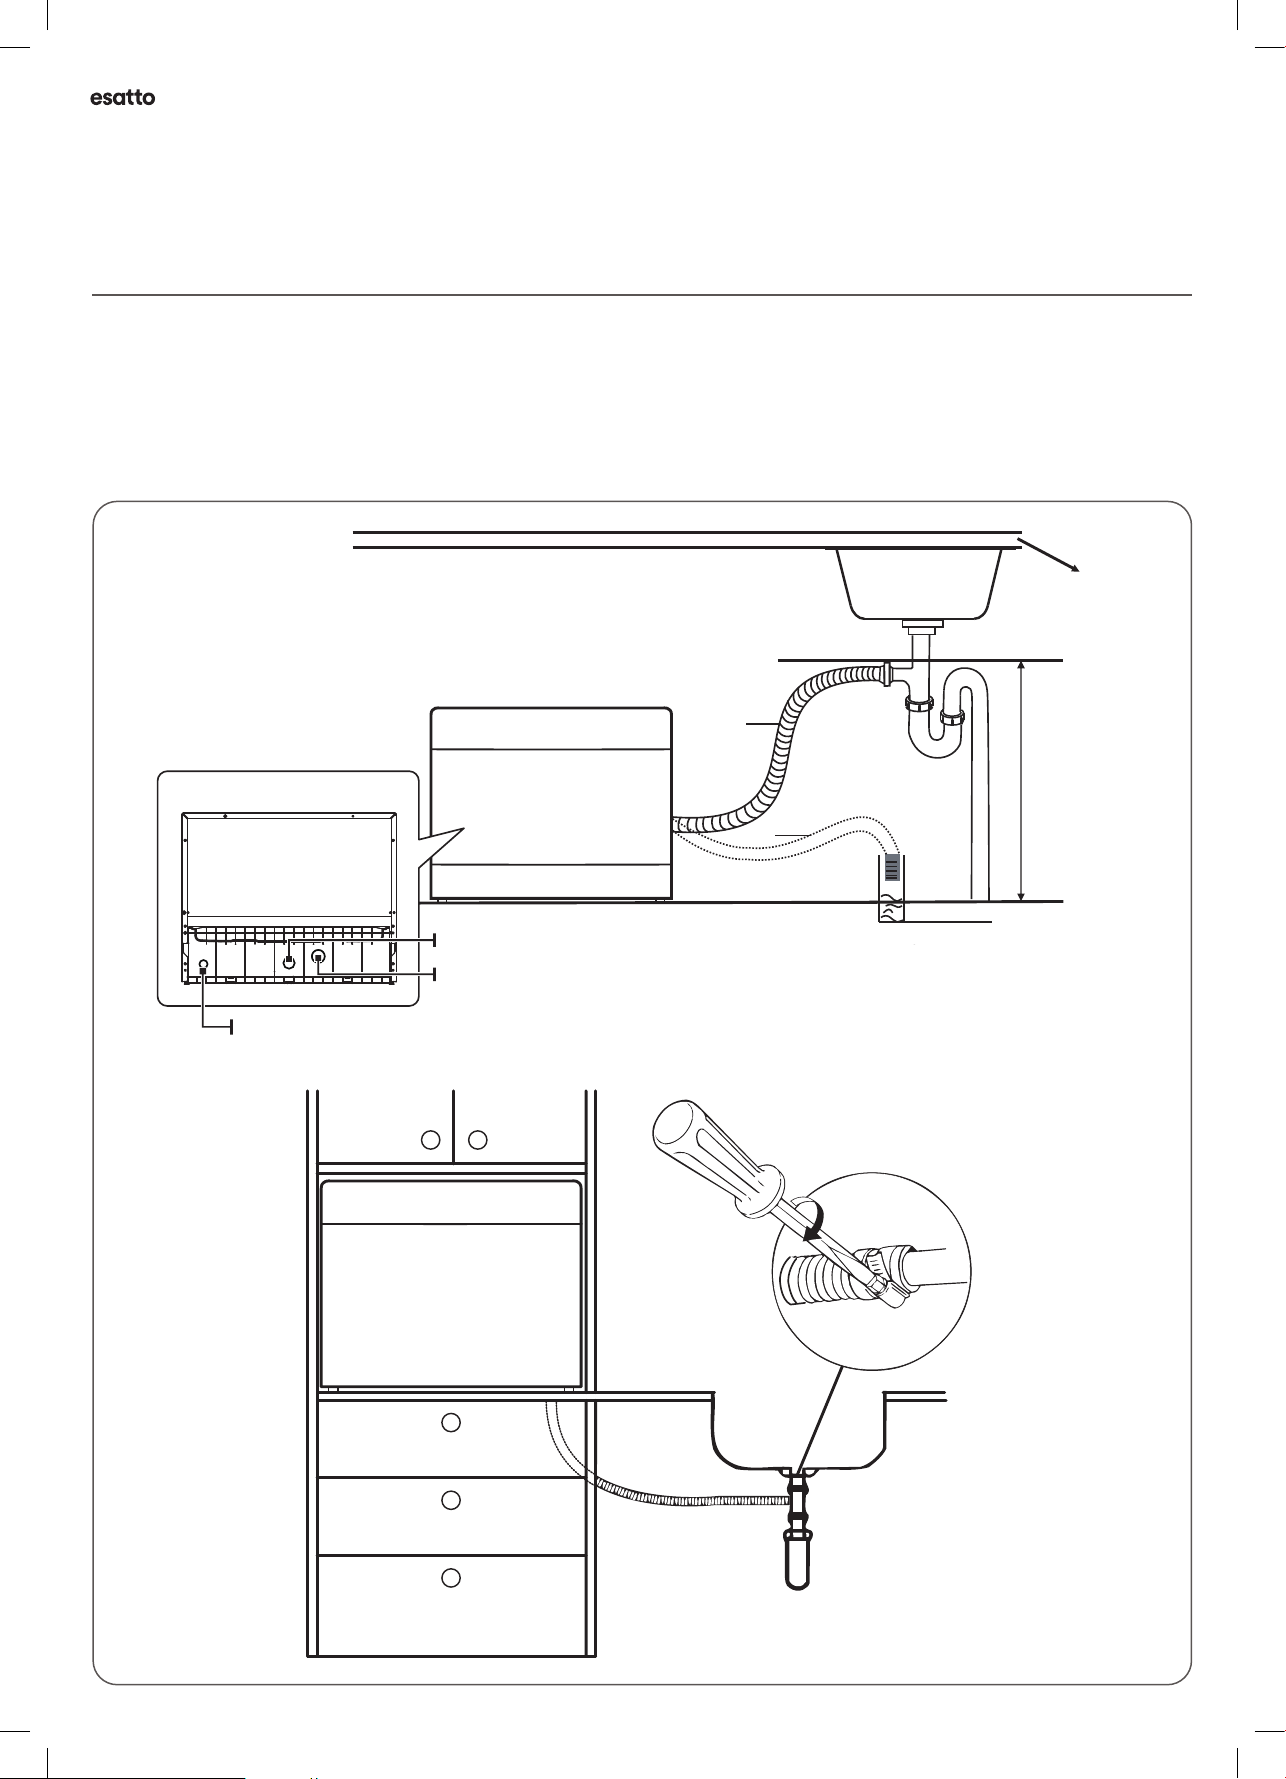
Water Supply And Drain
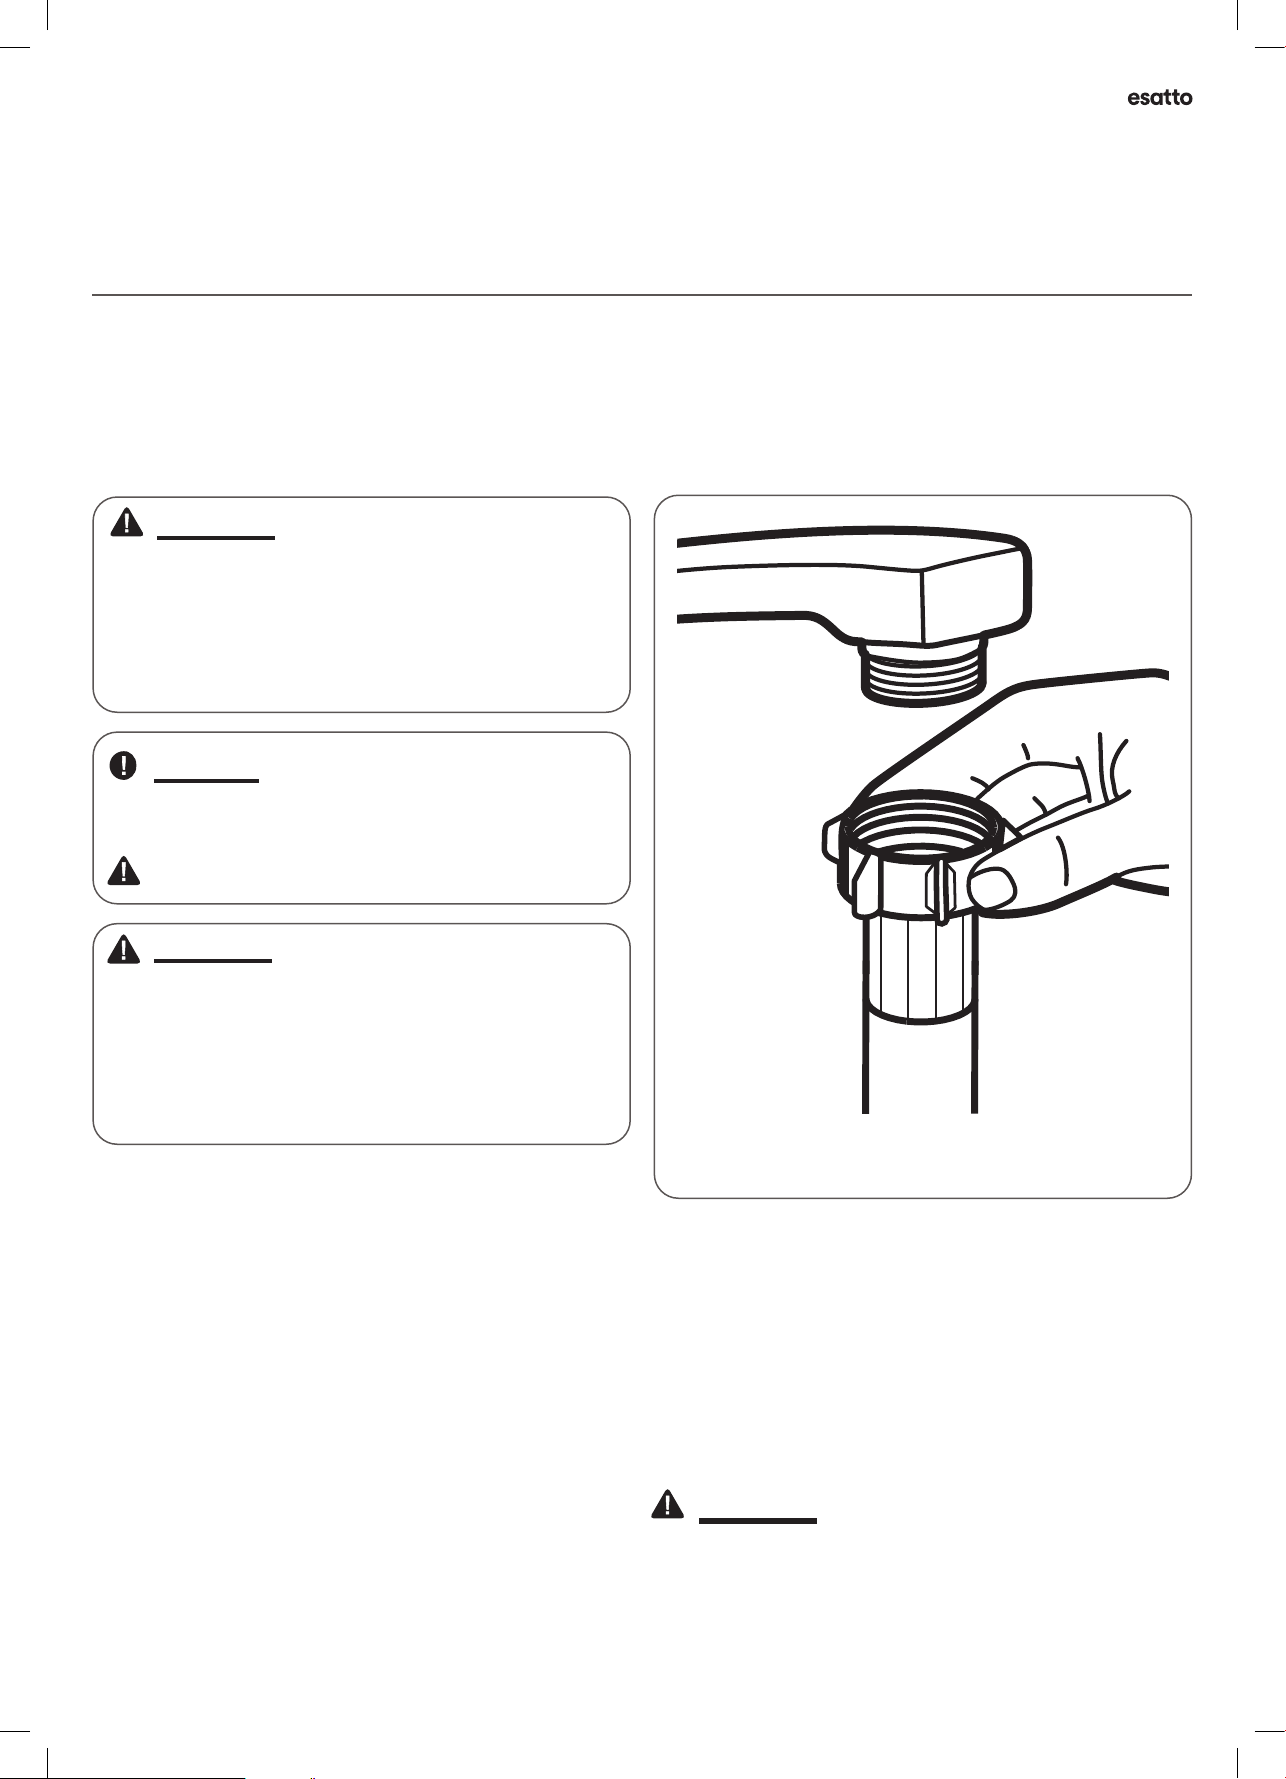
Cold water connection
Connect the cold water supply hose to
a threaded 3/4(inch) connector and
make sure that it is fastened tightly in
place.
If the water pipes are new or have not
been used for an extended period of
time, let the water run to make sure
that the water is clear. This precaution
is needed to avoid the risk of the
water inlet to be blocked and damage
the appliance.
ordinary supply hose
WARNING
A hose that attaches to a sink spray can burst if it is installed on the same
water line as the dishwasher. If your sink has one, it is recommended that
the hose be disconnected and the hole plugged.
14
WARNING :
Electricl Shock Hzrd
Disconnect electricl power before instlling
dishwsher. Filure to do so could result in
deth or electricl shock.
INSTALLATION INSTRUCTION
Ensure the voltage and frequency of the power being corresponds to those on the
rating plate. Only insert the plug into an electrical socket which is earthed
properly. If the electrical socket to which the appliance must be connected is not
appropriate for the plug, replace the socket, rather than using a adaptors or the like as
they could cause overheating and burns.
Electrical requirements
Electrical connection
Ensure that proper earthing exists before use
About Power Connection
WARNING
For personal safety:
Do not use an extension cord or an adapter
plug with this appliance.
Do not, under any circumstances, cut or remove
the earthing connection from the power cord.
The installation of the pipes and electrical equipments should be done by professionals.
Attention
WARNING
Electrical Shock Hazard
Disconnect electrical power before
installing dishwasher.
Failure to do so could result in death or
electrical shock.
13
Please look at the rating label to know the rating voltage and connect the dishwasher
to the appropriate power supply. Use the required fuse 10A/13A/16A, time delay fuse
or circuit breaker recommended and provide separate circuit serving only this appliance.
WARNING :
• Do not use n extension cord or n dpter
plug with this pplince.
• Do not, under ny circumstnces, cut or
remove the erthing connection from the
power cord.
INSTALLATION INSTRUCTION
Ensure the voltage and frequency of the power being corresponds to those on the
rating plate. Only insert the plug into an electrical socket which is earthed
properly. If the electrical socket to which the appliance must be connected is not
appropriate for the plug, replace the socket, rather than using a adaptors or the like as
they could cause overheating and burns.
Electrical requirements
Electrical connection
Ensure that proper earthing exists before use
About Power Connection
WARNING
For personal safety:
Do not use an extension cord or an adapter
plug with this appliance.
Do not, under any circumstances, cut or remove
the earthing connection from the power cord.
The installation of the pipes and electrical equipments should be done by professionals.
Attention
WARNING
Electrical Shock Hazard
Disconnect electrical power before
installing dishwasher.
Failure to do so could result in death or
electrical shock.
13
Please look at the rating label to know the rating voltage and connect the dishwasher
to the appropriate power supply. Use the required fuse 10A/13A/16A, time delay fuse
or circuit breaker recommended and provide separate circuit serving only this appliance.
Electricl Requirements
Plese look t the rting lbel to know the rting
voltge nd connect the dishwsher to the
pproprite power supply. Use the required fuse
10A/13A/16A, time dely fuse or circuit breker
recommended nd provide seprte circuit
serving only this pplince.
Electricl Connection
Ensure the voltge nd frequency of the power
being corresponds to those on the rting plte.
Only insert the plug into n electricl socket
which is erthed properly. If the electricl socket
to which the pplince must be connected is
not pproprite for the plug, replce the socket,
rther thn using dptors or the like s they
could cuse overheting nd burns.
Cold Wter Connection
Plese look t the rting lbel to know the rting
voltge nd connect the dishwsher to the
pproprite power supply. Use the required fuse
10A/13A/16A, time dely fuse or circuit breker
recommended nd provide seprte circuit
serving only this pplince.
WARNING :
A hose tht ttches to sink spry cn
burst if it is instlled on the sme wter line
s the dishwsher. If your sink hs one, it is
recommended tht the hose be disconnected
nd the hole plugged.
Attention: The instlltion of the pipes nd
electricl equipments should be
done by professionls.
PRODUCT OVERVIEW
To get the best performance from your dishwasher, read all operating instructions
before using it for the first time.
IMPORTANT:
Pictures are only for reference, different models may be different.
Please prevail in kind.
NOTE:
8
Filter assembly
Spray arm
Dispenser
Cutlery rack
Basket
Cup rack
INSTALLATION INSTRUCTION
Ensure the voltage and frequency of the power being corresponds to those on the
rating plate. Only insert the plug into an electrical socket which is earthed
properly. If the electrical socket to which the appliance must be connected is not
appropriate for the plug, replace the socket, rather than using a adaptors or the like as
they could cause overheating and burns.
Electrical requirements
Electrical connection
Ensure that proper earthing exists before use
About Power Connection
WARNING
For personal safety:
Do not use an extension cord or an adapter
plug with this appliance.
Do not, under any circumstances, cut or remove
the earthing connection from the power cord.
The installation of the pipes and electrical equipments should be done by professionals.
Attention
WARNING
Electrical Shock Hazard
Disconnect electrical power before
installing dishwasher.
Failure to do so could result in death or
electrical shock.
13
Please look at the rating label to know the rating voltage and connect the dishwasher
to the appropriate power supply. Use the required fuse 10A/13A/16A, time delay fuse
or circuit breaker recommended and provide separate circuit serving only this appliance.
Ensure there is proper erthing before use
Ordinry Supply Hose
Instlltion Instructions
Power Connection, Wter Supply Drining

User Manual
10
Connection Of Drain Hoses
Please securely fix the drain hose in either position A or position B
Insert the drain hose into a drain pipe with a minimum diameter of 4 cm, or let it run
into the sink, making sure to avoid bending or crimping it. The height of drain pipe
must be less than 600mm. The free end of the hose must not be immersed in water
to avoid the back flow of it.
15
B
A
MAX 600mm
Counter
Drain pipe
Back of dishwasher
Inlet pipe connector
Drain pipe
Mains Cable
Bck of Dishwsher
Drin Pipe
Ø 40mm
MAX 600mm
Counter
Inlet Pipe Connector
Drin Pipe
Mins Cble
A
B
*
*
Instlltion Instructions
Wter Supply Drining

esatto.house
11
Wter Outlet
Connect the wter drin hose. The drin hose
must be correctly tted to void wter leks.
Ensure tht the wter drin hose is not kinked or
squshed.
Extension Hose
If you need drin hose extension, mke sure to
use similr drin hose. It must be no longer thn
4 meters; otherwise the clensing eect of the
dishwsher could be reduced.
Connection
The wste connection must be t height less
thn 100 cm (mximum) from the bottom of the
dish. The wter drin hose should be xed.
Position the Applince
Crefully position the pplince in the desired
loction. The bck should rest ginst the wll
behind it, nd the sides, long the djcent
cbinets or wlls. The dishwsher is equipped
with wter supply nd drin hoses tht cn be
positioned either to the right or the left sides to
fcilitte proper instlltion.
Connection Of Drin Hoses
Insert the drin hose into drin pipe with
minimum dimeter of 4 cm, or let it run into the
sink, mking sure to void bending or crimping
it. The height of drin pipe must be less thn
600mm. The free end of the hose must not be
immersed in wter to void the bck ow of it.
How to Drin Excess Wter From Hoses
If the sink is 1000 higher from the oor, the excess
wter in hoses cnnot be drined directly into the
sink. It will be necessry to drin excess wter
from hoses into bowl or suitble continer tht
is held outside nd lower thn the sink.
INSTALLATION INSTRUCTION
Ensure the voltage and frequency of the power being corresponds to those on the
rating plate. Only insert the plug into an electrical socket which is earthed
properly. If the electrical socket to which the appliance must be connected is not
appropriate for the plug, replace the socket, rather than using a adaptors or the like as
they could cause overheating and burns.
Electrical requirements
Electrical connection
Ensure that proper earthing exists before use
About Power Connection
WARNING
For personal safety:
Do not use an extension cord or an adapter
plug with this appliance.
Do not, under any circumstances, cut or remove
the earthing connection from the power cord.
The installation of the pipes and electrical equipments should be done by professionals.
Attention
WARNING
Electrical Shock Hazard
Disconnect electrical power before
installing dishwasher.
Failure to do so could result in death or
electrical shock.
13
Please look at the rating label to know the rating voltage and connect the dishwasher
to the appropriate power supply. Use the required fuse 10A/13A/16A, time delay fuse
or circuit breaker recommended and provide separate circuit serving only this appliance.
Attention :
Plese securely x the drin hose
in either position:
Aor B
* *
INSTALLATION INSTRUCTION
Ensure the voltage and frequency of the power being corresponds to those on the
rating plate. Only insert the plug into an electrical socket which is earthed
properly. If the electrical socket to which the appliance must be connected is not
appropriate for the plug, replace the socket, rather than using a adaptors or the like as
they could cause overheating and burns.
Electrical requirements
Electrical connection
Ensure that proper earthing exists before use
About Power Connection
WARNING
For personal safety:
Do not use an extension cord or an adapter
plug with this appliance.
Do not, under any circumstances, cut or remove
the earthing connection from the power cord.
The installation of the pipes and electrical equipments should be done by professionals.
Attention
WARNING
Electrical Shock Hazard
Disconnect electrical power before
installing dishwasher.
Failure to do so could result in death or
electrical shock.
13
Please look at the rating label to know the rating voltage and connect the dishwasher
to the appropriate power supply. Use the required fuse 10A/13A/16A, time delay fuse
or circuit breaker recommended and provide separate circuit serving only this appliance.
Attention :
See pge 27 for technicl informtion
Instlltion Instructions
Wter Supply Drining

User Manual
12
USING YOUR DISHWASHER
Control Panel
4
面板类型1
Operation (Button)
Power
1
Delay
2
Program
3
Press this button to turn on your dishwasher, the screen lights up.
Press the button to set the delay time.
Press this button to select the appropriate washing program, the
selected program indicator will be lit.
To start the selected washing program or pause it when the
dishwasher is working.
4Start / Pause
2 7
15
8 4
3
Display
RRiinnssee AAiidd
If the “ ” indicator is lit, it means the dishwasher is low
on dishwasher rinse aid and requires a refill.
5Warning
indicator
WWaatteerr FFaauucceett
If the “ ” indicator is lit, it means the water faucet closed.
56
Power Press this button to turn on your dishwsher, the screen lights up.
Dely Press the button to set up the dely time feture.
Progrm Press this button to select the pproprite wshing progrm, the
selected progrm indictor will be lit.
Strt / Puse To strt the selected wshing progrm or puse it when while the
dishwsher is mid-opertion.
Opertion (Buttons)
Opertion Instructions
Button Interfce

esatto.house
13
Wrning
Indictors
Rinse Aid
If the “ ” indictor is lit, the dishwsher is low on rinse id
nd requires rell.
Wter Fucet
If the “ ” indictor is lit, it mens the wter fucet closed.
Progress
Indictor When the progrm hs ended, the “ ” indictor will be lit.
Dely Time To show the dely time. (2h/4h/6h/8h)
Progrm
Indictors
Intensive 70° C
For heviest soiled crockery, such s pots, pns, csserole
dishes nd dishes tht hve been sitting with dried food on
them for while.
Hevy
For hevily soiled lods, such s pots, pltes, glsses nd
lightly soiled pns.
ECO 50° C
For normlly soiled lods, such s pots, pltes, glsses nd
lightly soiled pns. stndrd dily cycle.
Glss
For lightly soiled lods, such s glsswre, crystl or ne
chin pieces.
Super '90
For lightly soiled crockery nd glss.
Quick 30'
A shorter wsh for lightly soiled lods nd quick wsh.
(Does not include drying stge).
Disply
Opertion Instructions
Disply Interfce

User Manual
14
Progrm
Title
Description
of Cycle
Detergent
Pre/Min
Running
Time (min)
Energy
(kWh)
Wter
(L)
Rinse-Aid
Required
Intensive 70° C
Pre-wsh (50˚C)
Wsh (55˚C)
Rinse ×
Rinse (70˚C)
Drying
5/17.5g
(1 or 2 pieces) 140 0.85 9.7
Hevy
Pre-wsh
Wsh (60˚C)
Rinse
Rinse (70˚C)
Drying
5/17.5g
(1 or 2 pieces) 120 0.65 7.8
ECO 50° C
(*AS/NZS 2007.1)
Pre-wsh
Wsh (47˚C)
Rinse
Rinse (50˚C)
Drying
5/17.5g
(1 piece) 135 0.45 7.4
Glss
Wsh (45˚C)
Rinse
Rinse (50˚C)
Drying
22.5g
(1 piece) 70 0.45 6
Super 90'
Wsh (65˚C)
Rinse (70˚C)
Drying
22.5g
(1 piece) 90 0.65 7
Quick 30'
Wsh (40˚C)
Rinse
Rinse
15g 30 0.32 5.8
Opertion Instructions
Progrmming the Dishwsher
WASH CYCLE TABLE:
The tble below shows which progrms re best for the levels of food residue on
them nd how much detergent is needed. It lso show vrious informtion bout
the progrms.
( or ) refers to whether or not you need to ll the Rinse-Aid Dispenser.
INSTALLATION INSTRUCTION
Ensure the voltage and frequency of the power being corresponds to those on the
rating plate. Only insert the plug into an electrical socket which is earthed
properly. If the electrical socket to which the appliance must be connected is not
appropriate for the plug, replace the socket, rather than using a adaptors or the like as
they could cause overheating and burns.
Electrical requirements
Electrical connection
Ensure that proper earthing exists before use
About Power Connection
WARNING
For personal safety:
Do not use an extension cord or an adapter
plug with this appliance.
Do not, under any circumstances, cut or remove
the earthing connection from the power cord.
The installation of the pipes and electrical equipments should be done by professionals.
Attention
WARNING
Electrical Shock Hazard
Disconnect electrical power before
installing dishwasher.
Failure to do so could result in death or
electrical shock.
13
Please look at the rating label to know the rating voltage and connect the dishwasher
to the appropriate power supply. Use the required fuse 10A/13A/16A, time delay fuse
or circuit breaker recommended and provide separate circuit serving only this appliance.
Note :
AS/NZS 2007.1: This progrm is
the test cycle. The informtion for
comprbility test in ccordnce
with AS/NZS 2007.1.

esatto.house
15
Opertion Instructions
Progrmming the Dishwsher
INSTALLATION INSTRUCTION
Ensure the voltage and frequency of the power being corresponds to those on the
rating plate. Only insert the plug into an electrical socket which is earthed
properly. If the electrical socket to which the appliance must be connected is not
appropriate for the plug, replace the socket, rather than using a adaptors or the like as
they could cause overheating and burns.
Electrical requirements
Electrical connection
Ensure that proper earthing exists before use
About Power Connection
WARNING
For personal safety:
Do not use an extension cord or an adapter
plug with this appliance.
Do not, under any circumstances, cut or remove
the earthing connection from the power cord.
The installation of the pipes and electrical equipments should be done by professionals.
Attention
WARNING
Electrical Shock Hazard
Disconnect electrical power before
installing dishwasher.
Failure to do so could result in death or
electrical shock.
13
Please look at the rating label to know the rating voltage and connect the dishwasher
to the appropriate power supply. Use the required fuse 10A/13A/16A, time delay fuse
or circuit breaker recommended and provide separate circuit serving only this appliance.
WARNING :
It is dngerous to open the door mid-cycle,
s hot stem my scld you.
STARTING A CYCLE WASH:
Drw out the lower nd upper bsket, lod the dishes
nd push them bck. It is commended to lod the
lower bsket rst, then the upper one.
Pour in the detergent.
Insert the plug into the socket. The power supply refer
to lst pge “Technicl Informtion”. Mke sure tht
the wter supply is turned on to full pressure.
Close the door, press the Power button, to switch on
the mchine.
Choose progrm, the response light will turn on.
Then press the Strt/Puse button, the dishwsher will
strt its cycle.
CHANGING THE PROGRAM MIDCYCLE
A wsh cycle cn only be chnged if it hs been running
for short time otherwise, the detergent my hve
lredy been relesed nd the dishwsher my hve
lredy drined the wsh wter. If this is the cse, the
dishwsher needs to be reset nd the detergent dispenser
must be relled. To reset the dishwsher, plese follow the
instructions below:
Press the Strt/Puse button to puse the wshing.
Press Progrm button for more thn 3 seconds - the
progrm will cncel.
Press the Progrm button to select the desired
progrm.
Press the Strt/Puse button, fter 10 seconds, the
dishwsher will strt.
FORGET TO ADD A DISH?:
A forgotten dish cn be dded ny time before the
detergent dispenser opens.
If this is the cse, follow these steps::
Press the Strt/Puse button to puse the wshing.
Wit 5 seconds; then open the door.
Add the forgotten dishes.
Close the door.
Press the Strt/Puse button fter 10 seconds, the
dishwsher will strt.
13
Starting A Cycle Wash
1. Draw out the lower and upper basket, load the dishes and push them back.
It is commended to load the lower basket first, then the upper one.
2. Pour in the detergent.
3. Insert the plug into the socket. The power supply refer to last page ”Product fiche”.
Make sure that the water supply is turned on to full pressure.
4. Close the door, press the Power button, to switch on the machine.
5. Choose a program, the response light will turn on. Then press the Start/Pause
button, the dishwasher will start its cycle.
Changing The Program Mid-cycle
A wash cycle can only be changed if it has been running for a short time otherwise,
the detergent may have already been released and the dishwasher may have already
drained the wash water. If this is the case, the dishwasher needs to be reset and the
detergent dispenser must be refilled. To reset the dishwasher, follow the
instructions below:
1. Press the Start/Pause button to pause the washing.
2. Press Program button for more than 3 seconds - the program will cancel.
3. Press the Program button to select the desired program.
4. Press the Start/Pause button, after 10 seconds, the dishwasher will start.
3 sec
AS/NZS 2007.1 This program is the test cycle. The information for comparability
test in accordance with AS/NZS 2007.1.
:
NOTE:

User Manual
16
1.Basket:
2.Cutlery basket:
LOADING THE BASKETS
ACCORDING TO AS/NZS 2007.1:
20
3
3
7
7
1
1
2
2
4
4
5
5
6
6
1
2
3
4
5
6
7
Cups
Saucers
Glasses
Dessert dishes
Dinner plates
Soup plates
Cutlery basket
Item
Number
1
2
3
4
5
Soup spoons
Forks
Knives
Teaspoons
Dessert spoons
Item
Number
1515231
235
4 4
2
43
2
1
3
3
4
2
4 4
5
51
3
5
2
1
Information for comparability tests in
accordance with (*AS/NZS 2007.1 )
Capacity: 6 place settings
Program: ECO
Rinse aid setting: 6
Detergent(Pre/main): 5/17.5g
Door is open at the end of the drying
cycle for the drying performance test
(Door position: Open 50 mm)
1 32 444 5
Prepring Loding Dishes
Loding the Bskets According to AUS/NZ S 2007.1
1.Basket:
2.Cutlery basket:
LOADING THE BASKETS
ACCORDING TO AS/NZS 2007.1:
20
33
77
11
22
44
55
66
1
2
3
4
5
6
7
Cups
Saucers
Glasses
Dessert dishes
Dinner plates
Soup plates
Cutlery basket
Item
Number
1
2
3
4
5
Soup spoons
Forks
Knives
Teaspoons
Dessert spoons
Item
Number
1515231
235
4 4
2
43
2
1
3
3
4
2
4 4
5
51
3
5
2
1
Information for comparability tests in
accordance with (*AS/NZS 2007.1 )
Capacity: 6 place settings
Program: ECO
Rinse aid setting: 6
Detergent(Pre/main): 5/17.5g
Door is open at the end of the drying
cycle for the drying performance test
(Door position: Open 50 mm)
1 32 444 5
1. Bsket:
1.Basket:
2.Cutlery basket:
LOADING THE BASKETS
ACCORDING TO AS/NZS 2007.1:
20
33
77
11
22
44
55
66
1
2
3
4
5
6
7
Cups
Saucers
Glasses
Dessert dishes
Dinner plates
Soup plates
Cutlery basket
Item
Number
1
2
3
4
5
Soup spoons
Forks
Knives
Teaspoons
Dessert spoons
Item
Number
1515231
235
4 4
2
43
2
1
3
3
4
2
4 4
5
51
3
5
2
1
Information for comparability tests in
accordance with (*AS/NZS 2007.1 )
Capacity: 6 place settings
Program: ECO
Rinse aid setting: 6
Detergent(Pre/main): 5/17.5g
Door is open at the end of the drying
cycle for the drying performance test
(Door position: Open 50 mm)
1 32 444 5
2. Cutlery Bsket:
No. Item
Cups
Sucers
Glsses
Dessert Dishes
Dinner Pltes
Soup Pltes
Cutlery Bsket
No. Item
1Soup Spoons
2Forks
3Knives
4Tespoons
5Dessert Spoons
Informtion for comprbility tests in
ccordnce with (*AS/NZS 2007.1)
• Cpcity: 6 plce settings
• Progrm: ECO 50° C
• Rinse id setting: 6 Detergent
(Pre/min): 5/17.5g
• Door is open t the end of the drying
cycle for the drying performnce test
(Door position: Open 50 mm)

esatto.house
17
Prepring Loding Dishes
For Wshing the Following Cutlery / Dishes
RECOMMENDED:
Scrpe o ny lrge mounts of leftover food. Soften
remnnts of burnt food in pns. It is not necessry to rinse
the dishes under running wter.
For best performnce of the dishwsher, follow these
loding guidelines. (Features and appearance of baskets and
cutlery baskets may vary from your model.)
• Consider buying utensils which re
identied s dishwsher-proof.
• For prticulr items, select progrm
with the lowest possible temperture.
• To prevent dmge, it is importnt you
do not tke glss or cutlery out of the
dishwsher immeditely fter the progrm
hs ended.
• Very smll items should not be wshed in the
dishwsher s they could esily fll out of the bsket.
NOT SUITABLE:
• Cutlery with wooden, horn chin
or mother-of-perl hndles
• Non het-resistnt plstic items
• Older cutlery with glued prts tht
re not temperture resistnt
• Bonded cutlery items or dishes
• Items mde of pewter or copper
• Crystl glss-wre
• Steel items subject to rusting
• Wooden pltters, bowls etc.
• Items mde from synthetic bres
LIMITED SUITABILITY:
• Some types of glsses cn become
dull fter lrge number of wshes
• Silver nd luminum prts hve
tendency to discolour during wshing
• Glzed ptterns my lso fde if
mchine wshed frequently
RECOMMENDED LOADING METHOD:
• Items such s cups, glsses, pots/pns, etc. re fced
downwrds.
• Curved items, or ones with recesses, should be loded
slnt so tht wter cn run o.
• All utensils re stcked securely nd cn not tip over.
• All utensils re plced in the wy tht the spry rms
cn rotte freely during wshing.
• Lod hollow items such s cups, glsses, pns etc.
With the opening fcing downwrds so tht wter
cnnot collect in the continer or deep bse.
• Dishes nd items of cutlery must not lie inside one
nother, or cover ech other.
• To void dmge, glsses should not touch one nother.
• The upper bsket is designed to hold more delicte nd
lighter dishwre such s glsses, coee nd te cups.
• Long blded knives stored in n upright position re
potentil hzrd!
• Long nd / or shrp items of cutlery such s crving
knives must be positioned horizontlly in the upper
bsket.
• Plese do not overlod your dishwsher. This is
importnt for good results nd for resonble
consumption of energy.
REMOVING THE DISHES:
To prevent wter dripping from the upper bsket into the
lower bsket, we recommend tht you empty the lower
bsket rst, followed by the upper bsket.
INSTALLATION INSTRUCTION
Ensure the voltage and frequency of the power being corresponds to those on the
rating plate. Only insert the plug into an electrical socket which is earthed
properly. If the electrical socket to which the appliance must be connected is not
appropriate for the plug, replace the socket, rather than using a adaptors or the like as
they could cause overheating and burns.
Electrical requirements
Electrical connection
Ensure that proper earthing exists before use
About Power Connection
WARNING
For personal safety:
Do not use an extension cord or an adapter
plug with this appliance.
Do not, under any circumstances, cut or remove
the earthing connection from the power cord.
The installation of the pipes and electrical equipments should be done by professionals.
Attention
WARNING
Electrical Shock Hazard
Disconnect electrical power before
installing dishwasher.
Failure to do so could result in death or
electrical shock.
13
Please look at the rating label to know the rating voltage and connect the dishwasher
to the appropriate power supply. Use the required fuse 10A/13A/16A, time delay fuse
or circuit breaker recommended and provide separate circuit serving only this appliance.
WARNING :
Items will be hot! To prevent dmge, do not tke
glss nd cutlery out of the dishwsher for round
15 minutes fter the progrm hs ended.

User Manual
18
8
For the best washing effect, please load the baskets refer to standard
loading options on last section of PART Generic VersionⅠ:
For the best washing effect, please load the baskets refer to standard
loading options on last section of PART Ⅰ: Generic Version
WARNING
Do not let any item extend through
the bottom.
Always load sharp utensils with the
sharp point down!
Loading the cutlery basket
For personal safety and a top quality cleaning,
place the silverware in the basket making sure that:
They do not nest together.
Silverware is placed with the handles-down.
But place knives and other potentially dangerous
utensils are placed handles-up.
Loading the basket
All tableware can't be placed face up, in order
to improve the cleaning area and washing
performance, it is recommended to place the
dirty side towards the spray arm.
Please don't let tableware out of basket bottom
to make sure not block the moving of the spray arm.
The maximum diameter advised for plates in front
of the detergent dispenser is of 19 cm, this not to
hamper the opening of it.
Prepring Loding Dishes
Loding the Bskets According to AUS/NZ S 2007.1
LOADING THE BASKET:
All tblewre cn't be plced fce up, in order to
improve the clening re nd wshing performnce,
it is recommended to plce the dirty side towrds the
spry rm.
Plese don't let tblewre out of bsket bottom to
mke sure not block the moving of the spry rm. The
mximum dimeter dvised for pltes in front of the
detergent dispenser is of 19 cm, this not to hmper the
opening of it.
LOADING THE CUTLERY BASKET
For personl sfety nd top qulity clening, plce
the silverwre in the bsket mking sure tht:
• They do not nest together.
• Silverwre is plced with the hndles-down.
• But plce knives nd other potentilly dngerous
utensils re plced hndles-up.
8
For the best washing effect, please load the baskets refer to standard
loading options on last section of PART Generic VersionⅠ:
For the best washing effect, please load the baskets refer to standard
loading options on last section of PART Ⅰ: Generic Version
WARNING
Do not let any item extend through
the bottom.
Always load sharp utensils with the
sharp point down!
Loading the cutlery basket
For personal safety and a top quality cleaning,
place the silverware in the basket making sure that:
They do not nest together.
Silverware is placed with the handles-down.
But place knives and other potentially dangerous
utensils are placed handles-up.
Loading the basket
All tableware can't be placed face up, in order
to improve the cleaning area and washing
performance, it is recommended to place the
dirty side towards the spray arm.
Please don't let tableware out of basket bottom
to make sure not block the moving of the spray arm.
The maximum diameter advised for plates in front
of the detergent dispenser is of 19 cm, this not to
hamper the opening of it.
WARNING :
Do not let ny item
extend through the
bottom. Alwys lod
shrp utensils with
the shrp point down!
INSTALLATION INSTRUCTION
Ensure the voltage and frequency of the power being corresponds to those on the
rating plate. Only insert the plug into an electrical socket which is earthed
properly. If the electrical socket to which the appliance must be connected is not
appropriate for the plug, replace the socket, rather than using a adaptors or the like as
they could cause overheating and burns.
Electrical requirements
Electrical connection
Ensure that proper earthing exists before use
About Power Connection
WARNING
For personal safety:
Do not use an extension cord or an adapter
plug with this appliance.
Do not, under any circumstances, cut or remove
the earthing connection from the power cord.
The installation of the pipes and electrical equipments should be done by professionals.
Attention
WARNING
Electrical Shock Hazard
Disconnect electrical power before
installing dishwasher.
Failure to do so could result in death or
electrical shock.
13
Please look at the rating label to know the rating voltage and connect the dishwasher
to the appropriate power supply. Use the required fuse 10A/13A/16A, time delay fuse
or circuit breaker recommended and provide separate circuit serving only this appliance.

esatto.house
19
The rinse aid is released during the final rinse to prevent water from forming droplets
on your dishes, which can leave spots and streaks. It also improves drying by allowing
water to roll off the dishes. Your dishwasher is designed to use liquid rinse aids.
When to refill the rinse aid dispenser
WARNING
Only use branded rinse aid for dishwasher. Never fill the rinse aid dispenser
with any other substances (e.g. Dishwasher cleaning agent, liquid detergent).
This would damage the appliance.
Unless the rinse-aid warning light ( ) on the control panel is on, you can always
estimate the amount from the color of the optical level indicator located next to the
cap. When the rinse-aid container is full, the indicator will be fully dark. The size of the
dark dot decreases as the rinse-aid diminishes. You should never let the rinse aid level
be less than 1/4 full.
As the rinse aid diminishes, the size of the black dot on the rinse aid level indicator
changes, as illustrated below.
Full 3/4 full 1/2 full 1/4 full Empty
Function Of The Rinse Aid And Detergent
Function of detergent
The chemical ingredients that compose the detergent are necessary to remove, crush and
dispense all dirt out of the dishwasher. Most of the commercial quality detergents are
suitable for this purpose.
WARNING
Proper Use of Detergent
Use only detergent specifically made for dishwashers use. Keep your detergent
fresh and dry.
Don't put powdered detergent into the dispenser until you are ready to wash
dishes.
Dishwasher detergent is corrosive! Keep dishwasher
detergent out of the reach of children.
9
Prepring Loding Dishes
Rinse-Aid Detergent
FUNCTION OF RINSEAID AND DETERGENT:
The rinse id is relesed during the nl rinse to prevent wter from forming
droplets on your dishes, which cn leve spots nd streks. It lso improves
drying by llowing wter to roll o the dishes. Your dishwsher is designed to use
liquid rinse ids.
WHEN TO REFILL THE RINSEAID DISPENSER:
Unless the rinse-id wrning light ( ) on the control pnel is on, you cn lwys
estimte the mount from the color of the opticl level indictor locted next to
the cp. When the rinse-id continer is full, the indictor will be fully drk. The
size of the drk dot decreses s the rinse-id diminishes. You should never let
the rinse id level be less thn 1/4 full.
As the rinse id diminishes, the size of the blck dot on the rinse id level
indictor chnges, s illustrted below.
FUNCTION OF DETERGENT:
The chemicl ingredients tht compose the detergent re necessry to remove,
crush nd dispense ll dirt out of the dishwsher. Most of the commercil qulity
detergents re suitble for this purpose.
INSTALLATION INSTRUCTION
Ensure the voltage and frequency of the power being corresponds to those on the
rating plate. Only insert the plug into an electrical socket which is earthed
properly. If the electrical socket to which the appliance must be connected is not
appropriate for the plug, replace the socket, rather than using a adaptors or the like as
they could cause overheating and burns.
Electrical requirements
Electrical connection
Ensure that proper earthing exists before use
About Power Connection
WARNING
For personal safety:
Do not use an extension cord or an adapter
plug with this appliance.
Do not, under any circumstances, cut or remove
the earthing connection from the power cord.
The installation of the pipes and electrical equipments should be done by professionals.
Attention
WARNING
Electrical Shock Hazard
Disconnect electrical power before
installing dishwasher.
Failure to do so could result in death or
electrical shock.
13
Please look at the rating label to know the rating voltage and connect the dishwasher
to the appropriate power supply. Use the required fuse 10A/13A/16A, time delay fuse
or circuit breaker recommended and provide separate circuit serving only this appliance.
WARNING :
Only use rinse-id for dishwsher. DO NOT ll the rinse-id
dispenser with ny other substnces (e.g. Dishwsher clening
gent or liquid detergent). Any substnce used in the rinse-id
dispenser tht is not rinse-id will dmge the pplince!
INSTALLATION INSTRUCTION
Ensure the voltage and frequency of the power being corresponds to those on the
rating plate. Only insert the plug into an electrical socket which is earthed
properly. If the electrical socket to which the appliance must be connected is not
appropriate for the plug, replace the socket, rather than using a adaptors or the like as
they could cause overheating and burns.
Electrical requirements
Electrical connection
Ensure that proper earthing exists before use
About Power Connection
WARNING
For personal safety:
Do not use an extension cord or an adapter
plug with this appliance.
Do not, under any circumstances, cut or remove
the earthing connection from the power cord.
The installation of the pipes and electrical equipments should be done by professionals.
Attention
WARNING
Electrical Shock Hazard
Disconnect electrical power before
installing dishwasher.
Failure to do so could result in death or
electrical shock.
13
Please look at the rating label to know the rating voltage and connect the dishwasher
to the appropriate power supply. Use the required fuse 10A/13A/16A, time delay fuse
or circuit breaker recommended and provide separate circuit serving only this appliance.
WARNING :
• Use only detergent speciclly mde for dishwshers use.
Keep your detergent fresh nd dry.
• Don't put powdered detergent into the dispenser until you
re redy to wsh dishes.
Dishwsher detergent is corrosive!
Keep dishwsher detergent out of the rech of children.
Full ¾ Full ½ Full ¼ Full Empty

User Manual
20
3Replace the cap by inserting it
aligned with "open" arrow and
turning it to the closed (right) arrow.
NOTE:
Clean up any spilled rinse aid with
an absorbent cloth to avoid
excessive foaming during the next
wash.
1 2
To open the dispenser, turn the cap
to the "open" (left) arrow and lift
it out.
Carefully pour in the rinse-aid into
its dispenser, whilst avoiding it to
overflow.
Rinse-Aid indicator
Filling The Rinse Aid Reservoir
Adjusting the rinse aid reservoir
The rinse aid reservoir has six settings. Both the
recommended setting and the factory setting is “4”. If the
dishes are not drying properly or are spotted, adjust the dial
to the next higher number until your dishes are spot-free.
Reduce it if there are sticky whitish stains on your dishes or
a bluish film on glassware or knife blades.
AAddjjuusstt lleevveerr((RRiinnssee))
翻盖1 滑盖
10
Prepring Loding Dishes
Filling the Rinse-Aid Reservoir
INSTALLATION INSTRUCTION
Ensure the voltage and frequency of the power being corresponds to those on the
rating plate. Only insert the plug into an electrical socket which is earthed
properly. If the electrical socket to which the appliance must be connected is not
appropriate for the plug, replace the socket, rather than using a adaptors or the like as
they could cause overheating and burns.
Electrical requirements
Electrical connection
Ensure that proper earthing exists before use
About Power Connection
WARNING
For personal safety:
Do not use an extension cord or an adapter
plug with this appliance.
Do not, under any circumstances, cut or remove
the earthing connection from the power cord.
The installation of the pipes and electrical equipments should be done by professionals.
Attention
WARNING
Electrical Shock Hazard
Disconnect electrical power before
installing dishwasher.
Failure to do so could result in death or
electrical shock.
13
Please look at the rating label to know the rating voltage and connect the dishwasher
to the appropriate power supply. Use the required fuse 10A/13A/16A, time delay fuse
or circuit breaker recommended and provide separate circuit serving only this appliance.
Note :
Clen up ny spilled rinse id with n
bsorbent cloth to void excessive foming
during the next wsh.
ADJUSTING THE RINSE AID RESERVOIR
The rinse id reservoir hs six settings. Both the recommended setting nd the fctory setting is
“4”. If the dishes re not drying properly or re spotted, djust the dil to the next higher number
until your dishes re spot-free. Reduce it if there re sticky whitish stins on your dishes or
bluish lm on glsswre or knife bldes.
3Replace the cap by inserting it
aligned with "open" arrow and
turning it to the closed (right) arrow.
NOTE:
Clean up any spilled rinse aid with
an absorbent cloth to avoid
excessive foaming during the next
wash.
1 2
To open the dispenser, turn the cap
to the "open" (left) arrow and lift
it out.
Carefully pour in the rinse-aid into
its dispenser, whilst avoiding it to
overflow.
Rinse-Aid indicator
Filling The Rinse Aid Reservoir
Adjusting the rinse aid reservoir
The rinse aid reservoir has six settings. Both the
recommended setting and the factory setting is “4”. If the
dishes are not drying properly or are spotted, adjust the dial
to the next higher number until your dishes are spot-free.
Reduce it if there are sticky whitish stains on your dishes or
a bluish film on glassware or knife blades.
AAddjjuusstt lleevveerr((RRiinnssee))
翻盖1 滑盖
10
Adjust lever (Rinse)
Rinse-Aid Indictor
To open the dispenser, turn the cp to the
“open” (left) rrow nd lift it out.
Replce the cp by inserting it ligned
with “open” rrow nd turning it to the
closed (right) rrow.
Crefully pour in the rinse-id into its
dispenser, whilst voiding it to overow.
This manual suits for next models
1
Table of contents
Other Esatto Dishwasher manuals

Esatto
Esatto EDWI605S User manual

Esatto
Esatto EDW6CS User manual

Esatto
Esatto EDW456S User manual

Esatto
Esatto EDW6004S User manual

Esatto
Esatto EDW6012W User manual

Esatto
Esatto EDW6S User manual

Esatto
Esatto EBTDW2D User manual

Esatto
Esatto EDW456S User manual

Esatto
Esatto EDW7CS User manual

Esatto
Esatto EDW7S User manual