Esatto EDWI605S User manual

Version
V2.0 0123
Everything you need
for your 60cm
Integrted Dishwsher
is in this User Mnul
Model/s
EDWI605S

User Manual
2
Welcome
Congrtultions on purchsing your new Dishwsher. The Estto brnd is
proudly distributed within Austrli by Residenti Group Pty Ltd.
Plese refer to the wrrnty crd t the rer of this mnul for informtion
regrding your product’s prts nd lbour wrrnty, or visit us online t:
www.residenti.group
At Residenti Group, we re customer obsessed nd our Support Tem re
there to ensure you get the most out of your pplince. Should you wnt to
lern more bout your new dishwsher, it's fetures or importntly tking cre
of the pplince, our Support Tem re here to help.
You cn use our online Support Centre t nytime by visiting:
http://support.residentigroup.com.u
Or you cn contct us vi phone by diling: 1300 11 HELP (4357).
It is importnt tht you red through the following use nd cre mnul
thoroughly to fmilirise yourself with the instlltion nd opertion
requirements of your pplince to ensure optimum performnce.
Agin, thnk you for choosing n Estto pplince nd we look forwrd
to being of service to you.
Kind Regrds,
The Residenti Tem
Residenti roup
—
Head Office
165 Brkly Avenue
Burnley, Victori
Austrli 3121
—
ACN
600 546 656
—
Online
residenti.group
www.estto.house
@estto.house
—
Postage
PO Box 5177
Burnley, Victori
Austrli 3121
—
Telephone
1300 11 4357
www.estto.house

esatto.house
3
Pge 2
Welcome
Pge 4
Sfety Instructions
Pge 5
Your Dishwsher
Pge 6
Quick Strt Guide
Pge 7
Control Pnel
Pge 8
Instlltion Instructions
Pge 14
Opertion Instructions
Pge 16
Prepring
Loding Dishes
Pge 17
Loding
Recommendtions
Pge 18
Bsket Tips
Pge 19
Rinse Aid Detergent
Pge 21
Clening Mintennce
Pge 23
Troubleshooting
Pge 26
Technicl Informtion
Pge 27
Purchse Detils
Pge 28
Wrrnty
Contents

User Manual
4
Wrning!
When using your dishwsher , follow the precutions
listed below:
• Instlltion nd repir cn only be crried out by
qulied technicin.
• This pplince is only intended for use indoors
only within domestic environment.
• This pplince is not intended for use by persons
(including children) with reduced physicl, sensory
or mentl cpbilities, or lck of experience
nd knowledge, unless they hve been given
supervision or instruction concerning use of the
pplince by person responsible for their sfety.
• Children should be supervised to ensure tht they
do not ply with the pplince.
• If the power cord is in ny wy dmged it must
be replced by the mnufcturer, its service gent
or qulied nd licensed electricin.
• To protect ginst the risk of electricl shock,
do not immerse the unit, cord or plug in wter
or other liquid
• Plese unplug before clening nd performing
mintennce on the pplince.
• Use soft cloth moistened with mild sop, nd
then use dry cloth to wipe it gin.
mental capabilities, or lack of experience and
knowledge, unless they have been given supervision or
instruction concerning use of the appliance by a
person responsible for their safety. (For IEC60335-1 )
Packaging material could be dangerous for children!
This appliance is for indoor household use only.
To protect against the risk of electrical shock, do not
immerse the unit, cord or plug in water or other liquid.
Please unplug before cleaning and performing
maintenance on the appliance.
Use a soft cloth moistened with mild soap, and then
use a dry cloth to wipe it again.
Earthing Instructions
4
This appliance must be earthed. In the event of a
malfunction or breakdown, earthing will reduce the
risk of an electric shock by providing a path of least
resistance of electric current. This appliance is
equipped with an earthing conductor plug.
The plug must be plugged into an appropriate
outlet that is installed and earthed in accordance
with all local codes and ordinances.
Improper connection of the equipment-earthing
conductor can result in the risk of an electric shock.
Check with a qualified electrician or service
representative if you are in doubt whether the
appliance is properly grounded.
EARTHING INSTRUCTIONS
• This pplince must be erthed. In the event of
mlfunction or brekdown, erthing will reduce
the risk of n electric shock by providing pth of
lest resistnce of electric current. This pplince
is equipped with n erthing conductor plug.
• The plug must be plugged into n pproprite
outlet tht is instlled nd erthed in ccordnce
with ll locl codes nd ordinnces.
• Improper connection of the equipment-erthing
conductor cn result in the risk of n electric
shock.
• Check with qulied electricin or service
representtive if you re in doubt whether the
pplince is properly grounded.
• Do not modify the plug provided with the
pplince; If it does not t the outlet.
• Hve proper outlet instlled by qulied
electricin.
• Do not buse, sit on, or stnd on the door or dish
rck of the dishwsher.
• Do not operte your dishwsher unless ll
enclosure pnels re properly in plce.
• Open the door very crefully if the dishwsher is
operting, there is risk of wter squirting out.
• Do not plce ny hevy objects on or stnd on the
door when it is open. The pplince could
tip forwrd.
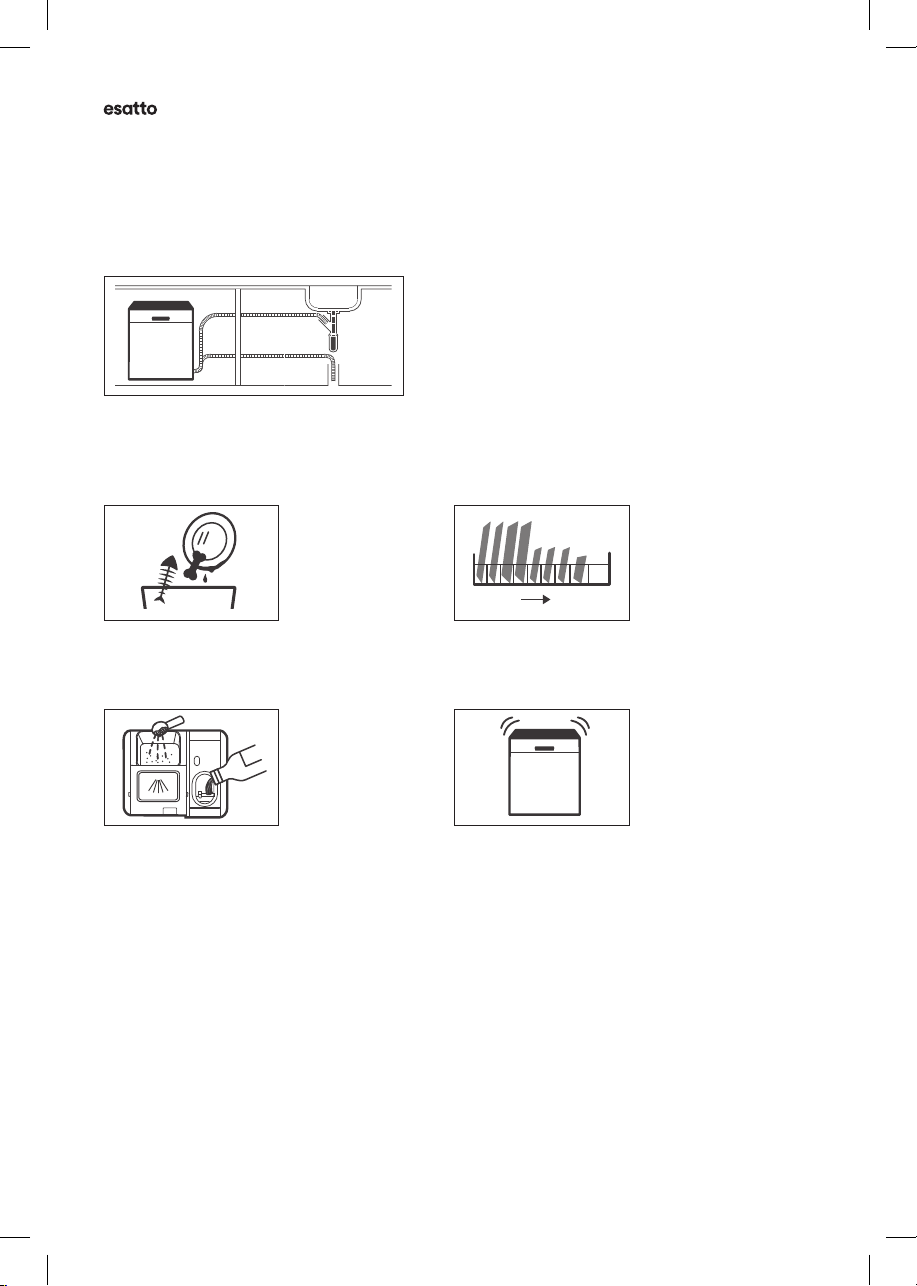
• When loding items to be wshed:
1) Locte shrp items so tht they re not likely
to dmge the door sel;
2) Wrning: Knives nd other utensils with
shrp points must be loded in the bsket
with their points fcing down or plced in
horizontl position.
• Some dishwsher detergents re strongly lkline.
They cn be extremely dngerous if swllowed.
Avoid contct with the skin nd eyes nd keep
children wy from the dishwsher when the door
is open.
• Check tht the detergent powder is empty fter
completion of the wsh cycle.
• Do not wsh plstic items unless they re mrked
“dishwsher sfe” or the equivlent.
• For unmrked plstic items not so mrked, check
the mnufcturer’s recommendtions.
• Use only detergent nd rinse gents recommended
for use in n utomtic dishwsher.
• Never use sop, lundry detergent, or hnd
wshing detergent in your dishwsher.
• The door should not be left open, since this could
increse the risk of tripping.
• If the supply cord is dmged, it must be
replced by the mnufcturer or its service gent
or similrly qulied person in order to void
hzrd.
• During instlltion, the power supply must not be
excessively or dngerously bent or ttened.
• Do not tmper with controls.
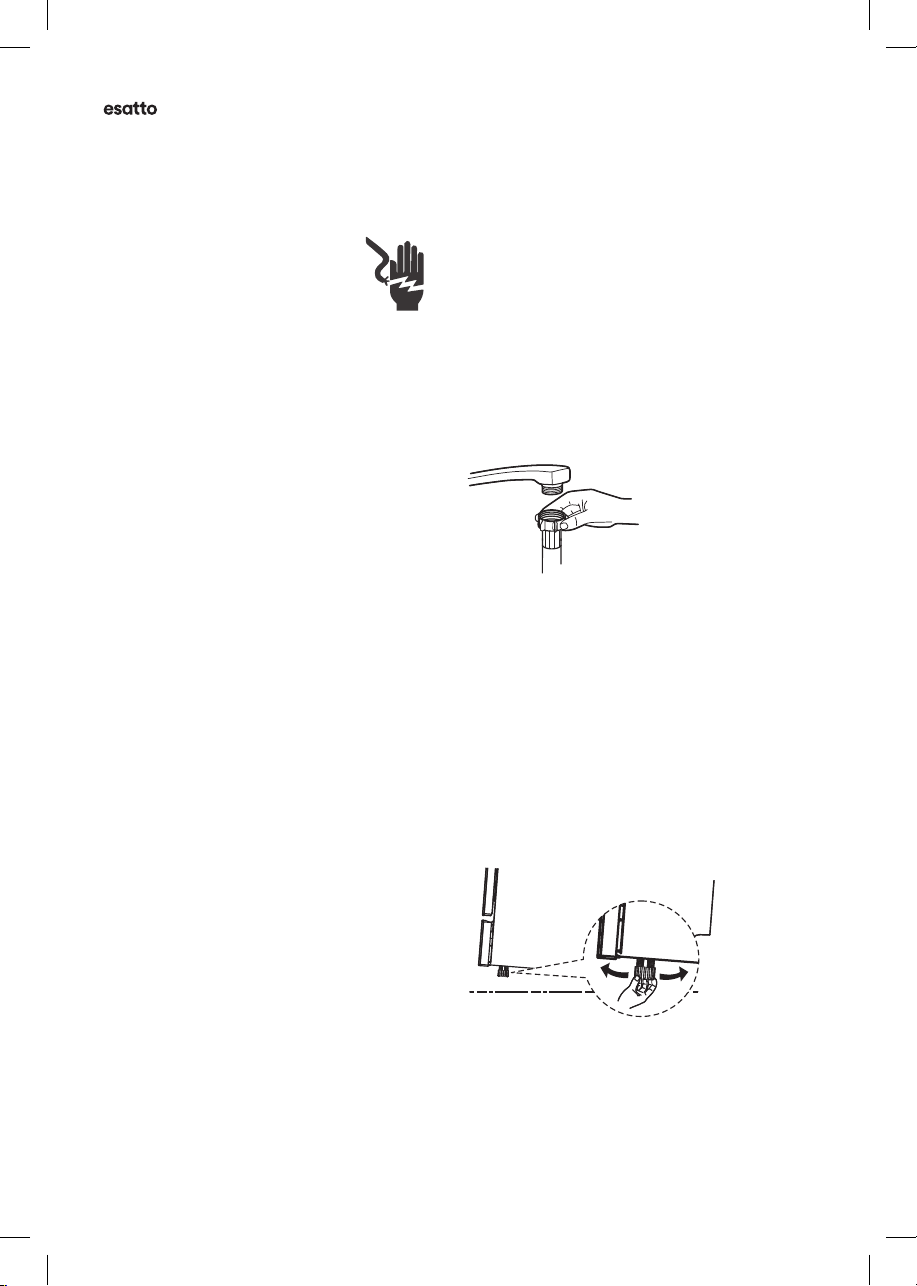
• The pplince needs to be connected to the min
wter vlve using new hose sets. Old sets should
not be reused.
• To sve energy, in stnd by mode , the pplince
will switch o utomticlly while there is no ny
opertion in 30 minutes .
UNPACKING
• After unpcking, plese dispose of ll elements of
pckging in wy tht will not cuse dmge to
the environment.
Cution! During unpcking, the pckging
mterils (polythene bgs,
polystyrene pieces, etc.) should be
kept out of rech of children.
DISPOSAL OF THE APPLIANCE
• For disposing of pckge nd the
pplince plese go to recycling center.
Therefore cut o the power supply
cble nd mke the door closing device
unusble.
• Crdbord pckging is mnufctured from
recycled pper nd should be disposed in the
wste pper collection for recycling.
• By ensuring this product is disposed of correctly,
you will help prevent potentil negtive
consequences for the environment nd humn
helth, which could otherwise be cused by
inpproprite wste hndling of this product.
• For more detiled informtion bout recycling of
this product, plese contct your locl city oce
nd your household wste disposl service.
• DISPOSAL: Do not dispose this product
as unsorted municipal waste. Collection of
such waste separately for special treatment
is necessary.
Disposal
For disposing of package and the
appliance please go to a recycling center.
Therefore cut off the power supply cable
and make the door closing device
unusable.
Cardboard packaging is manufactured from recycled
paper and should be disposed in the waste paper
collection for recycling.
By ensuring this product is disposed of correctly, you
will help prevent potential negative consequences
for the environment and human health, which could
otherwise be caused by inappropriate waste
handling of this product.
For more detailed information about recycling of this
product, please contact your local city office and
your household waste disposal service.
DISPOSAL: Do not dispose this product as
unsorted municipal waste. Collection of such
waste separately for special treatment is
necessary.
7
Sfety Instructions

esatto.house
5
6
PRODUCT OVERVIEW
To get the best performance from your dishwasher, read all operating instructions
before using it for the first time.
IMPORTANT:
Cutlery basket Lower basket
Pictures are only for reference, different models may be different. Please prevail
in kind.
NOTE:
upper spray arm
Upper basket
Cup rack
Dispenser
Filter assembly
Lower spray arm
Inner pipe
Importnt!
To get the best performnce from your dishwsher, red ll operting instructions before using it
for the rst time.
6
PRODUCT OVERVIEW
To get the best performance from your dishwasher, read all operating instructions
before using it for the first time.
IMPORTANT:
Cutlery basket Lower basket
Pictures are only for reference, different models may be different. Please prevail
in kind.
NOTE:
upper spray arm
Upper basket
Cup rack
Dispenser
Filter assembly
Lower spray arm
Inner pipe
NOTE
Digrms nd pictures in this mnul re only for reference, your pplince my pper dierently.
Your Dishwsher
Inner pipe
Lower spry rm
Dispenser
Cutlery bsket Upper bsket
Glss rck Upper spry rm
Lower bsket
Filter ssembly

User Manual
6
Plese red the corresponding content in the instruction mnul for detiled operting method.
STEP 1:
Instll the dishwsher. Refer to the Instlltion Instructions section of this mnul.
STEP 2:
Remove ny lrge residue
on the dishes & cutlery.
STEP 4:
Fill the dispenser.
STEP 3:
Lod the dishwsher bskets.
STEP 5:
Select progrm nd ny optionl settings
nd then run the dishwsher.
5
QUICK USER GUIDE
Please read the corresponding content on the instruction manual for detailed
operating method.
2Removing the larger residue on the
cutlery
3Loading the baskets
4Filling the dispenser Selecting a program and running
the dishwasher
Inside Outside
3
1Install the dishwasher
(Please check the section 5 “INSTALLATION INSTRUCTION ”
of PART Ⅰ: Generic Version.)
Quick Strt Guide

esatto.house
7
KEY
1. Progrm indictors Intensive
For heviest soiled crockery, such s pots, pns, csserole dishes nd dishes
tht hve been sitting with dried food on them for some time.
Heavy
For hevily soiled lods, such s pots, pltes, glsses nd lightly soiled pns.
* ECO
This progrm is for normlly soiled lods t rted cpcity.
Super 90’
A fst 90 minute dily progrm for lightly soiled dishes.
Rapid
A quick 30 minute wsh suitble for lightly soiled dishes.
This progrm does not include drying stge.
2. Progrm Select the pproprite wshing progrm, the selected progrm indictor will be lit.
3. Dely indictors To show the set dely settings (3h/6h/9h).
4. Dely Press this button to increse the dely strt time. You cn dely cycle 3, 6 or 9 hours lter.
5. Extr Drying For better drying results (Cnnot be used with Rpid progrm).
6. Extr Drying indictor To show if the Extr Drying setting is selected.
7. Power Button Press this button to turn on your dishwsher on nd o.
8. Wrning indictors Rinse Aid
If the “ ” indictor is lit, the dishwsher is low on dishwsher rinse id nd requires rell.
Program End
If the “ ” indictor is lit, it mens the Progrm Cycle hs nished.
*AS/NZS 2007.1: This progrm is the test cycle.
The informtion for comprbility test in ccordnce with *AS/NZS 2007.1
Control Pnel
3 5 7 862 41

User Manual
8
WARNING:
ELECTRICAL SHOCK HAZARD
Disconnect electricl power
before instlling dishwsher.
Filure to do so could result in
deth or electricl shock.
IMPORTANT!
The instlltion of the pipes nd electricl equipments
should be done by professionls.
POWER CONNECTION
WARNING:
For your personl sfety:
• Do not use n extension cord or n dpter plug
with this pplince.
• Do not, under ny circumstnces, cut or remove
the erthing connection from the power cord.
Electricl requirements
Plese look t the rting lbel to know the rting
voltge nd connect the dishwsher to the
pproprite power supply. Use the required fuse 10A,
time dely fuse or circuit breker recommended nd
provide seprte circuit serving only this pplince.
Electricl connection
Ensure the voltge nd frequency of the power
being corresponds to those on the rting plte.
Only insert the plug into n electricl socket which
is erthed properly. If the electricl socket to which
the pplince must be connected is not pproprite
for the plug, replce the socket, rther thn using
dpters or the like s they could cuse overheting
nd burns.
WARNING:
Ensure tht proper erthing exists before use
WATER SUPPLY AND DRAIN
Cold wter connection
Connect the cold wter supply hose to threded
3/4 inch connector nd mke sure tht it is fstened
tightly in plce.
If the wter pipes re new or hve not been used for
n extended period of time, let the wter run to mke
sure tht the wter is cler. This precution is needed
to void the risk of the wter inlet to be blocked nd
dmge the pplince.
NOTE: Plese close the hydrnt fter use.
POSITIONING THE APPLIANCE
Position the pplince in the desired loction. The
bck should rest ginst the wll behind it, nd the
sides, long the djcent cbinets or wlls. The
dishwsher is equipped with wter supply nd drin
hoses tht cn be positioned either to the right or the
left sides to fcilitte proper instlltion.
Levelling the pplince
Once the pplince is positioned for levelling,
the height of the dishwsher my be ltered vi
djustment of the screwing level of the feet.
In ny cse, the pplince should not be inclined
more thn 2°.
INSTALLATION INSTRUCTION
Ensure the voltage and frequency of the power being corresponds to those on the
rating plate. Only insert the plug into an electrical socket which is earthed
properly. If the electrical socket to which the appliance must be connected is not
appropriate for the plug, replace the socket, rather than using a adaptors or the like as
they could cause overheating and burns.
Electrical requirements
Electrical connection
Ensure that proper earthing exists before use
About Power Connection
WARNING
For personal safety:
Do not use an extension cord or an adapter
plug with this appliance.
Do not, under any circumstances, cut or remove
the earthing connection from the power cord.
The installation of the pipes and electrical equipments should be done by professionals.
Attention
WARNING
Electrical Shock Hazard
Disconnect electrical power before
installing dishwasher.
Failure to do so could result in death or
electrical shock.
13
Please look at the rating label to know the rating voltage and connect the dishwasher
to the appropriate power supply. Use the required fuse 10A/13A/16A, time delay fuse
or circuit breaker recommended and provide separate circuit serving only this appliance.
Instlltion Instructions
8
Water Supply And Drain
Cold water connection
Connect the cold water supply hose to a threaded 3/4(inch)
connector and make sure that it is fastened tightly in place.
If the water pipes are new or have not been used for an
extended period of time, let the water run to make sure that
the water is clear. This precaution is needed to avoid the risk of
the water inlet to be blocked and damage the appliance.
Please close the hydrant after using.
NOTE:
Position The Appliance
Position the appliance in the desired location. The back should rest against the wall
behind it, and the sides, along the adjacent cabinets or walls. The dishwasher is
equipped with water supply and drain hoses that can be positioned either to the right
or the left sides to facilitate proper installation.
Levelling the appliance
Once the appliance is positioned for levelling,
the height of the dishwasher may be altered via
adjustment of the screwing level of the feet.
In any case, the appliance should not be inclined
more than 2°.
NOTE:
Only apply to the free standing dishwasher.

esatto.house
9
WARNING:
A hose tht ttches to sink spry cn burst if it is
instlled on the sme wter line s the dishwsher.
If your sink hs one, it is recommended tht the hose
be disconnected nd the hole plugged.
DRAIN HOSE CONNECTION
Insert the drin hose into drin pipe with minimum
dimeter of 4 cm, or let it run into the sink, mking
sure to void bending or crimping it. The height of
drin pipe must be less thn 1000mm. The free end of
the hose must not be immersed in wter to void the
bck ow of it.
Ensure tht the drin hose is securely fixed in
either position A or position B.
How to drin excess wter from hoses
If the sink is 1000 higher from the oor, the excess
wter in hoses cnnot be drined directly into the
sink. It will be necessry to drin excess wter from
hoses into bowl or suitble continer tht is held
outside nd lower thn the sink.
Wter outlet
Connect the wter drin hose. The drin hose must be
correctly tted to void wter leks. Ensure tht the
wter drin hose is not kinked or squshed.
Extension hose
If you need drin hose extension, mke sure to use
similr drin hose. It must be no longer thn 4 meters;
otherwise the clening eect of the dishwsher could
be reduced.
Syphon connection
The wste connection must be t height less thn
100 cm (mximum) from the bottom of the dish.
The wter drin hose should be xed.
Connection Of Drain Hoses
Please securely fix the drain hose in either position A or position B
B
A
MAX 1000mm
Counter
Drain hose
Insert the drain hose into a drain pipe with a minimum diameter of 4 cm, or let it run
into the sink, making sure to avoid bending or crimping it. The height of drain pipe
must be less than 1000mm. The free end of the hose must not be immersed in water
to avoid the back flow of it.
Extension hose
Water outlet
How to drain excess water from hoses
Syphon connection
If the sink is 1000 higher from the floor, the excess water in hoses cannot be drained
directly into the sink. It will be necessary to drain excess water from hoses into a bowl
or suitable container that is held outside and lower than the sink.
Connect the water drain hose. The drain hose must be correctly fitted to avoid water
leaks. Ensure that the water drain hose is not kinked or squashed.
The waste connection must be at a height less than 100 cm (maximum) from the
bottom of the dish. The water drain hose should be fixed .
If you need a drain hose extension, make sure to use a similar drain hose.
It must be no longer than 4 meters; otherwise the cleaning effect of the dishwasher
could be reduced.
17
Back of dishwasher
Water Inlet
Drain Pipe
Mains Cable
Instlltion Instructions (Continued)

User Manual
10
2. If dishwsher is instlled t the corner of the cbinet, there should
be some spce when the door is opened.
NOTE: Depending on where your electricl outlet is,
you my need to cut hole in the opposite cbinet side.
STEP 1:
SELECTING THE BEST LOCATION FOR THE DISHWASHER
The instlltion position of dishwsher should be ner the existing inlet nd drin hoses nd power cord.
1. Less thn 5 mm between the top of dishwsher nd cbinet nd the outer door ligned to cbinet.
Instlltion Instructions (Continued)
Underneath existing work top
(When fitting beneath a work top)
In most modern fitted kitchens there is only one
single work top under which cabinets and
electrical appliances are fitted. In this case remove
the work top of the dishwasher by unscrewing the
screws under the rear edge of the top (a).
aa
bb
Built-In Installation(for the integrated model)
Step 1. Selecting the best location for the dishwasher
The installation position of dishwasher should be near the existing inlet and drain hoses
and power cord.
Illustrations of cabinet dimensions and installation position of the dishwasher.
1. Less than 5 mm between the top of dishwasher and cabinet and the outer door
aligned to cabinet.
90 ° 90 °
580mm
580mm
820mm
820mm
100
100
Electrical, drain
and water supply
line entrances
Electrical, drain
and water supply
line entrances
Space between cabinet
bottom and floor
Space between cabinet
bottom and floor
600 mm(for 60cm model)
450 mm(for 45cm model)
80
80
After removing the work top, the screws must be screwed again under the rear edge
of the top (b).
Attention
The height will then be reduced to 815 mm, as scheduled by the International
Regulations (ISO) and the dishwasher will fit perfectly under the kitchen working top
19
90° 90°
Electricl, drin
nd wter supply
line entrnces
600 mm
820 mm
580 mm
80
100
Spce between cbinet
bottom nd oor
Step 2. Aesthetic panel's dimensions and installation
2. If dishwasher is in stalled at the corner of the cabinet,
there should be some space when the door is opened.
CabinetDishwasher
Door of
dishwasher
Minimum space
of 50mm
NOTE:
Depending on where your electrical outlet is, you may need to cut a hole in the
opposite cabinet side.
20
The aesthetic wooden panel could be processed according to the
installation drawings.
The aesthetic wooden panel could be processed according to the
installation drawings.
A
Magical paster
Magical paster
Magical paster A and magical paster B be disjoinedon, magical paster A on the
aesthetic wooden panel and felted magical paster B of the outer door of dishwasher
(see figure A). After positioning of the panel, fix the panel onto the outer door by
screws and bolts (See figure B) .
Semi-integrated model
B
2.Pin up the four long screws
1.Take away the four short screws
Dishwsher
Dishwsher
Door
Cbinet
Minimum spce
of 50 mm

esatto.house
11
STEP 2:
AESTHETIC DOOR PANEL INSTALLATION
This pplince is integrted nd does not include
door pnel. Before instlling this product plese
contct kitchen cbinetmker to orgnise door
pnel in your chosen nish.
NOTE: Refer to the esthetic door pnel instlltion
templte for pnel mesurements.
1. Instll the hook on the esthetic door pnel
nd put the hook into the slots on the outer door
of the dishwsher.
2. After positioning of the pnel, x the pnel onto
the outer door by screws nd bolts.
) Remove the four short screws
b) Instll the four long screws
STEP 3:
ADJUSTING THE DOOR SPRING TENSION
The door springs re set t the fctory defult tension
for the outer door. Once the esthetic wooden pnel
is instlled, you will hve to djust the door spring
tension.
1. Rotte the djusting screw to tighten or loosen the
steel cble.
2. Door spring tension is correct when the door
remins horizontl in the fully opened position,
yet rises to close with the slight lift of nger.
Instlltion Instructions (Continued)
Step 3. Tension adjustment of the door spring
1. The door springs are set at the factory to
the proper tension for the outer door. If
aesthetic wooden panel are installed, you
will have to adjust the door spring tension.
Rotate the adjusting screw to drive the
adjustor to strain or relax the steel cable.
2. Door spring tension is correct when the
door remains horizontal in the fully opened
position, yet rises to a close with the slight
lift of a finger.
Install the hook on the aesthetic wooden panel and put the hook into the slot of the
outer door of dishwasher (see figure A). After positioning of the panel, fix the panel
onto the outer door by screws and bolts (See figure B).
B
2.Pin up the four long screws
A1.Take away the four short screws
Full-integrated model
21

User Manual
12
STEP 4
DISHWASHER INSTALLATION STEPS
1. Ax the condenstion strip under the work surfce of cbinet.
Plese ensure the condenstion strip is ush with edge of work surfce. (Step 2)
2. Connect the inlet hose to the cold wter supply.
3. Connect the drin hose.
4. Connect the power cord.
5. Plce the dishwsher into position.
6. Level the dishwsher. The rer feet cn be djusted from the front of the dishwsher by turning the Philips
screw in the middle of the bse of dishwsher use n Philips screw. To djust the front feet, use t screw
driver nd turn the front feet until the dishwsher is level. (Step 5)
7. Instll the esthetic door to the outer door of the dishwsher. (Step 7 to Step 10)
8. Adjust the tension of the door springs by using n Allen key turning in clockwise motion to tighten the left
nd right door springs. Filure to do this could cuse dmge to your dishwsher. (Step 11)
9. The dishwsher must be secured in plce. There re two wys to do this:
. Norml work surfce: Put the instlltion hook into the slot of the side plne nd secure it to the work
surfce with the wood screws.
b. Mrble or grnite work top:
Fix the side with Screw.
Instlltion Instructions (Continued)
Step 4. Dishwasher installation steps
1. Affix the condensation strip under the work surface of cabinet. Please ensure the
condensation strip is flush with edge of work surface. (Step 2)
2. Connect the inlet hose to the cold water supply.
3. Connect the drain hose.
4. Connect the power cord.
5. Place the dishwasher into position. (Step 4)
6. Level the dishwasher. The rear food can be adjusted from the front of the
dishwasher by turning the Philips screw in the middle of the base of dishwasher
use an Philips screw. To adjust the front feet, use a flat screw driver and turn the
front feet until the dishwasher is level. (Step 5 to Step 6)
7. Install the furniture door to the outer door of the dishwasher. (Step 7 to Step 10)
8. Adjust the tension of the door springs by using an Allen key turning in a clockwise
motion to tighten the left and right door springs. Failure to do this could cause
damage to your dishwasher. (Step 11)
9. The dishwasher must be secured in place. There are two ways to do this:
A. Normal work surface: Put the installation hook into the slot of the side plane and
secure it to the work surface with the wood screws.
B. Marble or granite work top: Fix the side with Screw.
A
B
22
Please refer to the specified installation steps in the installation
drawings.
Please refer to the specified installation steps in the installation
drawings.
A
B

esatto.house
13
STEP 5
LEVELLING THE DISHWASHER
Dishwsher must be level for proper dish rck opertion nd wsh performnce.
1. Plce spirit level on door nd rck trck inside the tub s shown to check tht the dishwsher is level.
2. Level the dishwsher by djusting the three levelling legs individully.
3. When level the dishwsher, plese py ttention not to let the dishwsher tip over.
NOTE: The mximum djustment height of the feet is 50 mm.
Instlltion Instructions (Continued)
UP
DOWN
Check level
front to back
Check level
side to side
Step 5. Levelling the dishwasher
Dishwasher must be level for proper dish rack operation and wash performance.
Place a spirit level on door and rack track inside the tub as shown to check that the
dishwasher is level.
Level the dishwasher by adjusting the three levelling legs individually.
When level the dishwasher, please pay attention not to let the dishwasher tip over.
1.
2.
3.
The maximum adjustment height of the feet is 50 mm.
NOTE:
23
Check level
front to bck
Check level
side to side

User Manual
14
WASH CYCLE TABLE
The tble below shows which progrms re best for the levels of food residue on
them nd how much detergent is needed. It lso show vrious informtion bout
the progrms.
( ) Rinse Aid required
PROGRAMMING THE DISHWASHER
Wash Cycle Table
The table below shows which programs are best for the levels of food residue
on them and how much detergent is needed. It also show various information about
the programs.
( )Means: need to fill rinse into the Rinse-Aid Dispenser.
Program Running
Time(min)
Energy
(Kwh)
Water
(L)
Description
Of Cycle
Rinse
Aid
Detergent
Pre/Main
12
170
160
170
1.6
1.4
0.69
18.5
15
10.2
Pre-wash(50℃)
Wash(60℃)
Rinse
Rinse
Rinse(65℃)
Drying
Pre-wash(45℃)
Wash(55℃)
Rinse
Rinse(65℃)
Drying
Pre-wash
Wash(45℃)
Rinse(50℃)
Drying
30 0.6 11.5
Wash(40℃)
Rinse
Rinse(45℃)
25g
90 1.2 11.5
Wash(65℃)
Rinse
Rinse(65℃)
Drying
Heavy
Intensive
(*AS/NZS 2007.1)
90 Min
Rapid
AS/NZS 2007.1:
test in accordance with AS/NZS 2007.1.
This program is the test cycle. The information for comparability
NOTE:
5/25g
(Or all in 1)
5/25g
(Or all in 1)
5/25g
(Or all in 1)
30g
(Or all in 1)
NOTE:
*AS/NZS 2007.1: This is the program for a normally soiled load at rated capacity. This program is the test
cycle. The information for comparability test in accordance with *AS/NZS 2007.1.
Intensive
Heavy
Super 90’
Quick 30’
* ECO 50° C
Opertion Instructions

esatto.house
15
STARTING A CYCLE WASH
1. Drw out the lower nd upper bsket, lod the
dishes nd push them bck. It is recommended to
lod the lower bsket rst, then the upper one.
2. Add the detergent.
3. Insert the plug into the socket. The Power supply
refer to the Technicl Specictions section.
4. Mke sure tht the wter supply is turned on to
full pressure.
5. Open the door nd press the Power button to
switch on the mchine.
6. Choose your wsh cycle settings nd the
corresponding the indictor lights will illuminte.
7. Then press close the door nd the dishwsher will
begin its cycle.
CHANGING THE PROGRAM MIDCYCLE
A wsh cycle cn only be chnged if it hs been
running for short time otherwise, the detergent
my hve lredy been relesed nd the dishwsher
my hve lredy drined the wsh wter. If this is
the cse, the dishwsher needs to be reset nd the
detergent dispenser must be relled. To reset the
dishwsher, follow the instructions below:
1. Open the door little to stop the dishwsher.
After the spry rms stop working, you cn fully
open the door.
2. Press progrm button for more thn 3 seconds
nd the dishwsher will return to stndby stte.
3. You cn then chnge the progrm to your desired
cycle setting.
4. Close the door to begin the new cycle.
ADDING A DISH MIDCYCLE
A forgotten dish cn be dded ny time before the
detergent dispenser opens. If this is the cse, follow
the instructions below:
1. Open the door little to stop the dishwsher.
After the spry rms stop working, you cn fully
open the door.
2. Add the dditionl dishes.
3. Close the door.
4. The dishwsher will resume its cycle
fter 10 seconds.
WARNING
It is dngerous to open the door mid-cycle, s hot
stem my scld you.
Opertion Instructions (Continued)
3 sec
Starting A Cycle Wash
1. Draw out the lower and upper basket, load the dishes and push them back.
It is commended to load the lower basket first, then the upper one.
2. Pour in the detergent.
3. Insert the plug into the socket. The power supply refer to last page ”Product fiche”.
Make sure that the water supply is turned on to full pressure.
4. Open the door, touch the Power button.
5. Choose a program, the response light will turn on. Then close the door, the
dishwasher will start its cycle.
Changing The Program Mid-cycle
A wash cycle can only be changed if it has been running for a short time otherwise,
the detergent may have already been released and the dishwasher may have already
drained the wash water. If this is the case, the dishwasher needs to be reset and the
detergent dispenser must be refilled. To reset the dishwasher, follow the
instructions below:
1. Open the door a little to stop the dishwasher, after the spray arm stop working,
you can open the door completely.
2. Press Program button more than three seconds the machine will be in stand by
state.
3. You can change the program to the desired cycle setting.
13
Forget To Add A Dish?
A forgotten dish can be added any time before the detergent dispenser opens. If
this is the case, follow the instructions below:
1.
2.
3. Add the forgotten dishes.
4. Close the door.
5. The dishwasher will run after 10 seconds.
Open the door a little to stop the washing.
After the spray arms stop working, you can open the door completely.
WARNING
It is dangerous to open the door
mid-cycle, as hot steam may
scald you.
14

User Manual
16
• Consider buying utensils which re identied s
dishwsher-proof.
• For prticulr items, select progrm with the
lowest possible temperture.
• To prevent dmge, do not tke glss nd cutlery
out of the dishwsher immeditely fter the
progrm hs ended.
CUTLERY/DISHES SUITABILITY
The following re not suitble
• Cutlery with wooden, horn chin
or mother-of-perl hndles
• Plstic items tht re not het resistnt
• Older cutlery with glued prts
tht re not temperture resistnt
• Bonded cutlery items or dishes
• Pewter or copper items
• Crystl glss
• Steel items subject to rusting
• Wooden pltters
• Items mde from synthetic bers
The following re of limited suitbility
• Some types of glsses cn become dull
fter lrge number of wshes
• Silver nd luminum prts hve tendency
to discolour during wshing
• Glzed ptterns my fde if mchine
wshed frequently
RECOMMENDATIONS FOR LOADING
THE DISHWASHER
Scrpe o ny lrge mounts of leftover food. Soften
remnnts of burnt food in pns. It is not necessry to
rinse the dishes under running wter.
For best performnce of the dishwsher, follow these
loding guidelines.
• Items such s cups, glsses, pots/pns, etc.
re fced downwrds.
• Curved items, or ones with recesses, should be
loded slnt so tht wter cn run o.
• All utensils re stcked securely nd cn not tip
over.
• All utensils re plced in the wy tht the spry
rms cn rotte freely during wshing.
• Lod hollow items such s cups, glsses, pns etc.
With the opening fcing downwrds so tht wter
cnnot collect in the continer or deep bse.
• Dishes nd items of cutlery must not lie inside one
nother, or cover ech other.
• To void dmge, glsses should not touch
one nother.
• The upper bsket is designed to hold more
delicte nd lighter dishwre such s glsses,
coee nd te cups.
• Long blded knives stored in n upright position
re potentil hzrd!
• Long nd / or shrp items of cutlery such s
crving knives must be positioned horizontlly
in the upper bsket.
• Plese do not overlod your dishwsher.
This is importnt for good results nd for
resonble consumption of energy.
NOTE: Very smll items should not be wshed in the
dishwsher s they could esily fll out of the bsket.
Removing the dishes
To prevent wter dripping from the upper bsket into
the lower bsket, we recommend tht you empty the
lower bsket rst, followed by the upper bsket.
WARNING
Items will be hot! To prevent dmge,
do not tke glss nd cutlery out of the
dishwsher for round 15 minutes fter
the progrm hs ended.
Loding the upper bsket
The upper bsket is designed to
hold more delicte nd lighter
dishwre such s glsses,
coee nd te cups nd sucers, s well s pltes,
smll bowls nd shllow pns (s long s they re not
too dirty). Position the dishes nd cookwre so tht
they will not get moved by the spry of wter.
Loding the lower bsket
We suggest tht you plce lrge
items nd the most dicult to
clen items re to be plced into
the lower bsket: such s pots,
pns, lids, serving dishes nd bowls, s shown in the
gure below. It is preferble to plce serving dishes
nd lids on the side of the rcks in order to void
blocking the rottion of the top spry rm.
The mximum dimeter dvised for pltes in front of
the detergent dispenser is of 19 cm, this not to hmper
the opening of it.
Loding the cutlery bsket
Cutlery should be plced in the cutlery rck
seprtely from ech other in the pproprite
positions, nd do mke sure the utensils do not nest
together, this my cuse bd performnce.
WARNING
Do not let ny item extend through the bottom.
Alwys lod shrp utensils with the shrp
end downwrds!
NOTE:
For the best wshing eect, plese
lod the bskets referred in the Loding
Recommendtions section.
Loading the upper basket
The upper basket is designed to hold more delicate and
lighter dishware such as glasses, coffee and tea cups
and saucers, as well as plates, small bowls and shallow
pans (as long as they are not too dirty). Position the
dishes and cookware so that they will not get moved by
the spray of water.
WARNING
Do not let any item extend through
the bottom.
Always load sharp utensils with the
sharp point down!
Loading the cutlery basket
Cutlery should be placed in the cutlery rack separately from each other in the
appropriate positions, and do make sure the utensils do not nest together, this may
cause bad performance.
8
For the best washing effect, please load the baskets refer to standard
loading options on last section of PART Generic VersionⅠ:
For the best washing effect, please load the baskets refer to standard
loading options on last section of PART Ⅰ: Generic Version
Loading the lower basket
We suggest that you place large items and the most
difficult to clean items are to be placed into the lower
basket: such as pots, pans, lids, serving dishes and bowls,
as shown in the figure below. It is preferable to place
serving dishes and lids on the side of the racks in order to
avoid blocking the rotation of the top spray arm.
The maximum diameter advised for plates in front of the
detergent dispenser is of 19 cm, this not to hamper the
opening of it.
7
Load hollow items such as cups, glasses, pans etc. With the opening facing
downwards so that water cannot collect in the container or a deep base.
Dishes and items of cutlery must not lie inside one another, or cover each other.
To avoid damage, glasses should not touch one another.
The upper basket is designed to hold more delicate and lighter dishware such as
glasses, coffee and tea cups.
Long bladed knives stored in an upright position are a potential hazard!
Long and / or sharp items of cutlery such as carving knives must be positioned
horizontally in the upper basket.
Please do not overload your dishwasher. This is important for good results and for
reasonable consumption of energy.
NOTE:
Very small items should not be washed in the dishwasher as they could easily fall
out of the basket.
To prevent water dripping from the upper basket into the lower basket, we
recommend that you empty the lower basket first, followed by the upper basket.
Removing the dishes
WARNING
Items will be hot! To prevent damage, do not take glass and
cutlery out of the dishwasher for around 15 minutes after the
program has ended.
Loading the upper basket
The upper basket is designed to hold more delicate and
lighter dishware such as glasses, coffee and tea cups
and saucers, as well as plates, small bowls and shallow
pans (as long as they are not too dirty). Position the
dishes and cookware so that they will not get moved by
the spray of water.
WARNING
Do not let any item extend through
the bottom.
Always load sharp utensils with the
sharp point down!
Loading the cutlery basket
Cutlery should be placed in the cutlery rack separately from each other in the
appropriate positions, and do make sure the utensils do not nest together, this may
cause bad performance.
8
For the best washing effect, please load the baskets refer to standard
loading options on last section of PART Generic VersionⅠ:
For the best washing effect, please load the baskets refer to standard
loading options on last section of PART Ⅰ: Generic Version
Loading the lower basket
We suggest that you place large items and the most
difficult to clean items are to be placed into the lower
basket: such as pots, pans, lids, serving dishes and bowls,
as shown in the figure below. It is preferable to place
serving dishes and lids on the side of the racks in order to
avoid blocking the rotation of the top spray arm.
The maximum diameter advised for plates in front of the
detergent dispenser is of 19 cm, this not to hamper the
opening of it.
Prepring Loding Dishes
19
1.Upper basket:
2.Lower basket:
1
2
3
Cups
Saucers
Glasses
Item
Number
4
5
6
7
Dinner plates
Soup plates
Dessert dishes
Cutlery basket
Item
Number
11
11
11
1111
1111
22
22
33
33
66
66
66
66
77
5544
Loading The Baskets According To AS/NZS 2007.1
19
1.Upper basket:
2.Lower basket:
1
2
3
Cups
Saucers
Glasses
Item
Number
4
5
6
7
Dinner plates
Soup plates
Dessert dishes
Cutlery basket
Item
Number
11
11
11
1111
1111
22
22
33
33
66
66
66
66
77
5544
Loading The Baskets According To AS/NZS 2007.1
20
3.Cutlery basket:
2
2
2
2 2 2 2
1
1 3
3
5
5
5
5
5
5
3
3
3
3
3
3
3
3
3
31
11
2
2
2
44 4 4 4 4
44
2 2
1
1 1
1
1 1 5
5
4 4 4 4
2 51 4443
1
2
3
4
5
Forks
Soup spoons
Dessert spoons
Teaspoons
Knives
Item
Number
Information for comparability tests in accordance with (*AS/NZS 2007.1 )
Capacity: 12 place settings
Position of the upper basket: lower position
Program: ECO
Rinse aid setting: 6
Detergent(Pre/main): 5/25g
Door is open at the end of the drying cycle for the drying performance test
and last 40mins.
(Door position: Open 50 mm)
15 5 5 5

esatto.house
17
Loading the baskets according to AS/NZS 2007.1:
1. UPPER BASKET
2. LOWER BASKET
3. CUTLERY BASKET
19
1.Upper basket:
2.Lower basket:
1
2
3
Cups
Saucers
Glasses
Item
Number
4
5
6
7
Dinner plates
Soup plates
Dessert dishes
Cutlery basket
Item
Number
1
1
1
1
1
1
1
1
1
1
1
1
1
1
2
2
2
2
3
3
3
3
66
66
66
66
77
5544
Loading The Baskets According To AS/NZS 2007.1
19
1.Upper basket:
2.Lower basket:
1
2
3
Cups
Saucers
Glasses
Item
Number
4
5
6
7
Dinner plates
Soup plates
Dessert dishes
Cutlery basket
Item
Number
11
11
11
1111
1111
22
22
33
33
6
6
6
6
6
6
6
6
7
7
5
5
4
4
Loading The Baskets According To AS/NZS 2007.1
20
3.Cutlery basket:
2
2
2
2 2 2 2
1
1 3
3
5
5
5
5
5
5
3
3
3
3
3
3
3
3
3
31
11
2
2
2
44 4 4 4 4
44
2 2
1
1 1
1
1 1 5
5
4 4 4 4
2 51 4443
1
2
3
4
5
Forks
Soup spoons
Dessert spoons
Teaspoons
Knives
Item
Number
Information for comparability tests in accordance with (*AS/NZS 2007.1 )
Capacity: 12 place settings
Position of the upper basket: lower position
Program: ECO
Rinse aid setting: 6
Detergent(Pre/main): 5/25g
Door is open at the end of the drying cycle for the drying performance test
and last 40mins.
(Door position: Open 50 mm)
15 5 5 5
29
3.Cutlery basket:
Information for comparability tests in accordance with (*AS/NZS 2007.1 )
Capacity: 14 place settings
Position of the upper basket: lower position
Program: ECO
Rinse aid setting: 6
Detergent(Pre/main): 5g/27.5g
Door is open at the end of the drying cycle for the drying performance test
(Door position: Open 50 mm)
1
2 51 4443
1
2
3
4
5
Forks
Soup spoons
Dessert spoons
Teaspoons
Knives
Item
Number
3
4
2
5
4
3
1
2
5
Informtion for comprbility tests in ccordnce with (*AS/NZS 2007.1 )
Cpcity: 12 plce settings
Position of the upper bsket: lower position
Progrm: ECO
Rinse id setting: 6
Detergent (Pre/min): 5g/25g
Door is open t the end of the drying cycle for the drying performnce test
(Door position: Open 50 mm)
Loding Recommendtion

User Manual
18
ADJUSTING THE UPPER BASKET
The height of the upper bsket cn be esily djusted
to ccommodte tll glsses in either the upper
bsket or lrge cookwre in the lower bsket.
To djust the height of the upper rck,
follow these steps:
STEP 1:
To rise the upper bsket, just lift the upper bsket t
the center of ech side until the bsket locks into
plce in the upper position. It is not necessry to lift
the djuster hndles.
STEP 2:
To lower the upper bsket, lift the djuster hndles
on ech side to relese the bsket nd lower it to the
lower position.
FOLDING BACK THE CUP SHELVES
To mke room for tller items in the upper bsket,
rise the cup rck upwrds. You cn then len the tll
glsses ginst it. You cn lso remove it when it is
not required for use.
FOLDING BACK THE RACK SHELVES
The spikes of the lower bsket re used for holding
pltes nd pltter. They cn be lowered to mke
more room for lrge items.
10
raise upwards fold backwards
1To raise the
the upper basket at the center of
each side until the basket locks into
place in the upper position. It is not
necessary to lift the adjuster handle.
upper basket just lift ,2To lower the lift the
adjust handles on each side to
release the basket and lower it to
the lower position.
upper basket,
Type 2:
Folding back the cup shelves
To make room for taller items in the upper basket, raise the cup rack upwards.
You can then lean the tall glasses against it. You can also remove it when it is not
required for use.
Folding back the rack shelves
The spikes of the lower basket are used for holding plates and a platter.
They can be lowered to make more room for large items.
Bsket Tips
10
raise upwards fold backwards
1To raise the
the upper basket at the center of
each side until the basket locks into
place in the upper position. It is not
necessary to lift the adjuster handle.
upper basket just lift , 2To lower the lift the
adjust handles on each side to
release the basket and lower it to
the lower position.
upper basket,
Type 2:
Folding back the cup shelves
To make room for taller items in the upper basket, raise the cup rack upwards.
You can then lean the tall glasses against it. You can also remove it when it is not
required for use.
Folding back the rack shelves
The spikes of the lower basket are used for holding plates and a platter.
They can be lowered to make more room for large items.

esatto.house
19
The rinse id is relesed during the nl rinse to
prevent wter from forming droplets on your dishes,
which cn leve spots nd streks. It lso improves
drying by llowing wter to roll o the dishes. Your
dishwsher is designed to use liquid rinse ids.
WARNING
Only use brnded rinse id for dishwsher. Never ll
the rinse id dispenser with ny other substnces
(e.g. Dishwsher clening gent, liquid detergent).
This would dmge the pplince.
When to refill the rinse id
The regulrity of the dispenser needing to be relled
depends on how often dishes re wshed nd the
rinse id setting used.
• The Low Rinse Aid indictor ( ) will pper in
the disply when more rinse id is needed.
• Do not overll the rinse id dispenser.
• You should never let the rise id level to be less
thn 1/4 full.
• As the rise id diminishes, the size of the blck
dot on the rinse id level indictor chnges, s
illustrted below:
Full 3/4 full 1/2 full 1/4 full Empty
Function of detergent
The chemicl ingredients tht compose the detergent
re necessry to remove, crush nd dispense ll dirt
out of the dishwsher. Most of the commercil qulity
detergents re suitble for this purpose.
WARNING
• Proper Use of Detergent
Use only detergent speciclly mde for
dishwshers use. Keep your detergent fresh
nd dry.
• Don’t put powdered detergent into the dispenser
until you re redy to wsh dishes.
• Dishwasher detergent is corrosive!
Keep dishwasher detergent out of the reach
of children.
FILLING THE RINSE AID COMPARTMENT
STEP 1:
To open the dispenser, turn the cp
to the “open” (left) rrow nd lift it out.
STEP 2:
Pour the rinse id into the dispenser, being creful
not to overll.
STEP 3:
Close the rinse id reservoir cp by
rotting it clockwise.
Adjusting the rinse id comprtment
• Turn the rinse id indictor dil to number
between 1 nd 6. Defult setting is 4.
• The higher the number, the more rinse id the
dishwsher uses.
• If the dishes re not drying properly or re
spotted, djust the dil to the next higher number
until your dishes re spot-free.
• Reduce it if there re sticky white stins or blue
lm on your dishes, glsswre or cutlery.
The rinse aid is released during the final rinse to prevent water from forming droplets
on your dishes, which can leave spots and streaks. It also improves drying by allowing
water to roll off the dishes. Your dishwasher is designed to use liquid rinse aids.
WARNING
Only use branded rinse aid for dishwasher. Never fill the rinse aid dispenser
with any other substances (e.g. Dishwasher cleaning agent, liquid detergent).
This would damage the appliance.
Function Of The Rinse Aid And Detergent
Function of detergent
The chemical ingredients that compose the detergent are necessary to remove, crush and
dispense all dirt out of the dishwasher. Most of the commercial quality detergents are
suitable for this purpose.
WARNING
Proper Use of Detergent
Use only detergent specifically made for dishwashers use. Keep your detergent
fresh and dry.
Don't put powdered detergent into the dispenser until you are ready to wash
dishes.
Dishwasher detergent is corrosive! Keep dishwasher
detergent out of the reach of children.
9
When to refill the rinse aid
The regularity of the dispenser needing to be refilled depends on how often dishes are
washed and the rinse aid setting used.
The Low Rinse Aid indicator ( ) will appear in the display when more rinse aid
is needed.
Do not overfill the rinse aid dispenser.
Rinse Aid Detergent
3Replace the cap by inserting it
aligned with "open" arrow and
turning it to the closed (right) arrow.
NOTE:
Clean up any spilled rinse aid with
an absorbent cloth to avoid
excessive foaming during the next
wash.
1 2
To open the dispenser, turn the cap
to the "open" (left) arrow and lift
it out.
Carefully pour in the rinse-aid into
its dispenser, whilst avoiding it to
overflow.
Rinse-Aid indicator
Filling The Rinse Aid Reservoir
Adjusting the rinse aid reservoir
The rinse aid reservoir has six settings. Both the
recommended setting and the factory setting is “4”. If the
dishes are not drying properly or are spotted, adjust the dial
to the next higher number until your dishes are spot-free.
Reduce it if there are sticky whitish stains on your dishes or
a bluish film on glassware or knife blades.
AAddjjuusstt lleevveerr((RRiinnssee))
10
13
3Close the rinse aid reservoir cap by
rotating it clockwise.
NOTE:
Clean up any spilled rinse aid with
an absorbent cloth to avoid
excessive foaming during the next
wash.
1 2
Remove the rinse aid reservoir cap
by rotating it counterclockwise.
Carefully pour in the rinse-aid into
its dispenser, whilst avoiding it to
overflow.
Filling The Rinse Aid Reservoir
Adjusting the rinse aid reservoir
AAddjjuusstt lleevveerr((RRiinnssee))
Turn the rinse aid indicator dial to a number between 1 and 6.
The higher the number, the more rinse aid the dishwasher uses.
If the dishes are not drying properly or are spotted, adjust the
dial to the next higher number until your dishes are spot-free.
Reduce it if there are sticky whitish stains on your dishes or a
bluish film on glassware or knife blades.
13
3Close the rinse aid reservoir cap by
rotating it clockwise.
NOTE:
Clean up any spilled rinse aid with
an absorbent cloth to avoid
excessive foaming during the next
wash.
1 2
Remove the rinse aid reservoir cap
by rotating it counterclockwise.
Carefully pour in the rinse-aid into
its dispenser, whilst avoiding it to
overflow.
Filling The Rinse Aid Reservoir
Adjusting the rinse aid reservoir
A
A
d
d
j
j
u
u
s
s
t
t
l
l
e
e
v
v
e
e
r
r
(
(
R
R
i
i
n
n
s
s
e
e
)
)
Turn the rinse aid indicator dial to a number between 1 and 6.
The higher the number, the more rinse aid the dishwasher uses.
If the dishes are not drying properly or are spotted, adjust the
dial to the next higher number until your dishes are spot-free.
Reduce it if there are sticky whitish stains on your dishes or a
bluish film on glassware or knife blades.
Adjust rinse level

User Manual
20
Filling The Detergent Dispenser
STEP 1:
Press the relese ctch on the detergent dispenser
to open the cover
STEP 2:
Add detergent into the lrger cvity (A) for the min
wsh cycle. For more hevily soiled wsh lods, lso
dd some detergent into the smller cvity (B) for
the pre-wsh cycle.
STEP 3:
Close the cover nd press on it until
it locks into plce.
NOTE
• Be wre tht depending on the soiling of wter,
setting my be dierent.
• Plese observe the mnufcturer’s
recommendtions on the detergent pckging.
Rinse Aid Detergent (Continued)
14
Filling The Detergent Dispenser
1 2
Press the release catch on the detergent
dispenser to open the cover.
Push latch to open
AAB
Add detergent into the larger cavity
(A) for the main wash cycle .
For more heavily soiled wash loads,
also add some detergent into the
smaller cavity (B) for the pre-wash
cycle .
3Close the cover and press on it until
it locks into place.
NOTE:
Be aware that depending on the soiling of water, setting may be different.
Please observe the manufacturer's recommendations on the detergent packaging.
Other manuals for EDWI605S
1
Table of contents
Other Esatto Dishwasher manuals

Esatto
Esatto EDW6004W User manual

Esatto
Esatto EDW7CS User manual

Esatto
Esatto EDW7CS User manual

Esatto
Esatto EDW456S User manual

Esatto
Esatto EDW6CS User manual

Esatto
Esatto EBTDWW User manual

Esatto
Esatto EDW7S User manual

Esatto
Esatto EDW6S User manual

Esatto
Esatto EDW6004S User manual

Esatto
Esatto EDW7CS User manual