Euhomy BR-115 User manual


Contents-euhomy@hotmail.com
Safety Precautions------------------------5-6
Installation----------------------------------7-8
Temperature Control--------------------- 9
Placement-----------------------------------10
Defrosting and Normal Sounds--------11
Maintenance---------------------------------12
Warranty--------------------------------------13
Troubleshooting----------------------------14

Dear Customer,So lucky to meet you guys !!!
Thanks for making a purchase on Euhomy!
We hope to provide you with sincere service. If there is anything missing
or wrong with your order,If you have any question about using our
beverage cooler. PLEASE reach out to us.
Email-(euhomy@hotmail.com) or Facebook-(@Euhomy).
Euhomy team will answer your doubts online for 24 hours. Your
satisfaction is our ultimate goal. We’d appreciate if you could share your
experience with other shoppers on Amazon. We’d love to make it right
for you! If you just want to see the problem description, you can directly
see the last page, or contact us directly.Email:euhomy@hotmail.com
Our Mission: To be the most trusted appliance brand , Creat compact and
practical appliance to better your life.
Five years ago, we founded Euhomy by a team of young people. Initially,
we mainly sold ice maker, mini fridge, upright freezer, which are generally
recognized by consumers. We are committed to providing a variety of
compact and practical appliances, while taking into account the high-end
design of the product. When we launched Euhomy for the first time,we
are committed to the quality of all our every product and the satisfaction
of customer needs first.
Now we’re thrilled to be the leading refrigeration and compact appliance
company , offering unique and necessary appliances loved by people
continent-wide. Euhomy wants consumers to enjoy the most practical
products at the most cost-effective price. Our brand philosophy has
always been around, intelligent design, intelligent technology and high-
end design.We would love to hear from you about how we can better
innovate your life.

•Do not use extension cords or ungrounded (two prong) adapters.
• Do not pull the power cord when pulling the power plug of the beverage cooler. Please rmly grasp the plug and pull
it out from the socket directly.
•Please use a dedicated three-hole power socket which is 15A or more and not shared with other electrical appliances.
•Please ensure that the grounding electrode of the power socket is equipped with a reliable grounding line.
• The beverage cooler uses AC power supply of 115V/60 Hz. If the voltage uctuation exceeds the range of 115V +- 10%,
it can cause accidents or damage the cooler.
• In case of leaking gas, turn off the leaking valve and open your doors and windows. Do not unplug the cooler yourself,
as it may cause a re. Contact customer support.
• For your safety, don’t place electric devices on top of the cooler like microwaves or electric kettles, and don’t store
your beverage cooler inside pantries.
WARNINGS RELATED TO USE
• Make sure there is ample ventilation space surrounding the beverage cooler.
• Be careful not to get ngers or dangling accessories caught in the cooler door.
• This cooler and its packaging are not intended to be played with or used by children. If a child is using the cooler, it must be with a
dult supervision to avoid injury.
• Keep the cooler out of moist, damp or humid environments and situations so as not to damage the electrical
insulation.
•Do not place heavy objects on top of the cooler to prevent accidental damage or injury.
WARNINGS RELATED TO PLACING ITEMS
•Do not place ammable items near the cooler to avoid res.
• This product is for household refrigeration appliances, mainly used in the storage of beverage, not for other purposes,
such as storage of blood, drugs and biological products.
•Do not cover or close ventilation and exhaust holes.
• This appliance is intended to be used in households and similar applications such as: staff kitchen areas in shops,
ofces and other working environments; hotels, motels and other residential type environments; bed and breakfast
type environments; catering and similar non-retail applications.
SAVE THESE INSTRUCTIONS / For Household Use Only
•Do not use base, cooler door, etc. as pedal or support.
•Keep ventilation openings, in the appliance enclosure or in the built-in structure, clear of obstruction.
• Do not use mechanical devices or other means to accelerate the defrosting process, other than those recommended
by the manufacturer.
•Do not store explosive substances such as aerosol cans with a ammable propellant in this appliance.
5
WARNINGS RELATED TO ELECTRICITY
•Do not damage the power cord under any condition.
• Do not put ammable, explosive, volatile and highly corrosive items in the cooler to prevent damages to the product
or re accidents.
Safety Precautions

Fan
Shelf
Shelf Glass Door
Adjustable Foot
Temperature Control
• Avoid putting the cooler in direct sunlight or too close to a heat source --keep a safe distance of at least 30cm
between the cooler and a stove or furnace if it can’t be avoided. We also advise applying an insulation board in that
case.
•Keep a circulation space of at least 4cm on both sides of the cooler to preserve power.
• Make sure the cooler is placed in a well-ventilated indoor place; on at, sturdy ground (rotate left or right to adjust
the wheel for levelling if unstable).
6
• The room for cooler should become larger with more refrigerant in cooler, with 8g refrigerant corresponding to 1m3
spaces. The content standards of refrigerant are labels in name board on backboard of cooler.
• Before usingthe cooler, remove all packaging materials including bottom cushions, foam pads, and tape inside the
PLACEMENT
Safety Precautions
cooler, tear off the protective lm on the door and the cooler body.

WARNING
To reduce the risk of fire, electrical shock, or injury when
using your appliance, follow these basic pre-cautions:
INSTALLATION INSTRUCTIONS
IMPORTANT SAFETY INSTRUCTIONS
7
INSTALLATION OF YOUR APPLIANCE
BEFORE USING YOUR APPLIANCE
Remove the exterior and interior packing.
Before connecting the appliance to the power source, let it stand upright for approximately 24 hours. This will
reduce the possibility of a malfunction in the cooling system from handling during transportation.
Clean the interior surface with lukewarm water using a soft cloth.
Installation
Read all instructions before using the appliance.
DANGER or WARNING: An empty beverage refrigerator can be a hazardous for children or small pets. If
disposing of the beverage refrigerator, remove gasket seals, latches, lids or the entire door from your unused
appliance, or take other action to ensure the beverage refrigerator is harmless.
Never allow children to operate, play with, or crawl inside the appliance.
Never clean appliance parts with flammable fluids or harsh chemicals. The fumes can create a fire haz-ard or
explosion.
Do not store or use gasoline or any other flammable vapors and liquids in the vicinity of this or any oth-er
appliance. The fumes can create a fire hazard or explosion.
The appliance is designed for freestanding installation.
WARNING: Do not store or install the appliance outdoors.
CAUTION: This appliance is designed for storing and cooling beverage or wines. Do not store perishable food,
medicine or other medical products.
Place your appliance on a hard and level floor that is strong enough to support it when it is fully loaded.
To level your appliance, adjust the leveling legs at the bottom of the appliance if needed.
Allowance of at least 5 inches (127mm) of space between the back and sides of the appliance are sug-
gested, which allows the proper air circulation to cool the compressor and condenser.
We do not recommend installing the appliance on carpet.
Do not install the appliance near an oven or other heating source. Direct sunlight may affect the acrylic
coating and heat sources may increase electrical consumption. For best performance, do not install the
appliance behind a cabinet door or block the base grille. Extreme cold ambient temperatures may also
cause the appliance not to perform properly.
Avoid locating the appliance in area that may be exposed to excessive moisture.
Plug in the appliance into an exclusive, grounded wall power outlet. Do not under any circumstances cut or remove
the third (ground) prong from the power cord. Any questions concerning power and/or ground-ing should be directed
toward a qualified electrician or an authorized service center.
INSTALLATION LOCATION
Your beverage refrigerator should be conveniently located for day-to-day use in a dry, well-ventilated room.
Do not install the appliance where thetemperature will go below 60°F or above 90°F, because it will not main-tain proper
temperatures. Be sure to install your beverage refrigerator on a floor strong enough to support it
when it is fully loaded.

8
Because of potential safety hazards, it is strongly recommended that you do not use an extension cord with this
appliance. However, if you must use an extension cord, it is absolutely necessary that it be a
UL-Listed, 3-wire grounding type appliance extension cord having a grounding type plug and outlet and that the
electrical rating of the cord be 115 volts and at least 10 amperes.
EXTENSION CORD
This appliance requires a standard 115/120 Volt AC ~/60Hz electrical ground outlet with three-prong.
Have the wall outlet and circuit checked by a qualified electrician to make sure the outlet is properly
grounded. The cord should be secured behind appliance and not left exposed or dangling to prevent accidental injury.
Department.
ELECTRICAL CONNECTION
WARNING: Improper use of the grounded plug can result in the risk of electrical shock. If the
power cord is damaged, have it replaced by a qualified electrician or contact W hynter Service
Installation
The appliance should always be plugged into its own individual electrical outlet which has a voltage rat-
ing that matches the rating label on the appliance. This provides the best performance and also prevent
overloading house wiring circuits that could cause a fire hazard from overheated. Never unplug the ap-
pliance by pulling the power cord. Always grip the plug firmly and pull straight out from the receptacle.
Repair or replace immediately all power cords that have become frayed or otherwise damaged.
Do not use a cord that shows cracks or abrasion damage along its length or at either end. When moving the
appliance, be careful not to damage the power cord.
FREESTANDING INSTALLATION
A freestanding installation will allow you to install the beverage refrigerator in any place you desire provided that the req
uired clearance space around the appliance is respected. In every setting, there must be an ad-equate ventilation and
a ccess for service. Never install or operate the unit in an enclosed area, such as a closed cabinet. Allowance of at
least 5 inches (127mm) of space between the back and sides of the appliance are suggested, which allows the proper
air circulation to cool the compressor and condenser.

•Try to shorten opening time of cooler’s door.
•Avoid putting warm beverages in the cooler.
FAULT CODE DESCRIPTION
E1 R Room sensorfailure
R room defrost sensor failure
E4
9
It is recommended you install the appliance in a place where the ambient temperatures is above 60°F (16°C) and below 90°F (32°
C). If the ambient temperature is above or below recommended temperatures, the performance may be affected. For example,
placing your appliance in extreme cold or hot conditions may cause interior temperatures to fluctuate.
•The cooler should be placed in a room that is dry and ventilated. The cooler cannot be placed under direct
sunlight or next to heat source (such as a radiator, stove, etc.), and a suitable insulation board must be applied
if necessary.
This beverage refrigerator is equipped with an internal fan that
prevents uneven temperature distribution, ensuring
all of your beverage reaches your desired temperature .
2.Memory Function
Ifturned off, this coolerwill remember anysettings in place and
willwork according to those settings once it’s turned on again.
4.Temperature Seing
Press the increase temperature button to increase the temperature
one degree at a time. Press the decrease temperature button to
decrease the temperature one degree at a time.
5.Fault Indicators
If any ofthese indicators are displayed it means the cooler
has the following issues.
INTRODUCTION TO THE BEVERAGE COOLER’S FUNCTIONS
Display Controls
When turning on for the rst time, the display screen will be
a full display for 3 seconds and the startup
tone will ring.
PROPER USE OF BEVERAGE COOLER
Energy Conservation
3.Lighting
Press the lighting button to turn the light on or off. 6.INTERNAL FAN
Temperature Control
1.Standby Mode
To activate standby mode, hold the standby button for 3
seconds. You will hear a beep and the display area will be
cut off. To deactivate standbymode, press the button again.
You will hear a beep and the standard
display will show.
Temperature Rise Key
Temperature Drop Key
Note:If you want to switch between Celsius and Fahrenheit, press and hold the Drop key and Rise key simultaneously for 3
seconds, the temperature can be converted.
10
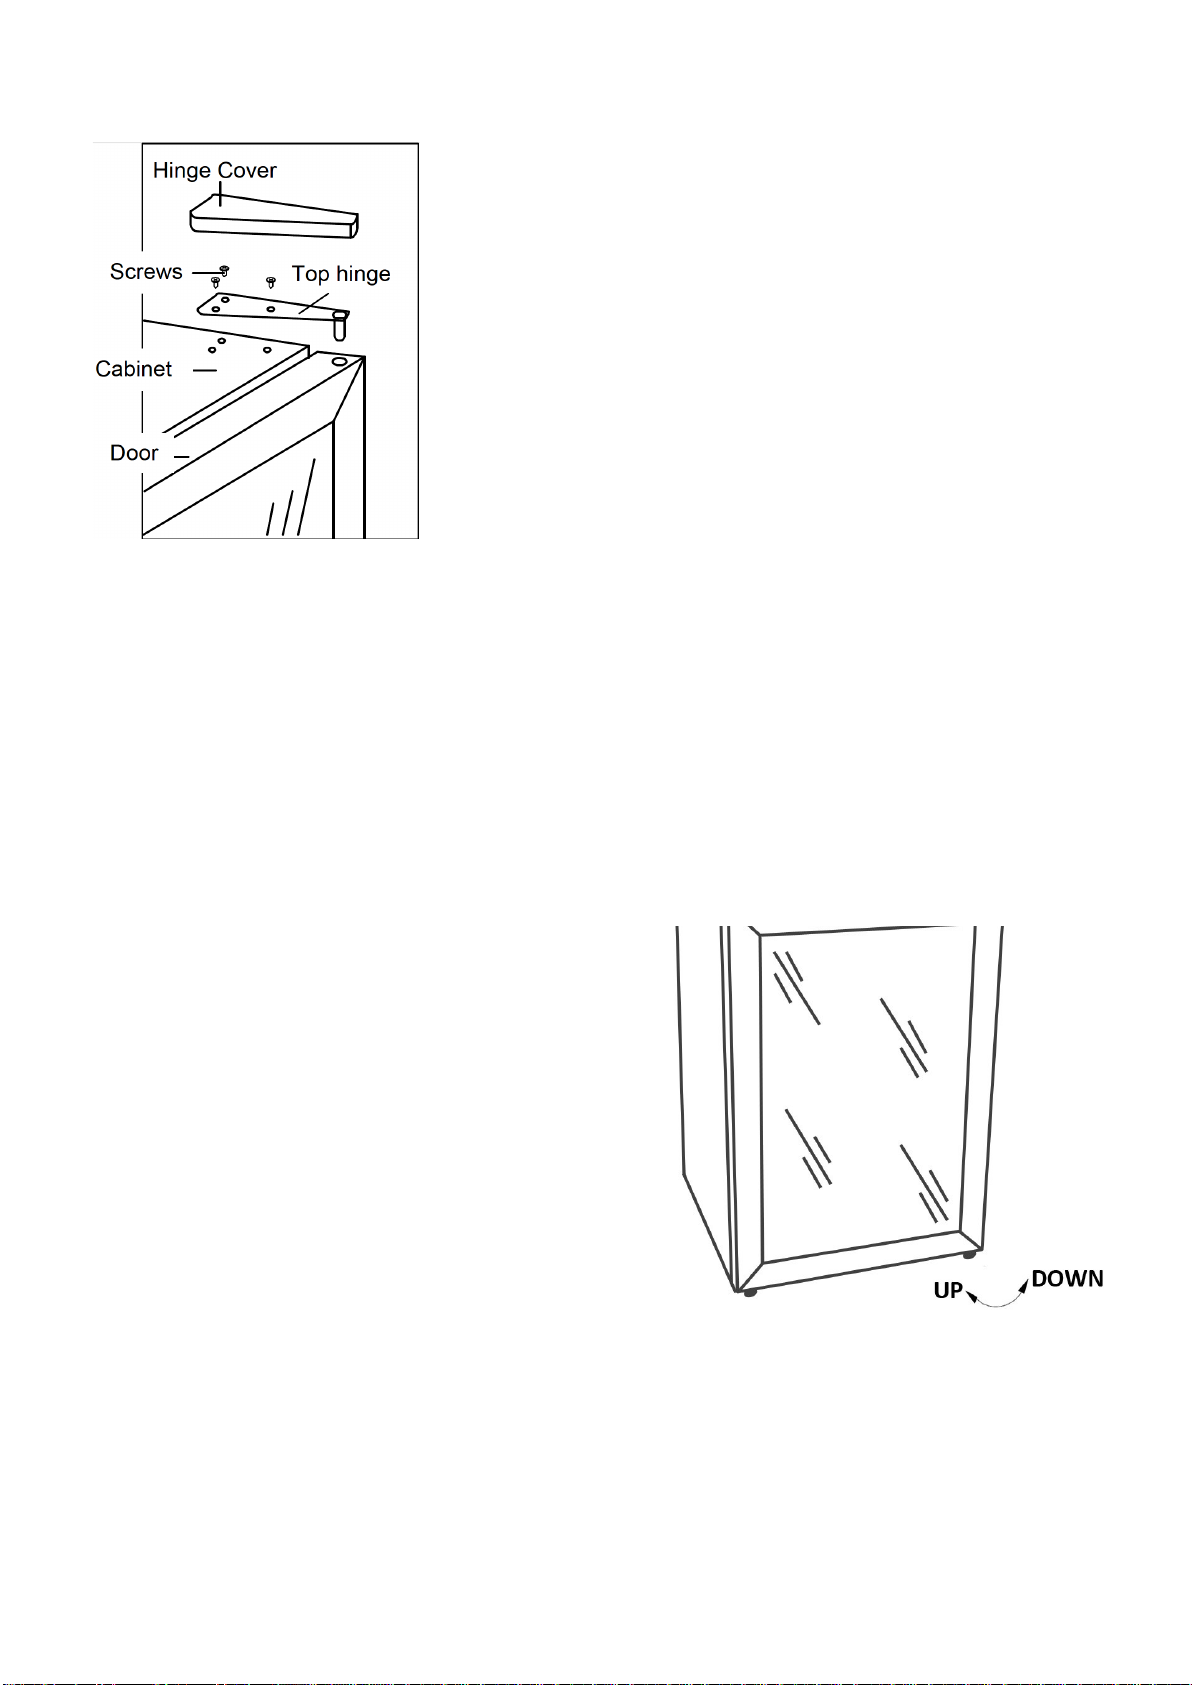
To remove the door:
To install the door:
1. Place a carpenter’s level on top of the product to see if the
beverage refrigerator is level from front to back and side to side.
2. Adjust the height of the feet as follows: Turn the leveling feet
to the right to lower that side of the refrigerator. Turn the leveling feet to
the left to raise that side of the refrigerator.
IMPORTANT: Once you are ready to install, you must adjust the
feet to level the beverage refrigerator .
LEVELING THE APPLIANCE
REVERSING THE DOOR SWING
Tools needed: flathead screwdriver, Phillips screwdriver
CAUTION: Before you begin, unplug the beverage
refrigerator from power.
-It is important for the beverage cooler to be leveled
in order to work properly.
-It can be raised or lowered by rotating each of the feet on the botto
m of the machine.
-If you find that the surface is not level, rotate the feet until the beve
rage refrigerator becomes level .You may need to make several ad
heck the machine.
Placement
1. Using a flathead screwdriver, remove the plugs and cover from the opposite cabinet top corner and from the door.
2. Install the bottom hinge at the opposite side corner and fasten the screws.
3. Position the door on the bottom hinge.
4. Align the door on the bottom hinge and install the top hinge.
5. Push the plugs and covers into the corresponding holes.
justments to level it. We recommend using a carpenter’s level to c
1. Using a flathead screw driver carefully pry the top hinge cover off.
2.Using a Phillips screwdriver, remove the screws and take
off top hinge. Keep the parts together and set them aside.
3. Lift the door off the bottom hinge and set the door aside.
4. Remove the bottom hinge by removing the screws with
a Phillips head screwdriver.

11
switching on.
-Cracking/popping sounds, resulting from the materials contraction and expansion due to temperature vari-
ations,Fan operating sound, to circulate the air within the refrigerator cabinet.
The following noises are normal and occur from time to time:
The unit is cooled by a compressor. The compressor pumps coolant through the cooling system, producing
operating noise. Even when the compressor cuts out, noises caused by changes in temperature and pressure are
unavoidable. Operating noise will be most audible immediately after the compressor comes on. It becomes quieter
as the operating period continues.
DEFROSTING
NORMAL SOUNDS
Defrosting and Normal Sounds
The ice build-up on the inner back wall of your cooler will automatically be defrosted in a comprossor-off cycle.
When you press the button(off),the comprossor and circulation fan stops running.While defrosting is in process.
Defrostwater will drain out of the cooler,passing through the drain outlet in the inner back wall into a drain pan
located above the comprossor.The water will evaporate from the drain pan on its own.
-Gurgling sound, caused by the refrigerant flowing through the appliance’s coils,
-Humming noise made by the compressor. This noise can get louder for brief periods when the motor is
NOTE: An individual’s perception of noise is directly linked to the environment in which the unit is lo-cated, as
well the specific type of models. Our appliances are in line with international standards for such appliance and in line with
the latest technical developments. Please remember that the noise of the compressor and the coolant circulating in the
system is unavoidable.

12
Note: Do not use hard brushes,wire brushes, abrasives, organic solvents, boilingwater, acid or alkaline items as this may
damage the cooler surface and interior.
Maintenance
FREQUENTLY ASKED QUESTIONS
I’m hearing some sounds, what’s up with that?
Buzzing or any gurgling sound is normal as that can be a result ofthe unit working properly or refrigerating uid owing through the pipeli
ne.
DISCONNECTING THE BEVERAGE COOLER
Unplug the power plug from the socket to disconnect the cooler
CLEANING YOUR BEVERAGE COOLER
Dusting behind the cooler and on the ground willimprove the cooling effect and save energy. The interiorofthe cooler should be
cleaned to avoid any odor. Follow the cleaning procedure below.
1. Unplug the cooler.
2. Wipe the door seal with warm water.
3. Use soap and warm waterto clean the cooler.
4. Reconnect the coolerwhen the cooler is clean and dry.
13
Warranty-1 year
Euhomy offers a limited 1-year warranty (“warranty period”) on all of our products purchased new and
unused from Euhomy company, with an original proof of purchase and where a defect has arisen, wholly
or substantially, as a result of faulty manufacture, parts or workmanship during the warranty period. The
warranty does not apply where damage is caused by other factors, including without limitation:
(a) normal wear and tear; (b) abuse, mishandling, accident, or failure to follow operating instructions;
(c) exposure to liquid or infiltration of foreign particles; (d) servicing or modifications of the product other
than by Euhomy; (e) commercial or non-household use.
The Euhomy warranty covers all costs related to restoring the proven defective product through repair or
replacement of any defective part and necessary labor so that it conforms to its original specifications. A
replacement product may be provided instead of repairing a defective product. Euhomy’s exclusive
obligation under this warranty is limited to such repair or replacement. A receipt indicating the purchase
date is requied for any claim, so please keep all receipts in a safe place. Although greatly appreciated,
the product registration is not required to activate any warranty and product registration does not
eliminate the need for the original proof of purchase.The warranty becomes void if attmpts at repair are
made by non-authorized third parties and/or if spare parts, other than those provided by Euhomy, are
used.
You may also arrange for service after the warranty expires at an additional cost. These are our general
terms for warranty service, but we always urge our customers to reach out to us with any issue,
regardless of warranty terms. If you have an issue with a Euhomy product, please contact us
(euhomy@hotmail.com), and we will do our best to resolve it for you.

Problem Possible Causes Solutions
There is a power failure
The appliance is not plugged in
A house fuse has blown or the
circuit breaker is tripped
The appliance is not cold
enough
The appliance turns itself on and
off frequently The ambient (room) temperature
is too low or high
A large amount of contents has
been added to the appliance
The door is opened too often
The door is not closed completely
The door gasket does not seal
properly
The appliance makes too much
noise The noise may come from the
flow of the refrigerant and expan-
sion of the inside walls may cause
popping and crackling noises
Contraction and expansion of the
inside walls may cause popping
and crackling noises
The appliance is not level
It is normal that as each cooling cycle
ends, you may hear rattling or gurgling
sounds caused by the flow of refriger-
ant in the appliance. The high efficien-
cy compressor may make a pulsating
or high pitched sound
Some popping or cracking noises are
normal. They are caused by expansion
and contraction of the inside walls due
to temperature changes
Make sure the unit is on a hard and
level surface. Do not place the appli-
ance on carpet
See Normal Sounds
The door does not close proper-
ly The appliance is not level
The door was reversed and not
properly installed
The shelves are out of position
Make sure the appliance is on a hard
and level surface. Avoid placing the
appliance on a carpeted or soft surface
Reinstall door
Correctly install the shelves
Condensation builds up on the
glass door.
Ambient temperature or humidity
is high. Lower the room humidity by a dehu-
midifier or air conditioner.
The appliance does not operate
The appliance is placed too close
to a heat source
The door is opened too often
The door is not closed completely
The door gasket does not seal
properly
Adjust the temperature
Keep the appliance away from sun-
shine or other heat sources
Close the door tightly and do not open
the door too frequently or for a long
period of time
Ensure the door gasket is not loose.
Ensure the appliance is plugged in and
the power outlet has power
Replace the broken fuse or reset the
breaker
14
Troubleshooting-euhomy@hotmail.com
Decrease or increase the ambient
(room) temperature
To minimize internal temperature fluc-
tuation, do not add large amount of
contents at once
Close the door tightly and do not open
the door too frequently or for a long
period of time
Ensure the door gasket is not loose
It is normal for the fan come on and off
to circulate the air inside of the unit for
even temperature distribution and to
save energy
Table of contents
Other Euhomy Freezer manuals


