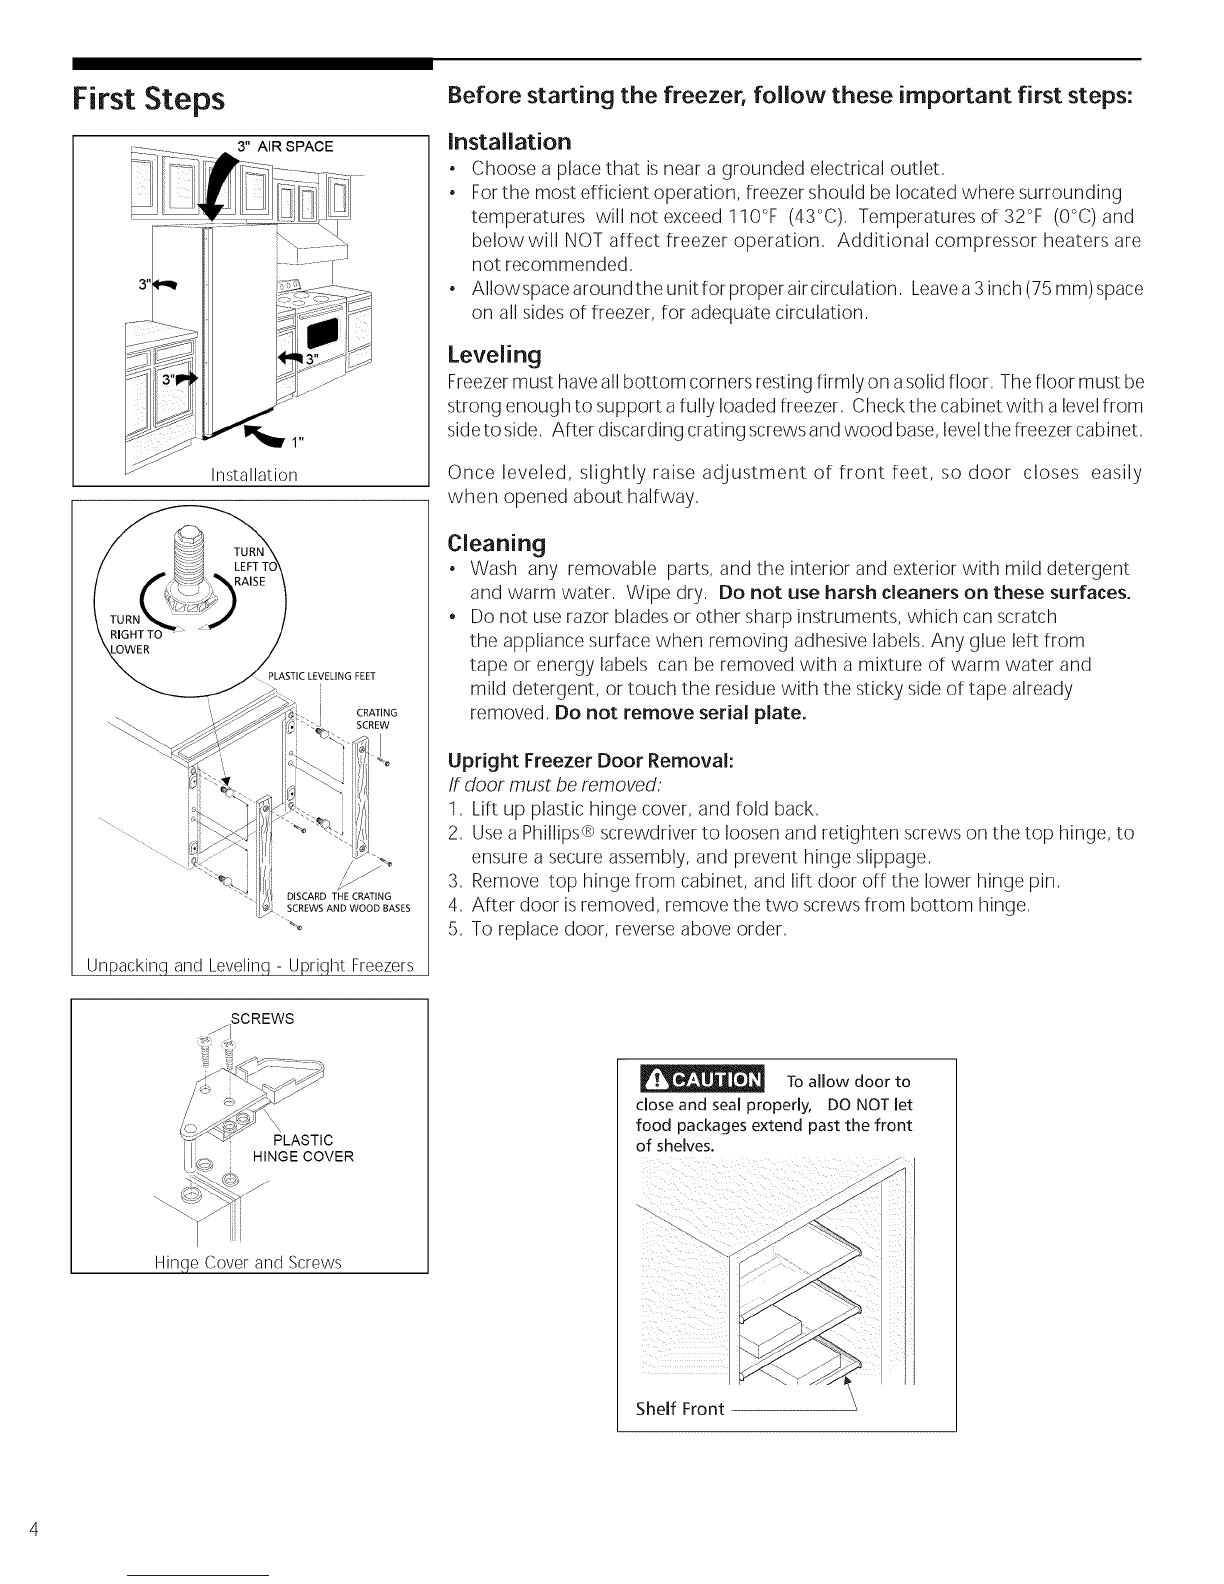
Crosley UL2494ECW User manual

OWN ERS MAN UAL

Contents Owner's Guide
2
2
3
4
5
5-6
6-7
7
8-9
10
Your Owner's Guide
Energy Saving Ideas
Important Safety Instructions
First Steps
Setting the Temperature Control
Freezer Optional Features
Care and Cleaning
Power Failure/Freezer Failure
Avoid Service Checklist
Warranty
Freezer Tips
11
12-13
14-17
18-19
20-23
24-31
32-35
36-37
38-41
42
42
43
44
Introduction
Packaging
Baked Goods
Dairy Products
Fruits
Meats
Prepared and
Soups, Salads,
Vegetables
Cooked Foods
Sandwiches
More Foods to Freeze
Foods Not Recommended for Freezing
Retail Cuts of Beef
Retail Cuts of Pork

Your Owner's Guide The information in this Owner's Guide will instruct you on howto properly operate
and care for your product, The FreezerTipsSection will help you produce favorable
results when freezing food, Pleaseread through the information contained in your
literature pack, to learn more about your new appliance,
Record Your Model and Serial Numbers
Record the Model No, and Serial No, of this freezer in the spaces provided below,
Model No.
Serial No.
Register Your Product
The self-addressed PRODUCTREGISTRATIONCARD (shown left) should be filled in
completely, signed, and returned to Electrolux Home Products,
Energy Saving Ideas • The freezer should be located in the coolest area of the room, away from heat
producing appliances or heating ducts, and out of direct sunlight,
• Let hot foods cool to room temperature before placing in freezer, Overloading
freezer forces compressor to run longer, Foodsthat freeze too slowly may lose
quality, or spoil,
• Besure to wrap foods properly, and wipe containers dry before placing them in
freezer, This cuts down on frost build-up inside freezer,
• Freezer shelves should not be lined with aluminum foil, wax paper, or paper
toweling, Linersinterfere with cold air circulation, making freezer lessefficient,
• Organize and label food to reduce door openings and extended searches,Remove
asmany items needed at one time, and close door as soon as possible,

Important Safety
Instructions
Proper Freezer
Disposal
IMPORTANT: Child entrapment and
suffocation are not problemsof the past,
Junked or abandoned freezers are still
dangerous-- evenif they will sit for "just
a few days," If you aregetting rid of your
old freezer,pleasefollow the instructions
below to help prevent accidents,
BEFOREYOUTHROW AWAY YOUR
OLDFREEZER:
*Remove doors,
*Leave shelves in
place so children
may not easily
climb inside,
_'!v,v-,_t_ll_[=l Avoid fire hazard or
electric shock, Do not usean extension
cord or an adapter plug, Do not remove
any prong from the power cord,
Grounding type
wall receptacle
Power supply
cord with 3-prong
grounding plug
Read all instructions before using this freezer.
For Your Safety
Do not store or usegasoline or other flammable vapors and liquids in the vicinity of
this orany other appliance, Readprod uct labelsfor flammability and other warnings,
Child Safety
• Destroycarton, plastic bags, and anyexteriorwrapping material immediatelyafter
freezer is unpacked, Children should never use these items for play, Cartons
covered with rugs, bedspreads, plasticsheets or stretch wrap may become airtight
chambers, and can quickly cause suffocation,
• A child might suffocate if he crawls into a freezer to hide or play. Remove
the freezer door when not in use, even if you plan to discard the freezer.
Many communities have laws requiring you to take this safety precaution,
• Removeand discard anyspacersusedto securethe shelvesduring shipping, Small
objects are a choke hazard to children,
Electrical Information
These guidelines must be followed to ensure that safety mechanisms in the
design of this freezer will operate properly.
• Refer to serial plate for correct electrical rating. The power cord of the
appliance isequipped with a three-prong grounding plug for protection against
shock hazards, Itmust be plugged directly into its own properly grounded three-
prong receptacle, protected with a 15 amp time delay fuse or circuit breaker, The
receptacle must be installed in accordance with the National Electrical Code, and
local codes and ordinances, Consult a qualified electrician, Receptacles
protected by Ground Fault Circuit Interrupters(GFCI) are NOT RECOM-
MENDED, DO NOT use an extension cord, or an adapter plug.
• If voltage varies by 10 percent or more, freezer performance may be affected,
Operating freezer with insufficient power can damage the motor, Suchdamage
isnot covered under the warranty, Ifyou suspect your household voltage ishigh
or low, consult your power company for testing,
• To prevent freezer from being turned off accidentally, do not plug the unit into
an outlet controlled by a wall switch, or the pull cord,
• Do not pinch, knot, or bend power cord in any manner,
Other Precautions
Never unplug freezer by pulling on the power cord, Always grip the plug firmly,
and pull straight out from receptacle,
Turning the control to OFF turns off the compressor, but does not
disconnect power to other electrical components,

3" AIR SPACE
1"
Installation
CRATING
SCREW
Unpackingand Leveling- Upright Freezers
\PLASTIC
HINGE COVER
Hinge Cover and Screws
Before starting the freezer, follow these important first steps:
Installation
• Choose a place that isnear a grounded electrical outlet,
Forthe most efficient operation, freezer should be located where surrounding
temperatures will not exceed 110°F (43°C), Temperatures of 32°F (O°C)and
belowwill NOT affect freezer operation, Additional compressor heaters are
not recommended,
AIIowspace aroundthe unit for proper aircirculation, Leavea3 inch (75 mm)space
on all sides of freezer, for adequate circulation,
Leveling
Freezermust haveall bottom corners resting firmly on asolid floor, The floor must be
strong enough to support a fully loaded freezer, Check the cabinet with a level from
sideto side, After discarding crating screws and wood base,levelthe freezer cabinet,
Once leveled, slightly raise adjustment of front feet, so door closes easily
when opened about halfway,
Cleaning
• Wash any removable parts, and the interior and exterior with mild detergent
and warm water, Wipe dry, Do not use harsh cleaners on these surfaces.
, Do not use razor blades or other sharp instruments, which can scratch
the appliance surface when removing adhesive labels, Any glue left from
tape or energy labels can be removed with a mixture of warm water and
mild detergent, or touch the residue with the sticky side of tape already
removed, Do not remove serial plate.
Upright Freezer Door Removal:
If door must be removed:
1, Lift up plastic hinge cover, and fold back,
2, Usea Phillips® screwdriver to loosen and retighten screws on the top hinge, to
ensure a secure assembly, and prevent hinge slippage,
3, Remove top hinge from cabinet, and lift door off the lower hinge pin,
4, After door isremoved, remove the two screws from bottom hinge,
5, To replace door, reverse above order,
To allow door to
close and seal properly, DO NOT let
food packages extend past the front
of shelves.
Shelf Front

Setting the
Temperature Control
Cool Down Period
For safe food storage, allow 4 hours for freezer to cool down completely.
Freezerwill run continuously for the first several hours. Foods that are already
frozen may be placed in freezer after the first few hours of operation. Unfrozen
foods should NOT be loaded into freezer until freezer has operated for 4 hours.
• When loading freezer, freeze only 3pounds of fresh food per cubic foot of freezer
space at one time. Evenlydistribute packages to be frozen throughout freezer.
it isnot necessaryto turn control knob to a colder setting while freezing food.
Temperature Control
Thetemperature control islocated insidethe freezer compartment.Thetemperature
isfactory preset to provide satisfactory food storage temperatures. However, the
temperature control isadjustable to provide a range of tmeperatures for your
personal satisfaction, if acolder temperature isdesire, turn the temperature control
knob toward COLDESTand allow.several hoursfor temperaturestostabilize between
adjustments.
Freezer Optional
Features
Power On Light
A_RM
TEMP
MONITOR OFF POWER ON 1
TempAlarm ......
Plunger
Super Freeze/Super Defrost
Your freezer may have some, or all of the features listed below. Become familiar
with these features, and their use and care.
Power On Light
The Power On Light indicates that the freezer is properly connected to electrical
power. The light glows even when the temperature control isturned to OFF. If the
light goesout, refer to "Freezer does not run" section in the Avoid ServiceChecklist.
Temp Alarm
This feature is designed to provide warning of a possible malfunction. The Temp
Alarm Switch is located in the base panel. This feature operates on household
electricity. If power fails, the alarm will not perform. The ON/OFFSwitch allows you
to turn off Temp Alarm when not wanted.
The freezer is shipped with Temp Alarm in the OFFposition. After freezer has run
long enough to lower the temperature, activate Temp Alarm by pressing eraserend
of a pencil into the hole marked ON, moving the rocker switch. To turn off alarm,
depressthe OFFSwitch. TheTemp Alarm should beturned to the OFFposition when
defrosting freezer.
If alarm sounds, be sure freezer isproperly leveled, and door closesfreely and seals
properly. If a technical problem is suspected, call an authorized servicer
immediately.
Super Freeze
When the Super FreezeSwitch isON, freezer will run continuouslyto reachthe coldest
possible temperatures. Usethis feature prior to adding large quantities of unfrozen
foods. (Not to exceed 3 pounds per cubic foot of freezer space.) This switch must
be manually returned to the OFFposition when not needed.
Super Defrost
Note: TheTempAlarm should beturned off when freezer isbeing defrosted. Freezer
will defrost in afraction ofthetime usually needed when using Super Defrost feature.
To defrost, remove all food, and follow these steps:
1. Pull out Super Defrost Switch, located behind lower part of door. Leave door
open while defrosting. Freezer will not defrost with door closed.
2. After defrosting is completed, push in Super Defrost button to restart
compressor.
3. Turn on Temp Alarm after freezer has reached freezing temperatures.

Freezer Optional
Features (continued)
Security Lock
Slide-Out Basket
TheSlide-Out Basket, located atthe bottom of the freezer provides separate storage
space for items that are difficult to store on freezer shelves, Toremove basket, puii
out and lift up,
Juice Can Rack
The Juice Can Rack on the freezer door isspecially ridged to store juice cans, and
prevent them from rolling out of the shelf,
Security Lock with Pop-Out Key
This security lock fastens the door snugly, ensuring stored food issecure, To lock or
unlock freezer, push key into the lock, and turn, The key pops out of the lock after
it hasbeen turned,
Interior Light
The light comes on automatically when the door isopened, To replace light bulb,
turn temperature control to OFF,and unplug electrical cord, Replaceold bulb with
a bulb of the same wattage,
Power Cord Clamp
This clamp prevents the power cord from being accidently unplugged, Remember
when removing or replacing electrical cord, to also remove or replace power cord
clamp,
Adjustable Shelf
This shelf can be moved to one of two positions, Lift shelf up and out to move to
desired position,
Defrost Drain
The Defrost Drain provides a method of draining the water during defrosting and
cleaning, See "Defrosting" in the Care and Cleaning section,
Fast Freezing Shelves
These shelves contain cooling coils to freeze foods quickly, and allow cold air to
constantly circulate throughout freezer, Do not usesharp metal objests such asice
picksor scrapersto clean these shelves, This could damage shelvesand reduce their
cooling ability, These shelves are not adjustable,
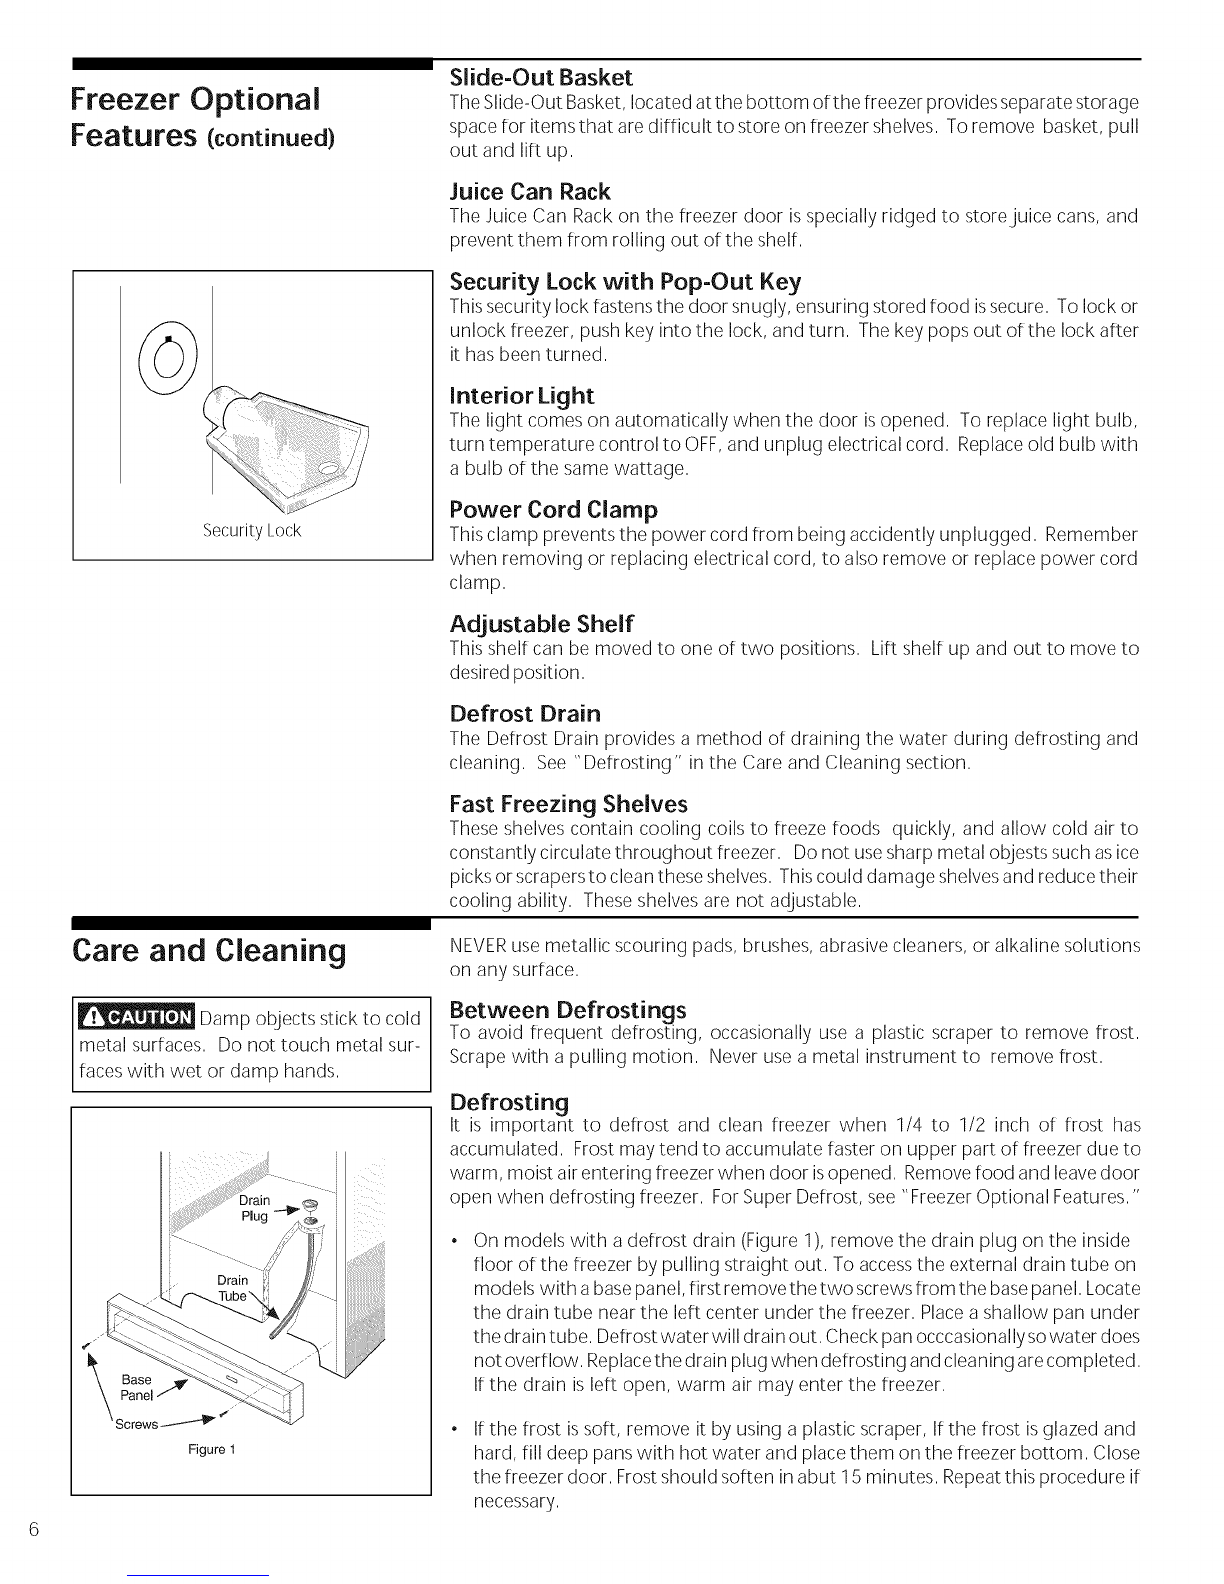
Care and Cleaning
Damp objects stick to cold
metal surfaces, Do not touch metal sur-
faces with wet or damp hands,
Base
Panel
4 _
Figure 1
NEVERuse metallic scouring pads, brushes, abrasive cleaners, or alkaline solutions
on any surface,
Between Defrostings
To avoid frequent defrosting, occasionally use a plastic scraper to remove frost,
Scrape with a pulling motion, Never use a metal instrument to remove frost,
Defrosting
it is important to defrost and clean freezer when 1/4 to 1/2 inch of frost has
accumulated, Frostmay tend to accumulate faster on upper part of freezer due to
warm, moist air entering freezer when door isopened, Removefood and leavedoor
open when defrosting freezer, ForSuper Defrost, see "Freezer Optional Features,"
On models with a defrost drain (Figure 1), remove the drain plug on the inside
floor of the freezer by pulling straight out, To accessthe external drain tube on
models with abasepanel, first remove the two screwsfrom the basepanel, Locate
the drain tube near the left center under the freezer, Placeashallow pan under
the drain tube, Defrost water will drain out, Check pan occcasionally sowater does
not overflow, Replacethe drain plug when defrosting and cleaning arecompleted,
If the drain is left open, warm air may enter the freezer,
If the frost issoft, remove it by using a plastic scraper, If the frost is glazed and
hard, till deep pans with hot water and placethem on the freezer bottom, Close
the freezer door, Frostshould soften in abut 15 minutes, Repeat this procedure if
necessary,

Care and Cleaning
(continued)
If leaving freezer
door open while on vacation, make
certain that children cannot get into
freezer and become entrapped,
Cleaning the inside
Wash inside surfaces of freezer with a solution of two tablespoons of baking soda
in one quart (1,136 litres) warm water, Rinseand dry, Besureto wring excesswater
out of sponge or cloth when cleaning inthe areaof the controls, or anyelectrical pars,
Wash removable parts and door gasket with the baking soda solution mentioned
above, or mild detergent and warm water, Rinseand dry, Do not wash removable
parts in a dishwasher,
Cleaning the Outside
Wash cabinet with warm water and mild liquid detergent, Rinsewell and wipe dry
with a clean soft cloth, Replace freezer parts and food,
Vacation and Moving Tips
Short Vacations: Leave freezer operating during vacations of one to three
weeks,
Long Vacations: If freezer will not be used for several months, remove all food,
turn temperature control to OFF, and unplug power cord, Clean and dry interior
thoroughly, Leavefreezer door open slightly, blocking it open if necessary,to
prevent odor and mold growth,
Moving: Disconnect power cord plug from wall outlet, Removefoods, then defrost
and clean freezer, Secureall loose items such asbasepanel, baskets, and shelves
bytaping them securely in place to prevent damage, Keep freezer door closed,
Inthe moving vehicle, secure freezer in an upright position, and secure to prevent
movement, Also protect outside of freezer with a blanket, or similar item,
Power Failure/
Freezer Failure
NOTE: Do not open freezer door
unnecessarily if power is cut off due to
electrical failure,
Ira power failure occurs, frozen foods will stayfrozen for at least 24 hours if freezer
iskept closed, Ifthe power failure continues, pack seven or eight pounds of dry ice
into freezer every 24 hours, Look in the Yellow Pagesunder "Dry Ice," "Dairies,"
or "Ice Cream Manufacturers" for local dry icesuppliers, Always wear gloves, and
use caution when handling dry ice,
If freezer has stopped operating, see"Freezer doesnot run" in the Avoid Service
Checklist of this manual, Ifyou cannot solvethe problem, call an authorized servicer
immediately,
Do not open freezer door unnecessarily, If freezer remains off for several hours,
follow directions above for the useof dry iceduring apower failure, If necessary,take
food to a local locker plant until freezer isreadyto operate, Look inthe Yellow Pages
under "Frozen Food Locker Plants,"

Avoid Service Checklist Before calling for service, review this list, It may saveyou time and expense, This
list includes common occurrences that are not the result of defective workmanship
or materials in this appliance,
OCCURRENCE
FREEZERDOES NOT RUN
SOLUTION
Temperature control is in the OFF position, See Setting the Temperature, Control,
Check to be sure freezer is NOT plugged into a circuit that has ground fault interrupt, Ifyou
are unsure about the outlet, have it checked by a certified technician,
Freezer may not be plugged in, or plug may be loose, Make sure plug is tightly pushed into
electrical outlet,
House fuse has blown, or circuit breaker has tripped, Check/reset circuit breaker, or replace
fuse with 15 amp, time delay fuse,
Power outage, Check house lights, Call local electric company,
Freezer runs too much, or too long. Room or outside weather is hot, It isnormal for freezer to work harder under these conditions,
Freezerhad recently been disconnected for a period of time, Freezer requires 4 hours to cool
down completely,
Largeamounts of warm or hot food have been stored recently, Warm food will cause freezer
to run more, until desired temperature is reached,
Door is kept open too long, or too frequently, Warm air enters the freezer everytime door is
opened, Open door less often,
Freezer door may be slightly open, See Occurrence section "Door Problems,"
Temperature control issettoo cold, Turn control knob to awarmer setting, Allow several hours
for temperature to stabilize,
Freezergasket is dirty, worn, cracked, or poorly fitted, Clean or change gasket, Leaks in door
seal will cause freezer to run longer in order to maintain desired temperature,
Temperatures inside freezer are too
cold. Temperature control issettoo cold, Turn control to a warmer setting, Allow several hours for
the temperature to stabilize,
Temperatures inside freezer are too
wa rm. Temperature control issettoo warm, Turn control to acolder setting, Allow several hours for
temperature to stabilize,
Door iskept open too long or isopened too frequently, Warm air enters freezer every time
door is opened, Open door less often,
Door may be open slightly, See Occurrence section "Door Problems,"
Largeamounts of warm or hot food may have been stored recently, Wait until freezer has had
a chance to reach its selected temperature,
Freezer has recently been disconnected for a period of time, Freezerrequires 4 hours to cool
down completely,
Temperature of external freezer
surface is warm. Exterior freezer walls can be as much as 30°F warmer than room temperature, This is normal
while compressor works to remove warm air from the inside freezer cabinet,

OCCURRENCE SOLUTION
SOUND AND NOISE
Louder sound levels when
freezer is on. Modern freezers have increased storage capacity and more even temperatures, They require
ahigh speed compressor, When surrounding noise level islow, you might hear the compressor
running while it cools the interior,
Louder sound levels when compressor
comes on. Freezer operates at higher pressures during the start of the ON cycle, This is normal, Sound
will level oft, or disappear as freezer continues to run,
Popping or cracking sound when
compressor comes on. Metal parts expand and contract, as do hot water pipes, This is normal, Sound will level oft
or disappear as freezer continues to run,
Bubbling or gurgling sound, like water Refrigerant (used to cool freezer) is circulating throughout the system, This is normal,
boiling.
Vibrating or rattling noise. Freezer is not level, It rocks on the floor when it is moved slightly, Re-level freezer, or move
freezer slightly, Refer to "Leveling" in First Steps,
WATER/MOISTURE/FROST
INSIDE FREEZER
Freezer istouching the wall,
First Steps, Re-levelfreezer, or move freezer slightly, Refer to "Leveling" in
Moisture forms on inside freezer walls. Door is slightly open, See Occurrence section "Door Problems,"
Door is kept open too long, or is opened too frequently, Open door less often,
WATER/MOISTURE/FROST
OUTSIDE FREEZER
Moisture forms on outside of
freezer.
Weather is hot and humid, which increases internal rate of frost build-up, This is normal,
Door is slightly open, causing cold air from inside the freezer to meet warm moist air from
outside, See Occurrence section "Door Problems,"
ODOR IN FREEZER
Interior needs to be cleaned, Clean interior with sponge, warm water, and baking soda,
DOOR PROBLEMS
Door will not close.
LIGHT BULB IS NOT ON
Foods with strong odors are in freezer, Cover food tightly,
Freezer is not level, It rocks on the floor when it is moved slightly, This condition can force
the cabinet out of square, and misalign door,
Light bulb is burned out, Follow directions under "Interior Light" in Freezer Features,
No electric current is reaching the freezer, See "Freezer Does Not Run,"
9

BROICH FREEZERWARRANTY
Your product is protected by this warranty
FULL ONE-YEAR
WARRANTY
LiMiTED 2ND -5TH
YEAR WARRANTY
(Sealed System)
LiMiTED
WARRANTY
(Applicableto the
Stateof Alaska)
THREE-YEAR
LIMITED FOOD
SPOILAGE PLAN
We authorize no person
be performed by Broich
NORMAL
RESPONSIBILITIES
OF THE
CONSUMER
WARRANTY
PERIOD
For one year from
original purchase
date.
During the second
through fifth years
from original
purchase date.
Time periods listed
above.
During the first three
years from original
purchase date.
BROICH, THROUGH ITS AUTHORIZED
SERVICERS, WILL:
Pay all costs for repairing or replacing any parts of
this appliance which prove to be defective in
workmanship or material.
Repair or replace any parts in the Sealed
Refrigeration System (compressor, condenser,
evaporator, dryer and tubing) which prove to be
defective in workmanship or material, and provide
the labor to install such part.
All of the provisions of the full and limited
warranties above and the exclusions listed below
apply.
THE CONSUMER WILL BE
RESPONSIBLE FOR:
Costs of service calls that are listed under
NORMAL RESPONSiBILiTIES OF THE
CONSUMER.*
Diagnostic costs and any removal, transportation
and reinstallation costs which are required
because of service. All costs for labor, parts and
transportation other than with respect to the
Sealed Refrigeration System.
Costs of the technician's travel to the home and
any costs for pick up and delivery of the
appliance required because of service.
Broich Enterprises Inc. will reimburse the owner for actual food spoilage loss in excess of $5.00 per
occurrence, but not to exceed the maximum for three years in the schedulebelow, due to failures
under normal personal, family, or household use, in the U.S.A., of this freezer to maintain food
preserving temperature provided that the food losses:
A)Are reported and the food shown to any Broich authorized servicer within 24 hours of the discovery
of the loss.
B) Are not occasioned by either the manual disconnection of the electrical power within the premises of
the owner or a general power failure or interruption of power due to a blown fuse or circuit breaker.
Size -Cubic Foot Cumulative Maximum
.5-9.9 _100
10.0-16.5 $150
16.6+ $200
to change or add to any of our obligations under this warranty. Our obligations for service and parts under this warranty must
Enterprises or an authorized Broich servicer.
This warranty applies only to products in ordinary household use, and the consumer is responsible for the items listed
below:
1. Proper use of the appliance in accordance with instructions provided with the product.
2. Proper installation by an authorized servicer in accordance with instructions provided with the appliance and in accordance
with all local plumbing, electrical and/or gas codes.
3. Proper connection to a grounded power supply of sufficient voltage, replacement of blown fuses, repair of loose connections
or defects in house wiring.
4. Expenses for making the appliance accessible for servicing, such as removal of trim, cupboards, shelves, etc., which are not
a part of the appliance when it was shipped from the factory.
5. Damages to finish after installation.
6. Replacement of light bulbs and/or fluorescent tubes (on models with these features).
EXCLUSIONS This warranty does not cover the following:
1. CONSEQUENTIAL OR INCIDENTAL DAMAGES SUCH AS PROPERTYDAMAGE AND INCIDENTAL EXPENSESRESULTING FROM
ANY BREACH OF THIS WRITTEN OR ANY IMPLIED WARRANTY.
Note: Some states do not allow the exclusion or limitation of incidental or consequential damages, so this limitation or exclusion
may not apply to you.
2. Service callswhich do not involve malfunction or defects in workmanship or material, or for appliances not in ordinary household
use. The consumer shall pay for such service calls.
3. Damages caused by services performed by persons other than authorized Broich servicers; use of parts other than genuine
renewal parts; obtained from persons other than such servicers; or external causes such as abuse, misuse, inadequate power
supply or acts of God.
4. Products with original serial numbers that have been removed or altered and cannot be readily determined.
SERVICE Since it is the responsibility of the consumer to establish the warranty period by verifying the original purchase date, keep your bill
of sale, delivery slip, or some other appropriate payment record. This written warranty gives you specific legal rights. You may also
have other rights that vary from state to state. Service under this warranty must be obtained by following these steps, in order:
1. Contact the dealer where you purchased your appliance or an authorized Broich servicer.
DEALER/SERVICER:
INSTALLATION DATE:
MODEL NUMBER:
SERIAL NUMBER:
2. If there is a question as to where to obtain service, call or write our consumer relations department at the toll-flee number
or address following: BROICH ENTERPRISES
6440 City West Parkway
Eden Prairie, MN 55344
(800) 526-6696
Product features or specifications as described or illustrated are subject to change without notice. All warranties are
made by Broich Enterprises. This warranty applies only in the 50 states of the U.S.A. and Puerto Rico.
Table of contents
Other Crosley Freezer manuals

Crosley
Crosley American Tribute Series User manual

Crosley
Crosley CFUM14LW0 User manual

Crosley
Crosley CFC05LW User manual

Crosley
Crosley CFUF14QW User manual

Crosley
Crosley XCM16SMWW Operating instructions

Crosley
Crosley WCF15E User manual

Crosley
Crosley CFC09LW User manual

Crosley
Crosley Conservator User manual

Crosley
Crosley XCM22DMWW Operating instructions

Crosley
Crosley CFCH20LW User manual