EuropAce EDY 5701T User manual

Thank you for purchasing EuropAce Oscillating Power Fan.
For safety purpose, please read this operating instruction manual carefully before using and
keep it for future reference.
7KG VENTED DRYER
EDY 5701T
EuropAce Tumble Dryer.

Safety information.......................................................................1
Product description.....................................................................4
Control panel..............................................................................5
Usage.........................................................................................6
Drying hints...............................................................................10
Drying programme....................................................................12
Care and cleaning.....................................................................13
Troubleshooting........................................................................14
Technical data...........................................................................15
Installation.................................................................................16
Environment concerns..............................................................19

1

2

3

4
5
1.) Control Panel 2.) Filter 3.) Adjustable Feet
4.) Thermostat reset button 5.) Vent Outlet 4
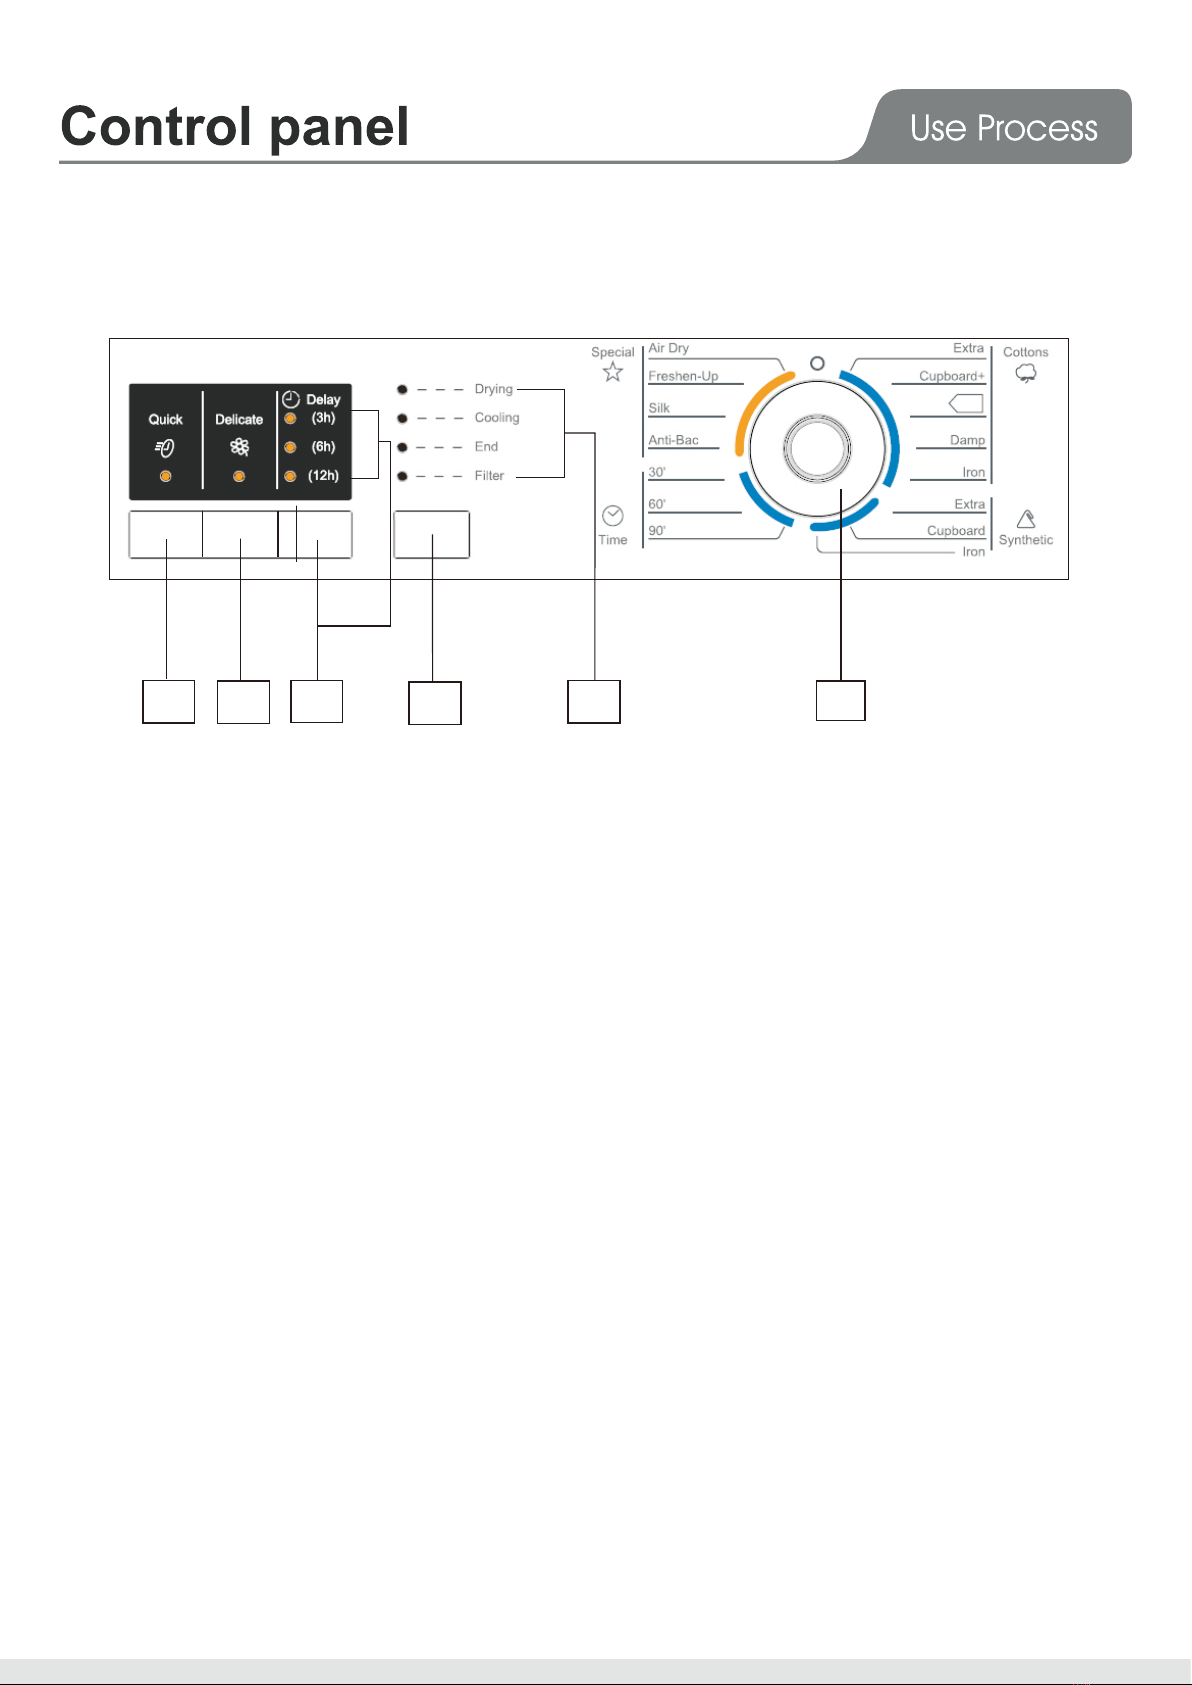
654321
1.Programme selector Dial 3.Start/Pause Button
2.Sequence Indicator Lights: 4.Delay Button and Lights
• Drying 5.Delicate Program Button
• Cooling 6.Quick Program Button
• End
• Filter
5

Turn the programme selector dial to the required programme.
The corresponding light starts to flash.The programme will be
switched off if you have not pressed any button for 10 minutes.
Note:
“ ” is for the “standard cotton programme”.The programme is suitable to dry normal wet
cotton laundry and it is the most ef
wet cotton laundry
6

If you select an option that is not compatible with the programme you have selected,
the option will not be selected.
The appliance detects the moisture in the load automatically adjust the drying time for
optimal drying.Just select the programme according to fabrics.This drying system holds
Anti-Bac,silk programme.
good for cottons,synthetics sections and
It can be selected in both cases before and after selecting option programme(Quick,Delicate).
The countdown begins after you have pressed the Start/Pause button and the corresponding light
illuminates.Press the button repeatedly to choose the programme 3,6 or 12 hours.
If you have selected a delay time by means of the relevant button,the light shows it.The countdown
is calculated automatically once you press the “Start/Pause” button,The appliance will start the delayed
process.
7
“ ”. By pressing this button the drying time will be reduced by 3-5
The option can be selected in the following programme: “Extra”, “Cupboard+”,
minutes.The corresponding light illuminates.This option cannot be selected
together with “Delicate” option.
The option can be selected in the following sections: “Cottons”, “Synthetics”.
Pressing this button allows drying to be performed at a lower temperature,for
delicate items.The corresponding pilot light comes on.This function cannot be
used with “Quick” and program “30min”, “60min” and “90min” and the “Special”
program.
These lights indicate the following functions:
“Drying” light
This light indicates that the appliance is in the drying phase.
“Cooling” light
This light indicates that the appliance is in the cooling phase.At the end of drying,
There is a 5 or 10 minutes cooling phase to cool the laundry.
“End of programme” light
This light is on at the end of the cooling phase,during the anti-creasing phase.
“Filter” light
It comes on every cycle to remind you that the filter must be cleaned and at the end of the
programme.
8

Thermostat reset
thermostat reset button
If during operation, the heating element doesn’t work.maybe
the manual thermostat disconnect,first turn the programme
selector dial to position “Air Dry” and press the start button,
approximately 20 minutes later, press the thermostat reset button.
All drying programmes end with a 5 or 10 minutes cooling phase.If the laundry is not removed
at the end of the cycle,the dryer performs an anti-creasing phase(duration:30 minutes maximum).
If you do not remove the laundry,the dryer will stop automatically at the end of the anti-creasing
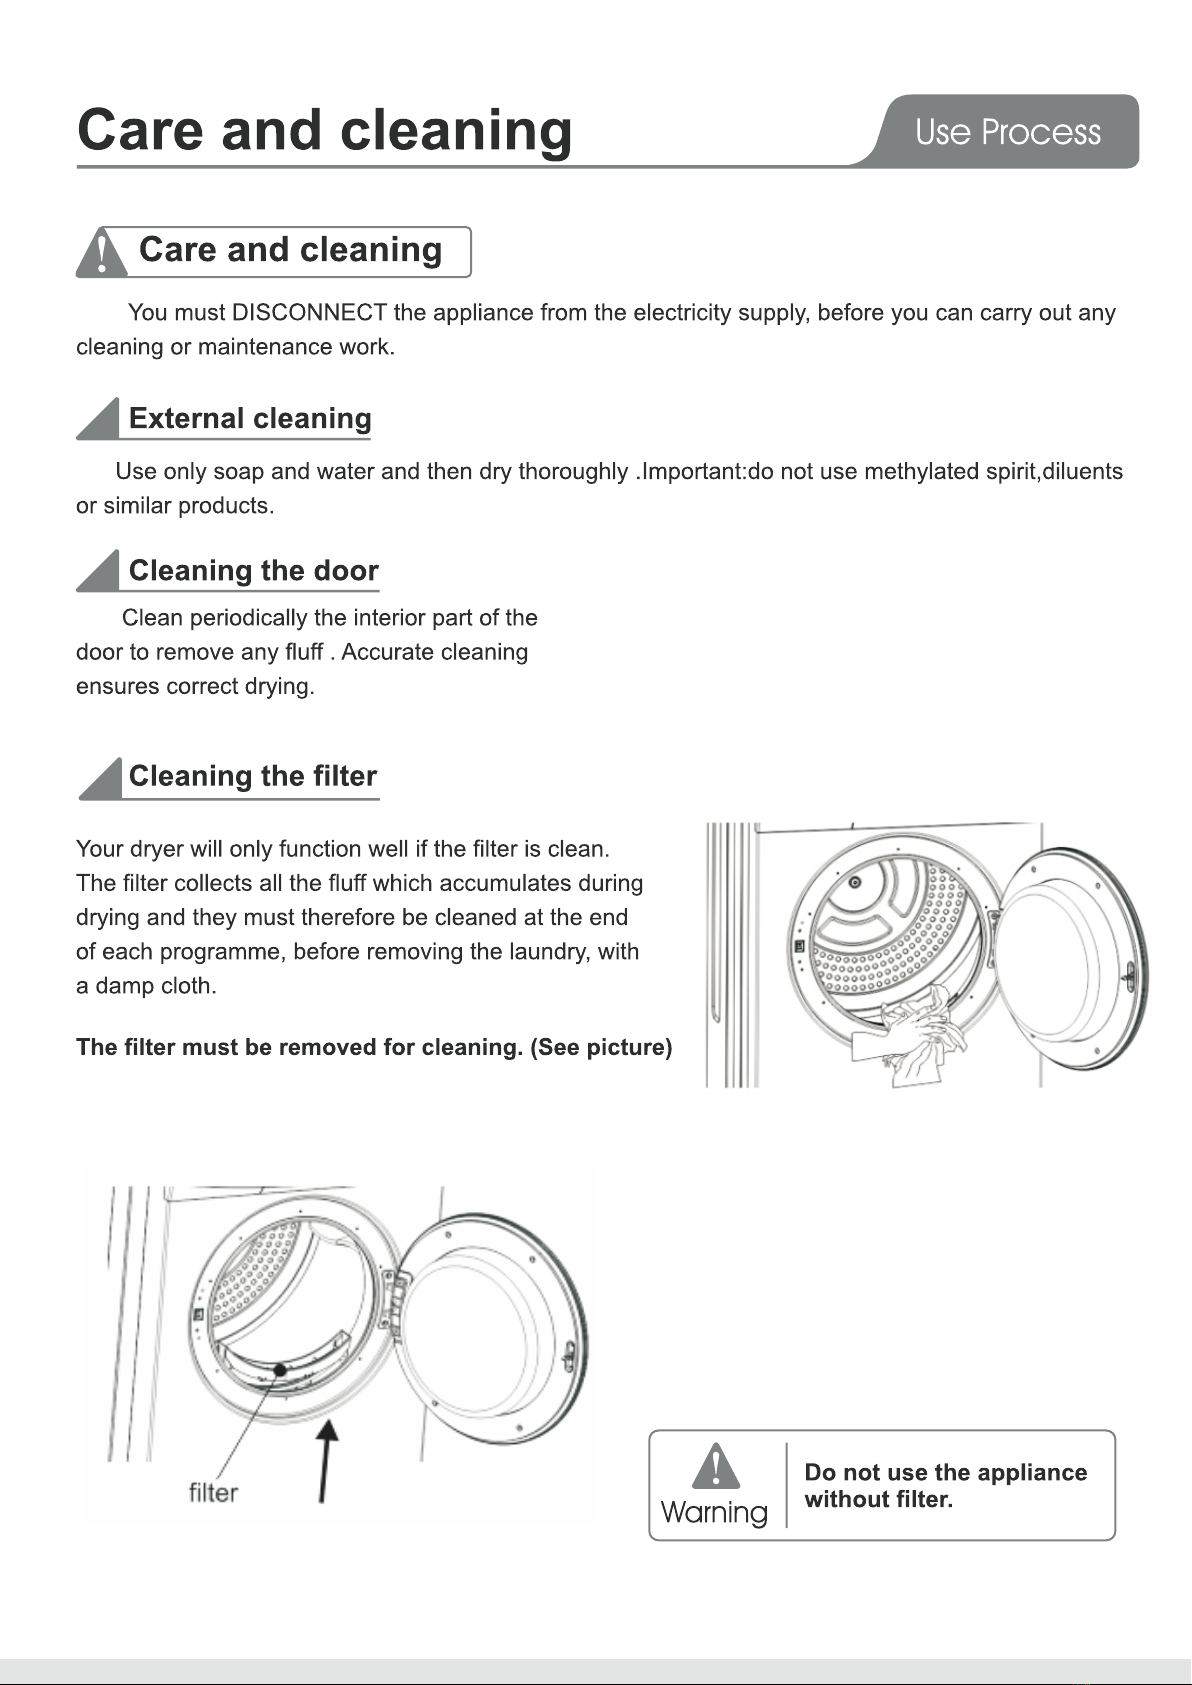
phase.The display light “Filter” shows.Turn the program selector dial to “O”,all lights go out.
Clean the filter.
Important!
If the drying programme has to be stopped before it reaches the end,we recommend that you turn
the programme selector dial to position “Air Dry” and wait until the end of this cooling phase
before removing the laundry.This will avoid a build-up of heat inside the appliance.T
turn the dial to “O” and then to “Air dry” and depress the “Start” button.
Modifying the programme
To change a programme which is running,first cancel it by turning the programme selector dial to
“O”.Select the new programme and press the Start button.
o do this first
9
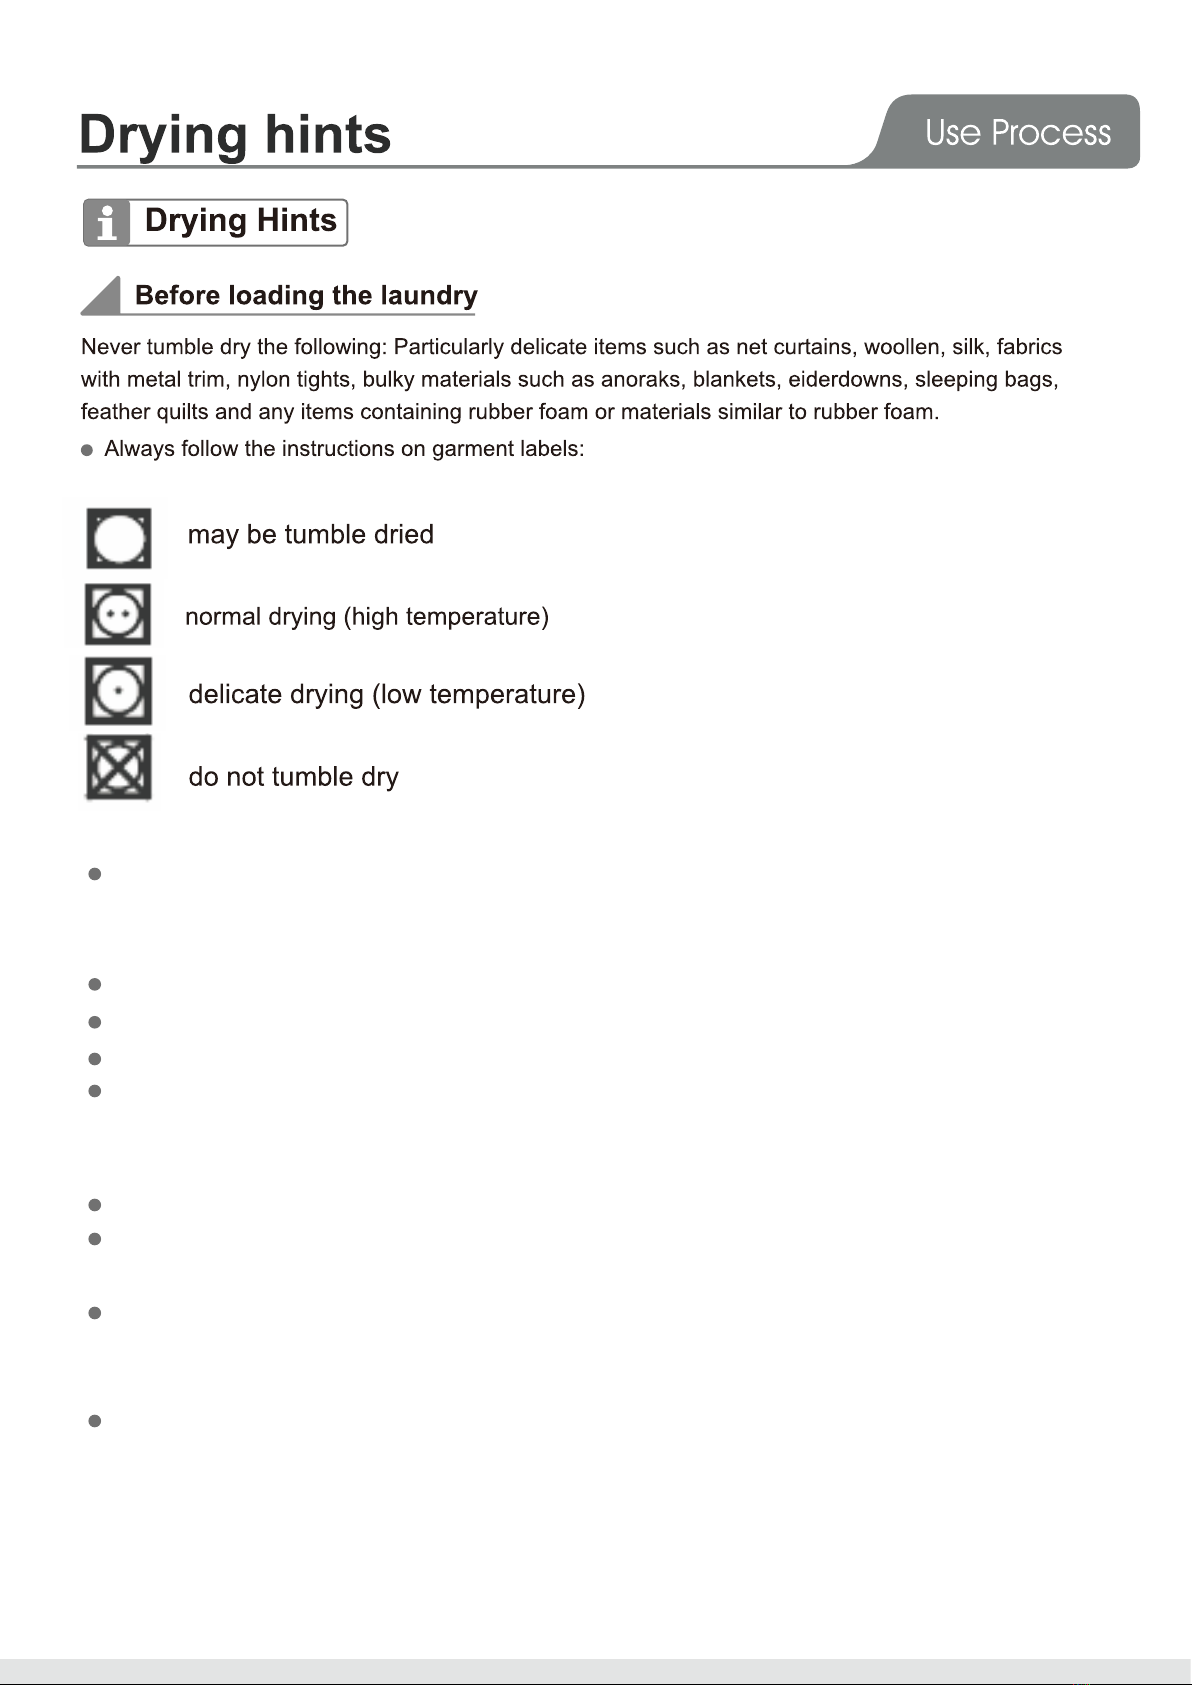
Close pillowcases and covers with fasteners to prevent small laundry items getting tangled inside
them.Close press studs,zips and hooks and tie belts and apron strings.Sort laundry according to
type and degree of drying required.
Do not over-dry laundry,this avoids creasing and saves energy
void drying dark clothes with light coloured fluffy items such as towels as they could attract the fluff.
The laundry must be thoroughly spun before tumble drying.
Close pillowcases and covers with fasteners to prevent small laundry items getting tangled inside
them.Close press stus,zips and hooks and tie belts and apron strings.Sort laundry according to
type and degree of drying required.
Easy-care items,too,e.g.shirts,should be briefly pre-spun before drying.
Knitted textiles(knitted underwear) may shringk a little during drying.Please do not over-dry items
of this type.It is advisable to allow for shrinkage when choosing the size of new purchases.
ou can also put starched items into your dryer
choose the programme “Iron dry”.To remove any starch residues,wipe out the internal drum after
drying with a moist cloth and then rub it dry
o avoid a static charge when drying is completed,use either a fabric softener when you are
washing the laundry or a fabric conditioner specifically for tumble dryers.
Y
A
T
10

11
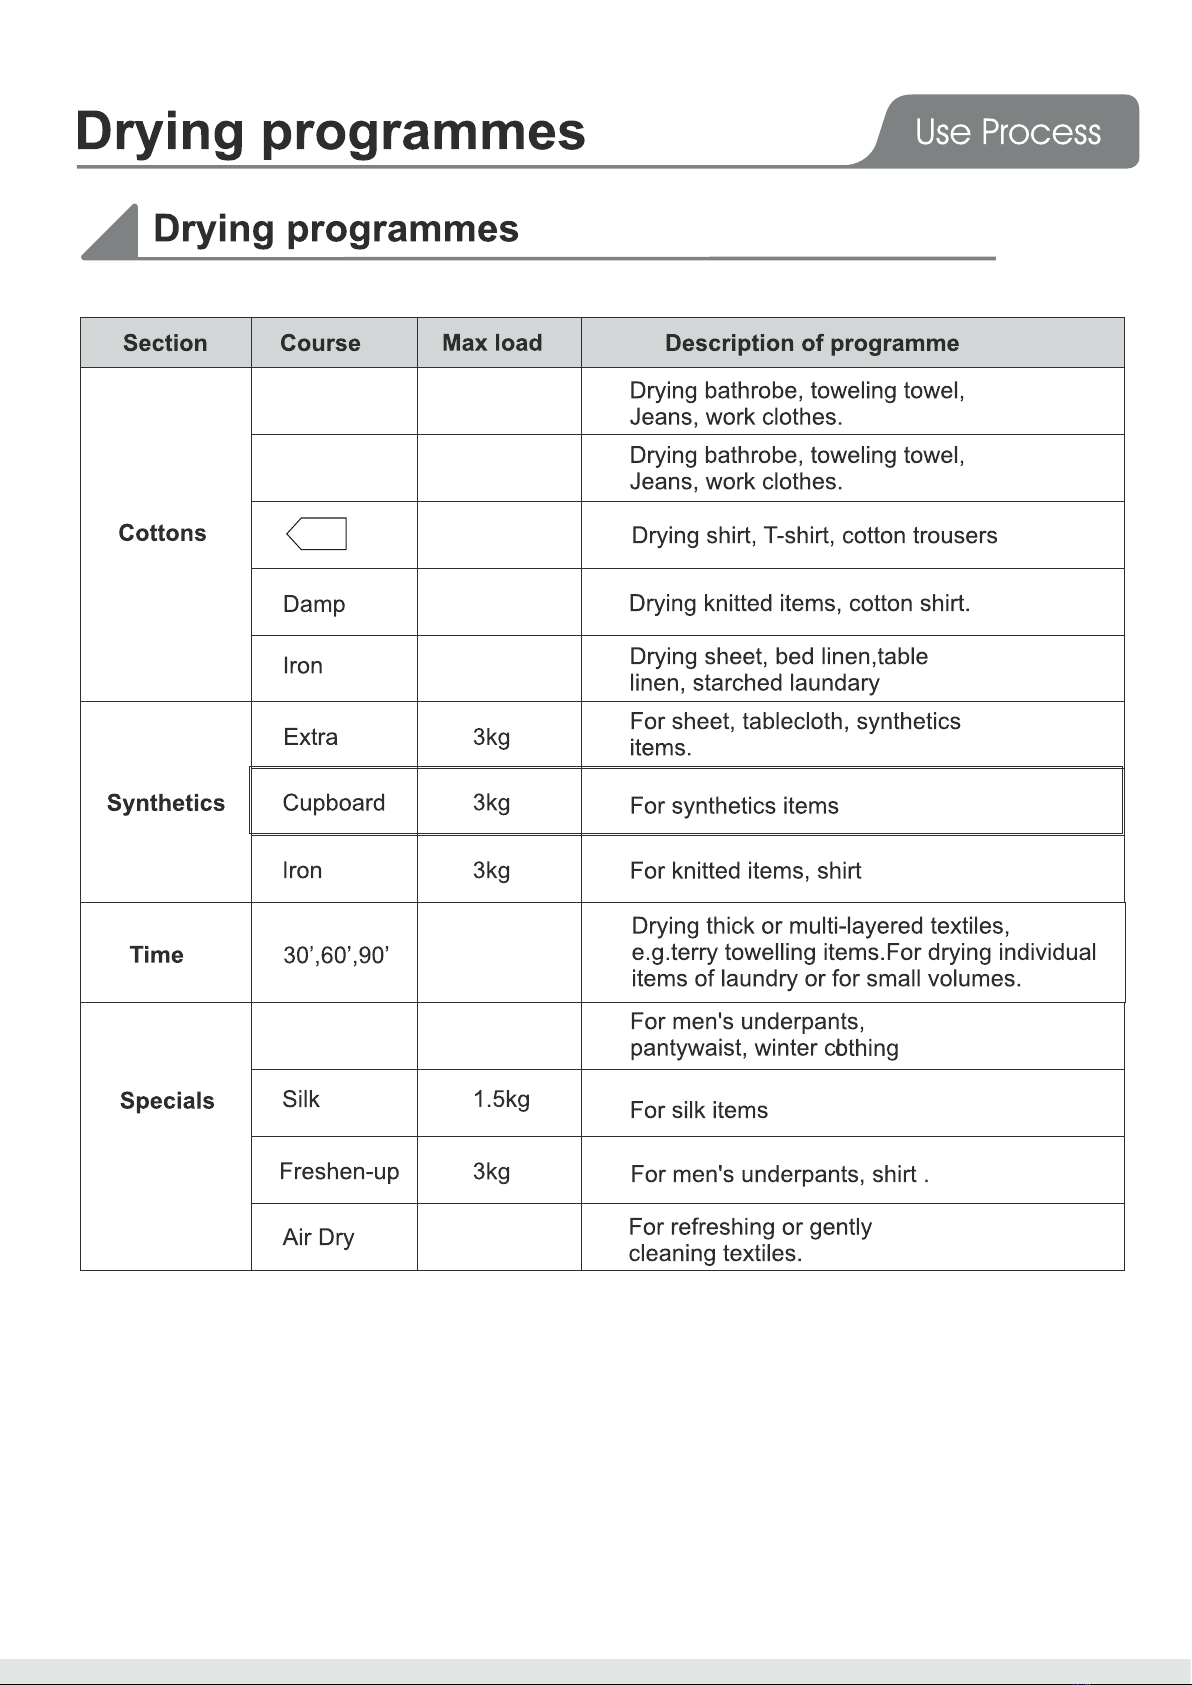
7kg
7kg
7kg
7kg
7kg
7kg
4kg
7kg
Anti-Bac
Extra
Cupboard+
12
13
If you are unable to identify or solve the problem, contact our service centre hotline.
Before making a call, make a note of the model, serial number and purchase date of your machine:
the Service Centre will require this information.
14

Note:All the above datas in the table came out base on “ ” which tested
121:2013 standard.
These datas may be different because of different laundry type, residual
moisture, environmental conditions and voltage fluctuation.
Rated Power
EDY 5701T
7.0
220-240V~ /50Hz
2350
33.5
595*555*850
Model
Dry Capacity (kg)
Voltage/ Frequency
Product Weight
Product Dimension
warranty.
call for on-site service to a fault listed below, or to repair a fault caused by incorrect use or
15

16

The hot air emitted by the tumble dryer can reach temperatures of up to 60 °C.The appliance
must there not be installed in floors which are not resistant to high temperatures.
Pull the ring nut (A) from the vent outlet , aligning arrows of hose and ring nut,fastening by
screwing hose to the direction of arrow and pushing it firmly back into place.
17
Advice:
Once connected to the dryer, run the vent hose to the desired
outlet point, it contains no more than two bends. As to the outlet
itself,if you have decided on a fixed wall/window grille, a good
local builder’s merchant should be able to supply you with the
necessary fittings and installation advice.
If the hose is long and the room temperature low, the moisture
might condense inside the hose. This is an unavoidable natural
phenomenon.To prevent this water from lying in the hose or
flowing back into the tumble dryer, it is advisable to drill a small
hole (dia. 3mm) in the lowest point of the hose and to place a small
container below it. (See picture,point B)
Table of contents
Other EuropAce Dryer manuals


