Eurostar MILANO User manual

Cordless Telephone MILANO
User's Manual

Composition and Function of the Base and Handset
Abb. 0-1 Composition
ANTENNA
SPEAKER
LCD
REDIAL/PAUSE
POWER INDICATOR
IN USE/RINING/
PAGING INDICATOR
CHARGING INDICATOR
PAGING KEY
MUTE KEY/PROGRAM
INTERRUPTION
RECALL KEY
MICROPHONE
ANTENNA
VOLUME
/PROGRAM SELECT
/DISPLAY MODIFY KEY
TALK/END KEY
PROGRAM SEARCH
TRANSFER TO MULTI-HANDSET
CALL
MEMORY KEY
POWER KEY
BASE CHARGE CONTACT
BELT CLIP
BUZZER
BATTERY
COVER
HANDSET
CHARGE CONTACT
POWER SOCKET TELLINE
SOCKET
Manual Telline Adaptor

Table of Contents
Versionsnr. 01-01D I
Table of Contents
1Safety ..........................................................................................1
2Connection of the Base and the Handset ............................... 3
2.1 Connection of the Base............................................................3
2.2 Turn on the Handset.................................................................4
3Bringing the Phone into Service ..............................................5
3.1 Charging the Handset...............................................................5
3.2 Handset Power on/off...............................................................5
4Placing and Answering Call ..................................................... 6
4.1 Placing Call ..............................................................................6
4.2 Answering Call .........................................................................6
5Function of Program Search Key ........................................... 7
6Wall mounting and Battery Replacement .............................11
6.1 Installation Environment .........................................................11
6.2 Placement ..............................................................................11
6.3 Battery Replacement..............................................................12
7Trouble Shooting Guide .........................................................13

Safety
1Versionsnr. 01-01D
1Safety
Please read this manual before use.
Precaution
Before using the phone, please read the operating instruction carefully.
Take special care to follow the safety suggestions listed below.
1. Power Source : The phone should be connected to power source of
230V AC/50Hz through only the provided AC/DC adapter (DC 9V out-
put).
2. The handset should be put on the base unit correctly for optimal
charging.
3. The AC/DC adapter does not have its own power switch. For dis-
connecting the phone from the power, the plug has to be drawn from
the power outlet.
4. Use only the delivered AC adapter as well as the delivered battery.
Technical data of the AC/DC adapter:
Type : SA41-403-3B or TE33131FD
Input : 230V AC, 50Hz 60mA
Output : 9V DC, 300mA/150mA
Technical data of the battery: 3.6V DC, 320mA,
Type GP320BVH3BMX,
Manufacturer : GP
3.6V DC, 350mA,
Type 3/V350H,
Manufacturer : Varta

Safety
Versionsnr. 01-01D 2
For Best Performance
1. The phone should be placed away from personal computer, televisi-
on, radio and fax machine.
2. If noise is high in conversation at the handset, approach the handset
to the base to lessen the noise.
3. The handset should be used at the "High" volume setting when re-
ceiver voice level is too low to hear.
4. The handset should be fully recharged on the base when the battery
low indicator is displayed.
5. The small-sized antenna of the handset should not be touched du-
ring the call for better communication quality.
6. The call distance may be shortened when the phone is used around
metal object such as wire fence, or in the following places: hill, tun-
nel, underground, etc.

Connection of the Base and the Handset
3Versionsnr. 01-01D
2Connection of the Base and the Handset
2.1 Connection of the Base
1. Insert the DC power plug into power socket (DC 9V) in the back of
the base and insert AC/DC adapter to power outlet of 230V AC/50Hz.
(Use only provided AC/DC adapter)
2. Insert one end of the telephone line cord into the base and the other
end into the telephone line(PSTN) socket on the wall.
3. Call distance will depend on the position of the base.
Therefore please keep the base in the middle of the room.
(If you want to use the phone set on the wall, please refer to page 11)
Note: If power failure takes place, the phone will not function. It is re-
commended that you may connect a reserve telephone (another tele-
phone) on the same telephone line to this phone in the event of power
failure.
Abb. 2-1 Connection of the base

Connection of the Base and the Handset
Versionsnr. 01-01D 4
2.2 Turn on the Handset
1. Please press the power on key "" or just place the handset on
the cradle. Then handset number and voice volume level will be display-
ed on the LCD.
: Voice Volume Low
: Voice Volume High
2. Before using the phone, please charge the battery of the handset for
about 10 hours.
3. After charging, use the phone through the operating procedure.
Abb. 2-2 LCD Diplay
MEMORY DIAL
PAGING
TALK/RINGING
HANDSET NUMBER
BATTERY LOW
VOICE VOLUME
LOCK
MUTE
LINK DISRUPTION

Bringing the Phone into Service
5Versionsnr. 01-01D
3Bringing the Phone into Service
3.1 Charging the Handset
1. Put the handset on the cradle for charging.
2. Charge the battery of the handset for 10 hours before initial use, and
do it, if the battery low indicator "" is displayed on the LCD.
3. The handset is always charged while on the cradle.
Be sure to put the handset on the cradle after use, so that it can be
charged.
Abb. 3-1 Charging the handset
3.2 Handset Power on/off
To Power On/Off
1. Press "" key of handset or, just place handset to Powered-on
base or charger.
2. Press "" key of handset until Power off.

Placing and Answering Call
Versionsnr. 01-01D 6
4Placing and Answering Call
4.1 Placing Call
Placing Call
Make handset and base power on. Dial
Pre-Dial
1. Make handset and base power on.
2. Dial or Dial
4.2 Answering Call
Auto Answer
Used when handset is in charging stage.
Answer can be automatically made by lifting the handset without any
keying.
Any Key Answer
Used when handset is placed separately from base or charger.
Answer can be made by pressing any key of ringing handset.
Hang-Up
By pressing key "" or just placing handset to base or charger wit-
hout pressing "" key.
Mute On/Off
During conversation
Temporal Voice Volume
During conversation
For correction
on off
High Low

Function of Program Search Key
7Versionsnr. 01-01D
5Function of Program Search Key
Functions you can control with Program Search Key are as follows.
Program Interruption
The program process can be interrupted by pressing key "" while
programming or not keying within 15 seconds.
Keypad Lock / Unlock
Changing the 4 Kind of Ring Sound
Setting the Ring Volume in Handset
Key Sound on/off
Setting the Initial Voice Volume(High/Low)
Lock Unlock
Select the Ringsound
with key
Set the Ring volume
high / low / off
Set the keypad on / off
Set the Voice volume
high / low

Function of Program Search Key
Versionsnr. 01-01D 8
Pause Auto-Insertion Function
To store the dial number under PABX-System (Internal Key Phone Sy-
stem), please follow the procedure as below:
For example when PABX internal key no. is "0".
After setting the Pause Auto-Insertion, the phone makes a spot delay
automatically after "0" on the LCD, when you start dialing with "0". so,
you do not need to push the pause key manually every time, when you
make a call under PABX - system.
Use this function by Memory dialing, Redialing and Pre-dialing under
PABX-system.
Setting the Tone/Pulse Mode
This function can not be used in some countries.
Storing Number in Memory
There are ten memory locations (0,1 ... 9) for storing numbers. Each
location can store a Max. 20 digits.
Precaution: Under PABX-System (Internal Key Phone System) you
should dial the PABX internal key no. firstly (for example " 0 ") and
dial the number you want to store.
In this case refer to Pause Auto Insertion Function (page 8).
Set the Internal key
number (0~9, off)
Select the
Tone/Pulse Mode
Telephone No.
Press the memory Max 20 digits
location no.

Function of Program Search Key
9Versionsnr. 01-01D
Erasing or Changing the Stored Number
Placing Call with the stored number in memory
Notice: If you press key "" once, the firstly stored memory dial is dis-
played on the LCD.
If you press the key two times, the secondly stored memory dial is dis-
played on the LCD.
for Pre-Dialing
Redial or
Call Transfer through PABX
Used to transfer the call to the other line through internal key phone sy-
stem.
During conversation
Call Transfer to Multi-Handset
Use this function after registering the Muilti-Handset.
How to register the Multi-Handset, please refer to "registering the hand-
set" as belows.
During conversation
Telephone No.
Press the memory Max 20 digits
location no. Erasing or
changing no.
...
Internal Line no.
Multi Handy no.

Function of Program Search Key
Versionsnr. 01-01D 10
Talk Time Display
Outgoing Call: 5 seconds after dialing /Incoming Call : 1 second after
pressing key "".
Registering the Handset
In case of multi handset(max. 3 sets)
Then the registered handset no. will be displayed on the LCD with a
beep sound.
Notice: All the handsets is registered to " 0 " at production. In case
of multi handset, each handset should have a number among " 1 ~
3 " (Handset number " 0 " is not allowed in multi-handset system).
Each multi handset should be registered all in Tone or Pulse.
In case of single handset, the number of handset should be " 0 "
Put the handy on the base unit
as charging mode
Enter no. of extra
handy(from 1~3) on the base unit
Put the handy on the base unit
as charging mode on the base unit

Wall mounting and Battery Replacement
11 Versionsnr. 01-01D
6Wall mounting and Battery Replacement
6.1 Installation Environment
1. Water and Moisture: Keep the phone away from water and moisture,
for example, near a bathtub, washbowl, or the like. Damp basement
should also be avoided.
2. Heat: The phone should be installed away from heat sources such
as radiators and the like. It also should not be placed in rooms where
the temperature is less than 0° C or higher than 55° C
6.2 Placement
1. Magnetism: The phone should be placed away from equipment or
devices that generate a strong magnetic field.
2. Stacking: Do not place heavy objects on the top of the phone.
3. Surface: Place the phone on a flat, level surface.
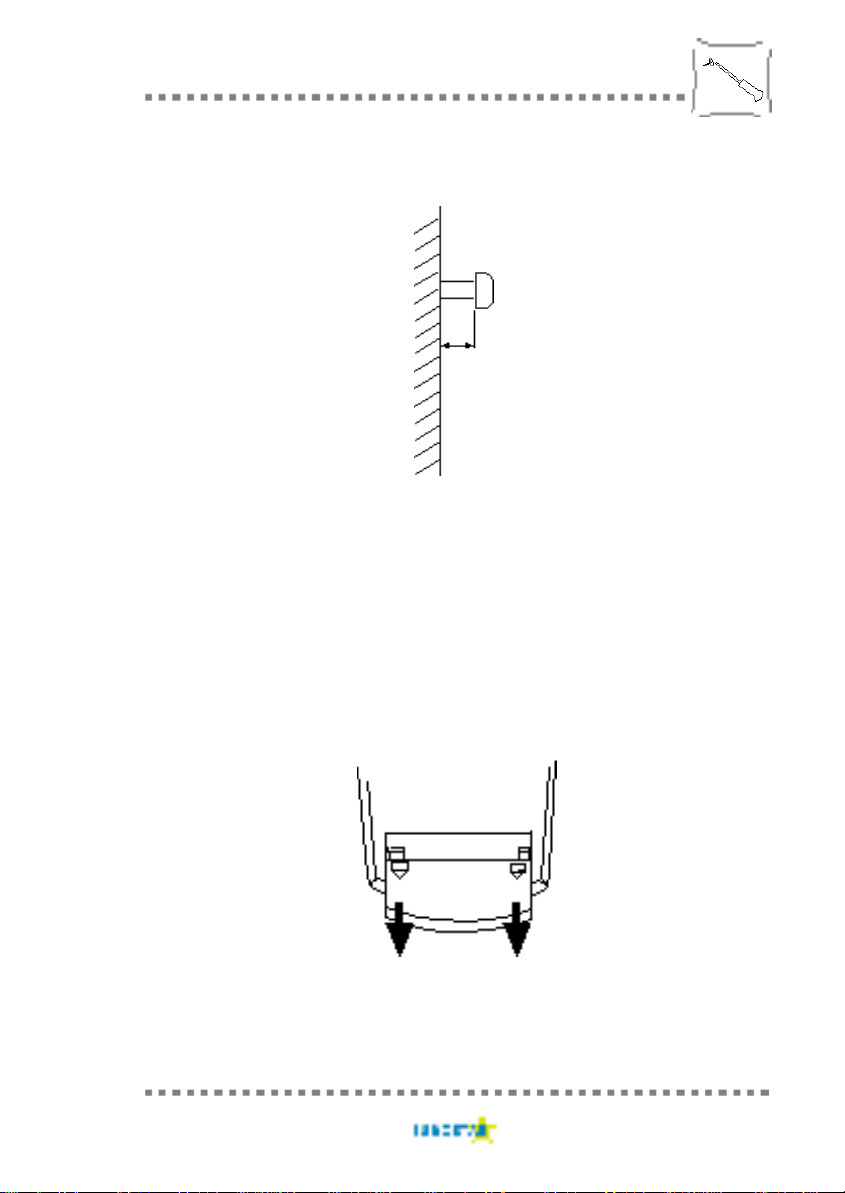
1. Choose the wall side.
2. Mark the two points with distance 71mm on the wall as belows.
Abb. 6-1 Drilling plan
71mm (distance)
Wall mounting and Battery Replacement
Versionsnr. 01-01D 12
3. Use the nail or screw for installation.
Abb. 6-2 screws’ height
6.3 Battery Replacement
1. Remove the battery cover.
2. Remove the battery.
3. Install the new battery.
4. Put the battery cover.
Abb. 6-3 Battery cover
8 mm

Trouble Shooting Guide
13 Versionsnr. 01-01D
7Trouble Shooting Guide
Tab. 1: Trouble shooting guide
Problem Cause & Remedy
1. The phone does not work. The battery is needed to be charged.
The AC/DC adapter is not plugged into power
outlet.
The connection of the phone is made impro-
perly.
You are too far from the base unit. Move clo-
ser to the base unit.
Check, if the Handset and Base are turned
on.
2. Sound flutters with fading. You are too far from the base unit. Move clo-
ser to the base unit.
3. The battery was charged for 10 hours,
but the battery low indicator turns on after
just a few calls.
Check the charge indicator during charging.
Charge the battery fully and properly again.
Wipe out the charge contact with smooth
cloth.
4. While operating the phone, the AC/DC
adapter feels warm. This is normal.

ACHTUNG!
WICHTIGE GARANTIEUNTERLAGE
BITTE UNBEDINGT AUFBEWAHREN !
Lieber Kunde,
wir freuen uns, dass Sie sich für eine Qualitätsprodukt der Marke ent-
schieden haben. Sollte sich an Ihrem Gerät wider Erwarten ein techni-
sches Problem ergeben, beachten Sie bitte folgende Punkte:
•Die Garantiezeit für Ihr Gerät beträgt 6 Monate.
•Bewahren Sie unbedingt den Kaufbeleg und die Originalverpackung
auf.
•Sollte ein Problem auftreten, rufen Sie bitte zuerst unsere Hotline an:
0180 / 5007414 ( 1 Minute = 0,12 Euro)
Oft kann unser Fachpersonal telefonisch weiterhelfen.
•Kann jedoch der Fehler telefonisch nicht beseitigt werden, bitten wir
Sie das Gerät in der Originalverpackung an folgende Anschrift zu
senden: Service - Center Hattingen
Weg zum Wasserwerk 10
45525 Hattingen
Garantiereparaturen können nur mit beigefügtem Kaufbeleg erfolgen.
Herzlichen Dank für Ihr Verständnis.
Table of contents


