EuroWorldNetwork HD2011IR User manual

Contents | 1

2 |
HD2011IR User Manual
Notice
This manual can help you to become familiar with the many great features of our high definition
digital Satellite receiver, as well as how to use and operate these functions of our receiver. All the
safety and operating instructions should be read before the receiver is operated. Please keep the
manual in a safe place so that it can be easily referred to later.
The following symbols will serve as follows:
Indicates any other additional important or helpful information.
Indicates warning information.
“MENU”
(Double quotation marks) Indicates a button on the remote control or the receiver.
To reduce the risk of electric shock, do not remove the receiver cover
(or back). No user serviceable parts inside. Refer all servicing needs
to your supplier or to a qualified service technician.
Indicates dangerous voltage inside the product that presents a risk of
electric shock or personal injury.
Indicates important-operating and maintenance instructions
accompanying the product.
HDMI, the HDMI Logo and High-Definition Multimedia Interface are trademarks or
registered trademarks of HDMI Licensing LLC.
Manufactured under license from Dolby Laboratories.
“Dolby” and the double-D symbol are trademarks of Dolby Laboratories.

HD2011IR
User Manual |
3
Safety and Precautions Attention when installing
the receiver
Install on an even plane.
Don’t install in the cold or under direct sunlight.
Leave a minimum 10cm gap all around the product.
Don’t disassemble, repair or reorganize the product.
Use and care of the receiver
Place the product in a well-ventilated area.
Place the product where dust and other materials do not build up.
Don’t plug in with several other power plugs.
Don’t place the product where there are extreme vibrations or near magnetic
forces.
Don’t place objects on top of the product.
Don’t place cups that hold water or other liquids on top of the product.
“ The main plug is used to disconnect the device. The disconnected device shall remain readily operable. ”

4 |
HD2011IR User Manual
FCC INTERFERENCE STATEMENT
FCC ID:
This equipment has been tested and found to comply with the limits for a Class B digital device,
pursuant to Part 15 of the FCC Rules. These limits are designed to provide reasonable protection
against harmful interference in a residential installation.
This equipment generates, uses and can radiate radio frequency energy and, if not installed and
used in accordance with the instructions, may cause harmful interface to radio communications.
However, there is no guarantee that interference will not occur in a particular installation.
If this equipment does cause harmful interference to radio or television reception which can be
determined by turning the equipment off and on, the user is encouraged to try to correct the
interference by one or more of the following measures:
z
Reorient or relocate the receiving antenna.
z
Increase the separation between the equipment and receiver.
z
Connect the equipment into and outlet on a circuit different from that to which the receiver is
connected.
z
Consult the dealer or an experienced radio/TV technician for help.
z
Only shielded interface cable should be used.
Finally, any changes or modifications to the equipment by the user not expressly approved by the
grantee or manufacturer could void the user’s authority to operate such equipment.

HD2011IR
User Manual |
5
Table of Contents
Chapter 1. Before You Begin ························ 7
1.1 Features·············································· 8
1.2 Package Contents ······························ 9
1.3 Names of Each Part·························· 10
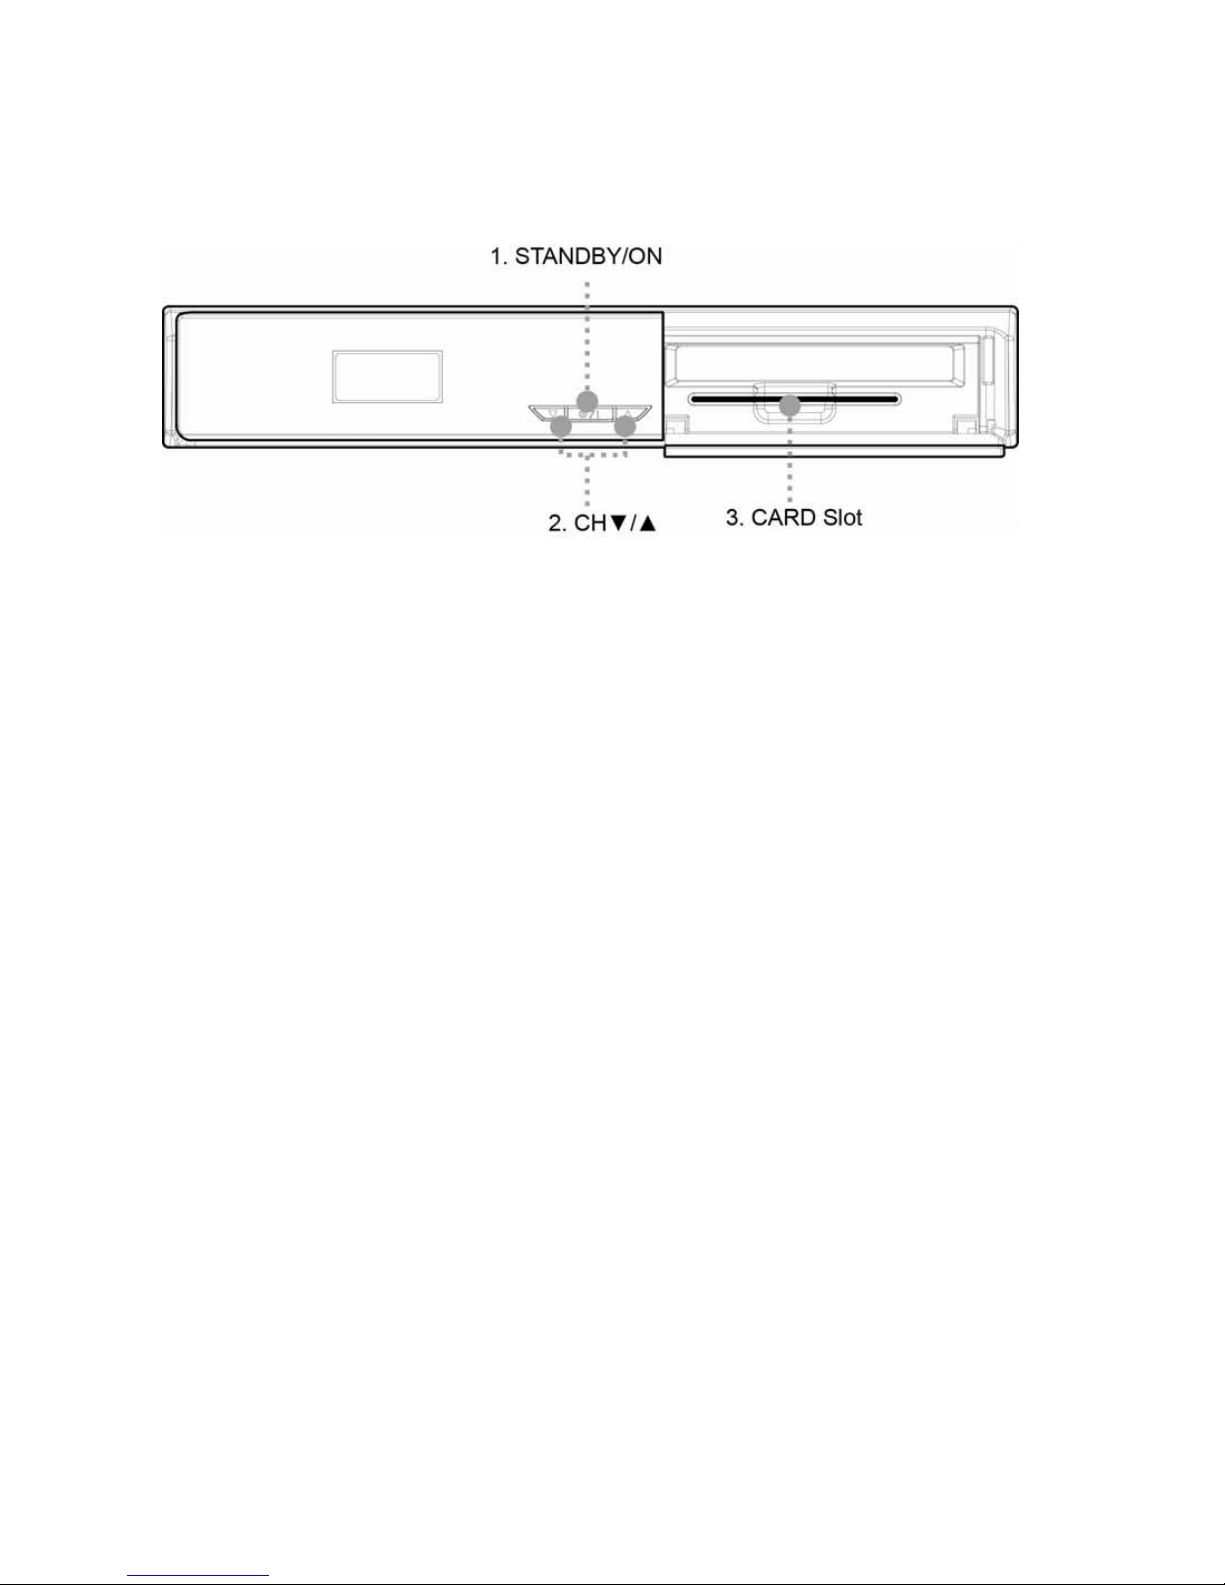
1.3.1 Front Panel ···································· 10
1.3.2 Rear Panel ····································· 11
1.4 Names of Remote Button ················· 12
Chapter 2. Connections ······························ 15
2.1 Connecting a TV ······························· 16
2.2 Connecting a Dish ···························· 18
2.3 Connect the Optical S/PDIF ············· 19
2.4 Starting Up ········································ 20
Chapter 3. Basic Settings ··························· 21
Chapter 4. Operations ································ 27
[Basic Functions]····································· 28
4.1 Changing Channels ·························· 28
4.2 Adjusting Volume ······························ 28
4.3 Viewing Program Information ··········· 29
4.4 Changing Subtitle Language ············ 30
4.5 Changing Audio Language ··············· 31
[Advanced Functions] ····························· 32
4.6 Managing Channel List ····················· 32
4.6.1 Displaying Channel List ················· 32
4.6.2 Editing Channels···························· 33
4.7 Managing Favorite Channel Lists ····· 34
4.8 Managing Edit Channel Lists ············ 36
4.9 Changing Channel Mode ·················· 37
4.10 Viewing Program Guide ·················· 38
4.11 Viewing Teletext ······························ 39
4.12 Switching TV and Radio·················· 39
4.13 Changing Video Format ·················· 40
Chapter 5. Settings ····································· 41
5.1 Channel Search ································ 43
5.2 Channel Manager ····························· 43
5.3 User Setting ······································ 44
5.4 Tools ················································ 44
5.5 Common Interface & Irdeto··············· 45
5.5.1 Irdeto CA Status ····························· 45
Chapter 6. Appendix ··································· 47
6.1 Trouble Shooting ····························· 48
6.2 Specification ···································· 49

6 |
HD2011IR User Manual

HD2011IR User Manual | 7
Chapter1
BeforeYouBegin

8 |
HD2011IR User Manual
1.1 Features
The satellite receiver is one of the best Digital Satellite receivers for the new High-Definition
Multimedia Interface. The satellite receiverI adopts the latest MPEG-4 technology thus you can
enjoy the various TV and radio programs. The simple connection and easy-of-use operation, user-
friendly three-dimensional OSD, highest quality audio output with S/PDIF for Dolby Digital.
Furthermore, the satellite receiver provides the enhanced Electronic Program Guide (EPG), various
utilities, and various channel sorting.
<Main Features>
z
Fully Compliant to MPEG-4 Part10 AVC HD/H.264 Standard
z
Fully Compliant to DVB-S/S2 Satellite Standard
z
MP Layer I and II, CD quality audio sound
z
S/PDIF for Dolby Digital Audio Output
z
Dolby Digital Down-Mix Output Support
z
Mono, Left, Right, Stereo, Audio Output Support
z
PCM with Decoded Stereo AAC Stereo or Decoded MPEG I layer II (Musicam) Audio Output
Support
z
Easy And Fast Auto Programming, Intuitive User Interface
z
Various Video Display Format With 576i/576p/720p/1080i Support
z
Various Video Aspect Ratio With 4:3, Letter Box, Full Screen And 16:9 Support
z
CVBS, HDMI, YPbPr Video Output Support
z
Luxurious And Elegant Front LCD Display for Service Number and Time display
z
Software Upgrade Via USB 2.0
z
Separated TV/Radio/All List & Favorite Group List
z
Multi Language Support
<Other Features>
z
Powerful and easy functions for editing (Lock, Delete, Rename Channel & Favorite group)
z
Electronic Program Guide (EPG) for On Screen Channel Information
z
Multi-language Function
z
Auto searching & manual searching function
z
Parental lock function
z
Teletext and subtitle supported by VBI and OSD

HD2011IR User Manual | 9
1.2 Package Contents
Please check to make sure the following contents are in the product package.
z
Product contents may be subject to change.
z
Cables not specified above must be purchased separately.

10 |
HD2011IR User Manual
1.3 Names of Each Part
1.3.1 Front Panel
1. STANDBY/ON
Switches the digital receiver between standby mode and operation mode.
z
Operation mode
→Front Panel displays the 7-Segment (current service number).
z
Active Standby Mode
→Front Panel displays the 7-Segment (current time).
→Switches between Active Standby Mode and Operation mode by
Press [O/l] on the Front Panel
2. CH ▼/▲
Changes channels in the No-menu State and moves the cursor up/down in the Menu state.
3. CARD Slot
Card slot for Irdeto program card.

HD2011IR User Manual | 11
1.4 Rear Panel
1. USB
USB2.0 connector for software upgrade.
2. S/PDIF
Connect S/PDIF to audio input of your amplifier with optical digital port via an
optical cable.
3. VIDEO (YPbPr)
Connect Y/Pb/Pr output of VIDEO to Y/Pb/Pr video input of your TV via a RCA cable.
4. AUDIO L/R
Connect AUDIO L/R to the matching Audio Inputs of your TV/VCR via a RCA cable.
5. CVBS
This CVBS provides a composite video output.
6. LNB IN (13/18V 400mA MAX)
Connect the coaxial cable from LNB.
7. LNB OUT
Connect to another STB
8. HDMI
If you have TV supporting HDMI, connect HDMI to your TV using a HDMI cable.

12 |
HD2011IR User Manual
1.4 Names of Remote Button
STANDBY
Switches the digital Receiver between standby mode
and operation mode.
zOperation mode
→Front Panel displays the 7-Segment (current
service number).
zActive Standby Mode
→ Front Panel displays the 7-Segment (current
time).
→ Switches between Active Standby Mode and
Operation mode by Press [standby] in RCU.
MUTE ( )
To mute the sound.
NUMERICAL BUTTONS
To enter a TV/Radio channel number or characters.
OPTIONS
To show the audio, teletext, and subtitle list(s).
EPG
To display the Electronic Program Guide. Press again to
return to the normal mode.
INFO
To display the information about the channel.
FAV
To make up favorite group by TV, Radio and by your
choice.
MENU
To show the menu OSD.
EXIT
To exit from the current menu or cancel the current
operation in menu state.
OK
To select a menu or confirm the user’s action and display
the channel list during watching a program.

HD2011IR User Manual | 13
▲/▼
To change the TV/radio channels Up/Down.
◄/►
To increase or decrease TV/Radio volume level or change the value of an item with
preprogrammed values.
VOL +/-
To change the TV/Radio volume.
P +/-
To change the TV/Radio channels Up/Down.
PAGE ( )
To change the TV/Radio channel lists by the page.
COLOR BUTTONS (R, G, Y)
To perform the interactive menu application.
RECALL (Hereafter “Blue”)
To return to the previous chosen channel.
TEXT ( )
To display the teletext information about the channel if applicable.
TV/RADIO( )
To switch the product TV or Radio.
SUBT ( )
To display the provided subtitle language lists of the current channel.
STB /TV
To select the input source between terrestrial
and TV.
PAUSE
To pause the video screen.
V.Format
To change video output format to
1080i, 720p, 576i, 576p, and Auto.

14 |
HD2011IR User Manual
: Angle of remote control use
The remote control can be used at a distance of up to 7 to 10 meters, and at an angle of 30
degrees from the remote control led.

HD2011IR User Manual | 15
Chapter2
Connections

16 |
HD2011IR User Manual
This chapter describes how to connect the product to your home entertainment system. Choose
the most appropriate procedure depending on your environments.
: If you encounter with any problems or have any questions during connecting the
product, please contact your local product distributor.
2.1 Connecting a TV
1. Connecting a TV with YPbPr (If your TV has YPbPr input)
1) Connect the VIDEO (YPbPr) to YPbPr input of your TV.
2) Connect the AUDIO L/R to Audio input of your TV.
3) Go to
2.2 Connecting to Dish,
and then connect your dish.

HD2011IR User Manual | 17
2. Connecting a TV with CVBS
1) Connect the VIDEO to CVBS input of your TV.
2) Connect the AUDIO L/R to Audio input of your TV.
3) Go to
2.2 Connecting to Dish,
and then connect your dish.
3. Connecting a TV with HDMI (If your TV has HDMI input)
1) Connect the HDMI output to HDMI input of your TV.
2) Go to
2.2 Connecting to Dish,
and then connect your dish.

18 |
HD2011IR User Manual
2.2 Connecting a Dish
1. Dish
Connect the satellite antenna cable to the LNB IN.
2
.
Fixed Dishes Using DiSEqC
Connect the output of DiSEqC to the LNB IN of the receiver.

HD2011IR User Manual | 19
2.3 Connect the Optical S/PDIF
If you watch a program encoded by a Dolby Digital, you can enjoy the higher quality sound of the
Dolby Digital audio
.
Connect the optical S/PDIF to Dolby Digital decoder or Digital television.

20 |
HD2011IR User Manual
2.4 Starting Up
1. Connect the power cord of the product to a power outlet and press the “Power” button at the
rear panel to turn the product on.
2. The first time you power up the product, it will display the initial screen, then some parameters
for system configuration should be set. Refer to the following chapter for detailed information
about the basic settings.
Table of contents