EVEREADY AS1-3KS-5.1 User manual

1

2
CONTENT
Chapter One General Precautions............................................................................5!
1.1 Safety Tips (Symbols)................................................................................5!
1.2 Symbols instructions..................................................................................7!
Chapter Two Product Introduction...........................................................................9!
2.1 Introduction of System...............................................................................9!
2.2 System Diagram.......................................................................................11!
2.3 Product Model Description......................................................................11!
2.4 Product Datasheet ....................................................................................12!
2.5 Package Contents [Primary unit] .............................................................15!
2.6 Package Contents [Secondary unit] .........................................................16!
2.7 System Appearance..................................................................................17!
2.7.1 Physical Dimensions.....................................................................17!
2.7.2 Primary Unit (Interface)................................................................18!
2.7.3 Electrical Interface Description of Primary ..................................19!
2.7.4 RS232 Pins of Primary .................................................................20!
2.7.5 Demand Response Management (DRM) ......................................21!
Chapter Three System Installation..........................................22!
3.1 Installation Site & Environment ..............................................................22!

3
3.2 Installation Tools Preparation ..................................................................25!
3.3 Installation Procedures.............................................................................26!
3.3.1 Primary Unit [Stand-alone Installation]........................................26!
3.3.2 Combined Installation [Primary & Secondary Units]...................29!
Chapter Four Electrical Connections ........................................33!
4.1!System Wiring Schematic .................................................................33!
4.2!Wiring for Primary..........................................................................34!
4.3 Combined Wiring (Primary & Secondary Units).....................................38!
4.4 CT/Meter Connections.............................................................................44!
4.4.1 Default method - CTs only............................................................44!
4.4.2 Energy Meters (Optional) .............................................................47!
4.5 Meter address setting ...............................................................................51!
4.5.1 Single Phase meter Settings (DDSU666) .....................................51!
4.5.2 Three phase meter Settings (DTSU666) .......................................52!
4.6 External AC Circuit Breaker and Residual Current Device .....................53!
Chapter FIVE .........................................................................................................54!
System commissioning ..........................................................................................54!
5.1 System commissioning ............................................................................54!
5.1.1 Install Monitoring Module............................................................54!

4
5.1.2 Pre-Installation checks ..................................................................57!
5.1.3 Start up the System .......................................................................58!
5.1.4 Commissioning Configuration......................................................60!
5.1.5 Shut Down the Inverter.................................................................66!
Chapter Six Fault Codes ........................................................................................68!
Chapter Seven Battery Maintenance......................................................................71!
7.1 Transportation ..........................................................................................71!
7.2 Storage .....................................................................................................71!
7.3 Cleanliness ...............................................................................................72!
Appendix I: Brief Introduction about the system operation modes:......................73!
Appendix II: Setting Reactive Power Control .......................................................75!
Appendix III: Earth Fault Alarm............................................................................79!
Chapter Eight Contact Us ......................................................................................82!
Limitation of Liability....................................................................................83!
WARRA N T Y CARD .............................................................................................84!

5
Chapter One Safety Instructions
This manual provides information about the installation, operation, and
maintenance of the Eveready Energy Vault (“Eveready”). It is targeted at qualified
personnel undertaking the Installation of the Battery Energy Storage System (BESS)
and associated equipment. It is recommended to read the entire document as well
as safety information carefully, prior to installing or operating the system. Incorrect
or improper usage can cause damage to the product, property and endanger life of
user or associated third party.
1.1 Safety Information (Symbols)
Danger: Danger to life due to high voltages of battery and electric shock.
• Only qualified personnel equipped with suitable specialist training,
knowledge and experience are permitted to install and debug the BESS.
• Before performing any work on the inverter or battery pack, please disconnect
the BESS from all voltage sources as described in this document.
• The Electrician should always wear the right Personal Protective Equipment
(PPE – Level 1) during installation and operation of the BESS.
• Do not touch any uninsulated DC cables,
• Do not place the BESS near a source of heat or ignition, such as a fire place,
electric or hot water heaters, sparks, or open flames.
• Do not mechanically damage or subject the BESS to any strong forces in the
form of deforming, piercing, or stripping down etc.

6
• Do not open the BESS or modify any of the protective devices such as Circuit
breakers, Isolators, or electrical cabling.
• Do not dispose of BESS in fire as the batteries may explode.
• Only use the BESS in its original state without any unauthorised
modifications and in proper working order.
• Do not attempt to repair the system yourself or with the help of a third-party
electrician, as this may result in injury or void the product warranty.
• Do not connect any undedicated battery pack to the BESS because it will
damage the system.
Warning: This indicates a situation where failure to follow instructions
may be a safety hazard or cause equipment malfunction. Use extreme
caution and follow instructions carefully.
• The battery modules installed in the BESS are protected by multiple
Electrical protection devices and can be operated safely during standard
operation. However, there is a potential for the electrolyte leakage from the
battery pack as well as form toxic gases if damaged mechanically or break
down. Therefore, it is recommended to proceed as follows,
• Do not install the system in extreme low/high temperatures or humidity
exceeding the permitted range.
• Do not expose the BESS to temperatures in excess of 45°C.
• Do not place heavy objects on top of the system or mechanically damage the
batteries (by piercing, puncturing, or deforming it)
• Do not short circuit the battery module or allow them to come in contact with

7
metal.
• Do not continue to use the battery module after a short-circuit event.
• Do not install the battery pack in the vicinity of any equipment
containing flammable gases or liquids.
• If the moisture penetrates the system (e.g. due to casing damage), please do
not operate the system and contact Eveready certified Distributor
immediately for further troubleshooting.
• If you come into contact with the electrolyte, please wash affected area with
water immediately, and consult a doctor immediately.
• Ensure that all relevant local and federal regulations are observed, and
electricians must be responsible for adhering to such regulations.
1.2 Symbols
Symbol Description
Hazardous voltage
Since the system is connected to the power grid, all
relevant operations on the battery must be performed by
qualified personnel.
No open flames
Install the battery away from inflammable and explosive
articles or gases. Keep the BESS away from corrosive
substances.

8
Danger of hot surface
During operation, internal components of
the equipment may release heat. Do not
touch the metal casing of the BESS when
it is running.
Attention
Install the BESS out of reach of children.
Refer to Error Codes
Please refer to the error code within this manual.
This device cannot be treated as household waste
For the correct treatment method,
please refer to Chapter 7
"Battery
Maintenance" within this manual.
CE mark
The equipment complies with low voltage and EMC
requirements.
Recycling & Correct Disposal
Proper disposal of this product will help save natural
resources and prevent damage to the environment.
Please contact your local authorities for further details.

9
Chapter Two Product Introduction
2.1 Introduction of System
The Eveready Energy vault is a scalable AC coupled all-in-one battery energy
storage system (BESS) and includes the following models - AS1-3KS-5.1, AS1-
3KS-10.2, AS1-3KS-15.3 and AS1-3KS-20.4 models.
The BESS systems is intended to be used for residential solar storage and can work
under several operating modes, viz. Self-consumption mode, Time-of-use (TOU)
mode and Back-up mode (refer to Appendix I), each mode catering to user’s unique
energy requirements, thereby enabling optimal usage of renewable energy.
Under Self-consumption mode, the BESS shall supply captured solar energy
towards house loads first and store the surplus energy within the battery. Any excess
is then exported to the grid as feed-in. If the Solar generation is not enough, the
system can then intelligently meet the requirement from a combination of batteries
and draw from the grid. When Blackout protection is enabled, the batteries can
supply safe and reliable back-up power towards selected back-up loads.
The primary unit [AS1-3KS-5.1] can be used independently to provide a storage
capacity of 5.1 kWh or combined with a secondary unit [B1-5.1-48] to increase the
overall battery storage capacity up to 20.4 kWh. Each primary unit can support a
maximum of 3 Secondary units.

10
Model
Capacity
Note
AS1-3KS-5.1
5.1kWh
1* Primary only
AS1-3KS-10.2
10.2kWh
1*Primary+1* Secondary
AS1-3KS-15.3
15.3kWh
1*Primary+2* Secondary
AS1-3KS-20.4
20.4kWh
1*Primary+3* Secondary
Fig. 2.1 AS1-3KS-5.1/AS1-3KS-10.2/ AS1-3KS-15.3/ AS1-3KS-20.4
Note: Please refrain from connecting any un-associated equipment to the Primary
unit [AS1-3KS-5.1] including any third-party batteries and/or unauthorized meters.
Please ensure any battery capacity expansion is conducted using the secondary unit
[B1-5.1-48] only.

11
2.2 System Diagram
The Eveready Energy Vault is designed to function seamlessly with your existing
solar PV system(s) and the utility grid as per the schematic below.
Fig. 2.2 Eveready Installation Schematic
2.3 Product Model Description
AS1 – XKS – XX
① ②③④
① AS1 represents the product series.
② XK indicates the rated power of the product X kW, such as 3K for 3kW.
③ S represents single phase.
④ Indicates the built-in battery capacity, such as 5.1 for 5.1kWh

12
2.4 Product Datasheet
Datasheet of Primary Unit
Type
AS1-
3KS-5.1
AS1-3KS-
10.2
AS1-3KS-
15.3
AS1-3KS-
20.4
Battery Parameters
Battery Type
LiFePO4 (Lithium iron phosphate)
Total Energy Capacity [Wh]
5120
10240
15360
20480
Battery Capacity [Ah]
100
200
300
400
Rated Voltage [V]
51.2
Voltage range [V]
42~58.4
Depth Of Discharge [DOD]
≤90%
Max.Charge Current [A]
60
Max.Discharge Current [A]
60
Max.Charge Power [W]
3000
Max.Discharge Power [W]
3000
Scalability*1
Primary
Primary+1
*Secondar
y
Primary+2
*Secondar
y
Primary+3
*Secondar
y
Grid Parameters
Max. Continuous Output Power
[VA]
3000
Max Output Current
[A]@230Vac
13.1
Rated Grid/Backup Voltage
230
Rated Grid/Backup Frequency
[Hz]
50 Hz

13
Power factor [cos φ]
0.8 leading ~ 0.8 lagging
Max Output Fault Current a.c
(A)
28
Max Output Overcurrent
Protection a.c. (A)
28
AC Output [Back-up Mode]
Max. Continuous Output Power
[VA]
3000
Output Voltage [V]
230
Max.Output Current
[A]@230Vac
13.1
Output Frequency [Hz]
50
Max.Output Power [VA]
3600 ,10sec
General Data
Inverter Max. Efficiency
93%
Communication Mode
Wi-Fi/4G(Optional)
Operating Temperature Range
0°C~45°C
Cooling Method
Natural Convection
Ambient Humidity
0-95% Non-condensing
Altitude
4000m (>3000m power derating)
Compatible RCD type/ rating
Type A or Type B/ 30mA
Noise[dBA]
<29
Ingress Protection
IP65
Dimensions[H*W*D][mm]
738*650
*186
1160*650*
186
1580*650*
186
2000*650*
186
Weight [kg]
64
112
160
208
Standard Warranty [Year]
7

14
Applicable Standards
AS 62040.1:2019, IEC 62619:2017, IEC 62040.1-
2017, AS/NZS 4777.2:2015
Datasheet of Secondary Unit
Type
B1-5.1-48
Electrical Characteristics
Total Energy Capacity [Wh]
5120
Usable Capacity [Wh]
4600
Rated Voltage [V]
51.2
Voltage range [V]
42~58.4
Depth of Discharge [DOD]
≤90%
Max.Charge Current [A]
60
Max.Discharge Current [A]
60
Max.Charge Power [W]
3000
Max.Discharge Power [W]
3000
Prospective Short Circuit
Current [A]1
1000 (Estimated)
1The battery is certified to AS62040.1:2019 & IEC 62619 standards, and the value is
estimated. In line with requirements, the battery is equipped with BMS Overcurrent
Protection requirements.
Physical Parameters
Battery Type
LiFePO4 (Lithium iron phosphate)
Communication
CAN
Operating Temperature Range
-10°C~50°C
Cooling Method
Natural Convection
Ambient Humidity
0-95% Non-condensing
Ingress Protection
IP65

15
Dimensions[H*W*D] [mm]
410!x!650!x!186
Weight [kg]
48
Standard Warranty [Year]
7
Applicable Standard
AS 62040.1:2019, IEC 62619:2017
2.5 Package Contents [Primary unit]
The Eveready Primary unit includes the following items within the package.
Ensure that you have all the items shown below prior to installation.
1* Primary Solar Battery
1* Mounting Bracket
6* Gasket
6* Expansion tube
6*Hexagon head wood screw
1* 4G Module

16
2* CT Line
1* Cross recessed hexagon
bolts group (M6*12)
6* E6012 tubular insulator
terminal
1* User Manual
Table 2.1 Package Contents [Primary unit]
2.6 Package Contents [Secondary unit]
The Eveready Secondary unit includes the following items within the package..
Ensure that you have all the items shown below prior to installation.
1* Secondary Solar Battery
1* Mounting Bracket
1* Mounting Bracket
6* Gasket
6* Expansion tube
6*Hexagon head wood screw
2* Power Lines (B+,B-)
1* M6*12 Cross recessed
hexagon bolts
1* Ethernet cable
& 1* RJ45 plug
1* User Manual

17
Table 2.2 Package Contents [Secondary unit]
2.7 System Appearance
2.7.1 Physical Dimensions
Fig. 2.3 AS1-3KS-5.1 Primary dimensions (Unit: mm)
186
410
650

18
Fig.2.4 B1-5.1-48 Secondary dimensions (Unit: mm)
2.7.2 Primary Unit (Interface)
100%
100%
A
B
Fig. 2.5 Primary interface (Display)
LED lights state
Description
A
Green/Red LED light
Green light flicker from bottom to top
Battery discharging
Green light flicker from top to bottom
Battery charging
Red light flicker:1 s/time
Standby
Green light and red-light flicker alternatively
Firmware is being upgraded
Red light Always light on
Device n fault mode
B
Residual battery capacity percentage (SOC)
Total remained battery capacity
of the system
Table 2.3 LED Status Description (Primary)

19
2.7.3 Electrical Interface Description of Primary
Fig. 2.6 Primary - Electrical interface
Code
Port Name
Description
A
DRMS Port
DRED connection port (for AU)
B
CT/Meter
CT or Meter Connection port
C
4G/WIFI/GPRS
RS232 communication port (to inverter)
D
GRID
Grid connection port
E
BACKUP
Back-up Load connection port
F
Battery switch ON/OFF
Switching On/Off BMS
G
DC switch
Turning On/Off Battery
H
BAT+
Positive (+) Power Cable (To Secondary Unit)
I
BMS LINK
BMS Communication Port (To Secondary Unit)
J
BAT-
Negative (-) Power Cable (To Secondary Unit)
Table 2.4 Primary – Electrical Interface description

20
2.7.4 RS232 Pins of Primary
Fig. 2.7 RS232 pins
!!!!!!!!!!!!!!!!!!!!!!!!!!!!!!!!!!!!!!!Table 2.5 RS232 pins description
Note: The 4G module connects to the RS232 interface for the purpose of monitoring.
For installation and operation of the module, please refer to Chapter 3 (System
Installation)
Pin number
Name
1
NC
2
RS-232 TX
3
RS-232 RX
4
GND
Other manuals for AS1-3KS-5.1
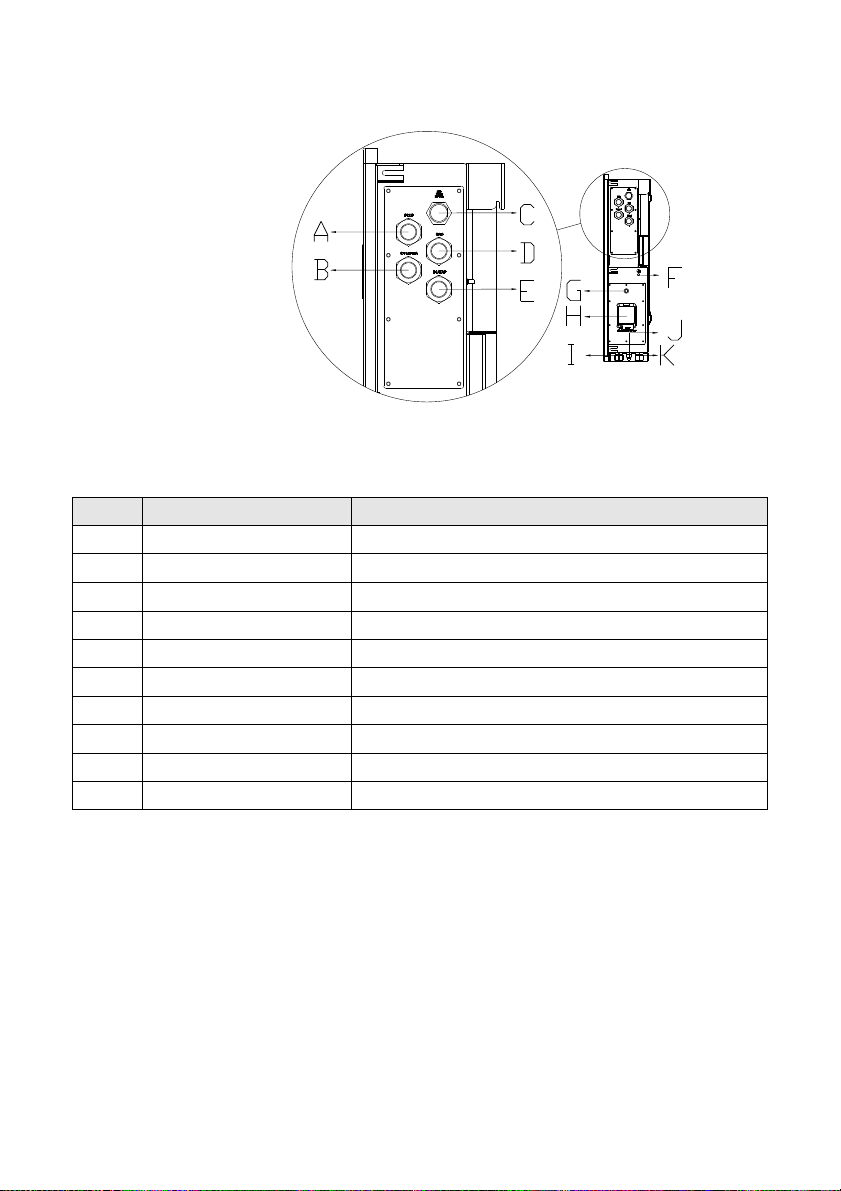
1
This manual suits for next models
3
Table of contents
Popular Inverter manuals by other brands

MPP Solar
MPP Solar PIP-MS 1-5KVA user manual

Cobra
Cobra CPI 400 operating instructions

Leroy-Somer
Leroy-Somer LSA 49.1 4P Installation and Maintenance

Resol
Resol DeltaSol AL E Manual for the specialised craftsman

LeadSolar
LeadSolar Energy Microinverter LS600 Installation & operation guide

Toshiba
Toshiba TOSVERT VF-AS3 manual