Evertune ET001 User manual
Congratulations on purchasing a guitar with
the EverTune bridge. EverTune allows players
to focus continuously on their inspiration
while holding the guitar in tune from the first
to the last note no matter what. Please read
this short instruction manual before using the
EverTune the first time. And if there are still
questions after reading this manual, please
refer to our setup page online at
evertune.com/setupfaq. Also feel free to
contact us at any time at [email protected]
and we will respond promptly.
So What is EverTune?
EverTune is an all passive system that is without batteries and
is maintenance free. It is completely invisible. Once setup by
the player, the string will just stay in tune, through temperature
changes, any size and amount of bends, any fingering
technique, any picking intensity, and any amount of string
stretching. And if one string breaks, the others stay perfectly in
tune, making EverTune the perfect guitar for all studio and live
environments.
Activating Each
EverTune Saddle
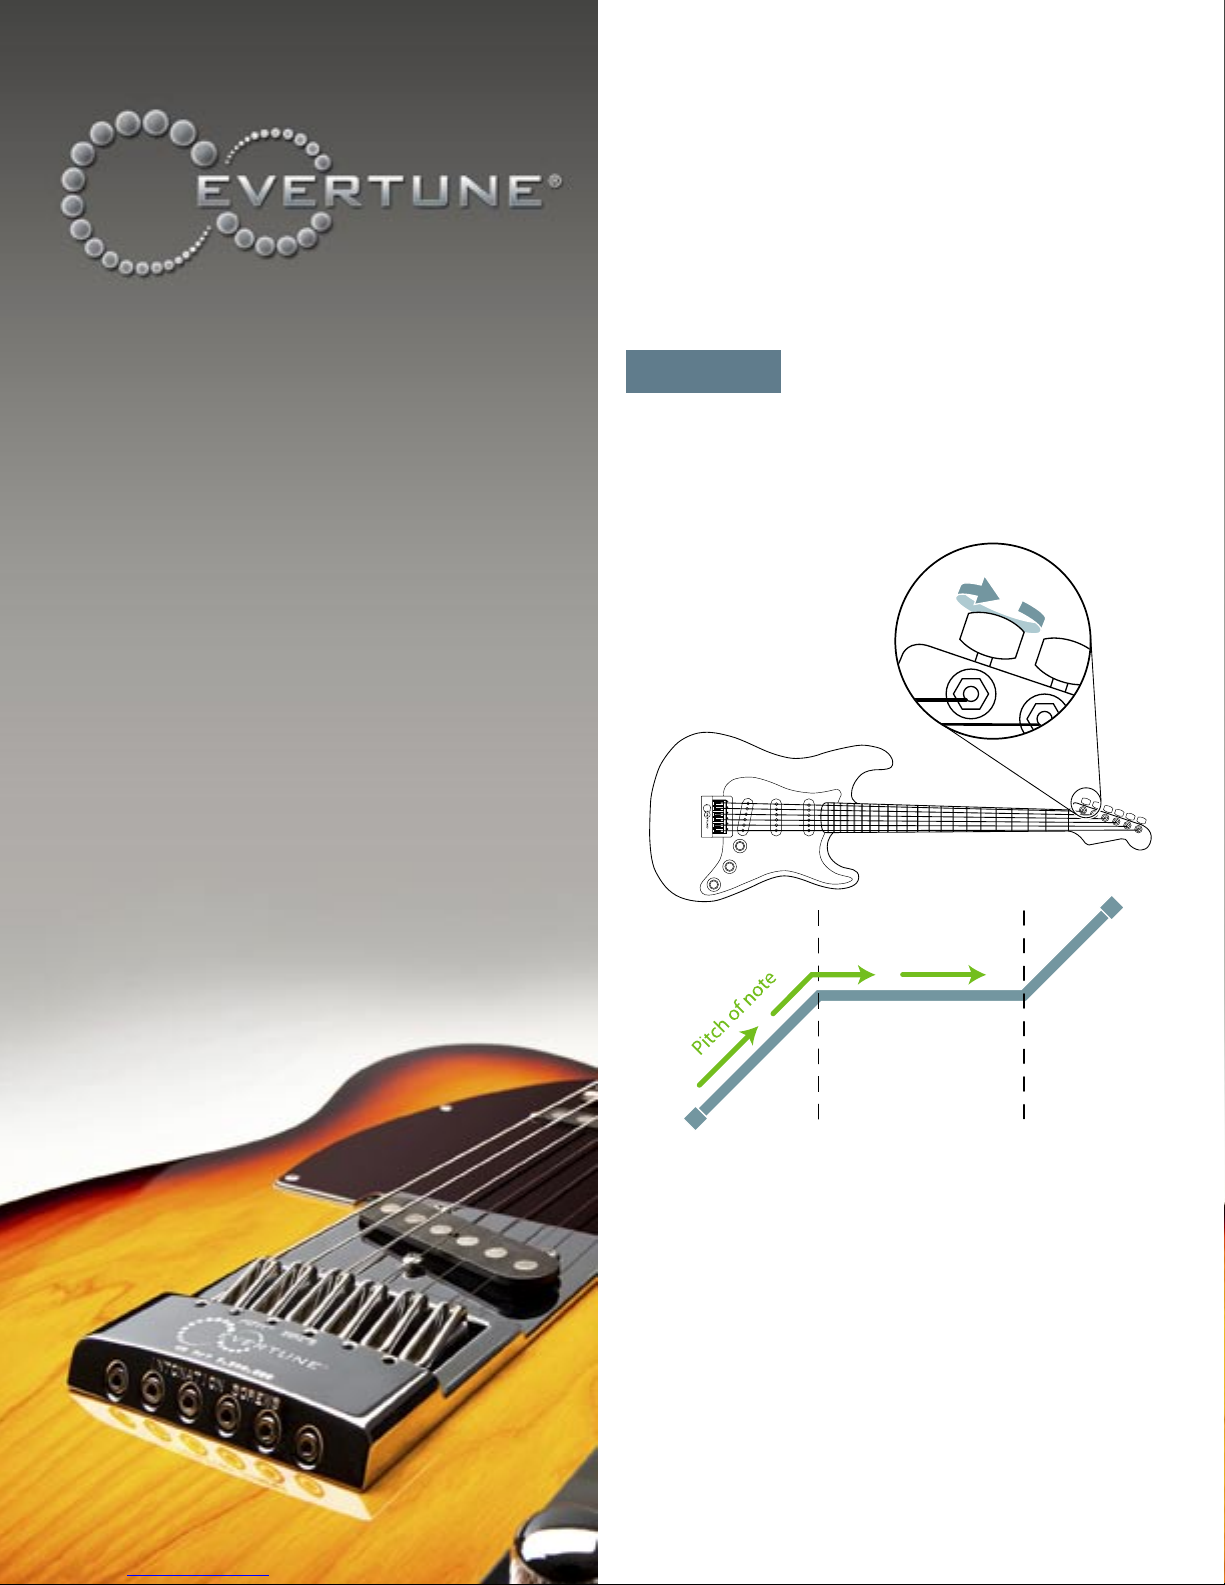
For an EverTune saddle to be active, it must be placed in the
active zone by the player. To do this, loosen the Low E tuning
peg until the string is slack. Now pluck the note and tighten
the tuning peg (Fig. 1). Keep plucking the note and tightening
the tuning peg and listen
until the note stays constant
as in the Chart below. When
the note stays constant, the
saddle has entered Zone 2,
EverTune’s active zone, which
we also call ‘the sweet spot’.
Before Zone 2, the pitch of the note goes up with each turn of
the tuning peg, exactly like a conventional guitar. EverTune is
inactive here. When we enter Zone 2, the pitch of the note stays
constant and EverTune is active here. When we keep tightening
the tuning peg we will eventually leave Zone 2 and the pitch of
the note will start rising again. EverTune is only active in Zone
2, so make sure every saddle is active (in Zone 2) before tuning
and playing. [To see more on Zone 2 and The EverTune system
check out evertune.com/setupfaq].
ET001
USER MANUAL
Fig. 1
STEP 1

Tuning with the Hex
Key
Note: On a guitar with EverTune, ALL the tuning is done with the
EverTune hex key at the bridge (Fig. 2). The tuning pegs at the
headstock are only used to put each saddle into Zone 2, and to
adjust each saddle’s position for optimal bend sensitivity.
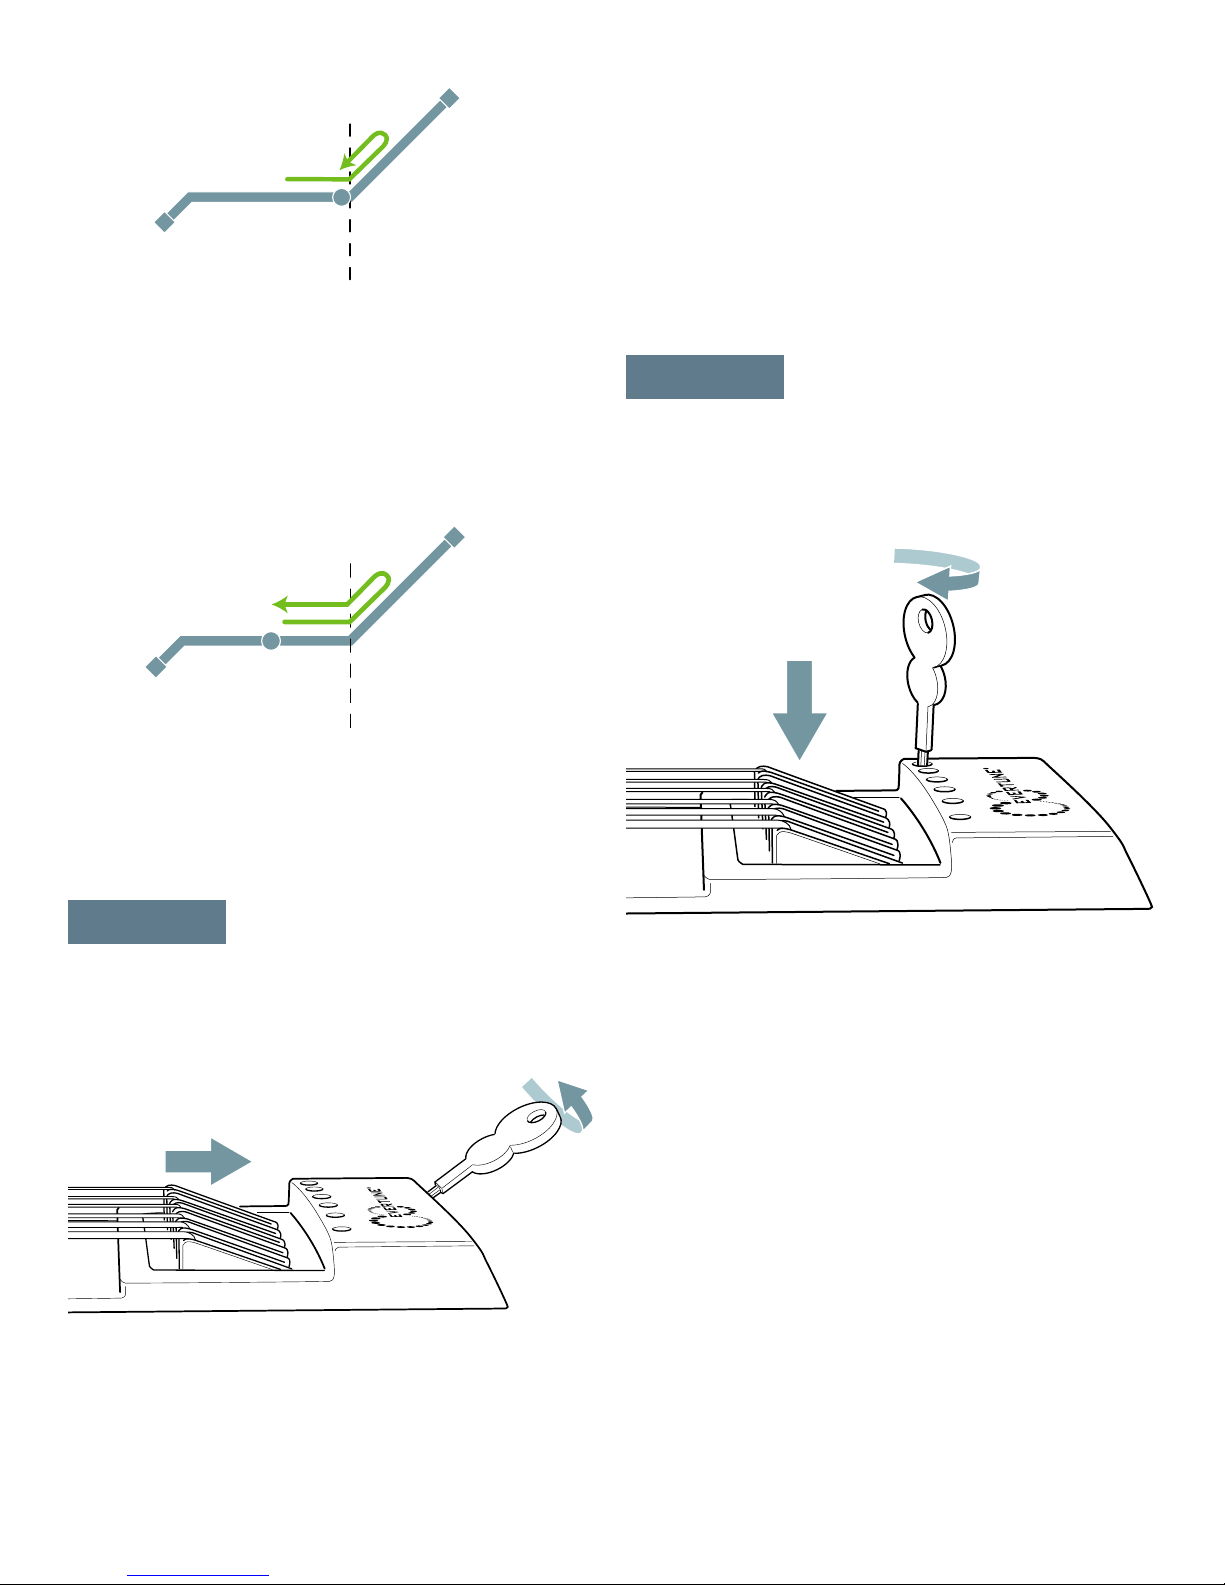
To tune a string, put the saddle in Zone 2, as covered in Step 1,
and then use the EverTune hex key to adjust the tension of the
saddle. Insert the EverTune hex key into the tuning hole (Fig.
3) and then turn it clockwise to increase the pitch and counter-
clockwise to decrease the pitch. Always remove the key before
checking the tune.
Every one half turn of the hex key is about 15 cents adjustment
on a tuner (fig. 4). [Please check out our Tuning page from
evertune.com/setupfaq for more info].
Fig. 3
Fig. 4
Fig. 2 EverTune Tuning
STEP 2
STEP 3 Bending
Once the saddle is in zone 2, as covered in Step 1, and the
string is in tune, as covered in Step 2, it is time to set the bend
sensitivity. Tighten the tuning peg at the headstock while
plucking the string until the note goes sharp. Then loosen the
tuning peg until the note drops right back into tune (Fig. 5).
The point at which the note drops right back into tune is the
transition point between Zone 2 and outside of Zone 2.
At this point the string bends and tremolos like a conventional
guitar except that the note will always stay in tune after the
bend. This point is maximum bend sensitivity.
Loosen the tuning peg about an eighth of a turn from the
boundary where the note goes sharp and we come to a point
where bends still happen fast and the intonation and tuning
are preserved even with heavy picking intensity and hard
finger pressure (Fig. 6). This is great for people who detune their
strings, or vary their picking intensity and finger pressure, and
want to still be perfectly in tune and intonated.
Fig. 5 Maximum Bend Sensitivity
NOTE: The EverTune hex key is a standard 2.5mm hex key available
at all hardware stores.
Intonation
To intonate each EverTune saddle, turn the hex key in the
intonation hole. To move the saddle back away from the nut,
turn the hex key clockwise (Fig. 8). To move the saddle forward,
towards the nut, turn the hex key counterclockwise.
IMPORTANT NOTE: After every intonation adjustment, we have to
re-adjust the saddle back into the playing position in Zone 2 using
the tuning pegs at the headstock. Every intonation adjustment
moves the saddle to a different point in Zone 2 and it can even
move it out of Zone 2.
Fig. 6 Fast Bends, Maximum Intonation
Two half turns of the tuning peg back from the boundary where
the note goes sharp is the middle of the sweet spot (Fig. 7).
Here, even bending is balanced out by EverTune. This is great
for rhythm guitar and studio overdubs and tracks with layering
of multiple guitar parts because the tune and intonation will
be constant from take to take and day to day regardless of
atmospheric conditions.
[For more information on bending, check out our Bending
section at this page: evertune.com/setupfaq].
Fig. 7 Maximum Tune Stability, Bend Is Off
STEP 4
Fig. 8
STEP 5 Action Height
To adjust the action height of each EverTune saddle, turn the
hex key in the action hole. To move the saddle up, turn the hex
key counterclockwise. To move the saddle down, turn the hex
key clockwise (Fig.9).
IMPORTANT NOTE: After every action adjustment, we have to re-
adjust the saddle back into the playing position in Zone 2. Every
action adjustment moves the saddle, which can move the saddle
to a different point in Zone 2 and it can even move it out of Zone 2.
Once the action is adjusted, we should also re-intonate.
Action adjustment is great with EverTune because it is so
easy to do and can be done while the string is at full tension,
and the string will stay in tune! [To see a more in depth look
at action adjustment, check out our link from this page
evertune.com/setupfaq]
Fig. 9
It is a good idea to loosen the tuning peg at the head stock 1
half turn before every 4 half turns of the intonation screw in the
tightening direction. Then the intonation screw will always be
easy to turn.
Intonating is great with EverTune because it is so easy to do and
can be done while the string is at full tension, and the string will
stay in tune! [To see a more in depth look at intonation, check
out our link from this page evertune.com/setupfaq]

More Info
For more info please check out evertune.com/setupfaq. We will
constantly be updating this page. Also contact us at any time at
[email protected] with any feedback and questions. And now
get ready for an insane experience: a guitar that stays exactly
the way it’s set up under all conditions!
Contact
Email: [email protected]
Web: www.evertune.com
Checking Tune
EverTune holds the string in tune for the life of the string. In a
studio environment, check the tune once per day. Sometimes
oxidation (rust) of the strings can increase their weight which
can lower the pitch a few cents. This can be adjusted back with
a quick check and minor tuning of the saddle’s tension. This
daily check is only necessary in a studio environment where
every cent counts.
Changing Gauges and Alternate
Tunings
Changing Strings Using the
Same String Gauge
When changing strings, each string goes through one of the
string holes on the back of the guitar, comes up behind the
saddle (Fig. 10), then wraps around the tuning peg at the
headstock as normal.
Then, simply put each saddle in Zone 2 using the tuning pegs,
and check the tune. When the new strings are the same string
gauge, the guitar should be in tune (some strings may need
slight adjustment because of small variations of string size in
manufacturing).
Fig. 10
Fig. 11
NOTE: When going from a higher to a lower string gauge, tune
the strings to about a half step sharp of the desired note with the
tuning pegs at the headstock. Then decrease the saddle tension
with the hex key in the tuning hole behind the saddle until each
string is in tune. This will avoid breaking strings by trying to get
saddles into Zone 2 when the tension is set too high for the smaller
string gauge.
CAUTION: Please note, if the hex key becomes hard to turn STOP
TURNING IT (Fig. 11), the tuners may have reached the end of their
range. So if this happens, please contact us at [email protected].
We will respond promptly.
EverTune saddles can be set to tensions from 10 - 28 pounds
(4.5 to 12.6KG). Which means they can usually handle 009 sets
to 011 sets and 012 sets with normal bottoms (as opposed
to heavy bottoms) in standard tuning . For higher and lower
tensions, custom saddles are available to order at
EverTune.com. [Please check out evertune.com/setupfaq for a
table showing string sizes, scale lengths, and tunings].
When changing string gauges and Tunings the saddle tension
usually has to be adjusted a lot. To go from E to drop D, for
example, will take 15-20 half turns of the hex key. If the string’s
pitch stops changing when we are turning the hex key up or
down a lot to change the pitch, then the saddle has moved out
of Zone 2.
As an example, to tune the Low E string down to a C we
put the saddle in Zone 2 and then start turning the hex key
counterclockwise. Before the note reaches C it may stop
detuning even though we are still turning the hex key in the
tuning hole. What happened? With this much tension drop,
the string contracted and the saddle was pulled on the bend
stop, out of Zone 2. So, we now put the saddle back in Zone
2 by loosening the tuning peg at the headstock and then we
can keep detuning. [For a more in depth discussion on tuning
topics such as string gauges and large tuning changes see
these topics on our page evertune.com/setupfaq.]


