EVIKA Amati.linea User manual

A player, amplier, media server and speakers in one unit:
Quick Start Manual
Music from any source: smartphone, tablet, computer, Internet, TV, CD/DVD- players, USB flash
drives, in-built memory and network storage. Including music on the air: AirPlay and DLNA
Amplier: HD-quality sound in the format of ”speakers on the shelf” — up to 24 bit and 96 kHz
(a standard CD offers 16 bit and 44 kHz). Includes optimisation for digital sources for maximum
quality in playing music from mobile devices. Supports all possible audio formats: (LOSSLESS,
AAC, WMA, МРЗ, FLAC, AIFF)
Media server: built-in HDD for storing audio les
Controlling the speakers from mobile devices: built-in web application
Amati.linea Stereo System

CONTENTS
INCLUDED PARTS
LAYOUT
AUDIO SYSTEM CONNECTION DIAGRAMS
SETTING UP
ACCESSING THE CONTROL INTERFACE
MAIN CONTROL WINDOW
AUDIO PLAYER AND AUDIO LIBRARY WINDOW
QUICK SETUP WINDOW
PLACING FILES ON THE SPEAKERS’ INTERNAL MEMORY
4
5
6
7
9
13
14
15
16
Additional equipment for comfortable operation (not included in package)
Подключение колонок к локальной сети ........................................................................................................................9
How to nd the speakers’ IP address......................................................................................................................................9
Conguring IP address reservation Conguring IP address reservation................................................................12

CONTROLLING THE SPEAKERS USING THE
APPLE REMOTE CONTROL
SYSTEM SETUP
OR QUICK SETUP WINDOW
DIRECT CONNECTION TO COMPUTER
FIRMWARE UPGRADE
KNOWN PROBLEMS AND TROUBLE SHOOTING SOLUTIONS
TECHNICAL SPECIFICATIONS
34
36
39
40
42
43
PLAYING MUSIC FROM EXTERNAL DEVICES
PLAYLIST MANAGEMENT
18
31
Playing music from a usb flash drive or usb hdd........................................................................................................18
Playing music from mobile devices or a computer (using airplay)......................................................................18
Playing music from mobile devices or a computer (via lan or wi- connection) using a dlna, upnp...
...
19
Playing from external audio sources (connected via s/pdif and/or toslink)
.......................................................
29
Automatically generated playlists (Albums, Artists, Genres)....................
.........................................................
.......
31
Current playlist......................................................................................................................................................
............
....
...........32
User’s playlists................................................................................................................................
.......
.......................
..............
.33
Playlist creation ...............................................................................................................................................................
............
33
Description..........................................................................................
.....
......................................................................................34
If Control Using The Remote Doesn’t Work..................................................................................
................
.....................34
Connecting The Remote To Apple Devices........................................................................................................................35
Quick setup tab................................................................................................................................................................
.............
36
Audio tab.........................................................................................................................................................................................36
Services tab....................................................................................................................................................................................37
Tools tab..........................................................................................................................................................................................38

4
INCLUDED PARTS
Additional equipment for comfortable operation (not included in package)
- Wi-Fi router for your Internet network (if it does not currently have one);
- USB Flash drive, as the optimal means of storage for your music library;
- Apple Remote (the speakers can be controlled using Apple Remote);
- Toslink and miniToslink optical cables and an S/PDIF coaxial cable as one of the best ways to plug in external devices
(CD, DVD, Blu-ray, computer etc.);
56
34
12
Acoustic speaker with built-in player Acoustic speaker
2x1.5 mm2 OFC 2 meter audio cable
Ethernet cablePower supply unit
TotoLink N150USM Wi-Fi adaptor
5
LAYOUT
Indicators
Ethernet RJ-45
USB port
IR receiver
Reset button
(reset to factory defaults)
Power port
Subwoofer
output
TOSLINK
S/PDIF
Speaker
Phase inverter,IR
Audio cable
connectors

6
AUDIO SYSTEM CONNECTION DIAGRAMS
DIAGRAM OF SPEAKER CONTROL DEVICES
DIAGRAM OF CONNECTION TO EXTERNAL AUDIO SOURCES
Wi-Fi adaptor
W i - F i a d a p t o r
wireless Wi-Fi connection
wireless Wi-Fi connection
wired LAN connection
wired LAN connection
Attention: for the speakers to play audio from devices connected via LAN or Wi-Fi, you must congure a DLNA server or
AirPlay (depending on the operating system) on the devices.
7
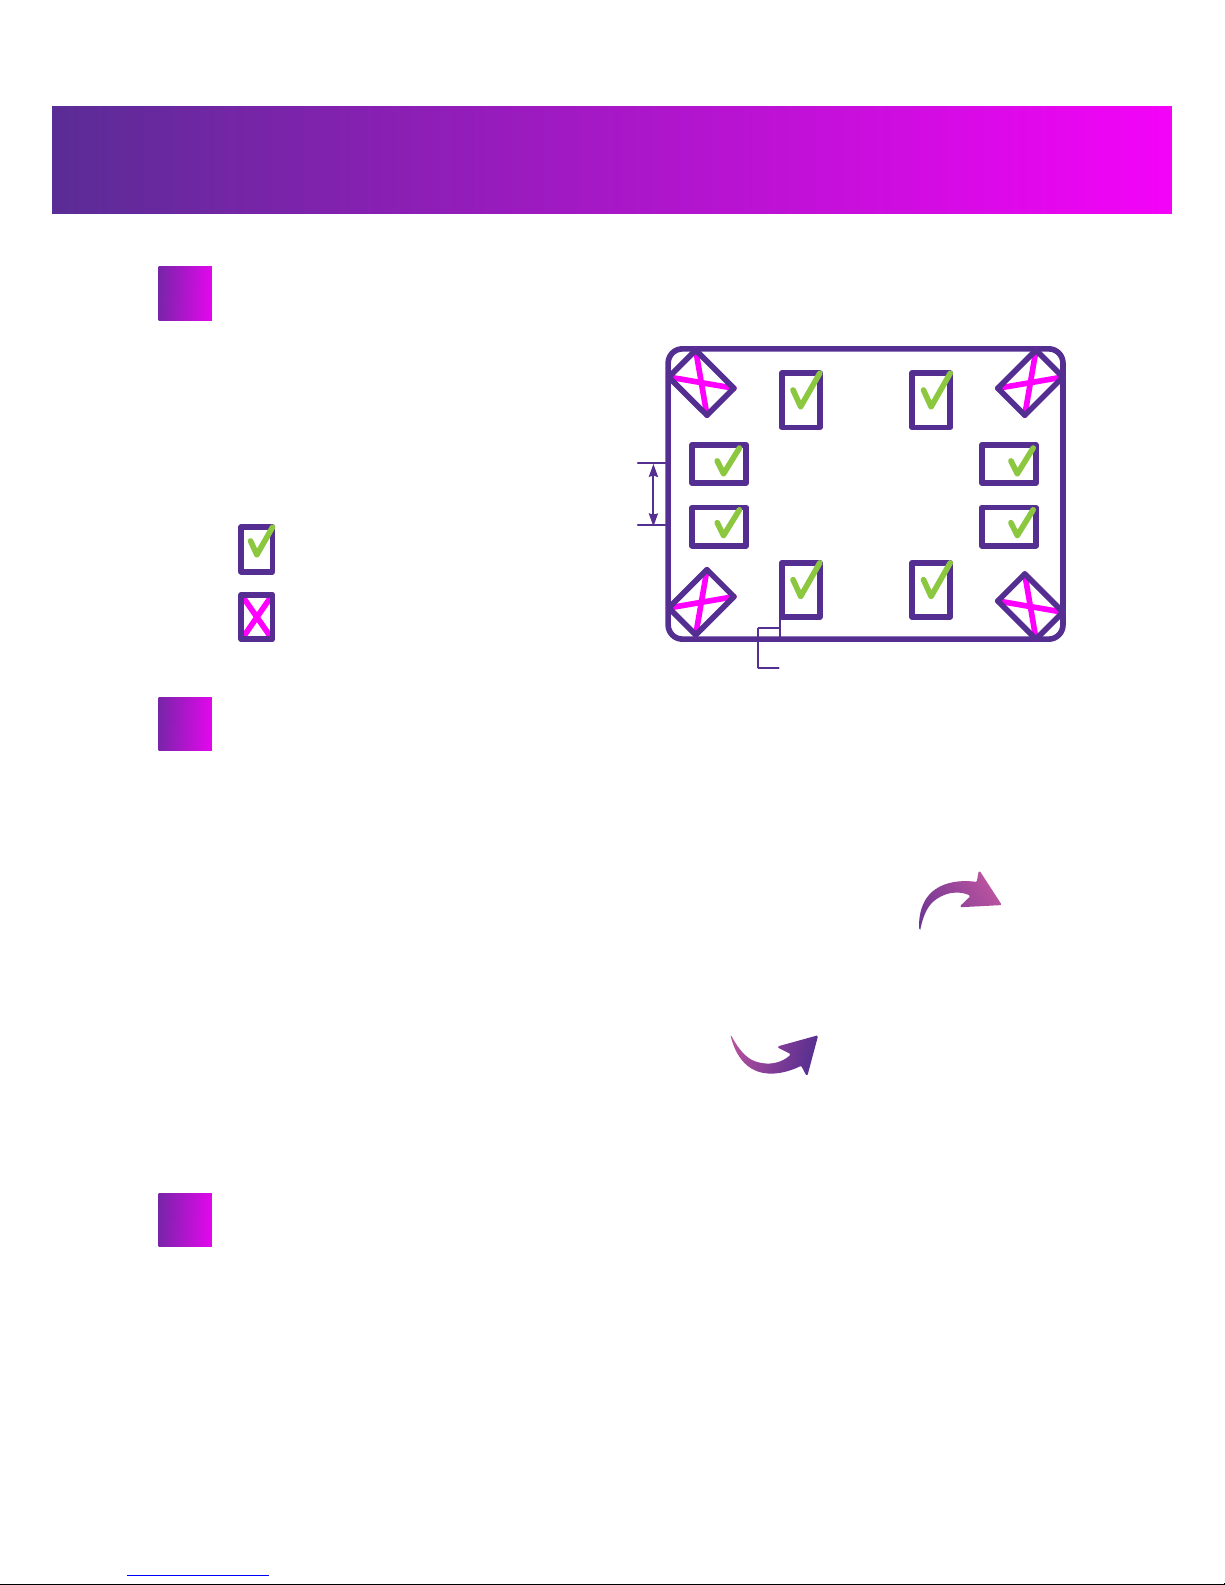
Place the speakers where they are to be installed
Connect the speakers to each other
SETTING UP
When placing the speakers in a room, do not install
them in corners. This can signicantly decrease the
sound quality. Try to place the speakers in the centre
of a wall.
recommended position
not recommended position
1. Unscrew the connector pin by turning it counter-
clockwise on one speaker
2. Connect the audio cable to the connector based
on colour (red cable to red connector, silver cable to
black connector)
Important: before connecting the audio cable to
the speaker, you must remove the insulation from
the end of the cable
3. Screw in the connector pins by turning them
clockwise. Tighten the pin to ensure that the audio
cable is securely fastened
4. Repeat steps 1-3 to connect the audio cable to
the other speaker or directly to the computer.
Important: the speakers and their control devices (smartphone, tablet, computer, TV etc.) must be connected
in a single local network. This is the only way all the devices in the system can “see” each other. To do this, you
will need to connect the devices to a router (not included) via Wi-Fi or Ethernet.
Note: you can also connect the speakers through Wi-Fi by plugging a Wi-Fi adaptor into the speakers’ USB port.
Attention: we recommend using an Ethernet cable to connect the speakers, as Wi-Fi can cause delays and
pauses in audio playback during high network loads.
1.5 -2 metres
— up to 50 centimetres
1
2
3
Connect an Ethernet cable to the speaker’s 100BaseTX Ethernet port

8
5
6
7
1. Plug the cable of the power supply unit into the speaker
Attention: if you are using a power supply unit that did not come included with this audio system, ensure that
its polarity and parameters correspond to the requirements (see the “Basic technical parameters” section)
2. Plug the power supply unit into a socket
If the indicators do not begin to flash, check that the router is turned on and that the second end of the
Ethernet cable is connected to it from the speaker.
4
Connect the Ethernet cable to a port on your router/gateway
(not included)
Connect the power supply
After the power supply is connected, the yellow and green
network indicators will begin to flash (Ethernet)
The speakers are ready for use. Please familiarise yourself
with the “Accessing the control interface” section

9
ACCESSING THE CONTROL INTERFACE
To access the stereo system’s control interface, you must enter the IP address of the device (the speaker) in your browser’s
address bar on your mobile device and press the “Go” button.
Recommended browsers: Google Chrome, Mozilla Firefox, Apple Safari
The steps described below should be performed once during the initial system conguration, during which the speak-
ers’ IP address is congured and an application icon appears on your device’s desktop which you will later be able to
press to gain instant access to the speakers.
Two ways are possible for connecting the speakers: to a local network or direct connection to a computer with an Ethernet
cable.
Connection of the speakers to a local network is recommended. It is a bit more difcult to set up, but it enables you to fully
realize the entire potential built in to the Amati.linea system. Connecting the speakers this way makes it possible to play
back music from practically any computer and practically any gadget in the same network as the speakers.
Direct connection to the computer is the simpler way to connect the system, but it strictly limits the capability of the
speakers to play back sound from various sources. This is why it is recommended to connect the speakers to the local
network using a router/gateway. For details on direct connecting, see the section “Direct connection to a computer”.
Connecting speakers to a local network
You will need to assign the IP address of the speakers (the procedure is described below) and it is also recommended that
you set up a reserve IP address for the speakers (see section “Setting up a reserve IP address”.
To nd the IP address, we recommend you use a network IP address scanning program.
The methods of nding the IP address using these programs
are shown below. You can download the installation les
for these programs for free from the developer’s site or in
the online application stores (Google Play, Apple App Store)
corresponding to your operating system.
Examples of programs are shown on the table on the right.
HOW TO FIND THE SPEAKERS’ IP ADDRESS
ОС Программа
Windows SoftPerfect Network Scanner
Android Network Scanner
MacOS IP Scanner
iOS Discovery

10
1. Click the button to automatically detect the network’s IP address
range (Auto Detect)
2. A conguration window will open
3. Select one of the address lines with a single click
4. Press the “OK” button
5. Press the “Start Scanning”
6. Wait for the scanning process to nish and the progress line to
reach the end
7. When the scan ends, the program will show you a table of IP
addresses belonging to the devices connected to the network
The speakers are usually called “Amati. linea” in the “Host Name”
column. If this name is not in the list, then the speakers’ IP is likely
to be the last in the list. If this is not the case, you must nd the
speakers’ IP by testing the addresses: copy one of the IP addresses
at a time into your browser’s address bar and press “Enter” until the
browser displays the speakers’ control interface.
Launch the program
SOFTPERFECT NETWORK SCANNER
1
2
3
4
5
6
7
Attention:
Write down the device’s MAC address – you will need it to set up IP address reservation.
1. Press the “Scan” button to start scanning the network
2. Wait for the scan to nish. When the process nishes, the program will display
the message “Scan nished!”
3. When the scan ends, the program will show you a table of IP addresses belong-
ing to the devices connected to the network
The speakers are usually called “Amati. linea” in the list. If this name is not in the
list, then the speakers’ IP is likely to be the last in the list.
Launch the program
If this is not the case, you must nd the speakers’ IP by testing the addresses:
Copy one of the IP addresses at a time into your browser’s address bar and press “Enter” until the browser displays the
speakers’ control interface.
Attention: Write down the device’s MAC address (shown directly below the IP address) – you will need it to set up IP address
reservation.
8. Copy the IP address into your browser’s address bar and press the “Go” button
Due to the fact that the IP address is usually set dynamically, meaning it changes whenever the device turns on, we recommend
setting up IP address reservation (to prevent the device’s IP address from changing). This will allow you to avoid going through
the process of nding the device’s IP address again in the future. See the “Conguring IP address reservation” section.
NETWORK SCANNER
1
2
3
4

11
4. Enter the IP address into your browser’s address bar and press the “Go” button.
To copy the IP address, press the arrow next to the corresponding IP address, then select “Change Name”.
Copy the IP address from the window that opens.
Due to the fact that the IP address is usually set dynamically, meaning it changes whenever the device turns on,
we recommend setting up IP address reservation (to prevent the device’s IP address from changing). This will allow you to
avoid going through the process of nding the device’s IP address again in the future. See the “Conguring IP address reserva-
tion” section.
DISCOVERY-BONJOUR BROWSER
Launch the program
1.It will begin to scan the
local network automatically
3. In the opened window,
select the player’s name.
4. The speakers’ IP address
will be shown in a new
window
5. To copy the IP address,
press the “Сору” button in
the top right corner.
2. Select the _mpd._tcp entry
6. Enter the IP address into your browser’s address bar and press the “Go” button
Due to the fact that the IP address is usually set dynamically, meaning it changes whenever the device turns on,
we recommend setting up IP address reservation (to prevent the device’s IP address from changing). This will allow you
to avoid going through the process of nding the device’s IP address again in the future. See the “Conguring IP address
reservation” section.
IP Scanner
Start up the program.
1. To begin scanning the network, press “Start” in the lower
part of the program window.
2. Upon completion of the scan, the listing of IP addresses of
the devices connected to the local network will appear.
The speakers are usually called “Amati.linea” on the listing.
Note:
- the free version of the program displays the IP-addresses
of only 6 devices. If the speakers do not appear on the list,
de-energize the devices not in use or remove them from the
network (Wi-Fi, Ethernet) and re-start the network scan.
3. Enter the IP-address in the browser subject line
and press “Go”.
As the IP-address is usually assigned dynamically, i.e. it may
change after each device is turned off, it is recommended that
a reserve IP-address be assigned (so that the IP-address for
the device won’t change). It will enable you to avoid the device
IP-address assignment procedure later. See section “Setting
up a reserve IP-address”.

12
Attention: the instruction steps and names of control buttons/elements may differ from those shown depending on the
type of router/gateway you have installed.
1. Enter the IP address of your router/gateway into your browser’s address bar and press the “Go” button
If you do not know the IP address of your router/gateway, launch a network scanning program (see the “How to nd the
speakers’ IP address” section) and scan the network. The IP address of the router/gateway is usually the lowest-value
address (usually based on the last number in the address) of those found by the scan.
2. Log in to the administration interface of your router/gateway
You will need a username and password to log in to the interface. The standard values are Username - admin, Password -
admin. If the standard username and password do not work, refer to the documentation of your router/gateway or contact
the installer/provider of the router/gateway for assistance.
3. Go to the LAN (local area network) conguration page
4. Find the “DHCP Reservation” section and press the “Set up DHCP Reservation” button (names may differ from those
shown depending on your device)
On some devices, you can reserve an IP address from the list of DHCP clients by ticking a box next to the required IP ad-
dress and pressing the “Reserve” button
5. In the resulting window, enter the speakers’ IP address and МАС address (found when scanning for the speakers’ IP
address) and a comment/name for the device
6. Restart the router
7. After this, the speakers will always be accessible through the single IP address you reserved
You can make a shortcut in your browser on your desktop to quickly access the speakers through this static IP address.
CONFIGURING IP ADDRESS RESERVATION
13
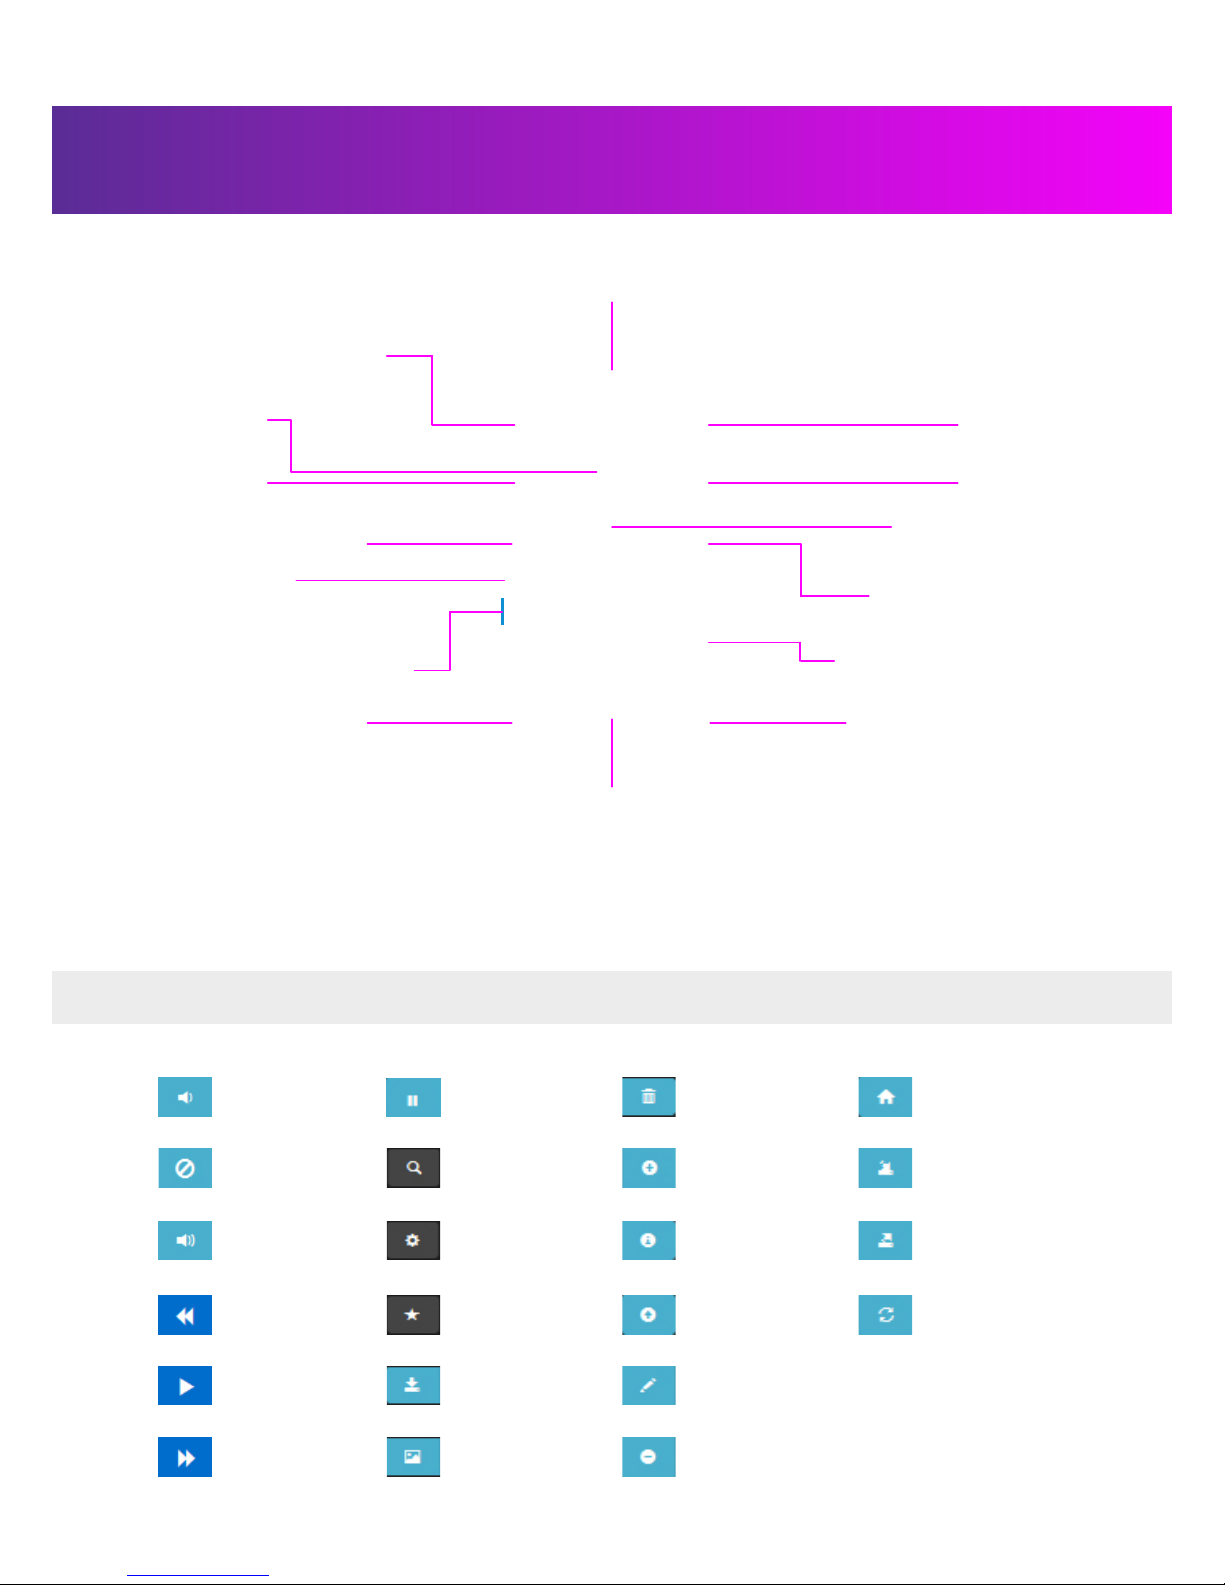
Volume down
MAIN CONTROL WINDOW
Device name
Mode for playing audio les
using the built-in player
Open the audio player
and audio library window
Open the quick setup window
Mute button
Go back to previous track*
List of playlists*
Playback progress bar. Can
be used to quickly navigate
forwards/backwards through the
Name of track/station
currently playing*
Go to next track*
Start/stop
playback
Volume up
Open the audio system’s
conguration window**
Mode for playing audio from
external devices connected via
the inputs:
-S/PDIF
-TOSLINK
* - these functions do not work when external device mode is activated (External)
** - we recommend that you do not change the conguration options unless absolutely necessary.
volume
down
mute
button
volume up
go back
to previous track
start
playback
go to next track
pause playback
search by title
playback options
add track
to Favourites
save current playlist
show/hide additional
information on the item
being played
clear current playlist
add track to current
playlist
clear current playlist and
add the current element to
current playlist
information about
contents of playlist,
folder etc.
return to parent folder/list
of playlists
copy / rename playlist
delete position from
current playlist
return to
oot directory
import list of online radio
stations
export list of online radio
stations
CONTROL BUTTON KEY

14
AUDIO PLAYER AND AUDIO LIBRARY WINDOW
Playlist window: Current playlist, Albums,
Artists, Genres, Playlists
Online radio window
Return to main window
File navigation window for les on internal
memory and connected USB
*1 – listing of radio stations is based on the iTunes listing. Not all radio stations on the list will work, since there may be geographical limitations.

15
QUICK SETUP WINDOW
Tools window
Quick setup window
Audio conguration window Service conguration window
Return to main window

16
PLACING FILES ON THE SPEAKERS’ INTERNAL MEMORY
To place (or see/delete) les on the speakers’ internal memory, you must activate the FTP server on the speakers and
install a program to upload les to the speakers.
ACTIVATING FTP SERVER ON THE SPEAKERS
The speakers’ FTP server only needs to be activated once and will remain active
until you disable it.
1. Enter the speakers’ control interface (if you are connecting to it for the rst time,
see the “Accessing the control interface” section)
2. Press the “System cong” button to open the conguration options window
3. Enter the username and password to access the conguration options
Defaults: Username: admin, Password: admin.
4. In the resulting window, select the “Services” menu and then the “Local FTP
server” option.
5. Congure the server in the FTP server conguration window:
- in the “Server status” line, select the “Enabled” option
- in the “Password” line, enter a password for access to the FTP server.
Attention: before entering the password, please check to make sure your key-
board’s caps-lock is in the correct state.
If you forget the password for the FTP server, you will need to come back to this
menu to set a new password.
6. Press the “OK” button to apply the settings.
7. Close the system conguration window.

17
EXCHANGING FILES WITH THE SPEAKERS
You can use any FTP client program to exchange les with the speakers. The next steps will be described using FileZilla as an
example (you can download it for free for various operating systems on the developer’s site: https://lezilla-project.org/)
1. Install and launch the program.
2. Enter the speakers’ IP address into the “Host” eld (see the “How to nd the speakers’ IP address” section).
3. Enter “ftp” into the “Username” eld and the password you provided in the speakers’ conguration options into the
“”Password” eld.
4.Press “Enter” or the “Quick connect” button and wait for “Status: connected” to appear in the eld below.
5. The program’s interface consists of:
- the computer’s le tree (1)
- the contents of the selected folder on the computer (2)
- the speakers’ le tree (3)
- the contents of the selected folder on the speakers (4)
- copy status window (5)
6. To copy les from the computer to the speakers, all you have to do is drag a le/folder from window (1) or (2)
into window (3) or (4)
7. Deleting a le from the speakers’ memory
To delete les/folders from the speakers’ internal memory, you must select the le/folder to be deleted in window (3) or (4)
by clicking it once. Press the “Del” / “Delete” key on the keyboard or right-click the le/folder to be deleted and select “De-
lete” from the drop-down menu.
1
2
3
4
5

18
PLAYING MUSIC FROM EXTERNAL DEVICES
PLAYING MUSIC FROM A USB FLASH DRIVE OR USB HDD
PLAYING MUSIC FROM MOBILE DEVICES OR A COMPUTER
(USING AIRPLAY)
1. Connect the device to a USB port on the speakers
2. Go to the speakers’ control interface (if you are connecting for the rst time,
see the “Accessing the control interface” section)
3. Conrm that the “Internal” mode is enabled in the speakers’ main control window
4. Open the audio player and audio library window by pressing the button
A method for activating playback is shown below using the iPhone as an example
5.The audio le library needs to be updated after connecting the USB device.
The update is completed when the button stops flashing.
Library update may be performed automatically; to do this, the “Auto-update
USB” function must be turned on (described in “Quick settings”, “Services” tab).
Manual update
Library update may be performed automatically; to do this, enter “File System”
mode and select the le that needs to be updated. Press the button. The
update is completed when the button stops flashing.
6. Press the library and playback source selection button
7. Select “File system”
8. Select “usb1” or “usb2” (depending on the port the device is connected to)
If the device does not appear in the list after it is connected, update the library
manually. To do this, select “Update database” in the playback options menu
( button)
9. Navigate through the les and folders and use the control buttons
to control playback as described in “Control button key”
1
1. Activate the music player
(“Music” button)
2. Select a track and play it 3. Open the options pop-up menu.
To do this, drag your nger upwards
in the lower part of the screen

19
If there is no “AmatiLinea” entry in the device list, or if the music does not come through the speakers, make sure that the
“AirPlay” service is activated on the speakers.
To activate it:
– enter the speakers’ control interface (see the
“Accessing the control interface” section);
–press the “Quick setup” button to open the quick setup
menu;
–ensure that the “AirPlay” service is switched on in the
“Quick setup” menu (if the AirPlay icon is blue, the service is
switched on – if it is grey, it is switched off);
–press the “Home” button to return to the main control
window;
If the service is switched on, but the problem is still present,
please ensure that all the devices are connected in the same
network and the connection has not been interrupted.
IMPORTANT!
Not all devices can support this function. Some devices may have operational problems. If necessary, contact the Amati.
linea technical support service at the contacts indicated on the site.
There are two ways to play music: using the UPnP renderer and the DLNA server.
The UPnP renderer mode enables reproduction of music directly from a mobile device/computer to anywhere. It is the
equivalent of Apple AirPlay. The DLNA server mode enables “scavenging” (accessing other devices for les on the device)
and le playback will launch automatically from the Amati.linea system. For the DLNA server to operate, it must be con-
gured (only one time required for each device) and the server must be launched (depending on the program, it may be
possible to congure automatic startup).
4. Press the “AirPlay” symbol 5. A device list will open.
Select “AmatiLinea”
6. “AmatiLinea” should now be
displayed next to the “AirPlay” symbol
in the options menu and current track
should come through the speakers
PLAYING MUSIC FROM MOBILE DEVICES OR A COMPUTER (VIA LAN OR WI-FI
CONNECTION) USING A DLNA, UPnP

20
There are a number of programs for working with a UPnP renderer/DLNA server. Some manufacturers have their own
applications for operations with DLNA and UPnP, like Sony Walkman and Samsung Link. By way of example, we will review
conguration of the following programs:
For use in UPnP renderer mode
- ”Bubble UPnP”, ОС Android
- ”JRiver Media Center”, ОС Windows, MacOS, Linux (Developer site http://www.jriver.com).
ATTENTION!
Note that the program “JRiver Media Center” is a pay system with a 30 day free period.
For operations in DLNA server mode:
- ”Bubble UPnP”, ”DLNA Server”, ОС Android
- ”Serviio”, iOS, Windows, Linux (Developer site http://www.serviio.org).
Conguration of “BubbleUPnP” program
3. Press the program button in the
upper left corner of the program.
1. Turn on the speakers and wait for
complete startup.
2. Activate the “BubbleUPnP”
program.
4. Press on the arrow in the “REN-
DERER” section of the window that
opens and display the list of accessi-
ble devices.
Note:
- If the list of accessed devices is empty or the names of the speakers do not appear on the list, make sure that the “UPnP
renderer” mode is turned on (if the mode is off, turn it on).
Table of contents


