Evolve SB-2500 User manual

Owner's Manual
SB-2500 / SB-2501 / SB-2502
www.evolveaudio.co.uk
For

Table of Contents
Welcome And Introduction
Inside the box .................................................................................................................................1
The soundbar ................................................................................................................................ 2
The wireless subwoofer ..................................................................................................................2
The remote control .........................................................................................................................2
Control panel overview ...................................................................................................................3
Getting Started
• Speaker placement ................................................................................................................8
• Connecting the soundbar to your TV.....................................................................................10
• Set up the wireless subwoofer .............................................................................................12
• Start using the soundbar ......................................................................................................12
Bluetooth
• Switch to Bluetooth mode ....................................................................................................14
• Pair with audio source .........................................................................................................14
• Reconnect to the soundbar ..................................................................................................15
• Connect to new Bluetooth device .........................................................................................15
EVOLVE Wireless Headphone
• How the headphones work ...................................................................................................16
• Pairing the Evolve wireless headphones to the soundbar.....................................................17
• Start using the wireless headphones....................................................................................17
• Switching back from the headphones to the soundbar ........................................................18
• Charging your wireless headphones .....................................................................................18
Advanced Features
• 3D 'Denitive Surround Sound'.............................................................................................19
• Bass adjustment ...................................................................................................................19
• Sound effects (EQ) settings..................................................................................................19
• Turn on/off LED indicator......................................................................................................20
• Reset to factory mode ..........................................................................................................20
Troubleshooting ............................................................................................................................21
Specications................................................................................................................................23
Evolve Warranty ...........................................................................................................................25
Important Safety Instructions and Warnings .............................................................................26

1
Welcome
Thank you for purchasing an Evolve Audio SB-2500 series ultra slim soundbar with wireless
subwoofer and Bluetooth aptX. This soundbar has been designed to deliver a superb high
definition listening experience utilizing our ‘Definitive Surround Sound’ technology, whether
watching TV, movies or listening to music.
To ensure you get maximum enjoyment from this product, we urge you to take a few minutes to
read through this manual. If you have any questions about the product which are not covered in
the user manual in the rst instance please contact our technical support helpline
on 08432 081 081.
Open - Monday To Friday 09.00 - 18.00, Saturdays 10.00 - 18.00.
Closed - Sundays and all Bank/Public Holidays.
Alternatively you can email us at support@evolveaudio.co.uk
Package Contents And Introduction
Inside the packaging you will nd:
- SB-2500 soundbar
- Wireless subwoofer
- Remote control with battery
- Power supply for soundbar (12V)
- Power supply for subwoofer (15V)
- Owner’s manual & quick start guide
- Optical cable
- RCA cable
- 3.5mm mini-jack to RCA cable connector
- Wireless headphones ( Only for SB-2501/SB-2502 )
- USB charger cable for wireless headphone
- Wall mount bracket - see page 8
2
The Soundbar
The SB-2500 Soundbar generates all the mid to high range sounds. It wirelessly connects to the
Evolve wireless headphones.
The Wireless Subwoofer
The subwoofer is a wireless active loudspeaker that generates powerful high delity bass. It works
together with the soundbar to create seamless high quality audio, delivering a truly enjoyable and
satisfying listening experience.
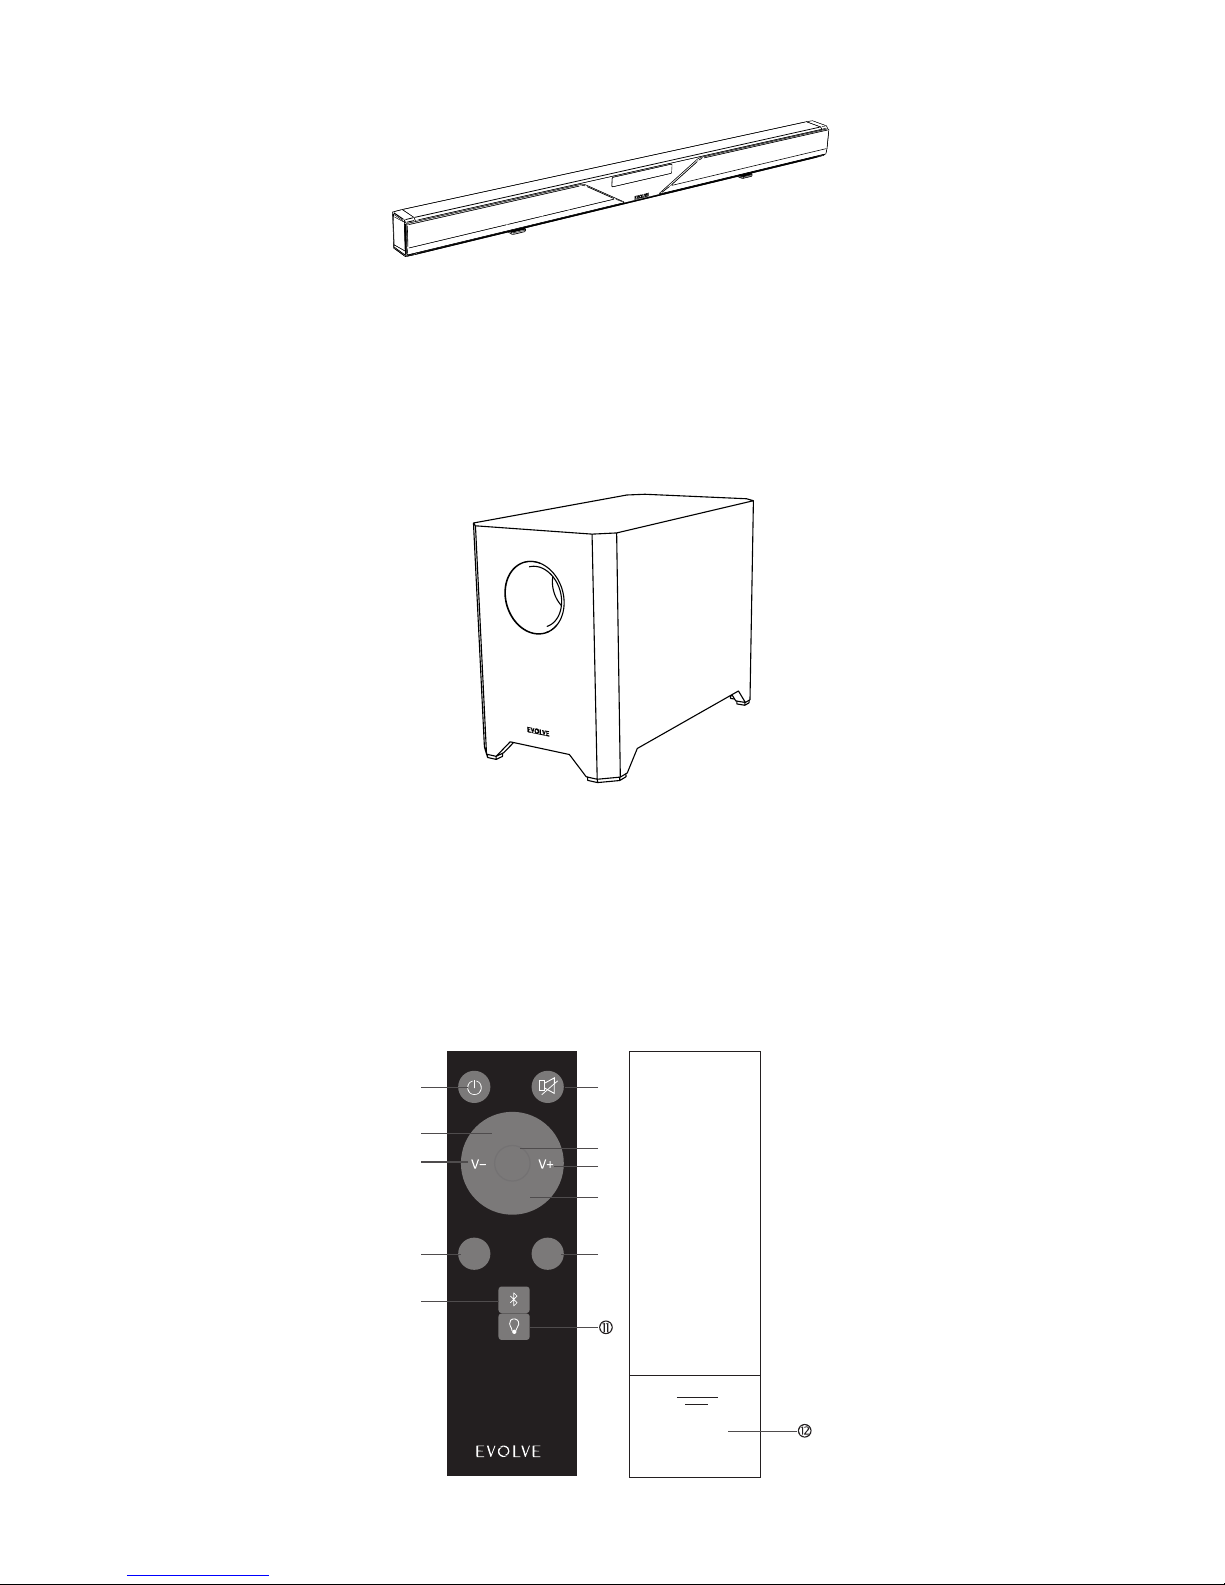
The Remote Control
EFFECT INPUT
BASS-
BASS+
3
With the remote control you can manage and adjust all the features of the soundbar. Each of the
remote control's functions are described below:
1. Power – Turns the soundbar on or off.
2. Input – Use this button to select the audio input source. The default setting is optical then
Aux1, Aux2.
3. Mute – Mutes the soundbar and wireless woofer.
4. V+ – Increases the volume level.
5. V- – decreases the volume level.
6. Bass+ – Increases the bass level.
7. Bass- – Decreases the bass level.
8. 3D – Turns on/off the Denitive Surround Sound 3D effect.
9. Effect – Switches between Music, Movie, News and Sports mode.
10. Bluetooth – Switches to Bluetooth mode and pairs with a new Bluetooth device.
11. LED – Turn off/on the LED light indicator on the front panel.
12. Battery cover – The cover of battery compartment.
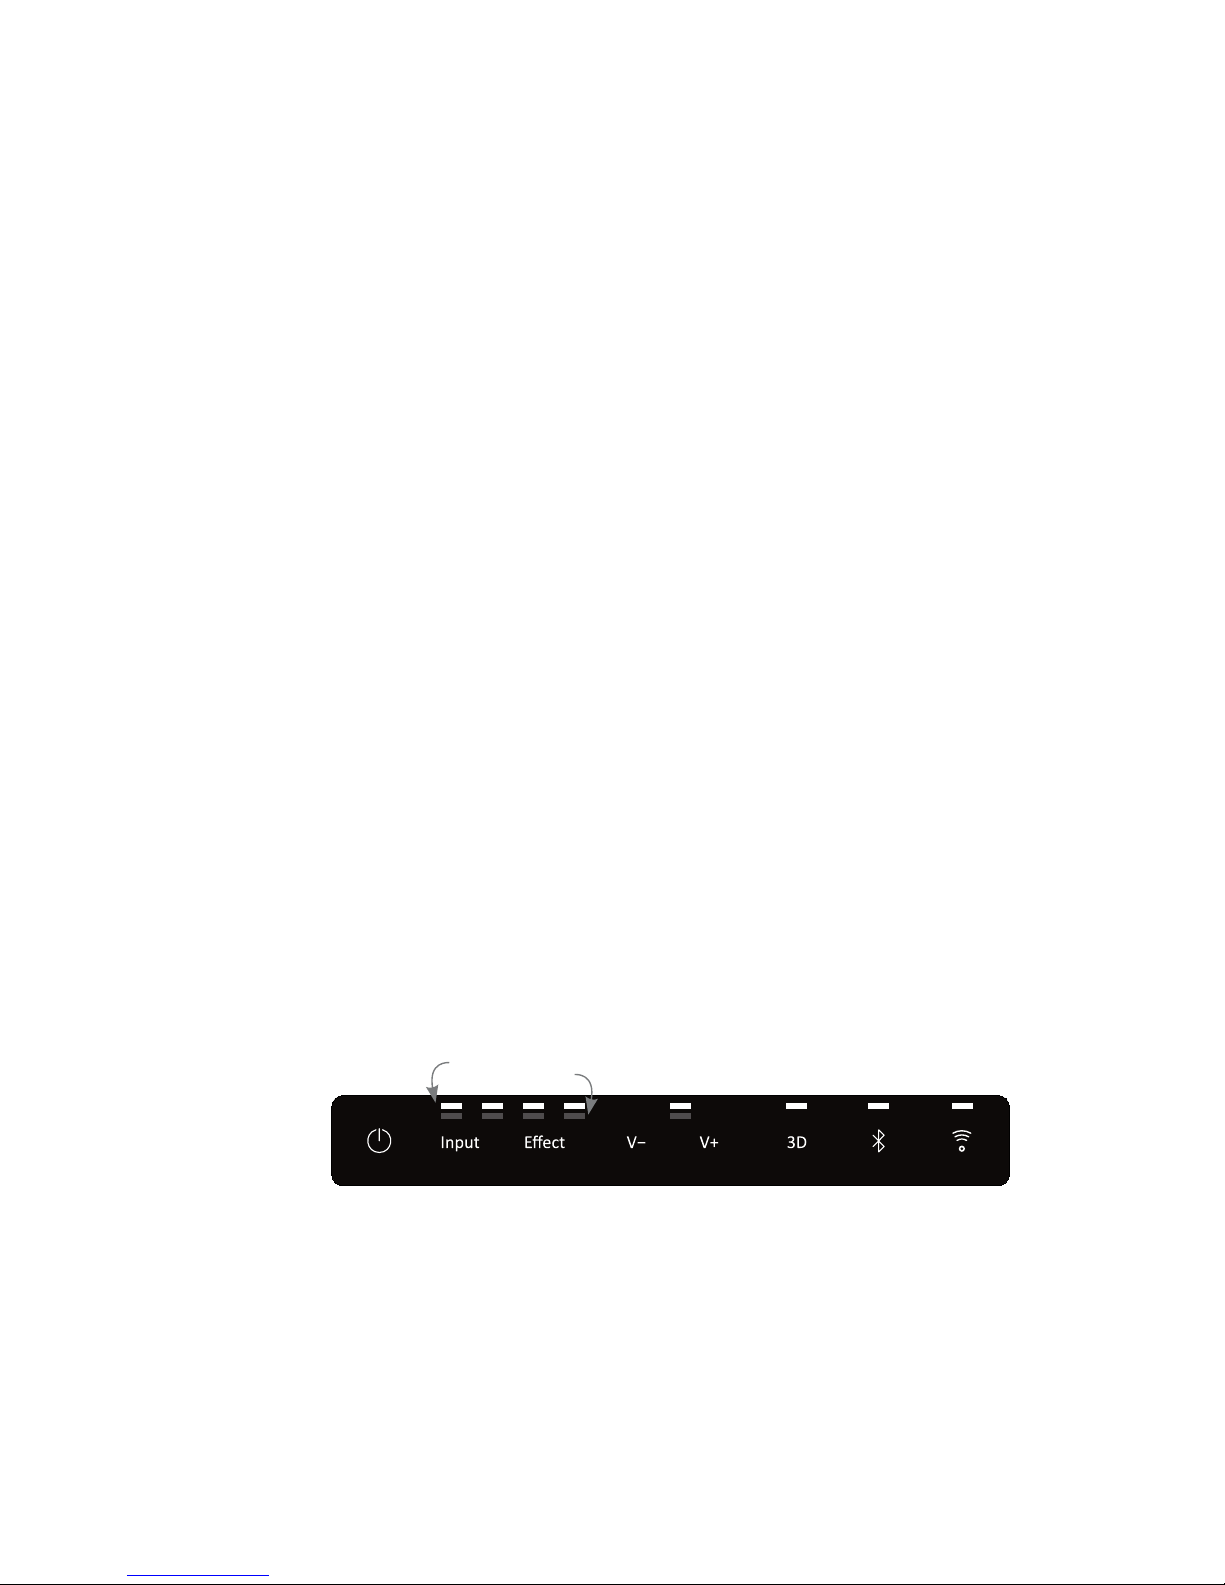
The Control Panel
The control panel contains touch keys that allow you to operate the soundbar without the remote
control. Light indicators display the current status of the soundbar.
Bluetooth3D
Indicator Power Source Selection
Soud Effect
Volume
& Mute
Wireless
Status
1. Power
Touch – Touch the power icon to wake up your soundbar from standby mode. Touch again to
turn it to standby mode.
Standby Mode: Red LED on.
Working Mode: White LED on.
4
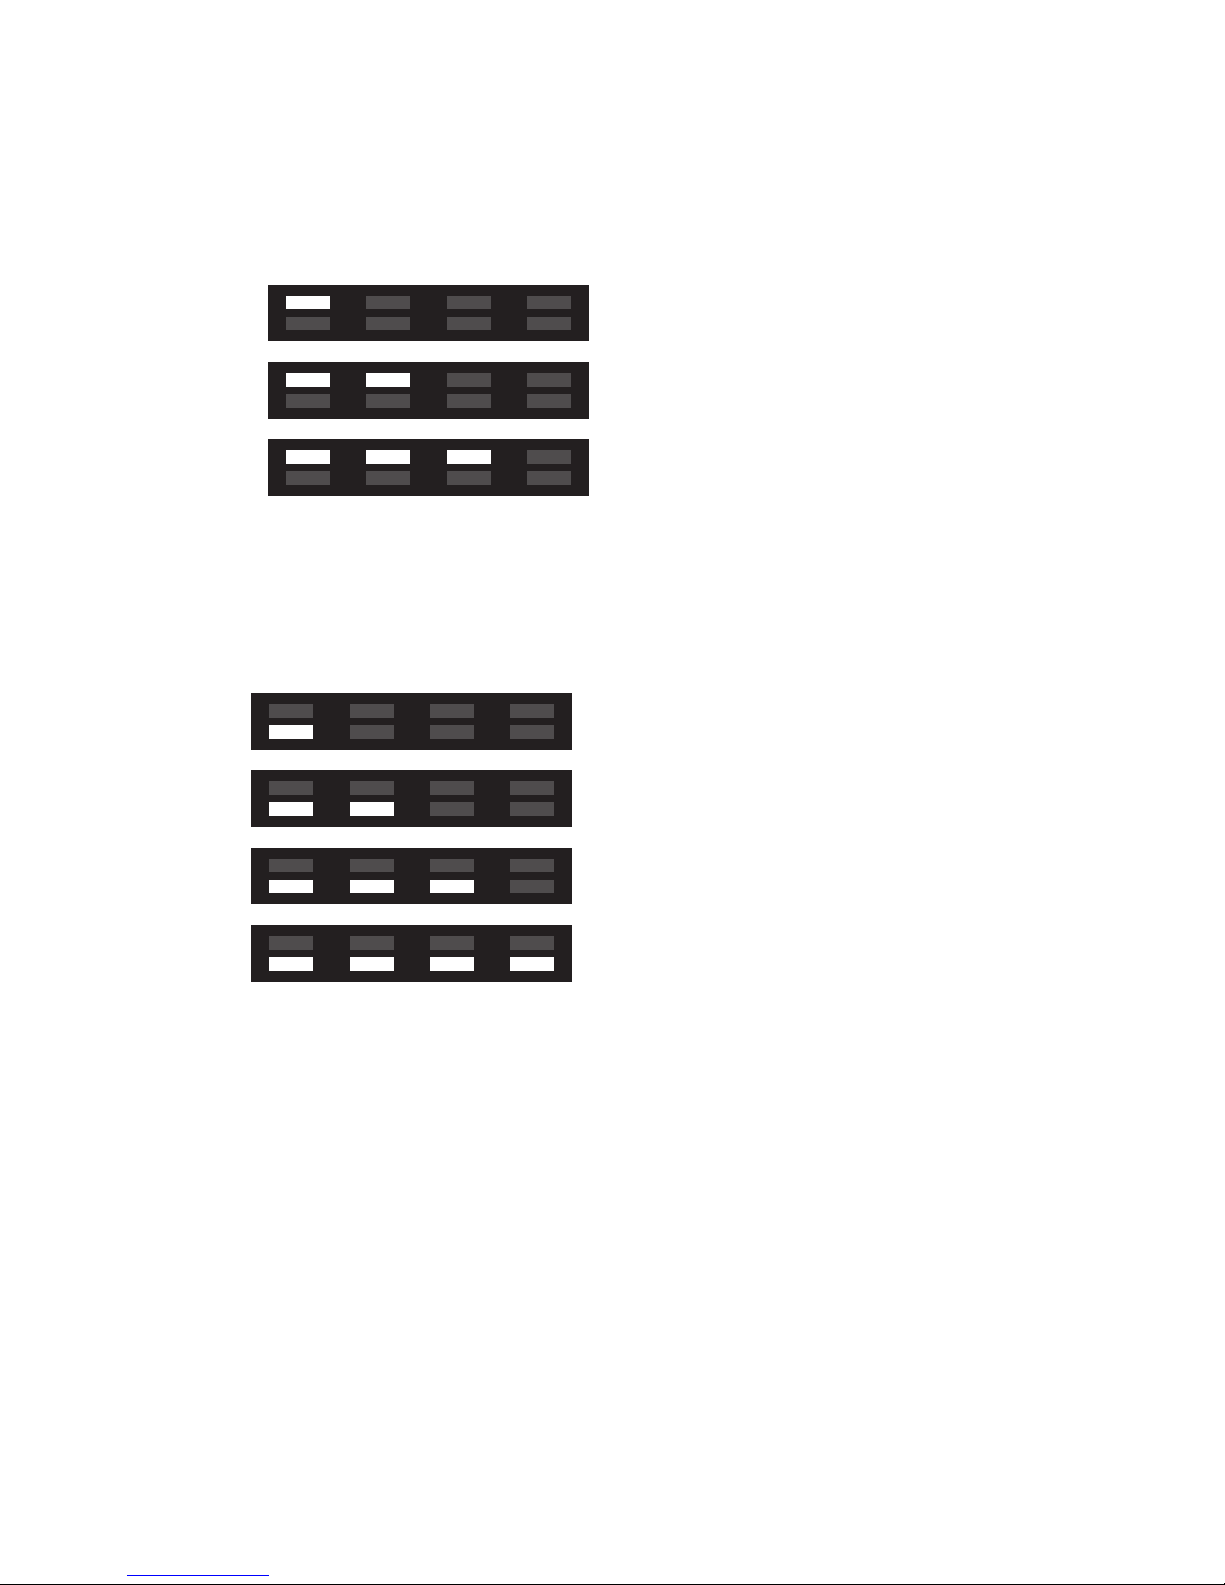
2. Source & sound effect indicators – Touch the source icon to switch between different input
sources.
Indicator-
OPTICAL:
AUX1:
AUX2:
3. Sound effect
Touch the sound effect icon to switch the Soundbar between different sound effect modes.
Indicator -
Music:
Movie:
News:
Sports:
4. Volume
V+ icon - Touch the icon to increase volume.
V- icon - Touch the icon to decrease the volume.
Indicator -
Volume adjustment - white LED flashes twice.
Max/Minimum volume - White LED stays on.
Mute - Red LED on.
5. 3D Sound
5
Touch the 3D icon to enable or disable the Denitive Surround Sound 3D effect.
Indicator -
3D on: White LED on.
3D off: White LED off.
5. Bluetooth
Touch the icon to turn on Bluetooth.
* To return from Bluetooth to one of the primary sources such as Optical you need to press
the Source icon.
Indicator:
Waiting to pair: Blue LED flashes quickly.
Bluetooth connected: Blue LED stays on.
6. Wireless Audio
Touch the icon for 3 seconds to start pairing with your new wireless subwoofer or
headphones. You will also need to press the pairing key on the subwoofer to complete the
pairing process.
Indicator -
Pairing – Red light flashes.
Paired – No light.
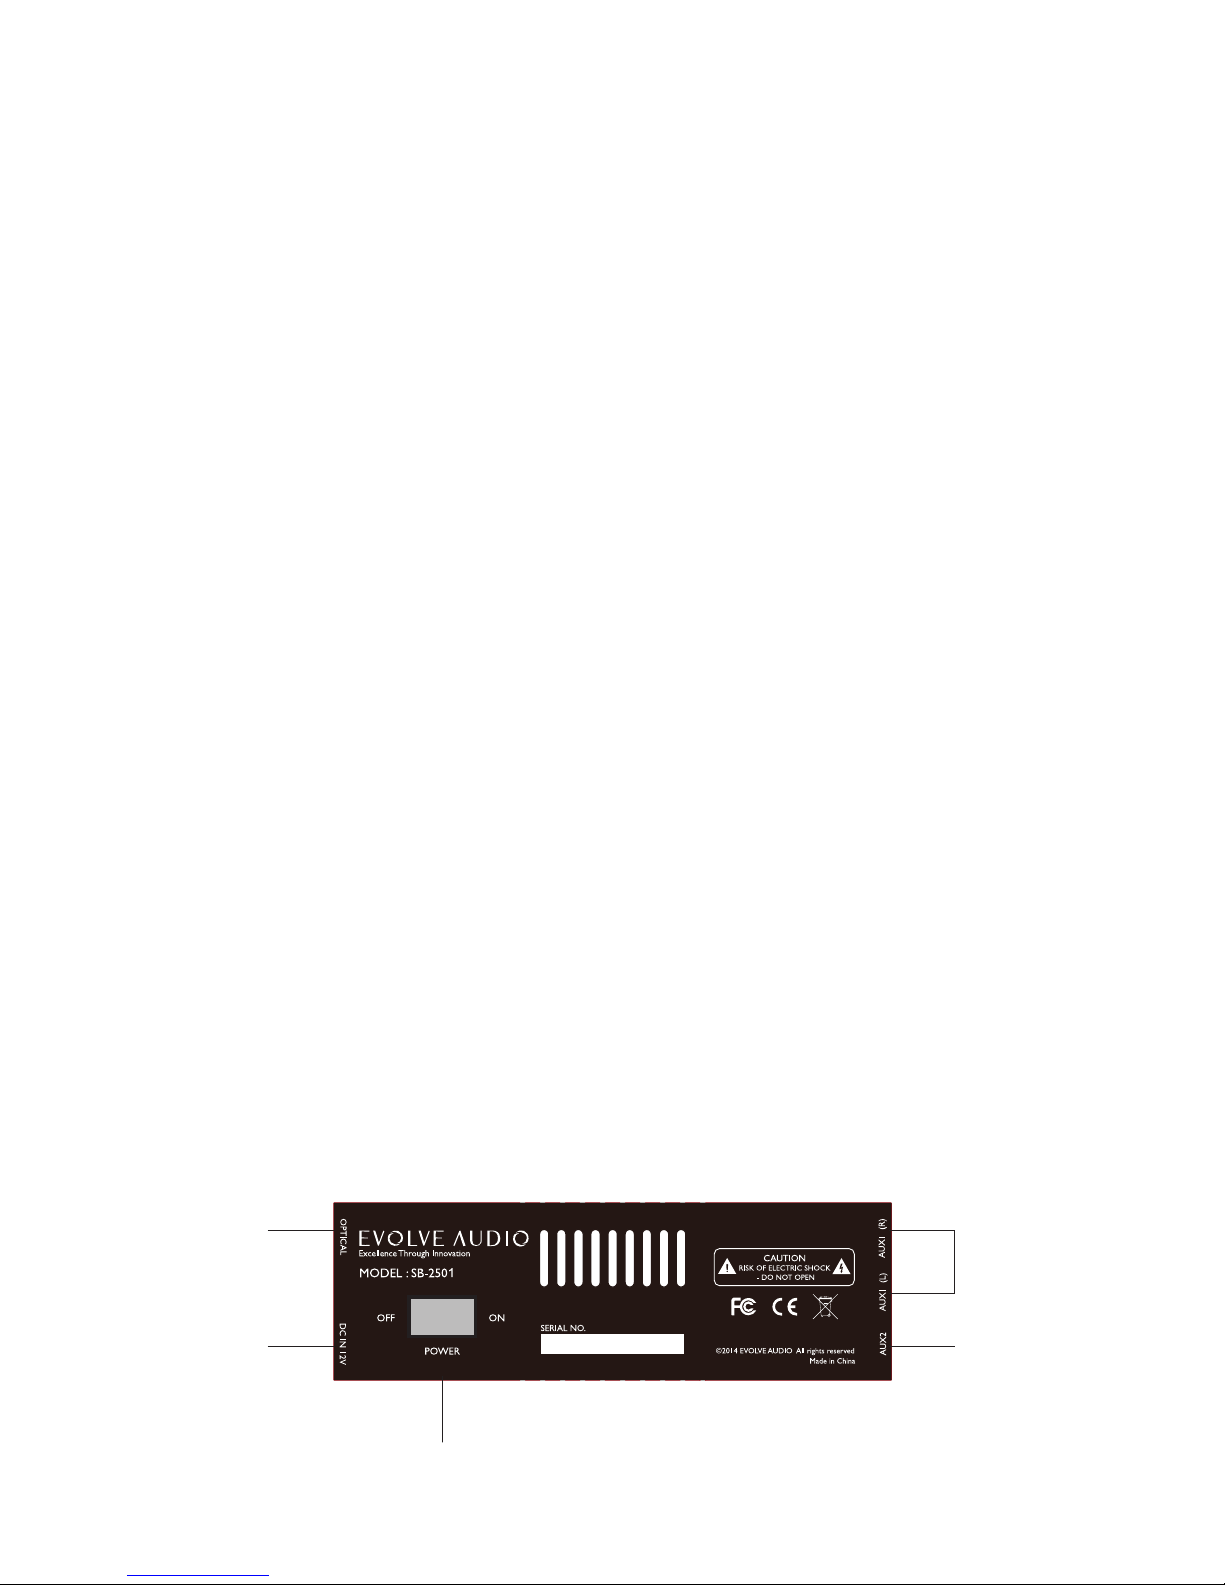
Soundbar Rear-Panel Controls and Connections
0 I

6
1. DC 12V – Connect the DC 12V jack to 12V AC/DC adaptor. Please connect the jack before
plugging into the AC mains power.
2. Power Switch – Switches on and off the mains power to the soundbar. It is recommended to
switch it off if you don't plan to use the Soundbar for long periods of time.
3. Optical – This is a Toss-link optical digital connector. It is recommended to use optical as
your main audio input source where possible, as it ensures minimal signal degradation and a
consistent volume level across all audio source devices. You should connect the cable from
the soundbar directly to your TV’s optical connection. This then results in your TV acting as
the hub for all your other connected devices.
*Important – Some DVD players or TV’s have set the default optical output to 5.1 or 7.1 audio
output, which will not work on a 2.1 Soundbar system. If no sound is heard from the Soundbar
when connecting through the optical input, please make sure the audio output setting of the
source device is set to stereo instead of Dolby 5.1 or DTS 7.1.
Power saving mode: Red light flashes once every 5 seconds. The subwoofer will automatically
enter into power saving mode when it’s not being used.
4. RCA Input(AUX1) - This is the analogue audio input which can be used as an alternative to
either the optical or 3.5mm mini jack connections.
5. 3.5mm Mini-jack(AUX2) - This is another analogue audio input which can also be used as an
alternative to the optical or RCA input.

7
Subwoofer Rear-Panel Controls and Connections
1. DC 15V - Connect the DC 15V jack to the 15V AC/DC mains adaptor. Please connect the jack to
the rear of the soundbar before switching on the power at the mains.
2. DC Power Switch - This is the switch which controls the mains power to the subwoofer. Switch
it on when using the soundbar system. It will automatically enter into the power saving
mode after 1 minute if the soundbar is not being used . The red light flashes once every ve
seconds. It is recommended to switch the power off if you don’t plan to use the soundbar
system for a long period of time.
3. USB charger port - Use this port to charge your wireless headphones.
4. Pairing button - This button is only required if your wireless connection between your soundbar
and subwoofer should drop. If this happens then follow these simple instructions:
- Hold the pairing button on the subwoofer for 2 seconds to start pairing it with the soundbar.
- Then touch and hold the wireless icon on the soundbar for 2 seconds to complete the pairing
process.
NB:The subwoofer & soundbar are pre-paired in the factory. Pairing is only required if the connection is lost
and the wireless indicator on the soundbar control panel remains flashing.
8
Getting Started
Speaker Placement
Placing the soundbar on a TV stand or other flat surface or cabinet
If your TV is placed on a table or TV stand, you can place the Soundbar in front of the TV stand on
the same surface. The soundbar comes with rubber feet already attached to the bottom to prevent
marking any surface it is placed on. Position the soundbar centered with the TV screen.
If placed in a TV cabinet, the shelves can be open or closed to the sides, but of course, if the
cabinet has doors these should be open when the soundbar is in use.
Wall-mounting the soundbar
If your TV is mounted on a wall, you can use the included wall-mount brackets attached as feet to
the soundbar to mount the soundbar on the wall. It is recommended to mount the soundbar right
under the TV, centred with the screen.
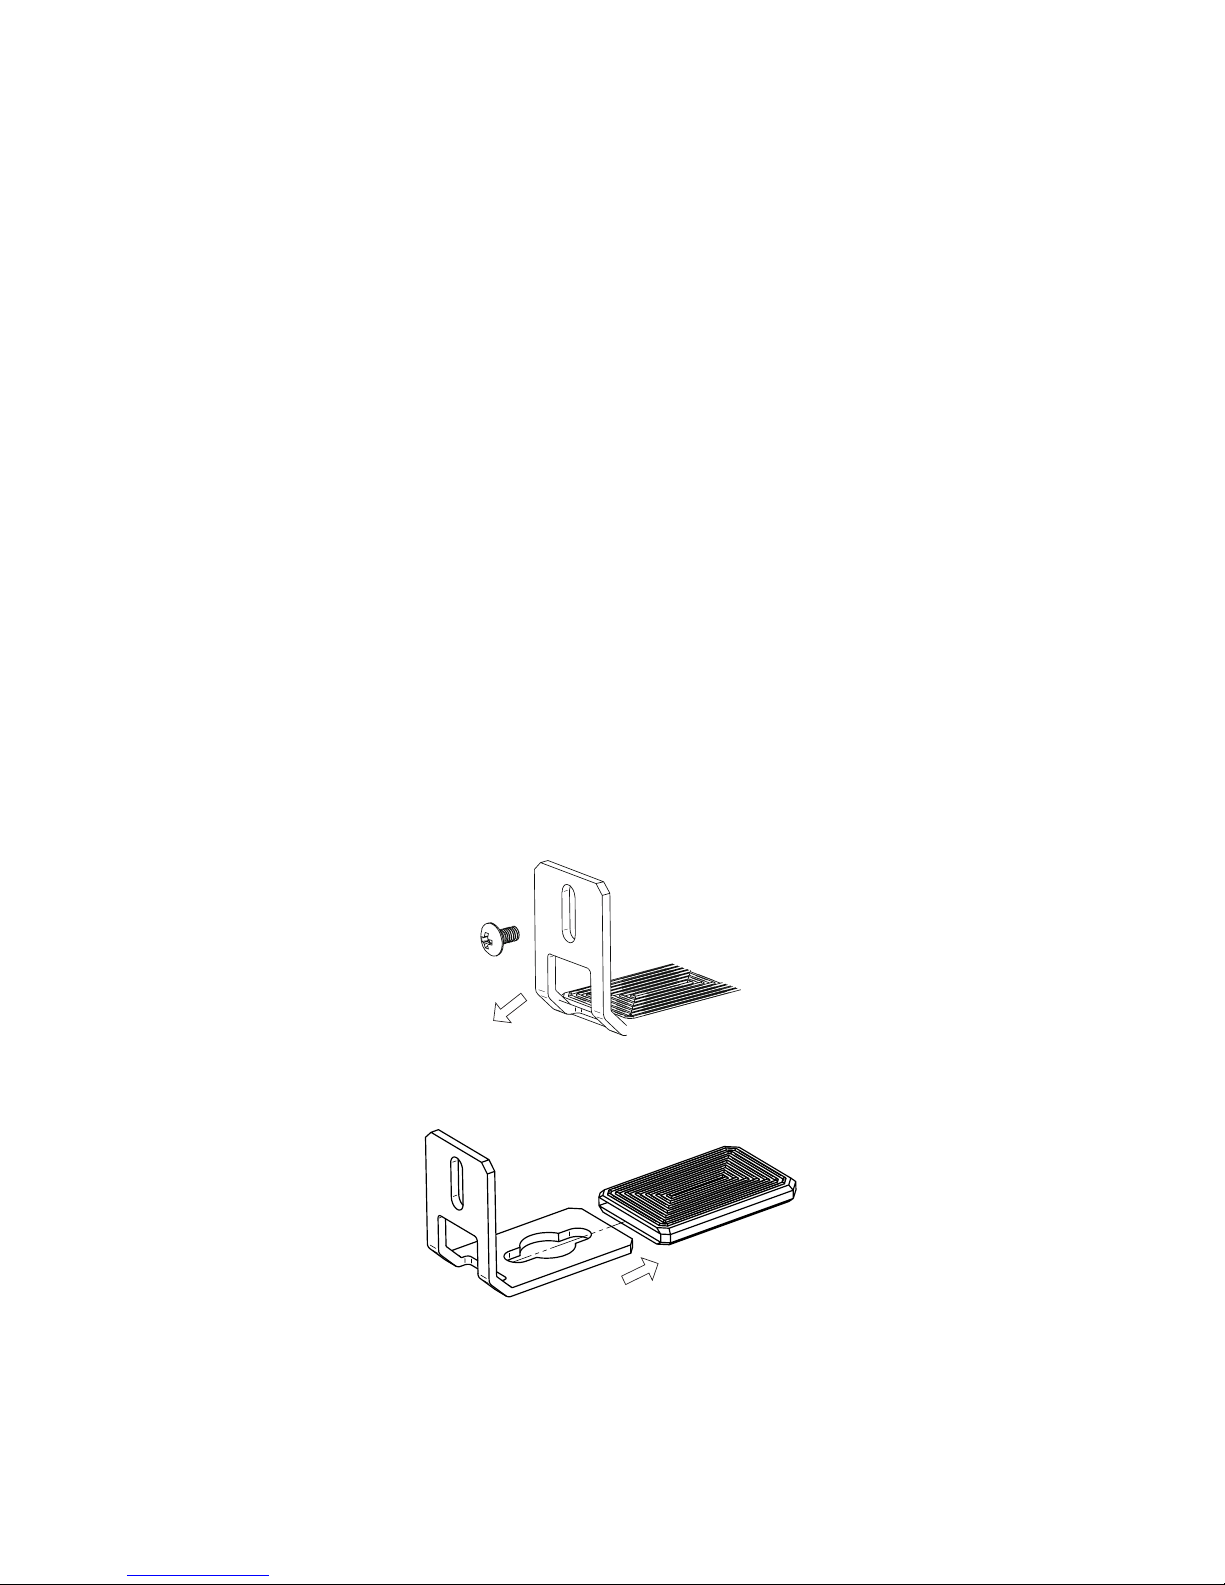
1. Remove the screws on the stand.
2. Remove the rubber covers on the stand
9
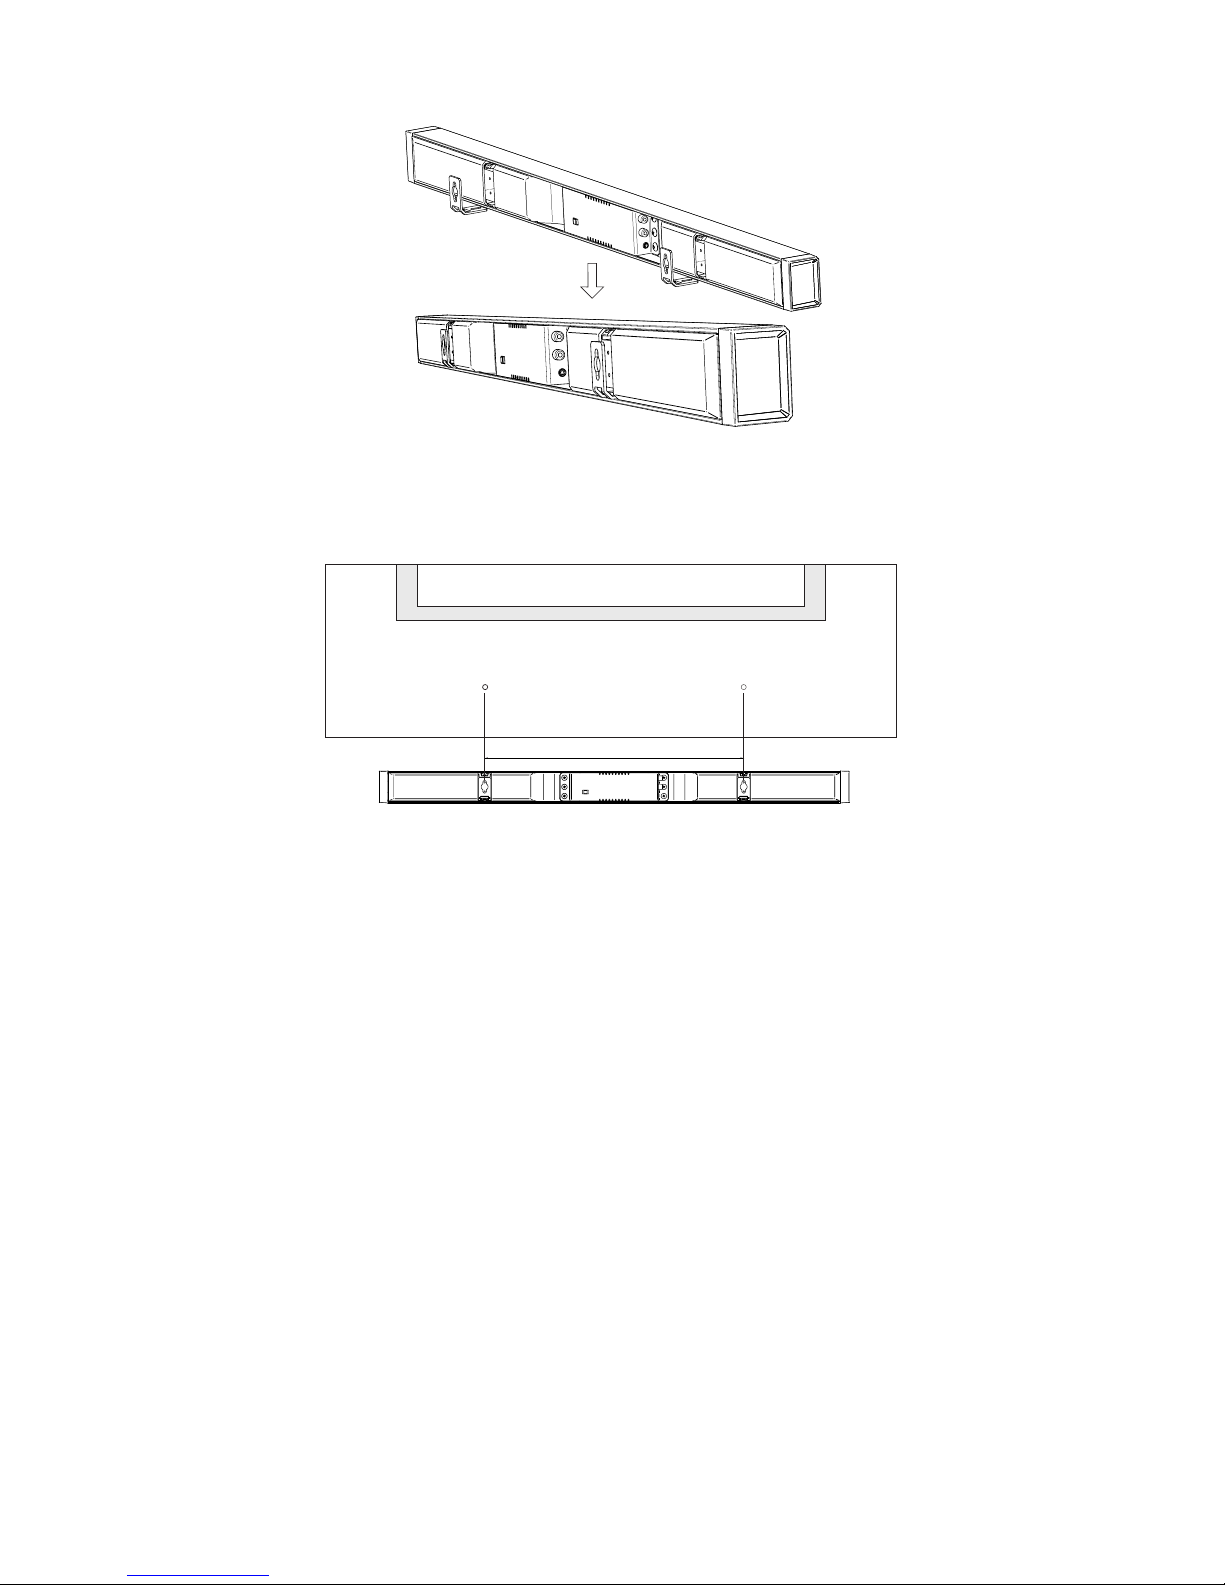
3. Reverse the direction of the bracket and mount it on the back of Soundbar.
4. Fix the mounting bolts or screws to the wall. The distance between the centre of the two
mounting screws is 452mm and the size of mounting screws should be M5. (Not provided)
452mm
TV
5. Hook the mounting brackets to the mounting screws or bolts.
Positioning the subwoofer
The wireless connectivity allows you to place the wireless subwoofer anywhere in the room where
there is access to AC power. For better sound performance, we would recommend the subwoofer
to be placed in a corner 10-20cm distance away from the wall, as this will generate higher bass
output. The maximum wireless transmission distance is about 10m and it is recommended to
keep the subwoofer distance less than 5m to minimize any outside interference, which may affect
the transmission quality.
It is also recommended to keep the distance from the listener to the subwoofer and soundbar at
a similar distance, which will deliver the best sound experience. If the subwoofer is placed much
farther than the distance from soundbar to the listener, it is recommended to increase the bass
volume from the remote control. Likewise, it is recommended to reduce the bass if the subwoofer
is placed close to the listener.
10
Connecting The Soundbar To Your TV
Source Connections
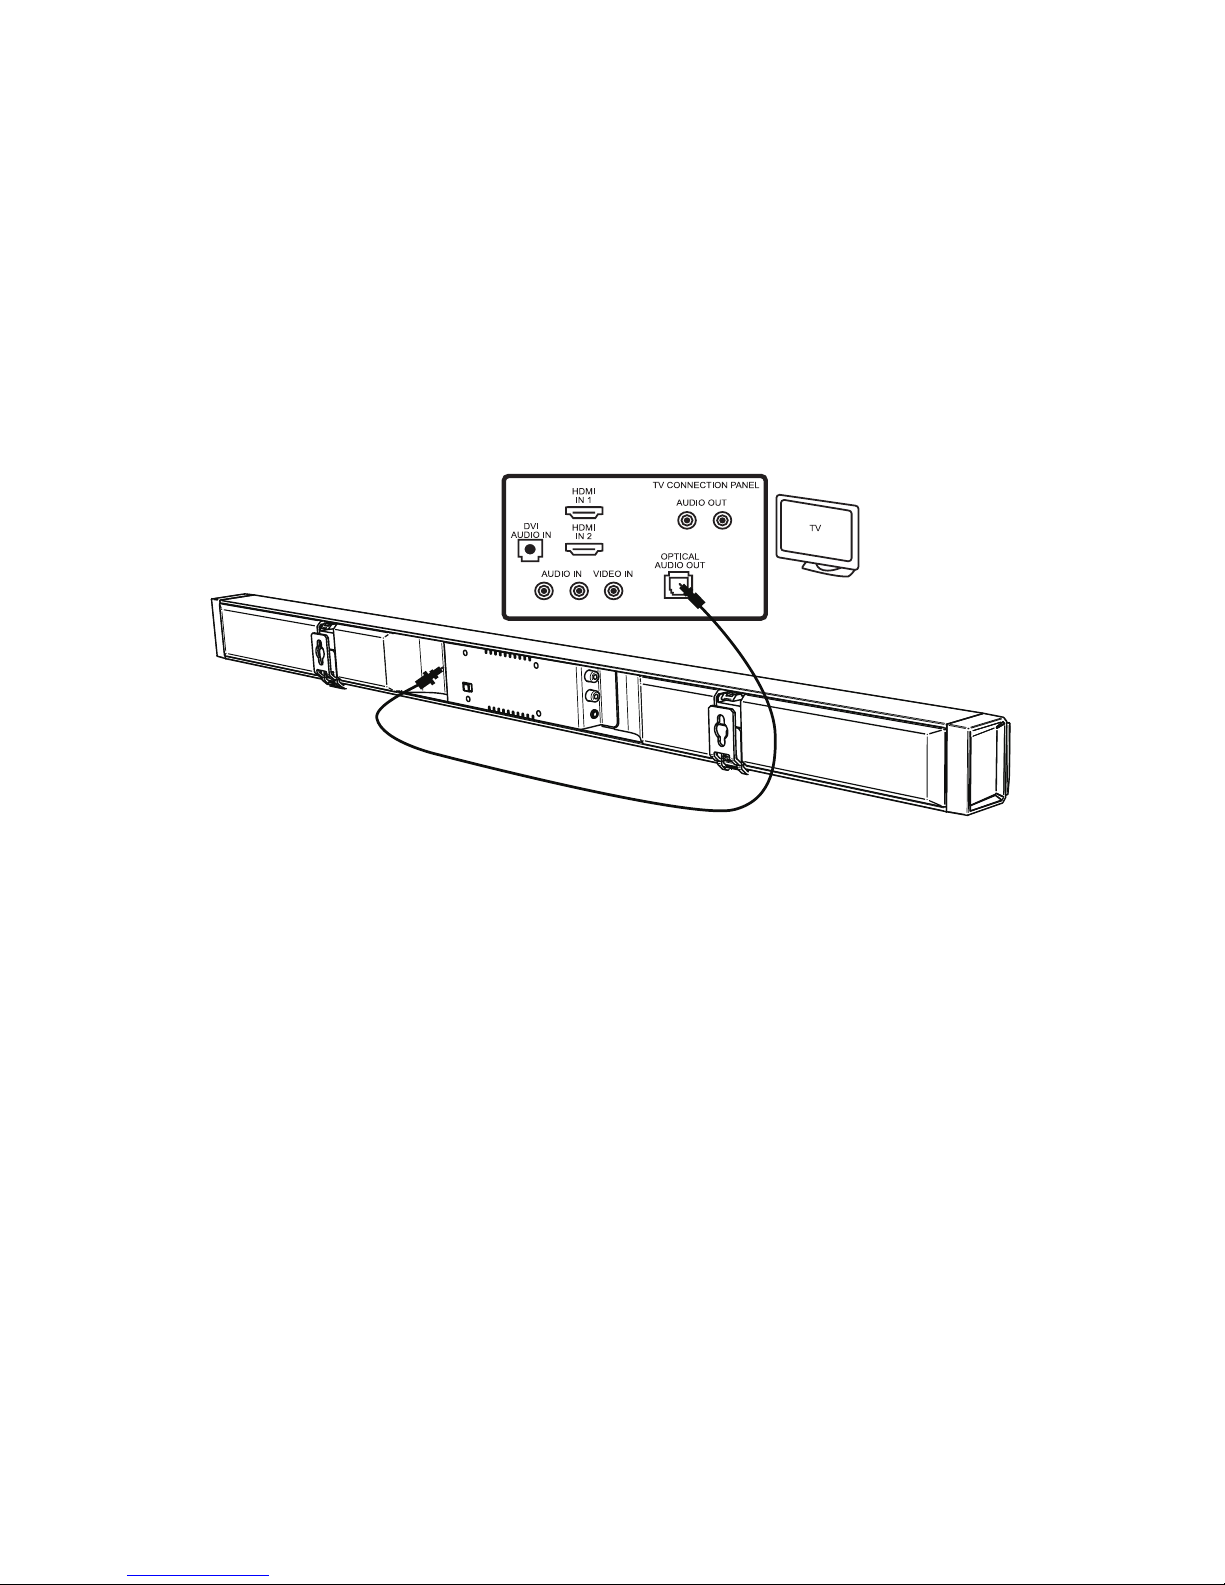
Digital Optical
The soundbar comes with a Toss-link optical connection on the rear panel.
Digital connections deliver a stable and consistent transmission, so it is recommended to use the
digital connection if your TV has a digital output.
*Important
Some digital sources are preset to output 5.1 channels, which is for dedicated home theatre
systems. To use the digital input on the SB-2500, you must set the output format of your video
source such as DVD, Bluray, Set top box, Digital TV tuner..etc to uncompressed PCM or Normal
Stream.
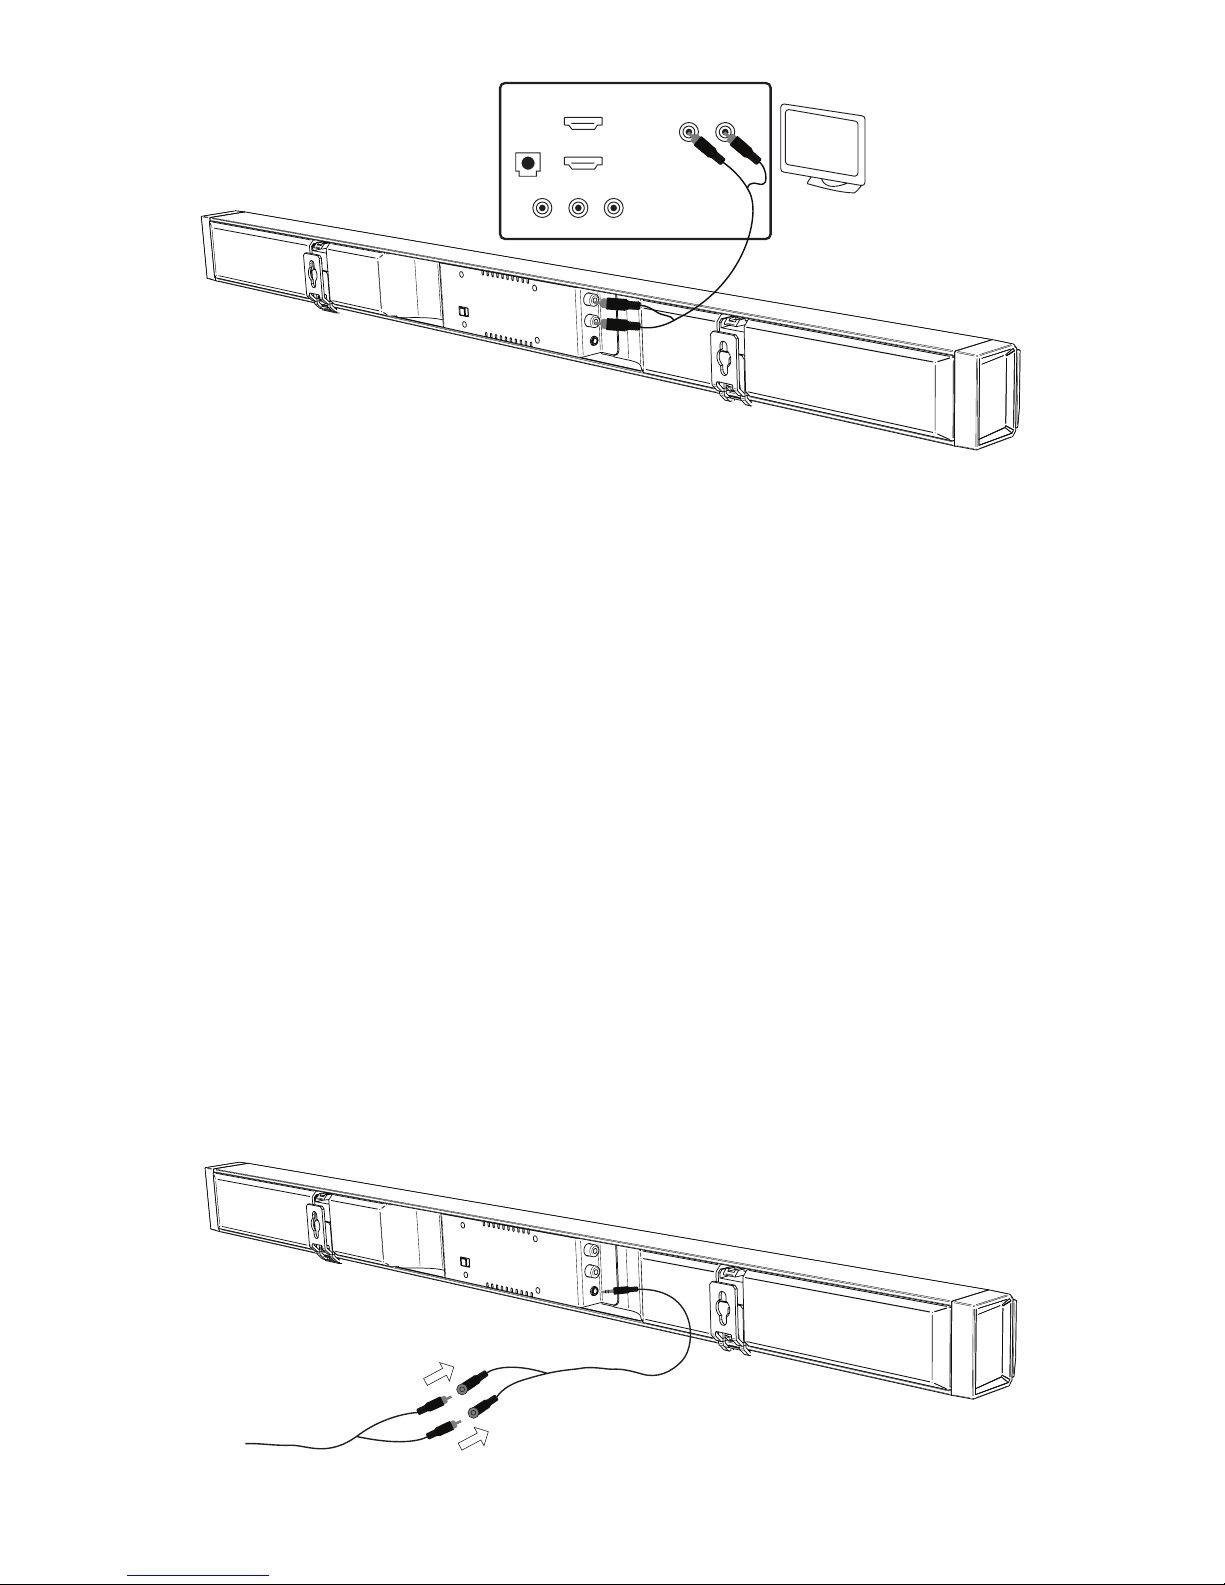
Analogue RCA
If your TV does not have a digital optical input, use the included RCA cable to connect the audio
output from your TV to the soundbar. This will also provide a reliable and stable transmission for
your soundbar.
11
HDMI
IN 1
TV
DVI
AUDIO IN
AUDIO IN
AUDIO OUT
TV CONNECTION PANEL
VIDEO IN
HDMI
IN 2
Analogue 3.5mm mini Jack
The 3.5mm mini-jack is generally used for headphones or smartphones/computers. Some
televisions may use a 3.5mm mini-jack as an audio output socket. You are also able to connect
the soundbar to your TV via the 3.5mm mini-jack if there is no optical digital or RCA analogue
connection on your TV or if you are connecting to another device.
NB: Whilst the RCA input jack is designed to accept standard analogue audio input, the 3.5mm mini-
jack was designed to work with an analogue audio input with a higher output level. If the audio signal
exceeds the regular output level of the Analogue RCA connection it may cause some audio distortion
at higher volume levels. If this happens we suggest you connect the TV to Soundbar using the the
3.5mm mini jack which is designed to handle higher audio levels.
Connecting the 3.5mm to RCA
There is a 3.5mm mini-jack to RCA converter cable inside the accessories box which will connect
the included RCA cable to the 3.5mm mini-jack converter cable.
Then you can connect the 3.5mm male connector to the soundbar 3.5mm jack.

12
Powering up the soundbar
1. Locate the power mains adaptor with 12V power output.
2. Connect the 12V jack to the soundbar DC input on the back of soundbar.
3. Connect AC plug into the mains wall outlet and switch on.
Setup The Wireless Subwoofer
1. Locate the power mains adaptor with 15V power output
2. Connect the 15 DC jack to the rear input of the subwoofer.
3. Connect the AC plug into the mains wall outlet(leave off).
4. Switch the DC power switch to ON position on the back of the soundbar.
5. Now you can swith the mains power on the wall outlet on.
Start Using The Soundbar
Activate The Remote Control
CR 3032
Before you can use the remote control, please open the battery compartment and insert the
battery.
Switch On The Power
0 I

13
Wake Up The Soundbar
Press the power button on the remote to wake up the unit .
Select Input Source
If you are connecting your TV through an optical jack, press the input key on the remote control.
When the LED indicator on the soundbar shows as below, you have selected the optical input.
If you are connecting your TV through the RCA jack, press the input key on the remote control.
When the LED indicator on the soundbar shows as below, you have selected the AUX 1 RCA input.
If you are connecting your TV through the 3.5mm jack, press the input key on the remote
control. When the LED indicator on the soundbar shows as below, you have selected the 3.5mm
headphone jack input.

14
BLUETOOTH AUDIO
The SB-2500 comes with Bluetooth for music streaming. It supports the advanced aptX decoder
that allows you to transmit ultra-high quality Bluetooth audio if the source device supports the
aptX encoder.
Switching to Bluetooth mode
Press the button on the remote or soundbar display to switch the SB-2500 to Bluetooth mode.
Bluetooth LED indicator
Bluetooth
The Bluetooth LED indicator is the blue LED on the right side of the control pancl display. It shows
the working status of the Bluetooth and the denition of the LED is as below:
Waiting to Pair – LED continuously flashes quickly.
Bluetooth Paired – The LED stays on.
Pair with audio source
The Evolve Audio SB-2500 is capable of pairing with any Bluetooth device such as a mobile phone
or computer. The Bluetooth prole allows wireless audio streaming between the two devices.
1. Turn on the Bluetooth function on your phone (most phone manufacturers put this function
under the settings section).
2. Search for Bluetooth device.
3. Once ‘EVOLVE SB-2500’ is found, choose to pair it with your phone/tablet etc…
4. You can now play music on the phone. The sound should come out from the soundbar.

15
Reconnect to the soundbar
The SB-2500 remembers the last 5 Bluetooth audio sources that it has been paired with. It will
reconnect to the active paired Bluetooth device automatically after switching to Bluetooth mode.
Connecting to a new Bluetooth device
The SB-2500 will automatically connect to available paired sources when in Bluetooth mode. If
you prefer to connect it with another Bluetooth device, you need to force it to pair with the other
device by following the steps below.
1. Stop playing music from the current paired Bluetooth audio source if connected to the SB-2500
2. Press the Bluetooth button again on the remote control. You will hear a two-tone pairing sound
and in the meantime, the Bluetooth indicator will start flashing quickly.
3. Turn on your Bluetooth settings and see if your Bluetooth device is able to nd “EVOLVE SB-
2500” and is ready for pairing. Pair with SB-2500 by choosing to pair with “EVOLVE SB-2500”.
4. You can now play music from the new source device.

16
EVOLVE EVO-1 HEADPHONES
*Only available on SB-2501/SB-2502
How the headphones work
If you also own the EVOLVE wireless headphones, they will work with the EVOLVE soundbar
seamlessly. The wireless headphones use the same transmitter that is in the wireless subwoofer.
Once the headphones are connected to the subwoofer, all your content will play through the
headphones.
When you turn on the headphones, the soundbar will be muted automatically. In addition, when
you turn off the wireless headphones, the soundbar will stay muted.
This is ideal if you have just nished a lm or listening to music and your partner or family are
asleep.
Headphone user interface
1. Volume Up – To increase the headphone volume.
2. Power –To turn on/off the headphones and pair the headphones with the soundbar.
3. Volume Down – To lower the headphone volume.
4. USB Charging – Charge the headphones through this connector using the USB charger
located on the rear of the subwoofers.

17
5. LED indicator – Display the headphone status. Denition as below.
Working – Green LED on
Pairing mode – Green LED flashing quickly.
Lost signal – Green LED flashing slowly.
Charging – Red LED on
Pairing Your Wireless Headphones
If the headphones came with your soundbar package, they should be pre-paired with the soundbar
when you rst switch them on. You should be able to use the headphones without any need for
pairing.
If the headphones came separately, you will need to pair them with the soundbar by following
these steps before using them.
1. Make sure the headphones are turned off before you start the pairing process. The LED
indicator is not lit when the headphones are turned off.
2. Press the power key to turn on the headphones. If the headphones can’t nd any paired audio
source, the green LED will start flashing and automatically enter into pairing mode. Then wait
for pairing.
3. Touch the button on the soundbar's display panel for 3 seconds.
4. If the headphones are paired with the soundbar, the soundbar will automatically mute and
audio will play through the headphones.
Start Using The Wireless Headphones
If your headphones were previously paired to the soundbar, simply press the power button on the
headphones for 2 seconds. Once you hear the 'Beep' sound from the headphones, they are on and
ready for use.
Once you have turned on the headphones, the soundbar will mute automatically until you press
the mute button to unmute the soundbar.

18
Switching Back To The Soundbar
When the headphones are off, the soundbar will stay muted to avoid potentially disturbing others
in the house. If you want to hear audio from the soundbar, you need to unmute your soundbar
by pressing the Mute key on the remote control or by holding the V+ button on the soundbar's
display screen for 3 seconds.
Volume adjustment of the headphones
The headphone volume adjustment is on the right side of the headphones. Press the + to increase
the volume or - to reduce the volume.
Selecting a source when using headphones
To select a new audio source for the headphones, you need to press the source key on the remote
control or touch panel on the soundbar to perform this action.
Charging Your Wireless Headphones
The EVO-1 wireless headphones use a lithium-ion rechargeable battery. Once fully charged the
wireless headphones should provide approximately 10 hours music playing time.
If you are not able to switch on your wireless headphones, you should rst charge them through
the USB charging connector provided. You can also charge the headphones by connecting to the
USB charging port on the back panel of the subwoofer using the USB cable provided or any other
USB charger that provides +5V DC power.
When charging the headphones, the red light will stay on. Once it is fully charged, the red light
indicator will switch off and you can then remove the headphones from the charger.
Low Power Indication
When the headphones battery power is low, the headphones will emit an audio ‘Beep’ sound, and
automatically switch off after a few seconds. You should now charge your headphones.
This manual suits for next models
2
Table of contents


