Evotools BC 520 A EPTO User manual

1
MANUAL DE UTILIZARE / USER’S
MANUAL
MOTOCOASA / BRUSH CUTTER
BC 520 A EPTO
INFORMATII REPARATII IN GARANTIE PE ULTIMA PAGINA

2
Parti componente / Components
1. Bujie / spark plug
2. Filtru aer / Air filter
3. Rezervor combustibil / Fuel tank
4. Suport maner / Handle support
5. Brida curea / Strap hook ring
6. Levier blocare acceleratie / Throttle safety lever
7. Buton pornit/ oprit –On/OFF button
8. Acceleratie / Throttle lever
9. Tija / Shaft tube
10. Aparatoare / Protective cover
11. Cutie de viteze / Gear box
12. Cutit taiere / Cutting head
13. Cap taiere / Nylon line head
Accesorii incluse in pachet / Accesories
included
1. Cap taiere cu nylon / Nylon line head
2. Cutit cu 3 lame / 3 blades cutting head
3. Ham protectie / shoulder strap (fig 6)
4. Recipient amestec carburant /Fuel mixture container
5. Set chei pentru montaj / Key set for installation
3

4
Masuri de protectie / Protective measures
Este interzis fumatul in
timpul alimentarii
Do no smoke during
refueling
Păstrata o distanta de cel
puțin 15 de metri intre
mașină și oameni, animale
sau bunuri fragile
All people, animals and
delicate property must be
kept at least 15 meters away
from the machine
Purtati echipament de
protectie adecvat
Wear protective equipment
Purtati ochelari de protectie
si casti antifonice
Wear protection goggles and
ear muffs
Purtati incaltaminte de
protectie antiderapanta
Wear protective shoes
Purtati manusi de protectie
Wear protective gloves
Atentie la particulele produse
de dispozitivul de taiere
Beware of particles produced
by cutting device

5
RO_________________________________________________
Va multumim pentru achizitionarea acestui produs EVOTOOLS, fabricat
conform celor mai inalte standarde de siguranta si de functionare.
Avertizare! Pentru siguranta dumneavoastra cititi cu atentie acest manual
si instructiunile generale de siguranta inaintea utilizarii echipamentului.
Nerespectarea acestor reguli poate avea ca rezultat producerea
incendiilor si/sau a ranirilor personale.
Masuri de siguranta generale
Zona de lucru
•Nu lasati copiii sau persoanele neautorizate in zona de lucru. Distragerea atentiei poate
cauza pierderea controlului uneltei.
•Nu suprasolicitati produsul! El poate fi folosit in conditii de siguranta daca sunt respectati
parametrii de exploatare care il caracterizeaza. Nu utilizati unelte cu un alt scop fata de cel
pentru care sunt destinate.
Masuri de siguranta personala
Nu utilizați motocoasa dacă ați consumat băuturi alcoolice, medicamente care pot influența
capacitatea de reacție și concentrare, droguri sau alte substanțe halucinogene, sau dacă sunteți
obosiți, bolnavi sau supărați.
•Particulele de iarbă si arbusti rezultate in urma taierii pot cauza reacții alergice.
•Intotdeauna utilizati o imbracaminte adecvata.Nu purtati haine largi sau bijuterii. Daca aveti
parul lung, acesta trebuie legat. Apare riscul prinderii acestora de catre partile componente ale
masinii aflate in miscare.
•Utilizati intotdeauna echipament de protectie adecvat: casti antifonice, ochelari, manusi si
incaltaminte de protective.
•Atentie la efectele produse de vibratii. Va recomandam oprirea activitatii pentru pauze de
odihna la anumite intervale de timp
•Evitați pornirile accidentale. Transportarea uneltelor cu degetul pe întrerupător creste riscul de
accidentare.
Masuri de siguranta specifice motocoasei.
ATENTIE! Se impun măsuri speciale de siguranță în cazul utilizării motocoasei,
datorită vitezei mare de rotire a capului de taiere.
•La prima punere în funcțiune a utilajului: se solicită vânzătorului sau persoanelor de
specialitate explicații cu privire la funcționarea în condiții de siguranță a echipamentului.
•Nu porniți și / sau utilizati aparatul in spatii inchise, intrucat exista riscul intoxicatiei cu gazele
evacuate. Amestecul de ulei si combustibil trebuie realizat în aer liber, departe de zonele cu
potential exploziv, de exemplu in prezenta lichidelor, gazelor sau particulelor inflamabile
•Este interzis fumatul in timpul alimentarii cu combustibil.
•Trebuie păstrata o distanta de cel puțin 15 de metri intre mașină și oameni, animale sau bunuri
fragile.
•Este interzisă utilizarea utilajului de către persoane minore cu excepția tinerilor peste 16 ani
care au fost instruiți de către persoane autorizate.
•Utilajul va fi împrumutat numai persoanelor care au fost instruite cu privire la utilizarea acestuia
și va fi însoțit întotdeauna de Manualul de utilizare.
•Nu lucrați cu motocoasa în caz de vreme nefavorabilă (vânt, ploaie, zăpadă , gheată) - pericol
crescut de accidente!
•Repararea trebuie realizata numai de catre personal autorizat prin inlocuirea cu accesorii si
piese de schimb originale pentru a se evita producerea accidentelor datorate reparatiilor
necorespunzatoare.

6
Service
•Repararea trebuie realizata numai de catre personal autorizat prin inlocuirea cu accesorii si
piese de schimb originale pentru a se evita producerea accidentelor datorate reparatiilor
necorespunzatoare.
Domeniu de utilizare.
Motocoasa este destinata uzului personal pentru operatiile tăiere a ierbii, arbustilor, tufelor, si a
cerealelor paioase (grau, orz, etc).
NU ESTE PROIECTATA PENTRU UZ INDUSTRIAL.
Pregatirea pentru punerea in functiune
Asamblare motor –fig 1
Cuplati motorul de tija motocoasei si strangeti cele 4 suruburi de fixare.
Asamblare maner –fig 2:
Motocoasa este construită pentru utilizarea pe partea dreaptă a corpului.
Montati manerul pe axul transmisiei cu levierul de acceleratie pe partea dreapta si strangeti cele 4
suruburi de fixare. Reglati manerele la un unghi de 50-60 °fata de axul principal.
Asamblare aparatoare siguranta
Această aparatoare se fixeaza cu patru șuruburi pe axul transmisiei, langa cutia de viteze.
Montare cap de taiere cu nylon –fig 3
ATENTIE! Filet pe stanga
•Introduceți o șurubelniță în locasul de blocare, pozitionat pe protecția din oțel și în bucsa
axului transmisiei, deșurubați capul de taiere in sensul acelor de ceasornic și indepartati
capacul metalic, lasand doar saiba plata.
•Insurubati noul cap de taiere cu nylon si strangeti in sens invers acelor de ceasornic.
•Verificati blocarea completa a capului nylon, dupa care indepartati surubelnita din locasul de
blocare.
Montare cutit cu 3 lame –fig 4
•Introduceți o șurubelniță în locasul de blocare, pozitionat pe protecția din oțel și în bucsa
axului transmisiei , deșurubați piulița in sensul acelor de ceasornic utilizând cheia
furnizata, și indepartati capacul metalic si saiba plata.
•Pozitionati cutitul de taiere in locasul din bucsa axului transmisiei, peste care asezati saiba
plata si capacul metalic.
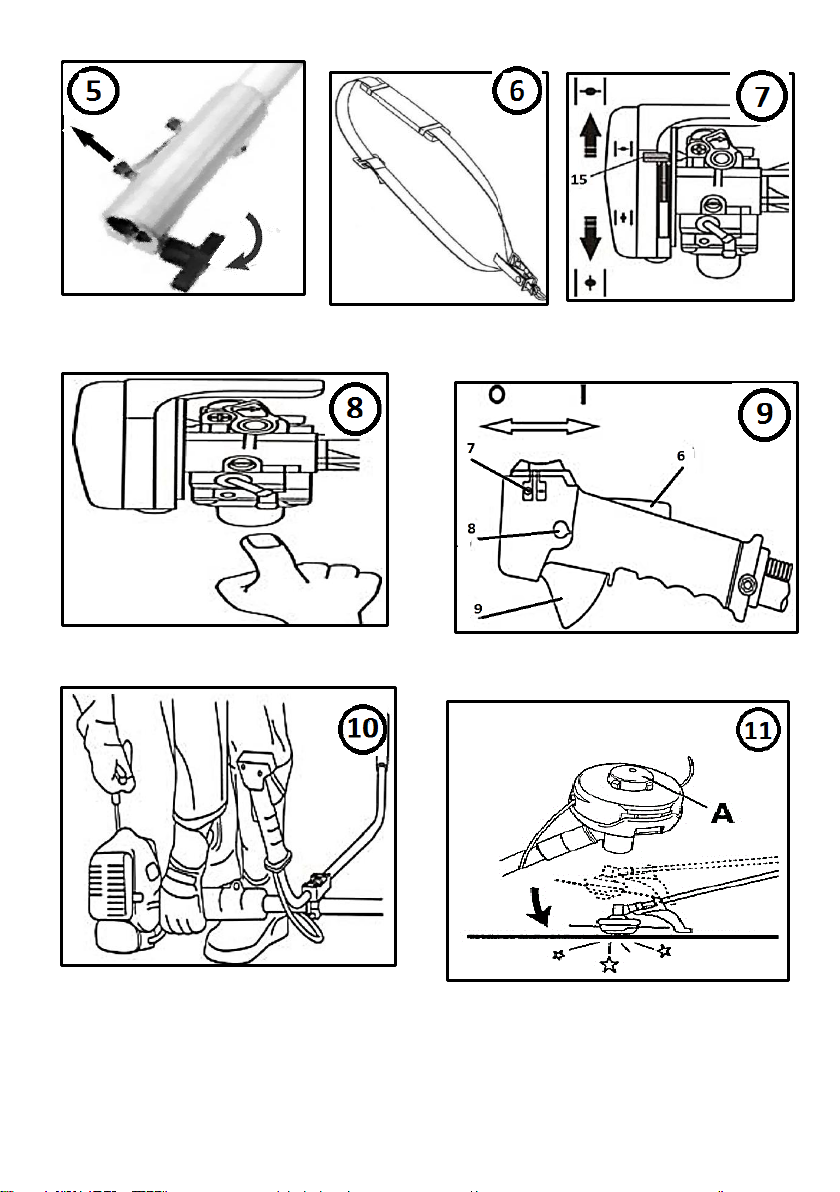
Montare tija 2 segmente –fig 5
•Slabiti manerul de blocare prin rotire in sens invers acelor de ceasornic.
•Trageti boltul de fixare si rotiti-l cca 90 ° pana se blocheaza in pozitia deschis.
•Introduceti usor tijele una in cealalta si aliniati cele 2 orificii.
•Deblocati boltul si asigurati-va ca este introdus complet in locas.
•Strangeti manerul de blocare.
Curea de umar –fig 6
Motocoasa trebuie utilizata impreuna cu o curea de umar.
•Atasati cureaua de umar pe tija motocoasei si reglaţi pe lungime cureaua astfel încât cârligul
să se găsească aproximativ la o lăţime de palmă sub şoldul drept.
•Lăsaţi motocoasa să se balanseze.
•Dispozitivul de tăiere trebuie să atingă solul în poziţie normală de lucru puteti sa slabiti
suportul în caz de nevoie cu o cheie hexagonala si sa-l deplasaţi catre fata sau catre spate.
Important este sa mentineti in permanenta coasa in echilibru.

7
•Strangeti piulita in sens invers acelor de ceasornic dupa care indepartati surubelnita.
Utilizare
ATENTIE! Este interzisa utilizarea firelor metalice sau a altor materiale pentru taiere.
Preparare amestec carburant
Pentru fiecare litru de benzina adaugati 40 mL de ulei (4% ulei sintetic pentru
motoare in 2 timpi + 96% benzina cu cifra octanica minim 95). Amestecul trebuie
utilizat in maxim 3 saptamani de la preparare!
Se va utiliza ulei pentru motoare în 2 timpi recomandat de HONEST GENERAL TRADING
SRL și specificat de vânzător la cumpărarea produsului
Agitati usor rezervorul de combustibil, înainte de orice utilizare, în scopul de a omogeniza
amestecul ulei-benzina.
Această operație trebuie executata într-o zonă deschisă departe de orice flacără sau scântei,
în timp ce motorul este oprit. Nu fumați și nu folosiți telefonul în tot acest timp.
Raportul de amestec recomandat :
Raport de amestec 25:1
Benzina fara Pb [litri]
1
2
3
4
5
Ulei motoare 2 timpi[ml]
40
80
120
160
200
Pornire motor
1. Apasati butonul rosu pornit/oprit (7) de pe mânerul dreapta în poziția "I"- fig 9
2. Deplasati clapeta de soc in sus în poziția "ON" - fig 7
3. Apăsați pompa de amorsare (buton transparent) de sub carburator de 4-5 ori, pentru a permite
combustibilului sa se intoarca in rezervorul prin conducta de retur- fig 8
4. Apasati concomitent clapeta de deblocare (6) si clapeta de acceleratie (8).
5. Cu mâna stângă prindeti masina și apăsați arborele de transmisie, în scopul de a menține ferm
poziționat aparatul pe sol, iar cu mâna dreaptă trageți încet de manerul demarorului până cand
clicheții agăța volantul. fig 10
6. Trageți cu putere de 4- 5 ori mânerul demarorului până porneste motorul. Nu trageți niciodată
de maner pana la desfasurarea totala a cablului, pentru a evita deteriorarea demarorului.
7. Eliberati clapeta de soc pana la ½ din cursa ei si mentineti-o in aceasta pozitie timp de
aproximativ 10-20 secunde, după care apasati-o pana in pozitia OFF.
8. Apasati pentru deblocare maneta de acceleratie si incepeti să utilizati mașina.
Dacă motorul nu pornește, este posibil ca bujia sa fie umeda.In acest caz, deșurubați bujia,
ștergeți-o și uscați-o dupa care actionati demarorul de mai multe ori, fără bujia montata, în scopul
de a curăța și ventila camera de ardere.
Rodaj
În primele zece ore de functionare, utilizati o turatie moderata pentru functionarea motorului. In
orice caz, nu supra-turati motorul pentru a permite componentelor in miscare un rodaj
corect.Dupa incheierea perioadei de rodaj motorul va atinge performantele maxime.
După primele două ore de functionare, verificați strangerea corecta a tuturor piulițelor și
șuruburilor.
Reglare carburator
In timpul functionarii normale carburatorul poate avea unele mici dereglari, în special din cauza
modificarilor condițiilor de lucru, utilizarii pentru o perioada indelungata sau variației de
temperatura sau presiune a mediului ambiant.
Pentru reglare urmati instructiunile de mai jos:
•Înșurubați in sensul acelor de ceasornic șurubul galben cu arc până când ajunge la baza,
fara a-l forta

8
•Din această poziție deșurubați 1.5 rotatii.
•Porniți motorul și accelerati-l la maxim.
•Găsiți punctul în care motorul este la regim maxim de turație prin înșurubarea sau
deșurubarea a cate aproximativ 1/8 dintr-o rotatie completa.
•Când ați stabilit regim maxim de turație, deșurubați un sfert de rotatie șurubul, în scopul de a
spori amestecul de benzina.
Taiere iarba –fig 12
Pentru o taiere corecta pendulati masina stanga-dreapa pe o latime de de 1,5 metri. Asigurati-va
ca la fiecare pas va pastrati starea de echilibru .Daca utilizati cutitul cu 3 lame pentru iarba,
incercati sa taiati de la dreapta la stanga pentru colectarea ulterioara a ierbii pe partea stanga.
Dacă este posibil, evitați pietrele si bucatile de lemn chiar de mici dimensiuni, bulgari de pământ,
sau orice alt obiect care ar putea fi ascuns sau putin vizibil în iarba.
In cazul in care loviti din greseala un obiect de dimensiuni mai mari sau se blocheaza capul de
taiere din cauza suprasolicitării sau a materialului vegetal fibros înfășurat în instrumentul de
tăiere, trebuie să reduceti turatia pana la turatia de mers în gol și să decuplati ambreiajul
Asigurati-va că masina este oprita prin apăsarea butonului pornit/oprit de pe maner in
pozitia ”O”.
Verificati daca dispozitivul de taiere nu a fost deteriorat, cum ar fi ruperea dintilor sau lamelor,
situatie in care inlocuiti-l imediat. In cazul în care pe capul de taiere este doar infasurat material
vegetal, eliminati-l cu ajutorul unei perechi de manusi .
Capul de taiere transmite vibrații catre utilizator în timpul utilizarii, chiar daca masina este dotata
cu un dispozitiv anti-vibratii , ceea ce poate genera o crestere a gradului de oboseala. Din acest
motiv, va recomandam sa luați pauze regulate, timp in care lasati motorul sa functioneze la ralanti
pentru a se raci cu ajutorul curentului de aer generat de volanta.
Oprire motor
•Lăsaţi motorul sa functioneze la turaţia la mers în gol.
•Poziţionaţi întrerupătorul (7) de pe mânerul de comandă pe „0”.
ATENŢIE: Dispozitivul de tăiere se mai roteşte câteva secunde după oprirea
motorului; ţineţi strâns ambele mânere până la repausul total al dispozitivului de
tăiere.
Reglare fir taiere –fig 11
Firul se uzează în timpul lucrului. Pentru a alimenta cu un fir nou, apăsaţi cu forţă capul
casetei firului pe sol, când motorul este în funcţiune.Firul este eliberat automat prin acţiunea forţei
centrifuge. Prin intermediul cuţitului de pe apărătoarea firului se scurtează firul la lungimea
corectă.
Schimbare fir taiere
•Scoateţi capacul apărătoarei firului prin presarea urechii laterale de siguranta concomitent
cu rotirea lui.
•Scoateţi bobina cu fir împreună cu resturile şi cu arcul de presiune.
•Apucaţi noua bobină cu fir şi scoateţi câte 10 cm din ambele fire.
•Aşezaţi bobina pe arcul conic şi treceţi ambele fire prin urechile metalice rotunde de pe
carcasa bobinei.
•Aşezaţi capacul pe noua bobină si rotiţi-l astfel încât urechile capacului să se suprapună
peste arcurile din carcasa bobinei cu fir.
•Apăsaţi capacul bobinei cu fir împreună cu bobina si rotiti pana la blocare.
Curatare si intretinere
Echipamentul nostru a fost proiectat astfel incat sa poata fi utilizat pentru o perioada indelungata cu
un minimum de intretinere.
Veti putea obtine intotdeauna o satisfactiemaxima in timpul utilizarii respectand indicatiile de mai jos.

9
Curatare generala
Pastrati curate fantele de ventilatie ale carcasei pentru a preveni supraincalzirea motorului
•Regulat, de preferat dupa fiecare utilizare curatati echipamentul cu o carpa moale.Daca
murdaria persista, utilizati o carpa umezita intr-o solutie de apa si sapun
•NU utilizati solventi (ca de exemplu: petrol si derivati, alcool) intrucat acestia pot deteriora
partile din plastic.
Intretinere filtru aer –fig 13
ATENTIE! Nu porniti niciodata motorul fara elementul filtrant!
Filtrul de aer trebuie curatat dupa fiecare lucrare mai lunga.
•Desurubati surubul cu fluture si scoateti capacul filtrului. Extrageti elementul filtrant si examinati-
l. Inlocuiti-l imediat daca ati constatat fisuri sau rupturi
•Spălaţi cu apă călduţă şi detergent elementul filtrant din burete, clătiţi bine şi lăsaţi-l să se
usuce complet.
•Montati la loc filtrul si capacul.
Reglare bujie –fig 14
Verificati distanta intre electrozii bujiei o data pe an sau in cazul functionarii defectuoase.
•Desurubati bujia cu ajutorul cheii speciale
•Reglati distanta intre electrozi la 0.6 mm
•Pentru remontare, rotiti MANUAL bujia pana la capat dupa care strangeti usor cu cheia.
Intretinere cutie de viteze –fig 15
Dupa fiecare 25 de ore de functionare ungeti cutia de viteze.
Deșurubați capacul lateral al cutiei de viteze și adaugati un lubrifiant special cutie de viteze care
rezista la temperaturi inalte, utilizand un instrument potrivit.
Strangeti bine capacul.
Întreținere după utilizare
La incheierea lucrului, curatati complet motocoasa de iarbă sau murdărie, asigurați-vă că nu
există nici un material înfășurat în instrumentele de tăiere și puneti mașina înapoi în ambalajul ei,
pentru a evita accidentari sau deteriorari. Nu loviti sau tăiati rezervorul de combustibil în timp ce il
asezati in pozitia de stationare. Ori de câte ori aparatul nu este folosit pentru mai mult de o luna,
procedați după cum urmează:
•Goliți complet rezervorul de amestecul carburant.
•Protejați contra coroziunii toate piesele metalice motor cu un strat subțire de ulei.
•Scoateți bujia, puneti câteva picături de ulei în cilindru, apoi trageți de manerul demarorului
de 2 - 3 ori, în scopul de a distribui uniform uleiul, dupa care montati inapoi bujia.
•Va recomandam sa porniti motorul timp de cateva minute la fiecare 60 de zile de inactivitate.
Inainte de orice utilizare agitati amestecul carburant în rezervor în scopul de a-l
reomogeniza.
Depozitare
•Intotdeauna inainte de depozitare curatati carcasa cu o carpa putin umezita in apa cu sapun.
•Depozitati unealta intr-un spatiu inaccesibil copiilor intr-o pozitie stabila si sigura intr-un loc
racoros si uscat, evitand temperaturile prea ridicate sau scazute.
•Protejati unealta fata de actiunea directa a razelor solare si pastrati-o intr-un loc intunecos,
daca este posibil.
•Nu pastrati unealta ambalata in folie sau in punga de plastic pentru a evita acumularea
umiditatii.
Garantie
Garantia acopera toate materialele componente si viciile de fabricatie cu exceptia,fara insa a fi
limitate la:
•Componente uzate ca urmare a unei exploatari normale sau accesorii,
•Defecte cauzate de o exploatare, intretinere si depozitare necorespunzatoare, modificari

10
neautorizate asupra echipamentului, costul transportului.
•Pagube materiale si leziuni corporale rezultate in urma exploatarii necorespunzatoare a
echipamentului.
•Deteriorari cauzate de lichide,patrundere excesiva de praf, distrugere intentionata , utilizare
inadecvata (pentru scopuri in care acest echipament nu este proiectat), etc..
Date tehnice
Tip motor
2 timpi, 1 cilindru racit cu aer
Capacitate cilindrica
52 cmc
Putere maxima
1.75 kW / 2.4 CP
Pornire
Manuala
Combustibil
Amestec 40 mL ulei motor 2 timpi
+ 1L benzina fara Pb min 95
Capacitate rezervor combustibil
1200 mL
Ulei*
SAE 10W-30 2T
Diametrul taiere cap nylon
255mm
Diametrul taiere cutit 3 lame
255 mm
Turatie maxima
7500 rot/min
Nivel de zgomot (LwA)
115 dB(A)
Nivel maxim de vibratii in maner
9.12 m/s²
Greutate cu accesorii si fara combustibil
7.5 kg
*Se va utiliza ulei pentru motoare în 2 timpi recomandat de HONEST GENERAL TRADING SRL și
specificat de vânzător la cumpărarea produsului

11
Asistenta tehnica
Constatare
Cauza posibila
Rezolvare
Motorul nu
porneste,functioneaza cu
turatie redusa sau se
opreste
Lipsa combustibil in rezervor
Se alimenteaza rezervorul cu
combustibil
Contact motor in pozitia OPRIT
Se comuta contactul in pozitia
FUNCTIONARE
Rezervorul are combustibil insa
acesta nu ajunge in carburator
Se curata sau se inlocuieste
filtrul de combustibil din rezervor
Rezervorul are combustibil
amestecat cu apa
Se curata tot sistemul de
alimentare si se inlocuieste
combustibilul
Filtrul de aer este murdar
Se curata filtrul
Material vegetal infasurat in jurul
cutitului de taiere
Se curata cutitul
Calitate scazuta a
procesului de taiere
Motor suprasolicitat din cauza
taierii vegetatiei prea inalte sau
a utilizarii unui cutit
supradimensionat raportat la
puterea motorului
Inaltimea vegetatiei taiate se va
limita la nivelul la care calitatea
operatiei este cea dorita si se va
utiliza accesoriul corespunzator
Scurgeri de ulei
Garnituri uzate
Se inlocuiesc
Suruburi slabite
Se strang
EN_________________________________________________
Thank you for buying this EVOTOOLS product, manufactured according
to the highest safety and performance standards
WARNING! For your own safety, read this manual and the general safety
Instructions carefully before using the appliance. Your power tool
should only be given to other users together with these instructions.
General power tools safety warnings
Working area
•Keep children and bystanders at a distance when operating a power tool. Distractions can
cause you to lose control of it.
•Do not overload the machine! The machine can be used safely if complied with the relevant
operating parameters. Do not use tools with a different purpose than the one for which they
are intended.
Personal safety
•Do not use the tool if are unde influence of alcoholic beverages, drugs that may affect the
ability to concentrate and react, hallucinogenic drugs or other substances or if you are tired,
sick or upset
•Always use protection equipment: earmuffs, goggles, gloves and shoes.
•Be aware of prolonged vibration effects. We recommend stop working and taking short
pauses from time to time.
•Chopped grass and shrubs sprayed into the air can cause allergy reactions.

12
•Avoid accidental starts. Carrying power tools with your finger on the switch makes accidents
more likely.
•Dress properly. Do not wear loose clothing or jewellery. Keep your hair, clothing and
gloves away from the power tool. Loose clothes, jewellery or long hair can become
entangled in the moving parts.
Service
Your equipment should be serviced by a qualified specialist using only standard spare parts. This
will ensure that it meets the required safety standards.
Specific safety instructions for brush cutter.
Special precautions are required when using brush cutter due to high speed of the
cutting head.
•The commissioning of the machine: it require the vendor or the person skilled explanations
for the safe operation of the equipment.
•Never start and /or use the machine in a close area or inside a structure as there is some risk
of intoxication due to exhaust gas. Mix and handle the fuel in the open air only far away from
potentially explosive surroundings, for example, in the presence of inflammable liquids, gases
or dust.
•Refrain from smoking while handling or mixing the fuel.
•All people, animals and delicate property must be kept at least 15 meters away from the
machine and the area of working.
•This machine is intended for use only by persons age over 16 who were trained by
authorized persons.
•The equipment will be loaned only to persons who have been trained on its use and will be
always accompanied by User Manual.
•Do not operate the brush cutter in case of bad weather (wind, rain, snow, ice)
•Your power tool should be serviced by a qualified specialist using only standard spare parts.
This will ensure that it meets the required safety standards.
Application
The brush cutter is intended for personal use for cutting grass,bush,arborescent shrub,clumps,
wheat and similar plants. IT IS NOT DESIGNED FOR PROFFESIONAL USE.
Assembly
Engine mounting –fig 1
Fit the engine to the shaft tube and tighten the 4 screws.
Handle assembly –fig 2
This product is designed to be use right- handed
Fit the handle on the transmission shaft at an 50-60° with the throttle lever on the right side and
tighten the 4 screws.
Mounting safety guard
This safety guard must be fastened on the Support near the gear case with the four screws and
the two plates.
Mounting nylon head –fig 3
ATTENTION! Left hand thread

13
Insert a screwdriver into the slot lock (1 hole positioned on steel protection sleeve and shaft drive),
unscrew the nylon head in a clockwise direction. Screw the new nylon cutting head in
counterclockwise direction.
Check complete blocking of nylon head, then remove the screwdriver from locking seat.
Mounting three teeth blade –fig 4
Insert a screwdriver into the slot lock (1 holes positioned on steel protection sleeve and shaft
drive), unscrew the nut in a clockwise direction using the supplied wrench, and remove the metal
cover and flat washer.
Position knife cutting into its place in transmission shaft, put flat washer and metalic cover.Fasten
the nut counter clockwise direction then remove the screwdriver.
Make sure that all different parts of the cutting tool are securely fastened as above.
Mounting 2 segments shaft- Figure 5
•Loosen the lock knob by turning it counterclockwise
•Pull locking bolt and turn it about 90 ° until it locks in the open position
•Insert slowlly the two shaft segments one to another and align the 2 holes
•Unlock the bolt and make sure it is fully inserted in the hole.
•Tighten the locking handle.
Shoulder strap - fig 6
The brush cuttershould be used with a shoulder strap
•Attach the shoulder strap rod brush cutter and adjust the strap length so that the hook find
about the width of the palm under the right hip
•Ballance the brush cutter.
•The cutter must touch the ground in the normal working position.To better fit, you can adjust
the support with an Allen wrench and move it to the front or the rear. It is important to keep
always the brush cutter well balanced
Operation
WARNING! Never use steel wires or other materials for cutting.
Fuel mixture
Use a fuel mixture of 4% (4% sintetic oil + 96% non leaded gasoline min 95) You
must use the mixture during the three weeks that follows its preparation.
Shake accurately the mixture in the fuel tank before any use,in order to re-mix the oil with
the gasoline.
This operation should be done in an open area away from any flames or sparks while the engine
is turn off. Do not smoke and do not use the telephone during operation.
Engine start
1.Push the start button (7) on the right handle in position “I” - fig 9
2. Push the starter lever of the carburetor in position”ON” –fig 7
3.Push the the gas lever and the safety lever (6) on the right handle, and block with button (8)
4. Press on the <<primer>>under the carburetor,4 or 5 times to allow the gasoline to arrive on the
return fuel tank transparent gasoline pipe - fig 8
5. With your left hand,grip the brush cutter and press the transmission shaft in order to keep firmly
positioned the machine on the ground ,and with the right hand pull slowly the handle recoil starter
until the pawls hook onto the flywheel. –fig 10
6. Pull hardly 4 or 5 times the handle recoil starter until the starting. Never pull the recoil starter to

14
its all length in order to avoid damages to the recoil starter
7.Release the starter level ½ halfway back for approx 10-20 sec and after that fully release to
ÖFF” position.
8.Pull the gas lever to unblock and start to use the machine.
If the engine do not start,may be the spark plug is wet,in this event ,unscrew the spark plug ,wipe
and dry it and pull the recoil starter several times ,without the spark plug in place ,in order to clean
and ventilated the combustion chamber.
Grinding
During the first ten hours of work run the engine at a moderate rpm,we advise you ,in any
case ,do not use your engine at high-speed as the different components must adjust one with the
others during grinding.At the end of the grinding the engine will reach its maximum power .
After the two first hours of work,make a pause and check that all nuts and screws are securely
fastened ,tighten if necessary.
Carburetor adjustment
During a normal use, the carburetor may have some slight changes, especially, when there are
some changes of working conditions and after many hours of work or because of variation of
temperatures or pressures in the surrounding.
If the carburetor needs adjustment proceed as follows:
•Screw clockwise the yellow screw with spring of the carburetor until it comes to the base,
never force it.
•From this position unscrew it by one and a half turn.
•Start the engine and accelerate at the maximum.
•Find the point where the engine is at the maximum rpm by screwing or unscrewing at around
1/8 of turn at each time.
•When you have founded the maximum rpm, unscrew of one 1/4 of turn the screw, in order to
increase the mixture gasoline.
Grass Cutting –fig 12
Cut the grass, like if you were in a corridor of 1.5 meters, wide, move step by step balancing the
machine right and left, and vice-versa. Make sure at each step that you are still well balance on
your feet .If you are using the 3 teeth blade for the grass ,always cut your right to left and leave a
pile of cut grass on the left for later gathering.
If possible, avoid stones even small ones, piles of earth, small piece of wood or anything that
could be hidden or poorly visible in the grass .If you hit a large object by accident, or if you block
the cutting tool due to overloading ,or overload of grass or stringy vegetal material wrapped in the
cutting tool, you must : reduce the speed to the idle speed and disengage the clutch .Make sure
that the cutting tool is stopped by pushing tile stop button .
Put the brush cutter on the ground and check that the cutting tool has not been damaged such as
breakage of teeth for the blade, cracking. If necessary, change the cutting tool, if the tool is only
wrapped by vegetal material, with your pair of gloves remove the vegetal materials and clean the
cutting tool.
Brush cutter transmit vibrations to the user during operation. Even the machine is equipped with
an anti-vibrating device, the vibration can generate an increased tiredness. For this reason, we
recommend taking regular pauses during work. We recommend as well that after a few hours of
work, to take a pause (a few minutes) and leave the engine at idle rpm in order to cool down by
the air current created by the flywheel.
Stop the engine
•Allow the engine to operate at idle speed.
•Position switch (7) on the control handle to "0"

15
CAUTION: The cutting head stops rotating seconds after stopping the engine;
tight hold both handles up to the completely stop of the cutter.
Adjust nylon line length - Figure 11
Thread wear while working. To load a new thread, press the cutting head box to the ground,
during the engine is working. Thread is released automatically. Through the knife on the guard
cover, the wire length adjust correctly
Change nylon line
•Remove the wire guard by rotating the cover.
•Remove the coil wire with debris and compression spring
•Hold the new coil wire and remove each 10 cm of both threads,
•Place the conical spring coil on both threads and go through the eye of the round metal coil
housing
•Place the new spool and turn it so that it overlaps the cover ears springs bobbin case.
•Push the coil bobbin cover and rotate it.
Cleaning and maintenance
Our machines have been designed to operate over a long period of time with a minimum of
maintenance. Continuous satisfactory operation depends upon proper machine care and regular
cleaning.
Cleaning
•Keep the ventilation slots of the machine clean to prevent overheating of the engine.
•Regularly clean the machine housing with a soft cloth, preferably after each use. If the dirt
does not come off use a soft cloth moistened with soapy water.
•Never use solvents such as petrol, alcohol, ammonia water, etc. These solvents may
damage the plastic parts.
Air Filter Maintenance –fig 13
CAUTION! Never start the engine without the filter element
The air filter should be cleaned after each longer period of work.
•Unscrew and remove the screw with butterfly filter cover. Extract filter element and examine
it. Replace it immediately if you discover cracks or tears
•Wash the foam filter element with warm water and detergent, rinse thoroughly and let it dry
completely.
•Reinstall the filter and cover
Spark plug checking –fig 14
•Check the distance between the spark plug electrodes once a year or if malfunctioning
•Unscrew the spark plug with supplied wrench
•Adjust the distance between the electrodes to 0.6 mm
•To remount, MANUALLY rotate the plug until the end and then slightly tighten with the
wrench.
Maintenance of gearbox –fig 15
Every 25 hours, grease the gear box.
Unscrew the lateral tap of the gear box and put grease inside using an appropriate tool.

16
Use a special gear box grease that resist to high temperature.Screw the tap tightly.
Maintenance after use
When you finish working,clean completely the brush cutter from any grass or dirt ,make sure there
is no grass material wrapped in the cutting tools and put the machine back in its packing,in order
to avoid to injury yourself or other people during the transport.
Be aware not to hit or cut the fuel tank while you put it to the ground. Do not let the brush cutters
fall down to the floor ,it may damage the machine.
Whenever the machine is not used for over 1 month,proceed as follows:
•Empty completely the fuel tank from the mixture.
•Protect all engine metal parts from corrosion by provided those with a thin coat of oil.
•Remove the spark plug,put some drops of oil in the cylinder then pull the recoil starter 2 to 3
times in order to distribute evenly the oil, put back the spark plug.
•We recommend you,to start the engine during a few minutes every 60 days of inactivity.
Shake accurately the mixture in the fuel tank before any use,in order to re-mix the oil with
the gasoline.
Storage
•Thoroughly clean the whole machine and its accessories.
•Store it out of the reach of children, in a stable and secure position, in a cool and dry
place, avoid too high and too low temperatures.
•Protect it from exposure to direct sunlight. Keep it in the dark, if possible.
•Don’t keep it in plastic bags to avoid humidity build-up.
Technical data
Engine type
2 stroke, 1 cylinder air cooled
Engine capacity
52 cmc
Max power
1.75 kW / 2.4 CP
Starter
Manual
Fuel
Mix 40 mL 2T oil motor +
1L unleaded gasoline
Fuel tank capacity
1200mL
Oil*
SAE 10W-30 2T
Nylon head cutting diameter
255mm
Blade cutting diameter
255mm
Maximum rotation speed
7500 rot/min
Sound power level (LwA)
115 dB
Vibration level
9.12 m/s²
Net weight with accessories and without fuel
7.5 kg
*Use 2 stroke oil recommended by Honest General Trading and specified by seller

17
Warranty
This warranty covers all material or production flaws excluding:
•Defective parts subject to normal wear & tear or accessories
•Damage or defects resulting from maltreatment, accidents or alterations; nor the cost
transportation.
•We also disclaim all liability for any bodily injury resulting from inappropriate use of tool.
•Definitely excluded from the warranty is damage resulting from fluid permeation, excessive
dust penetration, intentional damage (on purpose or by gross carelessness), inappropriate
usage (use for purposes for which the device is not suitable), incompetent usage (e.g. not
following the instructions given in the manual), inexpert assembly, lightning strike, erroneus
net voltage. This list is not exhaustive.
Table of contents
Languages:
Other Evotools Brush Cutter manuals


