EZDigiMagic DM220-D08E User manual

Portable Photo & Video Backup
DVD Burner
For Model: DM220-D08E
User’s Manual


Table of Contents
1. Introduction.............................................................. P. 2
1-1.Basic Configuration................................................. P. 2
1-2.Product Features..................................................... P. 2
2. Product Tour............................................................. P. 3
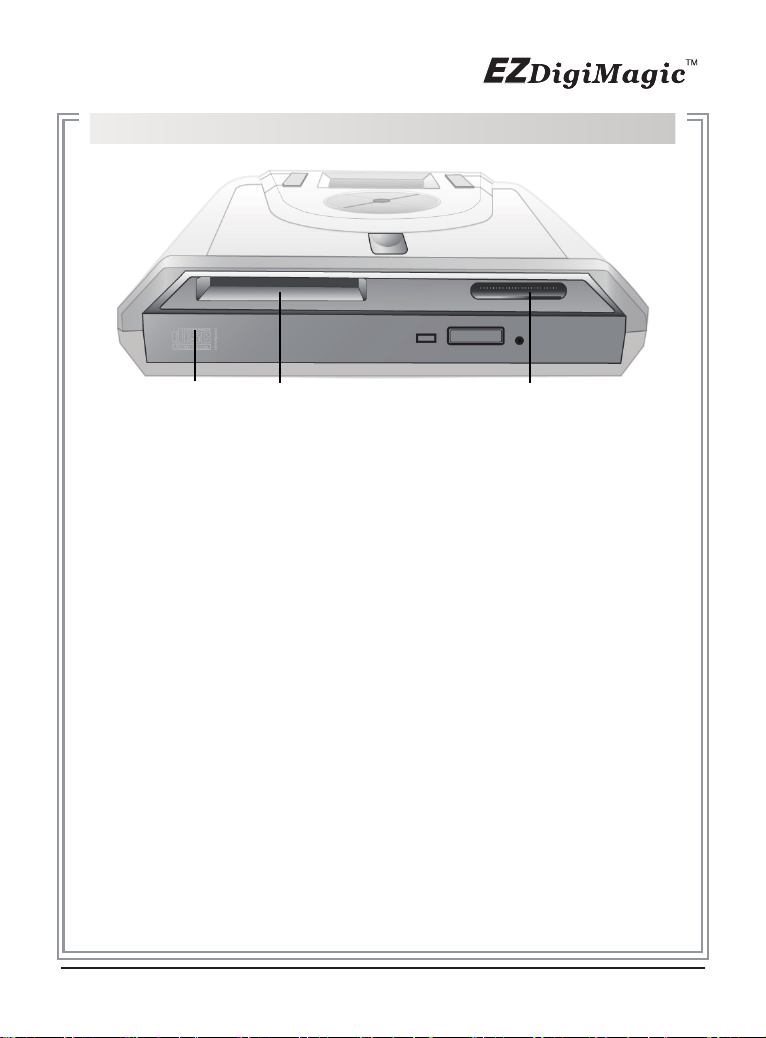
2-1.Front Bezel............................................................. P. 3
2-2.Top Beze................................................................. P. 4
2-3.Rear Panel............................................................... P. 5
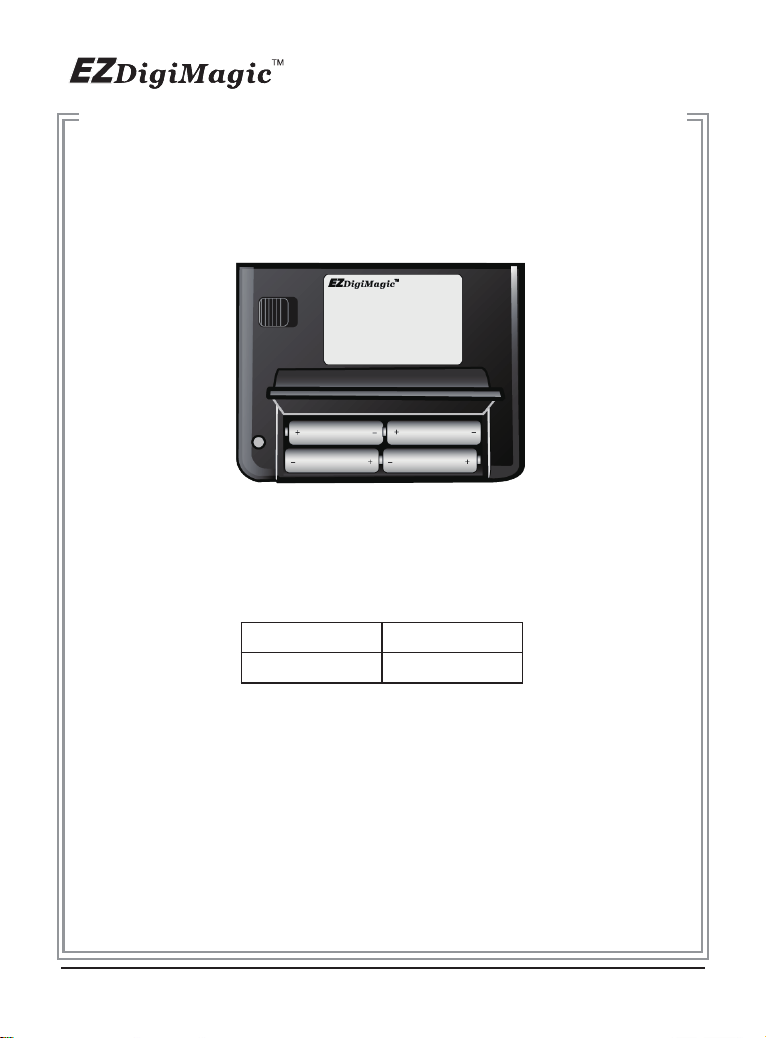
2-4.Battery Compartment.............................................. P. 6
2-5.Car Power Adapter Kit (Optional)............................. P. 7
3. Menu Instruction...................................................... P. 8
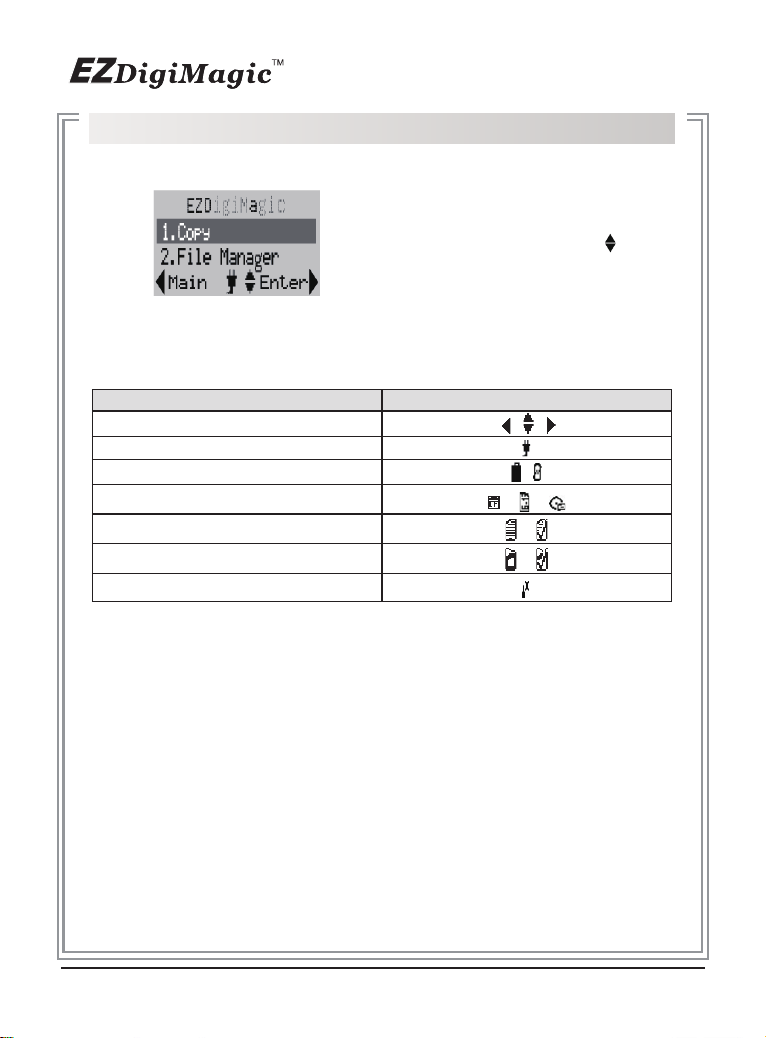
3-1.LCD Display............................................................. P. 8
3-2.Icon List................................................................... P. 8
3-3.Menu List................................................................. P. 9
4. Operating Instructions........................................... P.10
4-1.Standalone Copy..................................................... P.10
4-2.File Manager............................................................ P.13
4-3.Verify Session.......................................................... P.14
4-4.Compare.................................................................. P.14
4-5.Setup....................................................................... P.15
5. Product Application Scope................................... P.18
5-1.Lawful Use of Products............................................ P.18
5-2.Disclaimer................................................................ P.18
5-3.Acknowledgment & Trademark................................ P.18
6. FCC & Safety............................................................. P.19
6-1.FCC Compliance Statement.................................... P.19
6-2.FCC WARNING....................................................... P.19
6-3.Safety Instructions................................................... P.19
7. Warranty & Technical Support.............................. P.20
1

1. Introduction
Thank you for purchasing our EZDigiMagic DM220-D08E. EZDigiMagic
enables you to produce a backup copy of a ash memory card (CF/SD/MMC/MS/
xD) or USB storage device directly onto a blank DVD or CD disc. Features like
one-touch operation and stand-alone burning make using EZDigiMagic a snap.
EZDigiMagic’s compact size and portability make it the perfect travel companion.
There’s now no need to worry about your camera’s memory media not having
enough capacity when you’re on the go. Additionally, your unit can be connected
to a PC and be used as an external DVD/CD burner. EZDigiMagic makes digital
photography EZ!
Warning: Please be certain that all data on the memory card has been
successfully backed up onto the disc before erasing the contents of the
memory card. The manufacturer and resellers of EZDigiMagic are not
responsible for any data lost from the memory card.
1-1. Basic Configuration
Please review contents to ensure your EZDigiMagic is complete.
√ EZDigiMagic DM220-D08E main unit (Note: 1.2V AA Ni-MH batteries and
battery charger are not included)
√ User’s Manual CD
√ (110V – 240V) Universal AC Power Adapter
√ USB 2.0 Cable
1-2. Product Features
●Directly copy from USB drive or ash card to DVD with NO PC NEEDED
●Easy to backup photo and video files directly from most major iOS or Android-
based handheld devices, such as smart phones
● Supports most major memory card formats
● CF type I/II and multiple card slots are available
●Fast and reliable data backup from memory cards or USB devices to DVD/
CD
●Selectable copy modes: Copy by file type [Photo/Video/Music] are supported
●Advanced professional features including Disc Spanning and Time/Date
Stamping
●Back-lit LCD display allows function settings to be read easily
2

2. Product Tour
2-1. Front Bezel
(1) DVD Burner: Press top Eject button in order to release DVD tray. Place
blank DVD or CD disc in tray and close tray by sliding it back into operating
position.
(2) CF Card Slot: CF Type I/II slot, you may insert CF card or MD 1”HDD
directly into slot.
(3) Multi Card Slot: Multiple card slot for MS/MS Pro, SD, MMC, xD. (Note: Only
one card can be used at a time)
3
(1) (2) (3)
Figure 1

2-2. Top Bezel
(1) LCD display screen :
Displays the operating menu & working status
(2) Control Keypad:
One-touch operations to control EZDigiMagic functions.
Key Description Function
Eject Eject key Disc ejects from unit
Set/Copy Set /Copy key Allows special selections and setting of items,
also works as QuickCopy key
▲ Up key Navigate up a menu; or increase a value when
setting a selection
▼ Down key Navigate down a menu; or decrease a value
◄ Left key
Back out of a sub-menu and goes to the next
higher level; or hold for 2 sec. to return to the
main menu
► Right key Enter key; or navigate into a sub-menu or
selects a function from a list
4
Figure 2
(1)
(2)
(3)

(3) LED Indicator:
The green / red LED will light up as listed in table:
Item Operation Setting Light
0. Power off None
1. System initial stage G / R
2. Ready to Copy None / G
3. Copy / Busy G / F
4. Copy Error None
5. Battery Low R / F
* “F” Flash, “G” Green, “R” Red
2-3. Rear Panel
(1) USB Port:
Plug the USB 2.0 cable into this socket and connect the other end to your
PC.
(2) Power Connector:
Insert the power connector from the AC adapter or the optional car kit
adapter into this socket.
(3) Power Switch:
Slide the switch to the LEFT for the “ON” position to start the unit; or slide
the switch to the RIGHT for the “OFF” position to shut down the unit.
5
(1) (2) (3)
Figure 3

2-4.Battery Compartment
The DM220-D08E is equipped with a battery compartment. (Batteries
and battery charger are not included.) Install four AA rechargeable 1.2V
Ni-MH batteries into the battery compartment. Be sure to align the
(+) an (-) battery poles according to the diagram located at the bottom
of the compartment. (See Figure 4)
NOTE: EZDigiMagic does not recharge batteries.
* Important Notes Regarding Rechargeable NI-MH AA Batteries:
(1) EZDigiMagic DM220 requires (4) AA Ni-MH batteries with a minimum curent
of 1800 mAh. Dry cell or alkaline batteries do not meet this requirement.
Typical estimated usage times for fully charged recharge able batteries with
the following mAh ratings are:
Battery Capacity 2300mAh
Usage Time 120min
NOTE: As Cells Age, Usage Times Will Diminish
(2) The red LED indicator may blink occasionally during the burning operation.
This is normal even if the battery is fully charged.
(3) If the red LED indicator blinks continuously or the LCD battery icon displays
“low battery”, connect an AC power adapter or recharge the batteries imme-
diately after completing the current copy operation. If this is not done, the
next copy operation may result in failure or a damaged disc.
6
Figure 4

(4) Batteries will discharge if they are not used for a period of time. Make sure
batteries are all fully-charged before major usage.
(NOTE: The amount of discharge is dependent upon make and model
of the batteries; please consult battery manufacturer’s specification
data).
(5) Please follow instructions provided by rechargeable battery manufacturers
for operation, recharging, maintenance and disposal of the batteries.
(NOTE: Mixing different brands of rechargeable batteries, or fully and
partially charged batteries is NOT recommended.)
(6) For safety, batteries should be removed when discharged or when the
EZDigiMagic is not being used.
(7) NOTE: Batteries are not charged by the DM220-D08E. When powering
the unit using NiMH rechargeable batteries only, the user must consider
the added power drain associated with some memory cards and USB
devices. The use of MicroDrives, or certain USB Hard Drives and personal
media players (which are USB-powered or recharge from the USB port) will
substantially reduce the operating time for a charged set of NiMH batteries.
2-5.Car Power Adapter Kit (Optional)
For Use:
(1) Insert the connector (A) of the Car Power Adapter Kit into the car's cigarette
lighter or 12V accessory socket.
(2) Insert connector (B) into the power connector socket on DM220.
(3) Follow the normal operating procedures as described in Section 3: LCD
Menu
7
Figure 5
(A)
(B)

3. Menu Instructions
3-1 LCD Display
1. Line 1:
Title or Main Menu Selection
2. Line 2 & 3:
Menu Selection List (use key to
navigate up/down)
3. Line 4:
4-way navigation button menu
3-2 Icon List
Description Icons
Arrow Key , ,
AC Power
Battery High, Low ,
CF, 5-in-1, DISC , ,
File, File Selected ,
Folder , Folder Selected ,
Setup
8
Figure 6

3-3 Menu List
Main Menu Sub-Function Function Description
Copy
CF to Disc Quick copy CF Card data to disc
M-Card to Disc Quick copy M-Card data to disc
Can select Copy All or Copy Photo, Copy Video, Copy Music,
Copy Selected Folder/File
File
Manager
CF Card Display CF Card total capacity and used
capacity
M-Card Display SD/MMC/MS/xD card total capacity
and used capacity
Disc Display disc capacity
Verify
Session Verify the last burned session
Compare Compare data of the latest backup on the disc with the original
data on the ash card
Setup
Time Zone Set Time Zone [GMT-12 ~ GMT+13 ]
Disc Burn Method Set DISC Burn Method to “Multi-session or
Single Session “
Folder Name Display default folder name string on the
copied disc
Disc Label Display default disc label string on the copied
disc
Language
Currently supports only English; other
language may be supported for special
versions
Auto Tray Out Set disc auto tray out when burning is finished
LCD Contrast Set level of display contrast
Show
Backup Count Display backup counter information
Show Burner Info. Show burner model version
Show System Info. Show system model Firmware & Hardware
versions
Erase Disc Erase CD-RW,DVD+RW,DVD-RW disc
Update Firmware Update system firmware
Compare after
Burn
Set compare after burn to “After Success or
Never“
9

4. Operating Instructions
To ensure maximum usage satisfaction and extend product life, please follow the
operating instructions listed below:
4-1. Stand-Alone Copy
This function can quickly copy data from CF/5-IN-1 slot and burn to DVD/CD
disc; the operating procedures are listed below:
(1) Make sure the power source is connected correctly (or the batteries are fully
charged).
(2) Turn on the power switch.
(3) Put in a blank DVD or CD disc into the burner tray and close.
(4) Insert a CF, SD/MMC/MS/xD card into the appropriate slot. (NOTE: Insert
devices into only one slot at a time)
(5) From the menu selection, use the UP and DOWN arrow keys ( ) to move to
the menu item “Copy”.
(NOTE: only three menu options will be displayed at one time. Use the up/
down
( )
arrow to scroll to the additional menu options.) The selected item
will be highlighted with white text. Finish the selection by pressing the
RIGHT arrow key
(
►
)
.
(6) Source Selection: If only one ash slot is occupied, DM220-D08E will
automatic-ally detect and show the source card type in the dark background
bar. If all three sources are occupied, then the source type will default to
the 6-in-1 card slot. If two devices are inserted, then user must choose the
desired source card type for the “Copy” operation.
10
Figure 7
Figure 8

(7) Once the copy source is selected, press the RIGHT arrow key (►) to
activate the “Copy” command and move to any of the sub-option selections:
“Copy All”, “Copy Photo”, “Copy Video”, “Copy Music”, “Copy Selected
Folder/Files”.
(8) For most common applications, press the RIGHT arrow key (►) to execute
“Copy All” so all data from the source media will be copied onto the disc.
(9) When the “Copy” command is being executed, the display will show the
source and disc capacity for confi rmation of sufficient available space.
Press the RIGHT arrow key (►) to begin the disc burning.
(10) During disc burning, the progress will be indicated by the percentage of
completion.
(11) Once the burning is completed, the status will be shown on the display. If
the “Auto Tray Out” option is set in the device setup, the disc tray will eject
automatically; otherwise the user must press the eject button to remove.
(12) If the Copy Select sub-option is selected, then the user must use the SET
key to select the files or folders for copying. Use the UP/DOWN arrow key (
) to move to the item selected, press the SET key to confirm selection, the
selected file or folder will have a check mark. You may repeat the selection
above to check mark several files or folders.
11
Figure 9
Figure 10
Figure 11 ~ 13

(13) Once the selection process is completed, press the RIGHT arrow key (►
), the display will show the check-marked item (only one of the multiple-
selected file will be shown). Press the RIGHT arrow key (►) again, the
copying process will start and then the display will show <Copy Done> after
completion.
(14) If total data size is greater than remaining space of writable disc, DM220-U
will request "Disc Spanning" function. To continue the COPY operation using
multiple discs, press the RIGHT ARROW key (►). Otherwise, use the LEFT
ARROW key (◄) to abort. (NOTE: only complete files will be copied to each
disc. Files larger than 650MB cannot be backed up to a CD disc.)
12
Figure 14 ~ 16

4-2 File Manager
File Manager enables the user to browse the media currently available on
DM220-D08E. The user may check file sizes, delete, or copy files.
4-2.1 Operating Instructions
(1) From the main menu, use the UP/DOWN arrow keys ( ) to select “2. File
Manager”.
(2) Source Selection: If only one slot is occupied, DM220-D08E will detect and
show the source card type with a dark background bar. If all three slots are
occupied, the device will default to the 5-in-1 card slot as the source. If 2
slots are occupied, the user must select the desired source for the “Copy”
operation.
(3) Once the source is selected, press the RIGHT arrow (►) to execute the
command. The display will show the total capacity and the used capacity of
the media in the source. Press the RIGHT arrow key (►) again to open the
file folder and display the content of the folder.
(4) Use the UP and DOWN arrow keys ( ) to scroll in the file list and move
to the desired item. If the item is a file, press the RIGHT arrow key (►)
to display the file size. If the item is a sub-folder, then the contents will be
displayed. Press the BACK key to return to the previous folder level.
13
Figure 17
Figure 18

4-3 Verify Session
To verify whether the last burned session on the disc is readable or not.
(1) If you need to verify the result after Copy is completed, place the disc you
just burned into the disc tray and execute the menu item “3. Verify Session”.
(2) Press the RIGHT arrow key (►) to execute the function.The display will
show the status of verif cation. “File Count” indicates the number of files in
the last session and “Check” indicates the number of files that have been
verified.
(3) After the “Verify Session” is completed successfully, the display will show
“Check Disc OK!” message. Press the left or RIGHT arrow (►) to exit the
function. Receiving a failure message at this point may indicate a dirty or
damaged disc.
4-4 Compare
Compare data of the latest backup on the disc with the original data on the ash
card.
14
Figure 19
Figure 20
Figure 21
Figure 22 ~ 23

4-5 Setup
Setup can display the current status of the device and allows for changes of de-
faults and advanced operations that require more technical knowledge. For all
Setup options listed below, use the UP/DOWN ( ) arrows to scroll through the
setup options; use the LEFT (◄) arrow to return to the main menu; use the RIGHT
(►) arrow to enter the selected menu option. (
NOTE:some settings require the
use of the COPY/SET button
) The functions are explained below:
4-5.1 Time Zone: (NOTE: The time zone should always be set BEFORE
establishing the “ date/time “ setting)
Press the RIGHT arrow key (►) to enter this function. The display will show the
time zones for different GMT values. Use the UP/DOWN arrow key ( ) to move
to the desired time zone and press the RIGHT arrow key (►) to confirm. The time
zone is for time stamp of the files created by the device.
15
Figure 24

4-5.4 Disc Burn Method:
Press the RIGHT arrow key (►) to enter this function. The options “Multi Ses-
sion” and “Single Session“ will appear. Select the desired option and press the
RIGHT arrow key (►) again to confirm. (NOTE: if “Single Session” is selected,
each blank disc can only be burned once and no additional files can be added
later.)
4-5.5 Folder Name:
Press the RIGHT arrow key (►) to enter this function. The display will show the
folder name used.
4-5.6 Disc Label:
Press the RIGHT arrow key (►) to enter this function. The display will show
the name label for the disc created. (NOTE: Press the UP/DOWN ( ) arrow
to change setting; press the RIGHT (►) arrow to keep the new setting;
press the LEFT (◄) arrow to go back to the setup item menu.)
4-5.7 Language:
Press the RIGHT arrow key (►) to enter this function. The display will show the
language choices. Use the UP/DOWN key ( ) to move to the desired language,
and press the RIGHT arrow key (►) to confirm the selection. Only one language
may be available for your unit.
4-5.8 Auto Tray Out:
Press the RIGHT arrow key (►) to enter this function. The display will show
choice for On and Off. Use the UP/DOWN key ( ) to move to the desired choice
and press the RIGHT arrow key (►) to confirm the selection. Only one language
may be available for your unit. The “On” option will eject the disc tray after the disc
burning operation is completed.
4-5.9 LCD Contrast:
Press the RIGHT arrow key (►) to enter this function. The display will show the
current contrast level. Use UP/Down key ( ) to increase/decrease adjustment.
4-5.10 Show Backup Count:
Press the RIGHT arrow key (►) to enter this function. The display will show the
number of times the backup operations have been completed this time only and
the total number of backups made so far.
4-5.11 Show Burner Info:
Press the RIGHT arrow key (►) to enter this function. The display will show he
disc burner device model number and firmware version.
4-5.12 Show System Info:
Press the RIGHT arrow key (►) to enter this function. The display will show he
system model number and firmware version
16

4-5.14 Erase Disc:
Operating Instructions: Press the RIGHT arrow key (►) to enter this function and
the “Erase Now” message will appear. Press the RIGHT arrow key (►) again, the
“Erase” will start and the progress will be shown in percentage completion. Once
the operation is completed, the status will be shown on the display. Only CD-RW
or DVD +/- RW discs can be erased.
4-5.15 Update Firmware:
Press the RIGHT arrow key (►) to enter this function. The display will show the
current system firmware version number. If needed, the new firmware can be
saved onto any media (Memory Card, Disc or USB drive) and loaded into the
EZDigiMagic by pressing the RIGHT arrow key (►) again to install the firmware
update. (NOTE: This operation should be performed only if there is a need to
update the firmware.)
4-5.16 Compare After Burn:
Press the RIGHT arrow key (►) to enter this function. The display will show
choice for”After Success” and ”Never”. Choosing the ”After Success” setting will
compare data after burning is completed; choosing ”Never” selection will not
compare.
* PERFORMANCE NOTE:
To optimize the copy performance of your ash memory card with the EZDigiMagic
DM220-D08E unit, it is recommended that users backup their photos, and then
re-format the ash memory cards, in the camera, on a regular basis. Please refer
to your camera user’s manual for re-formatting instructions. Re-formatting your
memory card helps to prevent unpredictable burning results (to CD or DVD discs)
that can be caused by corrupted or damaged images found on the memory card.
17
Figure 25 ~ 26
Figure 27

CAUTION:
Re-formatting the flash memory card will erase all data that was previously
stored on the memory card. Be sure images are saved (to a HDD, CD disc or
DVD disc) before re-formatting the memory card.
5. Product Application Scope
5.1 Lawful Use of Products:
This product is intended to be used solely for lawful purposes and should not
be used to copy or duplicate any discs, information, data or other media that is
protected by copyrights, trademarks, patents or other proprietary rights without
the express consent of the owner of those rights. Purchasers and users of this
product agree to indemnify and hold EZPnP harmless from and against any
claims of infringement of any proprietary rights of others from use of this product.
5.2 Disclaimer:
The operating speed and performance stated in the product literature are for
comparison with similar products only. The actual speed or time may vary de-
pending on the type and quality of media. We do not offer any warranty that the
speed or performance will be identical in a similar backup copying cycle. Due to
continuous product improvement efforts, product performance and specifications
are subject to change without notice.
It is the user’s responsibility to make sure the data on the memory card has been
successfully backed up onto the disc before erasing the content of the memory
card. The manufacturer and sellers of this device are not responsible for any data
lost from the memory card.
5.3 Acknowledgment & Trademark
All contents are subject to change at any time without notice. No responsibility is
assumed for its use; nor for infringements of patents or other rights of third parties
and no patent or license is implied hereby.
EZDigiMagic is a trademark of EZPnP Technologies Corp. All other trademarks
mentioned herein are properties of their respective owners. The specifications of
the product are subject to change without any prior notice.
18
Table of contents