F3A CONTRAST LT User manual

1
F3A CONTRAST LT
INSTRUCTION MANUAL
Wing Span - 1870 mm
Lenght - 1980 mm
Wing area - 60 dm
Fly weight - 4850-4950 g

2
Thank you very much for purchasing our CONTRAST LT all-composite
professional F3A aircraft completely made using Total Area Vacuum
Sandwich technology.
The new CONTRAST LT was designed by Great Russian aerobatic pilot,
Sergey Danilov (Master of Sports, F3A Champion of Russia, since 1996
participated in the European and the World Championships) and produced
in Lithuania using top quality German made epoxy resin and glass/carbon
fiber. This professional CONTRAST LT kit is the result of Sergey’s 25
years experience in F3A world and his research in best F3A performances.
This innovative design combined with the extremely lightweight structure,
the full composite fuselage, wings and stabs, give the CONTRAST LT an
impressive precision and smoothness at any airspeed and flight condition.
Before you get started building and setting-up your aircraft, please make
sure you have read this instruction manual several times, and understood
it. If you have any questions, please don’t hesitate to contact us.
The contact details:
Email: algisu555@yahoo.com
Website: http://www.rc-composit.com
! Good flying to you !

3
Table of Contents
Warning 4
1. Available options 5
1.1. White Series 5
1.2. Painted in Molds Series 6
1.3. Custom Series 8
1.4. RTF Series 11
2. Kit Contents 14
3. Items Needed To Complete 15
3.1. Required Tools and Adhesiv 15
3.2. Power System Selection 16
3.3. Servos Selection 18
3.4. Radio Selection 18
4. Warranty Information 19
5. Model Assembly Process 20
5.1. Wings 20
5.1.1. Aileron control Horn Installation 21
5.1.2. Wing Servo Installation 29
5.2. Elevator 31
5.2.1. Elevator control Horn Installation 32
5.2.2. Elevator Servo Installation 37
5.3. Fuselage 41
5.3.1. Rudder and Rudder control Horn Installation 41
5.3.2.1 Canalizer installation 45
5.3.2. Tail Wheel Installation 47
5.3.3. Landing Gear Installation 50
5.3.4. Engine mounting 55
5.3.5. Battery Tray Installation 66
5.3.6. Radio Equipment Installation 74
6. Balancing the Model/Control Throws 77
7. Mixing the Model 77
8. Preflight 78

4
5. Model Assembly Process! Warning !
An RC aircraft is not a toy! If misused, it can cause serious bodily harm and
damage to property. Fly only in open areas and AMA (Academy of Model
Aeronautics) approved flying sites, following all instructions included with
your plane, radio and engine, avoid flying near full-scale aircraft and avoid
flying near or over groups of people.
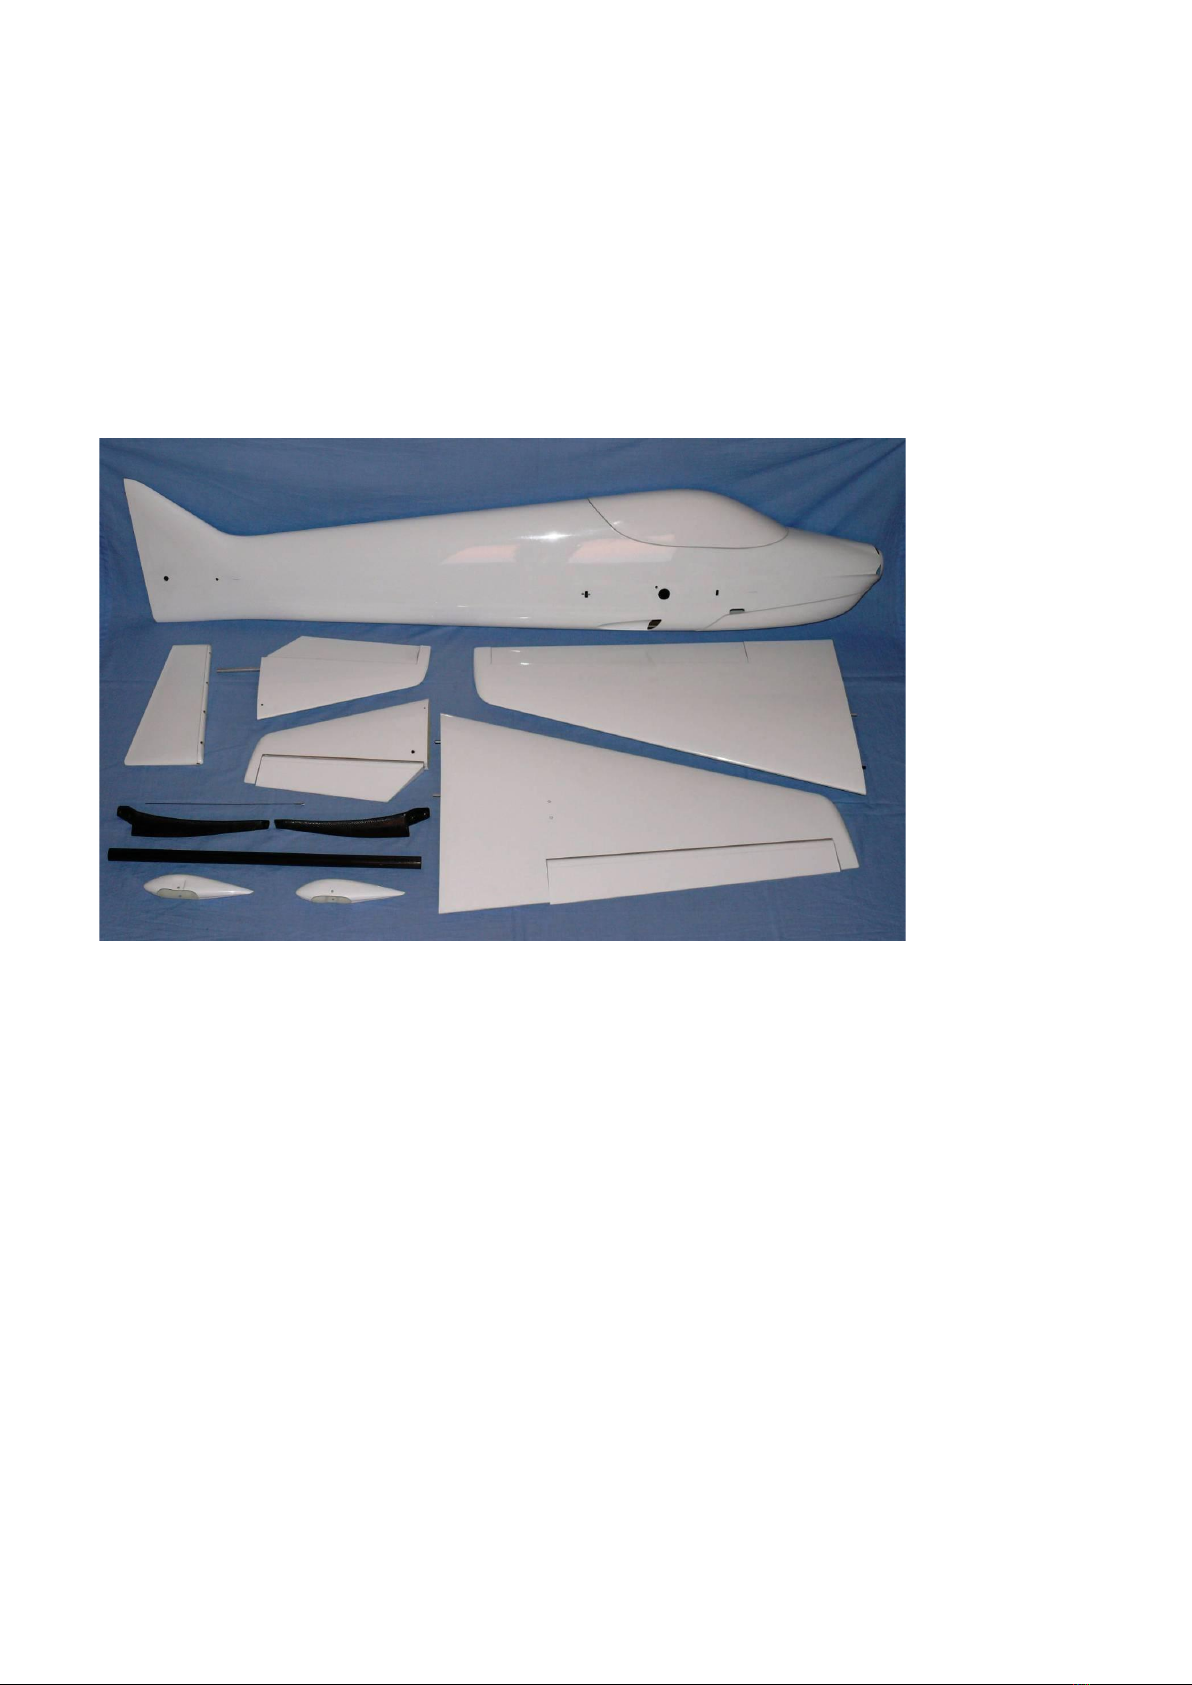
The fuselage, wings, stabs, rudder, landing gears and other parts included
in this kit are made of fiberglass and carbon fiber, the fibers of whose may
cause eye, skin and respiratory tract irritation. Never blow into a part to
remove fiberglass and carbon fiber dust, as the dust will blow back into
your eyes. Always wear safety goggles, a particle mask and rubber gloves
when grinding, drilling and sanding this parts. Vacuum the parts and the
work area thoroughly after working with fiberglass and carbon fiber parts.
It is important to understand that RC Compositus Company is unable to
monitor whether you follow the instructions contained in this instruction
manual regarding the construction, operation and maintenance of the
aircraft, or whether you install and use the radio control system correctly.
For this reason we at RC Compositus are unable to guarantee or provide a
contractual agreement with any individual or company that the model you
have made will function correctly and safely. You, as operator of the model,
must rely upon your own expertise and judgment in acquiring and operating
this model.
By operating this model RC plane you, as operator, assume full
responsibility for your actions.

5
1. Available options
1.1. White Series
If you would like to develop your own painting scheme on your CONTRAST
LT also to use own selected hardware, the basic white scheme is the way
to go. It can be painted with any acrylic or polyurethane based paint. It is a
good base for vinyl graphics as well.
The all white CONTRAST LT is the most economical version of this high
performance F3A plane.
The all white CONTRAST LT is the most economical version of this high performance
F3A plane.
Kit includes:
- Fuselage;
- Chin Cowl;
- Canopy;
- Preinstalled Removable Rudder with installed Rudder gap Cover;
- Preinstalled wings with cut Ailerons and installed Aileron gap Covers;
- Preinstalled Stabilizers with hinged Elevators and installed Elevator gap Covers
- Preinstalled Composite Landing gears;
- Preinstalled composit canalizer
- Wheel pants;
- Carbon fiber Wing tube, 25 mm Ø x 600 mm;
Hardware’s are not included in this series.

6
1.2. Painted in Molds Series
The standard scheme with its elegant lines is just perfect for F3A, as it
looks great in the air. We kept the style similar to other, typical F3A planes
paint schemes, but we paid attention really well not to overload it with too
much colors and shapes.
Painted in Molds Series is highly prefabricated for you. Only few hours of
work will be needed to get Contrast LT ready to fly.

7
Painted in Molds Series is highly prefabricated for you. Only few hours of
work will be needed to get Contrast LT ready to fly.
Kit includes:
- Fuselage;
- Preinstalled Chin Cowl;
- Preinstalled Canopy;
- Preinstalled Removable Rudder;
- Preinstalled wings with hinged Ailerons and installed Aileron gap Covers;
- Preinstalled Stabilizers with hinged Elevators and installed Elevator gap
Covers;
- Preinstalled Composite Landing gears;
- Preinstalled compost canalizer
- Wheel pants;
- Carbon fiber Wing tube, 25 mm Ø x 600 mm;
- Hardware bag;
- CNC milled carbon fiber parts bag;
- Instruction manual (English);
- Decal set.

8
1.3. Custom Series
Custom Series is highly prefabricated for you. Only few hours of work will
be needed to get Contrast LT ready to fly. All Custom Series planes will be
airbrushed according to your wishes.
The cowl, canopy, landing gear, wheel pants and tail wheel assembly are
already installed. On fuselage, seams on top and bottom are filled and
repainted.
Every Custom Series design is airbrushed on white base airplane in very
thin layer, after it is clear coated, sanded and polished. On average there is
about 1 –1,5 % (20-30 grams) weight increase in comparison to mold
painted airplane. Bottom of the wings and stabs will be also airbrushed
according to your design.

9
Kit includes:
- Airbrushed and preinstalled Fuselage;
- Airbrushed and preinstalled Chin Cowl;
- Airbrushed and preinstalled Canopy;
- Airbrushed and preinstalled Removable Rudder;
- Airbrushed and preinstalled wings with hinged Ailerons and installed
Aileron gap Covers;

10
- Airbrushed and preinstalled Stabilizers with hinged Elevators and installed
Elevator gap Covers;
- Preinstalled Composite Landing gears;
- Airbrushed Wheel pants;
- Carbon fiber Wing tube, 25 mm Ø x 600 mm;
- Hardware bag;
- Custom made protection bag set (fuselage, wings, stabs);
- CNC milled carbon fiber parts bag;
- Instruction manual (English);
- Custom Decal set.

11
1.4. RTF Series
RTF Series is fully assembled, trimmed and ready to flight planes. Only
plug the batteries and your Contrast LT are ready to fly.
Your Contrast LT, can and, will be provided with anything according to your
own preferences:
Only write to us what equipment you want and we will install it.
Composite sandwich parts are extremely strong, but fragile at the same
time. Always keep in mind that Contrast LT designed for minimum weight
and maximum strength in flight. Please take care of it, especially during
transport, to make sure that none of the critical parts and linkages are
damaged. Always handle your airplane with great care, especially on the
ground and during transport, so we offer to you custom made full protection
bag set (fuselage, wings, stabs) which are also part of this package or you
can order them separately!

12
2. Kit Contents
Quantity Description
1 Fuselage with hinged Removable Rudder;
1 Preinstalled Chin Cowl;
1 Preinstalled Canopy;
1 Preinstalled Wing with hinged Aileron, right;
1 Preinstalled Wing with hinged Aileron, left;
1 Preinstalled Stab with hinged Elevator, right;
1 Preinstalled Stab with hinged Elevator, left;
1 Preinstalled Composite Landing gear, right;
1 Preinstalled Composite Landing gear, left;
1 Preinstalled composit canalizer
1 Wheel pant, right;
1 Wheel pant, left;
1 Carbon fiber Wing tube, 25 mm Ø x 600 mm;
1 Aluminum Stab tube, 10 mm Ø x 200 mm;
1 Custom made protection bag set;
1 CNC milled carbon fiber (parts bag;
1 Instruction manual (English);
1 Decal set.

13
Hardware List
Wing Pack (2 sets )
Pcs.,
Description
2
CNC milled carbon fiber or composit
fiber aileron control horn;
4
Ball Link M2;
2
Carbon fiber Pushrod ( Steel) M2 x
150 mm;
4
Bolts M2x15
4
Nuts M2;
4
Threaded coupler M2;
Stab Pack (2 sets)
Pcs.,
Description
2
CNC milled Darbon fiber
or composit fiber elevator
control horn;
4
Ball Link M2;
4
Bolts M2x15
4
Nuts M2;
4
Threaded coupler M2;
Rudder Pack
Pcs.,
Description
2
CNC milled carbon fiber or
composit fiber rudder control
horn;
2
Pull-Pull Cables 0,6 mm Ø, 2
metres each;
4
Brass swag tube 2 mm Ø;
4
Ball Link M2;
4
Bolts M2x15
4
Nuts M2;
Landing gear Pack
Pcs.,
Description
2
Main wheels 65 mm Ø;
1
Tail wheel 28 mm Ø assembly;
2
Axle assemblies 4 mm Ø;
4
Landing gear mounting bolts
and nuts;

14
3. Items Needed To Complete
3.1. Required Tools and Adhesives
Personal protective equipment
The fuselage, dings, stabs, rudder, landing gears and other parts included
in this kit are made of fiberglass and carbon fiber, the fibers of Chose
may cause eye, skin and respiratory tract irritation. Never blow into
a part to remove fiberglass and carbon fiber dust, as the dust will blow
back into your eyes. Always wear safety goggles or safety shield,
a particle mask and rubber gloves when grinding, drilling and sanding
this parts.
Wear safety goggles or safety shield Wear particle mask Wear rubber gloves
Vacuum the parts and the work area thoroughly after working with
fiberglass and carbon fiber parts.
Tools
Felt-tip Marker or Pencil
Sander
Ruler Metric and Standard
Course and Fine Sandpaper
Phillips Screwdriver (small)
Pliers
Dremel Power Tool
Rat tail file
Cut-off wheel
Hobby knife
Paper Towels
Synthetic oil
Soapy water solution
Plastic card

15
Adhesives
15 and 30 Minute Epoxy
Thick CA (cyanoacrylate) glue
Masking Tape
Double-Sided Tape
Epoxy filler
Thread Locker
Acetone/Alcohol swabs or
Rubbing alcohol;
Paper or plastic caps
Wooden coffee spoons
Cotton buds
Required Hardwares
Main LiPo pack;
Receiver LiPo pack;
Receiver;
Speed controller;
Brushless motor;
Carbon Propeller;
Receiver voltage regulator;
Servo arms;
Servo Extension leads;
Servos;

16
3.2. Power System Selection
Performance Setup
Best efficiency and highest performance reached with (RTF weight 4900
grams):
- AXI model motors 5330/F3A GOLD LINE brushless motor;
- Jeti Advance 90 Pro Opto speed controller (or Castle Creations 110);
- PT model 20 x 13 E” Carbon Propeller;
- One (1) 10 S 40C 4500 mAh H-Energy LiPo pack or two (2) 5 S 40C
4500 mAh H-Energy LiPos;
Optimal Setup
Optimal efficiency, performance and price balance is reached with (RTF
weight 4700 - 4800 grams):
- AXI model motors AXI 5325/24 GOLD LINE brushless motor;
- Jeti Spin 99 Opto speed controller (or Castle Creations 110);
- PT model 20 x 12 WE” Carbon Propeller;
- One (1) 10 S 40C 4000 mAh H-Energy LiPo pack or two (2) 5 S 40C
4000 mAh H-Energy LiPos;
Lightweight Setup
Lightweight Setup allows reach total weight of RTF plane in range below
4600 –4700 grams:
- AXI model motors AXI 5325/18 GOLD LINE brushless motor;
- Jeti Spin 99 Opto speed controller (or Castle Creations 110);
- PT model 20 x 12 WE” Carbon Propeller;
- One (1) 8 S 40C 5000 mAh H-Energy pack or two (2) 4 S 40C 5000
mAh H-Energy LiPos;
Receiver Power Setup
For confident power and constant voltage to receiver we highly recommend
use one of this setups:
Hi power setup:
- Power Box System Sensor (up to 12 A);
- Two (2) 2 S, 25C, H-Energy LiPos with capacity from 400 mAh to 500
mAh each;

17
Lightweight setup:
- Power Box System Digi-Switch (up to 12 A);
- One (1) 2 S, 25C, H-Energy LiPo with capacity from 450 mAh to 600
mAh

18
3.3. Servos Selection
For the control surfaces of Contrast LT we recommend use follows Hitec
servos:
Ailerons –two (2) Digital Servos 5-6 kg/cm;
Elevator –two Digital Servos 5-6 kg/cm or one (1) Digital High Speed Metal
Gear Servo 8-9,5 kg/cm;
Rudder –one (1) Digital High Torque Servo 18-24 kg/cm;
Make sure you use same or equivalent torque servos that are digital.
Please do not risk your plane by using low torque or analog servos. Using
of weak servos will increase chance of flutter and will reduce the accuracy
of the airplane flight.
3.4. Radio Selection
For Contrast LT we recommend use minimum 6-channel 2,4 GHz computer
radio system

19
4. Warranty Information
Before starting to build, inspect the parts to make sure they are of
acceptable quality. If any parts are missing or are not of acceptable quality,
or if you need assistance with assembly, please contact RC Composit.
It is important to notify RC Composit of any damage or problems with the
model within 30 days of receiving your airplane to be covered under
warranty. If you wish to return this aircraft for any reason a 20 % restock
fee will be charged to the customer. In addition the customer is responsible
for all return shipping cost and all prior shipping cost will not be refunded.
Parts will be exchanged or replaced once the original item is returned at the
owner’s expense. If you have any problems or questions, please contact
www.rc-composit.com, or emeil algisu555@yahoo.com

20
5. Model Assembly Process
5.1. Wings
Both wings are made in negative moulds, and fully vacuum bagged, using 2
layers of super light fiberglass in combination with a 2 mm Airex foam
sandwich form a hard and durable outer skin. Each wing panel weighs
between 310 and 325 grams, depending on the color scheme.
The ailerons are hinged already for you - laminated in the mould and
attached to the wing with a special nylon hinge cloth, sandwiched between
the outer skin and the foam. This nylon hinge is 100% safe and durable.
You will never have to worry about breaking it, or wearing it out. There is no
gap at all on the top wing surface.
From the bottom of the aileron, aileron gap are covered with glass fiber
seal. Because the axis of the hinge is not at the centerline of the aileron,
so it moves slightly in and out when operated, and the aileron gets a little
"bigger" in surface area when moving up, and "smaller" when moving
down. This means that you need program in up to 10 % negative aileron
differential in your transmitter more than the positive.
Table of contents
Popular Toy manuals by other brands

Eduard
Eduard P-47M Thunderbolt undercarriage quick start guide

Klein
Klein 3936 Assembly instructions

ElectroFlying
ElectroFlying eska instruction manual

Mattel
Mattel RUGRATS 54967-0920 instructions

WARCRADLE STUDIOS
WARCRADLE STUDIOS DYSTOPIAN WARS TIANLONG BATTLEFLEET Assembly instructions

Twisted Hobbys
Twisted Hobbys YAK manual