Fatar ST-610 User manual

Welcometo the world ofthe Fatar Studio Series Keyboard Controllers.
Congratulations on purchasing the ST-610,one ofthe finest master keyboard
controllers in the world today. The Studio-610isthe perfect choicefor
a
musician
looking for a simple yet versatile keyboard controller to produce quality results for
the live or studio
environment
TECHNICALCHARACTERISTICS:
*61keys
*One zone
*Velocity Sensitive
*Pitch Bend Wheel and Programmable Wheel
*TwoParallelMIDIOutputs
*Sustain InputJack
*VolumeInputJack
*Program change, MIDI Channel, Transpose, Programmable wheel (Volume, Pan,
Aftertouch, Pitch,Modulation)etc.
*ExternalAdapter9VDC500mAincluded
CONNECTIONS:
1)Connect the AC adapter cable to the power input jack, inthe back ofthe
controller, located next to the power switch. SeeFigure #1.
Figure #1.

Make sure that the AC adapter corresponds to the correct voltage output. The
Studio 610will accept an adapter that has a rating of9VDC with a positive polarity
tip and has a minimum current of200 ma.
2)Connect MIDI cable from the ST-610MIDI output, (each output can handle up to
four synthesizers, modules, or effect devices) to the MIDI inputon your sound
sources. Set your sound sources to the desired MIDI channels by the ST-610Plus.
Each channel would normally be assigned to a different sound or effect. Since the
ST-610has only one zone, you can only program one ofthe16channels at a time.
Make sure that your sound source isproperly assigned to the channel you are
sending on.
To select a base channel hold the [CHANNEL] switch and enter the channel number
(1through16)by depressing the appropriateblack numbered key (0-9). The
function switch must be released afterthe black number keys. At this point the
ST-610issending on that channel.
Program change:
Aprogram change command allows you to change the sound on your sound
source from the ST-610.The program change will be sent onwhichever MIDI
channel the ST-610iscurrently set.Program changes are numbered 1 through 128.
You may notice, depending on the sound source, that a program change of\ will
show upon your sound source as0. This isnot a problem, since MIDI isnot
completely standard between manufacturers. Thank the heavens that there are only
afew anomalies like this between the manufacturers.
To issue a program change, hold the [PROGRAM] switch and enter the desired
number onthe numbered black keys with the appropriate program number oruse
the [INC]/ [DEC](increment/ decrement) keys. If a number greater than 128is
entered, itwillwrap around to the beginning.
Bank change:
Some sound sources today, especially found on computer sound cards, have a
featurecalled bank select. The MIDI specification calls for bank numbers 1 through
16384.Once you have selectedyour bank you are able to selecta program change
(1through 128).

Toselecta bank ofprograms, hold the [PROGRAM ]switch, press [BANK] key, and
enter the appropriatebanknumber using the0 through9 keys. The bank
command will be transmitted when the [PROGRAM] switch isreleased. The [INC]/
[DEC] keys may be used instead ofentering the bank number.
Control # Commands:
There are 127controller functions that are made up ofcontinuous and switch
control commands. SeeFigure # 3.The most commonly used controllers are
aftertouch,pitch,modulation, volume and pan.Many expensive keyboard
controllers offeraftertouch, which allows expressive control ofsound sources.The
ST-610allowsthesameexpressionvia [WHEELA], Aftertouch,pitch,
(1through 16).Refer to the sound source s owners manual for thisprocedure.
3)Connect a momentary fqotswitch, which circuit isnormally open, to the sustain
input jack clearly marked SUSTAINlocated next to the MIDI jacks. We recommend
aVFP-1/10(piano-like sustain pedal) available from Music Industries Corp.
4)Connect a controlvoltagepedal for volume in the jack clearly marked VOLUME
located next to the sustain jack.We recommend a VP-26 (expression pedal)
available fromMusic Industries Corp.
Once all connections are inplace, pressthe power switch to the ON position.
TOP PANEL:
Figure #2.
SeeFigure #2. You willnotice on the left a dedicated pitch and a programmable
second wheel, marked [WHEEL A].With [WHEEL A]you may assignaftertouch,
pitch, modulation, volume and pan aswellasany controller (0-127).
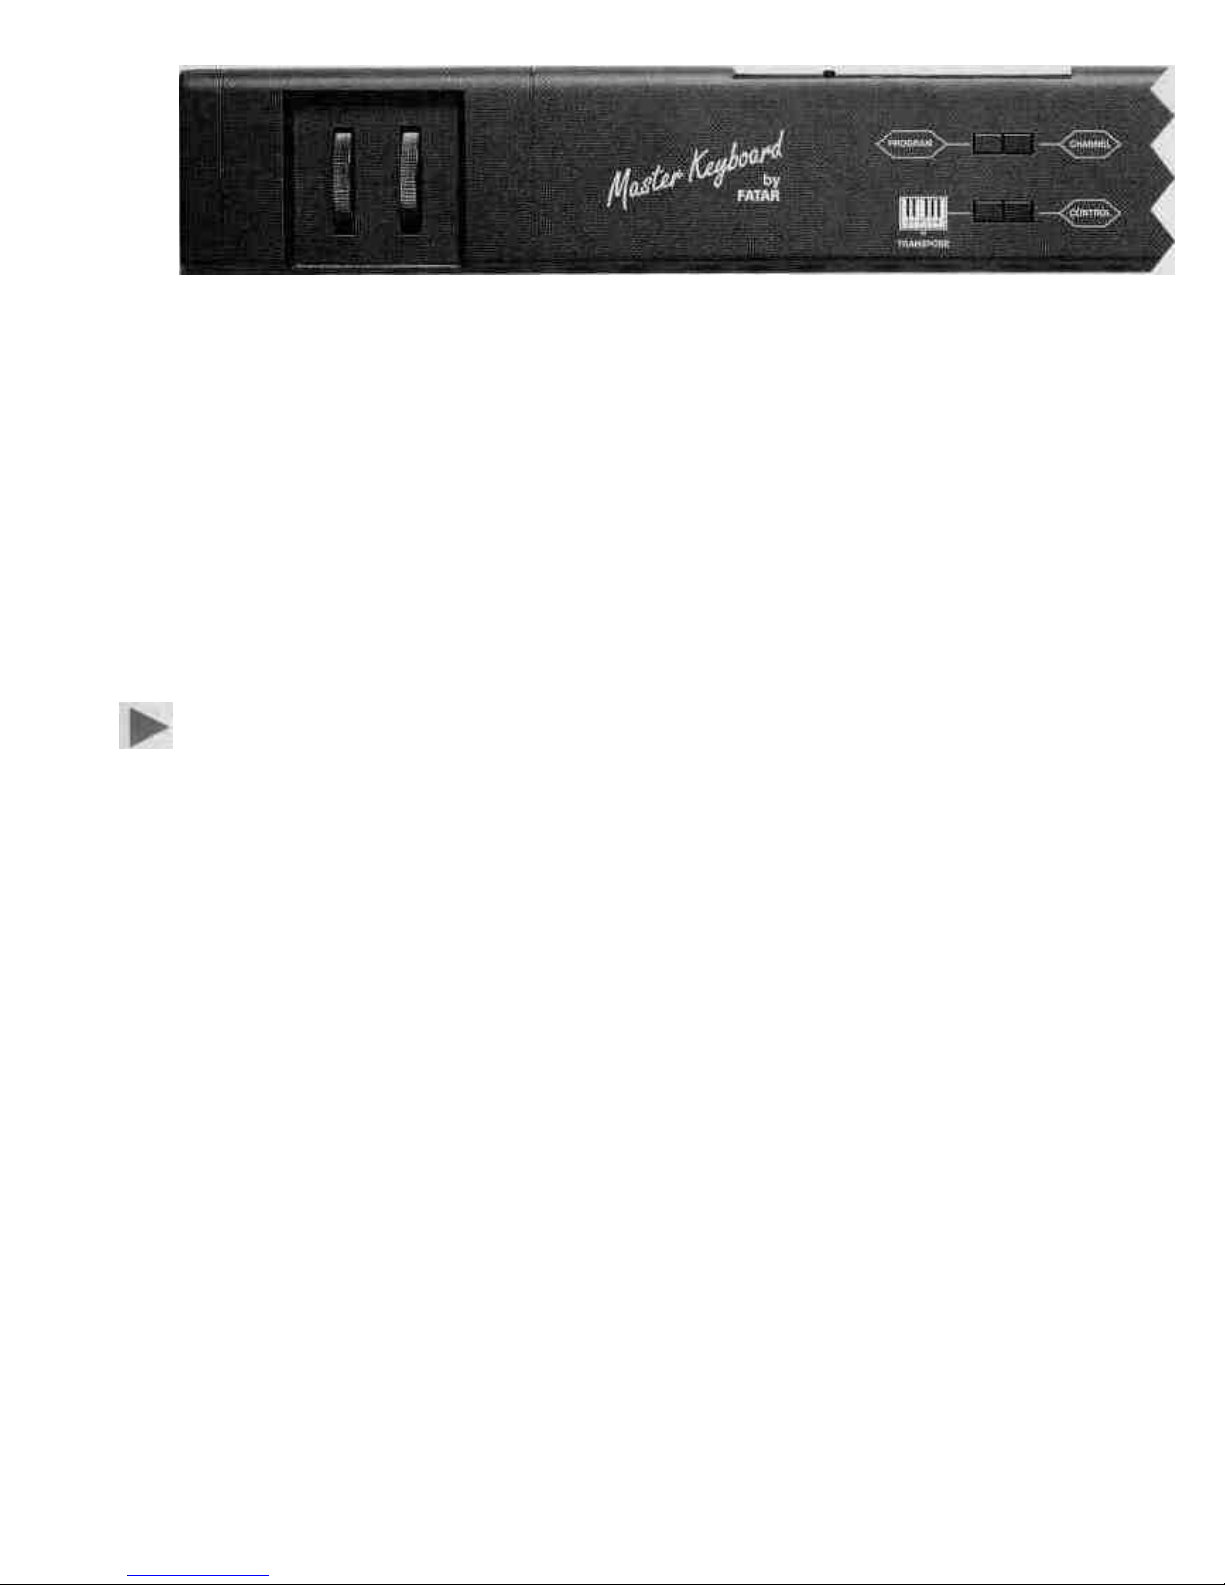
Tothe right ofthe wheels there are fourswitches. These switches are used for
program change, channel assignment, transposition and programmable wheel
assignment. Eighteen black keys on thekeyboard are used forspecial MIDI
functions. The first five are used for [WHEEL A]. Notice, [AFT],[PITCH], [MOD],
[VOL]and [PAN]. These keys represent aftertouch, pitch, modulation, volume and
panning. The next 10black keys represent a numeric key pad for program changes
and channel assignments. The following two black keys are used for increment and
decrement ofa program change. [INC]/[DEC] will also change the controller
number. Thelast key isused for selecting a bank. More on this in the next section.
OPERATION:
Getting around the ST-610isvery simple. However, you must know certain basic
MIDI theory before itcan make sense.
Base Channel-
There are 16different channels in the MIDI specification that can be accessed
modulation, volume and pan can be accessed by the corresponding black keys,
,while all the remaining control functions can be accessed by the number or
[INC]/[DEC]keys.
Toassign the programmable wheel press and hold the Control # switch. Enter the
desired controller number on the numbered black keys, or use the [INC] / [DEC]
keys, then release the control # switch. Look at the list in figure #3, try them out. If
you are having problems, chances are the sound source does not have that feature.
Sometimes you might get undesirable results. At this point it might bebest to reset
your sound source (see sound sources owners manual) and shut off the ST-610,
then turn itback on again. This will reset the ST-610to base channel #1,the control
wheel to modulation and no transposition.

CONTROLLER NUMBER
0
1
2
3
4
5
6
7
8
9
10
11
12-15
16
17
18
19
20-31
32
33-63
64
65
66
67
68
69
70-7
80
81
82
83
84-91
92
93
94
95
96
97
98-121
122
123
124
125
126
127
CONTROLLER FUNCTION
Bank
Modulation
Breath controller
Undefined
Foot controller
Portamento rate
DataEntryMSB
Volume
Balance
Undefined
Pan
Expression
Undefined
Gen'l Purpose #\
Gen'l Purpose #1
Gen'l Purpose
#3
Gen'l Purpose N
Undefined
Bank
Least significant byte forvaluesO to 31
Sustain (damper)
Portamento On/ Off
Sostenuto
Soft Pedal
Undefined
Hold 2
Undefined
Gen'l Purpose
#1
Gen'l Purpose #2
Gen'l Purpose #3
Gen'l Purpose
#4
Undefined ,
Tremolo Depth
Chorus Depth
Detune
Phaser Depth
Data increment
Data decrement
Undefined
Local control On/Off
AllNotesOff
OmniOff
Omni On
Mono On - Poly Off
Poly On - Mono Off
Figure #3
Refer to a MIDI technical handbook for furtherinformation on these controller
functions.

Transposition:
Sometimes a player may not be able to play in a certain key. At these times the
[TRANSPOSE] switch will be invaluable. For example, ifyou need to change from
the key ofC major to the key ofEb major, you can still play the C major keys, but
what you hear would be Eb major.
To transpose the keyboard, hold the [TRANSPOSE] switch and press the desired key on the
keyboard above orbelow middle C. The result will be a new key change when the C major
keys are played. Your range islimited to 24 half steps upand 24 halfsteps down.
Ifthere are any technicalproblems that relate to the ST-610 only, please contact Music
Industries Corp. 800-431-6699. Best ofluck!!!
Thisequipment hasbeentested andfound tocomply with thelimitsfor a ClassB digital
device, pursuanttoPart15oftheFCC rules.Theselimitsaredesigned toprovide
reasonableprotection against harmful interference ina residentialinstallation. This
equipment generates, uses, andcanradiateradiofrequency energy and, ifnotinstalled
andused in accordancewith the instructions, may causeinterference toradio
communications. However, thereis noguaranteethatinterference will notoccurin a
particularinstallation. Ifthisequipment doescauseharmfulinterference toradioor
television reception, which can bedeterminedby turningtheequipment onandoff, the
useris encouragedtotrytocorrect theinterference by oneormoreofthefollowing
measures:
•Reorient orrelocatethereceiving antennas.
•Increasetheseparationbetween theequipmentandthe receiver.
•Connectthe equipmentintoanoutlet ona circuit different from thattowhichthe
receiver
isconnected.
•Consultthe dealeroranexperienced radio/TVtechnicianfor help.
NOTE:Useofshieldedpower andinterface cableswith thisequipment isrequiredinorder
toensurecompliancewith FCC specifications.
CAUTION:Changesormodifications tothis equipmentnotexpresslyapprovedby the
manufacturer responsiblefor compliance couldvoid theuser'sauthoritytooperatethe
equipment.
It isrecommended that onlyFCC class B certified devices beusedwith this equipment.
OperationofClassA equipment ina residential areaislikely tocauseharmful interference
inwhich casetheuserwill berequiredtocorrecttheinterference athisorherown
expense.
Table of contents
Other Fatar Electronic Keyboard manuals


