FAVI L2626EA-V-P User manual
MODEL NO.: L2626EA-V-P/WH
26” LCD TV with DVD
ENTERTAINMENT


Contents
Contents
Caution
Safety Information
Accessories
Technical Specification
Product Introduction
Front View
Rear View
OSD Menu
1. Picture menu
2. Audio menu
3. Time menu
4. Setup menu
5. Lock menu
6. Channel menu
1
2
3
3
4
5
4
4
9-15
9
10
11
12
13
14-15
Connections
6-7
Remote Control
8
Basic Operation
DVD Basic Operation
DVD Systerm Setup 18-19
Simple Troubleshooting
16-19
16-17
Disc Care 17
20
DVD Operation

Caution
Correct disposal of this Product
Waste Electrical & Electronic Equipment (WEEE).
Your product is designed and manufactured with high quality materials and
components which can be recycled and reused.
This symbol means that electrical and electronic equipment, at their end-
of-life should be disposed of separately from your household waste.
Please dispose of this equipment at your local community waste collection/
recycling center.
In the USA there are separate collection systems for used electrical and
electronic products. Please help us to conserve the environment we live in!
1
Caution
The exclamation point within an equilateral triangle is intend to alert the
user to the presence of important operating and maintenance (servicing)
instructions in the literature accompanying the appliance.
The lightning flash with arrowhead symbol, within an equilateral triangle
is intended to alert the user to the presence of un-insulated “dangerous
voltage” within the products enclosure that may be of sufficient magnitude
to constitute a risk of electric shock to the persons.
This unit complies with America Safety directives.
This unit complies with FCC directives.

Safety Information
To ensure reliable and safe operation of this equipment, please read all of the instructions
carefully in this user guide, especially the safety information below.
Electrical safety
• The TV set should only be connected to a main supply which matches that stated on
the label on the main adapter.
• To prevent overload, don't share the same main supply socket with too many other
items of equipment.
- Do not place any connecting wires where they may be stepped on or tripped over.
- Do not place heavy items on the leads, as they may damage them.
- Hold the main plug, not the wires, when removing from a socket.
- During a thunderstorm or while leaving the TV for long periods, disconnect the aerial
(if outdoor) and main adapter from the supply.
- Do not allow water or moisture to enter the TV or main adapter. Do NOT use in wet
or moist areas such as bathrooms, steamy kitchens or near swimming pools.
• Pull the plug out immediately, and seek professional help if:
- The main plug or cable is damaged.
- Liquid is spilled onto the set, or if it is accidentally exposed to water or moisture.
- Anything accidentally penetrates the ventilation slots.
- The set does not work normally.
- Do NOT remove the safety covers. There are no user serviceable parts inside.
You may invalidate the warranty. Qualified personnel only are permitted to service
this apparatus.
- To avoid battery leakage, remove exhausted batteries from the remote control
handset, or when not using for a long period.
- Do NOT break open or throw exhausted batteries on a fire.
Physical safety
• Do NOT block ventilation slots in the back cover. You may place the TV in a cabinet,
but ensure there is at least 5cm (2") clearance all around the unit.
• Do NOT tap or shake the TV screen, you may damage the internal circuitry. Take good
care of the remote control, do not drop it or allow it to come into contact with liquids.
• To clean the TV use a soft dry cloth. Do NOT use solvents or oil based fluids. For
stubborn stains, you may use a damp soft cloth with diluted detergent.
2
Safety Information

Accessories
3
Accessories & Technical Specification
Technical Specification
User’s manual Remote control Main cable
* Note: The configuration of the components may look different from the following illustration
ATSC/NTSC
26 inch (diagonal)
1366x768
2x8W
100-240V~ 50/60Hz 160W
- TV system
- Screen size
- Resolution
- Aerial input
- Audio output power
- Power consumption
Remote Control
Type
Control distance
Control angle
Batteries
0
Infrared
5m
30 (horizontal)
2 x 1.5V, size AAA
PICTURE SOUND SLEEP DISPLAY
INPUT
VOL+
VOL-
EXIT
MUTE
MENU
OK
CH+
CH-
123
456
789
0
CC MTS EPG FAV
SETUP
TITLE
ANGLE
GOTOMENU
REPEAT
INTRO A-B
PROGRAM
LANGUAGE
ZOOM
SUBTITLE
SLOW
Product Introduction
4
Product Introduction
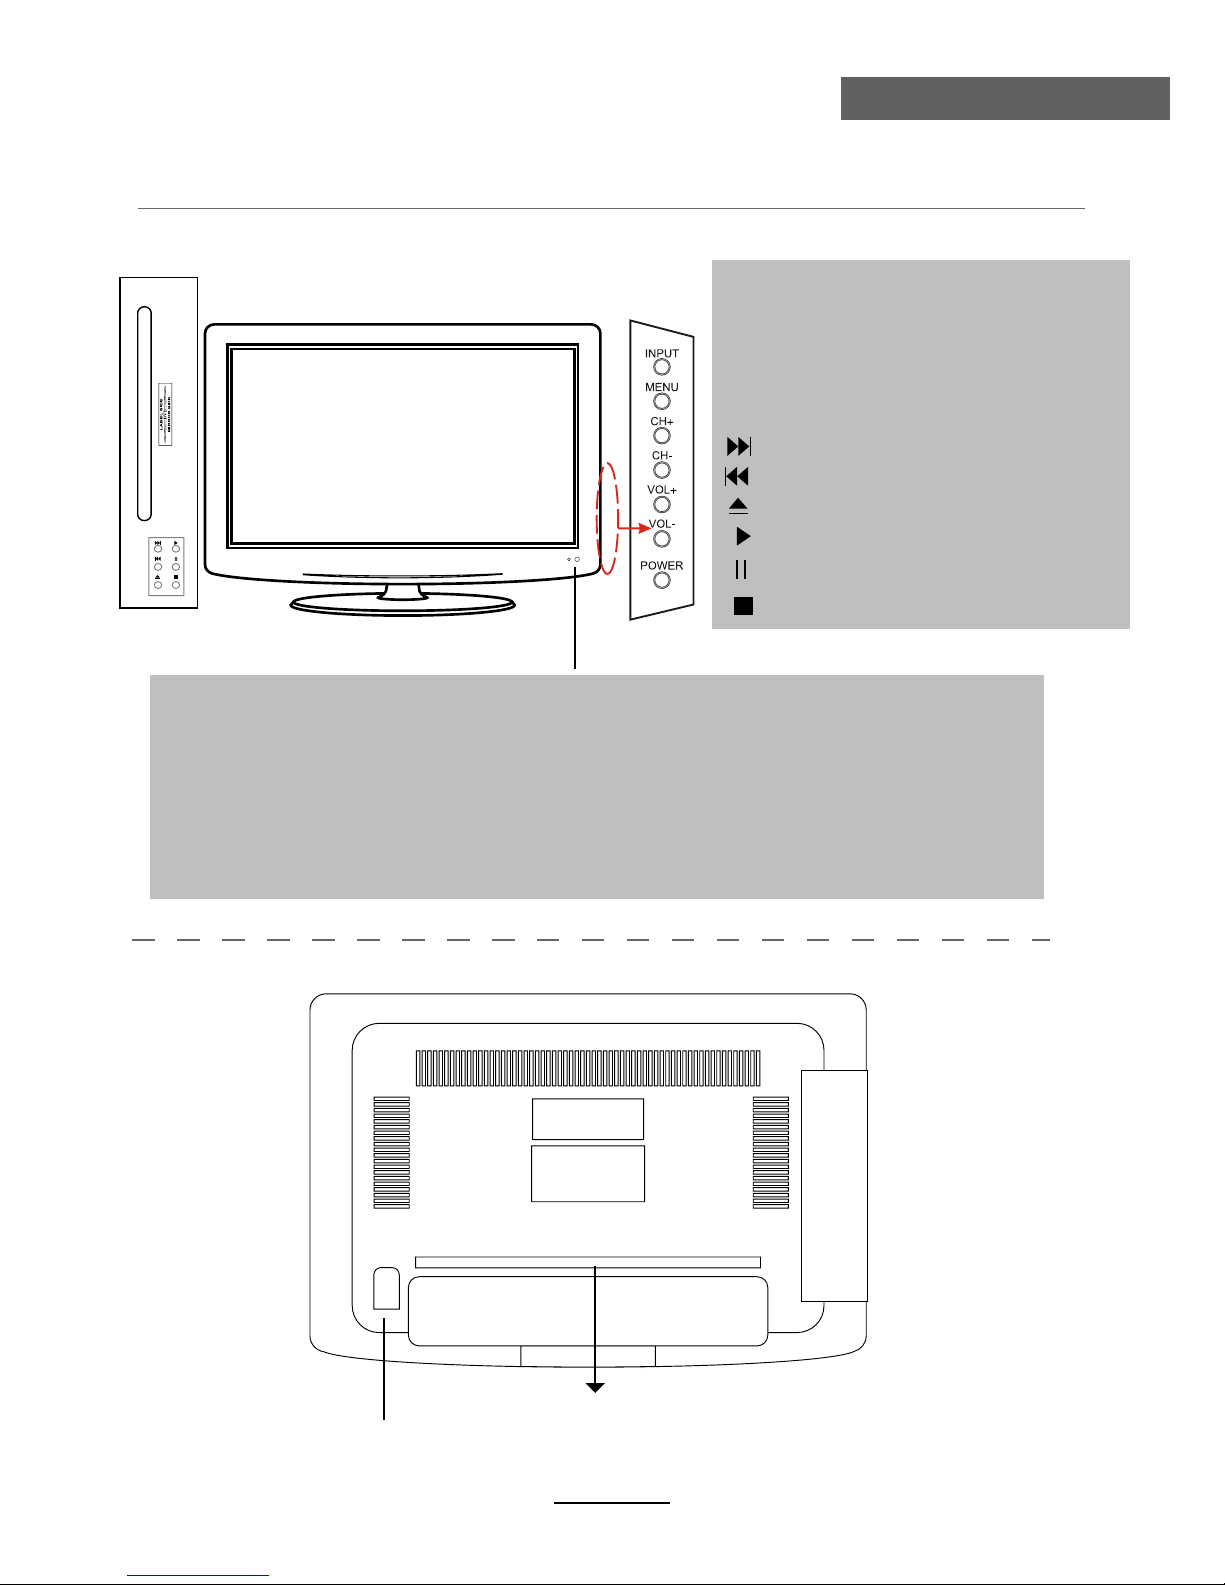
Front View
MENU: Display/exit the OSD menu.
CH+/-: Scan through channels.
VOL+/-: Adjust the volume.
INPUT: Display the input source menu.
POWER: Turn on/standby the TV set.
Remote control window (keep clear) & LED indicator
(IR) Infrared Receiver: Receives IR signals from the remote control.
(Power on/Standby) LED indicator: Press POWER to turn on and off.
The effective receiving range for the signal is 16-26 feet from the front of the remote
control window, and 30
0
to the left or right side and 20
0
above or below the control
window.
Indicator on(Red) Standby mode
Indicator on(Green) Power on mode
Rear View
Connections
See next page
Play the next track or chapter
Play the previous track or chapter
Eject the disc
Play the disc playing
Pause the disc playing
Stop the disc playing
SWITCH
Switch on or off the power supply

Connections
5
Connections
HDMI1 HDMI3
USB
-for upgrade
AC POWER IN
IN
YPbPr R INL IN 2 2
1
COAX Video R INL IN
Video R IN
L IN
S-VIDEOYPbPr R IN
L IN 1
Only for upgrade.
Connect it to the HDMI of DVD or other equipment.
For PC display.Connect it to the D-Sub 15 pins analog output connector of the PC
RF
USB-for upgrade:
: Connect antenna or cable 75 Ohm coaxial to receive TV signal.
YPbPr 2
COAX: Digital coaxial output.
: Connect them to the video output terminal of DVD.
YPbPr 1
HDMI1/2/3˖
: Connect them to the video output terminal of DVD.
:Connect it to the audio output terminal of PC.
L/R in 1˄YPbPr1) : Connect them to the audio output terminal of DVD
L/R in 2˄YPbPr2) : Connect them to the audio output terminal of DVD.
Connect it to S-Video output terminal of DVD(Audio share with Video1) .
VIDEO 1 : Connect it to video output terminal of DVD.
L/R in 1˄VIDEO1) : Connect them to audio output terminal of DVD.
VIDEO 2 : Connect it to video output terminal of DVD.
L/R in 2 ˄VEDIO2): Connect them to audio output terminal of DVD.
AC POWER IN: Connect to an earth 100-240V 50/60Hz outlet with the Power Cable.
~
Remote Control
6
Remote Control
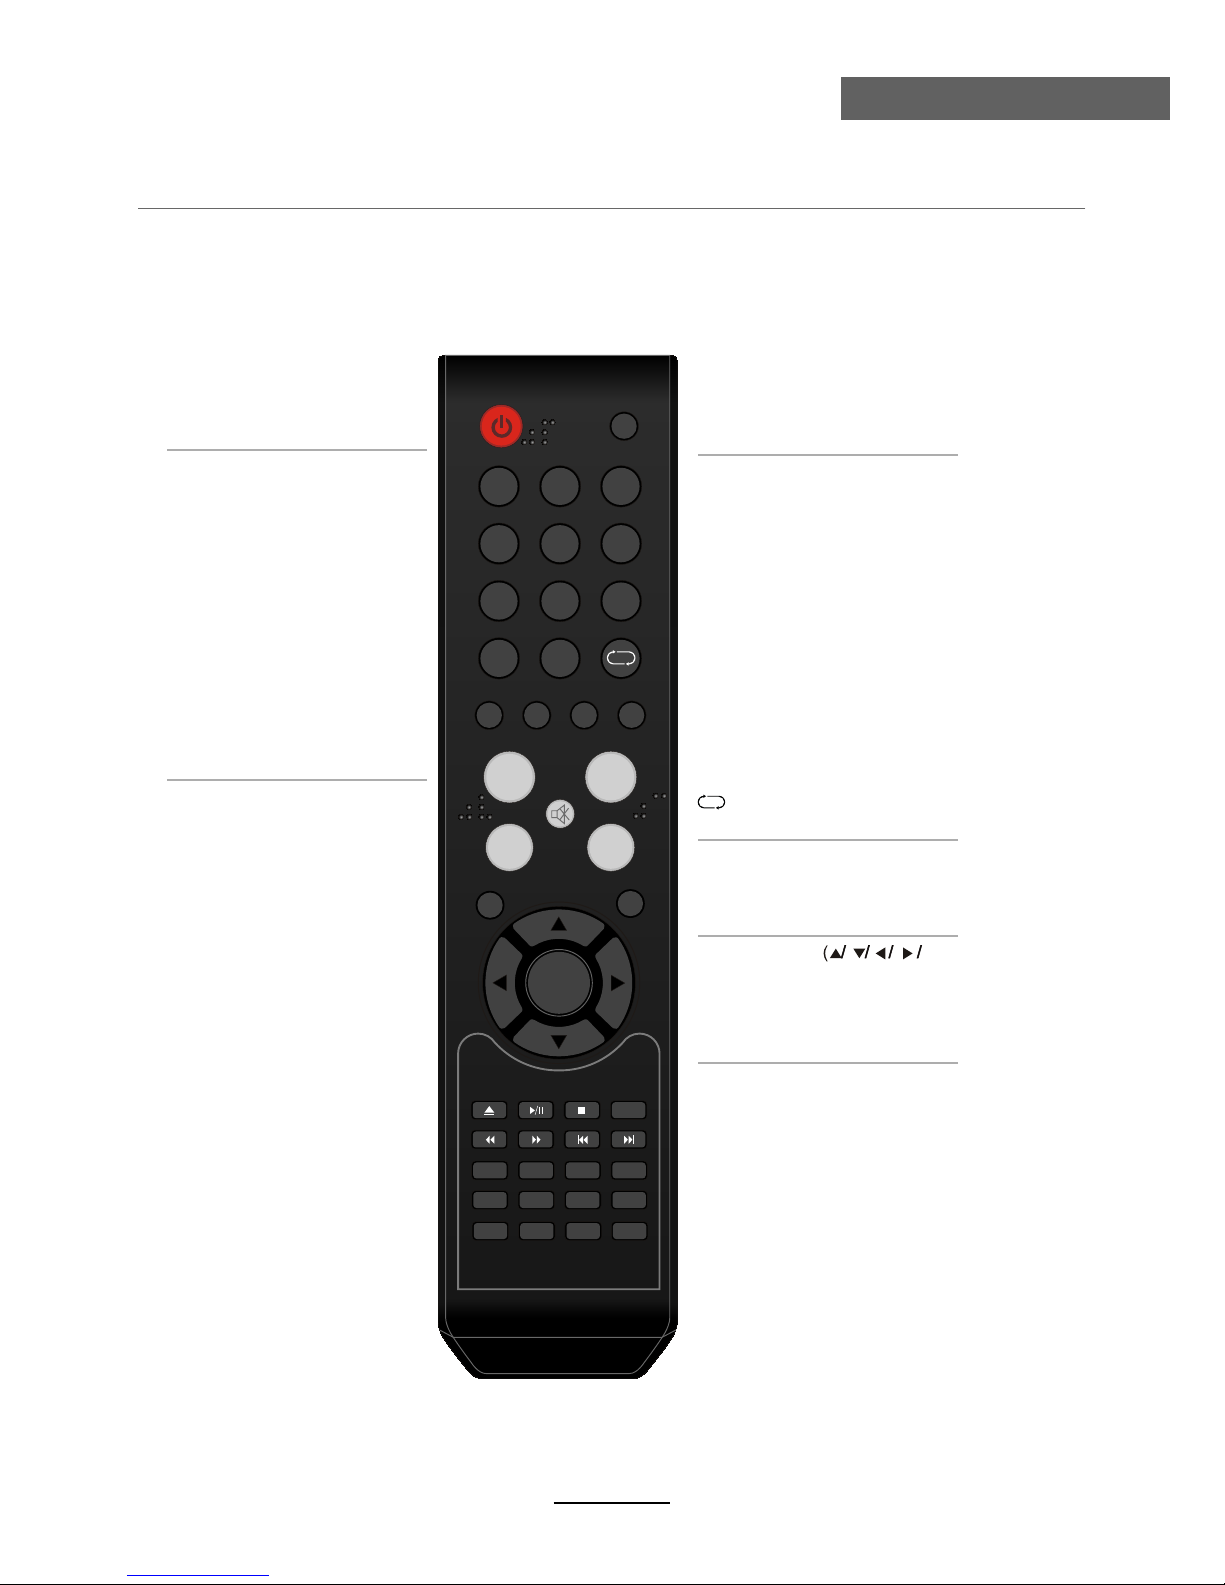
The remote control is using Infrared(IR). Point it towards the front of the LCD TV. The remote
control may not work correctly if it is operated out of range or out of angle.
POWER
Press to turn the TV on/standby
INPUT
Press to display the input source
menu
To select the program directly.
e.g.:
Select channel 5,
press “5” button.
Select channel 62
press “6” button, and press “2”
button in 2 seconds.
Select channel 152
press “1” button, and press “5”
button, then press “2” button
in 2 seconds.
select channel “5-1”,
press “5” then “-/--” and “1”.
NUMBER BUTTONS
Return to the previous channel viewed.
MUTE
Press to mute the sound.
Press again or press VOL+ to
unmute.
DISPLAY
Display the imformation of
current mode.
PICTURE
Press repeatedly to cycle
through the available video
picture modes.
SOUND
Press to cycle through the
different sound settings.
SLEEP
Press to setup the sleep time
CH+/-
Channel/Program +/-
VOL+/-
Volume +/-
MENU
Press to display the OSD menu.
EXIT
Press to exit form the OSD menu.
Allows you to navigate the
on-screen menus and adjust the
system settings to your
preference.
THUMBSTICK OK )
CC
Press to display the closed caption.
MTS
Press to select the audio channels.
FAV
Press to display the favorite
channels list.
EPG
Press to enter the EPG menu
directly.
PICTURE SOUND SLEEP DISPLAY
INPUT
VOL+
VOL-
EXIT
MUTE
MENU
OK
CH+
CH-
123
456
789
0
CC MTS EPG FAV
SETUP
TITLE
ANGLE
GOTOMENU
REPEAT
INTRO A-B
PROGRAM
LANGUAGE
ZOOM
SUBTITLE
SLOW
Remote Control
7
Remote Control
PICTURE SOUND SLEEP DISPLAY
INPUT
VOL+
VOL-
EXIT
MUTE
MENU
OK
CH+
CH-
123
456
789
0
CC MTS EPG FAV
SETUP
TITLE
ANGLE
GOTOMENU
REPEAT
INTRO A-B
PROGRAM
LANGUAGE
ZOOM
SUBTITLE
SLOW
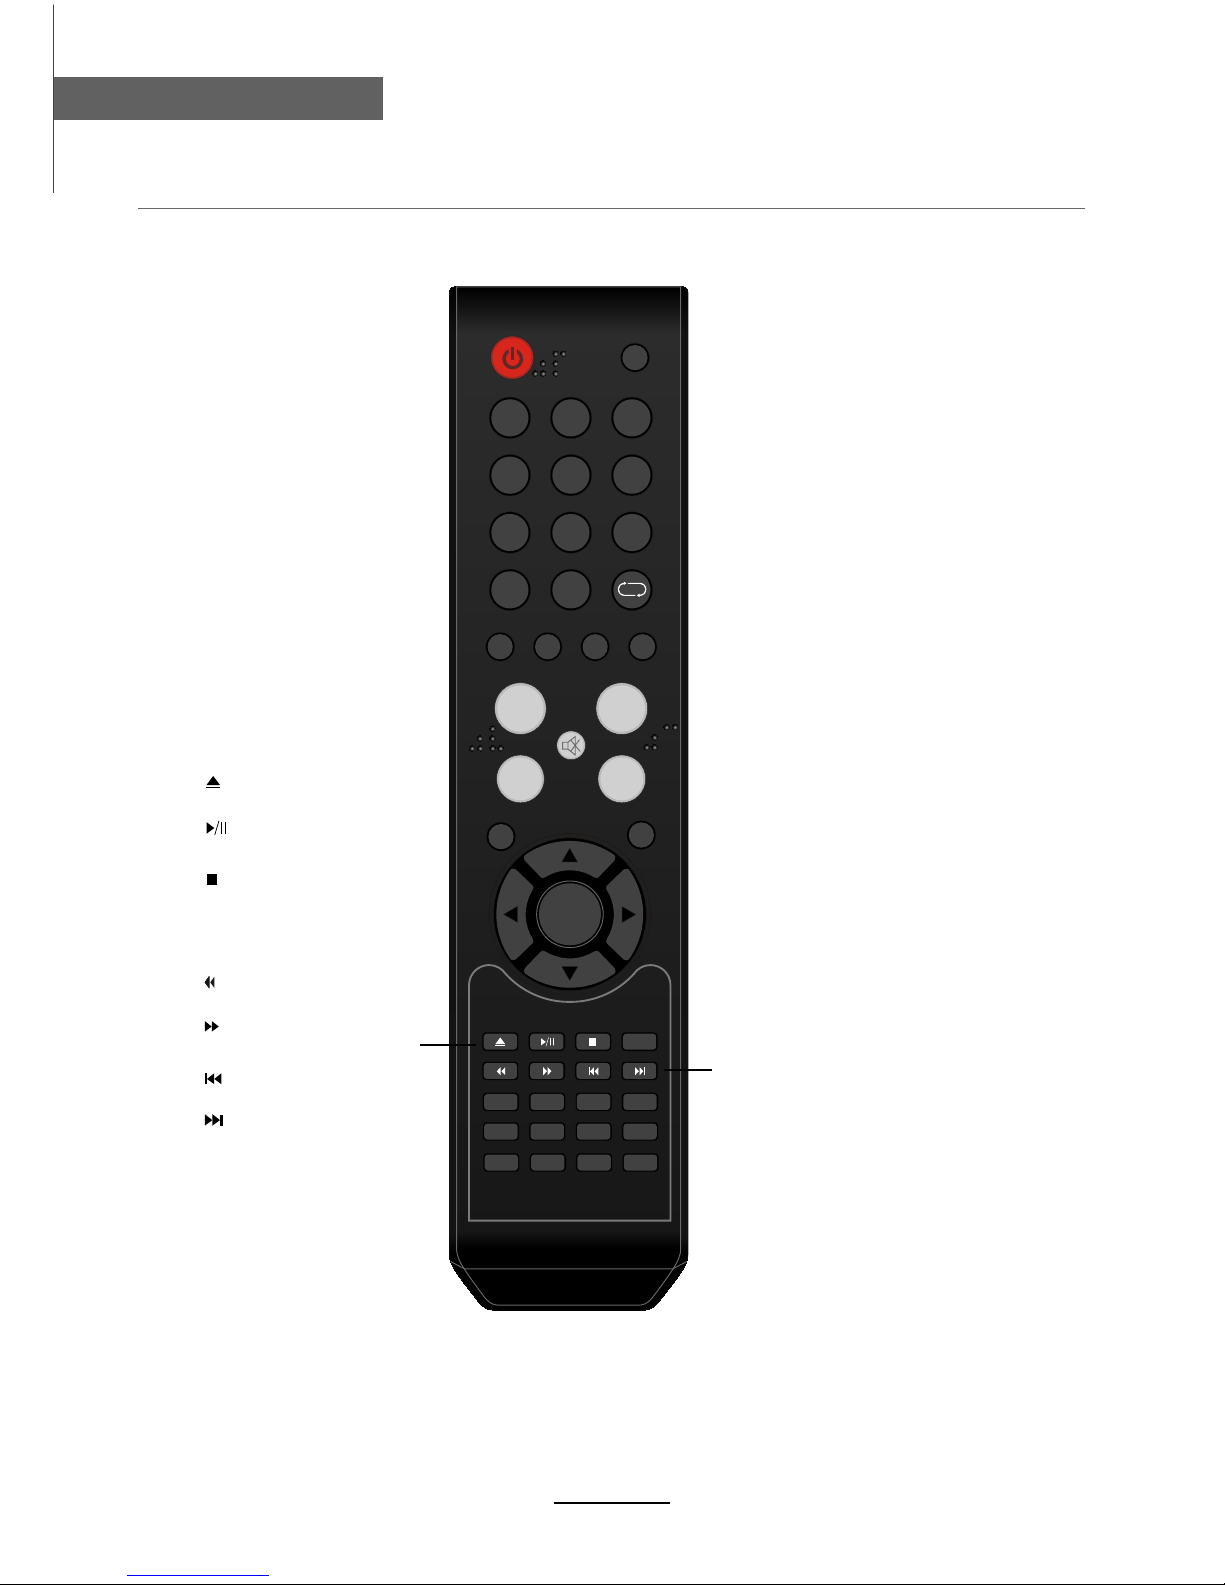
INTRO
If you play CD,it will scan program
with 15S.
A-B
Select and play the preferable
paragraph of DVD program by
pressing this key twice at the
beginning and end of it.
REPEAT
Repeat playing the title or chapter.
PROGRAM
DVD program.
ANGLE
Select DVD picture angle.
ZOOM
Adjust picture size in DVD mode.
DVD next chapter.
DVD previous chapter.
SUBTITLE
Select DVD disc subtitle.
SLOW
Play DVD programs at slow speed.
Stop DVD program.
DVD eject.
Play/Pause DVD program.
DVD fast reverse.
DVD fast forward.
SETUP
DVD system setup.
LANGUAGE
Select DVD disc language.
MENU
DVD play list/Disc menu
TITLE
GOTO
DVD title.
Play your favorite title/chapter/track.
Number buttons for DVD.
Pressing “-/--”button to display
“SELECT 10+”, and press a
number button to play the program.
DISPLAY( In DVD)
Press to display the current mode’s
information.

button to select the function item, press button to adjust/setup,
Basic Operation
8
Basic Operation
Power on/off
1. Connect to the power supply with the power cord and turn on the switch.
2. -To turn on the TV
Press POWER/ button on the TV or remote control.
-To turn off the TV
Press POWER/ button on the TV or remote control.
Input Source select
Press INPUT button on the TV set or remote control to display input
source menu, and use CH+/- button on the TV set or button
on remote control to select the input source, press OK button on the
remote control to enter.
Note: Before you select the input source, make sure the
connections are prepared.
Basic OSD Menu operation
Use /
/
button to select the main menu, and press button to enter the submenu.
In the submenu, use /
or press button to enter the submenu.
* (Press MENU button to return to the upper menu.)
* (Press EXIT button to exit the menu display.)
Note: Only when you input the suitable signal, the relevant items can be activated.
Main menu
Picture
Audio
Time
Setup
Lock
Channel Submenu
(Setup menu
example)
Hint---you should operate the OSD menu according to the hint.
Press MENU button to display the OSD menu as below:
TV
AV1
AV2
S-Video
YPbPr1
YPbPr2
HDMI3
DVD
VGA
HDMI1
HDMI2

OSD Menu
9
OSD Menu
1. Picture menu
Description
Picture mode: Select between Standard, Dynamic, Mild, Sports and User.
You may select the picture mode directly by pressing the PICTURE button on the remote
control.
Contrast: Control the difference between the bright and dark regions of the screen picture.
Brightness: Adjust brightness of the picture.
Color: Adjust color of the picture.
Tint: Control the flesh tones to make them appear natural.
Sharpness: Set the amount of fine detail in the picture.
Color Temp.: Select between Normal, Cool and Warm.

OSD Menu
10
OSD Menu
2. Audio menu
Description
Sound Mode: Select your desired picture mode as follows: Flat, Music, Movie, Sports and User.
You may select the sound mode directly by pressing the SOUND button on the remote control.
Bass: Low frequency intensity.
Treble: High frequency intensity.
Balance: Left and right stereo audio channels balance.
Surround: Activate or deactivate the Surround function.
Audio Language: Select audio language.

OSD Menu
11
OSD Menu
Description
3. Time menu
Sleep timer: You may set the automatic shutdown timer choosing from 5 to 240 minutes, or
deactivate this function.
Time zone: Select between Pacific, Alaska, Hawaii, Eastern, Central, Atlantic and Mountain.
Daylight Saving Time: Select between On and Off.
Clock: User can not change time manually during DTV mode, for time is from signal source
directly.

OSD Menu
12
OSD Menu
Description
4. Setup menu
Menu Language: Select OSD menu language.
Transparency: Turn on or off the transparency menu function.
Zoom Mode: Select the zoom mode between 16:9, 16:9 zoom, 4:3, 4:3 zoom.
Noise reduction: Select the noise reduction mode between Strong, Off, Weak and Middle.
PC SETUP: If the video input signal comes from your
PC, you may adjust the H-Position, V-Position, Clock,
Phase or even perform an Auto adjustment.
Closed Caption:
CC Mode: Allows you to select the CC Mode among: On, Off, CC or Mute.
Basic Selection: Allows you to select the basic selection among: CC1, CC2, CC3, CC4,
Text1, Text2, Text3 and Text4.
Advanced Selection: Allows you to select the advanced selection among: Service1, Service2,
Service3, Service4, Service5 and Service6.
Option: Use thumbstick buttons to operate in option menu as you desire.
XVS: Activate/deactivate the automatic dynamic brightness function.
Restore Default: Restore all settings in SETUP menu to factory settings.

OSD Menu
13
OSD Menu
Description
5. Lock menu
You must enter the password to gain access to the Lock menu. The default password is 0000.
You may modify the following options:
Change password: Change the password, you must enter the new password twice to confirm it.
Note: Do not forget the password.
System Lock: Allows you to turn the system lock on or off. If deactivated, the functions described
below don’t work.
This option menu allows you to lock any TV channel or adjust the Movie rating filter.
US:
TV: Use buttons to select the desired rating
and press button to block or unblock rating.
MPAA: The Movie rating (MPAA) is used for original
movies rated by the Motion Picture Association of
America (MPAA) as broadcasted on cable TV and not
edited for television.
Use button to select N/A, G, PG, PG-13, R,
NC-17 or X.
Canada English: Select among: E, C, C8+, G, PG,
14+ and 18+.
Canada French: Select among: E, G, 8ans+, 13ans+,
16ans+ and 18ans+.
G: General Audiences. Movie is appropriate for all ages.
PG: Parental Guideance Suggested. May contain material not
suited for younger viewers.
PG-13: Contains content that may not be appropriate for viewers
under the age of 13.
R: Restricted. Contains adult content, no one under 17 admitted
without parent.
NC-17: No one 17 and under admitted.
X: Adults only.
Canada:
Reset RRT: Allows you to reset the RRT setting.

OSD Menu
14
OSD Menu
Description
6. Channel menu
Air/Cable: Allows you to select antenna between Air and Cable.
If you select “Cable”, the following items (Favorite, Show/Hide, Channel NO, Channel Label and
DTV Signal) are unable to be used.
Auto Scan: Enter the Auto Scan menu to start auto scan.
If you select “Cable” as input signal in Antenna item, it allows
you to select Cable System among: Auto, STD, IRC and HRC.
Use button to highlight the “Start to Scan”, then press
button to search the channels automatically.
The receivable channels will be stored automatically.
When searching channels, press MENU to stop.
If you select “Air” as input signal in Antenna item, you
can press button to search the channels automatically.
The receivable channels will be stored automatically.
When searching channels, press MENU to stop.
NOTE: It will take a while to auto scan in NTSC or ATSC
mode, please wait patiently.
Use / button to highlight the desired item, then press
OK button to add or remove the highlighted channel as
favorite.
Favorite: Allows you to add these channels which you desired
as the favorite channels.

Channel No.: Show and select the channel.
Channel Label: Allows you to setup a label for the channel.
Press / button to select the position of the table, and press / button to select the
words.
DTV Signal: Shows the quality of digital signal: good, normal, bad.
OSD Menu
15
OSD Menu
Show/Hide: Allows you to show or hide the channels.
Use / button to highlight the desired item, then press
OK button to show or hide the highlighted channel.

16
DVD Operation
DVD Operation
DVD Basic Operation
Turn on your TV then use the INPUT button on the remote control or on the TV to select DVD
mode.
Place a disc
Insert a disc according to the silk.
Do not touch the playing surface.
automatically draw the disc into the player.
To "Eject" the disc, press the " " (EJECT)button on the remote control or on the TV.
Play
The contents of each disc vary, as to how the disc was authored and what features are included.
Some discs start playing as soon as they have been read, some need "Play" selecting in the
Menu. Different play modes are offered, such as Menu Play, Sequence Play and other modes.
Using the Display Feature
1. Compatible with DVD, SVCD, VCD, CD, HD-CD, WMA, Digital Audio disc discs.
2. Loading and playing DVDs (two pages)
- "Disc Type, Title * / * (the playing title / total titles), Chapter * / * (the playing chapter / total
chapters), Elapsed Time of the Disc".
- Press the button again to show the second page:
- "Language */* (the serial number of playing language / the amount of optional languages) or
Off, Language Type, Audio Type, Subtitle * / * (the serial number of playing subtitle /the
amount of optional subtitles) or Off, Angle * / * (the serial number of playing angle / the amount
of optional angles) or Off".
- Press the button for the third time, the display menu fades out.
3. Loading and playing SVCD discs (two pages)
- "Disc Type, Track * / * (the playing track / total tracks), Mute, PBC, Repeat Mode, Elapsed
Time of the Playing Track".
- Press the button again to show the second page:
- "Language * / * (the serial number of playing language/ the amount of optional languages) or
Off, Language Type, Audio Type, Subtitle * / * (the serial number of playing subtitle / the
amount of optional subtitles) or Off".
- Press the button for the third time, the display menu fades out.
4. Loading and playing VCD
- "Disc Type, Track * / * (the playing track / total tracks), Mute, PBC, Repeat Mode, Elapsed
Time of the Playing Track".
- Press the button again, the display menu fades out.
5. Loading and playing CD, HD-CD, WMA, Digital Audio / JPEG discs
- "Disc Type, Track * / * (the playing track / total tracks), Mute, Repeat Mode, Elapsed Time of
the Playing Track".
- Press the button again, the display menu fades out.

17
DVD Operation
DVD Operation
Subtitles
1. Compatible with DVD, SVCD discs.
2. Press the Subtitle button on the remote once, and the subtitle info banner appears
3. When a DVD or SVCD is recorded with subtitles, you can use the Subtitle feature to view the
subtitles on-screen. By default, subtitles are off. The info banner will display Subtitle Off.
4. To display subtitles, press the Subtitle button again. The default language with its responding
serial number will be displayed in the info banner and subtitles will be displayed in that
language. There are 8 supported subtitles: Chinese, English, Japanese, French, Spanish,
Portuguese, Germany and Latin. With each consecutive press of the Subtitle button, the
subtitle switches. For example, "Language Icon: [1 English DTS 6CH] or [Off]" (the availability
of the subtitles are disc-dependent). To turn subtitles off, press the Subtitle button until
Subtitle Off is displayed.
Digital Audio Disc
1. Compatible with Digital Audio discs
2. The player will search the disc directory automatically and display the contents on screen.
4. To change directories use the direction buttons.
Disc Care
About Disc Terms
Title
Generally, pictures or music compressed on a DVD are divided into several sections, "title".
Chapter
The smaller section unit of picture or music in a DVD under the title, usually one title is
comprised of one or more chapters and each of them is numbered for easy searching, but some
discs may not have a recording chapter.
Track
A segment of picture or music on a CD, Each track is numbered for searching.
Care of Disc
Video disc contains high-density compressed data that needs proper handling.
indle hole. Do not touch the discs
surface.
2. Do not bend or press the disc.
3. Do not expose the disc to direct sunlight or heating sources, Stere discs in cabinet vertically,
and in dry condition.
Prevent exposure to:
Direct sunlight, Heat or exhaust from a heating device, Extreme humidity
Clean the disc surface with a soft, dry cleaning cloth, Wipe the disc surface gently and radically
from center toward the outer edge.
will permanently damage the disc surface.
This manual suits for next models
1
Table of contents
Other FAVI TV DVD Combo manuals


