Feider FTDT5096-AC User manual

ORIGINAL INSTRUCTIONS >EN
PETROL LAWN MOWER
FTDT5096-AC
USER GUIDE
CAUTION: Read the instructions before using the product.

CONTENTS
1. INTENDED USE 3
2. SAFETY INSTRUCTIONS 3
3. YOUR PRODUCT 7
4. ASSEMBLY 8
5. FILLING FUEL TANK 9
6. USE 10
7. MAINTENANCE AND STORAGE 11
8. DECLARATION OF CONFORMITY 14
9. WARRANTY 15
10. PRODUCT FAILURE 16
11. WARRANTY EXCLUSIONS 17
02

1. INTENDED USE
This device is only for lawn mowing grass and grass up to 1800 m² in the domestic area. The device is
designed for home use. It is not intended for continuous professional use. Any other use that is not
expressly permitted in this manual may result in damage to the device and constitute a serious danger to
the user.
This device is designed for use by adults. Children and those unfamiliar with this manual should not use
this device. The user is responsible for accidents or damage caused to people or their property. The
manufacturer is not liable for damage caused by improper use or improper handling.
2. SAFETY INSTRUCTIONS
2.1 INSTRUCTIONS
Read the instructions carefully. Be familiar with the controls and proper use of the equipment.
Never allow children to use this mower. If the mower is given to an other people, also give this manual.
Also make sure that this person uses this device only after receiving the necessary instructions. Local
laws may restrict the age of the user.
Never mow while people, especially children, or animals are nearby.
Keep in mind that the operator or user is responsible for accidents or risks that may occur to other
persons or their properties.
If necessary, have training with an experienced person in order to use in a safe way this tool.
2.2 PREPARATION
During mowing, always wear slip-resistant foot protection and long pants. Do not use the equipment
barefoot or wearing sandals open.
Wear personal protective equipment including at least: clothes of protection, gloves, foot protection,
mask, ocular and hearing protection
Carefully inspect the area where equipment and remove all foreign objects such as stones, toys, stick
and wires.
WARNING - Gasoline is extremely flammable.
oAdd fuel before starting. Do not remove the fuel tank cap while the machine is running or when it is
hot.
oIf the fuel has spilled or leaked, do not attempt to start the machine but move the machine away
from the leakage area and avoid creating a source of ignition until the gasoline vapors has
dissipated.
oRefuel only outside and do not smoke during refueling.
oStore fuel in tanks specifically designated for this purpose.
oReplace the fuel tank or the defective gasoline plug securely.
Replace defective mufflers.
Before use, always inspect visually that the blades, blade assembly and blade lock are not worn or
damaged. Replace blades and blade assemblies that are not in good condition to maintain balance.
Always use recommended blades. Contact the manufacturer or your dealer in order to have a list of
recommended blades. Non-recommended blades can give a risk of malfunctions, injuries and accidents.
The blades must be balanced to ensure proper operation and to be able to work safely.
2.3 OPERATION
Do not use the machine in a confined space or hazardous carbon monoxide emissions can be collected.
Mow only under daylight or under good artificial light. Always have a good visibility.
Avoid using the equipment on greasy grass, where possible.
Always be sure of your walking on the slopes.
Walk, never run.
For lawn mowers, mow across slopes, never from top to bottom.
Exercise extreme caution when changing direction on slopes.
Stop the blades if the mower is to be tilted during transport when crossing surfaces other than grass,
and when transporting the mower due to the area to be mowed.
Do not mow on steep slopes.
03

Use extreme caution when tipping or pulling the mower towards you.
Never use the mower with defective guards, or without safety devices such as baffles and or collection
bins, which are not in place.
Do not change the motor configuration or increase the speed.
For starting, disengage all blades, the gears must be in neutral, the traction control lever must be
released. Set foot well away from the blades.
Before starting the engine or starting the engine, carefully read and understand all instructions.
Do not tilt the mower when starting the machine or turn on the engine, unless the mower needs to be
tilted for starting. In this case, do not tilt it more than absolutely necessary and lift only the part that is
furthest away from the user.
Do not start the machine by standing in front of the ejection
Do not place hands or feet near or under rotating parts. Keep clean the mouth of the grass extractor.
Never take or carry the mower while the machine is running.
Stop the machine and remove the ignition key, disconnect the spark plug from the spark plug:
oBefore cleaning or unclogging the grass extractor.
oBefore checking, cleaning, and working on the mower.
oAfter hitting an object. Inspect the mower for damage and repair before re-using the mower.
oIf the mower begins to vibrate abnormally, stop the engine immediately and check according to
previous recommendations.
The controls must be always checked if they are functioning correctly. In case of malfunction, do not
use the tool and bring to a service agent for inspection.
Stop the engine immediately:
oEvery time you leave the tool alone and the working area
oBefore refueling.
When the tool is stopped, park it in a safe place.
Move slowly when moving.
The lawnmower should not be used in slopes and near drop-offs, ditches or embankments; if the tool
must be used in these kinds of emplacements, take an extreme precaution and operate carefully the
tool.
The lawnmower safety systems or features shall not be tampered with or disabled;
The operator should not alter or tamper with any sealed adjustments for the engine speed control.
2.4 MAINTENANCE AND STORAGE
Check and tighten all bolts and screws to ensure that the equipment is in safe operating condition.
Never keep the mower with gasoline in the tank in a building or vapors can cause a bright flame or
spark.
Allow the machine to cool before storing it in an enclosed area.
To reduce the risk of fire, keep the machine clean without grass, without grease, the muffler and the
engine cools, disconnect the battery if necessary and empty the fuel tank
Check the grass catcher frequently, its condition or deterioration.
Replace worn and damaged parts for safety.
If the fuel tank is to be drained, it must be made outdoors.
2.5 SPECIAL SAFETY INSTRUCTIONS
Always use the mower with its pick-up bag and / or deflector in the intended position.
Switch off the engine before emptying the pick-up bag or before changing the cutting height.
While the engine is running, never put your hands or feet under the mower or under the grass ejection
area.
Before mowing, remove all foreign objects from the grass that can be propelled by the machine.
Keep children and pets at a safe distance while using the mower.
Never lift the mower when the engine starts.
Alcohol, drug, as well as illness, fever and fatigue affect your ability to respond. Do not use power tools
in such circumstances.
Never change the rated speed of the motor.
Never lift or carry the tool while the engine is running.
Before starting the engine, release the drawbar.
Before mowing, install the collection bag in its intended position.
04

Do not use the mower in the event of rain or when the grass is wet.
Never lift the rear of the mower when starting the engine and never place your hands or feet under the
mower deck or in the rear ejection port while the engine is running.
Turn off the engine and remove the spark plug cap in the following cases:
oBefore operating under the mower deck or near the ejection opening.
oBefore any maintenance, repair or verification.
oBefore transporting, lifting or storing the mower.
oIf you leave the mower unattended or change the cutting height.
oTo remove and empty the collection bag.
After striking a foreign object, turn off the engine and carefully inspect the mower for damage. Take the
lawnmower to an authorized service center for repair if necessary.
If the mower vibrates abnormally, try to understand the reason and bring your lawnmower to an
authorized repair center.
Regularly check that the bolts, nuts and screws are properly tightened for safe use of the mower.
Do not use the tool where there is a risk of lighting.
Use the tool on daylight or under a good lighting. Always keep bystanders away.
Warning: Take an extreme precaution when operating the lawnmower in slopes and near drop-offs,
ditches or embankments; always be sure of your footing and stay in alert.
The lawnmower safety systems or features shall not be tampered with or disabled;
The operator should not alter or tamper with any sealed adjustments for the engine speed control;
The operator must have, before using the tool for the first time, an adequate training with an
experienced people.
Warning: do not use of the unit while being tired, ill or under influence of alcohol or other drugs;
Park safely the tool before leave it. The tool must be switched off.
The lawnmower shall not be operated without either the entire grass catcher or self-closing discharge
opening guard in place;
Warning: be careful about exhaust gas. Do not inhale them.
Wear adequate clothing such as long trousers and a protective equipment: slip-resistant foot protection,
hearing protection, eyes protection and gloves.
To avoid health issues, limit the time of operation. Take enough rest. Exposure to noise and vibrate can
have bas consequences on health.
WARNING: There is a danger about moving blade assemblies. Always handle blades when they are in
a complete stop and wear protective gloves.
2.6 FUEL HANDLING
Use caution when handling fuels. They are flammable and the vapors are explosive.
Use only an approved container.
Never remove the fuel cap or add fuel while the machine is on. Turn off the unit and allow the engine and
exhaust components to cool down before refueling.
Do not smoke.
Never refuel inside a room.
Never store the tool and the fuel tank indoors where there is a naked flame, such as near a water heater.
If fuel has spilled, do not attempt to start the machine, but move it away from the spill before starting to use
it. Please clean up any spills.
Replace and tighten the fuel tank cap after refueling.
Follow strictly the instructions in this manual for filling the tool with fuel.
2.7 DURING MAINTENANCE AND STORAGE
Switch off the tool and wait until it stops completely. Make sure that all moving parts are stopped.
Allow the machine to cool before performing inspection, adjustments, maintenance, servicing and storage.
Store the tool where fuel vapour will not reach a flame or spark.
The transport of the tool must be secured in order to avoid fuel spillage, accidents and injuries.
2.8 RESIDUAL RISKS
Even if you use this product in compliance with all safety requirements, the potential risks of injury and
damage remain. The following hazards may arise in the structure and design of this product:
There are risks of injury and property damage due to attachments or broken the sudden impact of hidden
05

objects when using cutting.
There are risks of injuries and accidents caused by flying objects.
Prolonged use of this product exposes the operator to vibrations and can produce so-called "white finger"
disease. To reduce the risk, wear gloves and keep your hands warm.
If any of the symptoms of "white finger syndrome" occur, seek immediate medical attention.
Symptoms of "white finger" include numbness, loss of sensitivity, tingling, pain, loss of strength, color
changes or skin condition. These symptoms usually appear on the fingers, hands or wrists. Risk increases
at low temperatures.
A long exposition to noise can affect the health of the operator. A hearing protection must be always used
when operating the tool. The operation of the tool must be limited and some rest must be taken between
two sessions (e.g. 10min of operation and 20min of rest).
2.9 SYMBOLS
Read the instructions.
Watch out for projections! Keep viewers away from work area.
Danger! Keep your hands and feet away from the cutting element.
Be careful of exhaust gases. Do not inhale them and do not use the tool indoor.
Hot surface! The accessible surface can be hot during use.
Wear protective equipment. Wear eye and hearing protection when using the
tool.
Remove the spark plug before servicing and maintenance. Read the instruction
manual.
The fuel is flammable; keep it away from the fire. Do not add fuel while the
machine is running.
Do not use the tool when it is raining and in humid conditions.
Wait for the stop of the cutting attachment.
Guarantee sound power level.
06
Wear hearing and ocular protection.
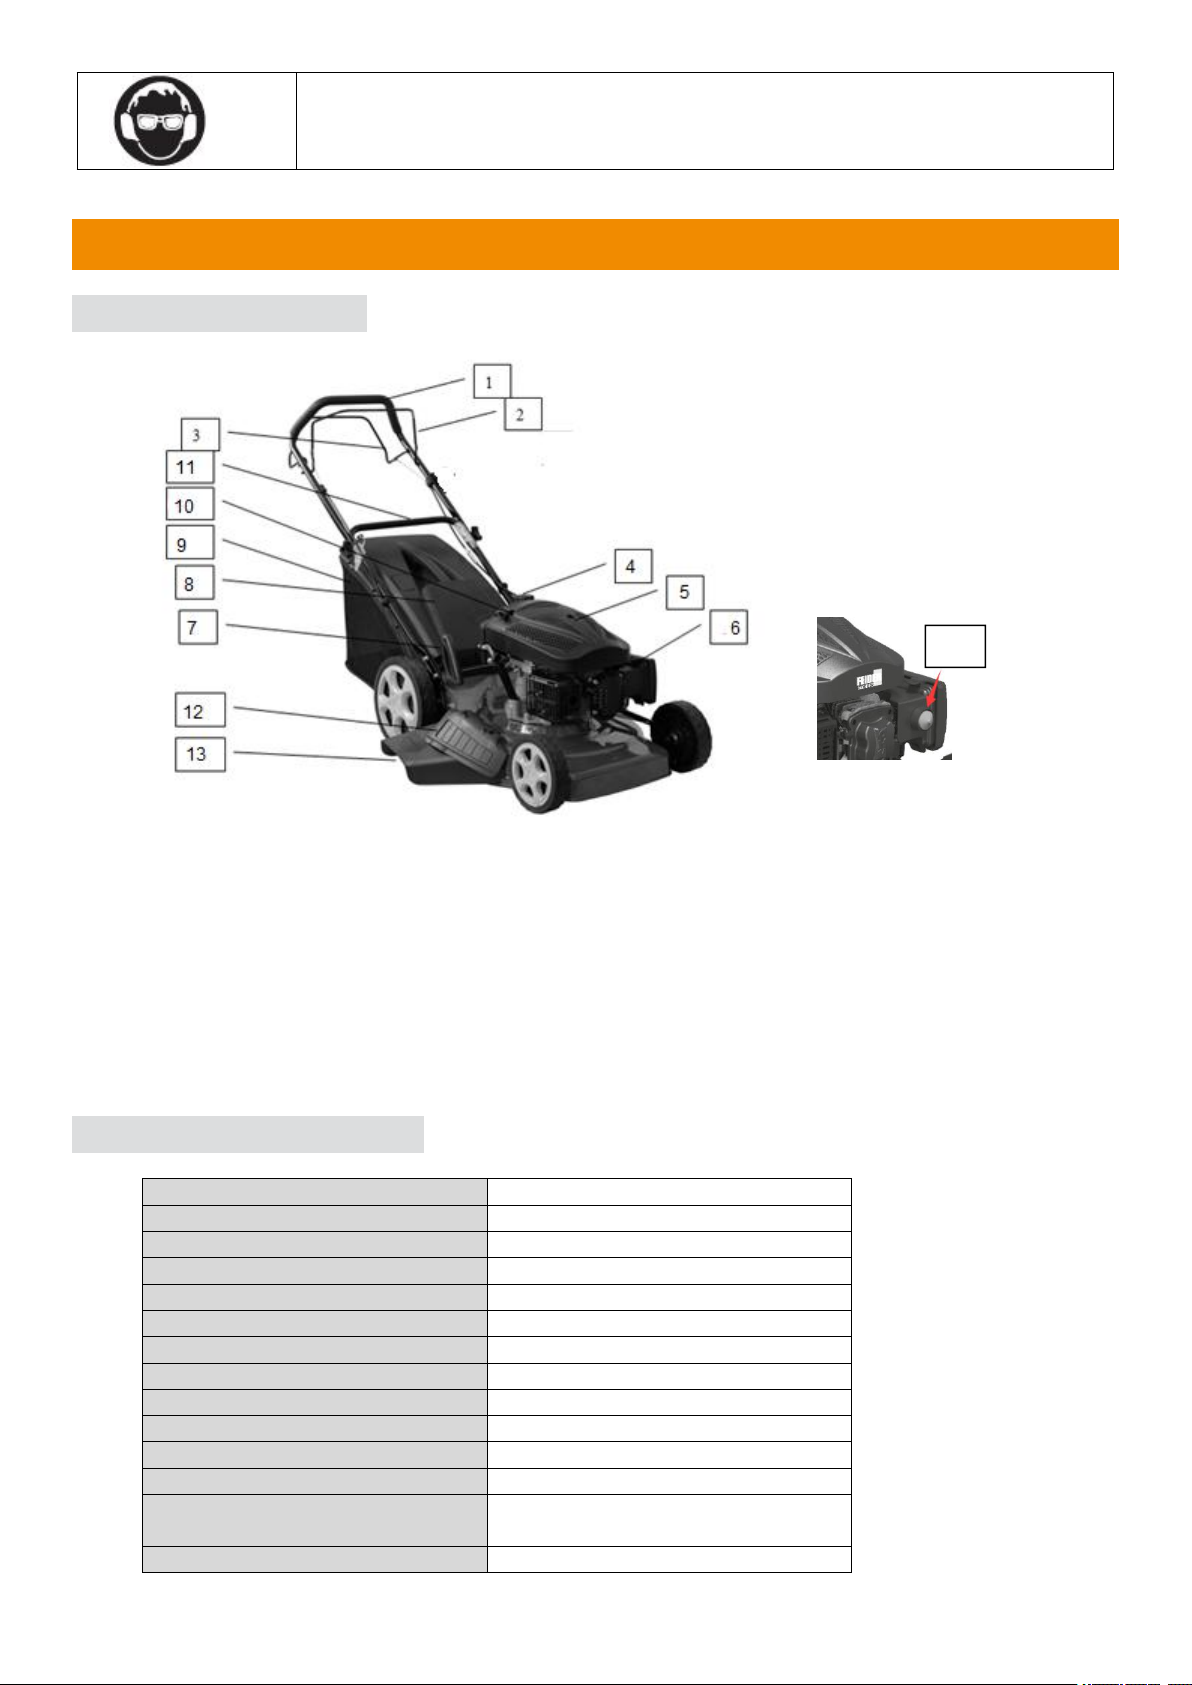
3. YOUR PRODUCT
3.1 DESCRIPTION
1. Upper bar
2. Operator control lever
3. Self-propeller bar
4. Fuel tank
5. Engine
6. Air filter
7. Cutting height lever
8. Flap
9. Grass catcher
10. Starter rope
11. Lower bar
12. Flap of the lateral discharge
13. Lateral discharge
14. Primer bulb
3.2 TECHNICAL DATA
Model
FTDT5096-AC
Nominal power
3.2kW
Displacement
196cm³
Max engine speed
2850/min
Cutting width
502mm
Volume of the collection bag
55l
Weight
37.5kg
Blade type
DY0605-12
Fuel tank capacity
1.5 l
Oil tank capacity
0,6l
Sound pressure level
LpA: 83dB(A), K=3,0 dB(A)
Sound power level
LwA: 98dB(A)
Guaranteed Sound Power
Level
98dB(A)
Vibration value
Max.5.0 m/s2, K=1,5m/s2
14
07
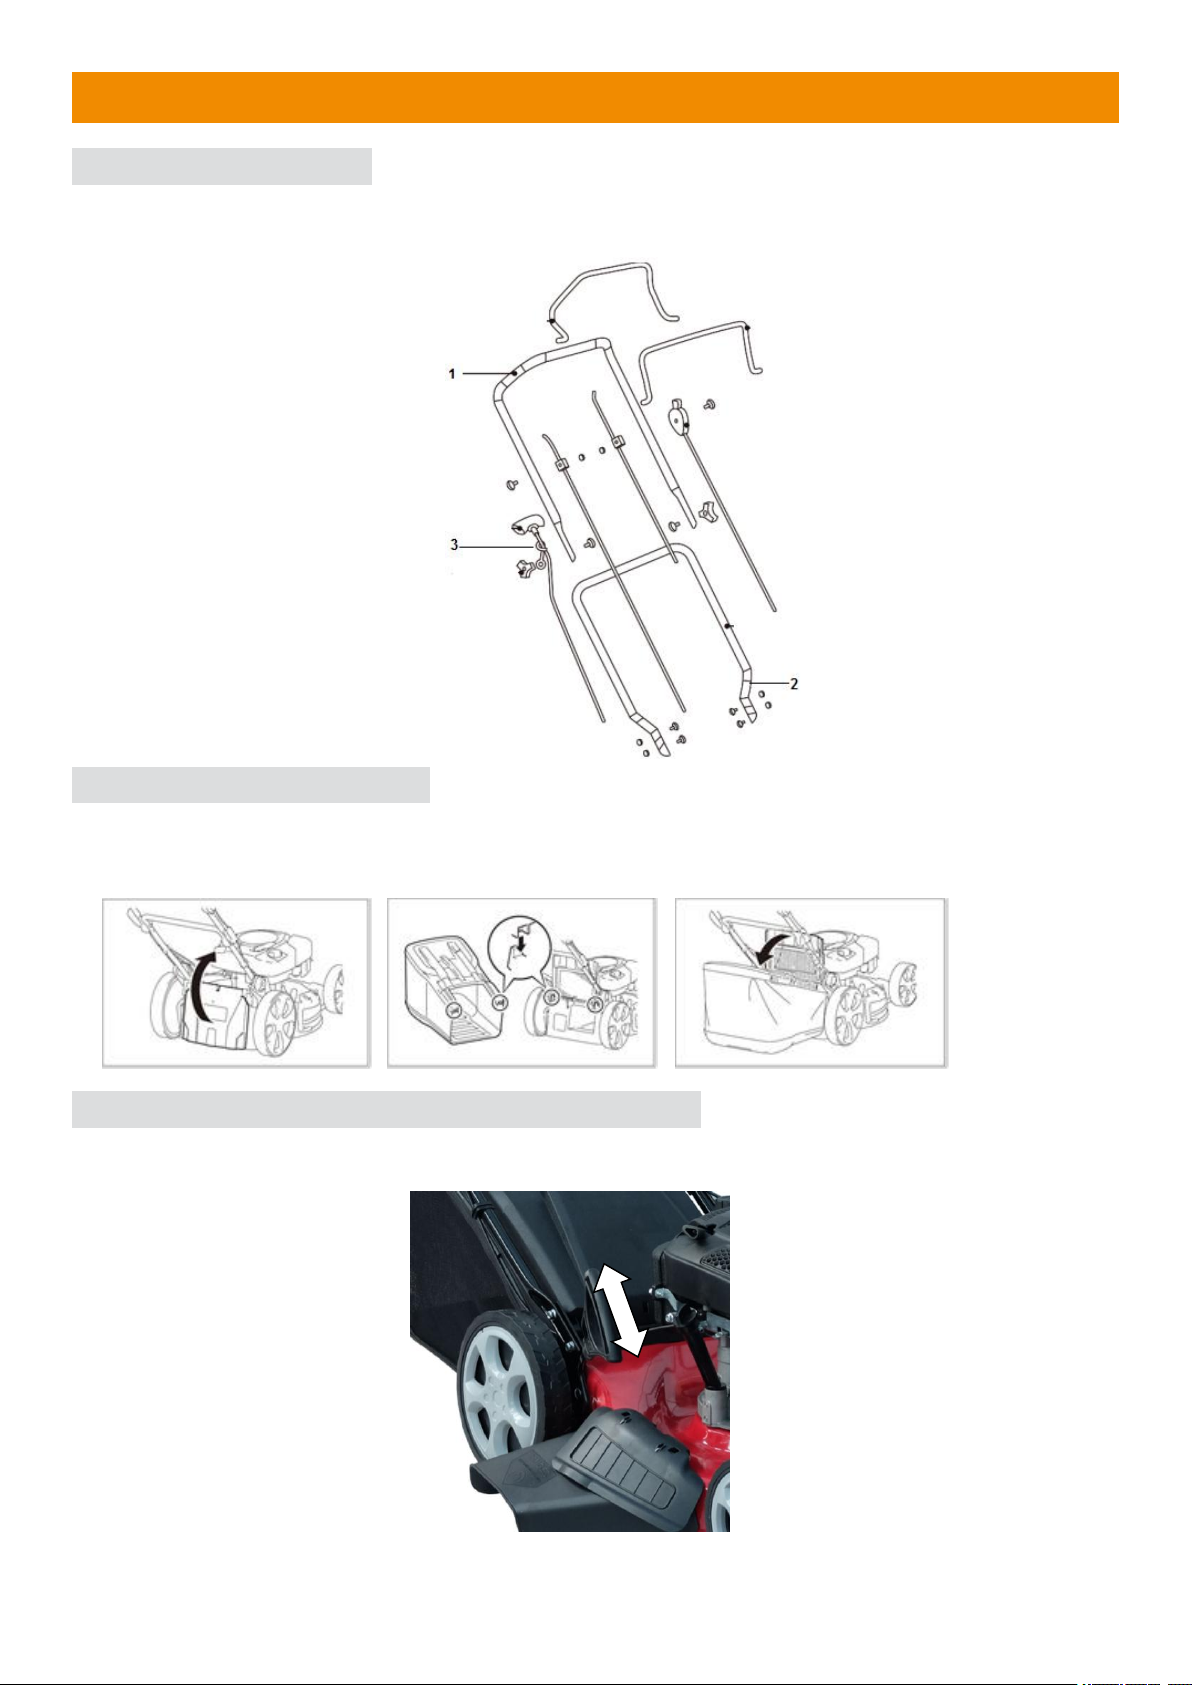
4. ASSEMBLY
4.1 HANDLES/BAR
- Install the lower handle (2) on the machine and screw it with the provided screws and nuts. Combine
the upper handle (1) and the lower handle (2) fix them with the two nut knobs and their screws.
4.2 GRASS CATCHER
- Open and hold the flap. Insert the grass catcher and attach it to the bar with the hooks. The flap
should fit securely.
- To remove the grass catcher, remove the hooks from the bar and remove the tray.
4.3 SETTING OF THE CUTTING HEIGHT
According operation to be performed, adjust the desired cutting height; Grasp the lever, pull it to the right
and then lower it to decrease the cutting height or raise it to increase the cutting height
08

4.4 LATERAL DISCHARGE
Push the tab and open the flap of the side discharge. Hold it and Install the lateral discharge by putting it on
the hooks on the bar. Then release the flap.
You must fit the mulching adapter in order to use the side ejector. Hook in the side ejector adapter.
4.5 BACK DISCHARGE
If need to use the back discharge function, screw out the bolt about 40mm.
To use the back discharge function, you must open the back flap of the tool. Insert the mulching adapter
on the hole on the back. Release the flap.
Note: do not install the grass catcher when using the mulching adapter.
The mulching adapter needs to be fitted when the lateral discharge is used.
5. FILLING FUEL TANK
5.1 FILLING TANK
WARNING! Gasoline is extremely flammable.
Store fuel in specially designed cans for this purpose.
Fill the fuel tank only outdoors and before starting the engine. Do not smoke when filling the fuel
tank or handling fuel.
Never open the fuel tank cap and never add fuel while the engine is running or when it is hot.
If fuel has spilled, do not start the engine any further, move the tool away from where the fuel has
been spilled, and be careful not to create a spark or flame until the fuel vapors have dissipated.
Fully close all fuel tank and fuel canisters.
Before tilting the mower to maintain the blade or drain the oil, empty the fuel tank.
WARNING: Never fill the fuel tank indoors, while the engine is running, or before the engine has
cooled down for at least 15 minutes after use.
09

CAUTION: Do not use unapproved gasoline, such as E15 and E85. Do not mix the oil with gasoline
or modify the engine to operate with alternative fuels. The use of unapproved fuels will damage the
engine parts and will void the engine warranty. To protect the fuel system from scale formation, add
a fuel stabilizer to the fuel. All fuels are not identical. If startup or performance problems occur,
change supplier or fuel brand.
Fuel must meet the following criteria:
- Clean, new and lead-free gasoline.
- A minimum octane rating of 87/87 AKI (91 RON). For use at high altitudes, see below
- A gasoline containing up to 10% ethanol is acceptable.
- Remove the fuel tank cap. Add fuel.
- Close the fuel tank with the cap.
Do not overfill. Wipe off any fuel that has overflowed before starting the engine.
5.2 ENGINE OIL
Recommended oil: We recommend the use of high quality detergent oil classified for SF, SG, SH, SJ or
higher. Do not use special additives.
Filling oil tank
- Open the oil tank.
- Fill directly the oil in the tank. Do not overfill.
- Close the oil tank. Wipe any spillage.
Checking the oil level
- Check the oil level when the engine is off and horizontal.
- Remove the plug / dipstick from the oil tank and wipe it off.
- Insert the oil tank plug / dipstick into the tank neck as shown, without screwing it in, and then remove
it to check the oil level.
- If the oil level is near or below the lower limit of the dipstick, remove the dipstick and fill the
recommended oil reservoir up to the upper limit of the dipstick (bottom edge of the dipstick). Do not
overfill.
- Replace the oil tank plug / dipstick.
6. USE
6.1 STARTING THE TOOL
Before starting and using the mower, check for the presence and operation of safety devices. Also,
check the condition of the blade and its securing bolt. If necessary, replace or repair defective items.
Use only genuine original parts.
- Place the mower in a clear, level area.
- Push the primer bulb (1) several times (at least 8 times).
- Stand behind the handlebars. Move the operator control lever positioned in front of the handlebars
rearwards so that the lever is resting against the handlebars. Take hold of the starter handle firmly
with the other hand.
- Pull the starter rope firmly until that the motor starts.
10

If possible, mow only when the grass is dry. If the grass is wet or excessively long, perform two cutting
passes. Make the first pass at maximum cutting height to avoid overloading the mower. The second pass
should be made at the required finished height. If grass builds up beneath the mower’s chassis, stop the
engine and remove the spark plug’s cap before cleaning the underside of the cutter deck.
6.2 SELF-PROPELLING
The mower can be self-propelled when in use. When the transmission is operated, the rear wheels turn
automatically. Push and hold the traction bar forward.
Release this bar to stop this function.
6.3 STOPPING
To stop the mower, release the operator control lever. The engine and the blade will stop turning
automatically.
If there is a build‐up of grass beneath the chassis, stop the engine, remove the spark plug’s cap and wait
until the engine has cooled before clearing the grass.
7. MAINTENANCE AND STORAGE
Before working on the cutting system of the machine, switch off the engine and remove the spark
plug’s cap.
7.1 CLEANING THE MOWER
- Cut grass is damp. Regular cleaning after each use will ensure better functioning of the mower and
reduce the risk of corrosion or seizure.
- Having finished mowing, allow the engine to cool then remove accumulated grass clippings from and
around the engine with a brush.
- Clean the grass collection bag annually with a brush or gentle spray of water.
- Disconnect the spark plug’s cap and tilt the mower on its side with the air filter and carburettor
uppermost.
- Remove any remaining cut grass from the cutting system with a scraper and a brush.
- Reposition the mower onto its four wheels.
- Do not use a pressure washer or hot water to clean the mower. Be careful to avoid soaking parts
such as the engine, air cleaner, wheel bearings and metal fastenings. Dry off the machine before
storing by leaving it running for a few minutes on a flat, clear surface to prevent corrosion or seizure.
7.2 BLADE MAINTENANCE
WARNING: Wear gloves, turn off the engine and remove the spark plug before proceeding.
11

The blade is made of hardened steel. To get a clean job, sharpen the blade frequently, about every 25
hours of use. Make sure the blade is always well balanced.
Insert a small iron pin (2 or 3 mm in diameter) into the hole in the middle of the blade: it must remain
horizontal. If the blade does not stay horizontal, balance it by sharpening it further on the side where it is
leaning.
WARNING: Use only original spare parts. Poor quality replacement parts can cause serious damage to
your mower and affect your safety.
To remove the blade, loosen the screw, check the blade bracket, and replace all parts if they are worn or
damaged.
When reassembling the blade, make sure that the cutting edges are in the same direction as the direction
of rotation of the motor. The tightening torque of the blade screw should be 3.7 kg * m / s 2 (37 Nm) and
can be checked with a torque wrench.
7.3 STORING THE MOWER
Store your mower in a dry, well-ventilated area, away from flames, sparks or heat sources. If the storage
area is accessible to children, immobilise the machine by disconnecting the spark plug’s cap. Storing the
mower beneath a tarpaulin or similar cover is not recommended as it may cause a build‐up of
condensation resulting in corrosion of the mower.
Extended shutdown and winter storage
Thoroughly clean the mower. Ideally, run the engine outdoors until the fuel tank is empty. Alternatively,
empty any remaining fuel using a fuel suction pump.
Dispose of discarded fuel safely and responsibly, remembering that petrol vapours can cause explosion or
fire. Run the engine until any remaining fuel is consumed. Allow the engine to cool. Check the condition
and cleanliness of the air cleaner. Remove the spark plug from the engine and pour a tablespoon of engine
oil into the cylinder. Gently pull the starter rope several times to turn over the engine, distributing the oil to
protect the cylinder over winter. Replace and tighten the spark plug.
At the start of the new season
Remove the spark plug and gently clean off any carbon deposits from the tip with a small copper wire brush,
finishing off with petrol. Allow the spark plug to dry. Pull the starter rope several times to expel excess oil
from the cylinder. Replace and tighten the spark plug. Fill the fuel tank with unleaded petrol. Turn over the
engine until it starts.
Before transporting the mower
Thoroughly clean the mower. Empty the fuel tank using a suction pump. Dispose of discarded fuel safely
and responsibly, remembering that petrol vapours can cause explosion or fire. Run the engine until any
remaining fuel is consumed.
Allow the engine to cool. Remove the grass collection bag. Loosen the quick release and fold down the top
section of the handles taking care not to bend the cables.
To avoid scratching the mower, insert corrugated cardboard or similar padding between the upper and
lower handlebars and the engine.
Due to the mower’s weight, use ramps or seek assistance when lifting or loading the mower.
7.4 MOWER MAINTENANCE
Cutting system
Before and after each mowing session, check that the blade, its attachment bolts and drive shaft are not
damaged or excessively worn. Never try to straighten a bent blade. Replace a damaged, worn or bent
blade as soon as possible. Use only genuine parts. Excessive vibration when mowing is a good indication
of a problem with the cutting system.
12

WARNING: Vibration from a bent or damaged blade can cause costly damage to the mower. Working with
an excessively worn blade wastes fuel and can lead to injury if the blade becomes detached from the
machine.
Warning: there is a danger about moving blade. Always handle the blade when it is totally stopped. Wear
protective gloves.
Sharpening the blade
For best mowing results, have the edges sharpened and the blade balanced at least once a year by a
specialist service dealer or agent.
Removing the blade
Wear appropriate protective gloves to prevent possible injury when handling the blade. Disconnect the
spark plug cap and tilt the mower on its side with air filter and carburettor side uppermost.
Holding the blade firmly in one hand, use a spanner or socket to loosen the blade screw.
Mounting the blade
Wear appropriate protective gloves to prevent possible injury when handling the blade. Disconnect the
spark plug cap and tilt the mower on its side with air filter and carburettor side uppermost.
Check that all components (the blade, key, blade holder, screws and washers).are present, clean and in
good condition.
Position the blade on its support with the cooling fins facing the engine.
Check the correct alignment and matching of pads with the blade. The blade must be positioned precisely
on its stand.
Tighten the screws connecting all of the components. Make a final visual check that all parts are present
and aligned before tightening the fixing bolt very firmly with a wrench while holding the blade firmly in one
hand (NB wear suitable gloves).
Spark plug
Check the spark plug initially after the first five hours of mower use. Thereafter, maintenance of the spark
plug should take place every 25 hours.
Remove the spark plug cap using a rotary motion and then remove the spark plug with the wrench provided.
Clean off any carbon deposits using a copper brush and check the electrode gap with a feeler gauge.
Replace and retighten the serviced spark plug and replace the cap.
If the spark plug is worn or damaged, replace with a new spark plug of the same or suitable type for the
engine.
Air Filter
An air filter in poor condition will reduce the performance and life of the engine while making it harder to
start. Regular checks are therefore essential, especially when using the mower in dusty conditions. Check
and clean the air filter every 25 hours of use or more often if the engine is used in a dusty environment.
Remove the air box lid and carefully remove the foam filter cartridge. Clean the cartridge in a small bowl of
warm water containing a few drops of washing up liquid until it is perfectly clean and free from all traces of
grease and dust. Rinse the filter cartridge in clean water and then squeeze gently to remove most of the
water. Let it air dry until it is completely dry.
WARNING: Never clean the foam cartridge in petrol, white spirit or other solvents. These products will
degrade the filter cartridge.
Clean the cover and inside of the air box with a clean lint‐free cloth. Apply a uniform layer of oil to the
outside of the cartridge filter with a brush (you can use clean engine oil for this). Insert the filter cartridge
into its housing and replace the air box lid, ensuring that each component is in place and properly installed.
If the filter cartridge is damaged or is very dirty, replace it using a genuine part.
WARNING: Do not twist the cartridge to clean foam, as you could damage it. This mower is equipped with
a dual filtration system comprising a foam pre‐filter and a cartridge filter paper.
The maintenance of a foam pre‐filter is identical to that of a foam cartridge filter, as described above. The
cartridge filter paper should be cleaned with a vacuum cleaner. If it is dirty or contaminated with oil or petrol,
replace it.
Clean the cover and inside of the air box with a clean cloth. Evenly apply a thin layer of oil to the outside of
the cartridge filter with a brush (you can use clean engine oil for this). Replace the filter cartridge in its
housing and then replace the lid of the air box, ensuring that each component is in place and properly
installed.
13

Adjusting the transmission cable
In its transmission‐engaged position, the mower’s advance lever is pushed fully towards the handlebar. An
incorrectly‐adjusted transmission cable can cause premature wear to the mower’s drive system.
If the transmission cable is too tight, it will be difficult to move the advance lever towards the handlebars.
Conversely, if the transmission cable is not tight enough, the transmission will function poorly and will lack
power.
To adjust the tension of the cable transmission, increase or reduce the length of the adjustment device
using the key. Check the effectiveness of the transmission and the resistance of the lever.
Once proper adjustment has been reached, secure the adjustment device by tightening the lock nuts.
8. DECLARATION OF CONFORMITY
BUILDER SAS
32, rue Aristide Bergès -Z1 31270 Cugnaux - France
Tel. +33 (0) 5.34.502.502 Fax: +33 (0) 5.34.502.503
Declares that the machine named below
PETROL LAWN MOWER
FTDT5096-AC
Serial number: 20220119690-20220119969
Complies with the following European Directives:
Machinery Directive 2006/42/EC
EMC Directive 2014/30/EU
Emission directive (EU) 2016/1628 & 2018/989/EU
Other applicable guidelines:
Noise Directive 2000/14/EC Annex VI and 2005/88/EC
Guaranteed Sound Power Level
98 dB(A)
Sound power level
98 dB(A)
Applicable harmonized standards:
EN ISO 5395-1:2013+A1:2018
EN ISO 5395-2:2013+A1:2016+A2:2017
EN ISO 14982: 2009
Notified body
Intertek Testing & Certification Ltd. (Notified Body 0359)
Davy Avenue, Know hill, Milton Keynes, MK5 8NL
Phone: +44 (0)1908 857777 Fax: +44 (0)1908 857830
Cugnaux, 30/12/2021
Philippe MARIE / CEO
Responsible of technical file: M. Olivier Patriarca
14

WARRANTY
The manufacturer guarantees the product against defects in material and workmanship for a period of 2
years from the date of the original purchase. The warranty only applies if the product is for household use.
The warranty does not cover breakdowns due to normal wear and tear.
The manufacturer agrees to replace parts identifed as defective by the designated distributor. The
manufacturer does not accept responsibility for the replacement of the machine, in whole or in part , and/or
ensuing damage.
The warranty does not cover breakdowns due to:
• insufcient maintenance.
• abnormal assembly, adjustment or operations of the product.
• parts subject to normal wear and tear.
The warranty does not extend to:
• shipping and packaging costs.
• using the tool for a purpose other than that for which it was designed.
• the use and maintenance of the machine done in a manner not described in the user manual.
Due to our policy of continuous product improvement, we reserve the right to alter or change specifcations
without notice. Consequently, the product may be diferent from the information contained therein, but a
modifcation will be undertaken without notice if it is recognized as an improvement of the preceding
characteristic.
READ THE MANUAL CAREFULLY BEFORE USING THE MACHINE.
When ordering spare parts, please indicate the part number or code, you can fnd this in the spare parts list
in this manual. Keep the purchase receipt; without it, the warranty is invalid. To help you with your product,
we invite you to contact us by phone or via our website:
• +33 (0)9.70.75.30.30
• https://services.swap-europe.com/contact
You must create a "ticket" via the web platform.
• Register or create your account.
• Indicate the reference of the tool.
• Choose the subject of your request.
• Describe your problem.
• Attach these fles: invoice or sales receipt, photo
of the identifcation plate (serial number), photo
of the part you need (for example: pins on the
transformer plug which are broken).
9. WARRANTY
15

WHAT TO DO IF MY MACHINE BREAKS DOWN?
the repairer will refuse the machine.
Go to the store with the complete machine and with the receipt or invoice.
the repairer will refuse the machine.
c) Create a SWAP-Europe service ticket on the site: https://services.swap-europe.com When making the
request on SWAP-Europe, you must attach the invoice and the photo of the nameplate (serial number).
d) Contact the repair station to make sure it is available before dropping of the machine.
Go to the repair station with the complete machine packed, accompanied by the purchase invoice and the
station support sheet downloadable after the service request is completed on the SWAP-Europe site
For machines with engine failure from manufacturers BRIGGS & STRATTON, HONDA and RATO, please
refer to the following instructions.
Repairs will be done by approved engine manufacturers of these manufacturers, see their site:
• http://www.briggsandstratton.com/eu/fr
• http://www.honda-engines-eu.com/fr/service-network-page;jsessionid=5EE8456CF39CD572AA2AEEDFD
290CDAE
• https://www.rato-europe.com/it/service-network
Please keep your original packaging to allow for after-sales service returns or pack your machine
with a similar cardboard box of the same dimensions.
For any question concerning our after-sales service you can make a request on our website https://
services.swap-europe.com
Our hotline remains available at +33 (9) 70 75 30 30.
If you bought your product on a website:
a) Empty the fuel tank if your product has one.
b) Make sure that your machine is complete with all accessories supplied, and clean! If this is not the case,
If you bought your product in a store:
a) Empty the fuel tank if your product has one.
b) Make sure that your machine is complete with all accessories supplied, and clean! If this is not the case,
10. PRODUCT FAILURE
16

THE WARRANTY DOES NOT COVER:
• Start-up and setting up of the product.
• Damage resulting from normal wear and tear of the product.
• Damage resulting from improper use of the product.
• Damage resulting from assembly or start-up not in accordance with the user manual.
• Breakdowns related to carburetion beyond 90 days and fouling of carburetors.
• Periodic and standard maintenance events.
• Actions of modifcation and dismantling that directly void the warranty.
• Products whose original authentication marking (brand, serial number) has been degraded, altered or
withdrawn.
• Replacement of consumables.
• The use of non-original parts.
• Breakage of parts following impacts or projections.
• Accessories breakdowns.
• Defects and their consequences linked to any external cause.
• Loss of components and loss due to insufcient screwing.
• Cutting components and any damage related to the loosening of parts.
• Overload or overheating.
• Poor power supply quality: faulty voltage, voltage error, etc.
• Damages resulting from the deprivation of enjoyment of the product during the time necessary for repairs
and more generally the costs related to the immobilization of the product.
• The costs of a second opinion established by a third party following an estimate by a SWAP-Europe repair
station
• The use of a product which would show a defect or a breakage which was not the subject of an immediate
report and/or repair with the services of SWAP-Europe.
• Deterioration linked to transport and storage*.
• Launchers beyond 90 days.
• Oil, petrol, grease.
• Damages related to the use of non-compliant fuels or lubricants.
* In accordance with transport legislation, damage related to transport must be declared to carriers within 48
hours maximum after observation by registered letter with acknowledgement of receipt.
This document is a supplement to your notice, a non-exhaustive list.
Attention: all orders must be checked in the presence of the delivery person. In case of refusal by the
delivery person, it you must simply refuse the delivery and notify your refusal.
Reminder: the reserves do not exclude the notifcation by registered letter with acknowledgement within 72
hours.
Information:
Thermal devices must be wintered each season (service available on the SWAP-Europe site). Batteries must
be charged before being stored.
11. WARRANTY EXCLUSIONS
17

BUILDER SAS
32, rue Aristide Bergès - ZI 31270 Cugnaux – France
Made in PRC 2022
Table of contents


