Feider FBT220 User manual

1
ORIGINAL INSTRUCTIONS
PETROL SHREDDER
FBT220
READ THIS INSTRUCTIONS MANUAL BEFORE USE THE TOOL
BUILDER SAS
32, rue Aristide Bergès - ZI 31270 Cugnaux – France
MADE IN PRC

2
Identification
Machine Identification (Pic.1)
A. Hopper
B. Motor
C. Chip Outlet
D. Chipper Funnel
E. Choke
F. Fuel Cock
G. ON/OFF Switch
H. Throttle
I. Fuel Tank Cap
J. Air Cleaner
K. Exhaust
L. Pull Start Handle
Pic.1 Chipper/Shredder Identification
Technical Parameter
Model
FBT220
Chipping Capacity
49.5mm
Blade Speed
2400/min
Engine Type
OHV 4-stroke
Starting System
Recoil
Displacement
212cm3
Engine Power
3.8kW
Engine Speed
3600/min
Fuel Volume
3.6L
Oil Volume
0.6L
Weight
71kg
Noise emission
Sound pressure level LpA:91.8dB(A);
Sound power level: LwA: 105,8dB(A) K=2dB(A)
Guarantee sound power level: 110 dB(A)
Fuel Type
Unleaded Gasoline
Pic.1

3
SECTION 1: SAFETY
IMPORTANT
READ CAREFULLY BEFORE USE
KEEP FOR FUTURE REFERENCE
Safe operating practices
Training
Become familiar with the owner's manual before attempting to operate this equipment.
Preparation
1) Do not allow children to operate this equipment;
2) Do not operate this equipment in the vicinity of bystanders;
3) Do not run engine powered machines in an enclosed area since the exhaust from an engine
contains carbon monoxide, which is colourless, odourless, and tasteless; carbon monoxide can be
extremely dangerous in enclosed areas;
4) Wear ear protection and safety glasses at all times while operating the machine;
5) Avoid wearing clothing that is loose fitting or that has hanging cords or ties;
6) Only operate the machine in open space (e.g. not close to a wall or other fixed object) and on a
firm, level surface;
7) Do not operate the machine on a paved or gravel surface where ejected material could cause
injury;
8) Before starting the machine, check that all screws, nuts, bolts, and other fasteners are properly
secured and that guards and screens are in place. Replace damaged or unreadable labels;
9) Use extra care in handling fuels. They are flammable and the vapours are explosive. The
following points should be observed:
use only an approved container;
Never remove the fuel cap or add fuel with the power source running. Allow engine and exhaust
components to cool before refuelling;
do not smoke;
never refuel the machine indoors;
never store the machine or fuel container inside where there is an open flame, such as a water
heater;
if fuel is spilled, do not attempt to start the power source, but move the machine away from the
area of spillage before starting;
always replace and securely tighten the fuel cap after refuelling;
If the fuel tank is drained, this should be done outdoors.
Operation
1) Before starting the machine, look into the feeding chamber to make certain that it is empty;
2) Keep your face and body away from the feed intake opening;
3) Do not allow hands or any other part of the body or clothing inside the feeding chamber,
discharge chute, or near any moving part;
4) Keep proper balance and footing at all times. Do not overreach. Never stand at a higher level than
the base of the machine when feeding material into it;
5) Always stand clear of the discharge zone when operating this machine;
6) When feeding material into the machine be extremely careful that pieces of metal, rocks, bottles,
cans or other foreign objects are not included;
7) If the cutting mechanism strikes any foreign objects or if the machine should start making any
unusual noise or vibration, shut off the power source and allow the machine to stop. Disconnect the
spark plug wire from the spark plug (electric unit disconnect from supply) and take the following
steps:
inspect for damage;
check for and tighten any loose parts ;
Have any damaged parts replaced or repaired with parts having equivalent specifications.
8) Do not allow processed material to build up in the discharge zone; this may prevent proper
discharge and can result in kickback of material through the feed intake opening;
9) If the machine becomes clogged at the inlet opening or discharge chute shut-off the power source
and disconnect the spark plug wire or remove the ignition key before clearing debris in the inlet
opening or discharge chute. Keep the power source clear of debris and other accumulations to

4
prevent damage to the power source or possible fire. Remember that operating the starting
mechanism on engine powered machines will still cause the cutting means to move;
10) keep all guards and deflectors in place and in good working condition;
11) Do not tamper with the power source governor settings; the governor controls the safe maximum
operating speed and protects the power source and all moving parts from damage caused by over-
speed. Seek authorised service if a problem exists;
12) Do not transport this machine while the power source is running;
13) Shut off the power source and disconnect the spark plug lead (electric unit disconnect from
supply) whenever you leave the work area;
14) Do not tilt the machine while the power source is running.
Mandedintenance and storage
a) When the machine is stopped for servicing, inspection, or storage, or to change an accessory,
shut off the power source, disconnect the spark plug wire from the spark plug, make sure that all
moving parts have come to a complete stop and, where a key is fitted remove the key. Allow the
machine to cool before making any inspections, adjustments, etc.
b) Store the machine where fuel vapour will not reach an open flame or spark. For extended storage
periods, run the unit dry of fuel. Always allow the machine to cool before storing;
c) When servicing the cutting means be aware that, even though the power source will not start due
to the interlock feature of the guard, the cutting means can still be moved by a manual starting
mechanism.
Additional safety instructions for units with bagging attachments
a) shut-off the power unit before attaching or removing the bag.
.
Explain symbols
Read operator's manual
Keep bystanders away
Danger - Rotating blades. Keep hands and feet out of openings while machine is
running
Wear eye and ear protection
Do not use as a step

5
SECTION 2: SET UP
Set Up Safety
This machine presents serious injury hazards to untrained users. Read through
this entire manual to become familiar with the controls and operations before
starting the machine!
Location
Site Considerations
The chipper/shredder must be placed on a firm, flat, grass or dirt surface to prevent the
machine from tipping. DO NOT place the machine on concrete, asphalt, or other hard
surfaces. The chips could bounce up from the hard surface and cause injury.
Working Clearances
Consider the length of the material to be processed through the machine and make sure
that there is enough height above the chipper/shredder to accommodate the material.
Make sure the unit is located close to the area where the chips are going to be used to
reduce carrying.
Stay clear of the discharge area. Make sure all bystanders, children, pets, or objects that
you do not want damaged or covered in chips, are clear of the discharge area.

6
Assembly
The major components of this chipper/shredder have been assembled at the factory.
Some minor assembly is required. The assembly process will use all the parts and
hardware listed in the inventory.
DO NOT attempt to start this machine until all assembly has been completed. Serious
personal injury and damage to the machine could occur.
To assemble the chipper/shredder:
1.
Tip the chipper/shredder over and remove the bolts shown in Pic.2. DO NOT turn the
chipper/shredder over once it is full of oil and gas. The oil and gas will spill out.
For fixing the leg: 3pcs Bolt M8x20, 1pc Bolt M8x200, 1pc Support Tube, 3pcs
Washer Ø8, 3pcs Locknut M8.
For fixing the wheel assembly: 2pcs Bolt M8x200, 2pcs Support Tube, 2pcs Washer
Ø8, 2pcs Locknut M8.
Pic.2 Attaching the leg
2.
Attach the wheel assembly and the leg with the bolts that were removed in Step 1.
3.
Place the handle on the hopper and line up all of the holes. Secure it with flat
washer(Ø8, 4pcs), spring washer(Ø8, 4pcs) and bolt(M8x20, 4pcs). (See Pic.3)
Pic.3 Installing the handle
4.
Place the funnel over the studs in the side of the chipper/shredder and secure it with
flat washer(Ø8, 3pcs), spring washer(Ø8, 3pcs) and locknut(M8, 3pcs). (See Pic.4)
Pic.4 Funnel installation

7
This chipper/shredder does not have oil in the motor when shipped. Add oil
before operating the chipper/shredder, or the motor will seize.
Pic.5 Fence netting installation
6.
Before operating, fill the motor with oil and gas according to the instructions.
Filling the engine oil
Place the machine on a level surface and remove the oil filler cap (Pic.5)(5.1).
Add engine oil up to the upper level of the dipstick (Pic.6)(6.1).
Filling the fuel tank
The chipper/shredder is powered by a four-stroke engine, which uses unleaded gasoline
fuel. Use a suitable funnel to transfer the fuel to the engines fuel tank, taking care not to
spill any fuel or over fill the fuel tank. The fuel tank should not be filled above the top of the
fuel filter as shown in Pic.7
5. Fit
the fence netting use the 4screws and 4 nuts. (See Pic.5)

8
Loose hair and clothing could get caught in machinery and cause serious
personal injury. Keep loose clothing and long hair away from moving machinery.
If you have never used this type of machine or equipment before, WE STRONGLY
RECOMMEND that you read books, trade magazines, or get formal training
before beginning any projects.
This chipper/shredder does not have oil in the motor when shipped. Add oil
before operating the chipper/shredder, or the motor will seize.
SECTION 3: OPERATIONS
Operation Safety
Damage to your eyes, hands, and ears could result from using this machine
without proper protective gear. Always wear safety glasses, hearing protection,
and leather gloves when operating this machine.
Chipping/Shredding
Understand and follow all of the safety precautions listed in SECTION 1: SAFETY before
operation.
This chipper/shredder is intended for mulching garden and pruning waste such as green
branches, twigs, brush, vines, and long grasses. DO NOT use this chipper/shredder for
chipping construction debris, plastic, paper products, rope or twine, or any material that
may contain metal.
Note: Remove any nails, rope, twine, or rocks that may be imbedded in roots, before
inserting material into the chipper/shredder.
To operate the chipper/shredder:
1.
Place the chipper/shredder on a flat, firm, dirt or grass surface and point the outlet in
a safe direction.
2.
Check the oil and gas levels before starting the motor.
3.
Place the bag over the chute and tie it securely in place.
4.
Make sure the hopper and funnel are empty before starting the engine. If there is
material in the hopper or funnel, the pull start cord may stop suddenly causing the
chipper/shredder to fall over, or causing injury to your hand or arm.
5.
Put on eye and ear protection, and gloves, start the chipper/shredder as instructed in the
manual, then set the throttle to fast.

9
6.
Stand to the side of the hopper and make sure you have a stable stance and firm
footing.
To start the chipper/shredder:
Turn the fuel lever to the ON position (Pic.8)(8.1).
Set the choke lever to the ON position (Pic.9)(9.1).
Turn the engine ON/OFF switch to the ON position (Pic.10)(10.1).
Hold down the engine firmly with one hand on the frame. With the other hand grip the
recoil starter cord handle and pull slowly until resistance is felt indicating that the recoil
starter is engaged. When resistance is felt pull the cord sharply (Pic.11). Continue this
procedure until the engine starts.
When the engine has been successfully started and is running smoothly return the choke
lever to the OFF position (Pic.12)(12.1).
When the engine is running, the speed can be adjusted by moving the throttle control
lever (Pic.13)(13.1) to the high (indicated by a hare), medium or low position (indicated by
a tortoise).

10
To stop the chipper/shredder:
To stop the engine, turn the engine ON/OFF switch to the OFF position (Pic.14)(14.1).
When the engine has stopped and before storage, turn the fuel lever to the OFF position
as shown in Pic.15 (15.1).
To shred twigs, leaves, and brush:
1.
Slowly pour the material into the hopper. DO NOT try to stuff too much material in at
one time or the machine will jam.
2.
Use a 1" diameter branch to push the material into the hopper if necessary (see
Pic.16). DO NOT use your hands!
Pic.16 Shredding leaves
Note: Move the throttle to the idle position, or turn the chipper/shredder OFF, when not
actively shredding or chipping.
3.
Turn OFF the machine, allow all moving parts to completely stop, and disconnect the
spark plug wire before moving the machine, emptying the bag, unclogging the inlets
or outlets, filling the gas tank, or performing maintenance and repairs.
Shredding Tips:
Feed material into the chipper/shredder slowly. If the motor begins to bog down, you
are feeding too fast.
Roots and dirty material will dull or damage the blades.

11
Remove the chips often. Allowing the chips to pile up to the outlet will cause the outlet
to clog.
Avoid shredding wet leaves or brush to reduce clogging. If you must shred wet material,
alternate wet and dry material.
To chip branches:
1.
Stand to the side of the hopper and make sure you have a stable stance and firm
footing.
2.
Remove twigs and smaller branches from the branch if they might catch on the edges
of the funnel and prevent the branch from going in.
3.
Place branches into the funnel, thick end first, and allow the blades to draw the
branch into the funnel (see Pic.17).
Pic.17 Chipping branches
4.
When finished chipping, turn OFF the machine, allow all moving parts to come to a
complete stop, and disconnect the spark plug wire before moving the machine,
emptying the bag, unclogging the inlets or outlets, filling the gas tank, or performing
maintenance and repairs.
Chipping Tips:
DO NOT feed material in excess of the diameter indicated on the funnel cover into the
funnel. Large branches will cause the motor to stall.
Chipping wood when it is green is easier on the machine. The blades will stay sharper
longer.
The chipper/shredder will work best if the blades are sharp. Rotate, sharpen, or replace
the blades as soon as chipper/shredder performance begins to deteriorate.

12
Turn OFF the machine, allow all moving parts to come to a complete stop, and
disconnect the spark plug wire before moving the machine, emptying the bag,
unclogging the inlets or outlets, filling the gas tank, or performing maintenance
and repairs.
SECTION 4: MAINTENANCE
Visual Inspection
Before and after using the chipper/shredder, closely inspect the machine for loose parts
and damage.
Check the hopper, hopper guard, and funnel for cracks, holes, and loose bolts.
Check the box frame for cracks or damage.
Check the entire machine for loose bolts or screws.
Check the blades and hammers for cracks and dings.
Check the engine oil level.
Cleaning
Clean the machine after each use. Allow the motor to cool and remove the spark plug wire.
Brush off or vacuum wood chips and wipe off the remaining dust from the exterior of the
machine with a dry cloth. DO NOT rinse off the chipper/ shredder with water. Remove any
chips or debris from the hopper and the discharge chute.
It is much harder to clean the machine if you allow it to sit for a while after use. You may
need to use an engine cleaner to remove the built up resins from the motor. Engine
cleaners are available at most auto parts stores.
Maintenance of engine
Spark Plug
After every 50 hours of running the spark plug should be removed. Check the color of the
deposits on the end of the spark plug it should be a “Tan” color. Remove all deposits using
a stiff brush a brass wire brush is ideal. Check the spark plug gap (Pic.18)(18.1) and adjust
if required. The correct gap should be 0.7 to 0.8mm.
13
Engine oil replacement
Place the machine on a level surface and warm up the engine for several minutes. Then
stop the engine.
Remove the oil filler cap (Pic.5)(5.1).
Place an oil pan under the engine. Remove the oil drain plug (Pic.5)(5.2) so that the oil
can be completely drained. You will need to use a tube or other similar device to prevent
the oil leaking onto the frame of the chipper/shredder.
Check the oil drain plug, gasket, oil filler cap and O-ring and if damaged replace.
Reinstall the oil drain plug.
Add engine oil up to the upper level of the dipstick (Pic.6)(6.1).
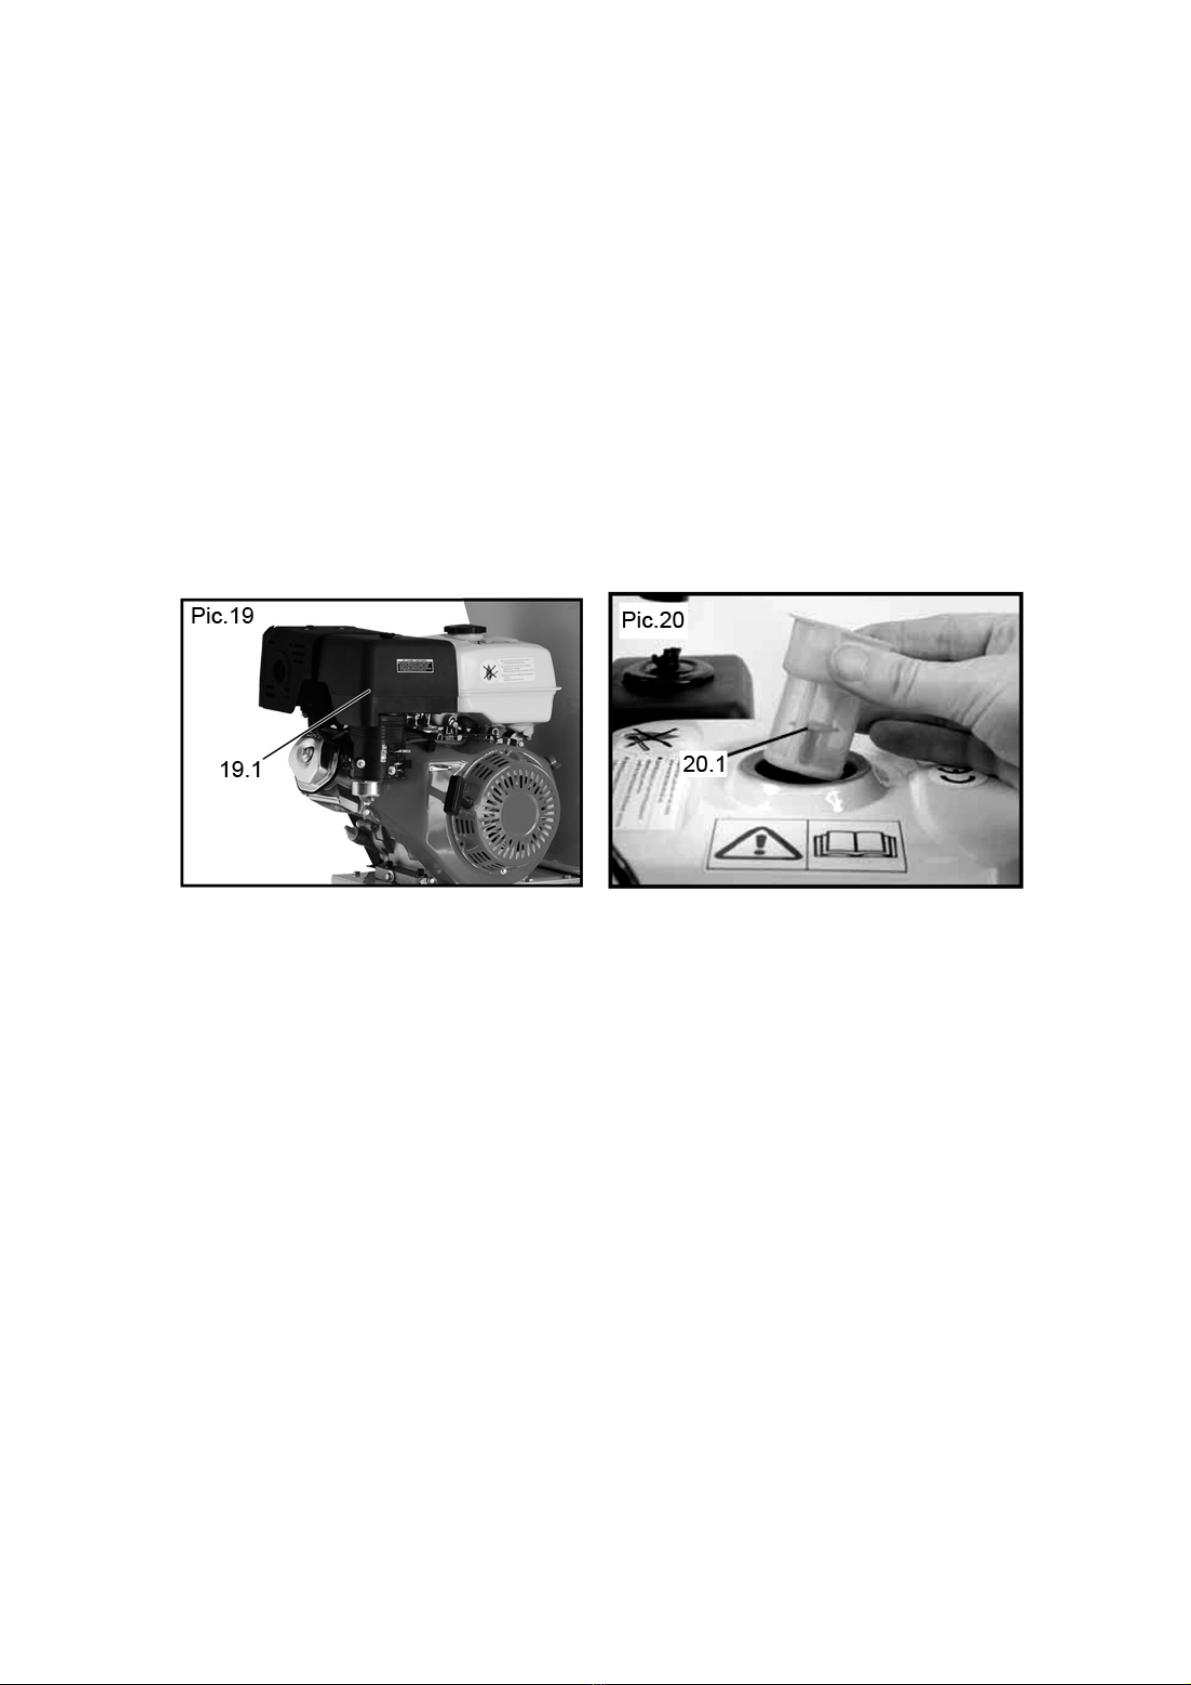
Air Filter
After every 100 hours of running or every month, the air filter (Pic.19)(19.1) should be
removed, examined for deterioration and cleaned. Clean the air filter thoroughly using
environmentally friendly water based degreasing agent. Allow to dry fully then replace the
air filter. Warning! Never run the engine without the air filter fitted.
Fuel tank filter
After every 150 hours of running or every three months the fuel tank filter (Pic.20)(20.1)
should be removed and cleaned. Remove the fuel tank filler cap and the filter, clean the
filter thoroughly using environmentally friendly water based degreasing agent and re-fit.
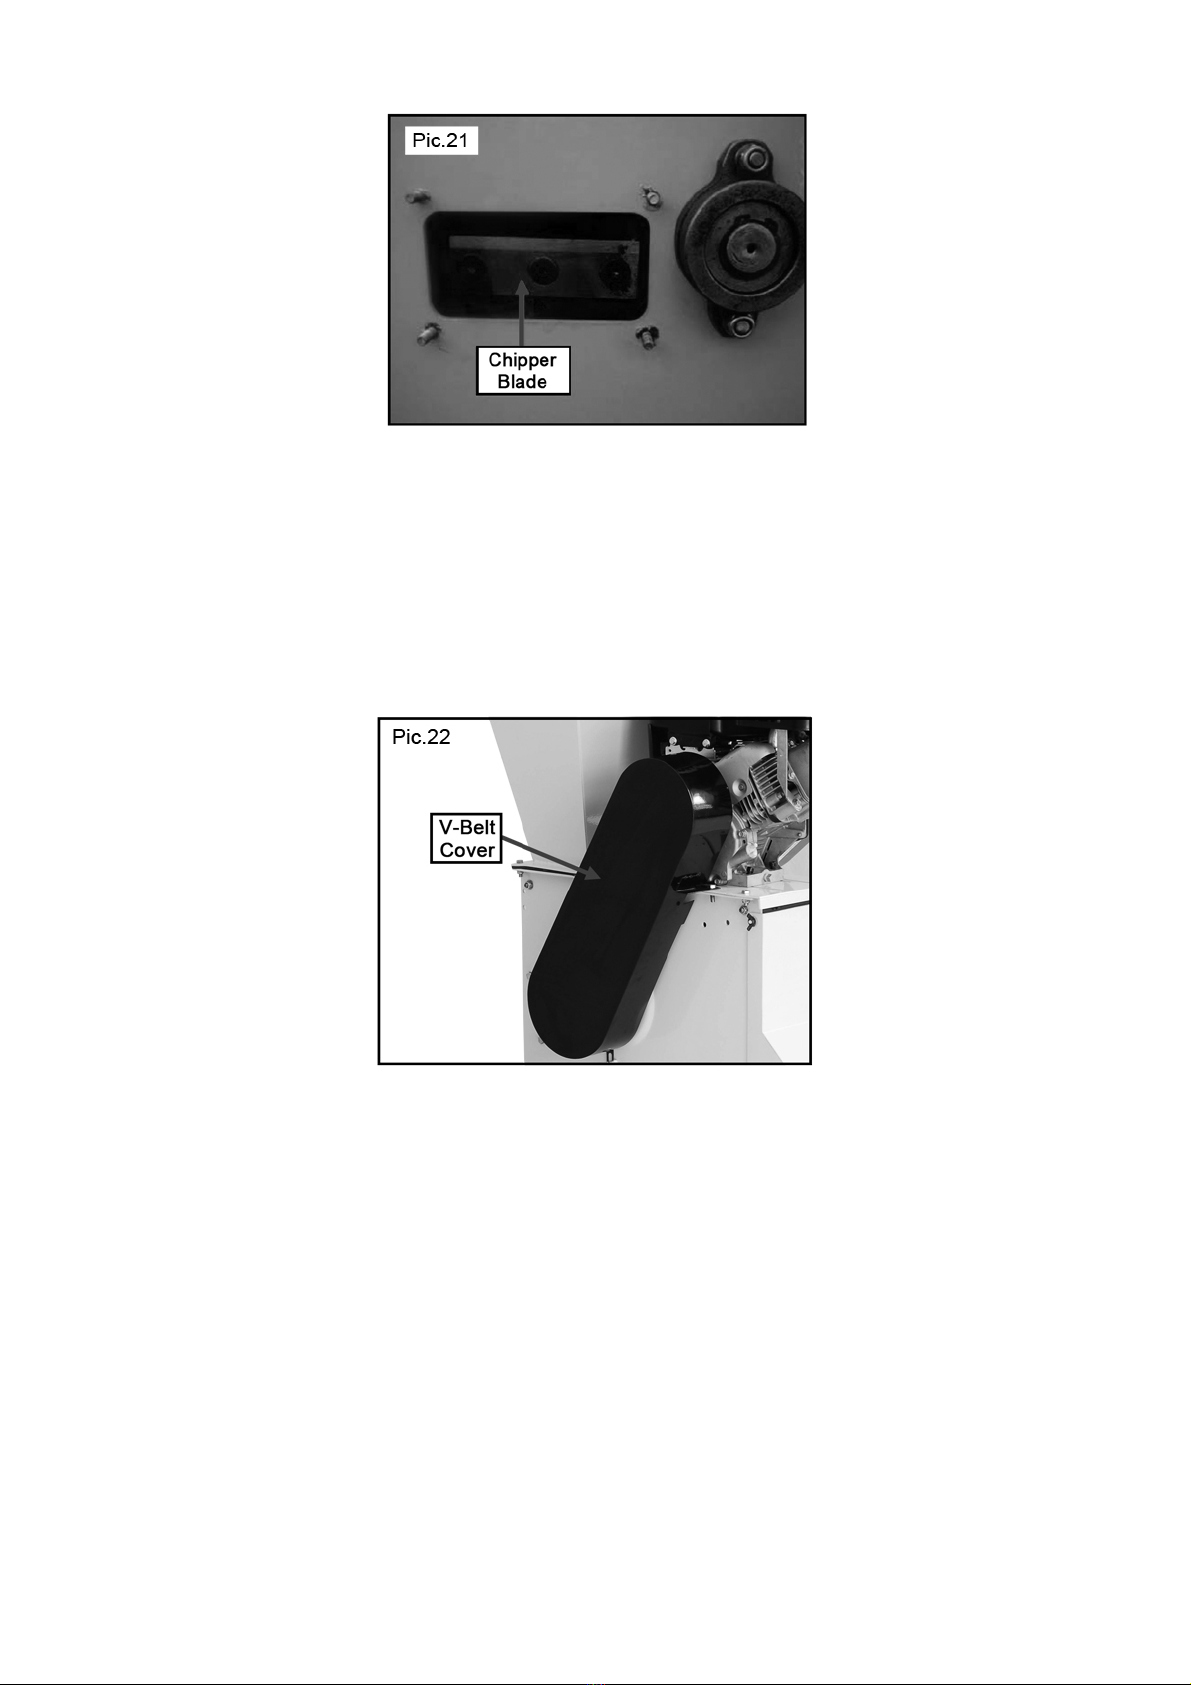
Replacing Blades
Sharpen or replace the blades as soon as the chipping performance begins to deteriorate,
or if you notice dings, chips, or cracks.
To perform this procedure:
1.
TURN OFF THE MACHINE, ALLOW ALL MOVING PARTS TO COME TO A
COMPLETE STOP, AND DISCONNECT THE SPARK PLUG WIRE!
2.
Remove the side cover plate to expose the blades. (See Pic.21)
3.
Remove one blade, rotate the impeller, and remove the second blade.
4.
Have the original blades professionally sharpened, or order a replacement set, then
re-install the blades.
5.
Replace the side cover plate and re-attach the spark plug wire.
14
Pic.21 Chipper blade
Replacing V-Belt
Replace or tighten the V-belt if you notice the motor running and the chipper blades
are not spinning.
To perform this procedure:
1.
TURN OFF THE MACHINE, ALLOW ALL MOVING PARTS TO COME TO A
COMPLETE STOP, AND DISCONNECT THE SPARK PLUG WIRE!
2.
Remove the V-belt cover as shown in Pic.22.
3.
Roll the belt off of the pulleys and install the new belt.
4.
Replace the V-belt cover and re-attach the spark plug wire.
Storage
Follow these guidelines when storing your chipper/shredder.
Remove the spark plug wire to prevent unauthorized starting.
Empty the bag before storing to keep the mulch from rotting in the bag.
Place the chipper/shredder in a dry, level area. If the chipper/shredder is tipped it may
leak oil and gas.
DO NOT store the chipper/shredder near an ignition source, such as a wood stove, gas
or electric heater, or an appliance or heater with a pilot light.
Store the chipper/shredder in a well ventilated area. DO NOT store the
chipper/shredder in an area that will allow toxic gas fumes into areas inhabited by
humans or animals.

15
Close the discharge chute deflector and place the covers over the hopper and the
funnel to prevent objects or critters from getting into the machine.
If the engine is not to be used or is to be stored for more than one month the following
storage procedure should be carried out. Drain all the fuel from the fuel tank and the
carburetor ensure that all the fuel has been removed. Remove the spark plug and
pour approximately one tablespoon full of clean engine oil into the spark plug hole.
With the ignition turned OFF gently pull on the recoil starter cord several times. Re-fit
the spark plug continue to pull the recoil starter cord until the piston is on the
compression stroke (when resistance is felt) then stop pulling.

16
SECTION 5: SERVICE
Review the troubleshooting and procedures in this section to fix your machine if a problem
develops.
Troubleshooting
Symptom
Possible Cause
Possible Solution
Engine will not start.
1.
Control levers are not in correct
positions for starting.
2.
Spark plug wire is not connected
to the spark plug, or the spark plug
is bad.
3.
No gas, or gas is old and stale.
4.
Air filter is dirty.
5.
Engine oil is low.
6.
Blocked fuel line.
1. Make sure the ON/OFF switch is ON, the
fuel shut-off valve is open, and the choke and
throttle controls are in the start position.
.2. Connect the spark plug wire or replace the
spark plug.
3.
If empty, fill the tank. If full, drain the gas,
then fill the tank with fresh gas.
4.
Clean out the air filter.
5.
Add oil to the engine.
6.
Clean out the fuel line.
Engine does not
run smoothly.
1.
Engine is warm, and the choke is
still in the CHOKE position.
2.
Air filter is dirty.
3.
Stale fuel, water or dirt in fuel,
blocked fuel line.
1.
Move the choke to the RUN position.
2.
Clean the air filter.
3.
Drain the fuel tank, clean out the fuel line,
and fill the tank with fresh gas.
Engine overheats.
1.
Chips and sawdust around the
motor.
2.
Dirty air filter.
1.
Clean off the motor.
2.
Clean out the air filter.
Machine vibrates or
makes unusual noises.
1.
Loose or damaged parts.
2.
Impeller or blades have woody
residue or chunks stuck to them.
1.
Check the blades, hammers, impeller, and
all connections. Tighten, repair, or replace
any loose or damaged parts.
2.
Clean the impeller and blades.
Chipper/shredder no
longer chips or shreds
well.
1.
Dull or damaged blades and
hammers.
2.
Loose, worn, or damaged V-belt.
1.
Sharpen or replace blades and check the
hammers for damage.
2.
Replace or tighten V-belt.
Chips do not come out
of the discharge chute
or come out slowly.
1.
Discharge chute or hopper is
clogged.
2.
Insufficient motor RPM's.
1. Turn OFF the motor, disconnect the spark
plug, then clean out the machine
2. Move the throttle to FAST.
Turn OFF the machine, allow all moving parts to come to a complete stop, and
disconnect the spark plug wire before moving the machine, emptying the bag,
unclogging the inlets or outlets, filling the gas tank, or performing maintenance
and repairs.

17
SECTION 6: CE DECLARATION
BUILDER SAS
32 rue Aristide Berges -Z1 31270 Cugnaux - France
Tel: +33 (0) 5.34.508.508 Fax: +33 (0) 5.34.508.509
Declares that the machinery designated below:
PETROL SHREDDER
FBT220
Serial number: 20210454963-20210454982
20210640968-20210640987
Is in conformity with the requirements of the Directive Machine 2006/42/EC and to the followings
Europeans Directives: EMC Directive 2014/30/EU
Directive 2000/14/CE Annex VI, 2005/88/EC
Emission directive (EU) 2016/1628 & 2018/989/EU
This tool is also in conformity with the following these standards:
EN 13683:2003+A2:2011, EN 55012:2007+A1:2009, EN 61000-6-1:2007
Sound power level: LwA: 105,8dB(A)
K=2dB(A)
Guarantee sound power level: 110 dB(A)
Responsible of the technical file: Olivier PATRIARCA
Cugnaux, 19/04/2021
Philippe MARIE / PDG

WARRANTY
The manufacturer guarantees the product against defects in material and workmanship for a period of 2
years from the date of the original purchase. The warranty only applies if the product is for household use.
The warranty does not cover breakdowns due to normal wear and tear.
The manufacturer agrees to replace parts identied as defective by the designated distributor. The
manufacturer does not accept responsibility for the replacement of the machine, in whole or in part , and/or
ensuing damage.
The warranty does not cover breakdowns due to:
• insucient maintenance.
• abnormal assembly, adjustment or operations of the product.
• parts subject to normal wear and tear.
The warranty does not extend to:
• shipping and packaging costs.
• using the tool for a purpose other than that for which it was designed.
• the use and maintenance of the machine done in a manner not described in the user manual.
Due to our policy of continuous product improvement, we reserve the right to alter or change specications
without notice. Consequently, the product may be dierent from the information contained therein, but a
modication will be undertaken without notice if it is recognized as an improvement of the preceding
characteristic.
READ THE MANUAL CAREFULLY BEFORE USING THE MACHINE.
When ordering spare parts, please indicate the part number or code, you can nd this in the spare parts list
in this manual. Keep the purchase receipt; without it, the warranty is invalid. To help you with your product,
we invite you to contact us by phone or via our website:
• +33 (0)9.70.75.30.30
• https://services.swap-europe.com/contact
You must create a "ticket" via the web platform.
• Register or create your account.
• Indicate the reference of the tool.
• Choose the subject of your request.
• Describe your problem.
• Attach these les: invoice or sales receipt, photo
of the identication plate (serial number), photo
of the part you need (for example: pins on the
transformer plug which are broken).
18
SECTION7:WARRANTY

WHAT TO DO IF MY MACHINE BREAKS DOWN?
the repairer will refuse the machine.
Go to the store with the complete machine and with the receipt or invoice.
the repairer will refuse the machine.
c) Create a SWAP-Europe service ticket on the site: https://services.swap-europe.com When making the
request on SWAP-Europe, you must attach the invoice and the photo of the nameplate (serial number).
d) Contact the repair station to make sure it is available before dropping o the machine.
Go to the repair station with the complete machine packed, accompanied by the purchase invoice and the
station support sheet downloadable after the service request is completed on the SWAP-Europe site
For machines with engine failure from manufacturers BRIGGS & STRATTON, HONDA and RATO, please
refer to the following instructions.
Repairs will be done by approved engine manufacturers of these manufacturers, see their site:
• http://www.briggsandstratton.com/eu/fr
• http://www.honda-engines-eu.com/fr/service-network-page;jsessionid=5EE8456CF39CD572AA2AEEDFD
290CDAE
• https://www.rato-europe.com/it/service-network
Please keep your original packaging to allow for after-sales service returns or pack your machine
with a similar cardboard box of the same dimensions.
For any question concerning our after-sales service you can make a request on our website https://
services.swap-europe.com
Our hotline remains available at +33 (9) 70 75 30 30.
If you bought your product in a store:
a) Empty the fuel tank if your product has one.
b) Make sure that your machine is complete with all accessories supplied, and clean! If this is not the case,
If you bought your product on a website:
a) Empty the fuel tankif your product has one.
b) Make sure that your machine is complete with all accessories supplied, and clean! If this is not the case,
SECTION8: PRODUCT FAILURE
19

THE WARRANTY DOES NOT COVER:
• Start-up and setting up of the product.
• Damage resulting from normal wear and tear of the product.
• Damage resulting from improper use of the product.
• Damage resulting from assembly or start-up not in accordance with the user manual.
• Breakdowns related to carburetion beyond 90 days and fouling of carburetors.
• Periodic and standard maintenance events.
• Actions of modication and dismantling that directly void the warranty.
• Products whose original authentication marking (brand, serial number) has been degraded, altered or
withdrawn.
• Replacement of consumables.
• The use of non-original parts.
• Breakage of parts following impacts or projections.
• Accessories breakdowns.
• Defects and their consequences linked to any external cause.
• Loss of components and loss due to insucient screwing.
• Cutting components and any damage related to the loosening of parts.
• Overload or overheating.
• Poor power supply quality: faulty voltage, voltage error, etc.
• Damages resulting from the deprivation of enjoyment of the product during the time necessary for repairs
and more generally the costs related to the immobilization of the product.
• The costs of a second opinion established by a third party following an estimate by a SWAP-Europe repair
station
• The use of a product which would show a defect or a breakage which was not the subject of an immediate
report and/or repair with the services of SWAP-Europe.
• Deterioration linked to transport and storage*.
• Launchers beyond 90 days.
• Oil, petrol, grease.
• Damages related to the use of non-compliant fuels or lubricants.
* In accordance with transport legislation, damage related to transport must be declared to carriers within 48
hours maximum after observation by registered letter with acknowledgement of receipt.
This document is a supplement to your notice, a non-exhaustive list.
Attention: all orders must be checked in the presence of the delivery person. In case of refusal by the
delivery person, it you must simply refuse the delivery and notify your refusal.
Reminder: the reserves do not exclude the notication by registered letter with acknowledgement within 72
hours.
Information:
Thermal devices must be wintered each season (service available on the SWAP-Europe site). Batteries must
be charged before being stored.
SECTION9: WARRANTY EXCLUSIONS
20
Table of contents
Other Feider Paper Shredder manuals


