Feixun FWR-714N User manual


Copyright Statement
Feixun is the registered trademark of Shanghai Feixun Communication Co.,Ltd. Other
trademark or trade name mentioned herein are the trademark or registered trademark of the
company. Copyright of the whole product as integration, including its accessories and software,
belongs to Shanghai Feixun Communication Co.,Ltd. Without the permission of Shanghai
Feixun Communication Co.,Ltd., individual or party is not allowed to copy, plagiarize, imitate or
translate it into other languages.
All the photos and product specifications mentioned in this manual are for references only, as
the upgrading of software and hardware, there will be changes. And if there are changes, Feixun
is not responsible for informing in advance. If you want to know more about our products
information, please visit our website at www.feixun.com.cn

Table of Contents
i
300Mbps Wireless N Rouer
CONTENTS
Introduction………………………………………………………………………………… 1
Product Overview……………………………………………………1
Main Features ………………………………………………………3
Installation…………………………………………………………………………………… 5
Physical Connection …………………………………………………5
Configure the Computers IP Address ………………………………5
Setup Wizard…………………………………………………………8
Router Configuration …………………………………………………………………11
Basic Setting ……………………………………………………… 11
WAN Interface Settings ……………………………………………………… 11
Wireless Settings …………………………………………………………… 12
Wireless Security Settings …………………………………………………… 13
Expert Setting …………………………………………………… 14
Network Settings …………………………………………………………… 15
Operating Mode…………………………………………………………… 15
LAN Interface Settings …………………………………………………… 16
WAN Interface Settings …………………………………………………… 16
PPTP VPN Server…………………………………………………………… 16
MAC Address Cloning……………………………………………………… 17
Wireless Settings …………………………………………………………… 18
Basic Settings ……………………………………………………………… 18
Wireless Security Settings ………………………………………………… 18
Wireless MAC Address Filtering …………………………………………… 18
Advanced Wireless Settings ……………………………………………… 19
Wireless Client List ………………………………………………………… 20
WPS Settings ……………………………………………………………… 20
WDS Settings ……………………………………………………………… 21
DHCP Server ………………………………………………………………… 23

Table of Contents
ii
300Mbps Wireless N Rouer
DHCP Service ……………………………………………………………… 23
Static Address Allocation ………………………………………………… 24
DHCP Client List …………………………………………………………… 24
Forwarding Rule……………………………………………………………… 24
Port Forwarding …………………………………………………………… 25
Port Triggering Settings…………………………………………………… 25
DMZ Host ………………………………………………………………… 27
UPnP Settings……………………………………………………………… 28
Multicast Forwarding Settings …………………………………………… 28
Security Options……………………………………………………………… 28
Security Settings…………………………………………………………… 28
Advanced Security Settings ……………………………………………… 29
LAN Web Management …………………………………………………… 30
Remote Web Management ……………………………………………… 30
Access Control ……………………………………………………………… 31
MAC/IP/Port Filter Settings ……………………………………………… 31
Web URL Filtering ………………………………………………………… 31
Routing Settings……………………………………………………………… 32
Static Routing Table ……………………………………………………… 32
Dynamic Routing Settings ………………………………………………… 32
IP Bandwidth Control………………………………………………………… 33
IP Bandwidth Control Settings …………………………………………… 33
IP Bandwidth Control List ………………………………………………… 33
Dynamic DNS Settings ……………………………………………………… 34
System Tools ………………………………………………………………… 34
Network Time Settings …………………………………………………… 35
Diagnosis Tools …………………………………………………………… 35
Load Default Settings……………………………………………………… 37
Export and Load Settings ………………………………………………… 37
Reboot …………………………………………………………………… 37
System Settings …………………………………………………………… 38

Table of Contents
iii
300Mbps Wireless N Rouer
System Log………………………………………………………………… 38
Traffic Statistics …………………………………………………………… 38
Setup Wizard……………………………………………………… 39
Software Upgrade ……………………………………………… 39
Software Update …………………………………………………………… 39
Logout …………………………………………………………… 39
Specification ………………………………………………………………………………40
Appendix A: Troubleshooting ……………………………………………………41
Appendix B: Certification……………………………………………………………43
FCC Statement …………………………………………………… 43
CE Mark Warning ………………………………………………… 44
Appendix C: Glossary …………………………………………………………………45
Appendix D: Technical Support …………………………………………………47

1
300Mbps Wireless N Rouer
Chapter1: Introduction
Introduction
Product Overview
Thank you for choosing FWR-714N Wireless N Router.
FWR-714N 300Mbps Wireless N Router is an all-in-one router, ideal for home and SOHO users to
share broadband Internet connection over the wired and wireless network. With the speed of
up to 300Mbps, it can provide users with extraordinary smooth internet surfing, internet phone
calling, on-line gaming, and HD video streaming. Moreover, by adopting two external Omni-
directional antennas and MIMO technology, FWR-714N could greatly increases the wireless
range & sensitivity, which enables you to receive wireless signals in the farthest corner of your
home or office. And you can quickly setup the security at a simple push of the “WPS” (Wi-
Fi Protected Setup) button on the fashionable designed router, preventing your device from
potential internet attacks.
Front Panel
Power WLAN WPS WAN 1 3 42
Power LED: The Power LED lights up when the Router is powered on. When the Router goes
through its self-diagnostic mode during every boot-up, the LED flashes. When the diagnostic is
complete, the LED is continuously lit.
WLAN LED: The Wireless LED lights up when the wireless feature is enabled. It flashes when

2
300Mbps Wireless N Rouer
Chapter1: Introduction
the Router sends or receives data over the wireless network.
Wi-Fi Protected Setup (WPS) LED: If you have client devices, such as wireless adapters,
that support Wi-Fi Protected Setup, then you can use the Wi-Fi Protected Setup button to
automatically configure wireless security for your wireless network. To use Wi-Fi Protected
Setup, refer to the section of Wi-Fi Protected Setup.
WAN: The Internet LED lights up when there is a connection made through the Internet port. It
flashes to indicate network activity over the Internet port.
LED (1-4): These LEDs are corresponding with the LAN ports on the rear panel. The LED is
continuously lit when the Router is connected to a device through that port. It flashes to
indicate network activity over that port.
LED Status Description
Power On Power is on
Off Power is off
WLAN On Wireless network is switched on
Off Wireless LAN is disabled
Blink Data is transmitting
WPS
Off WPS function is disabled
Blink A wireless device is connecting to the network by WPS function.This
process will last in the first 2 minutes
On A wireless device has been successfully connected to the network by
WPS function
WAN On Internet is connected
Off Internet is unconnected
Blink Data is transmitting
LAN (Port 1-4) On LAN port is connected
Off LAN port is unconnected
Blink Data is transmitting

3
300Mbps Wireless N Rouer
Chapter1: Introduction
Rear Panel
ResetWANLAN 1~4 WPSPowerON/OFF
Reset: Long press and hold the button for 8 seconds, the Router will reboot to its factory
default settings.
WPS: Press the button and the WPS LED in front panel flashing, WPS function is enabled.
WAN: Using an Ethernet cable (also called a network or Internet cable), the Internet port
connects the Router to your Internet connection, which is typically a cable or Digital Subscriber
Line (DSL) modem.
LAN(1~4): Using Ethernet cables, these Ethernet ports (4, 3, 2, 1) connect the Router to
computers and other Ethernet network devices on your wired network.
Power: The Power port connects to the included power adapter.
ON/OFF: The power on/off button.
Main Features
• 4 LAN ports and 1 WAN port
• Wireless N speed up to 300Mbps, ideal for internet surfing, on-line gaming and HD video
streaming
• MIMO technology greatly increases the wireless range, sensitivity and stability
• Multi-SSID allows users to create multiple networks, and distributes access privilege of each

4
300Mbps Wireless N Rouer
Chapter1: Introduction
network
• QoS controls the reasonable allocation of bandwidth to achieve optimum utilization,
ensuring reliable Internet connection
• Quick wireless security setup by simply pressing the WPS button
• WDS wireless bridge provides seamless bridging to expand your wireless network
• Built-in firewall featured with IP, MAC, URL filtering and ARP attack prevention to protect
your PC
• Backward compatible with 802.11b/g product
• Setup wizard simplifies installation and configuration

5
Chapter2: Installation
300Mbps Wireless N Rouer
Installation
Physical Connection
12
PC
Modem
Internet
Power Socket
654
3
Router
WAN WPS RSTON/OFFPWR LAN4 LAN3 LAN2 LAN1
Note:
• Actual product may be different as the picture, but the installation will be the same.
• Please use the included power adapter. Use of a different power adapter could cause
damage and void the warranty for this product.
• Please ensure the Power, LAN and WAN lights are ON when the installation finished
successfully.
Configure the Computers IP Address
After connecting your PC to the router, you need to configure your PCs IP address.
For Windows XP/2000
1. Click Start>Control Panel.

6
Chapter2: Installation
300Mbps Wireless N Rouer
2. Select and double click Network Connection.
3. Right click Local Area Connection and then select Properties.

7
Chapter2: Installation
300Mbps Wireless N Rouer
4. Select Internet Protocol (TCP/IP) and click Properties.
5. Select Obtain an IP address automatically andObtain DNS server address
automatically. Then click OK.
For Windows Vista/7
1. Click Start>Control Panel.
2. Click View network status and tasks and then click Manage network connection

8
Chapter2: Installation
300Mbps Wireless N Rouer
(Change adapter settings for Windows 7).
3. Right click Local Area Connection and then click Properties.
4. Select Internet Protocol Version 4 (TCP/IPv4) and click Properties.
5. Select Obtain an IP address automatically andObtain DNS server address
automatically. Then click OK.
Setup Wizard
After successful installation, now you can go ahead with connecting to the internet, the
operations are as following:
1. Open your web browser and enter 192.168.0.1.
2. You are prompt to enter the Username/Password (preset as admin/admin) which you can
found on the label at the bottom of your router, and then click Login.
3. After a successful login, the following page will appear. Click Next.
9
Chapter2: Installation
300Mbps Wireless N Rouer
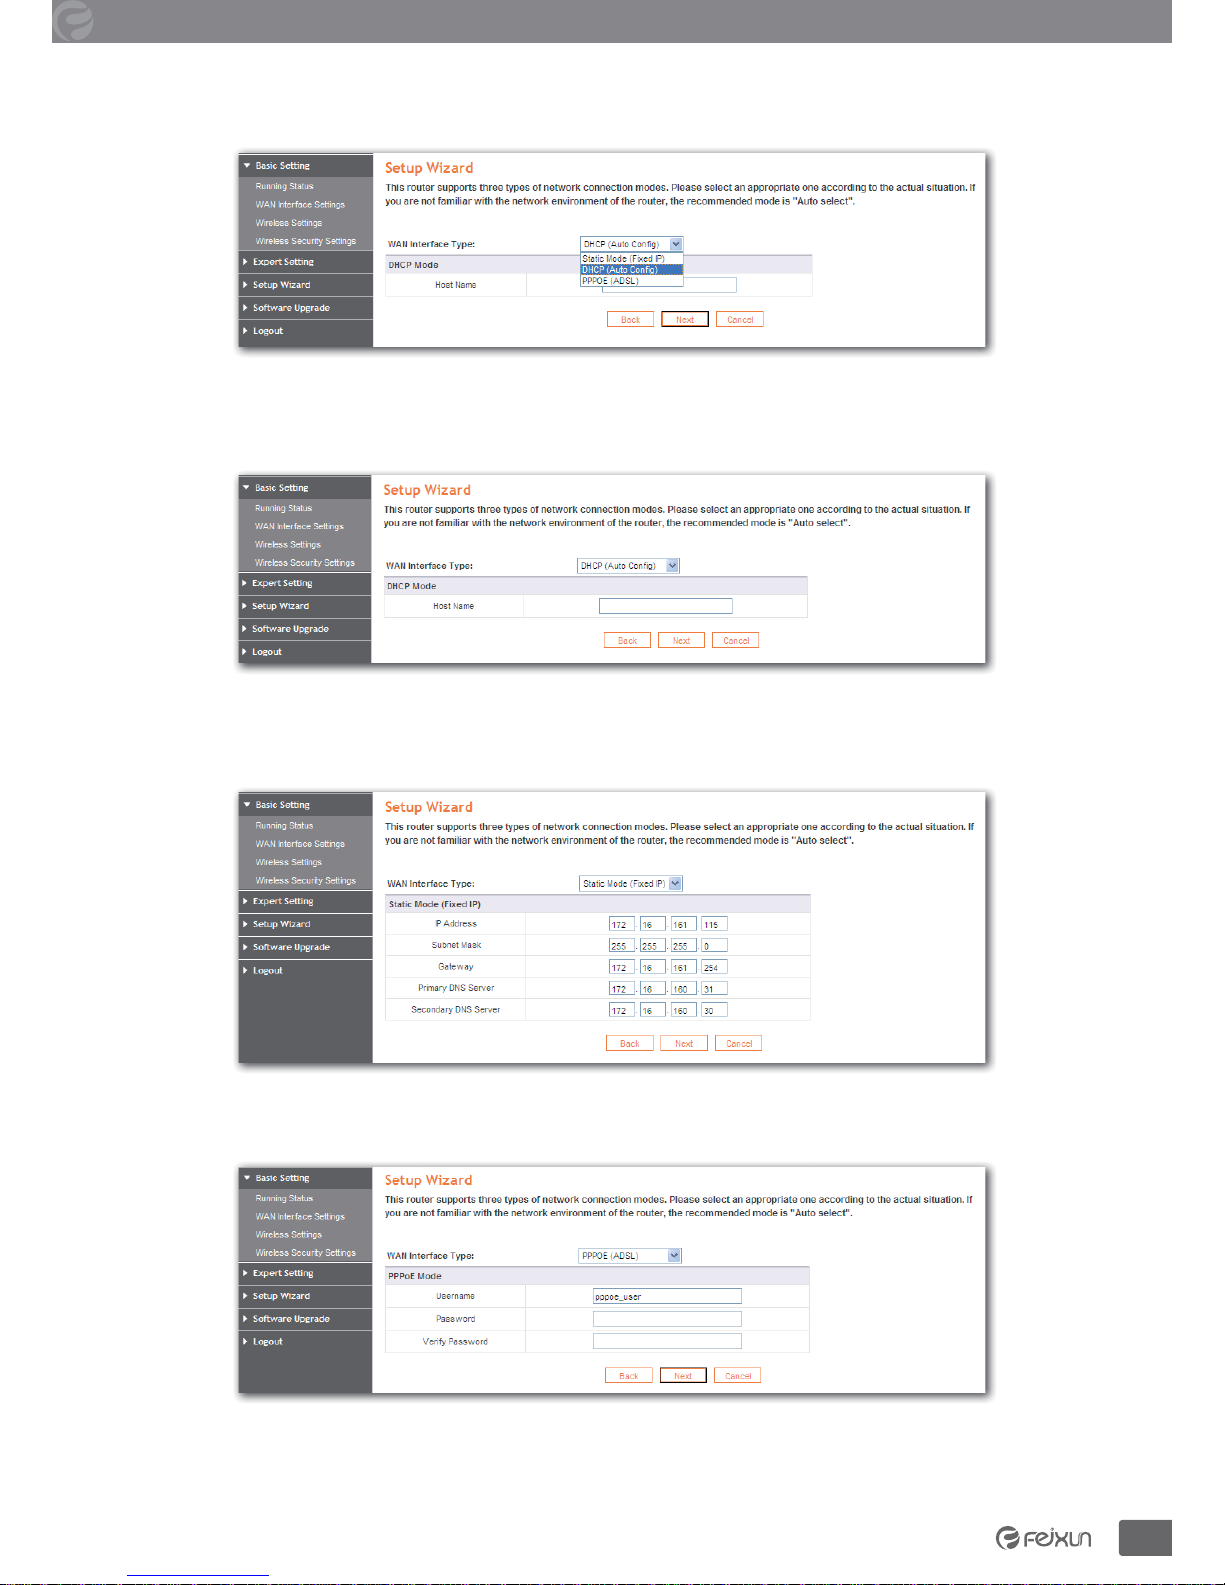
4. You are prompted to select your WAN interface type, there are three types available: DHCP,
Static IP andPPPoE.
a. Select Dynamic IP (DHCP) if your ISP does not give you any IP numbers to use.
This option is commonly used for cable modem services. Router will obtain IP address
information automatically. In this case, no need to input anything but click Next.
b. Select Static IP if all the internet ports IP information is provided to you by your ISP, you
will need to enter in the IP address, subnet mask, gateway address and DNS address, and
then click Next.
c. PPPoE is typically used for DSL services. Select PPPoE and fill the Username and Password
information provided by your ISP, and then click Next.

Chapter2: Installation
10
300Mbps Wireless N Rouer
5. In this page, please set the Wireless Network Name (SSID), Mode, Wireless Security, click
Next.
6. Click Finish, you would successfully access to the internet.

11
Chapter 3: Router Configuration
300Mbps Wireless N Rouer
Router Configuration
You will see the five main menus on the left of the web-based utility. On the right, there are
the corresponding explanations and instructions. The Status page provides the current status
information about the Router. All information is read-only.
Basic Setting
The basic setting section configures the Router to your Internet connection. Most of this
information can be obtained through your Internet Service Provider (ISP).
WAN Interface Settings

12
Chapter 3: Router Configuration
300Mbps Wireless N Rouer
WAN Interface Connection Type:
Dynamic IP: Obtain the IP address automatically assigned by the DHCP server from the ISP.
Static IP: Have a static IP address provided by the ISP.
PPPoE: Access the Internet by virtual ADSL dialup.
L2TP: Layer 2 Tunneling Protocol (L2TP) is a service applies to connections in Israel only.
PPTP: Point-to-Point Tunneling Protocol (PPTP) is a service applies to connections in Europe
only.
Select the connection type according to the information provided by your Internet Service
Provider (ISP), and fill in the information accordingly.
Wireless Settings
The basic settings for wireless networking are set on this screen. In this page, you can set the
basic network parameters of the wireless network of the router.

13
Chapter 3: Router Configuration
300Mbps Wireless N Rouer
Wireless Status: If you do not have any other wireless devices in your network, select
Wireless Disabled.
Wireless Network Name (SSID): The name of routers wireless network. The wireless work
station must keep the same SSID name with the APs for connections. By select Hidden or
Isolated, the device can open or close to search available APs.
Mode: From this drop-down menu, you can select the wireless standards running on your
network:
• 11b /g /n - M i x e d : If you have only Wireless-G Wireless-N and Wireless-B devices in your
network, select 11b /g /n - M i x e d .
• 11b /g - M i x e d : If you have only Wireless-G and Wireless-B devices in your network, select
11b/g-Mixed.
• Wireless-G Only: If you have only Wireless-G devices, select Wireless-G Only.
• Wireless-B Only: If you have only Wireless-B devices, select Wireless-B Only.
Channel: You can use the channel same as the AP. By enabling Open Scanning button to
find out the available APs channel.
SSID Broadcast: Select enable to enable the devices SSID to be visible by wireless clients.
BSSID: It is a 48-bit identity used to identify a particular BSS (Basic Service Set) within an
area. In Infrastructure BSS networks, the BSSID is the MAC (Medium Access Control) address
of the AP.
Frequency Bandwidth: Select wireless work frequency 20M or 20/40M.
Save: Click the Save button to save your setting.
Wireless Security Settings
The wireless security settings configure the security of your wireless network(s). Six wireless
security modes, WEP, WPA-Personal, WPA2-Personal, WPA-Enterprise, WPA2-Enterprise and
RADIUS, are supported. If you do not want to use wireless security, select Disable from the
drop-down menu.
WIRELESS NETWORK NAME (SSID): Select SSID to be configured security. The device

14
Chapter 3: Router Configuration
300Mbps Wireless N Rouer
supports to configure different security classes between the main SSID and the subordinate
SSID.
Security Mode: There are several different security modes; you can choose one from
disable, open, share, WEPAUTO, WPA-PSK WPA2-PSK, and WPA-PSK/WPA2-PSK etc..
The operations of each security mode are as following:
• Mode 1: Security Mode > Disable
If you do not want to use wireless security, check this radio button.
• Mode 2: Security Mode > Open/Share/ WEPAUTO
It is based on the IEEE 802.11 standard. If you check this radio button, you will find a
notice in red as show in Figure 4-18. You can choose the type for the WEP security on
the pull-down list. You can select Shared Key or Open System authentication type
automatically based on the wireless stations capability and request.
Default Key: Select a valid encryption key.
WEP Key 1, 2, 3, 4: Enter the WEP key here. Please note that the key should be in
accordance with the key format and be valid. The key should beASCII Characters or
Hexadecimal Digits.
Note: If you do not set the key, the wireless security function is still disabled even if
you have selected Shared Key as the Authentication Type.
• Mode 3: Security Mode>WPA-Personal/WPA2-Personal
WPA PSK (Wi-Fi Protected Access): A Wi-Fi standard is a more recent wireless
encryption scheme, designed to improve the security features of WEP. It applies
more powerful encryption types (such as TKIP [Temporal Key Integrity Protocol] or
AES [Advanced Encryption Standard]) and can change the keys dynamically on every
authorized wireless device.
WPA Algorithms: Select one encryption type, AES or TKIP. (AES is stronger than TKIP)
Pass Phrase: Default as 12345678, please enter a new key (8-63 ASCII characters).
Key Renewal Interval: It is to tell how often the Router changes key. The default time is
3600s; do not change it unless it is necessary.
Note: To improve security level, do not set the keyword with words that can be found
in a dictionary or too easy to remember.
Expert Setting
Expert Setting enables users to realize many advanced funtions of the router. Under this menu,
there are ten submenus as follow:

15
Chapter 3: Router Configuration
300Mbps Wireless N Rouer
Network Settings
There are five submenus under the Network Setting menu as shown below. Click any of
them, and you will be able to configure the corresponding function.
• Operating Mode
This page is used to set the operating mode of the device. Please choose Bridge mode or
router mode according to your requirement; When the NAT is enabled, it can provide the
transfer of internal / external networks addresses for the LAN and wireless networks. You
can choose the mode for the router on the pull-down list.
Table of contents
Popular Wireless Router manuals by other brands

ZyXEL Communications
ZyXEL Communications NBG-4615 Specifications

Sapido
Sapido RB-1830 user manual

NETGEAR
NETGEAR WNR612v2 - Wireless-N 150 Router datasheet

D-Link
D-Link DIR-615S Quick installation guide

D-Link
D-Link DIR-810L Quick install guide

Duratech
Duratech WIFI MODULE Installation instructions manual


