Felix Storch Summit LD2444 User manual

LD2444
4.4 CU. FT. HEAT PUMP DRYER

SAFETY AND PRECAUTIONS.................................................................2
WHAT YOU NEED TO KNOW ABOUT SAFETY INSTRUCTIONS................................2
IMPORTANT SAFETY SYMBOLS AND PRECAUTIONS............................................2
IMPORTANT SAFETY INSTRUCTIONS.................................................................2
INSTALLATION REQUIREMENTS.........................................................6
IMPORTANT TO INSTALLER...............................................................................6
BASIC REQUIREMENTS.....................................................................................6
LOCATION REQUIREMENTS..............................................................................6
STACK KIT INSTALLATION INSTRUCTION..........................................................10
DRAIN SYSTEM...............................................................................................12
ELECTRIC REQUIREMENTS...............................................................................12
GROUNDING..................................................................................................14
REPLACEMENT PARTS AND ACCESSORIES.........................................................14
INSTALLATION INSTRUCTION............................................................14
REMOVING FROM THE PACKAGE.....................................................................15
PARTS IDENTIFICATION...................................................................................15
TOOLS NEEDED IN INSTALLATION....................................................................16
INSTALLATION STEPS......................................................................................16
OPERATING INSTRUCTION..................................................................20
CONTROL PANEL............................................................................................20
DRYING A LOAD OF LAUNDRY........................................................................ .22
FILTER CLEAN.................................................................................................25
SPECIAL LAUNDRY TIPS...................................................................................27
MAINTENANCE........................................................................................28
CARE AND MAINTENANCE.............................................................................28
TROUBLESHOOTING INSTRUCTIONS..............................................29
CHECK THESE SOLUTIONS IF YOUR DRYER…...................................................29
ERROR CODES...............................................................................................31
APPENDIX.....................................................................................................32
CONTENTS
1
SAFETY AND PRECAUTIONS
SAFETY AND PRECAUTIONS
2
Introduction
Congratulations on the purchase of your new Insignia dryer. Insignia dryers feature
the latest in design and capabilities and will provide reliable and trouble-free
performance.
WHAT YOU NEED TO KNOW ABOUT SAFETY INSTRUCTIONS
This manual contains important information on the installation, use, and care of
your appliance. Please read this manual carefully before installation and operation
of this machine to prevent injury and property damage.
Warnings and Important Safety Instructions in this manual DO NOT cover all
possible conditions and situations that may occur. It is your responsibility to use.
IMPORTANT SAFETY SYMBOLS AND PRECAUTIONS
WARNING
CAUTION
This indicates that hazards or unsafe practices may cause
serious personal injury or death.
To reduce the risk of fire, explosion, electric shock, or
personal injury when using your dryer, these basic safety
precautions SHOULD be followed.
This indicates that hazards or unsafe practices may
cause minor personal injury or property damage.
For your safety the information in this manual
must be followed to minimize the risk of fire or
explosion, or to prevent property damage,
personal injury or death.
WARNING
– Do not store or use gasoline or other flammable vapors and liquids
in the vicinity of this or any other appliance.
– Installation and service must be performed by a qualified installer,
service agency, or the gas supplier.
1. Read all instructions before using the appliance.
2. Use this appliance only for its intended purpose as described in this Owner’s Manual.
3. Before use, the dryer must be properly installed as described in this manual.
WARNING-To reduce the risk of fire, electric shock, or injury to persons when
using your appliance, follow basic precautions, including the following:
IMPORTANT SAFETY INSTRUCTIONS

3
SAFETY AND PRECAUTIONS
4. ALWAYS follow the fabric care instructions supplied by the garment manufacturer.
5. Do not dry articles that have been previously cleaned in, washed in, soaked in,
or spotted with gasoline, dry-cleaning solvents, other flammable or explosive
substances as they give off vapors that could ignite or explode.
6. Do not use the dryer to dry clothes which have traces of any flammable substance,
such as vegetable oil, cooking oil, machine oil, flammable chemicals, thinner, etc.,
or anything containing wax or chemicals, such as mops and cleaning clothes.
Flammable substances may cause the fabric to catch fire by itself.
7. Do not store or use gasoline or other flammable vapors and liquids near this or
any other appliance.
8. Do not allow children to play on or in the appliance. Close supervision of children
is necessary when the appliance is used near children.
9. Before the appliance is removed from service or discarded, remove the lid of the
washing or door of the drying compartment.
10.Do not reach into the appliance if the drum is moving.
11.Do not install or store this appliance where it will be exposed to the weather or
freezing temperatures.
12.Do not tamper with the controls.
13.Do not repair or replace any part of the appliance or attempt any servicing unless
it is specifically recommended in the user-maintenance instructions or in published
user-repair instructions that you understand and have the skills to carry out.
14.Keep the area underneath and around your appliances free of combustible materials
(lint, paper, rags, etc.), gasoline, chemicals and other flammable vapors and liquids.
15.Do not place items exposed to cooking oils in your dryer. Items contaminated with
cooking oils may contribute to a chemical reaction that could cause a load to catch
fire. o reduce the risk of fire due to contaminated loads, the final part of a tumble
dryer cycle occurs without heat (cool down period). Avoid stopping a tumble dryer
before the end of the drying cycle unless all items are quickly removed and spread
out so that the heat is dissipated.
16.Turn off the water faucets and unplug the washer if the machine is to be left for an
extended period of time, such as during vacations.
17.Packaging material can be dangerous for children. There is a risk of suffocation!
Keep all packaging from children.
18.Always check the inside of the dryer for foreign objects before loading laundry.
Keep the door closed when not in use.
19.Do not use fabric softeners or products to eliminate static unless recommended
by the manufacturer of the fabric softener or product.
20.Clean the lint screen before or after each load.
T

4
SAFETY AND PRECAUTIONS
21.Keep the area around the exhaust opening and surrounding areas free from lint,
dust, and dirt.
22.The interior of the dryer and exhaust duct should be cleaned periodically by
qualified service personnel.
23.Do not place items exposed to cooking oils in your dryer. Items contaminated with
cooking oils may contribute to a chemical reaction that could cause a load to catch
fire.
24.This appliance must be grounded. See “Electric requirements” and
“Grounding” in the “ ” section.
25.This appliance must be properly grounded. Never plug the power cord into a
receptacle that is not grounded adequately and in accordance with local and
national codes. Refer to installation instructions for grounding this appliance.
26.Ensure pockets are free from small irregularly shaped hard objects and foreign
material, i.e. coins, knives, pins, etc. These objects could damage your dryer.
27.Do not use heat to dry articles containing foam rubber or similarly textured
rubber-like materials.
SAVE THESE INSTRUCTIONS.
INSTALLATION REQUIREMENTS
WARNING-To reduce the risk of fire or explosion
Do not dry items that have been previously cleaned, washed, soaked, or spotted
with gasoline, dry cleaning solvents, or other flammable or explosive substances.
They emit vapors that could ignite or explode. Any material that has been in
contact with a cleaning solvent or flammable liquids or solids should not be
placed in the dryer until all traces of these flammable liquids or solids and their
fumes have been removed.
There are many highly flammable items used in homes, such as acetone,
denatured alcohol, gasoline, kerosene, some liquid household cleaners, some
spot removers, turpentine, waxes, and wax removers.
Do not dry items containing foam rubber (may be labeled latex foam) or similarly
textured rubber-like materials on a heat setting. Heated foam rubber materials
can under certain circumstances, produce fire by spontaneous combustion.
5
SAFETY AND PRECAUTIONS
CAUTION
1. Do not sit on top of the dryer.
2. Because of continuing product improvements, we reserves the right
of change specifications without notice. For complete details, see the
Installation Instructions packed with your product before selecting cabinetry,
making cutouts, or beginning installation.
3. Do not dry clothing with large buckles, buttons, or other heavy metal or solid things.
4. Install and use in accordance with the manufacturer’s instructions.
5. Do not place items in your dryer that have been spotted or soaked with vegetable oil
or cooking oil. Even after being washed, these items may contain significant
amounts of these oils.
6. Residual oil on clothing can ignite spontaneously. The potential for spontaneous
combustion increases when items containing vegetable oil or cooking oil are
exposed to heat. Heat source such as your dryer can warm these items, allowing an
oxidation reaction in the oil to occur.
7. Oxidation creates heat. If this heat cannot escape, the items can become hot enough
to catch fire. Piling, stacking, or storing these kinds of items may prevent heat from
escaping and can create a fire hazard.
8. Take care that children’s fingers are not caught in door when closing it.
This may result in injury.
Clothes dryer installation must be performed by a qualified installer.
Install the clothes dryer according to the manufacturer’s instructions and local
codes.
To reduce the risk of severe injury or death, follow all installation instructions.
Save these instructions.
WARNIG- Risk of Fire

6
INSTALLATION REQUIREMENTS
INSTALLATION REQUIREMENTS
IMPORTANT TO INSTALLER
Please read the following instructions carefully before installing the dryer.
These instructions should be kept for future reference.
The dryer is not suitable for installation in a mobile home.
Remove the door from all discarded appliances to avoid the danger of a
child being trapped and suffocating, after unplugging cut off Power Cord.
CAUTION
BASIC REQUIREMENTS
Make sure you have everything necessary for the proper installation.
- A GROUNDED ELECTRICAL OUTLET is required. Refer to the “Electrical
requirements” section.
- A POWER CORD electric dryer (except for Canada).
LOCATION REQUIREMENTS
1. The dryer should be located where there is enough space at the front for loading
the dryer, and enough space behind for the exhaust system.
2. Make sure the room in which the dryer is located has enough fresh air. The dryer
must be located where there are no air-flow obstructions.
3. The dryer must not be installed or stored in an area where it will be exposed to
water and/or weather. The dryer area must be kept clear of combustible materials,
gasoline, and other flammable vapors and liquids. A dryer produces combustible
lint. The area around the dryer should be kept lint-free.
7
INSTALLATION REQUIREMENTS
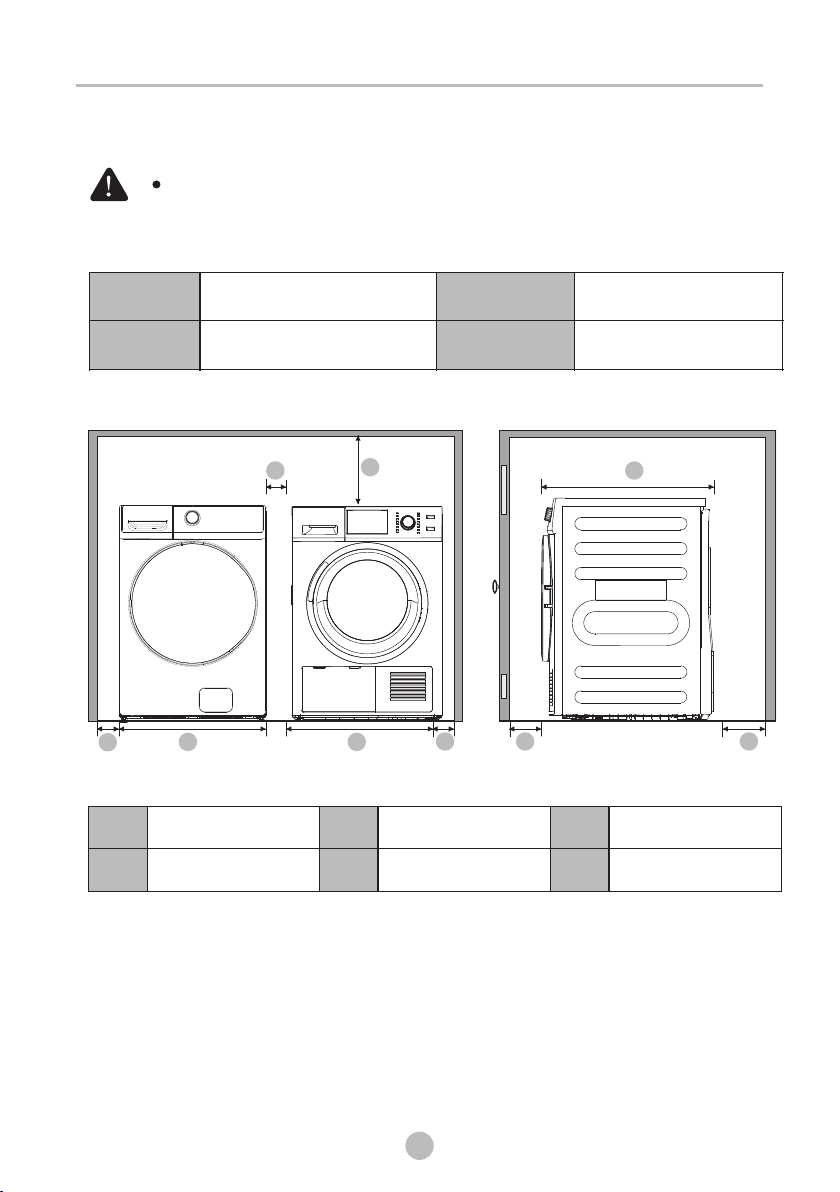
WARNING
Alcove or closet installationsor wall insert/recessed
Minimum clearances between the dryer and adjacent walls or other surfaces :
No other fuel-burning appliance should be installed in the same closet as the dryer.
Sides
1 in. (25.4mm)
Rear
2 in.(50.8mm)
Top
2 in. (50.8mm)
Closet front
2 in. (50.8mm)
A
AA
B B
CE
D F
A
B
C
D
E
F
1 in. (25.4mm)
23.4 in. (595mm)
2 in. (50.8mm)
2 in. (51mm)
25.7 in. (653mm)
2 in. (50.8mm)
8
INSTALLATION REQUIREMENTS
A
CB D
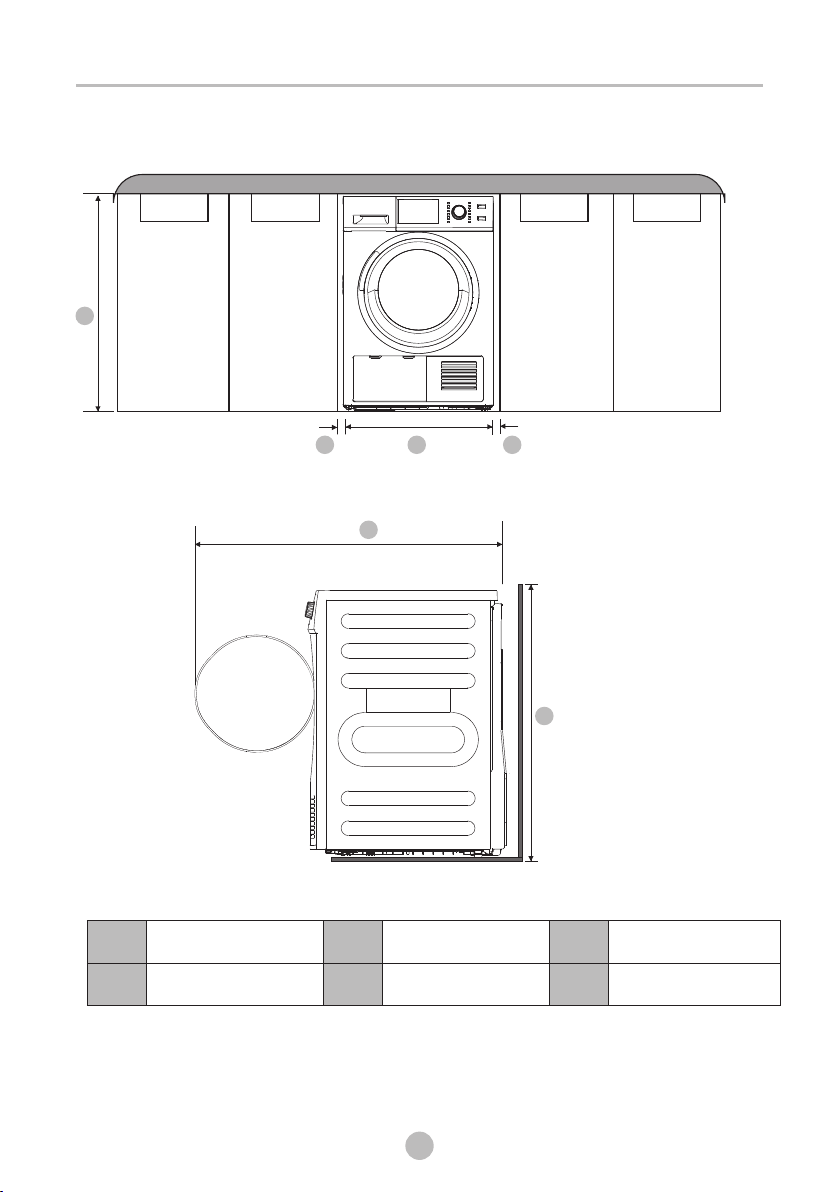
Undercounter installation
E
F
A
B
C
D
E
F
≥35.5in.( ≥901mm)
1 in. (25mm)
23.4 in. (595mm)
1 in. (25mm)
42.2in.(1072mm)
33.5in.(850mm)

9
INSTALLATION REQUIREMENTS
Installation with stacked washing machine and dryer
A
B
C
D
E
F
G H I J K
NOTE
The front of the closet must have two unobstructed air openings for a combined
minimum total area of 72 sq.in. (465 sq.cm) with a minimum clearance of 3 in. (76mm)
at the top and bottom. A slatted door with equivalent space clearance is acceptable.
C
D
G
H
K
24in.²(1550mm²)
3in.(76mm)
1in.(25.4mm)
23.4 in. (595mm)
2 in.(50.8mm)
A
B
E
F
I
J
3in.(76mm)
48in.² (3100mm²)
2in.(50.8mm)
/
3in.(76mm)
25.7 in.(653mm)

10
INSTALLATION REQUIREMENTS
Stack Kit Installation Instruction
1.The stacking kit includes the following parts:
Rubber pad x1 Rubber sheet x2
Rubber pad x1
Connecting bracket L x1 Support piece x4 Screw x10
Connecting bracket R x1
2.Rubber pad attaching position
Attach the rubber pad to the top cover of the front loader, as shown in the
figure below:
12
11
INSTALLATION REQUIREMENTS
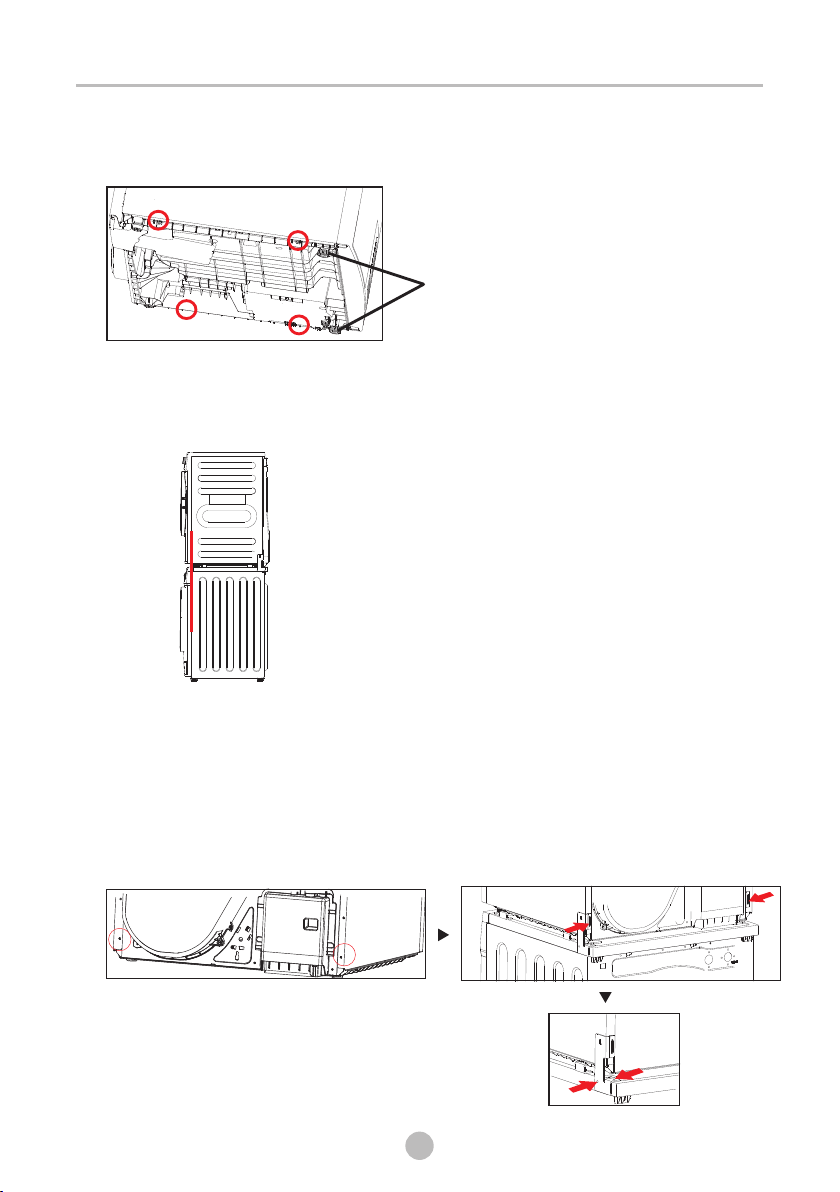
3.Support piece installation
Install the support at the bottom of the dryer, as shown in the figure below:
Screw the two feet on the front of
the dryer to the minimum distance
(clockwise rotation)
4.Method for stacking clothes dryer and washing machine
Lift the dryer to the top of the washing machine. Adjust the position of the dryer
to align both sides, as shown in the picture:
5.Connecting bracket installation
1.Remove the screws at the back of the dryer, first fix the connecting bracket
and the rubber sheet to the back of the dryer and align the U-shaped holes
of the rubber sheet and the connecting bracket.
2.Use a 3mm diameter drill bit to drill the remaining two screw holes.
Then use a torque not exceeding 5Nm to fix the screws.
12
INSTALLATION REQUIREMENTS
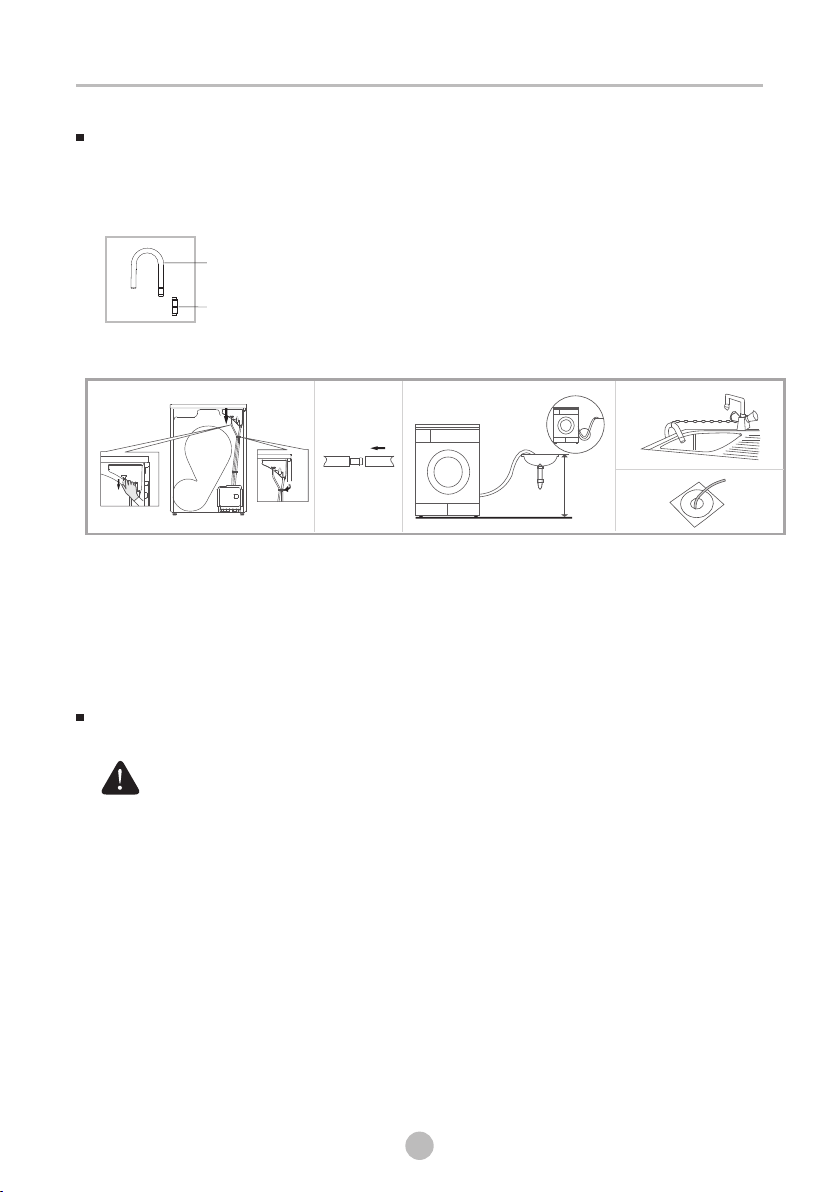
DRAIN SYSTEM
The following parts are optional for specific models.
If your dryer has following parts, please wear gloves and install them as per the
instruction below.
Condensing drain hose
Connector
Installation
1. Take the hose out of the holder.
2.Disconnect the hose from the water container inflow.(To assure water tightness,
there is tension between the hose and the inflow and therefore an increased
force is required for disassembly.)
3. Insert the drain hose and the external drainage hose into the connector.
4. Put the hose on the washing basin or floor drain. To assure the smooth drainage, ensure
the pipe is not folded.
ELECTRIC REQUIREMENTS
The wiring diagram is located on the back board of the unit.
- The improper connection of the equipment grounding conductor can result
in the risk of electric shock. Check with a qualified electrician or serviceman
if you are in doubt as to whether your dryer is properly grounded. Do not
modify the plug provided with your dryer - if it doesn’t fit the outlet, have a
proper outlet installed by a qualified electrician.
- To prevent unnecessary risk of fire, electrical shock, or personal injury, all
wiring and grounding must be done in accordance with local codes, or in
the absence of local codes, with the National Electrical Code, ANSI/NFPA
No. 70 - Latest Revision (for the U.S.) or the Canadian Electrical Code CSA
C22.1 - Latest Revisions and local codes and ordinances. It is your
responsibility to provide adequate electrical services for your dryer.
- All gas installations must be done in accordance with the National Fuel
Code ANSI/Z2231 - Latest Revision (for the U.S.) or CAN/CGA - B149
Installation Codes - Latest Revision (for Canada) and local codes and
ordinances.
WARNING
Max.78cm
x

13
Electric models - U.S. only
The dryers require a 120/240 volt, 60Hz AC approved electrical service.
The electric service requirements can be found on the data label located on the back.
A 30-amperefuse or circuit breaker on both sides of the line is required.
- If a power cord is used, the cord should be plugged into a 30-ampere receptacle.
- The power cord is NOT provided with U.S. electric model dryers.
RISK OF ELECTRIC SHOCK:
When local codes allow, the electrical supply of the dryer may be connected by
means of a new power supply cord kit, marked for use with a dryer, that is UL
listed and rated at a minimum of 120/240 volts, 30-ampere with three No. 10
copper wire conductors terminated with closed loop terminals, open-end spade
lugs with turned up ends, or with tinned leads.
- Do not reuse a power supply cord from an old dryer. The power cord electric
supply wiring must be retained at the dryer cabinet with a suitable UL-listed
strain relief.
- Grounding through the neutral conductor is prohibited for (1) new branch-
circuit installations, (2) mobile homes, (3) recreational vehicles, and (4) areas
where local codes prohibit grounding through the neutral conductor. (Use a
4-prong plug for 4 wire receptacles, NEMA type 14-30R.)
WARNING
An individual branch (or separate) circuit serving only your dryer is recommended.
DO NOT USE AN EXTENSION CORD.
Electrical connections
Electric models - Canada only
- A 120/240 volt, 60Hz AC approved electrical service fused through a 30-ampere
fuse or circuit breaker on both sides of the line is required.
- All Canadian models are shipped with the power cord attached. The power cord
should be plugged into a 30-ampere receptacle.
Note: A power cord is NOT provided with U.S. electric model dryers
INSTALLATION REQUIREMENTS

14
GROUNDING
- For products sold in the U.S., your dryer has an optional cord with an equipment-
grounding conductor and a grounding plug, which is sold separately.
For products sold in Canada, your dryer is equipped with a cord having an
equipment-grounding conductor and a grounding plug.
- The plug must be plugged into an appropriate outlet that is properly installed and
grounded in accordance with all local codes and ordinances.
- Do not modify the plug provided with the appliance: if it will not fit the outlet,
have a proper outlet installed by a qualified electrician.
- If a power cord is not used and the electric dryer is to be permanently wired,
This appliance must be connected to a grounded metal, permanent wiring system,
or an equipment-grounding conductor must be run with the circuit conductors
and connected to the equipment-grounding terminal or lead on the appliance.
WARNING
- Improper connection of the equipment-grounding conductor can result in
a risk of electric shock. Check with a qualified electrician or service
representative or personnel, if you are in doubt as to whether the appliance
is properly grounded.
-
electric shock only during servicing.
service personnel-do not contact the following parts while the appliance is
energized: Main Motor; Cooling Fan.
Certain internal parts are intentionally not grounded and may present a risk
of
INSTALLATION INSTRUCTION
Install the clothes dry according to manufacture’s instructions and local
codes.

15
INSTALLATION INSTRUCTION
REMOVING FROM THE PACKAGE
INSTALLATION INSTRUCTION
1. Unpack your dryer and inspect it for shipping damage. Make sure you have
received all the items shown below.
2. To prevent personal injury or strain, wear protective gloves whenever lifting or
carrying the unit.
Packaging materials can be dangerous to children;
Keep all packaging material (plastic bags, polystyrene, etc.) well out of
children’s reach.
WARNING
PARTS IDENTIFICATION
water tank
Side Plate
Maintenance Cover
Adjustable leg(Two legs)
Control Panel
Door
Filter
Fan Cover
Wiring Box Drain Hose

16
INSTALLATION INSTRUCTION
TOOLS NEEDED IN INSTALLATION
Pliers
Flat screwdriver Level
Cutting knife
Adjustable wrench
that opens to 1"
(25 mm)
Phillips screwdriver
Tools needed:
Tape measure
INSTALLATION STEPS
For the proper installation, we recommend that you hire a qualified installer.
1. Move your dryer to an appropriate location for the installation. Consider
installing the dryer and washer side-by-side, to allow access to the gas, electrical,
and exhaust connections. Place two of the carton cushion-tops on the floor. Tip
your dryer on its side so it lies across both cushion-tops.
2. Set your dryer back in an upright position.
STEP 1 Choose the proper location
STEP 2 Connect the electrical wiring
3-Wire
receptacle
(10-30R)
Three wire outlet
Then choose a 3-wire power supply cord with ring terminals and
UL listed strain relief. The 3-wire power supply cord, at least
4.92 ft. (1.5 m) long, must have 3 10-gauge solid copper wires
and match a 3-wire receptacle of NEMA Type 10-30R, rated
120/240V, min 10A.

17
INSTALLATION INSTRUCTION
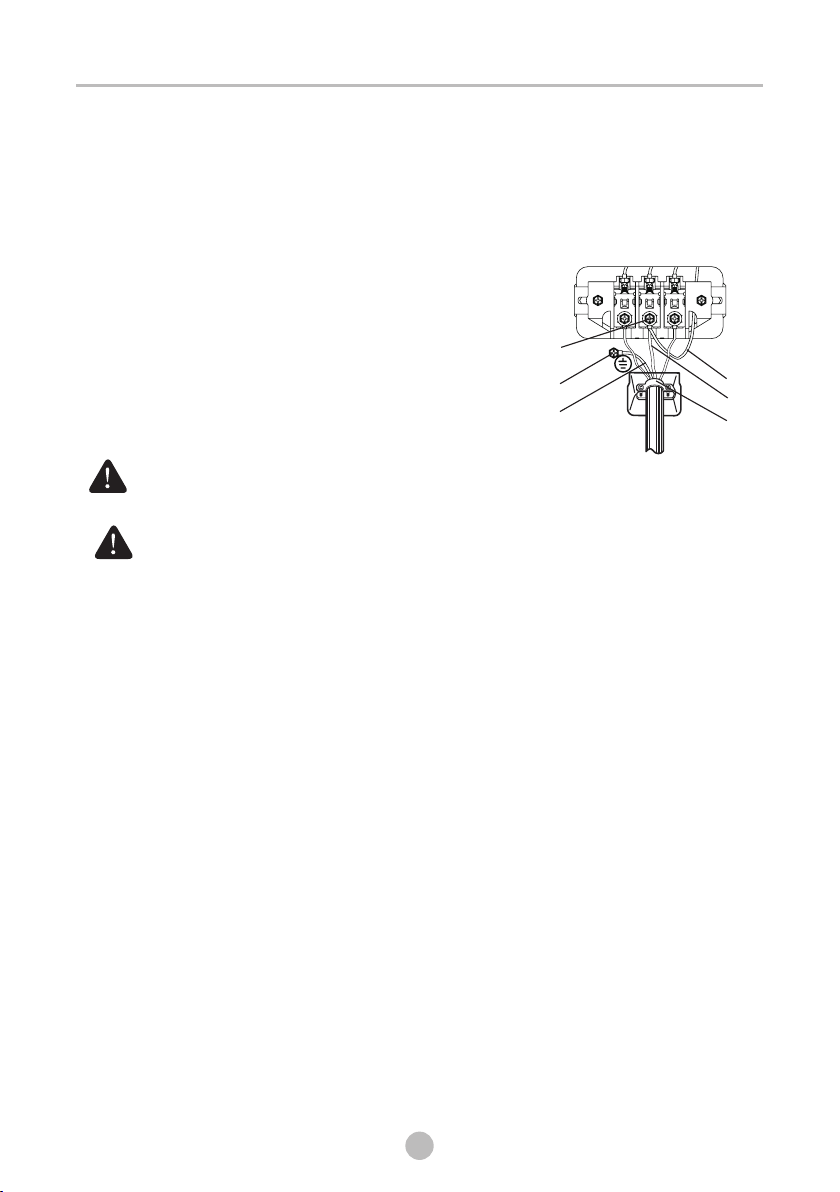
3-Wire system connections
1. Connect the grounding wire of the power cord to the external
screw. If there is no the power cord
2. Remove the two side terminal block screw and connect the other wires to the
outer terminal screws. Be sure to cross the screw through the terminal ring and
tighten the screw.
3. Tighten the strain relief screws.
4. Insert the tab of the terminal block cover into your dryer's rear panel slot. Secure
the cover with a screw.
ground conductor
grounding wire of , please remove the Neutral
grounding wire from center terminal block screw of the dryer, then connect it to
the external ground conductor screw and connect the neutral wire to the center
terminal block screw.
- Ring-type terminals are recommended. If using strap
terminals, make sure they are tightened.
WARNING
4-Wire
receptacle
(14-30R)
Four wire outlet
Then choose a 4-wire power supply cord with ring terminals and
UL listed strain relief. The 4-wire power supply cord, at least
4.92 ft. (1.5 m) long, must have 4 10-gauge solid copper wires and
match a 4-wire receptacle of NEMA Type 14-30 R, rated 120/240V,
min 10A. The ground wire (ground conductor) may be either green
or bare.The neutral conductor must be identified by a white color.
4-Wire system connections
1.
2.
3.
Remove the center terminal block screw.
Connect the ground wire (green or unwrapped) of the power cord to the external
ground conductor screw.
Connect the neutral wire (white or center wire) of the power cord and the appliance
ground wire (white) under the center screw of the terminal block. Be sure to cross the
screw through the ring of the power cord terminal and tighten the screw.
Connect the other wires to the outer terminal block screws. Be sure to cross the
screw through the terminal ring and tighten the screw.
4.
3-Wire system instructions:
A Center terminal block screw
B External ground connector
C Neutral grounding wire (White)
D Neutral wire (white or center wire)
E 3/4" (1.9cm) UL-listed strain relief
A
BC
D
E
18
INSTALLATION INSTRUCTION
5.
6.
Tighten the strain relief screws.
Insert the tab of the terminal block cover into your dryer’s rear panel slot. Secure
the cover with a screw.
Ring-type terminals are recommended. If using strap terminals, make sure
they are tightened.
WARNING
U.S. Models:
Risk Of Electric Shock - All U.S. models are produced for a 3-WIRE
SYSTEM CONNECTION.
The dryer frame is grounded to the neutral conductor at the terminal block.
A 4-WIRE SYSTEM CONNECTION is required for new or remodeled
construction,mobile homes, or if local codes do not permit grounding through
neutral conductor.
If the 4-wire system is used, the dryer frame cannot be grounded to the neutral
conductor at the terminal block. Refer to the “Electric requirements”
section on page 14 for 3-WIRE or 4-WIRE SYSTEM CONNECTIONS.
Remove the terminal block cover plate.
Insert the power cord with a UL-listed strain relief through the hose provided
in the cabinet near the terminal block.
- A strain relief must be used.
Do not loosen the nuts already installed on the terminal block. Be sure they
are tight.
Use a 3/8" (1cm) deep well socket.
WARNING
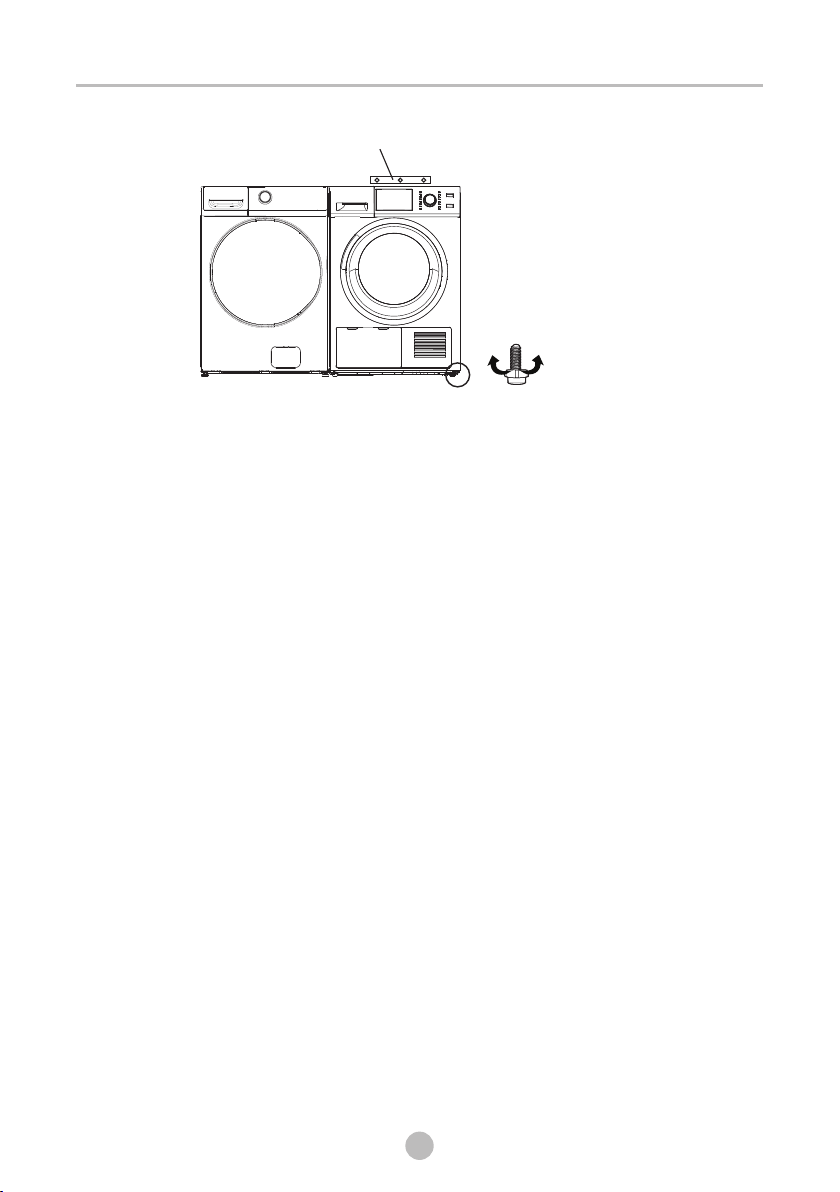
STEP 3 Level the dryer
To ensure that the dryer provides the optimal drying performance, it must be leveled.
To minimize vibration, noise, and unwanted movement, the floor must be a perfectly
level, solid surface.
- Adjust the leveling feet only as much as necessary to level the dryer. Extending the
leveling feet more than necessary can cause the dryer to vibrate.
4-Wire system instructions:
IMPORTANT: Ring-type terminals are recommended. If using strap terminals, make sure they are tightened.
A Center terminal block screw
B External ground connector
C Green or bare copper wire of the
power cord
D Neutral grounding wire (White)
E Neutral wire (white or center wire)
F 3/4" (1.9cm) UL-listed strain relief
A
B
C
D
E
F
White
Black Red
Green
19
INSTALLATION INSTRUCTION
loosen lock
Adjustable legs
level
STEP 4 Power on
Make sure all electrical connections are complete. Plug in your dryer.
STEP 5 Final check
- Make sure the dryer is plugged into an electrical outlet and is properly grounded.
- The dryer is leveled and is sitting firmly on the floor.
- Start your dryer to confirm that it runs, heats, and shuts off.
Table of contents


