Femometer FC-IR205 User manual

Infrared Thermometer
Operating Manual
Model: FC-IR205


1. Introduction
2. Product Structure
3. Display description
4. How to use your thermometer
5. Einleitung
6. Wie können Sie Ihr Thermometer benutzen
7. Introduction
8. Comment utiliser votre thermomètre
9. Introduzione
10. Come usare il termometro
11. Introducción
12. Cómo usar su termómetro
13. Warnings And Precautions
14. Product Description
15. Features
16. Temperature taking tips
17. Care and cleaning
18. Error and Troubleshooting
19. Specifications
20. Symbols
21. EMC information
22. Warranty and After-Sale Service
23. Package Contents
EN
EN
DE
FR
IT
ES
01
01
01
02
04
04
06
07
09
09
11
12
14
15
16
17
17
18
19
19
20
23
24


Thank you for purchasing this Dual-mode Infrared Thermometer. It has been carefully
developed for accurate, safe and fast temperature measurements in the ear and
forehead.
Please read these instructions carefully before using this product and keep the instructions and the
thermometer in a safe place.
1. Introduction
1
EN
EN
2. Product Structure
1. Temperature value
2. Forehead temperature mode
3. Ear temperature mode
4. Mute /Un-mute
5. Memory recall
6. Battery warning
7. Fahrenheit and Celsius conversion
1
2
3 4 5 6 7
3. Display description
1. Probe cover (take it off when measuring ear temperature)
2. LCD display screen
3. Measure button
4. Memory button
5. Probe
6. Beeper switch
7. Rating label
8. Battery cover
9. ºF/ ºC switch
10. Fill light
4
5
10
6
8
7
9
1
2
3

2
EN
When using the thermometer for the first time, please load the batteries.
1)Take your forehead temperature
Press the "Measure button" to turn on the thermometer.
Hold the thermometer within 3cm of the forehead and aim
it at the center. Start to measure with a short pressing of
"Measure" button, when the beep is completely heard, you
can now read the value.
Remarks: please measure forehead temperature in
forehead temperature mode (the screen will show “ ”).
NOTE: The forehead measurement is an indicative reading. The measured forehead temperature
can fluctuate up to 1 ºF/0.5 ºC from your actual body temperature. Please be aware of the factors
that influence the accuracy as described in the section “Temperature taking tips” and “WARNINGS
AND PRECAUTIONS”.
If the eyebrow area is covered with hair, sweat or dirt, please clean the area before
hand to improve the reading accuracy.
Always check if the lens is clean.
Always make sure the user and the thermometer will have been in the same room for
at least 30 minutes prior to the measurement.
2)Take your ear temperature
Take off the probe cover, fit the probe snugly into the ear canal.
Press and release the Measure button in 1 second, the beep is heard, you can now read the
value.
Please make sure that the ear is clean, with no earwax or obstructions.
The right ear reading may differ from the reading taken at the left ear.
Therefore, always take the temperature in the same ear.
0-3cm
Short press button
4. How to use your thermometer
Children under 1 year: Pull the ear straight back.
Children aged 1 year to adult: Pull the ear up and back.
Do not force the thermometer into the ear canal. Otherwise, the ear canal may get
injured.
When taking the temperature on an adult, gently pull the ear up and back to make sure
the ear canal is straight, so that the temperature probe can receive an infrared ray from
the eardrum.
Be careful when taking temperature on a child, whose ear canal is small.
34.7°C 36.9°C
3
3)After a measurement
Once the reading has been completed, remove the thermometer away from the
forehead/ear and observe the temperature.
After each measurement, you can enter the recall mode and query earlier temperature
readings.
Do not hold the thermometer for a long time, because it is sensitive to the ambient
temperature.
After each measurement, clean the temperature probe with a soft cloth, and put the
thermometer in a dry and well-ventilated place.
You should wait at least 10 seconds between each measurement.
It is dangerous to make a self-diagnosis or self-treatment based on the obtained
measurement results. For such purposes, please consult a doctor.
4)Read your temperature
To indicates a temperature reading in forehead or ear mode.
1. If 32°C≤T≤37.3°C(89.6°F≤T≤99.2°F), the white light will be on, with one long beep.
2. If 37.4°C≤T≤37.9°C(99.3°F≤T≤100.3°F), the orange light will be on, with 3 short beeps, and the
value in LCD flickers, which is a warning that you may have a slight fever.
3. If 38°C≤T≤42.9°C(100.4°F≤T≤109.2°F), the red light will be on, with 5 short beeps, and the
value in LCD flickers, which is a warning that you may have a high fever.
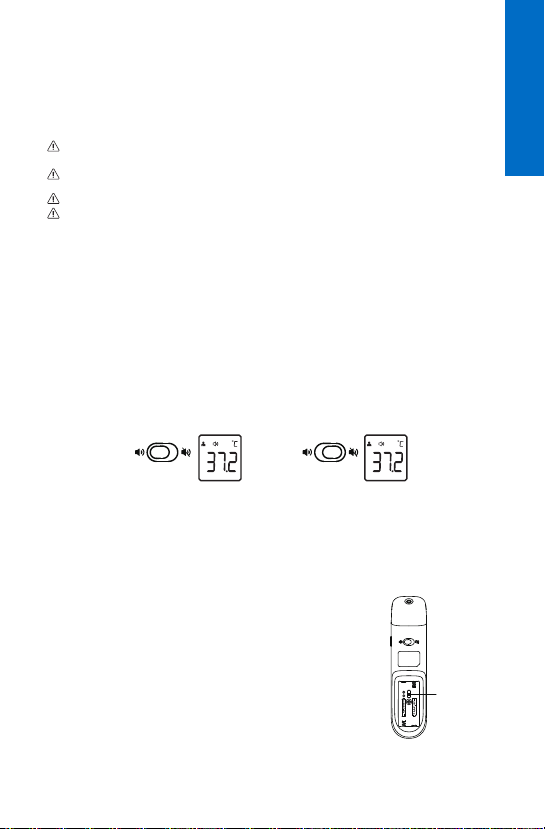
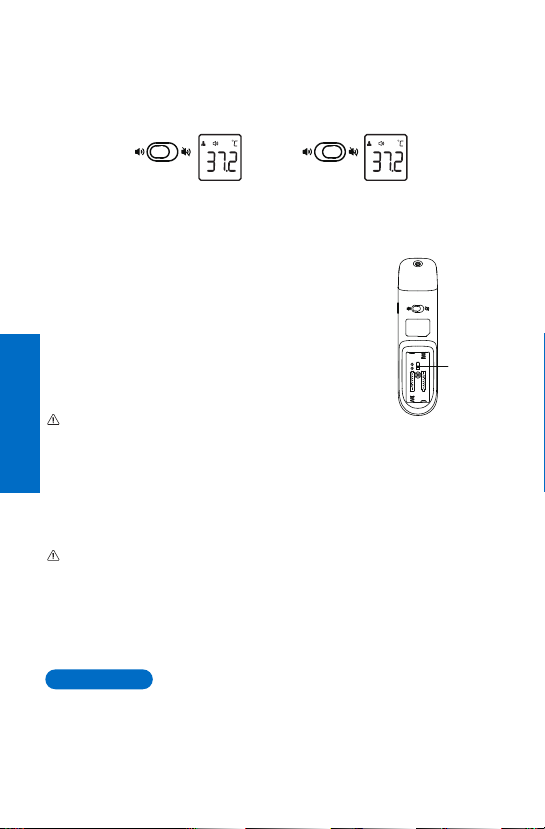
5)Switching between mute and un-mute
Use the toggle switch behind the machine to change the mute/unmute mode.
* Un-mute is only beep sound, not broadcast temperature value.
mute modeunmute mode
6)Checking 30 sets of memory data
When the thermometer is turned on or turmed off, by short pressing the "M" button by the
side to go to the memory mode, press "M" button again to check the 30 sets of memories
one by one. If no value, it will display "---".
*The memory data will be lost when removing the batteries.
7)ºF/ºC conversion
Open the battery cover, use the toggle switch to change the ºF/ºC.
Note: All the future temperature you are taking will be automatically
added the value you are adjusted.
8)To turn off
The unit will shut down automatically after 30 seconds of no use.
Or you can keep pressing the Measure button for 5 seconds.
Toggle switch
EN

4
DE
Caution
1.All memory records will loss when uninstalling or reinstalling the battery.
2.All settings will come to default when uninstalling the battery. If need adjust the settings,
please power on and make the new settings.
9)Replace the battery
Slide the battery cover off along the marked direction. Put two AAA batteries correctly into
the compartment.
Remove the batteries if the thermometer will not be used for more than two months.
Vielen Dank, dass Sie dieses Dual-Mode-Infrarot-Thermometer gekauft haben. Es wurde
sorgfältig für genaue, sichere und schnelle Temperaturmessungen im Ohr und auf der Stirn
entwickelt.
Bitte lesen Sie diese Anweisungen sorgfältig durch, bevor Sie dieses Produkt benutzen, und
bewahren Sie die Anweisungen und das Thermometer an einem sicheren Ort auf.
5. Einleitung
DE
Wenn Sie das Thermometer zum ersten Mal benutzen, legen Sie bitte die Batterien ein.
1)Messen Sie Ihre Stirntemperatur
Drücken Sie die "Messtaste", um das Thermometer
einzuschalten. Halten Sie das Thermometer innerhalb von
3cm in der Nähe der Stirn und richten Sie es auf die Mitte.
Starten Sie die Messung mit einem kurzen Drücken der
Taste "Messen". Wenn der Signalton vollständig ertönt,
können Sie nun den Wert ablesen.
Anmerkungen: Bitte messen Sie die Stirntemperatur im
Stirntemperatur-Modus (auf dem Bildschirm wird " "
angezeigt).
Kurzer Tastendruck
0-3cm
6. Wie können Sie Ihr Thermometer benutzen
HINWEIS: Die Messung der Stirntemperatur ist ein indikativer Ablesewert. Die gemessene
Stirntemperatur kann um bis zu 1 ºF / 0.5 ºC von Ihrer tatsächlichen Körpertemperatur abweichen.
Bitte beachten Sie die Faktoren, die die Genauigkeit beeinflussen, wie in den Abschnitten "Tipps zur
Temperaturmessung" und "WARNUNGEN UND VORSICHTSHINWEISE" beschrieben.
Wenn der Augenbrauenbereich mit Haaren, Schweiß oder Schmutz bedeckt ist, reinigen Sie bitte
den Bereich vorab, um die Lesegenauigkeit zu verbessern.
Prüfen Sie immer, ob die Linse sauber ist.
Vergewissern Sie sich immer, dass sich der Benutzer und das Thermometer vor der
Messung mindestens 30 Minuten lang in demselben Zimmer aufgehalten haben.
2)Messen Sie Ihre Ohrtemperatur
Nehmen Sie die Sondenabdeckung ab, und führen Sie die Sonde passgenau in den
Ohrkanal ein.

5
DE
Drücken Sie die Messtaste 1 Sekunde lang und lassen Sie sie wieder los, dann ertönt ein
Piepton und Sie können den Wert ablesen.
Bitte stellen Sie sicher, dass das Ohr sauber ist und kein Ohrenschmalz oder keine
Behinderungen vorhanden sind.
Die Messung am rechten Ohr kann von der Messung am linken Ohr abweichen.
Messen Sie daher die Temperatur immer am selben Ohr.
Kinder unter 1 Jahr: Ziehen Sie das Ohr gerade nach hinten.
Kinder im Alter von 1 Jahr bis zu Erwachsenen: Ziehen Sie das Ohr nach oben und hinten.
Führen Sie das Thermometer nicht mit Gewalt in den Ohrkanal ein. Anderenfalls kann
der Ohrkanal verletzt werden.
Wenn Sie die Temperatur bei einem Erwachsenen messen, ziehen Sie das Ohr sanft
nach oben und hinten, um sicherzustellen, dass der Ohrkanal gerade ist, sodass die
Temperatursonde einen Infrarotstrahl vom Trommelfell empfangen kann.
Seien Sie vorsichtig, wenn Sie die Temperatur bei einem Kind messen, dessen Ohrkanal
klein ist.
3)Nach einer Messung
Sobald die Messung abgeschlossen ist, entfernen Sie das Thermometer von der Stirn / vom
Ohr und beobachten Sie die Temperatur.
Nach jeder Messung können Sie den Abrufmodus aufrufen und ältere Temperaturmess-
werte abfragen.
Halten Sie das Thermometer nicht über längere Zeit, da es empfindlich auf die
Umgebungstemperatur ist.
Reinigen Sie die Temperatursonde nach jeder Messung mit einem weichen Tuch und
stellen Sie das Thermometer an einen trockenen und gut belüfteten Ort.
Sie sollen mindestens 10 Sekunden zwischen jeder Messung warten.
Es ist gefährlich, eine Selbstdiagnose oder Selbstbehandlung auf der Grundlage der
Messergebnisse durchzuführen. Bitte konsultieren Sie einen Arzt für solche Zwecke.
4)Lesen Sie Ihre Temperatur ab
Zur Anzeige einer Temperaturmessung im Stirn- oder Ohr-Modus.
1. Wenn 32°C ≤ T ≤ 37.3°C (89.6°F ≤ T ≤ 99.2°F), leuchtet das weiße Licht mit einem langen
Piepton.
2. Wenn 37.4°C ≤ T ≤ 37.9°C (99.3°F ≤ T ≤ 100.3°F), leuchtet das orangefarbene Licht auf, es
ertönen 3 kurze Pieptöne und der Wert in der LCD-Anzeige flimmert, was eine Warnung ist,
dass Sie möglicherweise schwaches Fieber haben.
3. Wenn 38°C ≤ T ≤ 42.9°C (100.4°F ≤ T ≤ 109.2°F), leuchtet das rote Licht auf, es ertönen 5 kurze
Töne und der Wert in der LCD-Anzeige flimmert, was eine Warnung ist, dass Sie möglicher-
weise hohes Fieber haben.
5)Umschalten zwischen Stummschaltung und Aufhebung der Stummschaltung
Verwenden Sie den Kippschalter hinter der Maschine, um zum Stummschaltmodus bzw.
Aufhebung-Modus der Stummschaltung zu ändern.
34.7°C 36.9°C
6
FR
* Das Aufheben der Stummschaltung bedeutet nur einen Piepton, nicht die Übertragung
des Temperaturwerts.
Stummschaltmodus
Aufhebung-Modus
der Stummschaltung
6)Prüfung von 30 Sätzen von Speicherdaten
Wenn das Thermometer ein- oder ausgeschaltet ist, drücken Sie kurz die Taste "M" an der
Seite, um in den Speicher-Modus zu gelangen. Drücken Sie erneut die Taste "M", um die 30
Speicherplätze nacheinander zu prüfen. Wenn kein Wert vorhanden ist, wird "---" angezeigt.
*Die Speicherdaten gehen bei Entfernung der Batterien verloren.
7)ºF/ ºC-Umrechnung
Öffnen Sie die Batterieabdeckung und verwenden Sie den
Kippschalter, um die Temperatur in ºF / ºC zu ändern.
Hinweis: Alle zukünftigen Temperaturen, die Sie messen, werden
automatisch zu dem von Ihnen eingestellten Wert addiert.
8)Zum Ausschalten
Die Einheit schaltet sich automatisch ab, wenn sie 30 Sekunden lang
nicht benutzt wurde.
Sie können auch die Messtaste 5 Sekunden lang gedrückt halten.
Vorsicht
1. Alle Speichereinträge gehen verloren, wenn die Batterie deinstalliert oder wieder installiert
wird.
2. Alle Einstellungen werden auf die Standardeinstellungen zurückgestellt, wenn Sie die
Batterie deinstallieren. Wenn Sie die Einstellungen einstellen möchten, schalten Sie das
Gerät bitte ein und stellen Sie die neuen Einstellungen ein.
9)Ersetzen Sie die Batterie
Schieben Sie die Batterieabdeckung in die markierte Richtung ab. Legen Sie zwei AAA-Batte-
rien ordnungsgemäß in das Fach ein.
Nehmen Sie die Batterien heraus, wenn das Thermometer länger als zwei Monate nicht
benutzt wird.
Kippschalter
Nous vous remercions d'avoir acheté ce thermomètre infrarouge à double fonction. Il a été
soigneusement mis au point pour des mesures de température précises, sûres et rapides
au niveau de l'oreille et du front.
Veuillez lire attentivement ces instructions avant d'utiliser ce produit et conservez les instructions
et le thermomètre dans un endroit sûr.
7. Introduction
FR

7
FR
Lorsque vous utilisez le thermomètre pour la première fois, veuillez mettre des piles.
1)Prenez la température de votre front
Appuyez sur le "bouton de mesure" pour allumer le
thermomètre. Tenez le thermomètre à une distance de 3cm
du front et dirigez-le vers le centre. Commencez à
prendre la mesure en appuyant brièvement sur le bouton
"Mesure", lorsque le bip retentit complètement, vous pouvez
désormais lire le résultat.
Remarques : veuillez prendre la température du front en
mode température frontale (l'écran affichera " ").
REMARQUE : la prise de mesure sur le front est une lecture indicative. La température frontale
mesurée peut fluctuer jusqu'à 1 ºF/0.5 ºC par rapport à votre température corporelle réelle. Veuillez
être attentif aux facteurs qui influencent la précision, comme décrit dans la section " Quelques
conseils pour la prise de température " et " AVERTISSEMENTS ET PRÉCAUTIONS ".
Si la zone des sourcils est recouverte de poils, de sueur ou de saleté, veuillez nettoyer
la zone avant de prendre les mesures afin d'améliorer la précision de la lecture.
Vérifiez toujours si le verre est propre.
Vérifiez toujours que l'utilisateur et le thermomètre ont été dans la même pièce pendant
au moins 30 minutes avant la mesure.
2)Prenez la température de votre oreille
Enlevez le capuchon de la sonde, insérez la sonde dans le conduit auditif.
Appuyez et relâchez le bouton de mesure en 1 seconde, un bip se fait entendre, vous
pouvez maintenant lire la mesure.
Veuillez vérifier que l'oreille est propre, sans cire d'oreille ni obstruction.
La lecture de l'oreille droite peut différer de la lecture prise à l'oreille gauche.
Par conséquent, prenez toujours la température dans la même oreille.
Mettez le thermomètre
avant le front 0-3cm
8. Comment utiliser votre thermomètre
Les enfants de moins d'un an : Tirez l'oreille directement vers l'arrière.
Les enfants âgés de 1 an à l'adulte : Tirez l'oreille vers le haut et l'arrière.
Ne forcez pas le thermomètre dans le conduit auditif. Sinon, le canal auditif risque d'être
abîmé.
Lorsque vous prenez la température d'un adulte, tirez doucement l'oreille vers le haut et
l'arrière pour vérifier que le conduit auditif est droit, afin que la sonde de température
puisse recevoir un rayon infrarouge du tympan.
Soyez prudent lorsque vous prenez la température d'un enfant, dont le conduit auditif
est petit.
34.7°C 36.9°C

8
3)Après une prise de température
Une fois la mesure terminée, retirez le thermomètre du front/de l'oreille et surveillez la
température.
Après chaque mesure, vous pouvez accéder au mode de rappel et interroger les relevés
de température antérieurs.
Le thermomètre ne doit pas être gardé longtemps, car il est sensible à la température
ambiante.
Après chaque mesure, nettoyez la sonde de température avec un chiffon doux, et placez
le thermomètre dans un endroit sec et bien ventilé.
Vous devez attendre au moins 10 secondes entre chaque mesure.
Les résultats des mesures obtenues ne doivent pas servir de base à un auto-diagnostic
ou à un auto-traitement. Dans ce cas, veuillez consulter un médecin.
4)Prenez votre température
Pour indiquer une prise de température en mode front ou oreille.
1. Si 32°C≤T≤37,3°C(89,6°F≤T≤99,2°F), la lumière blanche s'allume, avec un long bip.
2. Si 37,4°C≤T≤37,9°C(99,3°F≤T≤100,3°F), le voyant orange s'allume, avec 3 bips rapides, et les
données du LCD clignotent, ce qui indique que vous avez peut-être une légère fièvre.
3. Si 38°C≤T≤42,9°C(100,4°F≤T≤109,2°F), le voyant rouge s'allume, accompagné de 5 bips
rapides, et les données de l'écran LCD clignotent, ce qui indique que vous avez peut-être
une température élevée.
5)Changement entre le mode silencieux et le mode non silencieux
Utilisez l'interrupteur situé à l'arrière de l'appareil pour changer le mode silencieux ou non
silencieux.
* La mise en sourdine ne concerne que le bip sonore et non la diffusion de la température.
mode silencieuxmode non silencieux
6)Vérification de 30 jeux de données de mémoire
Lorsque le thermomètre est allumé ou éteint, il suffit d'appuyer légèrement sur le bouton
"M" situé sur le côté pour passer en mode mémoire, puis d'appuyer à nouveau sur le bouton
"M" pour vérifier les 30 jeux de mémoires un par un. S'il n'y a pas de données, l'écran affiche
"---".
*Les données mémorisées seront perdues lors du retrait des piles.
7)Conversion ºF/ºC
Ouvrez le cache-piles, utilisez l'interrupteur à bascule pour changer
les ºF/ºC.
Notez : toutes les prochaines températures que vous prendrez seront
automatiquement ajoutées à la mesure que vous aurez ajustée.
8)Pour éteindre
TL'appareil s'éteint automatiquement après 30 secondes de
nonn-utilisation.
Ou vous pouvez continuer à appuyer sur le bouton Mesure pendant
5 secondes.
Interrupteur
à bascule
FR

9
IT
Attention
1.Tous les enregistrements de la mémoire sont effacés lors de la désinstallation ou de la
réinstallation des piles.
2.Tous les paramètres sont réinitialisés par défaut lors de la désinstallation des piles. Si
vous avez besoin d'ajuster les paramètres, veuillez mettre l'appareil sous tension et
effectuer les nouveaux réglages.
9)Remplacez les piles.
Faites glisser le couvercle des piles en suivant la direction indiquée. Placez correctement
deux piles AAA dans le compartiment.
Retirez les piles si le thermomètre n'est pas utilisé pendant plus de deux mois.
Grazie per aver acquistato questo termometro a infrarossi a doppia modalità. È stato
sviluppato per garantire misurazioni accurate, sicure e veloci della temperatura
nell'orecchio e sulla fronte.
Si prega di leggere attentamente queste istruzioni prima di utilizzare questo prodotto e di
conservare le istruzioni e il termometro in un luogo sicuro.
9. Introduzione
Quando si utilizza il termometro per la prima volta, si prega di caricare le batterie.
1)Prendere la temperatura della fronte
Premere il "tasto Misura" per accendere il termometro.
Tenere il termometro a 3cm dalla fronte e puntarlo al
centro. Iniziare a misurare con una breve pressione del
pulsante "Misura", quando si sente il segnale acustico è
possibile leggere il valore.
Osservazioni: si prega di misurare la temperatura della
fronte in modalità temperatura della fronte (lo schermo
mostrerà " ").
Premere brevemente il
pulsante 0-3cm
10. Come usare il termometro
IT
NOTA: La misurazione della fronte è una lettura indicativa. La temperatura misurata sulla fronte
può fluttuare fino a 0.5 ºC/1 ºF rispetto alla temperatura corporea reale. Si prega di essere
consapevoli dei fattori che influenzano la precisione come descritto nella sezione "Consigli per la
misurazione della temperatura" e "AVVERTENZE E PRECAUZIONI".
Se l'area del sopracciglio è coperta da peli, sudore o sporcizia, si prega di pulire prima
l'area per migliorare la precisione della lettura.
Controllare sempre che la lente sia pulita.
Assicurarsi sempre che l'utente e il termometro siano stati nella stessa stanza per
almeno 30 minuti prima della misurazione.

10
IT
2)Prendere la temperatura dell'orecchio
Togliere il coperchio della sonda e inserire la sonda nel canale uditivo.
Premere il pulsante Misura per 1 secondo e leggere il valore dopo il bip.
Si prega di assicurarsi che l'orecchio sia pulito, senza cerume o ostruzioni.
La lettura dell'orecchio destro può essere diversa da quella dell'orecchio sinistro.
Pertanto, prendere sempre la temperatura nello stesso orecchio.
Bambini sotto 1 anno: Tirare l'orecchio all'indietro.
Bambini da 1 anno ad adulti: Tirare l'orecchio verso l'alto e indietro.
Non forzare il termometro nel canale uditivo. In caso contrario, il canale uditivo potrebbe
essere danneggiato.
Quando si prende la temperatura su un adulto, tirare delicatamente l'orecchio in alto
e indietro per assicurarsi che il canale uditivo sia dritto, in modo che la sonda di temperatu-
ra possa ricevere un raggio infrarosso dal timpano.
Fare attenzione quando si prende la temperatura su un bambino poiché il canale uditivo
è piccolo.
3)Dopo una misurazione
Una volta completata la lettura, rimuovere il termometro dalla fronte/orecchio e osservare
la temperatura.
Dopo ogni misurazione, è possibile accedere alla memoria e visualizzare le letture della
temperatura precedenti.
Non tenere il termometro per tropo tempo, perché è sensibile alla temperatura
dell'ambiente.
Dopo ogni misurazione, pulire la sonda di temperatura con un panno morbido e
mettere il termometro in un luogo asciutto e ben ventilato.
Si dovrebbe aspettare almeno 10 secondi tra ogni misurazione.
È pericoloso effettuare un'autodiagnosi o un'autotrattamento sulla base dei risultati
delle misurazioni ottenute. Per tali scopi, si prega di consultare un medico.
4)Leggi la tua temperatura
Indicazione di una lettura della temperatura in modalità fronte o orecchio.
1. Se 32°C≤T≤37.3°C (89.6°F≤T≤99.2°F), si accenderà la luce bianca, con un unico segnale
acustico lungo.
2. Se 37.4°C≤T≤37.9°C (99.3°F≤T≤100.3°F), si accenderà la luce arancione, con 3 brevi segnali
acustici, e il valore sullo schermo LCD lampeggerà per indicare che si può avere una
leggera febbre.
3. Se 38°C≤T≤42.9°C (100.4°F≤T≤109.2°F), si accenderà la luce rossa, con 5 brevi segnali
acustici, e il valore sullo schermo LCD lampeggierà per indicare che si può avere una
febbre alta.
34.7°C 36.9°C

11
ES
5)Modalità muto e non muto
Utilizzare l'interruttore a levetta dietro il dispositivo per cambiare la modalità mute/unmute.
* Un-mute è solo il suono del bip, non trasmette il valore della temperatura.
modalità mutomodalità non muto
6)Controllo di 30 serie di dati in memoria
Sia con termometro acceso che spento, premendo brevemente il pulsante "M" a lato si
potrà passare alla modalità di richiamo della memoria. Premere nuovamente il pulsante
"M" per controllare le 30 serie di dati salvati una per una. Se non ci sono valori, verrà
visualizzato "---".
*Rimuovendo le batterie si perderanno i dati memorizzati.
7)Conversione ºC/ºF
Aprire il coperchio della batteria, usare l'interruttore a levetta per
cambiare i ºC/ºF.
Nota: Tutte le temperature future misurate saranno automaticamente
aggiunte con l'unità di misura scelta.
8)Per spegnere
L'unità si spegnerà automaticamente dopo 30 secondi di inutilizzo.
Oppure e possibile spegnere il termometro premendo il pulsante
Misura per 5 secondi.
Attenzione
1. Tutti i record di memoria andranno persi quando si disinstalla o si reinstalla la batteria.
2. Tutte le impostazioni torneranno ai valori di default quando si rimuove la batteria. Se è
necessario regolare le impostazioni, si prega di accendere e modificare manualmente le
impostazioni.
9)Sostituire la batteria
Far scorrere il coperchio della batteria lungo la direzione segnata. Inserire correttamente
due batterie AAA nel vano.
Se il termometro non verrà utilizzato per più di due mesi, rimuovere le batterie.
Interruttore
a levetta
Gracias por elegir este termómetro por infrarrojos de modo dual. Ha sido cuidadosamente
desarrollado para realizar mediciones precisas, seguras y rápidas de la temperatura en
oído y frente.
Lea atentamente estas instrucciones antes de usar este producto y guarde las instrucciones y el
termómetro en un lugar seguro.
11. Introducción
ES

12
ES
Al usar el termómetro por primera vez, cargue las pilas.
1)Tome la temperatura de su frente
Pulse el "botón de medida" para encender el termómetro.
Sostenga el termómetro a una distancia de 3cm de la
frente y apunte al centro. Comience a medir con una breve
pulsación del botón "Medir", cuando se escuche por
completo el pitido, ya puede leer el valor.
Observaciones: por favor, mida la temperatura de la frente
en modo de temperatura de frente (la pantalla
mostrará " ").
NOTA: La medición de la frente es una lectura indicativa. La temperatura medida en la frente puede
variar hasta 1 ºF/0.5 ºC con respecto a su temperatura corporal real. Tenga en cuenta los factores
que influyen en la precisión, tal y como se describe en la sección "Consejos para la toma de
temperatura" y "ADVERTENCIAS Y PRECAUCIONES".
Si la zona de la ceja está cubierta de pelo, sudor o suciedad, límpiela antes para mejorar
la precisión de la medición.
Compruebe siempre que la lente esté limpia.
Asegúrese siempre de que el usuario y el termómetro hayan estado en la misma habitación
durante al menos 30 minutos antes de medir.
2)Tome la temperatura del oído
Retire la tapa de la sonda, introduzca la sonda en el canal auditivo.
Presione y suelte el botón de medición en 1 segundo, se oirá el pitido, ahora puede leer el
valor.
Asegúrese de que el oído está limpio, sin cerumen ni obstrucciones.
La lectura en el oído derecho puede diferir con respecto al oído izquierdo.
Por ello, tome siempre la temperatura en el mismo oído.
Botón de presión corta
0-3cm
12. Cómo usar su termómetro
Menores de 1 año: Tira de la oreja hacia atrás.
Desde 1 año y adultos: Tira de la oreja hacia arriba y hacia atrás.
No fuerce el termómetro en el canal auditivo. De lo contrario, el conducto auditivo podría
lesionarse.
Al tomar la temperatura en un adulto, tire suavemente de la oreja hacia arriba y hacia
atrás para asegurarse de que el canal auditivo quede recto, de modo que la sonda de
temperatura pueda recibir un rayo infrarrojo del tímpano.
Tenga cuidado al tomar la temperatura en un niño, ya que su canal auditivo es pequeño.
34.7°C 36.9°C

ES
13
3)Tras la medición
Una vez realizada la lectura, retire el termómetro de la frente/oído y consulte la temperatura.
Después de cada medición, puede entrar en el modo de recuperación y consultar las
lecturas previas.
Evite sostener el termómetro durante mucho tiempo, ya que es sensible a la temperatura
ambiente.
Después de cada medición, limpie la sonda de temperatura con un tejido suave y
coloque el termómetro en un lugar seco y bien ventilado.
Debe esperar al menos 10 segundos entre cada medición.
Es peligroso hacer un autodiagnóstico o autotratamiento basado en los resultados de las
mediciones obtenidas. A tal efecto, consulte a un médico.
4)Lea su temperatura
Permite indicar la lectura de la temperatura en el modo frente u oído.
1. Si 32°C≤T≤37.3°C (89.6°F≤T≤99.2°F), la luz blanca se encenderá, con un pitido largo.
2. Si 37.4°C≤T≤37.9°C(99.3°F≤T≤100.3°F), la luz naranja se encenderá, con 3 pitidos cortos, y el
valor en la pantalla LCD parpadeará, siendo una advertencia de que puede tener un poco
de fiebre.
3. Si 38°C≤T≤42.9°C (100.4°F≤T≤109.2°F), la luz roja se encenderá, con 5 pitidos cortos, y el
valor en la pantalla LCD parpadeará, siendo una advertencia de que puede tener fiebre
alta.
5)Alternar entre silencio y sonido
Use el interruptor situado detrás del dispositivo para cambiar el modo de silencio/sonido.
* El modo sonido es un pitido, no emite el valor de la temperatura.
modo silenciomodo sonido
6)Comprobar 30 grupos de datos memorizados
Cuando el termómetro se enciende o se apaga, pulsando brevemente el botón "M" del
lateral para pasar al modo de memoria, pulse de nuevo el botón "M" para comprobar los
30 grupos de memorias uno por uno. De no haber ningún valor, se mostrará "---".
*Los datos de la memoria se perderán al retirar las pilas.
7)Conversión ºF/ºC
Abra la tapa de las pilas y utilice el botón para cambiar entre ºF/ºC.
Nota: Todas las temperaturas futuras que se tomen se sumarán
automáticamente al valor ajustado.
8)Apagado
La unidad se apagará automáticamente al cabo de 30 segundos sin uso.
También puede mantener pulsado el botón Medida durante 5 segundos.
Atención
1.Todos los registros de memoria se perderán al quitar o poner las pilas.
2.Todos los ajustes vendrán por defecto al quitar las pilas. Si necesita ajustar la configura-
ción, por favor enciéndalo para configurarla de nuevo.
Interruptor

14
1)Keep out of reach of children under 12 years.
2)Never immerse the thermometer into water or other liquids (not waterproof). For
cleaning and disinfecting please follow the instructions in the “Care and cleaning” section.
3)Never use the thermometer for purposes other than those it has been intended for.
Please follow the general safety precautions when using on children.
4)Keep the thermometer away from direct exposure to the sun and keep it in a dust- free,
dry area, well-ventilated place at a temperature between 10°C (50°F)-40°C (104°F). Do not
use the thermometer in high humidity environments. (>95% RH)
5)Do not use the thermometer if there are signs of damage on the measuring sensor or on
the instrument itself. If damaged, do not attempt to repair the instrument! Please contact
dealer.
6)This thermometer consists of high-quality precision parts. Do not drop the instrument.
Protect it from severe impact and shock. Do not twist the instrument or the measuring
sensor.
7)Please consult your doctor if you see symptoms such as unexplained irritability, vomiting,
diarrhea, dehydration, changes in appetite or activity, seizure, muscle pain, shivering, stiff
neck, pain when urinating, etc., even in the absence of fever.
8)Even in the absence of fever, those who exhibit a normal temperature may still need to
receive medical attention. People who are on antibiotics, analgesics, or antipyretics should
not be assessed solely on temperature readings to determine the severity of their illness.
9)Temperature elevation may signal a serious illness, especially in adults who are old, frail,
have a weakened immune system, or neonates and infants. Please seek professional
advice immediately when there is a temperature elevation and if you are taking
temperature for whom are:
Over 60 years of age (Fever may be blunted or even absent in elderly patients)
Having diabetes mellitus or a weakened immune system (e.g., HIV positive, cancer, chemotherapy,
chronic steroid treatment, splenectomy)
Bedridden (e.g., nursing home patient, stroke, chronic illness)
A transplant patient (e.g., liver, heart, lung, kidney
10)This thermometer is not intended for pre-term babies or small-for-gestational age
babies. This thermometer is not intended to interpret hypothermic temperatures. Do not
allow children to take their temperatures unattended.
11)Use of this thermometer is not intended as a substitute for consultation with your
physician or pediatrician. It is for household use only.
12)Clean the thermometer probe after each use.
13. Warnings And Precautions
9)Cambio de pilas
Extraiga la tapa de las pilas hacia la dirección marcada. Coloque dos pilas AAA
correctamente en el hueco.
Retire las pilas si el termómetro no se va a utilizar durante más de dos meses.

15
13)Do not use the thermometer on newborns or for continuous temperature monitoring
purposes.
14)Do not take a measurement while or immediately after nursing a baby.
15)Patients should not drink, eat, or be physically active before/while taking the
measurement.
1)Overview
Infrared Thermometer measures the body temperature based on the infrared energy
emitted from the eardrum or the forehead. Users can quickly get measurement results
after positioning properly the temperature probe in the ear canal or forehead.
Normal body temperature is a range. The following tables shows that this normal range
also varies by site. Therefore, readings from different site should not be directly compared.
Tell your doctor what type of thermometer you used to take your temperature and on what
part of the body. Also, bear this in mind if you are diagnosing yourself.
14. Product Description
Measurements
36.1°C to 37.5°C (97.0°F to 99.5°F)
35.8°C to 38.0°C (96.4°F to 100.4°F)
35.5°C to 37.5°C (95.9°F to 99.5°F)
36.6°C to 38.0°C (97.9°F to 100.4°F)
34.7°C to 37.3°C (94.5°F to 99.1°F)
Forehead temperature
Ear temperature
Oral temperature
Rectal temperature
Axillary temperature
2)Structure
The thermometer consists of a shell, an LCD screen, a measure button, a beeper, an
infrared temperature sensor, and a Microprocessor.
3)Operating principle
The infrared temperature sensor collects infrared energy emitted by the eardrum or the
skin surface. After being focused by a lens, the energy is converted into a temperature
reading by the thermopiles and measurement circuits.

16
4)Indications for use
The Dual-mode Infrared Thermometer is intended for the measurement of human body
temperatures. The forehead mode is indicated for people of all ages and the eardrum
mode is indicated for people above three months old.
5)Contraindications
Do not use the thermometer if the ear is infected with otitis or suppuration.
• Accurate and reliable
• Quick measurement, less than 1 second
• Easy operation, one button design, to measure both ear and forehead
• Dual-functional, can measure ear, forehead temperature.
• 30 sets of memories, easy to recall
• Switching between mute and un-mute mode
• Fever alarm function, displayed in orange and red light.
• Switching between ºF and ºC
• Auto shut-down and power-saving
15. Features
Infrared temperature
Infrared ray
Eardrum
Ear canal
Table of contents
Popular Thermometer manuals by other brands

Radio Shack
Radio Shack 63-1028 owner's manual

Jumper
Jumper JPD-FR202 instruction manual

Nixie
Nixie Temp n Glow IN-16 user manual

Tenma
Tenma 72-820 operating manual

Guangzhou Bosma Technology
Guangzhou Bosma Technology WT001 Series user manual

Ashcroft
Ashcroft S5500 Installation and maintenance instruction manual


