Ferguson F3216LVD2 User manual

F3216LVD2
HD Ready LCD TV with Freeview, DVD Player & USB PVR
Model No
User Guide

4
ferguson user manual F3216LVD2.indd Sec1:4ferguson user manual F3216LVD2.indd Sec1:4 22/06/2011 10:55:3122/06/2011 10:55:31
5
5
ferguson user manual F3216LVD2.indd Sec1:5ferguson user manual F3216LVD2.indd Sec1:5 22/06/2011 10:55:3222/06/2011 10:55:32

6
ferguson user manual F3216LVD2.indd Sec1:6ferguson user manual F3216LVD2.indd Sec1:6 22/06/2011 10:55:3322/06/2011 10:55:33

7
7
CONTENTS
Manufacturers Guarantee Information. . . . . . . . . . . . . . . . . . . . . . . . . . . . . . . . . . . . . . 3
Important Safety Instructions. . . . . . . . . . . . . . . . . . . . . . . . . . . . . . . . . . . . . . . . . . . . . . 4-5
What is included in the box . . . . . . . . . . . . . . . . . . . . . . . . . . . . . . . . . . . . . . . . . . . . . . . 8
Attaching/Detaching the stand and wall mounting . . . . . . . . . . . . . . . . . . . . . . . . . . . . 9-10
Important installation instructions . . . . . . . . . . . . . . . . . . . . . . . . . . . . . . . . 10
Getting Started - Initial Set Up. . . . . . . . . . . . . . . . . . . . . . . . . . . . . . . . . . . . . . . . . . . . . 11
TV Buttons and Input Source Menu. . . . . . . . . . . . . . . . . . . . . . . . . . . . . . . . . . . . . . . . . 12
Remote Control. . . . . . . . . . . . . . . . . . . . . . . . . . . . . . . . . . . . . . . . . . . . . . . . . . . . . . . . . 13
Connections. . . . . . . . . . . . . . . . . . . . . . . . . . . . . . . . . . . . . . . . . . . . . . . . . . . . . . . . . . . . 14-15
TV Menu Operation . . . . . . . . . . . . . . . . . . . . . . . . . . . . . . . . . . . . . . . . . . . . . . . . . . . . . 16-21
Channel Menu . . . . . . . . . . . . . . . . . . . . . . . . . . . . . . . . . . . . . . . . . . . . . . . . 16
Picture Menu . . . . . . . . . . . . . . . . . . . . . . . . . . . . . . . . . . . . . . . . . . . . . . . . . 17
Sound Menu . . . . . . . . . . . . . . . . . . . . . . . . . . . . . . . . . . . . . . . . . . . . . . . . . . 18
Time Menu . . . . . . . . . . . . . . . . . . . . . . . . . . . . . . . . . . . . . . . . . . . . . . . . . . . 19
Feature Menu. . . . . . . . . . . . . . . . . . . . . . . . . . . . . . . . . . . . . . . . . . . . . . . . . 20
Setup Menu . . . . . . . . . . . . . . . . . . . . . . . . . . . . . . . . . . . . . . . . . . . . . . . . . . 21
DVD Menu . . . . . . . . . . . . . . . . . . . . . . . . . . . . . . . . . . . . . . . . . . . . . . . . . . . . . . . . . . . . . 22
PC Operation . . . . . . . . . . . . . . . . . . . . . . . . . . . . . . . . . . . . . . . . . . . . . . . . . . . . . . . . . . . 24-25
7 Day TV Guide / USB Record . . . . . . . . . . . . . . . . . . . . . . . . . . . . . . . . . . . . . . . . . . . . . . 26
USB Record / Digital Freeview mode . . . . . . . . . . . . . . . . . . . . . . . . . . . . . . . . . . . . . . . . 27
USB Mode / Media Player . . . . . . . . . . . . . . . . . . . . . . . . . . . . . . . . . . . . . . . . . . . . . . . . . 28
General Information . . . . . . . . . . . . . . . . . . . . . . . . . . . . . . . . . . . . . . . . . . . . . . . . . . . . . 29-33
Operating the TV with a universal or Sky (BSKYB) remote control . . . . . . 29
Frequently Asked Questions . . . . . . . . . . . . . . . . . . . . . . . . . . . . . . . . . . . . . 30
Technical Specifications . . . . . . . . . . . . . . . . . . . . . . . . . . . . . . . . . . . . . . . . . 31
Digital Switchover . . . . . . . . . . . . . . . . . . . . . . . . . . . . . . . . . . . . . . . . . . . . . 33
Index . . . . . . . . . . . . . . . . . . . . . . . . . . . . . . . . . . . . . . . . . . . . . . . . . . . . . . . . 33
ferguson user manual F3216LVD2.indd Sec1:7ferguson user manual F3216LVD2.indd Sec1:7 22/06/2011 10:55:3322/06/2011 10:55:33

8
Please save your packaging as you will need this in the event of warranty/service repair or support. We
are unable to carry out warranty/service if you are unable to package it correctly. The safest way to
package your item in the event of warranty/service repair is in it’s original box/packaging.
WHAT IS INCLUDED IN THE BOX
Accessories
Included with this TV are the following accessories:
1 x User Guide
1 x Quick Start Guide
2 x AAA Batteries
1 x TV
1 x RF Cable
1 x Remote Control
What is included in the box
User Guide
Quick Start
Guide
1 x Blanking plate for use when
wall mounting
1 x Stand plus screws
(4 x screws for stand base plate
1 x screw for stability)
ferguson user manual F3216LVD2.indd Sec1:8ferguson user manual F3216LVD2.indd Sec1:8 22/06/2011 10:55:3322/06/2011 10:55:33
9
9
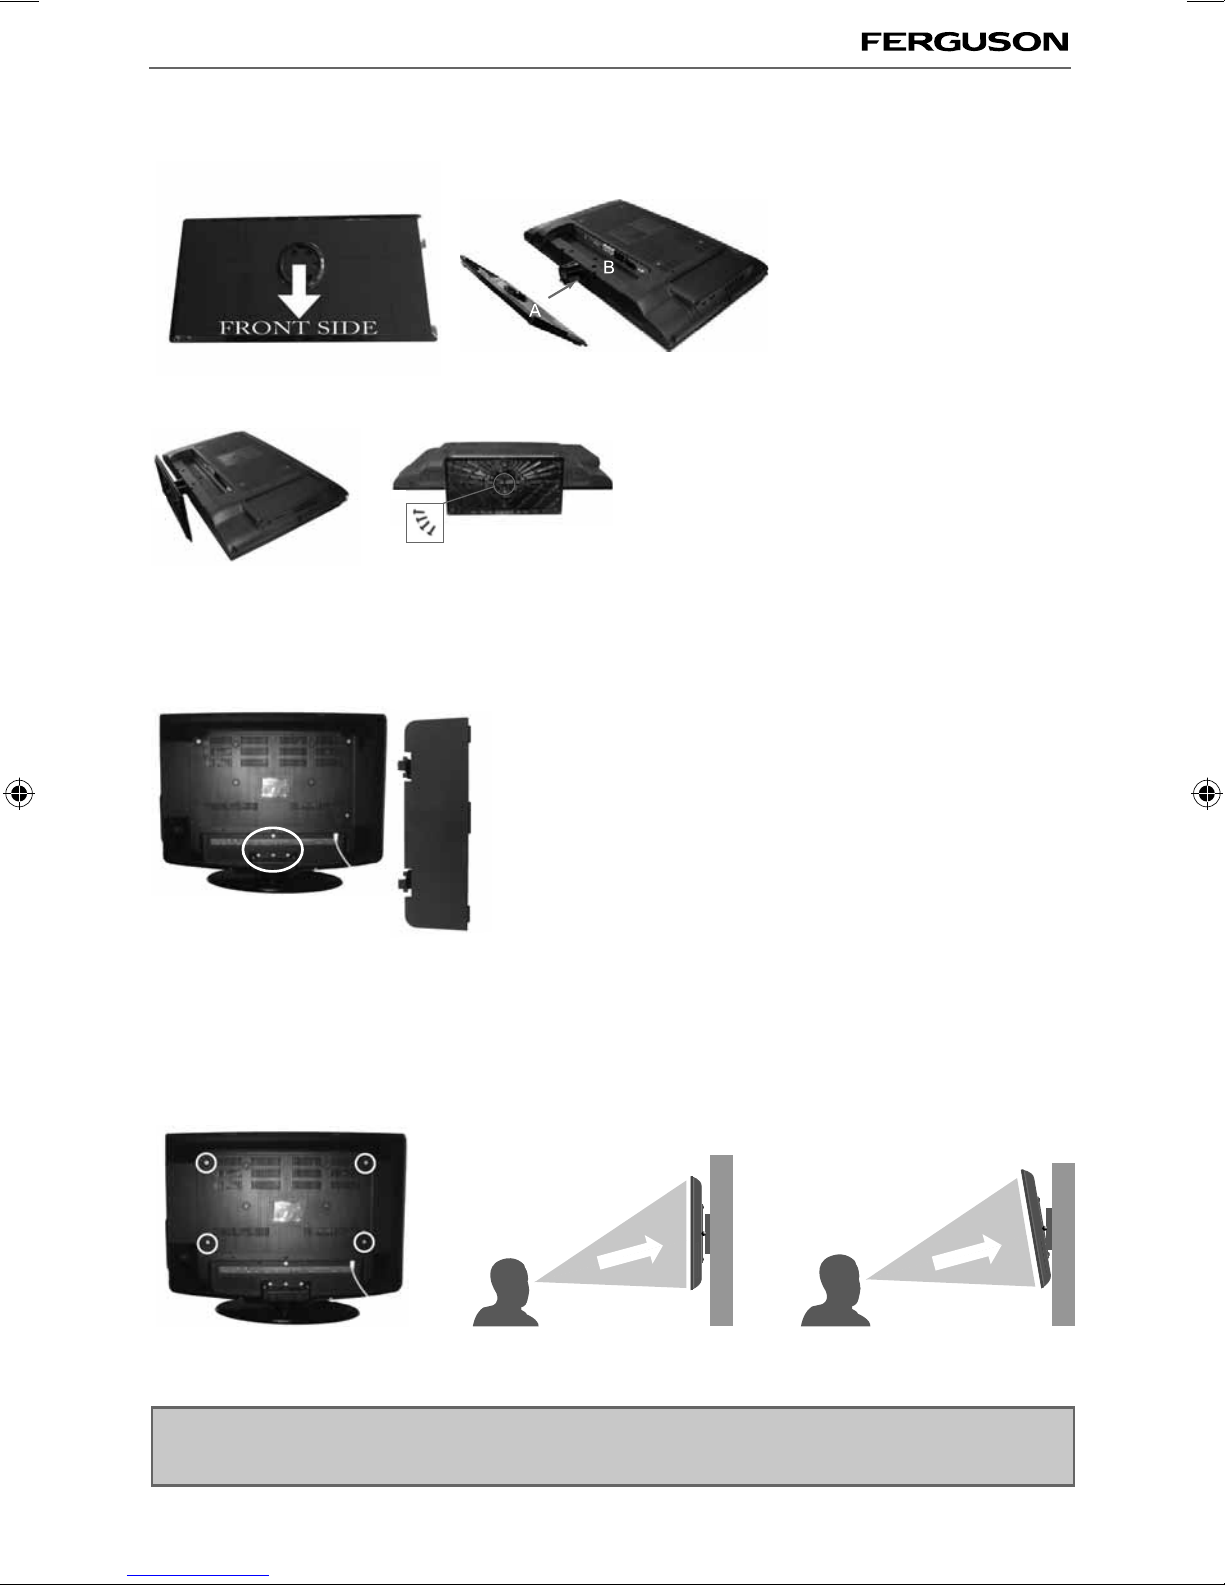
ATTACHING THE STAND
Attaching/Detaching the stand and wall mounting
2) Use the assembly screws to fasten the stand base securely.
Make sure that the screws are securely tightened.
Detaching the Stand
1) Remove the screws highlighted
2) Although there are no live parts exposed when removing
the stand, (in the event of wall mounting the TV) for aesthetic
purposes, included in the accessory pack is a cover plate which can
be clipped into the underside of the TV.
IMPORTANT - Before drilling any holes in the wall
ensure you are not drilling where there could be
any electric wires, water or gas pipes.
Wall mounting the TV
This television requires a VESA 400 x 200 wall mount, or equivalent.
1) Remove the four screws highlighted below.
2) The wall mount can now be easily attached to the mounting holes on the rear of the TV. These holes
are indicated in the picture below.
Important – If wall mounting this TV, only use the screws already provided in the wall mounting holes.
Using other screws which are longer could cause irreparable damage to internal parts.
Max length is 12mm
For optimum viewing, if wall mounting the TV higher than eye level, the TV should be
tilted downwards so that the TV’s screen is ‘face on’. See fig 1 and 2
DETACHING THE STAND
1) Insert the stand (PART A) into the stand neck (PART B)
fig 2
TV
Viewing angle
CORRECT
fig 1
Viewing angle
INCORRECT
ferguson user manual F3216LVD2.indd Sec1:9ferguson user manual F3216LVD2.indd Sec1:9 22/06/2011 10:55:4022/06/2011 10:55:40

10
Important installation instructions
TV base
Desk/TV stand
WARNING
To prevent injury, this apparatus must be securely attached to the floor, wall or
TV cabinet in accordance with these installation instructions
IMPORTANT INSTALLATION INSTRUCTIONS
Securing the TV to a Desk/TV Stand
Image shown may differ from your TV. The TV
must be attached to desk so it cannot be pulled in
injury or damaging the product. Use only the screw
supplied.
Using the screw provided, screw through the hole
in the TV base to secure the TV to the desk/stand.
Securing the TV to a Wall
• Position the TV close to the wall to avoid the
possibility of it falling when pushed.
• The instructions shown below are a safer way to
set up the TV, by fixing it tothe wall, avoiding the
possibility of it falling forwards if pulled. This will
prevent the TV from falling forward and causing
injury. This will also prevent the TV from damage.
• This method is used if the TV is placed on a glass
surface or you do not wish to screw anything
into your furniture.
• Ensure that children do not climb or hang onto
the TV.
For this type of installation you will need a
fastening chord
(available free of charge from the helpline)
A) Using one/both of the top wall-mounting holes
and screws (the screws are already supplied in the
wall mounting holes) fasten one end of the
fastening chord/s to the TV.
B)Secure the other end of the fastening chord/s to
your wall. (you will need screws/fixings suitable for
your wall type - available separately from most
DIY stores)
•
ferguson user manual F3216LVD2.indd Sec1:10ferguson user manual F3216LVD2.indd Sec1:10 22/06/2011 10:55:4322/06/2011 10:55:43

11
11
GETTING STARTED - INITIAL SET UP
Getting Started - Initial Set Up
1) Using the RF cable supplied, connect the TV
to the TV Aerial wall socket (Fig A)
2) Connect the power cable to the Electrical
outlet (Fig B)
5) You will now be welcomed with the initial
set-up screen.
If it does not appear, on the remote control,
please press [MENU] then 8-8-8-8 and the
menu will appear.
Press OK on the remote control and tuning
will start.
6) After tuning the following screen will
appear.
If you are missing channels, the reason for this is likely to be signal strength, you should
consider connecting signal booster and re-tuning the TV.
Fig A
Fig B
4) Insert the batteries supplied into the
Remote control and press the Standby
button to power on the TV
3) Switch on the television using the
power on/off switch.
Power on/off
Tip: If the TV finds some, but not all, of the Digital channels, the TV is functioning correctly but the
signal being received is not strong enough. (The signal strength needs to be above 85% - you can see the
signal strength the TV is receiving when you change channels/ programmes) you will need to increase
the signal reception in order to receive all of the channels available. The most economical way to do
this is by purchasing and connecting a ‘signal booster’ in between the TV and the TV aerial socket. If this
does not solve the problem, you will need to upgrade the TV aerial to a digital hi-gain compatible aerial
ferguson user manual F3216LVD2.indd Sec1:11ferguson user manual F3216LVD2.indd Sec1:11 22/06/2011 10:55:4522/06/2011 10:55:45

12
TV BUTTONS & SOURCE MENU
Choosing Mode Input/Source
To switch between the different input/
connections.
A) Using the buttons on the remote control:
1) Press [SOURCE/ AV] - The source menu will
appear
2) Press [\/] or [/\] to select the input you
require.
3) Press [OK]
B) Using the buttons on the Television:
1) Press [SOURCE]
2) Scroll up / down using CH+/ CH- buttons to
the input/source you require
3) Press Vol+ to change input/source to the
one selected.
TV Buttons and Source Menu
Eject
Pause/Play
Displays the input source menu
Displays Menu/OSD
Volume up and menu right
Volume down and menu left
Programme/Channel up and menu up
Programme/Channel down and menu down
Standby Power On/Off
1
2
3
4
5
6
7
8
9
1
2
3
4
5
6
7
8
9
ferguson user manual F3216LVD2.indd Sec1:12ferguson user manual F3216LVD2.indd Sec1:12 22/06/2011 10:55:5122/06/2011 10:55:51
13
13
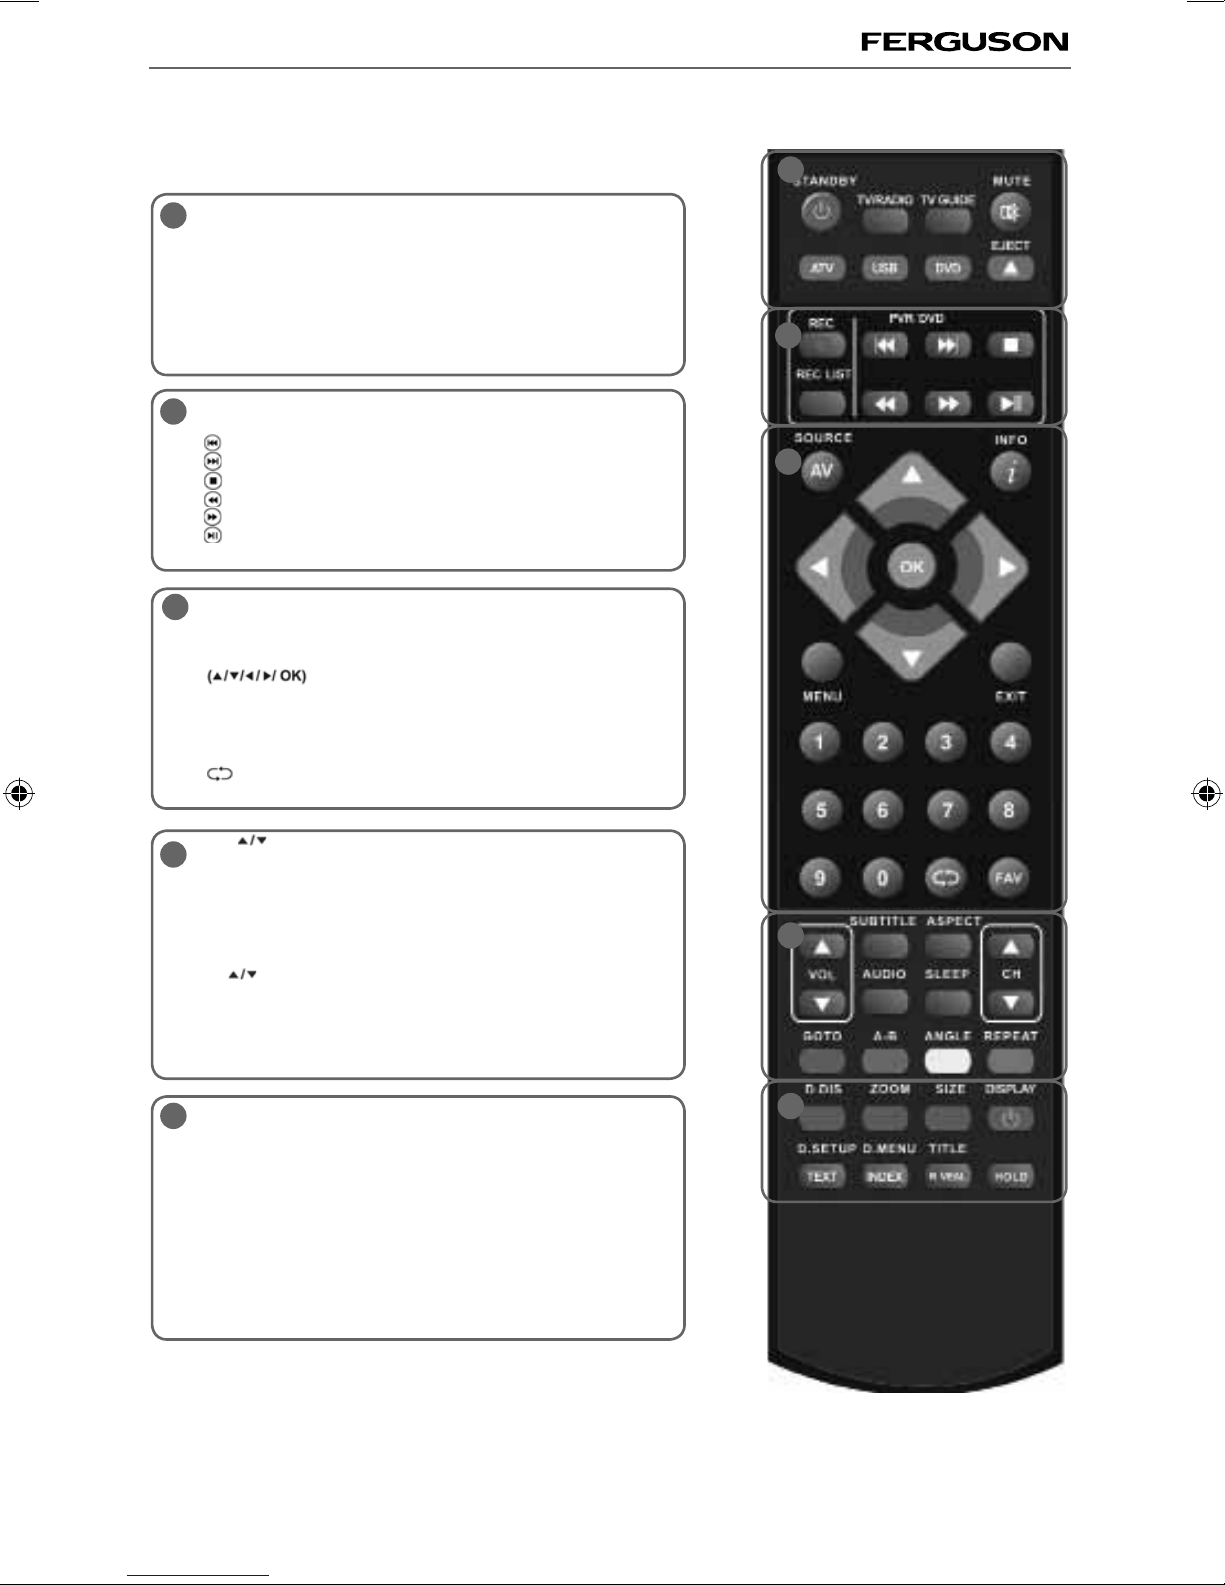
Remote Control
REMOTE CONTROL
STANDBY - Switch on TV when in standby or vice versa
MUTE - Mute the sound or vice versa
TV/RADIO - Switch to Freeview and switch between TV and
radio in Freeview mode
TV GUIDE - Opens the 7 Day TV Guide (Freeview mode)
ATV - Switch to analogue TV source
USB - Switch to USB source
DVD - Switch to DVD source
EJECT - Eject disc in DVD mode
REC - To record what is currently on television
REC LIST - Opens the list of what you have previously recorded
- To restart the current chapter
- To advance forward to the next chapter
- To stop the playback
- To play in fast rewind mode
- To play in fast forward mode
- To play/pause (Pause live TV when USB Memory Stick is
inserted)
SOURCE/AV - To display the input/source menu
INFO - Press once for now/next channel information
Press twice for programme information about current
programme
- Allows you to navigate the on-screen menus
and adjust the system settings to your preference
MENU - To display OSD menu
EXIT - To exit all menus
NUMBER BUTTONS - 0 – 9 to select a TV channel directly.
- To return to the previous channel viewed
FAV - To display favourites menu
VOL - To increase / decrease the sound level
SUBTITLE - To switch the dialogue at the bottom of the screen
(on/off)
ASPECT - To switch the screen between the different picture
formats
AUDIO - To change the audio language (if available)
SLEEP - Press repeatedly to cycle through the sleep options
CH To increase or decrease the channel being watched
GOTO - DVD mode - To go to a specific chapter
A-B - DVD mode - Press once to set point, press a second time to
return to point
ANGLE - DVD mode - Select different angle of DVD (if available)
REPEAT - DVD mode - To repeat playback
D.DIS - DVD mode - To display the current disc information
ZOOM - DVD mode - To zoom in
SIZE - Teletext mode* - To change the display size in Teletext
mode
DISPLAY - To switch off the screen when listening to radio
DVD SETUP/TEXT - DVD mode - To display the DVD setup menu
Teletext mode* - To enter Teletext
D.MENU/INDEX - DVD mode - To display the DVD disc menu
Teletext mode* - To display the index page
TITLE/REVEAL - DVD mode - To display the DVD title menu
Teletext mode* - To reveal or hide the hidden words.
HOLD - Teletext mode - Hold current page which is displayed
* Teletext function is only available in analogue
1
1
2
3
4
5
4
5
2
3
ferguson user manual F3216LVD2.indd Sec1:13ferguson user manual F3216LVD2.indd Sec1:13 22/06/2011 10:55:5222/06/2011 10:55:52

14
ABCDE G I MN
L
N
M
J
USB USB port
HDMI 1 HDMI input
HDMI 2 HDMI input
HDMI 3 HDMI input
VGA(PC) VGA-PC input
VGA(PC) Audio In 3.5mm PC audio input
CI CARD IN Common Interface Card Input
SCART SCART input
COAX Audio Out Digital Coax output
COMPONENT (HD) Component input (YPbPr)
VIDEO Video input
R/L (COMPONENT)
RF IN RF / TV Aerial Input
3.5mm JACK Headphone socket
A
B
C
D
E
F
G
H
I
J
K
Connecting a DVD Player/Recorder, Video Recorder or
Cable/Satellite Box
TVs Input/Source should be set to SCART
CONNECTIONS
Connections
RF IN
SCART
TV Aerial
Wall Socket SCART
OUT RF
IN RF
OUT
DVD or VCR
FHL
K
AV (CVBS) & Component
(Y,Pb,Pr) Audio input
ferguson user manual F3216LVD2.indd Sec1:14ferguson user manual F3216LVD2.indd Sec1:14 22/06/2011 10:55:5222/06/2011 10:55:52

15
15
CONNECTIONS
Connecting a Camcorder, Camera or Games Console
Source should be set to Video
Connecting a High Definition (HD) Device
Option 1 - via HDMI to HDMI cable
A HDMI cable can output both video and audio and enables you to enjoy digital-quality video and audio
with minimal loss of quality.
TVs Input/Source should be set to HDMI.
Option 2 - via Component cable
If you are supplied with a cable from the device which has RED, GREEN, BLUE, RED & WHITE connectors
you must connect via Component (for picture) and by phono cable (for sound).
TV Source should be set to Component.
Connections
Component (HD)
Component
Green
Blue
Red
Audio L/R
White
Red
Audio
In L/R
Camera or
Camcorder Yellow
White
Red Audio
In L/R
Video
HDMI OUT
HDMI
ferguson user manual F3216LVD2.indd Sec1:15ferguson user manual F3216LVD2.indd Sec1:15 22/06/2011 10:55:5322/06/2011 10:55:53

16
TV Menu Operation
CHANNEL MENU
Auto Tuning - Allows you to retune the television for all digital channels, digital radio stations and
analogue channels.
Freeview Manual Tuning- Allows you to manually tune your digital signal
Analogue Manual Tuning - Allows you to manually tune your analogue signal
Programme Edit - Allows you to delete, skip and add favourite channels.
To access this menu, press [MENU] button on the remote control. To enter a menu press [OK]
If you wish to make changes to any of the default settings, use the scroll buttons. To confirm
any settings press [OK] button.
To exit this menu at anytime, press [EXIT] button.
AV
ferguson user manual F3216LVD2.indd Sec1:16ferguson user manual F3216LVD2.indd Sec1:16 22/06/2011 10:55:5322/06/2011 10:55:53

17
17
TV Menu Operation
PICTURE MENU
To access this menu, press [MENU] button on the remote control. To enter a menu press [OK]
If you wish to make changes to any of the default settings, use the scroll buttons.
To confirm any settings press [OK] button.
To exit this menu at anytime, press [EXIT] button.
Picture Mode - Choose from the following presets
Standard Default settings
Dynamic Recommended settings for fast moving pictures
Mild Set to be lighter in colour and less bright
Personal Lets you manually alter all the settings
Contrast - Switch the balance between black and white
Brightness - Increase or decrease the brightness of the picture
Colour - Increases the colour from black and white
Tint - Lets you increase or decrease the level of tint within the picture
Sharpness - Increase or decrease the sharpness of the picture
Colour Temperature - Choose from the following presets
Normal Default settings
Warm Increases red within the picture
Cool Increases blue within the picture
Noise Reduction - Choose from the following presets
Off Turns noise reduction off
Low Minor system adjustment
Middle Medium system adjustments
High Maximum system adjustments
Default Default settings
Tip: If you do not press any buttons for 10 seconds, the menu will automatically exit. You can change the
length of time before the menu exits automatically - see ‘Menu Duration’ section.
AV
ferguson user manual F3216LVD2.indd Sec1:17ferguson user manual F3216LVD2.indd Sec1:17 22/06/2011 10:55:5422/06/2011 10:55:54
18
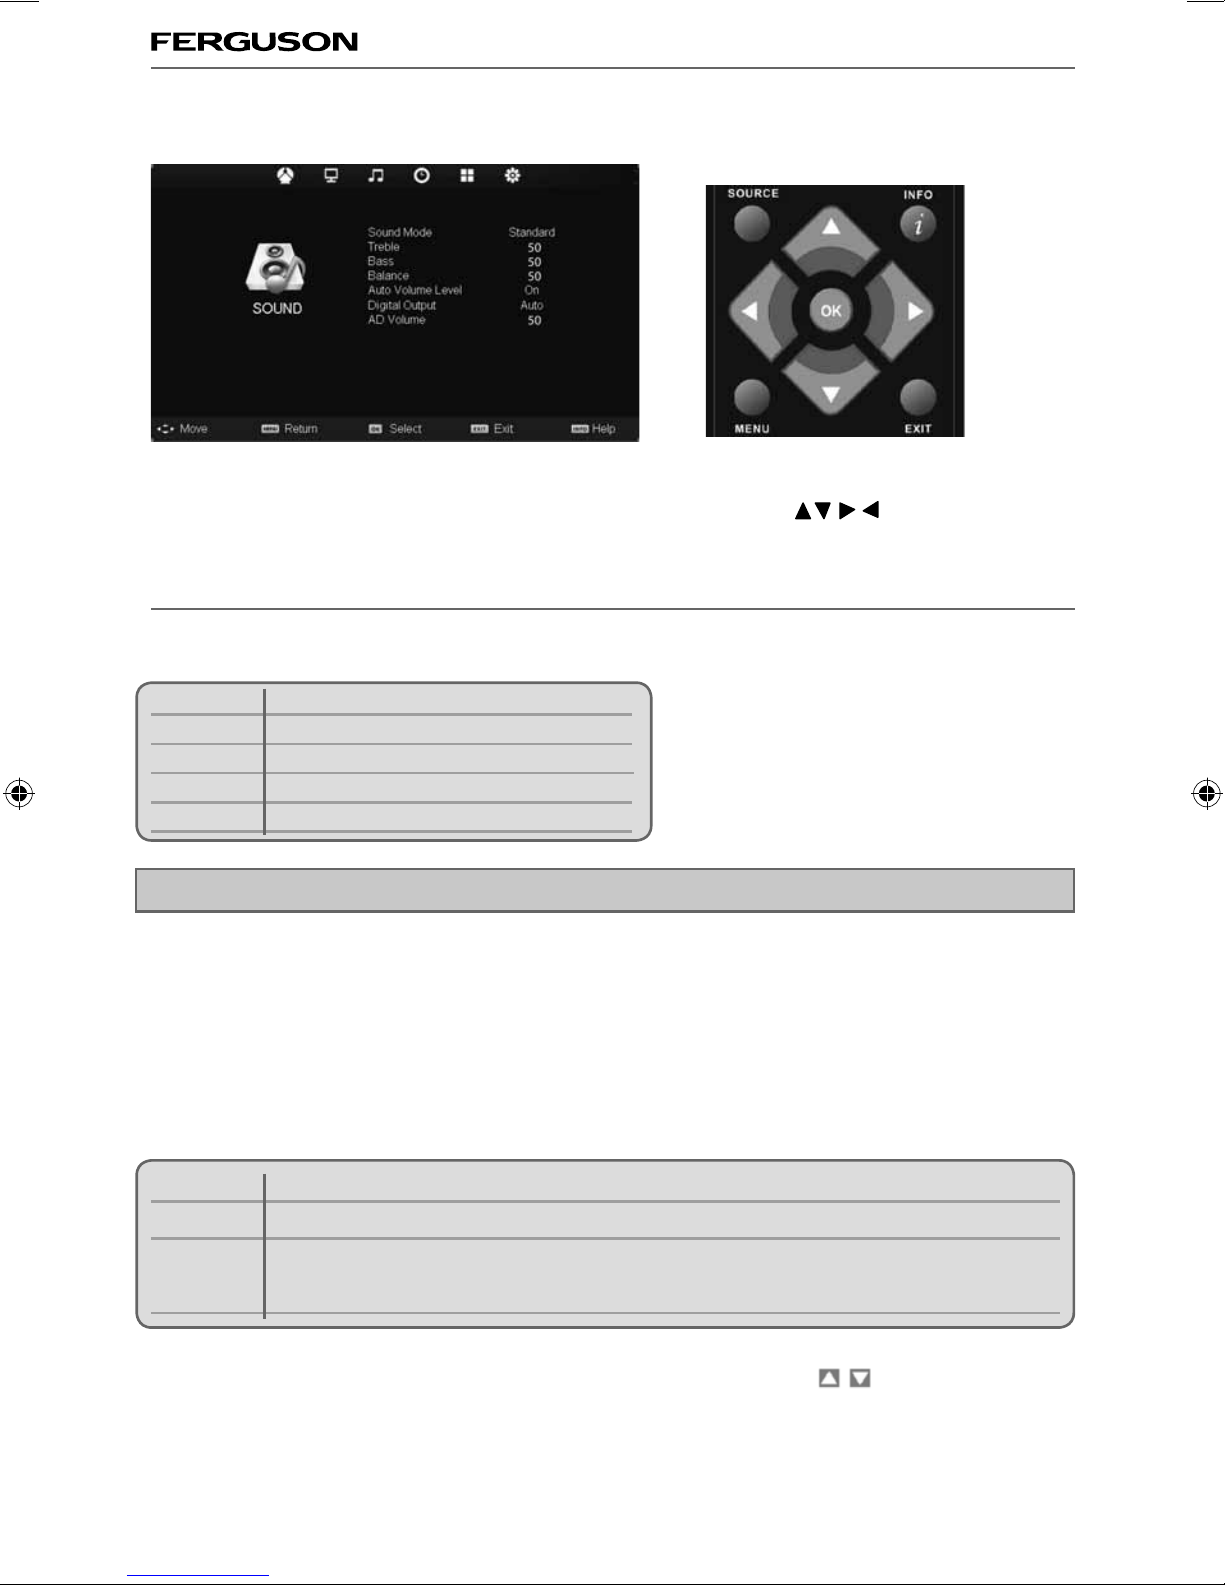
TV Menu Operation
SOUND MENU
Treble - To adjust the amount of high frequency within the sound
Bass - To adjust the amount of low frequency within the sound
Balance - To switch the sound between the left and right speakers
Auto Volume Level (AVL) - When ‘on’ is selected, the volume will stay at a constant level regardless of
input/source
AD Volume Adjust - Increase or decrease Audio Description volume.
To access Audio Description, press the AUDIO button on the remote, use the buttons to select
MPEG VI L+R. To switch Audio Description off, select MPEG.
Sound Mode - Choose from the following presets
Standard Default settings
Music Emphasises music over voices
Movie Provides live and full sound for movies
Personal Selects your personal sound settings
Sports Emphasises sound for sports
Digital Output - This is the digital COAX Audio output. Choose from the following options:
Off Off
Auto Selects the best settings automatically
PCM Select this option if you are connecting to a Stereo Hi-fi via coax cable (Pulse-code
modulation (PCM) is a digital representation of an analogue signal)
To access this menu, press [MENU] button on the remote control. To enter a menu press [OK]
If you wish to make changes to any of the default settings, use the scroll buttons. To confirm
any settings press [OK] button.
To exit this menu at anytime, press [EXIT] button.
Tip: Treble and bass levels can only be adjusted when the sound mode ‘Personal’ is selected.
AV
ferguson user manual F3216LVD2.indd Sec1:18ferguson user manual F3216LVD2.indd Sec1:18 22/06/2011 10:55:5522/06/2011 10:55:55
19
19
TV Menu Operation
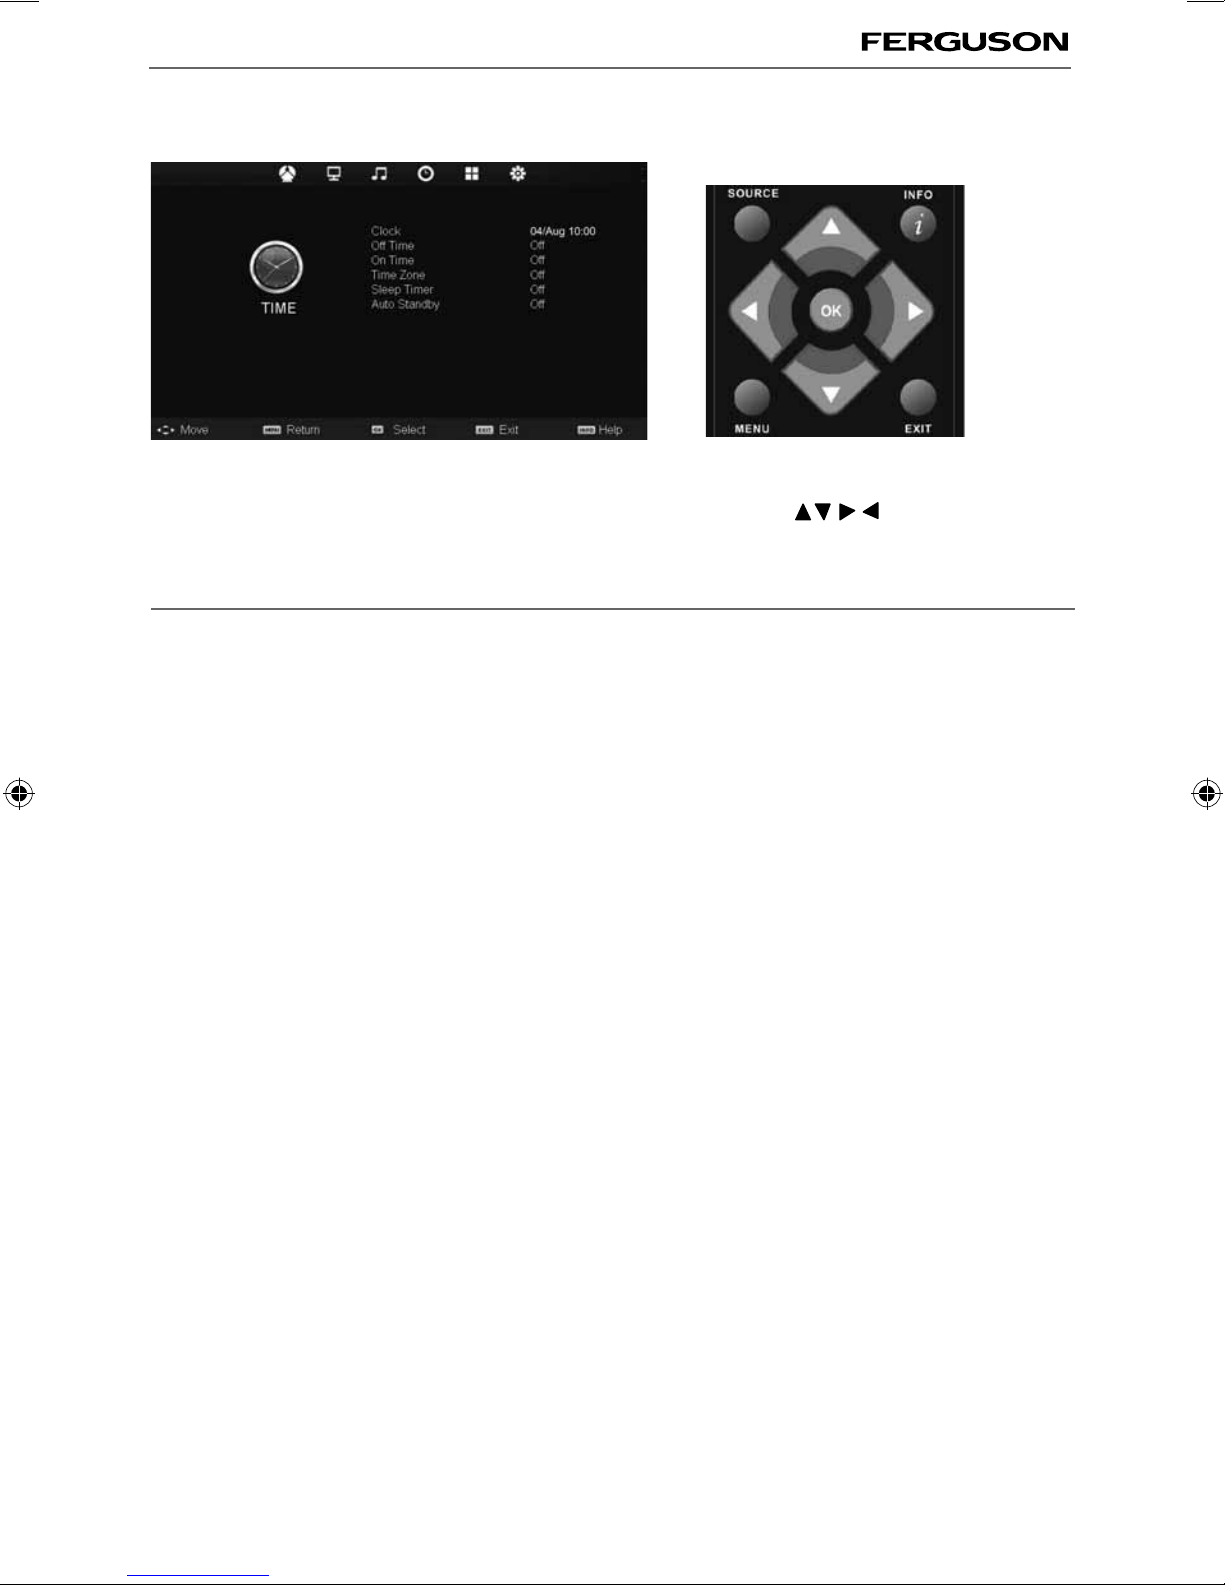
TIME MENU
To access this menu, press [MENU] button on the remote control. To enter a menu press [OK]
If you wish to make changes to any of the default settings, use the scroll buttons. To confirm
any settings press [OK] button.
To exit this menu at anytime, press [EXIT] button.
AV
Clock - Set the date and time
Off Time - Allows you to set a specific time for your TV to turn off
On Time - Allows you to set a specific time for your TV to turn on, the channel it will then display, the
source it will be on and also the volume. This function can then be toggled to repeat every day or a
certain day.
Time Zone - Change your current time zone
Sleep Timer - Lets you set the sleep timer so the television automatically switches off after a set amount of
time. Off -> 10min -> 20min -> 30min -> 60min -> 90min -> 120min -> 180min -> 240min
Auto standby - Toggle the Function on and off
ferguson user manual F3216LVD2.indd Sec1:19ferguson user manual F3216LVD2.indd Sec1:19 22/06/2011 10:55:5622/06/2011 10:55:56

20
TV Menu Operation
FEATURE MENU
Schedule List - Lists your programme reminders
PVR File System - Allows you to access recorded programs
CI Information - Pay per view services require a “smartcard” to be inserted into the TV.
If you subscribe to a pay per view service the provider will issue you with a ‘CAM’ and a “smartcard”. The
CAM can then be inserted into the COMMON INTERFACE PORT (CI Card In).
System Lock - Allows you to lock or unlock the menu. You will be asked to enter a 4 digit password use
the button to quit the password input. Use the button to clear. Default password is 0000
Audio Language - Allows you to change audio language
Sub.T Language - Allows you to change subtitle language
To access this menu, press [MENU] button on the remote control. To enter a menu press [OK]
If you wish to make changes to any of the default settings, use the scroll buttons. To confirm
any settings press [OK] button.
To exit this menu at anytime, press [EXIT] button.
AV
ferguson user manual F3216LVD2.indd Sec1:20ferguson user manual F3216LVD2.indd Sec1:20 22/06/2011 10:55:5722/06/2011 10:55:57
21
21
TV Menu Operation
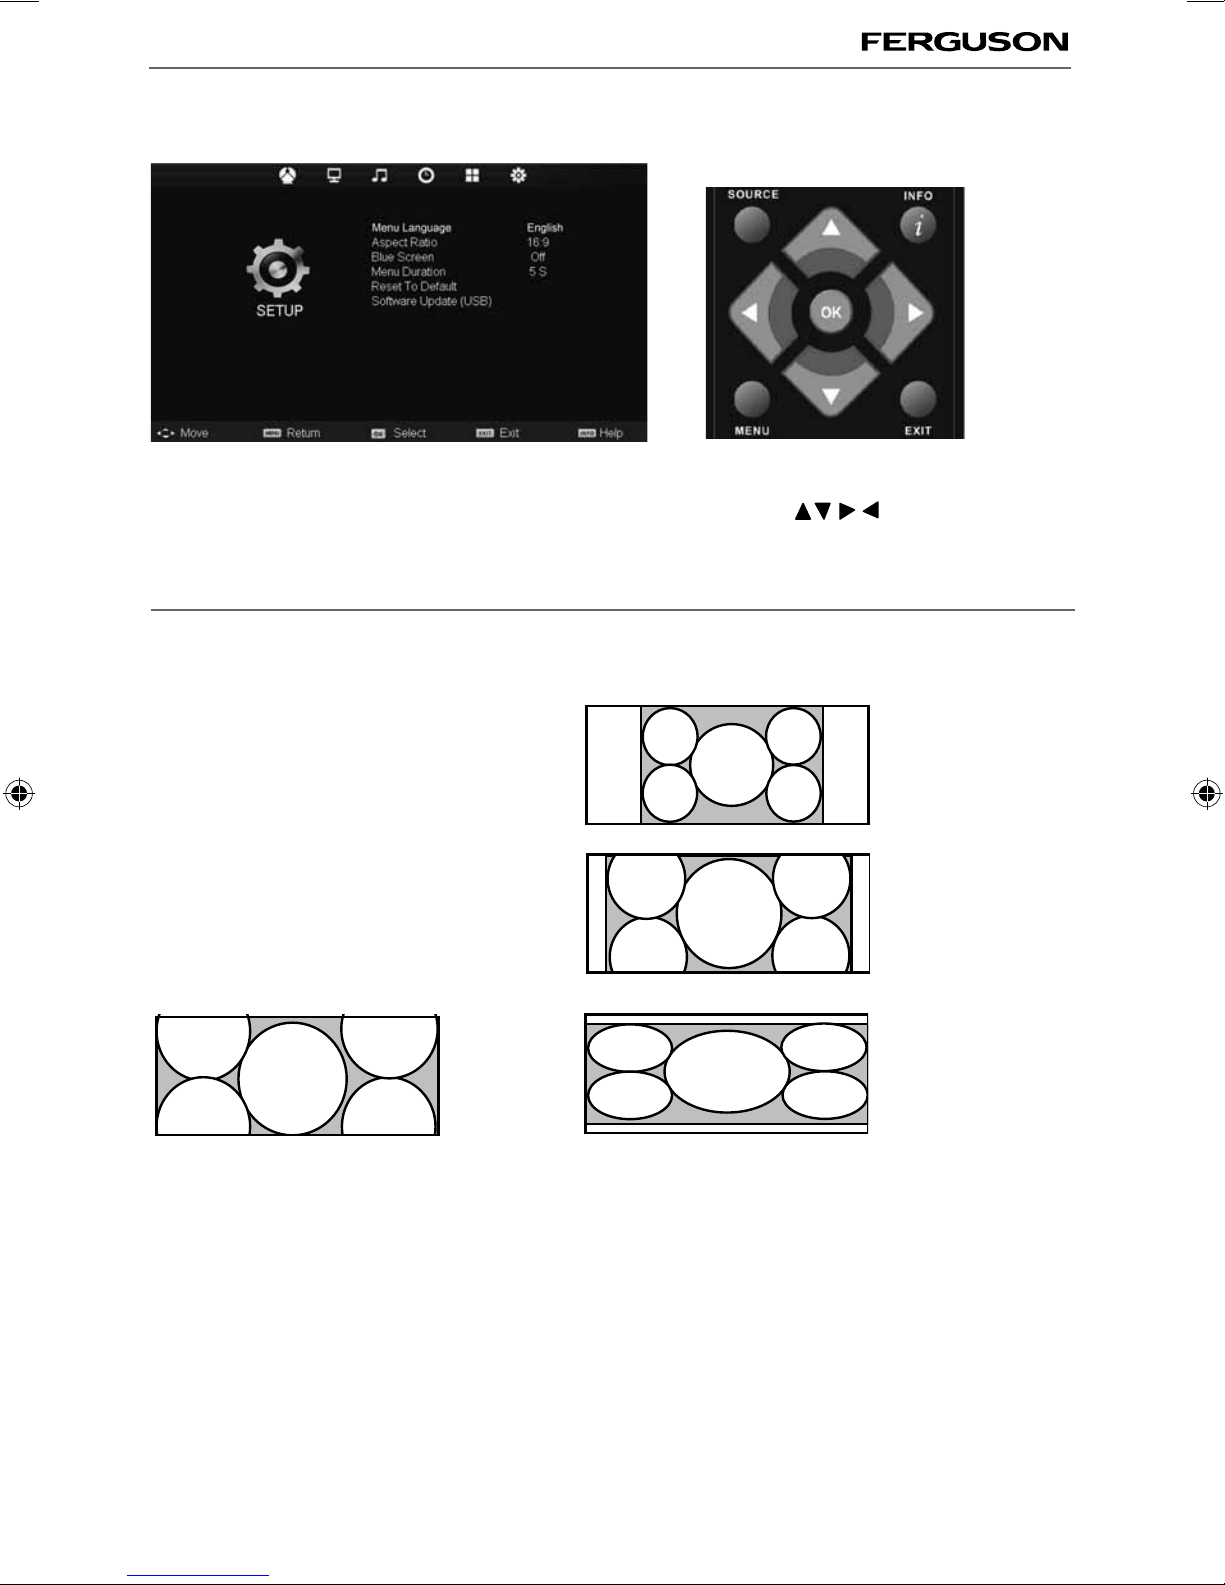
SETUP MENU
To access this menu, press [MENU] button on the remote control. To enter a menu press [OK]
If you wish to make changes to any of the default settings, use the scroll buttons. To confirm
any settings press [OK] button.
To exit this menu at anytime, press [EXIT] button.
AV
Auto
Automatically displays the best picture format. So the
picture is in the correct position. May have black lines
At the top/bottom and/or sides.
Zoom
Original
16:9
The picture
is the correct
proportion but
zoomed in to
fill the screen
Will display the picture from the broadcaster
without any change
14:9
Blue Screen - Changes the background when there is no input between clear and a blue background (Only
available on some sources)
Menu Duration - Lets you adjust the amount of time the On Screen Menu stays on the screen before
disappearing
Reset to default
Reset Menu System - This resets the menus to factory settings.
Reset TV Channels - This clears all the TV channels from the television.
Software Update (USB) - From time to time we may release new firmware to improve the operation of
the television (available to download). This menu lets you install the new software/firmware onto the
television. Further details of how to do this will be issued with the firmware. Contact the helpline or refer
to the ‘product support’ section of the website.
Aspect Ratio - Within the UK the picture format
varies depending on the channel/broadcast.
There are a number of different options to best
meet your needs
Menu language - Allows you to change the language of the menu
4:3
Displays the
14:9 picture
in the correct
proportion. As
a result side
bars are shown
on the screen
Displays the 4:3
picture in its
original size.
Side bars are
shown to fill the
16:10 screen
Top and
bottom bars
are shown to
fill the 16:10
screen. 4:3
pictures will be
stretched
ferguson user manual F3216LVD2.indd Sec1:21ferguson user manual F3216LVD2.indd Sec1:21 22/06/2011 10:55:5722/06/2011 10:55:57

22
AV
DVD MENU
To access this menu, press D.Setup button on the remote control.
If you wish to make changes to any of the default settings, use the scroll buttons. To confirm
any settings press [OK] button.
To exit this menu at anytime, press [EXIT] button.
TV System - Choose from the following options
NTSC Normally used for discs from North America, Japan etc
PAL The standard for discs from UK/Europe, most of Asia, Australia etc
Auto For both NTSC and PAL
TV Type - Choose from the following options
4:3PS Traditional picture format, often used on old film
4:3 LB Traditional picture which has been adapted for widescreen
16:9 Widescreen picture format
Default - This option allows you reset all DVD settings to factory settings.
Dynamic Range - This is the difference between the quietest and loudest sounds. This setting works only
with DVD discs recorded in Dolby digital.
Full Set this to listen with the range recorded on the disc
4/8 Set this to listen with a range equivalent to a normal television
2/8 Set this to listen with a smaller difference between the maximum and minimum volume
Dual Mono
Stereo Outputs 2 channels of sound both left and right
Mono L Outputs left side sound
Mono R Outputs right side sound
Mix Mono Outputs a single channel of sound but mix between right and left
Tip: This TV/DVD player is pre-set to play Region 2 DVDs. In the event you wish to use the TV/DVD in
another country that uses different region discs, please visit www.skymediauk.co.uk. Select ‘Product
Support’, ‘Changing Region’.
DVD Menu
ferguson user manual F3216LVD2.indd Sec1:22ferguson user manual F3216LVD2.indd Sec1:22 22/06/2011 10:55:5822/06/2011 10:55:58
Table of contents
Other Ferguson TV DVD Combo manuals


