Goodmans GTVL19W19DVD User manual

INSTRUCTION MANUAL
TFT LCD TV & DVD PLAYER
MODEL:GTVL19W19DVD
Read these instructions thoroughly before attempting to connect,operate
or adjust this player.Retain the book for future reference.
Goodmans Helpline 0870 8730080
Goodmans Web Site: www.goodmans.co.uk

1
LCD TV User Guide
Safety Instructions
IMPORTANT SAFETY INSTRUCTIONS
To reduce the risk of fire or electric shock, do not expose this
equipment to rain or moisture.
This symbol is intended to alert the user to avoid the risk of
electric shock, do not disassemble this equipment by anyone
except a qualified service personnel.
This symbol is intended to alert the user to the presence
of important operating and maintenance instructions
in the literature accompanying the appliance.
RISK OF ELECTRIC SHOCK
DO NOT OPEN
CAUTION
CAUTION: TO AVOID THE RISK OF ELECTRIC SHOCK,
DO NOT REMOVE COVER (OR BACK).
NO USER-SERVICEABLE PARTS INSIDE.
REFER SERVICING TO QUALIFIED SERVICE PERSONNEL.
Use of controls or adjustments or performance of procedures other than those
specified herein may result in hazardous radiation exposure.
WARNING
CAUTION
CAUTION
Invisible laser radiation when open and interlocks defeated.
avoid exposure to beam.

2LCD TV User Guide
Safety Instructions
PREFITTED MAINS PLUGS
For your convenience a mains plug has been fitted to this appliance. For your safety
please observe the following information.
1. Should the fuse in the plug, fall remove the plug from the wall socket and replace
the fuse with a 3 Amp ASTA approved to BS 1362 fuse.
2. Never use the plug without the fuse cover fitted. Replacement of fuse cover are
available from your dealer or most electrical retail outlets.
3. If the mains plug cut off the cable, rewire the replacement of plug in accordance
with instruction given in this manual.
4. CAUTION: Under no circumstances should the discarded plug be inserted into the
mains socket. To prevent a shock hazard carefully dispose of the discarded plug.
Do not leave the plug lying around where children might see it.
WARNING: To prevent fire or shock hazerd do not expose this unit to rain or moisture.
MAINS PLUG WIRING
CAUTION:DANGEROUS VOLTAGES EXIST INSIDE THIS UNIT. DO NOT REMOVE
COVER(OR BACK).
NO USER SERVICEABLE PARTS INSIDE REFER SERVICING TO
QUALIFIED SERVICE PERSONNEL. DISCONNECT FROM MAINS
SUPPLY WHEN NOT IN USE.
The wires in this mains lead are coloured in
accordance with the following wiring codes:
Blue..................................................Neutral
Brown....................................................Live
Green&Yellow.......................................Earth
The wires in this mains lead must be
Connected to the terminals in the plug as
Follows:
Blue Wire..................................... N or Black
Brown Wire..................................... L or Red
Green&Yellow.......................................Earth
Only a 3 Amp fuse should be fitted in the
Plug or a 5 Amp fuse at the destribution
Board.
WARNING:UNDER NO CIRCUMSTANCES MUST THE LIVE OR NEUTRAL WIRES BE
CONNECTED TO THE EARTH TERMINAL IN A 3-PIN MAINS PLUG.

3
LCD TV User Guide
Safety Instructions
IMPORTANT SAFETY INSTRUCTIONS
Do not attempt to service the equipment yourself.
Opening and removing the covers may expose you to dangerous
voltage or any other hazards and may void your warranty.
Refer service from qualified personnel.
Do not place or drop any other objects on top.
Do not insert anything into the ventilation holes of your
equipment.Inserting any metal or flammable objects may result in
fire or electric shock.
Do not place the equipment on uneven or unstable, stands,tables, shelves etc..
The equipment may fall, causing serious injuries to children or adults and serious
damages to the equipment itself.
Always place the equipment on the floor or on a surface that
is sturdy, level, stable and strong enough to support
the weight of the equipment.
Do not block any ventilating openings, leave an open space around the equipment.
Never place the equipment :
on a bed, sofa, rug, or any other similar surfaces;
too close to drapes/curtains/walls, in a bookcase,built-in cabinet,
or any other similar places that may cause poor ventilation.
Always remove the cord from the outlet before cleaning the equipment.
Never use cleaners, harsh or abrasive chemicals or solvents on the
equipment. Clean only with a dry, soft, lint-free cloth.

4LCD TV User Guide
Safety Instructions
WARNINGS
WEEE:
This appliance is labelled in accordance with European Directive 2002/96/EG
concerning used electrical and electronic appliances(waste electrical and electronic
equipment - WEEE). The guideline determines the framework for the return and
recycling of used appliances as applicable throughout the EU.
● Unqualified attempts to repair this TV are not allowed. Refer repairs to this unit
to a qualified technician only.
● Do not disassemble this unit. There are dangerous-voltage parts inside that may
cause electric shock even after power is disconnected.
● Store your unit in a clean, dry environment, Unplug the unit immediately it gets
wet, and consult your servicing technician.
● Always unplug the unit before cleaning it. Wipe dust off the cabinet of the unit
with clean & dry &soft cloth. Apply non-ammonia cleansing lotion onto the cloth,
not directly onto the screen.
● Do not place heavy objects on top of the unit.
●Avoid exposing your unit directly to sunlight or other heat sources.
● Put your unit in a well-ventilated area away from high humidity.
●Do not expose this TV to rain or moisture, dripping or splashing.
Safety Tips
● If smoke, abnormal noise or odour comes out of your unit, unplug from the
mains supply immediately and call your dealer.
● Never try to repair the your unit on your own. Always call your dealer
for repairs.
Note
This user’s manual contains for-reference-only graphics and information that are
subject to change without notice.

5
LCD TV User Guide
CONTENT
CONTENT
PREPARATION .............................................................................................................. 6
Features ............................................................................................................................................................... 6
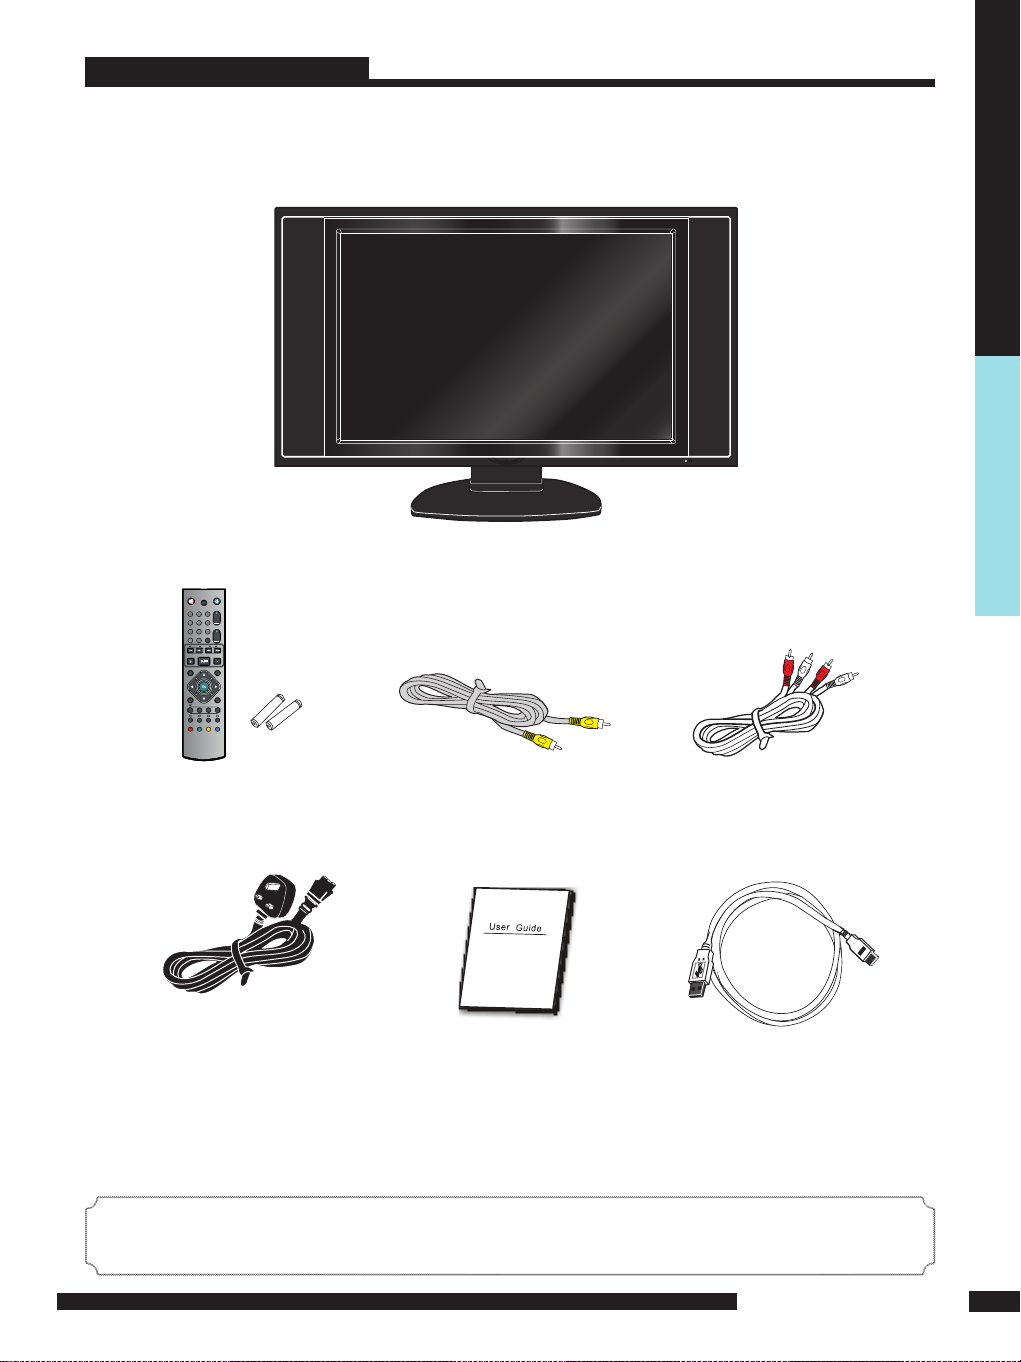
Package Contents ............................................................................................................................................... 7
LCD TV .................................................................................................................................................................. 8
Front View ............................................................................................................................................................. 8
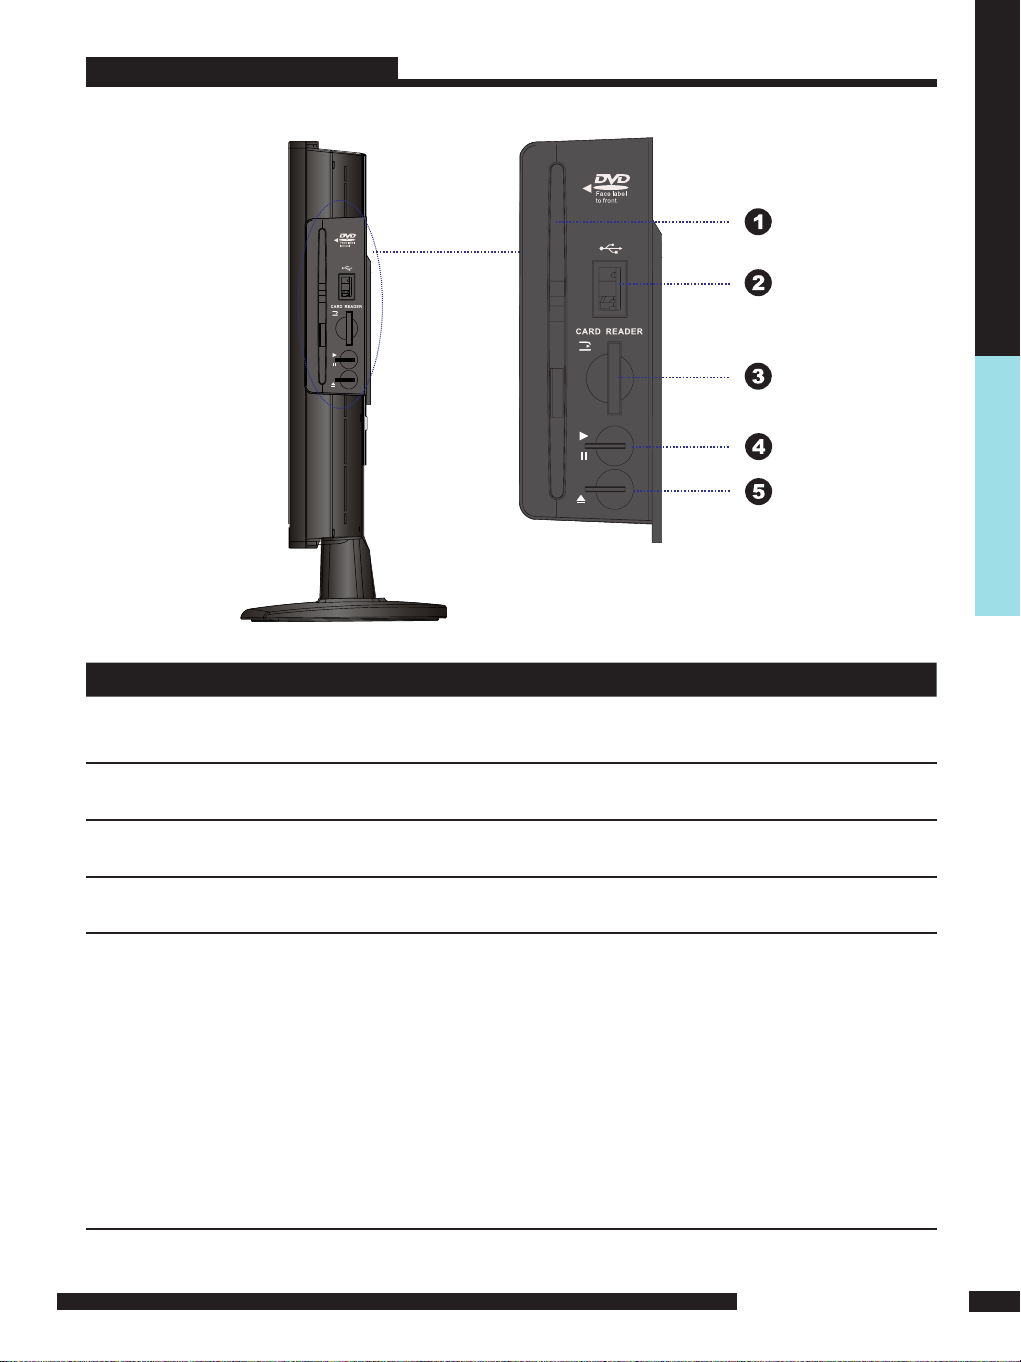
Side View...................................................................................................................................................................9
Rear View .............................................................................................................................................................. 10
Remote Control ....................................................................................................................................................... 11
Setting up your LCD TV............................................................................................................................................ 14
Using your LCD TV............................................................................................................................................... 15
INSTALLATION ........................................................................................................... 16
Connecting a TV Cable or Aerial....................................................................................................................... 16
Connecting a DVD Player .................................................................................................................................. 17
Connecting a VCR & a Video Camera .............................................................................................................. 18
Connecting a TV Box and Satellite Receiver ..................................................................................................... 19
Connecting an Audio Receiver...............................................................................................................................20
USING THE FEATURES................................................................................................. 21
Basic Operation................................................................................................................................................. 21
OSD Menu Operation .......................................................................................................................................... 22
Video .................................................................................................................................................................. 22
Audio.................................................................................................................................................................... 23
Setup................................................................................................................................................................ 24
Preferences........................................................................................................................................................... 25
Screen................................................................................................................................................................... 25
Using the Built-in DVD........................................................................................................................................... 26
Using the Card Reader &USB .............................................................................................................................. 27
Advanced Operations........................................................................................................................................... 28
MP3/WMA Playback............................................................................................................................................. 28
Picture CD Operations.......................................................................................................................................... 29
MPEG4 Operations...... ........................................................................................................................................ 30
Using the DVD Features..................................................................................................................................... 31
TROUBLESHOOTING................................................................................................... 35
SPECIFICATIONS........................................................................................................... 36

6
PREPARATION
PREPARATION
Features
PREPARATION
VGA Support:
Multimedia socket
VIDEO in socket
S-VIDEO in socket
SCART socket (RGB, CVBS ,CVBS+RGB,Y/C input/ CVBS output)
Y Pb Pr in socket
VGA in socket
DVD COAXIAL OUT socket (DVD SPDIF OUT)
640x480/60Hz~1024x768/75Hz
NICAM/ FM-Stereo Function
Auto Programme Sort (APS)
Manual search
Sleep-Timer
User selectable colour temperature settings
Built-In CATV tuner
WSS (Wide Screen Scale ) Function
This function can automatically convert and display any aspect ration (4:3 / Wide) TV
broadcast signal.
Teletext Function
Card Reader Function
Slot-type DVD Player
Built-In USB

7
PREPARATION
PREPARATION
*Most devices (VCRs, DVD player, etc.) come with the necessary
cable for connection. If you want to set up a complex system, you may need to buy
extra cable, connector, etc.
Package Contents
Once you open the box, make sure all of the following contents are
included.If you’re missing any items, please contact your dealer.
These items are all you need to set up and operate the LCD TV
in its basic configuration.
LCD TV
Audio Cable
User Guide
(you are reading it)
Power Cord
Remote control/
AAA batteries
VOL.- VOL.+ CH. CH. MENU SOURCE
Video Cable
TV/SCART
CH.
VOL.
BACK
+10
EXIT
INFO SO URCE
CH. LIST
MENU
1
4
78 9
0
56
23
OPEN/ CLOSE ST OP
PLAY/PAUSE
SEARC H SKIP
I-II P.SIZE
DVD
SLEEP
SUBTITLE
USB/CARD
TITLE
FAST TE XT
AUDIO
SETUP
ZOOM
DVD MEN U
GO TO
USB Cable

8
PREPARATION
PREPARATION
LCD TV
Front View
VOL. -+
Adjusts the volume up and down. Change values for
items when in the OSD mode.
HEADPHONE
Connects to the external
headphone for private listening.
CH.▲▼
Changes TV channels. Selects menu item when
in the OSD mode.
SOURCE
Press to select different input signal sources.
MENU
Press once to display the OSD (on screen
display), press again to turn the OSD off.
Power Button
Turns the LCD TV on and off.
IR
Infrared Receiver
LED
The LED light indicates when the LCD
TV is activated (Red = standby, Green
On).
Note:
Source button on the TV, has the same function of OK button on the remote control,
can be used as confirm button.

9
PREPARATION
PREPARATION
LCD TV
ITEM DESCRIPTION
1 SLOT-TYPE DVD PLAYER
Any of the following disc types are playable on the DVD player:
CD-R, CD-RW, DVD-R, DVDRW, MP3, VCD, SVCD,DVD+R, or DVD+RW
( DVD mode )
2 USB Allows the insertion of a USB disk, You can view digital images / movie or
etc playout on your TV. ( DVD mode )
3 CARD READER Allows the insertion of a SD/MMC card. You can view digital images or movie
playout for MPEG1/MPEG2 on your TV. ( DVD mode )
4 PLAY/PAUSE Press to start playback or pause. ( DVD mode )
5 OPEN/CLOSE Press to open and close the disc tray. ( DVD mode )
Side View
To View USB or SD/MMC card you must select DVD mode then attach/insert USB/SD
Card. Using the remote controller navigation (arrow buttons) and SELECT button select
the file shown on the TV screen to view the Card or USB information. Use the arrow /
navigation buttons to rotate any jpeg picture.

10
PREPARATION
PREPARATION
Rear View
LCD TV
ITEM DESCRIPTION
1 AC IN / Power Switch
Connects the AC power cord to this socket./ Make sure that this switch
is in the ON position (Red LED light will show on the bottom centre of
the TV)
2AV1
SCART IN
Connects to a piece of AV equipment with a SCART socket.
The SCART interface offers multiple signals (CVBS,Y/C,RGB+CVBS,
RGB,S -VIDEO)with audio input /output between the T V and external
video equipment.
3AV2
S-VIDEO/AUDIO(L/R)
Connects to the S- VIDEO output sockets and Audio output
sockets on your video equipment.
4 AV3
VIDEO/AUDIO(L/R)
Connects to the composite A/V output sockets on your video
equipment.
5 AV4
Y, Pb, Pr /AUDIO(L/R)
Connects to the component (Y, Pb, Pr) video sockets and
audio (L/R) sockets of your DVD player, HDTV, or video equipment.
6 AV5
VGA IN/PC AUDIO IN Connects to a PC or other devices with a VGA interface.
7 Coxial Connects to DVD coxial socket on external digital audio equipment.(only for DVD
mode)
8 RF/ANT. Connect TV aerial here.
PCAUDIO IN
PC AUDIO IN
Power Switch
AC IN
6
8
Note:
S-VIDEO and Video have a common audio input, If both devices are being used at the same time audio from
both will be heard at same time. Only switch on the required device to stop the mixing of audio.
7

11
PREPARATION
PREPARATION
POWER
Turns the LCD TV on and into standby mode .
Mutes and restores your LCD TV sound.
TV/SCART
Pressing enter TV or SCART Mode.
0-9
Select and switch to a channel by
using 0-9 buttons.
BACK/ +10
Returns to previously selected channel. (For TV)
Press this button twice to select song number
when the number over 9. ( DVD mode )
CH. +/-
Changes the channels up and down .
VOL. +/-
Increases and decreases volume.
SLEEP
Sets the LCD TV sleep time.
- Press the SLEEP button to select the number of
minutes. followed by 15, 30, 60minutes and off.
The timer begins to count down from the number
of minutes selected.
a.To check the remaining sleep time, press the
SLEEP button once.
b.To cancel the sleep time, repeatedly press the
SLEEP button until the display off appears.
c. If you turn the set off after setting the sleep
timer, the setting will be erased.
Press to skip to the beginning of the currently
played chapter(track). ( DVD mode )
Press to skip to the beginning of the next
chapter (track). ( DVD mode )
Use to advance or reverse playback rapidly.
(DVD mode )
1
2
3
4
5
6
7
8
9
10
11
13
12
14
Press to open and close the disc tray.
( DVD mode )
TV/SCART
OPEN/CLOSE
14
12
11
9
8
5
2
3
1
4
7
10
13
6
SKIP
SEARCH
PLAY/PAUSE
/
STOP
Press to start playback or pause.
( DVD mode )
EXIT
Exits the OSD menu (on-screen display).
Press to stop playback.(DVD mode)
Remote Control
OPEN/CLOSE

12
PREPARATION
PREPARATION
Remote Control
21
20
19
18
17
16
15
Pressing once displays a variety of information
such as the current channel and the input source.
Browse the disc’s information. (DVD mode)
TV DVD AV1(SCART) AV2(S-VIDEO) AV3(CVBS) AV4(Y Pb Pr) AV5(VGA)
Cycles among the different input signal sources:
TV/SCART
OPEN/CLOSE
OK
INFO
Turns on and off the Teletext function.
I-II(NICAM)
Cycles through the TV Sound options:
MONO/DUAL/STEREO.
CH.LIST
Display all channel list .
P.SIZE
Selects from the following modes
settings: Wide, 4:3, Zoom, Original.
/ USB/CARD
/ AUDIO
/ ZOOM
/ GO TO
Press to change subtitles when the disc
being played contains several subtitles.
Press the button to display the DVD title
content.
SUBTITLE
TITLE
Press to call up setup menu screen.
SETUP
Press the button to display the DVD disc
menu.
DVD MENU
Allows you to move, select and set up
the OSD options.
Displays the main index in Teletext mode.
Press this button switch DVD/CARD READER /USB.
(DVD mode)
Reveals hidden information such as the answer to
a quiz in Teletext mode.
Change the audio language or audio channel.
(DVD mode)
Freezes a multi-page passage on screen in Teletext
mode.
Zoom in /zoom out the displayed frame.
(DVD mode)
Displays the top ,bottom or all of page, to easily
read in Teletext mode.
Play from the desired location. (DVD mode)
Accesses the TELETEXT items or
corresponding pages.

13
PREPARATION
PREPARATION
VOL.- VOL.+ CH. CH. MENU SOURCE
2
3
1
Installing the batteries in your remote control
Pull the tab of the back cover and pull up on
the cover to open the batter y compartment
of the remote control.
Insert t wo A A A size batteries.
Make sure to match the (+) and (-) ends of
the batteries with the (+) and (-) ends indicated
in the batter y compartment.
Align the lower tabs of the back cover to the
remote control and squeeze the cover into
place.
Do not use caustic cleaners( porcelain, stainless steel, toilet, or oven cleaner, etc...).
You may cause damage to your remote control.
Your remote control can be activated from up to the LCD TV 5m away,
if points directly in front of the device.
Effective range
Note :
Remote Control
5M
30O
30O

14
PREPARATION
PREPARATION
Follow the instructions below to install the TV stand:
Open the box, and make sure all necessary parts are in the box.
How to install the TV Stand
Cover an even stable surface with a soft cloth. Place the LCD TV unit face-down on the cloth.
Fit the stand onto the bottom of the LCD TV unit as shown:
LCD TV Stand
Then push until stand clicks into the LCD TV’s stand socket.
Setting Up Your LCD TV
1
2
3

The Power button on the front panel and also on the remote control is only used
for powering up and switching the TV to standby mode,it does not disconnect
the device from the mains supply.
To completely disconnect the main voltage, please switch off the power switch
on the rear of the T V, or remove the power plug from the socket.
1
15
PREPARATION
PREPARATION
Using your LCD TV
RPOWE
VOL.- VOL.+ CH. CH. MENU SOURCE
PCAUDIO IN
Make sure the power switch
is switched of f.
Unplug from
a wall outle t

16 INSTALLATION
INSTALLATION
INSTALLATION
Refer to the owner’s manual of the external equipment to be connected.When connecting
external equipment, do not connect any AC power cords to wall outlets until you have completed
all the connections.
Connecting a TV aerial
Basic Connection: Connecting cable or aerial .
Connect your existing TV aerial to the Aerial input socket on the TV.
Connect all AC power sources before turning on the
power switch at the back of the TV.
Press the POWER button on your remote to turn on your LCD TV.
Press the TV/SCART button to enter TV mode when it is not in TV mode or to enter
SCART source while it is in TV mode.
1
2
3
5
A
PCAUDIO IN
B
Make sure the power switch
is switched of f.
Unplug from
a wall outle t
TV Aerial
Aerial/75-ohm
coaxial input
connect the supplied mains
cable to this socket.
Insert the supplied mains cable to the mains socket located on the rear of
the TV. Connect the other end of this cable to a 3 pin mains socket.
4

17
INSTALLATION
INSTALLATION
Connecting a DVD Player
For best picture quality, if your DVD player has (Y Pb Pr) video output, Please use component
cable instead of a standard video or S-video cable (cables not supplied). Otherwise connect
using a standard Scart cable (not supplied).
Use a Component cable to connect the (Y Pb Pr ) sockets on the DVD player to your LCD
TV. Use an audio cable to connect the DVD’s audio sockets to your LCD TV.
Connect all power sources before turning on the power switch
of the LCD TV or other connected equipments.
Press the POWER button to turn on your LCD TV.
To watch DVD, press the SOURCE button to select AV1,
AV2, AV3,AV4.
Use an Audio cable to connect the DVD’s audio output sockets to your LCD TV.
Use a S-Video cable to connect your LCD TV and DVD player.
Use an A/V cable to connect the DVD’s composite output sockets to your LCD TV.
Use a SCART cable to connect the DVD’s SCART socket to the LCD TV’s SCART socket.
1METHOD A (AV4 )
METHOD B (AV2)
METHOD C (AV3)
METHOD D (AV1)
2
3
4
DVD PLAYER
Audio
( R)
Video/Audio Cable
ideo Audi
(L )
C
BA
Pb
Pr
D
Vo
PC AUDIO IN
CABLES NOT SUPPLIED

18 INSTALLATION
INSTALLATION
Use an Audio cable to connect the VCR’s/ the VIDEO CAMERA’s audio output
sockets to your LCD TV.
Use a S-Video cable to connect your LCD TV and VCR player/ VIDEO CAMERA.
Use an A/V cable to connect the VCR’s/ VIDEO CAMERA’scomposite output sockets
to your LCD TV.
Use a SCART cable to connect the VCR’s SCART socket to the LCD TV ‘s SCART socket.
Connect all power sources before turning on the power switch of the LCD TV
or other connected equipments.
Press the POWER button to turn on your LCD TV.
Connecting a VCR & a Video Camera
1METHOD A (AV2)
METHOD B (AV3)
METHOD C (AV1)
2
3
5To watch VCR, press the SOURCE button to select AV1, AV2 or AV3 .
Note: Not all cameras have the ability to connect to a TV. Please check your video camera
user guide for compatibility.
4To watch VIDEO CAMERA, press the SOURCE button to select AV2 or AV3.
Audio
(R
)
Video/Audio Cable
ideo Audi
(L )
C
B
AVo
PC AUDIO IN

19
INSTALLATION
INSTALLATION
Connecting a TV Box and Satellite Receiver
Method A(AV4) :
Use a Component cable to connect the Y/Pb/Pr sockets on the TV Cable Box to
your LCD TV. Use an Audio cable to connect TV cable box’s audio output sockets to LCD TV.
Method B(AV2) :
Use an Audio cable to connect the TV Cable Box’s audio output sockets to your LCD TV.
Use a S-Video cable to connect your LCD TV and TV Cable Box.
Method C(AV3) :
Use an AV cable to connect the TV Cable Box’s composite output sockets to your LCD TV.
Method D(AV5) :
Use a VGA 15 pins cable to connect the TV Cable Box’s RGB output sockets to your LCD TV.
Use a 3.5mm socket to RCA adapter cable for connecting audio.
Method E(AV1) :
Use a SCART cable to connect the TV Cable Box’s SCART
socket to the LCD TV’s SCART socket.
1
Connect all power sources before turning on the power switch of the LCD TV or
other connected equipments.
2
Audio
(R
)
Video/Audio Cable
ideo Audi
(L )
C
BA
Pb Pr
E
VGA CA BLE
D
Vo
PC AUDIO IN
Press the POWER button to turn on your LCD TV.
To watch TV cable box, press the SOURCE button to select AV1, AV2, AV3, AV4 ,AV5.
3
4
To watch programs satellite receiver, press the SOURCE button repeatedly to select DVD .
5
Freeview / Sky boxes will usually have scart cables supplied with them. Connect
the scart cable to the scart socket on the rear of the TV.
Table of contents
Other Goodmans TV DVD Combo manuals

Goodmans
Goodmans GTV51N16DVD User manual

Goodmans
Goodmans GTVC14N14DVD User manual

Goodmans
Goodmans GTVL19W17HVFW User manual

Goodmans
Goodmans GLCD17W2DVD User manual

Goodmans
Goodmans GTV14T5DVD User manual

Goodmans
Goodmans GM700 Series User manual

Goodmans
Goodmans GPTV70WLCD User manual

Goodmans
Goodmans GTVL15DVDS User manual

Goodmans
Goodmans GTV51RFDVD User manual

Goodmans
Goodmans GTVL19W17HVFW User manual