Ferguson F1915LVD User manual

1
Instruction Manual
19”/22” HD READY DIGITAL LCD TV + DVD
F1915LVD/F2215LVD
F1915LVD & F2215LVD_IB_FRG_050.indd 1 1/11/2011 10:21:35
2
SAFETY INFORMATION
•Whenconnectingordisconnectingthecord,griptheplugandnottheACcorditself.Pullingthecord
maydamageitandcreateahazard.
•Whenyouarenotgoingtousetheunitforalongperiodoftime,disconnecttheACcord.
•Themainsplugisusedasthedisconnectingdevice.Itshallremainreadilyoperableandshouldnotbe
obstructedduringintendeduse.Tobecompletelydisconnectedfromthesupplymains,themainsplug
oftheapparatusshouldbedisconnectedfromthemainssocketoutletcompletely.
•Theapparatusshouldnotbeexposedtodrippingorsplashingandthatnoobjectslledwithliquids,such
asvases,shouldbeplacedonapparatus.
•
Tobecompletelydisconnectthepowerinput,themainsplugofapparatusshallbedisconnectedfromthemains.
•
ThemainsplugofapparatusshouldnotbeobstructedORshouldbeeasilyaccessedduringintendeduse.
•Leave a minimum of 200mm around the apparatus for ventilation, and 200mm beside the DVD
mechanism;
•Attentionshouldbedrawntotheenvironmentalaspectsofbatterydisposal;
•Theuseofapparatusinmoderateclimates.
•Undertheinuenceofelectrostaticphenomenon,theproductmaymalfunctionandrequireusertopower
reset.
•Nonakedamesourcessuchaslightedcandlesshouldbeplacedontheapparatus;
•Attentionshouldbedrawntoenvironmentalaspectsofbatterydisposal;
•Theuseofapparatusinmoderateclimate.
CONDENSATION INFORMATION
• Whenleftinaheatedroomwhereitiswarmanddamp,waterdropletsorcondensationmayforminsidethe
unit.Whenthereiscondensationinsidetheunit,theunitmaynotfunctionnormally.Lettheunitstandfor1-2
hoursbeforeturningthepoweron,orgraduallyheattheroomandlettheunitdrybeforeuse.
RATING PLATE LOCATION
• Theratingplateisontherearofproduct.
WARNING:Shouldanyproblemsoccur,disconnecttheACcordandreferservicingtoaqualied
technician.
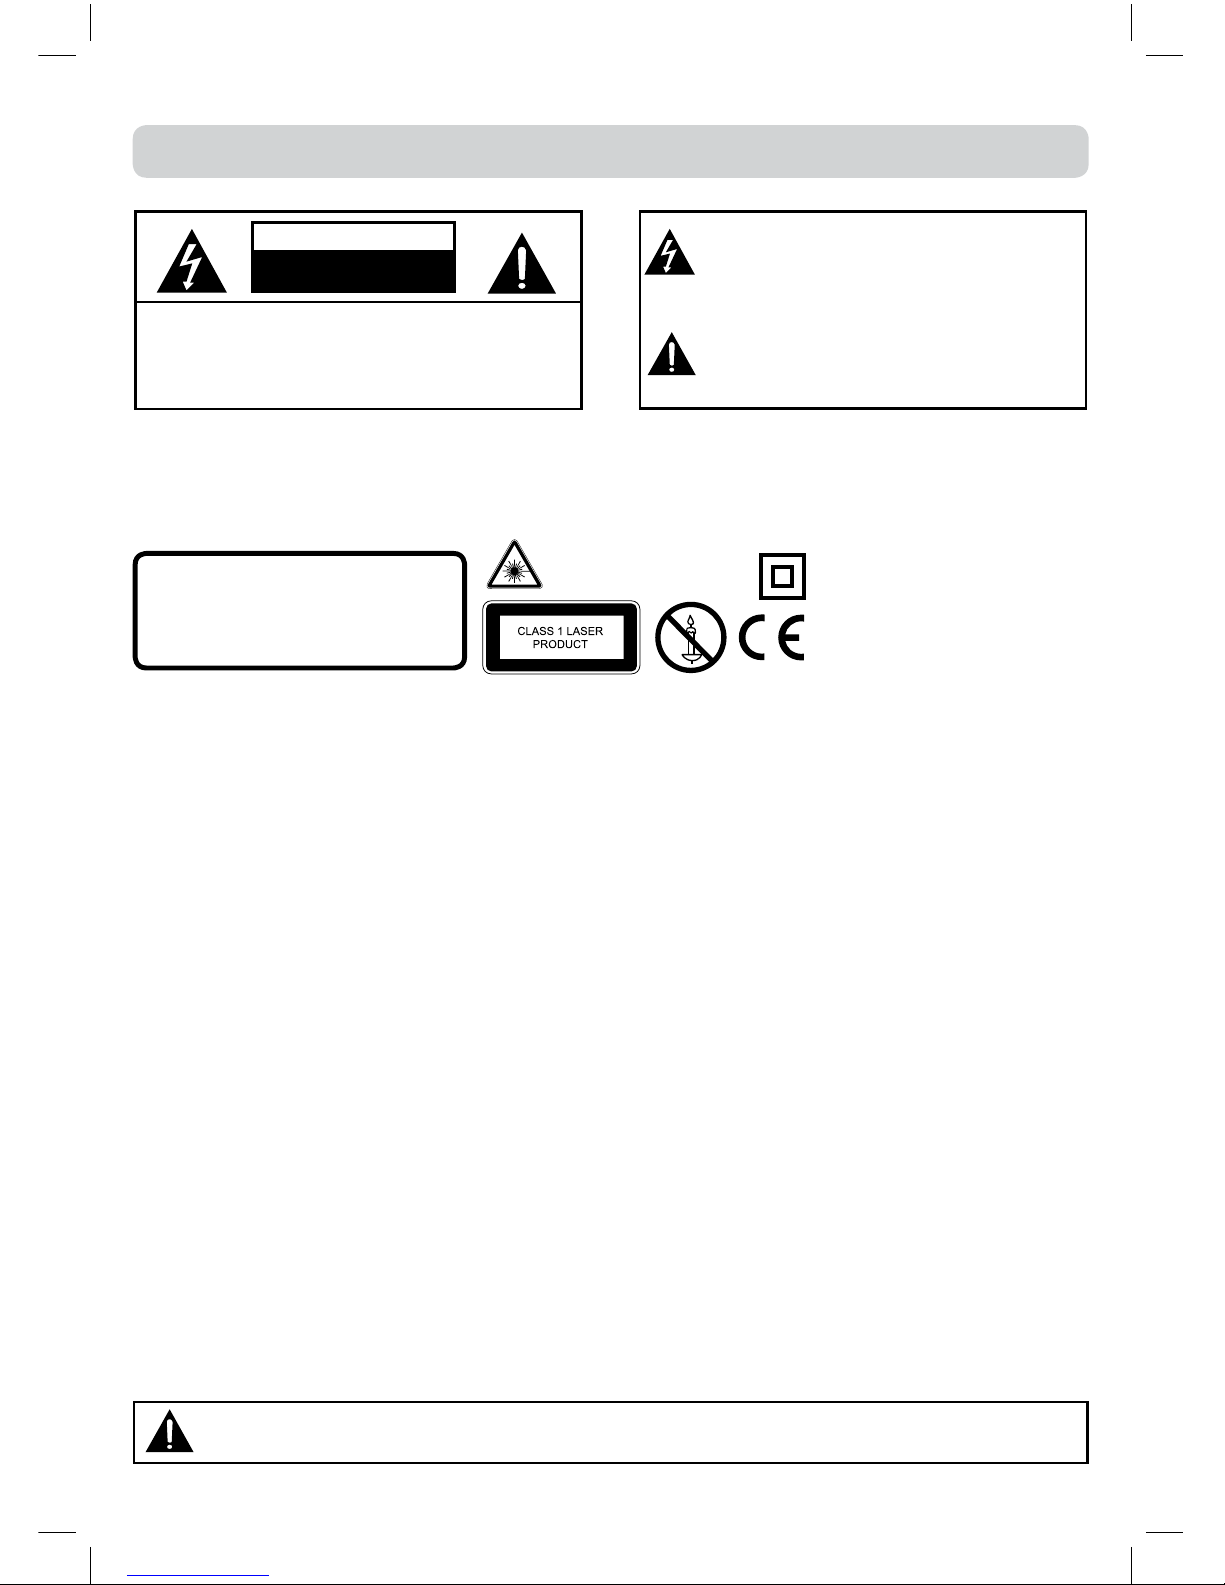
CAUTION
INVISIBLELASERRADIATIONWHEN
OPENANDINTERLOCKSDEFEATED.
AVOIDEXPOSURETOBEAM
ThesymbolforClassII
(Doublelnsulation)
This product contains a
lowpowerlaserdevice.
CAUTION: DANGEROFEXPLOSIONIFBATTERYISINCORRECTLYREPLACED.REPLACEONLYWITHTHE
SAMEOREQUIVALENTTYPE.DONOTMIXOLDANDNEWORDIFFERENTTYPESOFBATTERY.
IFTHE PRODUCT IS NOTTO BE USED FORA PROLONGEDTIME; REMOVETHE BATTERIES
AS ELECTROLYTE LEAKAGEWILL DAMAGETHE PRODUCTAND WILL INVALIDATETHE
WARRANTY.
Theexclamationpointwithinatrianglealerts
youtothepresenceofimportantoperating,
maintenanceandservicinginstructionsin
thisuser’smanual.
Thelightningashwithanarrowheadwithin
atrianglealertsyoutouninsulateddangerous
voltagewithintheproduct’senclosurethat
couldcauseanelectricshock.
SAFETY PRECAUTIONS
CAUTION
RISK OF ELECTRIC SHOCK
DO NOT OPEN
WARNING: TO REDUCE THE RISK OF ELECTRIC
SHOCK, DO NOT REMOVE COVER (OR BACK).
NO USER-SERVICEABLE PARTS INSIDE. REFER
SERVICING TO QUALIFIED PERSONNEL.
This symbol means that the unit
complieswithEuropeansafelyand
electricalinterferencedirectives.
F1915LVD & F2215LVD_IB_FRG_050.indd 2 1/11/2011 10:21:35

3
IMPORTANT SAFETY INSTRUCTIONS
This unit is designed to operate from a 230V AC ~ 50Hz mains supply.
MAINS PLUG
UNITS SUPPLIED WITH MOULDED MAINS PLUG
1.IfthemainsplugttedtotheACcordsuppliedisnotsuitableforyourmainsoutletitmaybenecessarytocut
itoff.Carefullydisposeoftheseveredplug.Undernocircumstancesmustitbeinsertedintoamainssocket,
otherwiseadangerouselectricshockcouldresult.
2.Ifthefuseinthettedmainsplugshouldfail,replaceitwithaBS1362approvedfuseratedat5ANeverusethe
plugwithoutthefusecovertted.
WIRING A MAINS PLUG
Asthewiresinthemainsleadmaynotcorrespondwiththecolouredmarkingsidentifying
theterminalsinyourplugproceedasfollows:
• Thewirewhichiscolouredbluemustbeconnectedtotheterminalwhichismarked
withtheletterNorcolouredblack.
• Thewire whichiscolouredbrownmustbeconnectedtotheterminalwhichismarked
withtheletterL orcolouredred.
• No connectionistobemadetotheearth terminaloftheplugwhichismarkedwith
theletterEorcolouredgreenorgreen and yellowormarkedbythesafety earth
symbol.
Thestandard(BS1363)mainsplugmustbettedwitha5AmpfuseapprovedtoBS1362.Ifanyotherplugor
connectionisuseda5Ampfusemustbettedintheplugoradaptororinthedistributionboard.
Caution: Moisture Condensation
Iftheequipmentismovedfromacoldplacetoawarmone,waterintheairwillcondenseonsomepartsandmay
causedamageormalfunctioniftheequipmentisoperated.
Allowatleasttwohoursfortheequipmenttoacclimatisebeforeswitchingiton.
PleasenotethatwhentheSTANDBY/ONswitchisinthestandbypositionthisdoesnotcompletelydisconnectthe
unitfromthemainssupply.Iftheequipmentisnottobeusedforadayormore,disconnectitatthewalloutlet.
SAFE USE OF YOUR EQUIPMENT
ThisequipmenthasbeendesignedandmanufacturedtomeetUKsafetystandardsbutlikeanyelectricalequipment
caremustbetakentoobtainthebestresultsfromtheequipmentandassureyourownsafety.Hereareafewtips
tohelpyoudothis:
READthisinstructionmanualbeforeyouattempttousetheequipment.
NEVERtmakeshiftstandsorlegswithwoodscrews.Useonlyapprovedsupportsandfastenersspeciallydesigned
fortheequipment.
NEVERletanyone,especiallychildren,pushobjectsintoholes,ventilationslotsoranyotheropening;thiscould
resultinfatalelectricshock!
ALWAYSdisconnecttheACpowercordwhenyouarenotgoingtousetheunitforalongperiodoftime.
ENSUREadequateventilationoftheequipmentisnotobstructed,forexamplebycurtainsaboveorsoftfurnishings
underneathit.
ENSUREthatallelectricalconnections(includingthemainsplug,extensionleadsandinterconnectionsbetween
piecesofequipment)areproperlymadeinaccordancewiththeinstructionsgiven.Switchoffthemainsupply
whenmakingorchangingconnections.
CONSULTyourdealerifyouareeverindoubtabouttheinstallation,operationorsafetyofyourequipment.
DON’Tcontinuetooperatetheequipmentifitisdamagedinanywayorifitdoesnotfunctionnormally.
Withdrawthemainsplugandconsultyourdealer.
DON’Tleaveequipmentswitchedonwhenitisunattendedunlessitispartofit’snormalfunctiontooperatein
yourabsence,forexampleavideocassetterecorderwithtimedrecordingfacility.
LISTENtoheadphonesatmoderatevolumelevels;highvolumelevelscanpermanentlydamageyourhearing.
Connecttheheadphones withthevolumesetlowandincrease ittoacomfortable listeninglevel.Prolonged
listeningthroughsomeheadphonesathighvolumelevelscancausehearingdamage.
The wires in this mains lead are
coloured in accordance with the
following code.
BLUE-NEUTRAL
BROWN-LIVE
5
F1915LVD & F2215LVD_IB_FRG_050.indd 3 1/11/2011 10:21:35

4
SAFETY INFORMATION
Thisproductmustbeearthed.
Mains supply
Thistelevisionisdesignedtooperatefroma220-240Volts50HzACmainssupply.Otherpowersources
maydamageit.Checkthattheratinglabelstates220-240VAC(~)beforeyouplugitinforthersttime.
Mains plug
Wehavettedthistelevisionwithastandardmainsplug.
Ifthemainsleadgetsdamageditmustbereplacedwithaleadofthesametypeandrating.
Ifforanyreasonyoucutoffthemainsplug,pleasedestroytheoldplugasitwouldbedangerousif
insertedintoalivepoweroutlet.Carefullyfollowthewiringinstructionssuppliedwiththenewplug.
Ifafuseisttedtotheplug,removethefusebeforethrowingtheplugaway.
Neveruseafusedmainsplugwithoutthefusecover.
Thisequipmentmustbeearthedbyconnectingtoama
Themainsplugshallbethemaindisconnectdeviceandshallremainoperableatalltimes.
inspoweroutletwithaprotectiveearthingconnection.
Symbols
Dangerousvoltageconstitutingariskof
electricshockispresentinsidethisequipment.
Thismarkisappliedtoshowtheequipment
conformstoEuropeansafetyandelectromagnetic
compatibilitystandards.
Thereareimportantoperatingand
maintenanceinstructionsintheliterature
accompanyingthisequipment.
Safe use and care of your television
WehavedesignedandmadethistelevisiontomeetEuropeansafetystandards,butaswithanyelectronic
equipmentyoumusttakecaretostaysafeandgetthebestresults.Hereissomegoodadvicetohelpyou
dothis.
Readtheseinstructionscarefullybeforeyoutrytousethetelevision.
Protect the mains lead.Youmustmakesurethemainsleadcannotbewalkedon,crushed,chafedor,cut.
Avoid harsh conditionssuchaswetordampplaces,highhumidity,strongvibration,extremelyhighorlow
temperatures,strongsunlightandplacesthatareverydusty.
Nevertmakeshiftstandsorlegstothetelevision.
Neverletanyonepushobjectsintoholesandventilationslots.
Don’tcontinuetouseyourtelevisionifyouhavespiltliquidsinit,ifitisdamagedinanywayorifitdoes
notworknormally.Immediatelyunplugthetelevisionandgetexpertadvice.
Switch offmainspowerorpulloutthepowerplugwhenyouleavethetelevisionunattended,unlessthe
functionofthetelevisionrequiresacontinuouspowersupply.
Protectthescreenfromngerprints.
Thisproductisdesignedfordomesticuseonly.Commercialoranyotherusemayinvalidatetheguarantee
andmightbedangerous.
Ventilation
Placethetelevisiononahardatsurfaceawayfromdirectsunlightandheatsources.Ifitisinacabinet,
allowatleasta10cmgapallaround.Don’tobstructtheventilationslots,includingthoseunderneath,with
softfurnishings.Overheatingwillshortenthelifeofthetelevisionandincreasetheriskofre.
F1915LVD & F2215LVD_IB_FRG_050.indd 4 1/11/2011 10:21:35

5
SAFETY INFORMATION
Cleaning
Disconnectthemainssupplyandusealightlydampenedsoftcloth.Donotusechemicalsolventsorstrong
detergentsasthesemaydamagethecosmeticsurfacesorthescreen.
Never allow water droplets to remain on the screen as moisture can cause permanent discolouration.
Greasy marks must only be removed with a commercial cleaner specically recommended for LCD
screens.
Batteries
Removebatterieswhenthetelevisionisnottobeusedforalongtime.Batteriesleftinequipmentmay
causedamagethroughdeteriorationandcorrosiveleakage,invalidatingtheguarantee.Toprotecttheenvi-
ronmentpleaseuselocalrecyclingfacilitiesforbatterydisposal.
Important Safety Warnings
•Topreventelectricshock,donotremoveanycover.
•Ifanythinggoeswrong,don’ttryandxityourself,getaqualiedserviceagenttolookatit.
•Donotexposethistelevisiontodrippingorsplashingorplaceanyobjectslledwithliquids,suchas
vases,onthetelevision.
•Neverputanakedamesourceonornearthetelevision.
•Pullthemainsplugoutofthewallsocketanddisconnecttheaerialleadduringthunderstorms.
•Topreventinjurythistelevisionmustbesecurelyattachedtothewallorit’ssuppliedstandinaccordance
withtheinstallationinstructions.
Eye Fatigue
When using this product as a computer monitor, health and safety experts recommend short frequent
breaksratherthanoccasional,longerbreaks,forexamplea5-10minutebreakafteranhourofcontinuous
screenworkislikelytobebetterthana15minutebreakevery2hours.
Donotusethemonitoragainstabrightbackgroundandwheresunlightorotherlightsourceswillshine
directlyonthescreen.
ThisTelevisionincorporatesHigh-Denition
MultimediaInterface(HDMI™)technology.
HDMI,theHDMIlogoandHigh-DenitionMultimediaInterfaceare
trademarksorregisteredtrademarksofHDMILicensingLLC.
HDMI
F1915LVD & F2215LVD_IB_FRG_050.indd 5 1/11/2011 10:21:35

6
TABLE OF CONTENTS
SAFETY PRECAUTIONS .............................. 2
IMPORTANT SAFETY INSTRUCTIONS ........ 3
SAFETY INFORMATION ......................... 4 - 5
TABLE OF CONTENTS ................................ 6
DISC FORMATS ......................................... 7
INSTALLATION ............................................... 8
GETTING STARTED .................................... 9
REMOTE CONTROL REFERENCE GUIDE ...
........................................................ 10 - 11
REFERENCE GUIDE ................................. 12
CONNECTING A TV ANTENNA ................ 13
CONNECTING A POWER CORD ................. 13
UNIT OPERATION ............................ 14 - 15
Turningtheunitonforthersttime.........14
Electronic Programme Guide (EPG) for DTV
........................................................... 15
AudioLanguageforDTV...........................15
ANALOGUE TV / DTV SETUP ........... 16 - 19
TVSetting..................................................16
PictureMenu.............................................17
Sound Menu ........................................... 17
TimeMenu................................................18
SetupMenu................................................18
LockMenu.................................................19
TELETEXT .............................................. 20
CONNECTIONS ................................. 21 - 23
Common Interface ................................. 21
Connecting to devices with a composite
(yellowRCA-type)videooutput................21
Connectingtosourceswithscart...............21
Connecting a High Denition (HD) Source
(YUV).......................................................22
UsingHeadphones...................................22
ConnectingHDMI.....................................23
SOUND SYSTEM ...................................... 23
CD/DVD OPERATION ...................... 24 - 25
Playingadisc.............................................24
Playingapictureledisc..........................24
Pausing playback (still mode) ............... 24
Stoppingplayback...................................24
Skippingtoadifferenttrack......................24
Fast forward/fast reverse ....................... 25
Slow-motion play (DVD) ........................ 25
Audioselection(DVD).............................25
Subtitle selection (DVD) ......................... 25
Angleselection(DVD)..............................25
SPECIAL FUNCTIONS .............................. 26
Displayfunction.........................................26
Locatingaspecictitle(DVD).....................26
Locatingaspecicchapter/track................26
Locatingaspecictime.............................26
REPEAT PLAYBACK .................................... 27
Repeatingachapter/title(DVD)...................27
Repeatingasingletrack/wholedisc(CD)...27
Repeatingaspecicsection(DVD/CD)......27
CD/DVD PROGRAMMABLE PLAYBACK ... 28
Programmablememory.............................28
Track/Title/chapterprogrammedplayback....28
PROGRAMMABLE PHOTO FILE PLAYBACK . 28
CUSTOMISING THE FUNCTION SETTINGS .
......................................................... 29 - 30
Language setup ....................................... 29
Video setup ............................................ 29
System setup ........................................ 30
MAINTENANCE ................................... 31
SPECIFICATION ...................................... 31
TROUBLESHOOTING GUIDE ......... 32 - 33
USE OF PIRATED COPIES ......................... 34
F1915LVD & F2215LVD_IB_FRG_050.indd 6 1/11/2011 10:21:36

7
DISC FORMATS
Thisunitcanplayback:
TITLES, CHAPTERS AND TRACKS
•DVDs are divided into “titles” and “chapters”. If
thedischasmorethanonemovieonit,eachmovie
wouldbeaseparate“title”.“Chapters”aresections
oftitles.
•AudioCDsaredividedinto“tracks”.A“track”is
usuallyonesongonanAudioCD.
ICONS USED ON DVDS
Samplelcons
Note:
•WhenplayingbackaCD-G(Graphics)orCDEXTRA
disc,theaudioportionwillbeplayed,butthegraphic
imageswillnotbeshown.
DVDS
[8CM/12CM DISC] AUDIO CDS
[8CM/12CM DISC]
CD-R/CD-RW
Compatible
REGION MANAGEMENT INFORMATION
RegionManagementInformation:ThisunitisdesignedandmanufacturedtorespondtotheRegion
ManagementInformationthatisencodedonDVDdiscs.IftheRegionnumberprintedontheDVD
discdoesnotcorrespondtotheRegionnumberofthisunit,thisunitcannotplaythatdisc.
Theregionnumberofthisunitis .
Note:
•Numbersidentifyeachtitle,chapter,andtrackonadisc.Mostdiscshavethesenumbersrecorded
onthem,butsomedonot.
Notes on Unauthorized Discs
YoumaynotbeabletoplaybacksomeDVDdiscsonthisunitiftheywerepurchasedfromoutside
yourgeographicareaormadeforbusinesspurposes.
DISC FUNCTION OR OPERATION THAT IS NOT AVAILABLE
Whenthe symbolappearsonthescreen,itindicatesthatthefunctionoroperationattemptedis
notavailableatthattime.ThisoccursbecausetheDVDdiscmanufacturerdeterminesthespecic
functions.Certainfunctionsmaynotbeavailableonsomediscs.Besuretoreadthedocumentation
providedwiththeDVD.
NOTES ON COPYRIGHT
Itisforbiddenbylawtocopy,broadcast,show,broadcastoncable,playinpublic,orrentcopyrighted
materialwithoutpermission.
ApparatusClaimsofU.S.PatentNos.6,836,549;6,381,747;7,050,698;6,516,132;and5,583,936
licensedforlimitedviewingusesonly.
This product incorporates copyright protection technology that is protected by U.S. patents and
otherintellectualpropertyrights.Useofthiscopyrightprotectiontechnologymustbeauthorizedby
Macrovision,andisintendedforhomeandotherlimitedviewingusesonlyunlessotherwiseauthorized
byMacrovision.Reverseengineeringordisassemblyisprohibited.
Languageselectionsforaudio
Languageselectionsforsubtitles
Screenaspectratio
Multiplecameraangles
Regioncodeindicator
F1915LVD & F2215LVD_IB_FRG_050.indd 7 1/11/2011 10:21:36

8
INSTALLATION
INSTALLING / REMOVING THE STAND
WARNING:TheLCDDisplayisveryfragile,andmustbeprotectedatalltimeswheninstalling/
removingthestand.Besurethatnohardorsharpobject,oranythingthatcouldscratchordamage
theLCDdisplay,comesintocontactwithit.DoNOTputpressureonthefrontoftheunitatanytime
becausethescreencouldcrack.
1.Disconnectanycablesorcordsconnectedtotheunit.
2.Laytheunitdownonaatsurface,sothebackisfacingup,makingsuretoplaceasoftcushioned
material(suchasapilloworthickpieceoffoam)beneaththescreen.
3.Install/removethetwoscrewsandtheninstall/removetheSTANDto/fromtheTV.
MOUNTING ON THE WALL
ThisunitisVESA-compliant,andisdesignedtobewall-mountedwithaVESA-compliant75mmx
75mmmountingkitdesignedforat-panelTVs(soldseparately).Mountthisunitaccordingtothe
directionsincludedwiththemountingkit.
Note:
Removethestandbeforemountingtheunitonthewall.
IMPORTANT
Screws must not project more than 8mm into the TV or damage may occur. For secure fixing make
sure at least 4mm of the screw thread is engaged.
75mm
75mm
F1915LVD & F2215LVD_IB_FRG_050.indd 8 1/11/2011 10:21:36
9
GETTING STARTED
USING THE REMOTE CONTROL
• PointtheremotecontrolattheREMOTESENSORlocatedontheunit.
• Whenusingthisunitinaverybrightlylitarea,theinfraredREMOTECONTROLSENSORmaynot
workproperly.
• Therecommendedeffectivedistanceforusingtheremotecontrolisabout16feet(5metres).
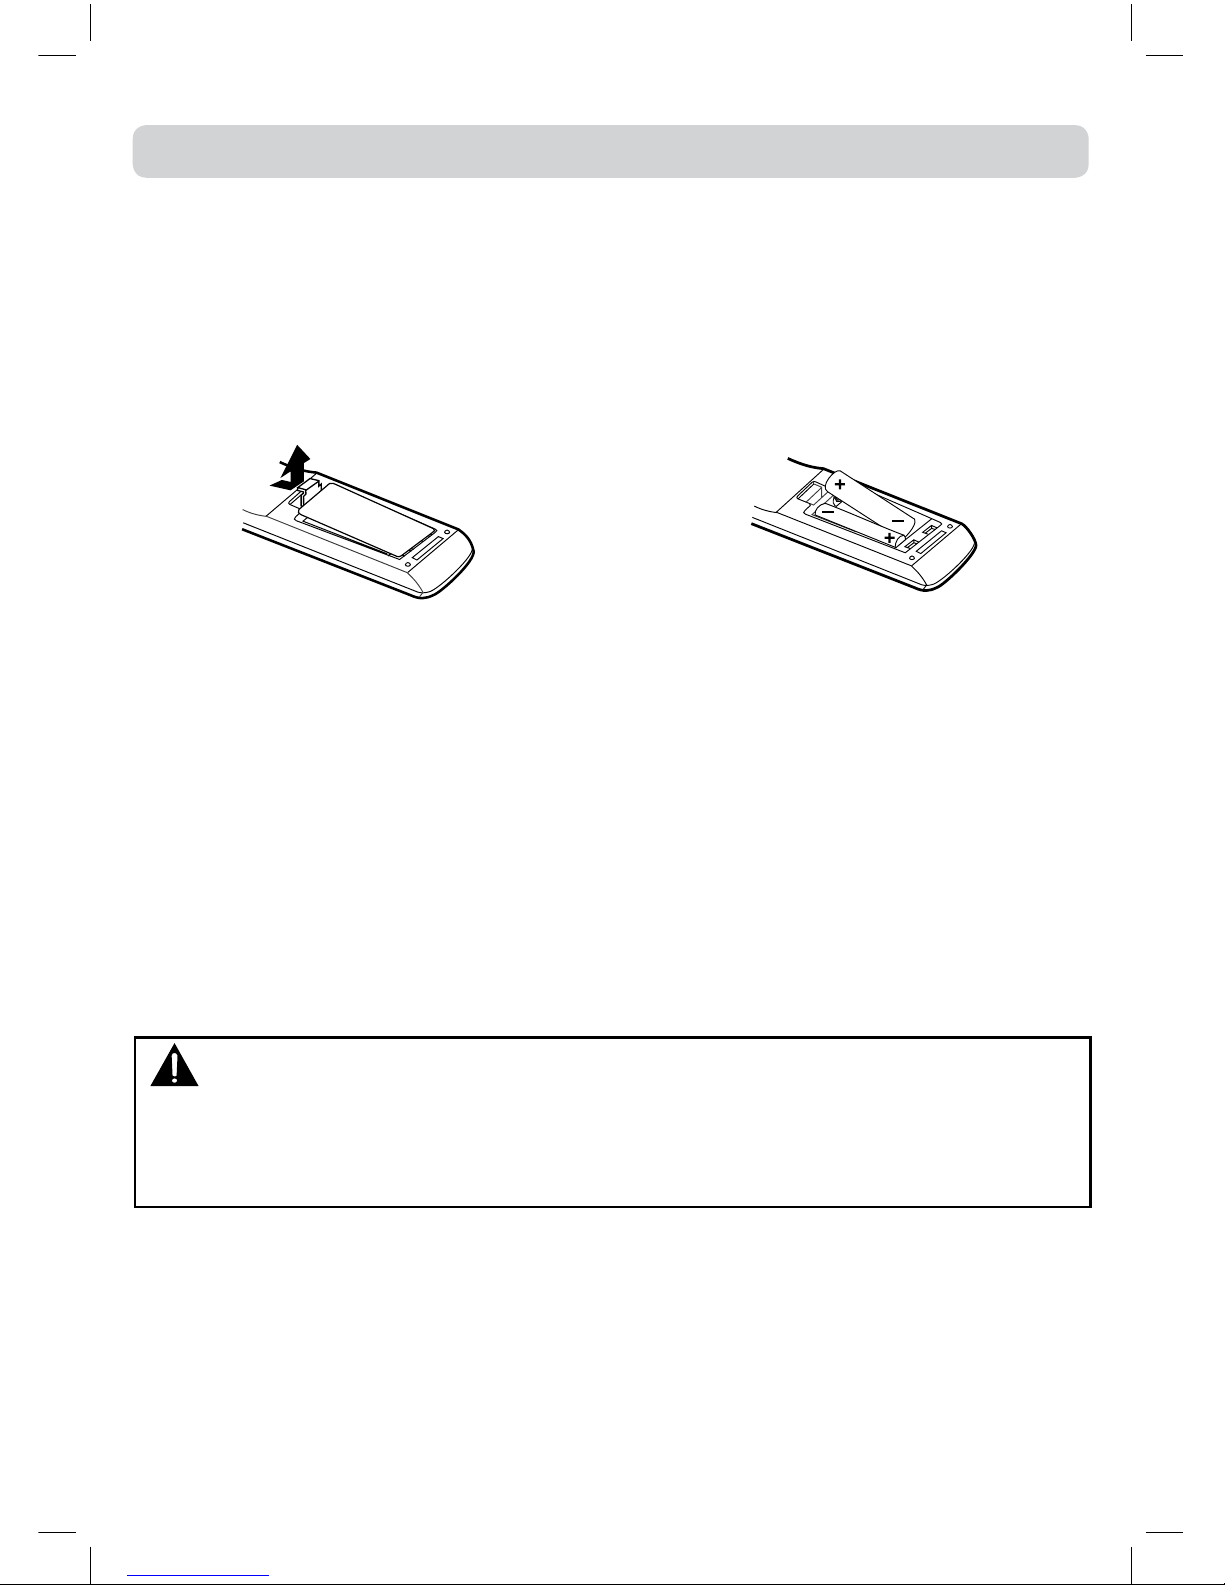
TO CHANGE THE REMOTE CONTROL BATTERIES
1.Openthebatterydoor. 2.Inserttwo“AAA”batteries.
BATTERY REPLACEMENT
Whenthebatteriesbecomeweak,theoperatingdistanceoftheremotecontrolwillbegreatlyreduced
andyouwillneedtoreplacethebatteries.
Note:
•IftheRemoteControlisnottobeusedforalongtime,removethebatteriestoavoiddamagecaused
bybatteryleakagecorrosion.
•Donotmixoldandnewbatteries.DonotmixALKALINE,standard(CARBON-ZINC)orrechargeable
(NICKEL-CADMIUM)batteries.
•Corrosion, oxidation, battery-leakage and any other gradually acidic defect of this nature will
invalidatetheguarantee.
•Whendiscardingbatteries,environmentalproblemsmustbeconsideredandlocalrulesorlaws
governingthedisposalofthesebatteriesmustbestrictlyfollowed.
WARNING:
•Donotdisposeofbatteriesinareortheymayleakand/orexplode.
•Thebatteryshallnotbeexposedtoexcessiveheatsuchassunshine,reorthelike.
•Dangerofexplosionifbatteriesareincorrectlyreplaced.Replaceonlywiththesameorequivalent
type.
F1915LVD & F2215LVD_IB_FRG_050.indd 9 1/11/2011 10:21:36
10
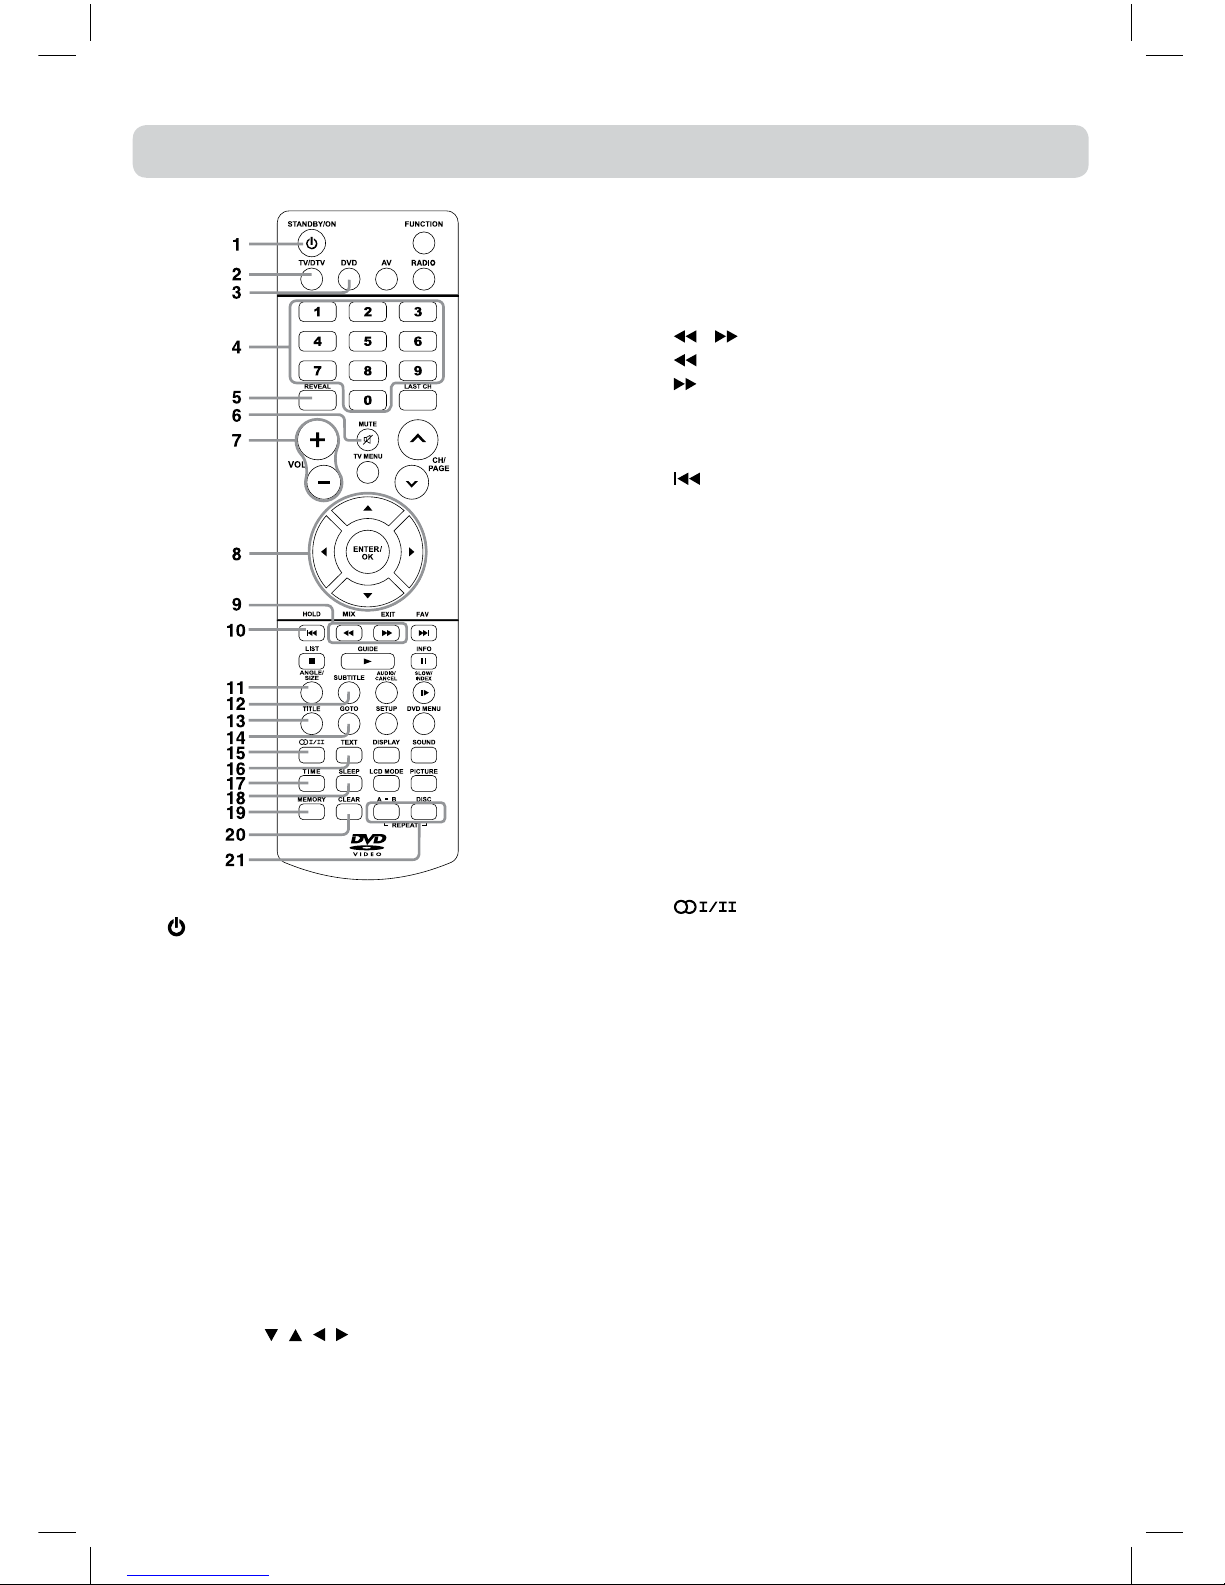
REMOTE CONTROL REFERENCE GUIDE
1) STANDBY/ON button
PresstoturnONtheunitorputitinSTANDBY
(OFF)mode.
2) TV/DTV button
PresstoswitchtoATV/DTVmode.
3) DVD button
PresstoselectDVDmode.
4) Number (0 - 9) buttons
UsetochangetheATV/DTVchannels.
5) REVEAL button
Presstorevealanswersonaquizorgamepages
fromTeletext.
6) MUTE button
Presstomutethesound.
Pressagaintocancelmute.
7) VOLUME (–/+) buttons
Presstoadjustthevolumelevel.
8) CURSOR ( , , , ) buttons
Presstohighlightselectionsonamenuscreenand
makeadjustcertainsettings.
ENTER/OK button
Presstoconrmselectionsonamenuscreen.
9) MIX button
PresstoselectTeletextwithaATVprogramme.
EXIT button
Presstoexitthemenuandreturndirectlytonormal
viewing.
/ buttons
:Fastreverseplayback.
:Fastforwardplayback.
10) HOLD button
Press to stop the automatic page change from
Teletext.
PREV button
Presstoselectprevioustitles,chaptersortracks
onadisc.
11) ANGLE button
Press to switch the camera angle of the video
presentationwhensceneswithmultiplecamera
anglesarerecordedonaDVD.
SIZE button
Press to set the letters size of teletext on the
screen.
12) SUBTITLE button
Press to select one of the subtitle languages
programmedonaDVD.
13) TITLE Button
Presstoselectthetitlemenuscreen.
14) GOTO button
Presstoskipdirectlytoaspeciclocationona
DVD/CD.
15) button
PresstodirectlyselectSTEREO/MONO/DualI/
DualII/DualI+IIinATVmode.
EnterAudioLanguagemenuinDTVmode.
16) TEXT button
PresstodirectlyselectsTeletextmode.
17) TIME button
EnterandexittheTIMEmenu.
18) SLEEP button
PresstosettheSLEEPtimer.Theunitwillremain
ONforthetimethatisset,andwillautomatically
shutoffafterwards.
19) MEMORY button
In stop mode, press to enter the number of a
selectedchapterortrack.
20) CLEAR button
Presstoclearinputselectionsandcancelcertain
playbackfunctions.
21) REPEAT A-B button
Presstoperformpoint-to-point repeat playback
onaDVDorCD.
REPEAT DISC button
RepeatchapterofaDVD.
RepeatsingletrackorwholeCD.
F1915LVD & F2215LVD_IB_FRG_050.indd 10 1/11/2011 10:21:36

11
REMOTE CONTROL REFERENCE GUIDE
22) FUNCTION button
Press to switch between DTV,ATV,AV1, AV2/
SCART,YUV/SCART,DVDorHDMI.
23) RADIO button
PresstoselectDTVdigitalradioprogrammes.Press
againtoexittonormalDTVprogrammesmode.
24) AV button
Press to select source connected toAV1, AV2/
SCART.
25) LAST CH button
Presstoswitchrepeatedlybetweenthelasttwo
channelsdisplayed.
26) TV MENU button
Presstodisplaytheon-screenTVmenu.
27) CH/PAGE / buttons
PresstochangetheATV/DTVchannels.
Press to go forward or backward the page of
TeletextscreeninATVmode.
Press to go forward or backward the page of
ProgrammeEdit&FavouriteinATV/DTVmode.
28) FAV button
Presstodisplaythefavouriteprogrammeslistin
ATV/DTVmode.(Youshouldsetupyourfavourite
ATV/DTVchannelsinProgrammeEditmenu.)
NEXT button
Press to select next title, chapter or track on a
disc.
29) STOP button
Presstostopplayingadisc.
LIST button
Press to display the channel list inATV/DTV
mode.
PLAY button
Presstostartandresumeplaybackofadisc.
GUIDE button
PresstodisplaytheElectronicProgrammeGuide
(EPG)inDTVmode.
PAUSE button
Press to pause playback and single frame
advance.
INFO button
PresstodisplaythechannelinformationinDTV
mode.
30) SLOW button
PresstoplayaDVDinslow-motion.
INDEX button
Presstoselectthepagenumberoftheindexfrom
TeletextinATVmode.
31) AUDIO button
Press to select audio soundtracks of a DVD or
changetheoutputmodeofaCD.
CANCEL button
PresstocanceltheTeletextmenu.
32)DVD MENU button
Presstoenterthemainmenuofthediscyouare
watching.
33) SETUP button
PresstoenterandexittheSETUPmenuoftheDVD
player.
34) SOUND button
Presstoselectfrompresetsoundsettings(Standard,
Music,Theatre,Voice,Personal)tomatchthetype
ofshowyouarewatching.
35) DISPLAY button
Presstochangediscstatusinformationdisplayed
onthescreen.
36) PICTURE button
Presstoselectfrompresetscreendisplaysettings
to match the type of show you are watching
(Standard,Movie,Dynamic,Soft,Personal).
37) LCD MODE button
PresstosetthesizeofLCDdisplayorturnitoffto
savepowerwhenlisteningtoradioservices.
38) RED/GREEN/YELLOW/BLUE button
Press to select the relevant page quickly from
Teletext.
F1915LVD & F2215LVD_IB_FRG_050.indd 11 1/11/2011 10:21:37
12
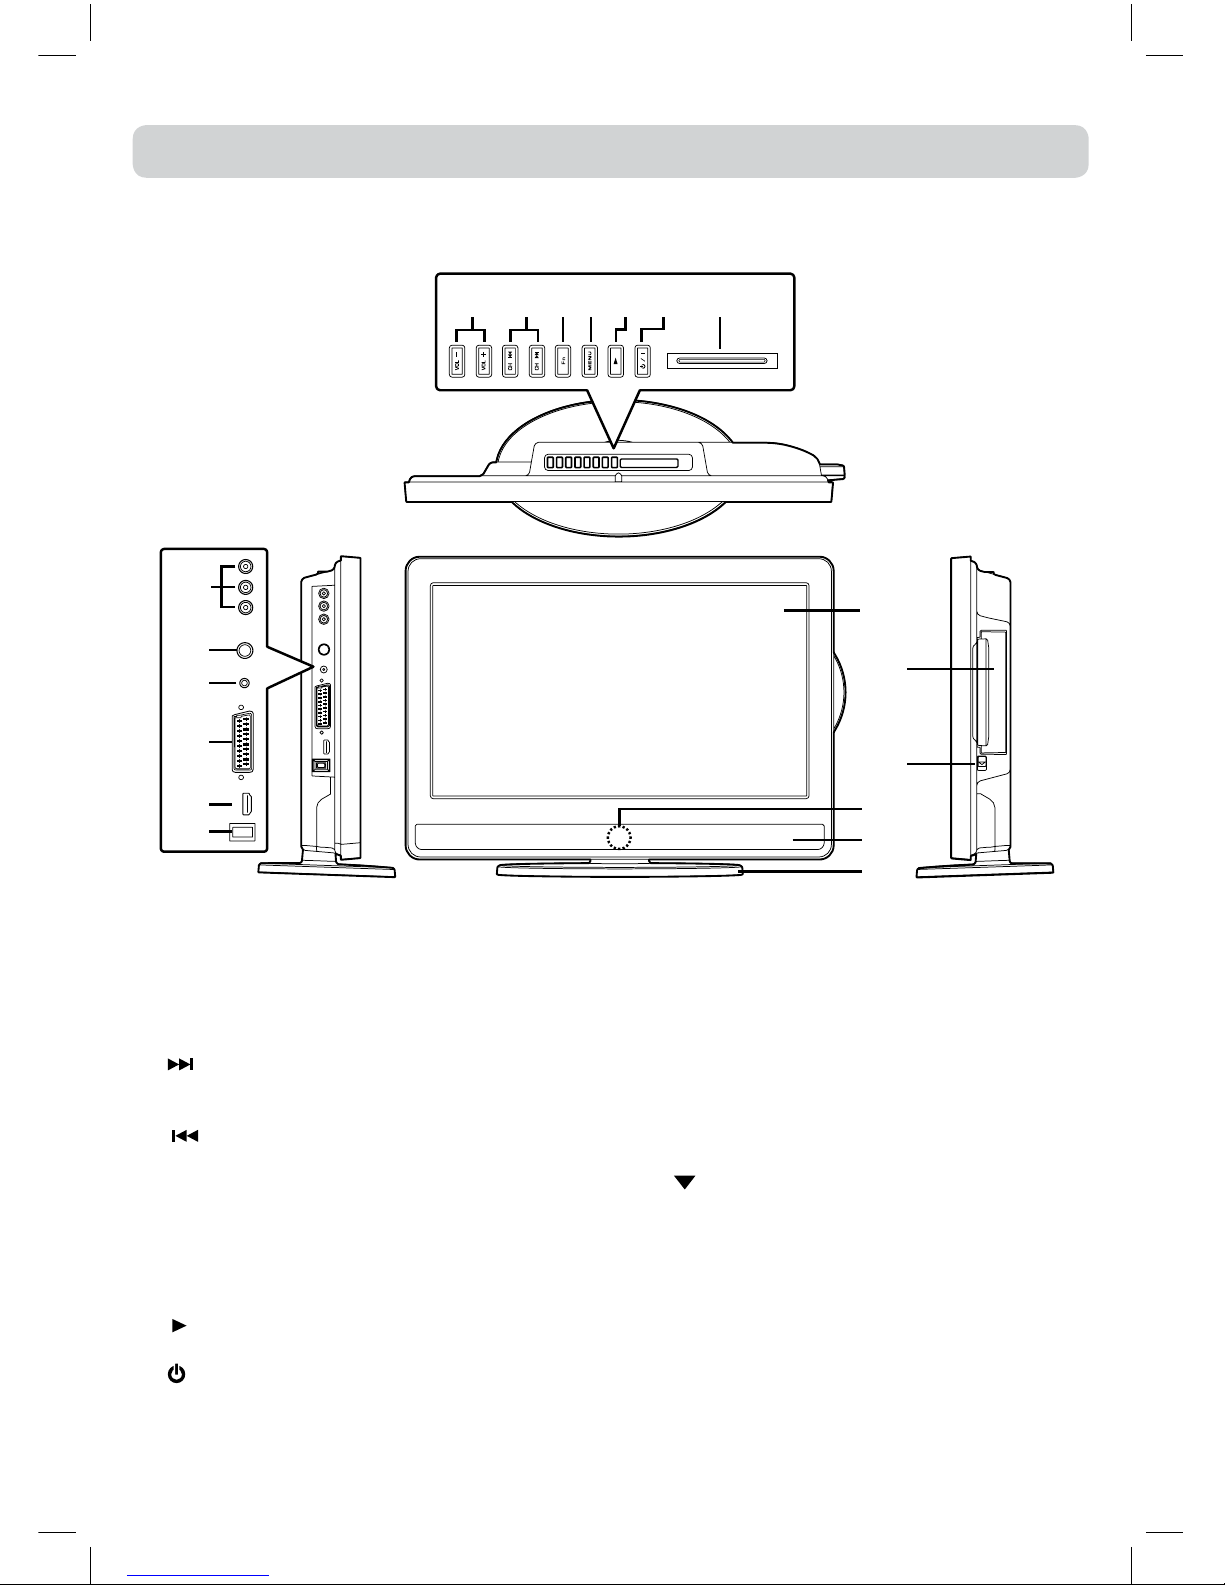
9
12
11
10
8
13
14
15
16
17
18
19
1234 56 7
REFERENCE GUIDE
FRONT, TOP & SIDES VIEW
1) – VOLUME + controls
Adjustthevolumelevel.
2) CH buttons
Press to change the TV channels and highlight
selections(Up&Down)onthemenuscreen.
button
Presstoselectnexttitle,chapterortrackonadisc
andfastforwardplayback.
button
Presstoselectprevioustitles,chaptersortracks
onadiscandfastreverseplayback.
3) FUNCTION button
SelectDTV,ATV,AV1,AV2/SCART,YUV/SCART,
DVDorHDMI.
4) MENU button
Presstodisplaytheon-screenTVmenu.
5) PLAY button
Presstostartorresumeplaybackofadisc.
6) / I button
Turnstheunitonandoff.
7) COMMON INTERFACE slot
(ForoptionalConditionalAccessModule)
8) AUDIO IN jacks (Left/Right) / VIDEO IN jack
(AV IN 1)
9) TV Aerial - Coaxial TV antenna input
10) HEADPHONES jack
11) SCART jack (AV IN 2)
12) HDMI jack
13) Power Cord
14) Colour LCD Screen
15) Disc Door
Pushgentlytoclosethediscdoor.
16) PUSH OPEN knob
Pushdowntoopenthediscdoor.
17) Remote Sensor
Donotblockthissensorortheremotecontrolwill
notwork.
Standby Indicator
IndicateswhethertheunitisONorinSTANDBY
(OFF)mode.
Light On:TheunitisinSTANDBY.
Light Off: TheunitisturnedON.
18) Speakers
19) Removable stand
F1915LVD & F2215LVD_IB_FRG_050.indd 12 1/11/2011 10:21:37

13
TV
AERIAL
To wall
outlet
Satellite / Cable RF Out or
TV antenna cable to
TV AERIAL CABLE Terminal
(cable not included)
CONNECTING A TV ANTENNA/CABLE/SATELLITE
Toviewtelevisionchannelscorrectly,asignalmustbereceivedfromoneofthefollowingsources:
-Anindoororoutdooraerialantenna
-RFoutputofacablesystem
-RFoutputofasatellitesystem
Note:
For receiving over-the-airTV broadcasts,we recommendthatyouuse anexternalxed antenna.
Shouldyourequiretheuseofatemporaryantenna,pleaseensurethatyoupurchaseanantennawith
sufcientabilitytoreceiveinweaksignalareas.Onlywhenyouareincloseproximitytoatransmitter
willatemporaryantennareproduceasignalasstronglyasaxedantenna.
•ConnecttheACpowercordintoawalloutlet.
•Pressthe /Ibuttonontheunitorremotecontrol
toturntheTVon.
Note:
•BesuretheACpowercordisdisconnectedandthe
TVisswitchedoffbeforemakingconnections.
•Makesurethatallthecomponentsareconnected
correctly.
•Whenyouarenotgoingtousetheunitforalong
periodoftime,disconnectthepowercord.
•Themainsplugisusedasthedisconnectingdevice.
It should remain readily accessible and should
notbe obstructed duringuse.Tobe completely
disconnectedfrom the supplymains,themains
plugoftheTVshouldbedisconnectedfromthe
mainssocketoutletcompletely.
CONNECTING A TV ANTENNA
CONNECTING A POWER CORD
F1915LVD & F2215LVD_IB_FRG_050.indd 13 1/11/2011 10:21:37

14
TURNING THE UNIT ON
WhentheACpowercordisconnected,pressthe / I buttonontheunittoturniton.Pressthe
FUNCTION buttontoselectthedesiredmode(DTV,ATV,AV1,AV2/SCART,YUV/SCART,DVDor
HDMI).
Note:
Whentheunitisnotgoingtobeusedforalongtime,disconnecttheACpowersupplycordfrom
walloutletandremovethebatteriesfromtheremotecontrol.
UNIT OPERATION
TURNING THE UNIT ON FOR THE FIRST TIME
Thersttimeyouturntheuniton,itwillgostraightintostart-upscreen.Simplyfollowthescreen
promptsasbelowtotuneinthechannels.
Choose preferred country and regional options
You may receive signals from more than one region
Use </> to choose, then “OK” to select each option in turn
DTVregionmenu
4.AfterscanninghasnishedtheTVwilldisplaytherstprogramstored.
1.Usethe , , , buttontoselectadesiredlanguage,
thenpresstheENTER/OKbuttontoconrm.
2.Usethe , , , buttontoselectCountry,thenpress
theENTER/OKbuttontoconrm.
3.Thesystemwillautomaticallyscan
and store all available programs
which may take ve minutes or
more.
If the digital TV region choice
menuappears,pressENTER/OKto
conrmyourdigitalTVregions.
F1915LVD & F2215LVD_IB_FRG_050.indd 14 1/11/2011 10:21:37

15
UNIT OPERATION
AUDIO LANGUAGE FOR DTV
While watching a DTV programme, you can press
the buttontodisplaytheAudioLanguagemenu,
andselectaudiolanguage,audioformatandsound
track.
•Usethe or buttontoselectanaudiolanguage
oraudioformatifavailable,pressthe or button
toselectsoudtrackbetweenL/R(Stereo),L/L(Mono
Left) and R/R (Mono Right). Press the ENTER/OK
buttontoconfrim.
•Press the or EXIT button to exit the Audio
Languagemenu.
Note:
For analogue TV, press the button repeatedly
to select STEREO/MONO/Dual I/Dual II/Dual I+II
directly.
sound track
audio format
audio language
ELECTRONIC PROGRAMME GUIDE (EPG) FOR DTV
WhilewatchingaDTVprogramme,youcanpresstheGUIDEbuttontodisplaythePROGRAMME
GUIDEmenu.
•Pressthe or toscrollthroughtheprogrammesofdifferentchannels.Pressthe or toskip
totheprogrammesofdifferentperiods.(Note:ProgrammenamesinGREENindicatesthatthese
programmesarenowbroadcastingondifferentchannels.)
•Usethe , , or orbuttontoselectaprogramme,presstheINFObuttontodisplaydetailed
informationifavailable.PresstheINFObuttonagaintoreturn.
•PresstheYELLOWbuttontoviewtheprogrammelistofthenextdate;presstheGREENbuttonto
viewtheprogrammelistofthepreviousdate.
•PresstheENTER/OKbuttontowatchtheselectedchannel.
•PresstheEXITbuttontoexitthePROGRAMMEGUIDEmenu.
Note:
GuideinformationdisplaymaybedifferentaccordingtotheDTVprogrammes.
F1915LVD & F2215LVD_IB_FRG_050.indd 15 1/11/2011 10:21:38
16
1.Usethe or buttontoselectachannel.(PresstheCH/PAGE / buttontoskiptoprevious/
nextpage.)
2.PresstheRED/GREEN/YELLOW/BLUEbuttonortheFAVbuttontoeditthechannel.
• DELETE
PresstheREDbuttontodeletetheselectedchannel.Pressthe
TV MENUbuttontostopdelete.
• RENAME(forATVmodeonly)
PresstheGREENbuttontorenametheselectedchannel.Usethe
or buttontoselectthecharacterstorepresentthestation
name,usethe or buttontomovetothenextcharacter,press
theTV MENUbuttontoconrm.
• MOVE(forATVmodeonly)
PresstheYELLOWbuttonandusethe or buttontomovethe
selectedchannel,thenpresstheTV MENUbuttontoconrm.
•SKIP
PresstheBLUEbuttontoskipornotskiptheselectedchannel.
•FAV(Favourite)
PresstheFAVbuttontosetorcanceltheselectedchannelasoneofthefavouriteprogrammes.
A“heart” willappearalongsidetheprogramsetasafavourite.
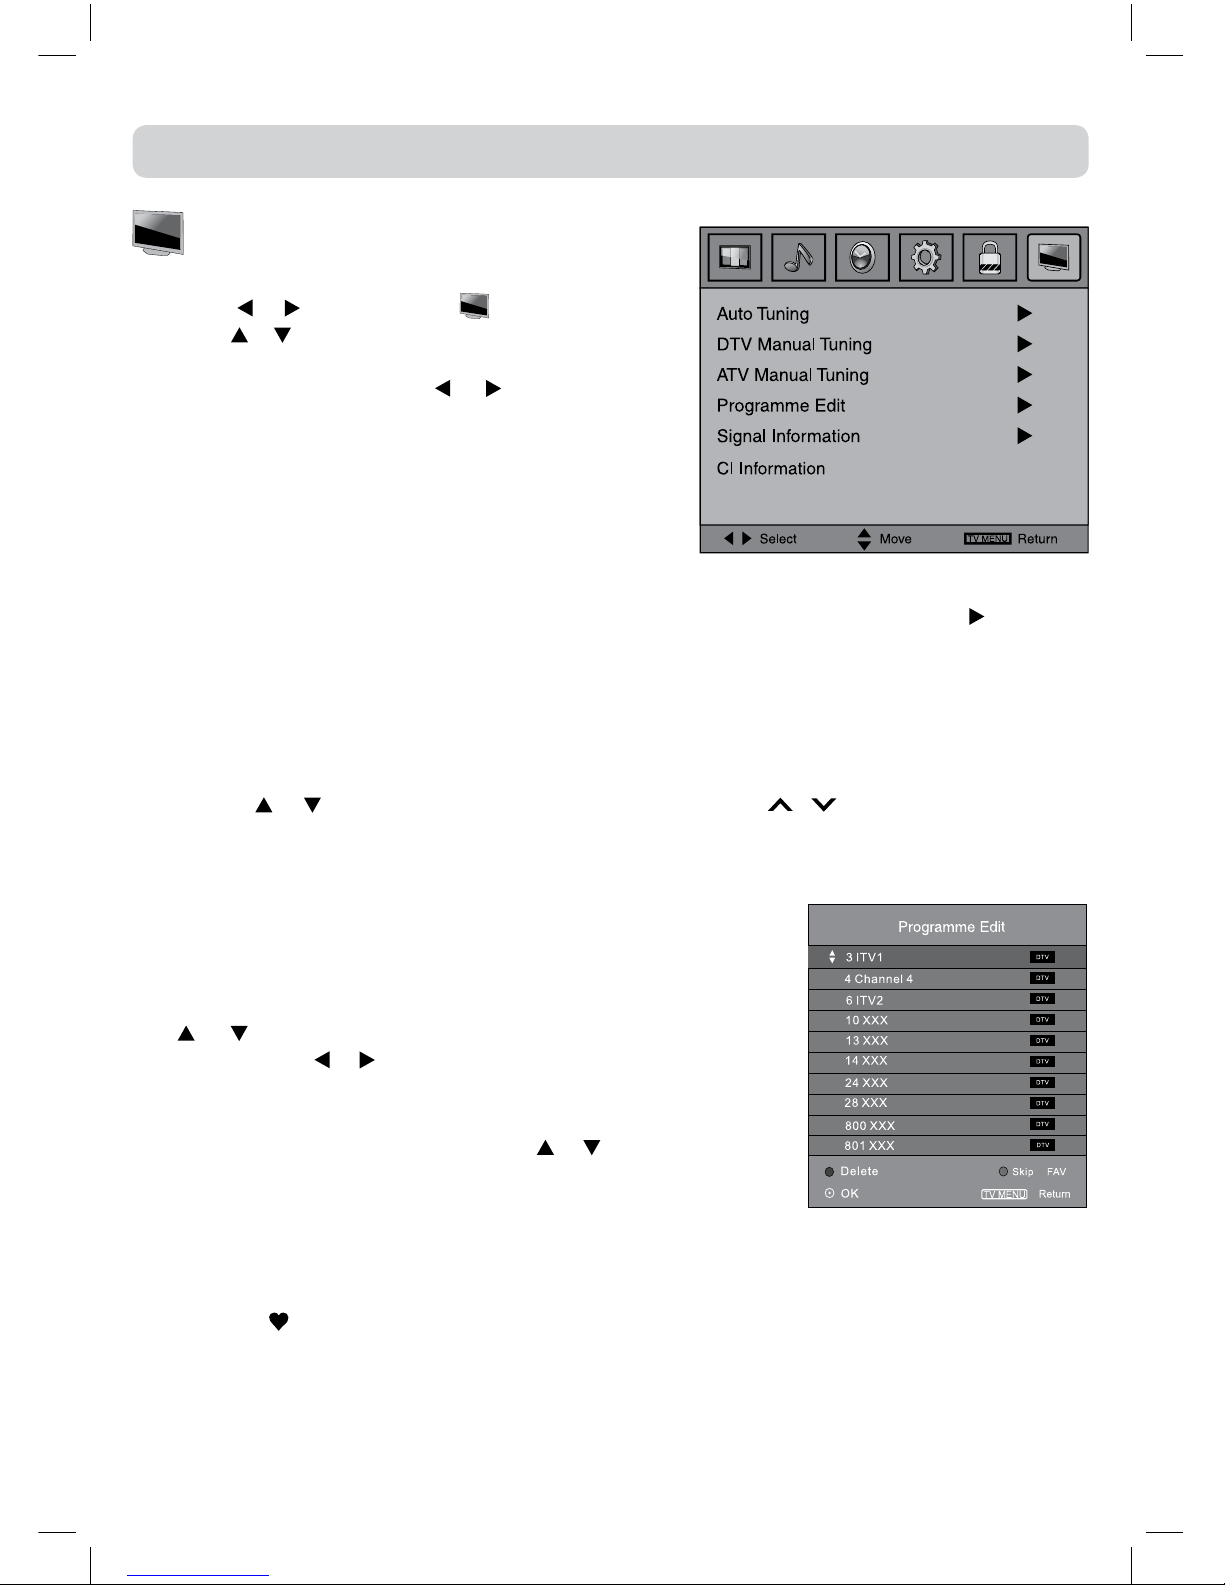
ANALOGUE TV / DTV SETUP
TV SETTING (only in ATV or DTV mode)
1.PresstheTV MENUbutton.
2.Usethe or buttontoselect .
3.Usethe or buttontoselecttheoptions(Auto Tuning,
DTV Manual Tuning, ATV Manual Tuning, Programme
Edit),adjustthemusingthe or button.Common
InterfaceandSignal informationareonlyavailablein
DTVmode.
4.PresstheTV MENUbuttontoreturntopreviousmenu,
repeatstep2toadjustothersettings.
5.Toexitthesetupmenuandreturntothenormalscreen,
presstheEXITbutton.
• AutoTuning :Automaticallyscan, sortandstore allavailable programmes. Press to choose
DTV+ATV,DTVorATVonly.
• DTVManualTuning:PerformmanualsearchforDTV(DigitalTV)programmes.
• ATVManualTuning:PerformmanualsearchandnetuneforATV(AnalogTV)programmes.
• ProgrammeEdit:AllchannelsstoredarelistedintheProgrammeEditmenu,youcaneditthe
channelsbythefollowingsteps:
•SignalInformation
Displaythesignalinformation,suchaschannelname,network,modulation,qualityandstrength.
•CIInformation
DisplayCAMandSmartcardinformation;selectthelanguageifavailable.
DTVsetupmenu
F1915LVD & F2215LVD_IB_FRG_050.indd 16 1/11/2011 10:21:38
17
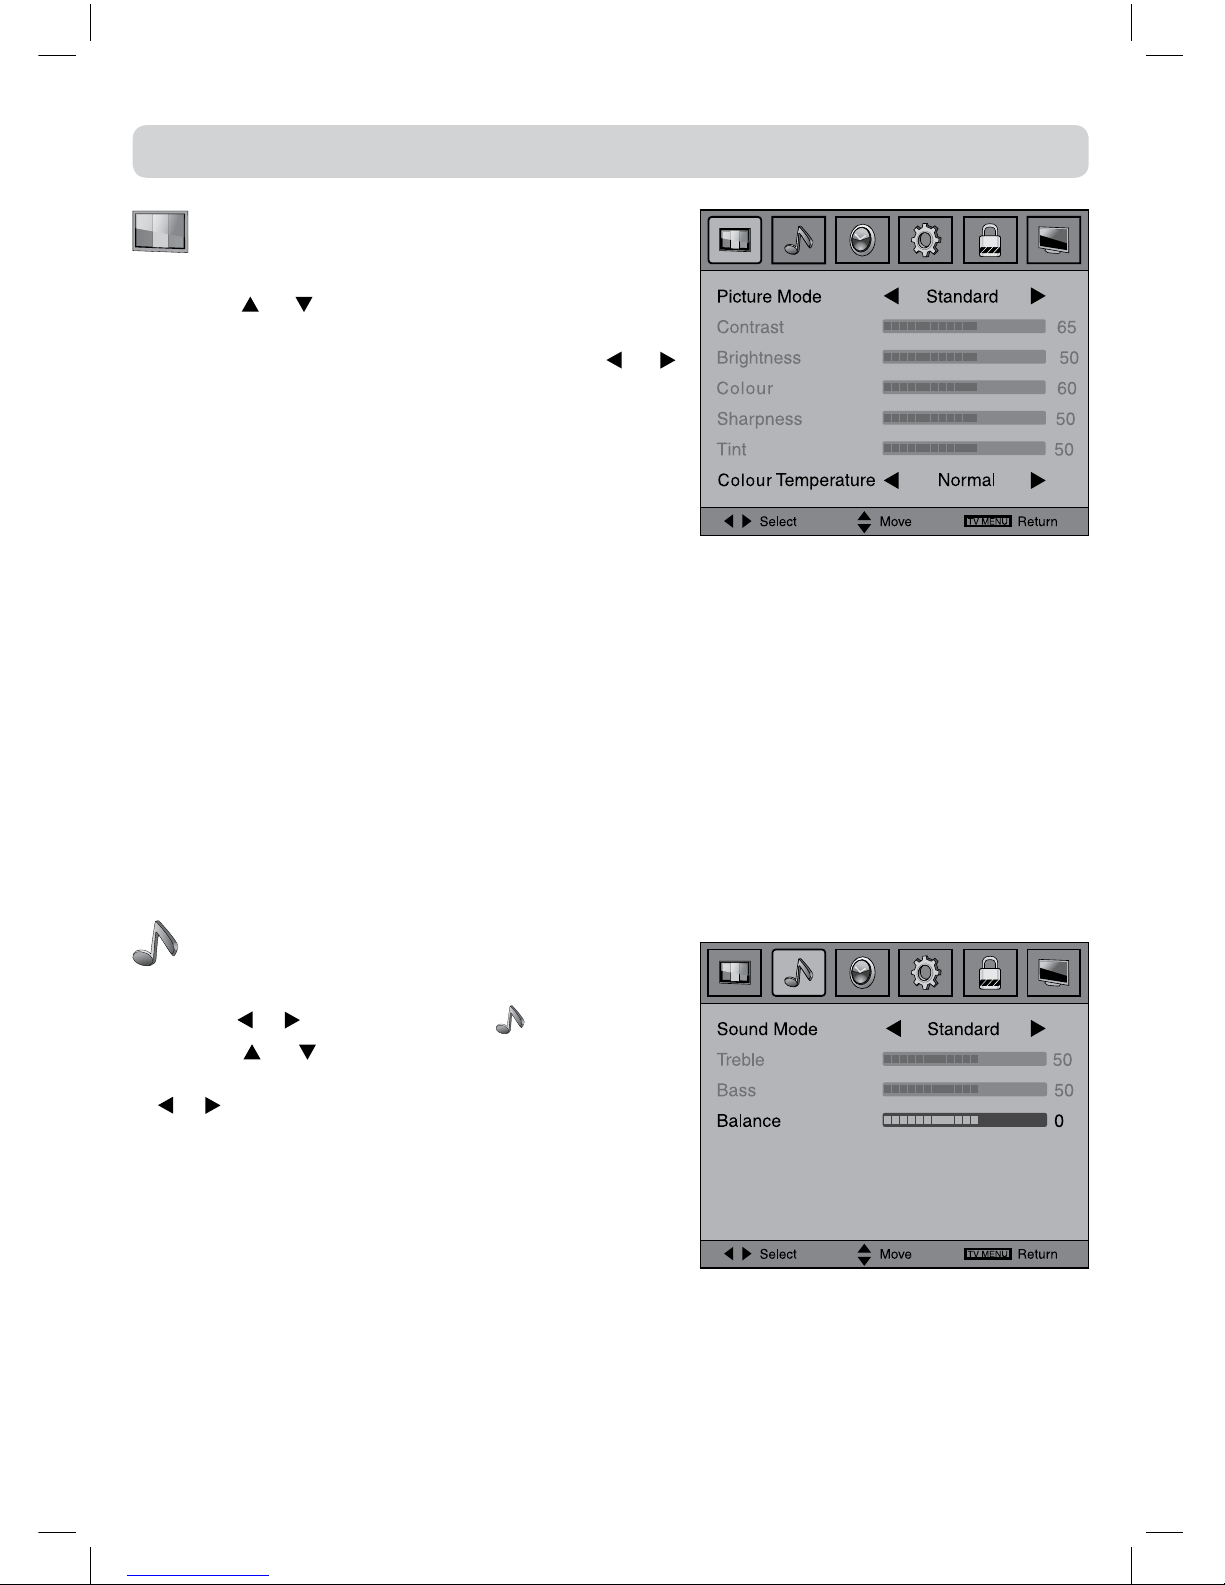
ANALOGUE TV / DTV SETUP
PICTURE MENU
1.PresstheTV MENUbutton.
2.Usethe or buttontoselecttheoptions(Picture
Mode, Contrast, Brightness, Colour, Sharpness, Tint,
Colour Temperature), adjust them using the or
button.Theadjustmentsonlyworkin'personal'mode.
TintonlyworksforNTSCvideo.
3.PresstheTV MENUbuttontoreturntopreviousmenu.
4.Toexitthesetupmenuandreturntothenormalscreen,
presstheEXITbutton.
• PictureMode:Selectfromfourpresetscreendisplay
settings(Standard,Soft,DynamicandMovie),orselectPersonalinwhichyourownsettingsof
Contrast,Brightness,ColourandSharpnessarestored.
• Contrast:Adjustthecontrastofthepicture.Theblackportionsofthepicturebecomericherin
darknessandthewhitebecomebrighter.
• Brightness:Adjustthebrightnessofthepicture.
• Colour:Adjustthecolourofthepicture.
• Sharpness:Adjustthesharpnessleveltoimprovedetailinthepicture.
• Tint(only for AV mode with NTSC signal) :Adjustthetintofthepicture.
•Colour Temperature : Select the colour temperature of the picture. Select Normal (balanced)/
Warm(redwhite)/Cool(bluewhite)mode.
Note:
YoucanalsoselectPictureModesimplybypressingthePICTURE buttonontheremotecontrol.
SOUND MENU
1.PresstheTV MENUbutton.
2.Usethe or buttontoselectthe .
3.Use the or button to select the options (Sound
Mode, Treble, Bass, Balance),adjustthemusingthe
or button.
4.PresstheTV MENUbuttontoreturntopreviousmenu.
5.To exit the setup menu and return to the normal
screen,presstheEXITbutton.
Experiment with different sound settings until you find
the settings you prefer.
• SoundMode:Selectfromfourpresetsoundsettings
(Standard,Music,TheatreandVoice),orselectPersonalinwhichyourownsettingsofTreble,
BassandBalancearestored.
• Treble:Adjustthetreblerange.
• Bass:Adjustthebassrange.
• Balance:Adjustthebalanceleveltowardtheleftorrightspeakers.
Note:
YoucanalsoselectSoundModesimplybypressingtheSOUNDbuttonontheremotecontrol.
F1915LVD & F2215LVD_IB_FRG_050.indd 17 1/11/2011 10:21:39
18
ANALOGUE TV/ DTV SETUP
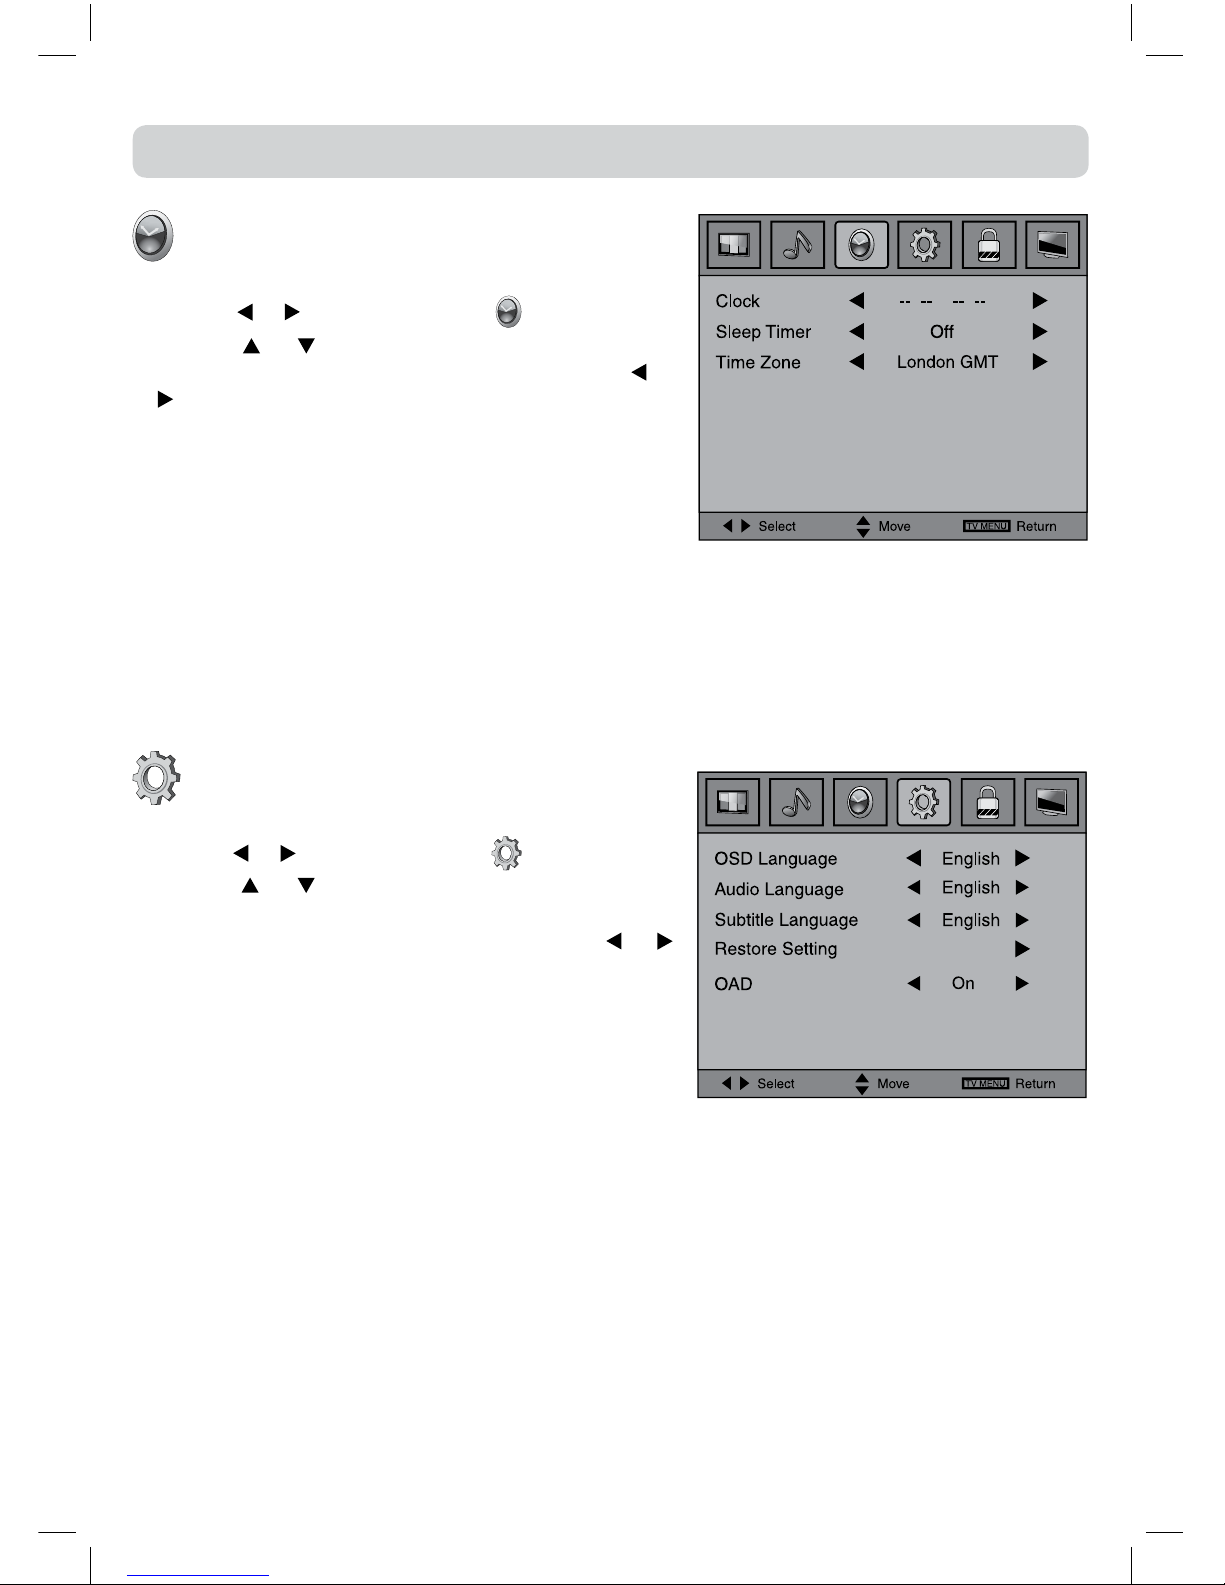
TIME MENU
1.PresstheTV MENUbutton.
2.Usethe or buttontoselectthe .
3.Use the or button toselectthe options(Clock,
Sleep Timer, Time Zone),adjustthemusingthe or
button.
4.PresstheTV MENUbuttontoreturntopreviousmenu.
5.To exit the setup menu and return to the normal
screen,presstheEXIT button.
• Clock:Theclockissetautomaticallywhenreceiving
adigitalsignal.
• Sleep Timer : Select the time to turn the unit to
Standbymodeautomatically:Off->5min--->90min->120min.
• TimeZone:Selectyourtimezone.
SETUP MENU
1.PresstheTV MENUbutton.
2.Usethe or buttontoselectthe .
3.Usethe or buttontoselecttheoptions(OSD
Language, Audio Language, Subtitle Language,
Restore Setting, OAD),adjustthemusingthe or
button.
4.Press the TV MENUbuttontoreturntoprevious
menu.
5.Toexitthesetupmenuandreturntothenormal
screen,presstheEXITbutton.
• OSDLanguage:SelectyourpreferredOnScreenDisplaylanguage.
• AudioLanguage:Selectyourpreferredaudiolanguage.(Availablefordigitalchannelsifmultiple
audiolanguagesarebroadcasted.)
• SubtitleLanguage:Selectyourpreferredsubtitlelanguageorturnoffsubtitle.(Availablefordigital
channelsifmultiplesubtitlelanguagesarebroadcasted.)
• RestoreSetting:PresstheENTER/OKbuttontorestorethesystemsettingstothefactorydefault.
•OAD (Over Air Download) :Selecttoenable/disableOAD(OverAirDownload)feature.This
shouldnormallybeSettoONtoallowtheTVtobeautomaticallyupdgradedifthisisneededfrom
timetotime.
F1915LVD & F2215LVD_IB_FRG_050.indd 18 1/11/2011 10:21:39
19
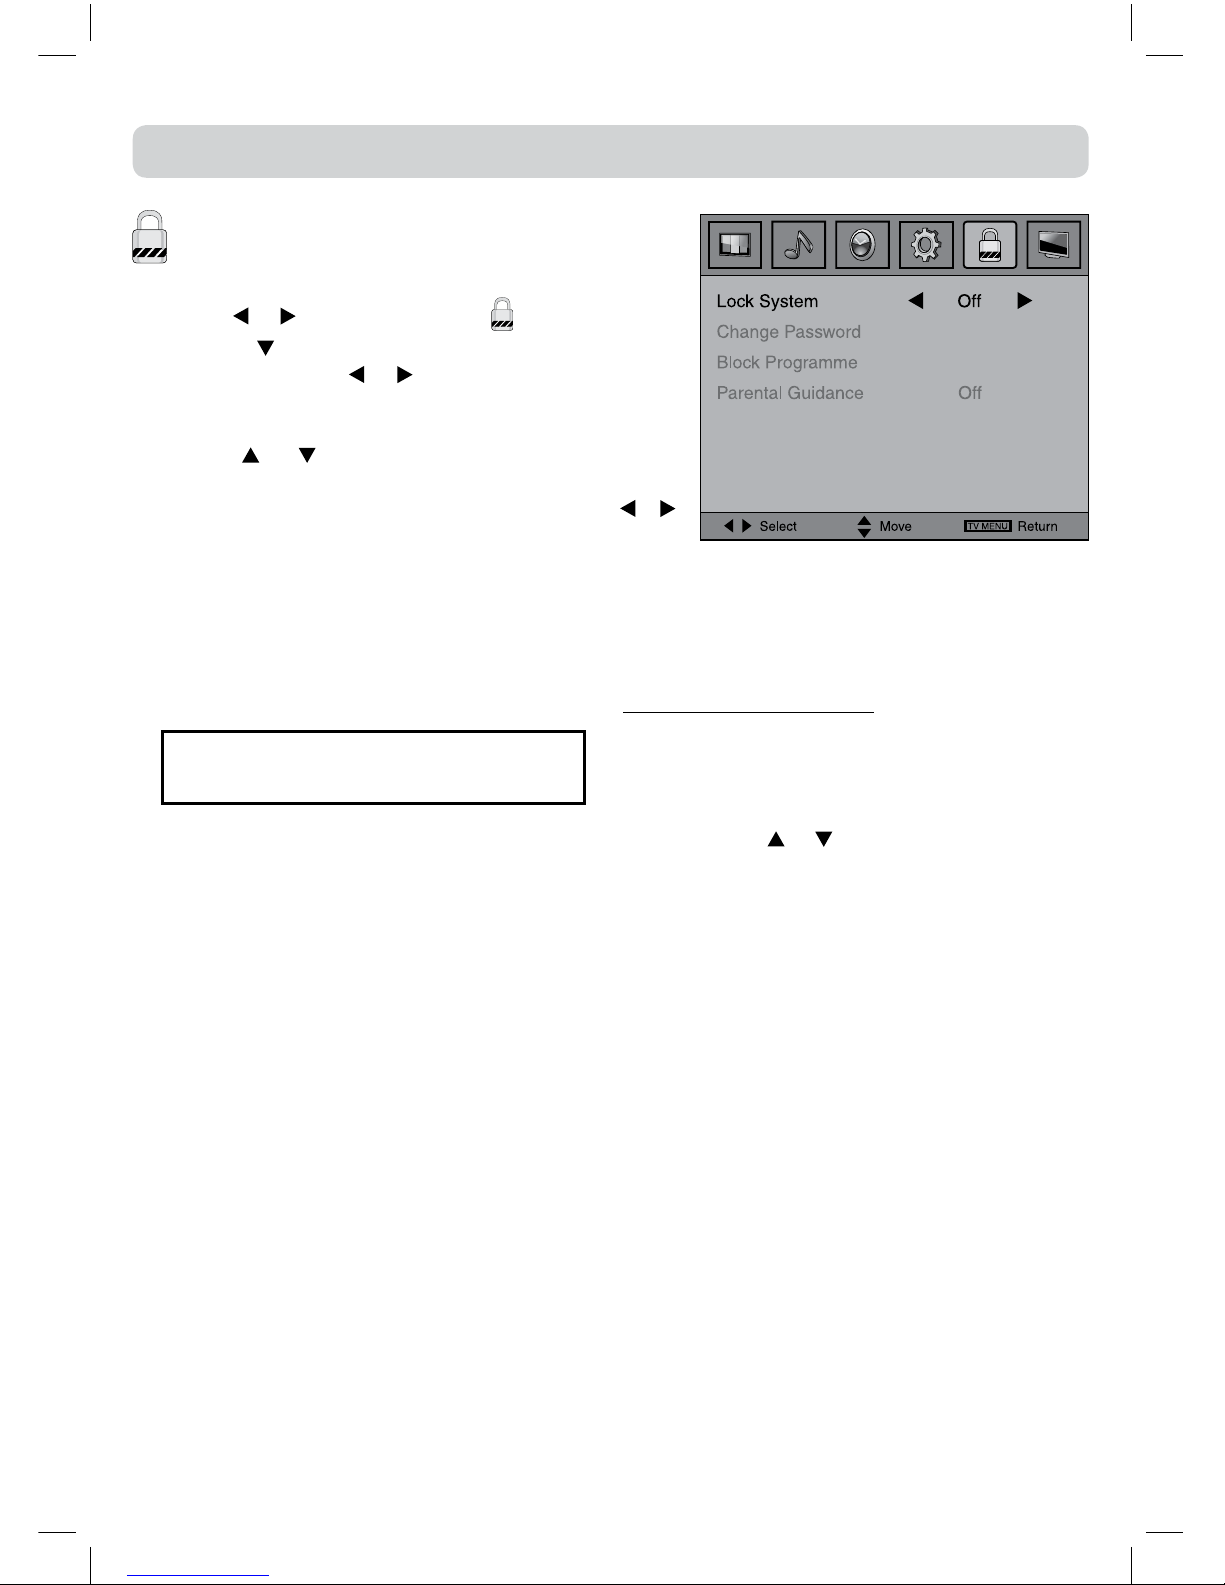
ANALOGUE TV / DTV SETUP
LOCK MENU
1.PresstheTV MENUbutton.
2.Usethe or buttontoselectthe .
3.Pressthe buttontohighlightLockSystemthen
pressENTER/OKor or toenter,enterpasswordto
proceed.
(The default password is 0000.)
4.Usethe or buttontoselecttheoptions(Lock
System, Change Password, Block Programme,
Parental Guidance),presstheENTER/OKor/
buttontoadjust.
5.PresstheTV MENU buttontoreturntoprevious
menu.
6.Toexitthesetupmenuandreturntothenormalscreen,presstheEXITbutton.
• LockSystem:Selecttolockorunlocktheprogrammes.
• ChangePassword:Ifyouchangethepassword,rememberyourpassword.
• BlockProgramme:EntertheBlockProgrammemenu,pressthe or buttontoselectachannel,
presstheGREENbuttontoLockorUnlockthechannel.
• ParentalGuidance:Selectacensorshipleveltocensorandblocktheprogrammes.
Note:
ThissystemwillonlyworkifthecorrectinformationistransmittedbytheTVchannel.
If you forget the password, enter " 8888 "
to unlock parental control.
F1915LVD & F2215LVD_IB_FRG_050.indd 19 1/11/2011 10:21:39

20
TELETEXT
TeletextisaninformationsystemthatdisplaystextonyourTVscreen.UsingtheTeletextcontrolbuttonsyou
canviewpagesofinformationthatarelistedintheteletextindex.
AnalogandDigitaltextlookverydifferentandoperatedifferently.
Please Note
Teletextisonlytransmittedonsomechannels.YouwillonlybeabletoenterTeletextonthese.
TO ENTER TEXT MODE
ForAnaloguetext,presstheTEXTbuttoninATVmode.
For digital text, press the TEXT button in DTV mode.
Thetextpagewillappear,normallytheindexpage.
TO EXIT TEXT MODE
PresstheTEXTbutton.TheTVwillreturntothe
channelyouwerewatching.
TO SELECT A PAGE OF TEXT
Findthenumberofthepageintheindexandenter
itusing theNumericbuttons.Thenumberofthe
pagewillappearonthetopcornerofthescreen.
Thepagecounterwillsearchforyourpage.Whenit
ndsit,thepagewillbedisplayed.
Tomovetothenextpageoftext,presstheCH/PAGE
button.
To move to the previous page, press the CH/PAGE
button.
Toreturntotheindexpage,enterthe“100”byusing
theNumericbuttons.
ForDigitalTextyoucanalsousethecursor , and
TV MENU buttonstoselectpages.
FASTEXT
Atthebottomoftheteletextscreenisarowof
subjectheadingsinred,green,yellowandblue.
Theremotecontrolhasarowofcolourbuttons
correspondingto therowofcolouredsubjectson
thescreen.
Pressingoneofthecolourbuttonswilltake you
directlytothepagecorrespondingtothesubject
heading.
ANALOGUE TEXT ONLY:
MIX
To view a page of the text whilst watching aTV
programme, press the MIX button.The text will be
superimposedovertheTVprogramme.
PresstheMIXbuttonagaintoreturntothetextpage.
PAGE SEARCH WHILST WATCHING TV
InTextmodepresstheCANCELbutton.
EnterthepagenumberyouwantusingtheNumeric
buttons.
Thetoplineof thetextpage willappearwhilstthe
textsearchesforyourpage.Whenthepageisfound
thenumberwill remain inthetoplefthand corner
ofthescreen.
DOUBLE HEIGHT TEXT
IfyouhavedifcultyreadingthetextontheTVyou
candoubletheheightofthetext.
PresstheSIZEbutton.Thetophalfofthepagewill
bedisplayedindoubleheighttext.
Pressthe SIZEbuttonagain.The bottomhalfof the
pagewillbedisplayedindoubleheighttext.
PresstheSIZEbuttonagaintoreturntothefullpage.
PAGE STOP
Ifthepage oftextyou haveselectedcontains sub
pages,thesewillgraduallyllupthepagememory.
Youcanpresscursor or toselectindividualsub-
pagesor highlighttherollingpagesymbol to
readthemoneafteranother.
To stop the move to the next sub page, press the
HOLDbutton. “ ”willappear onthetopleft
cornerofthescreen.
Tocontinuemovingthroughthesubpages,pressthe
HOLDbuttonagain.
TO REVEAL INFORMATION
PresstheREVEALbuttontorevealconcealed
information(quizanswersetc.).
PresstheREVEALbuttonagaintoconcealthe
informationagain.
F1915LVD & F2215LVD_IB_FRG_050.indd 20 1/11/2011 10:21:40
Other manuals for F1915LVD
1
This manual suits for next models
1
Table of contents
Other Ferguson TV DVD Combo manuals


