Fervi 0530 User manual

OPERATION AND
MAINTENANCE MANUAL
Low consumption lamp
Art. 0530
TRANSLATION OF THE ORIGINAL INSTRUCTIONS
fervi.com

HARDWARE
Page 2 of 12
PREFACE
Please ensure you have read this manual before any
operation
TRANSLATION OF THE ORIGINAL INSTRUCTIONS
It is compulsory to read this instruction manual before starting operation. The guarantee of
smooth operation and full performance of the product is highly dependent on the application
of all the instructions contained in this manual.
Operator Qualifications
The workers responsible for using this product must have all the necessary information,
education and receive adequate training regarding safety, including:
a) Conditions of use for the equipment;
b) Foreseeable abnormal situations, pursuant to Article 73 of Legislative Decree
81/08.
We guarantee the product's conformity to specifications and technical instructions
described in the Manual on the date of issue, listed on this page; however, the product
may be subject to potentially major technical changes in the future, without the
Manual being updated.
Therefore, contact FERVI for information about modifications that may have been
implemented.
REV. 2 October 2013
fervi.com

HARDWARE
Page 3 of 12
1 GENERAL INFORMATION
This manual is considered an integral part of the lighting device to which it was attached at
the time of purchase.
The manufacturer holds all ownership to material and intellectual property of this manual;
any disclosure or copying, even partial, of this publication without prior written consent is
forbidden.
The manufacturer waives any and all responsibility for damage to people and/or
things caused by non-observance of the instructions in this manual.
Users will be held fully responsible for any changes they have made to the device,
and the manufacturer will not be held responsible for any damage caused to
persons and/or property resulting from maintenance and/or modifications carried
by unqualified personnel and in a manner that differs from the operating
procedures shown below.
fervi.com

HARDWARE
Page 4 of 12
2 GENERAL SAFETY WARNINGS
Risks associated with using the instrument
Each person who is in charge of the installation, use and maintenance of the Low consumption
lamp, must carefully read this manual, and in particular this chapter with information about
safety, in order to acquire full knowledge of the device.
2.1 Precautions with regard to electric shocks
Risks associated with electric shocks
Check that the switch is in the "0" position and that the power supply plug is
disconnected before touching live parts of the appliance.
Touching these parts without disconnecting the power supply plug may cause an
electric shock.
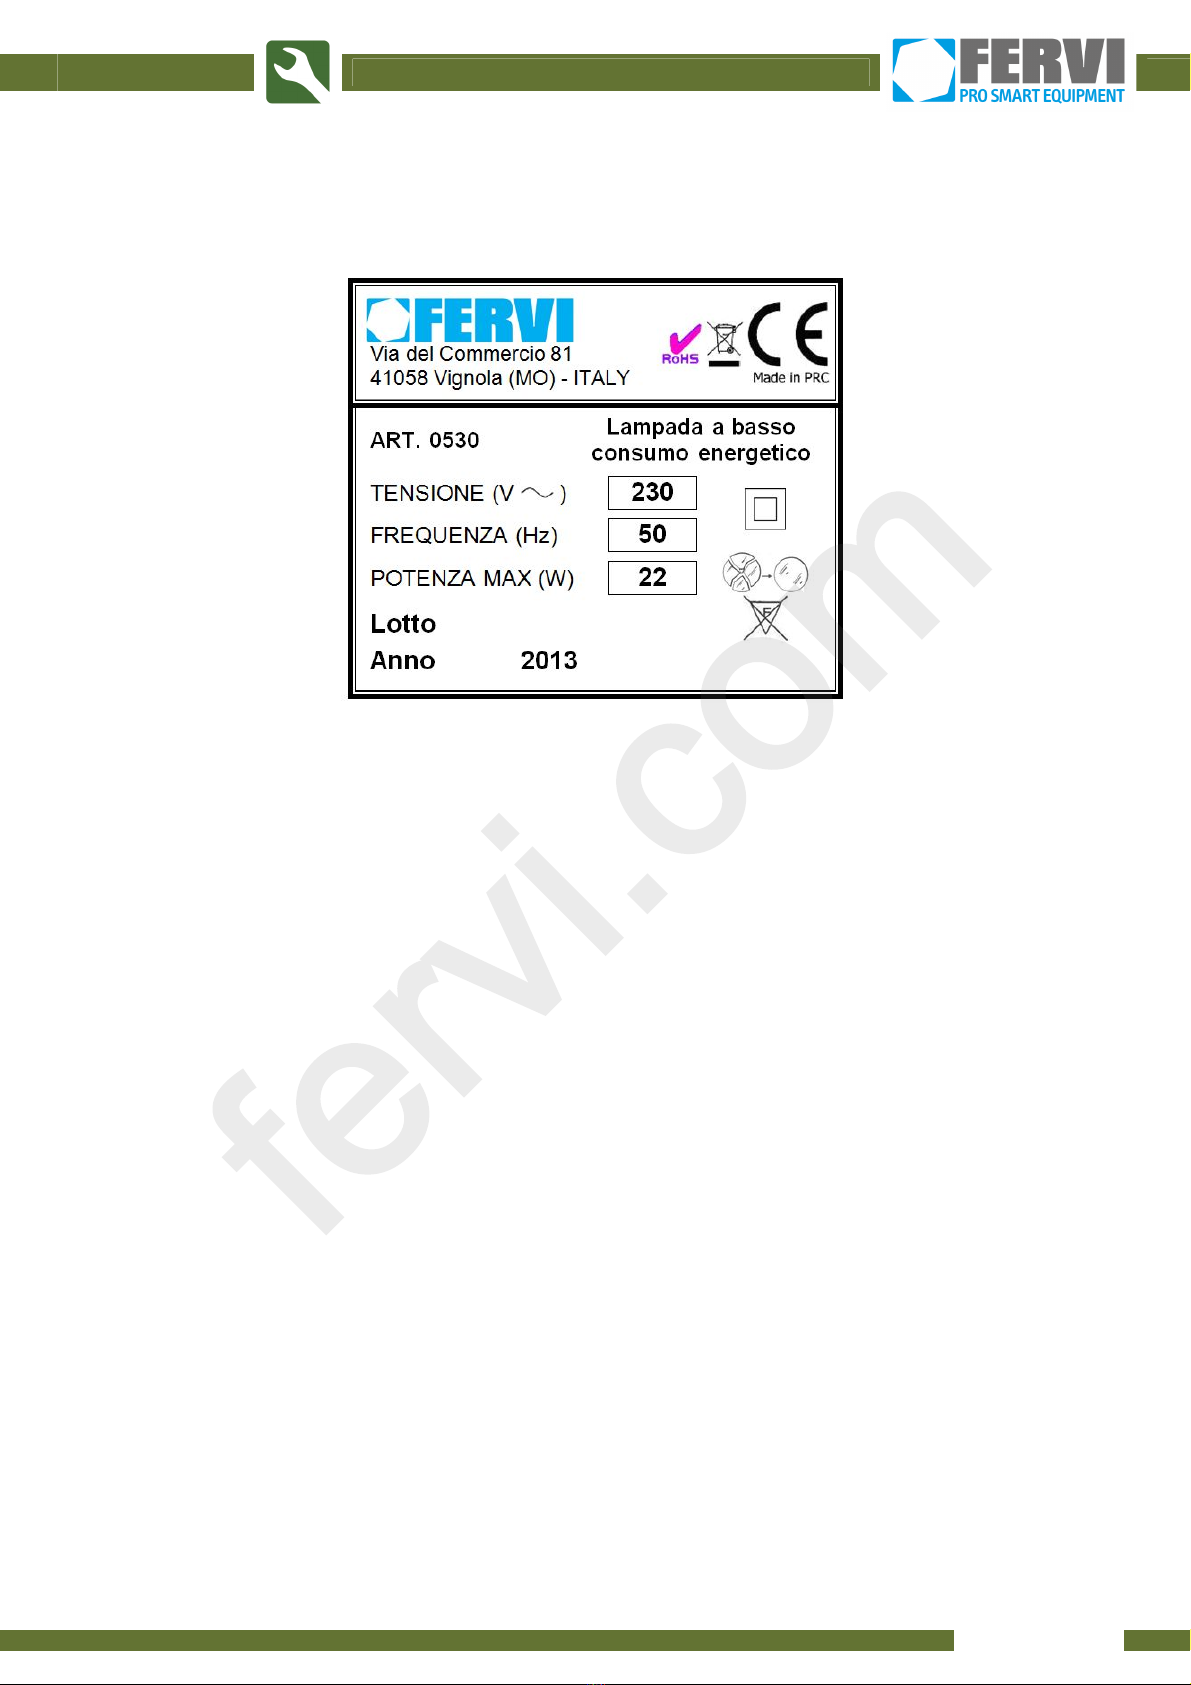
Make sure that the power supply used meets the requirements for voltage and
frequency required by the device (shown on the plate).
The use of different types of power supplies may cause an electric shock, as well as fire
or damage to the device.
DO NOT spray or pour water on the unit, this may cause an electric shock.
If water comes into contact with the unit, unplug the power plug immediately and
contact Technical Support as soon as possible.
Using the device disassembled may cause an electric shock.
Regrading the repair of the equipment contact Technical Support.
2.2 Precautions regarding installation
Risks associated with installation
DO NOT install the device in an unstable position. If the lamp falls, it can break or
become damaged.
Position the clamp of the lamp on a support surface (table, bench etc.) which is solid
and resistant, taking care to completely tighten the screw.
DO NOT install the device in places where there is dust, fumes, gases and/or vapours.
DO NOT install the product in places subject to high temperatures or exposed to direct
sunlight.
The unit MUST be used in closed spaces, protected from the elements (rain, hail, etc.).
Do NOT use the equipment in humid environments.
fervi.com

HARDWARE
Page 5 of 12
2.3 Precautions regarding cleaning
Risks associated with cleaning
Plastic materials are used in some parts of the lamp. Applying organic solvents (such as
benzene), or other chemicals for cleaning may cause deformation or discolouration.
Clean the device gently, using a soft dry cloth.
2.4 Technical Assistance
For any problems or concerns, please contact, without hesitation, the Customer Service
Department of the dealer from whom you purchased the product, who has specialised staff,
specific equipment and spare parts.
fervi.com

HARDWARE
Page 6 of 12
3 DESCRIPTION OF THE LAMP AND INTENDED USE
The Low consumption lamp Art. 0530 is an adjustable table mounted lighting device,
installed on an articulated and adjustable arm and equipped with a magnifying glass for the
observation of machined surfaces.
The lighting device is made up of the following parts (see Figure 1):
Figure 1 – General view of the lamp
1
Cap made of insulating polymeric materials, with the mag
nifying
lens and the lighting device itself (circular fluorescent tube around
the magnifying glass);
2Steel articulated mechanical arm;
3Universal clamp for attachment to the supporting surface;
4Flexible power supply cable.
The device is powered by the mains power supply (230V/50Hz).
1
2
3
4
fervi.com

HARDWARE
Page 7 of 12
3.1 Identification plate
The following identification plate is affixed to the body of the device.
Figure 2 – Identification plate
fervi.com

HARDWARE
Page 8 of 12
4 TECHNICAL SPECIFICATIONS
Description (Measurement unit) Model
0530
Voltage (V) 230
Frequency (Hz) 50
Power (W) 22
Arm length (mm) 1,150
Maximum clamp thickness (mm) 65
Dimensions of the lens (mm) 127
Magnification power / Diopters: 75% / 3
5 DEFINITIONS
DIOPTER:This refers to the curvature of a lens.
With an increase in diopters, the lens becomes thicker and its curvature is bigger. With an
increase in the curvature, the rays of light sent to our eyes cover a larger portion of the
retina, which makes the object appear larger.
MAGNIFICATION POWER:This refers to how large an object appears when looking at it through
a magnifying lens (see Figure 2).
NORMAL
VIEW
WITH LENS
WITH 3
DIOPTERS
WITH LENS
WITH 5
DIOPTERS
WITH LENS
WITH 11
DIOPTERS
WITH LENS
WITH 16
DIOPTERS
Figure 3 - Examples of magnification.
fervi.com

HARDWARE
Page 9 of 12
6 IMPROPER USES AND PRECAUTIONS
The following actions described, which obviously can not cover the entire range of potential
possibilities of "misuse" of the equipment, are to be considered strictly prohibited.
THE FOLLOWING IS STRICTLY PROHIBITED!
To install and use the equipment on surfaces that are not strong enough to support its
weight;
To install and use the device on easily flammable surfaces;
To allow personnel to use the device who are insufficiently trained and who have not
read the instruction manual;
To use this device in environmental conditions not envisaged (in the external
environments with adverse weather conditions, exposed to direct sunlight, high
magnetic fields, etc.).
To use the device in places where there is dust, fumes, gases and/or vapours;
To use the device in places subject to high temperatures;
To use the equipment in humid environments.
To use the equipment in potentially explosive environments;
To replace the bulbs, and perform inspections and maintenance to the internal parts of
the device, without checking that the switch is in the "0" position and that the power
supply plug is disconnected;
To power the device with parameters different to those required and recommended;
Throw water onto the device and/or touch it with wet hands.
7 TRANSPORTATION AND MOVING
Lifting the equipment for transportation, can be done manually, by the operator. The
relatively low weight of the lamp allows it to be moved manually and safely without the
danger of injury to the operator. The operator must hold the lamp with both hands when
lifting and moving it.
fervi.com

HARDWARE
Page 10 of 12
8 UNPACKING INSTRUCTIONS
The lamp is supplied in a cardboard box. Before disposing of the shipping carton, check you
do not to throw away parts of the machine, the instruction "sheets" or other documentation.
Standard packaging
Packaging materials (plastic bags, polystyrene foam, etc.) must not be left within reach of
children as these are potentially dangerous.
9 COMMISSIONING
9.1 Installation
Attach the universal clamp lamp on the edge of a table or a bench and tighten the locking
screw of the clamp until a rigid and secure attachment is achieved. In this regard, always
choose a solid and resistant support surface.
9.2 Power supply / connection
To power the device, plug the cord into an appropriate 230 V / 50 Hz wall socket.
Connection
Ensure the the power plug is properly connected.
10 SWITCHING ON
After you have successfully installed the device, turn on the
lamp, by putting the switch into position "1".
The switch is located on the lamp above the cap behind the
magnifying lens.
Figure 4 – Close-up of the
lamp switch.
fervi.com

HARDWARE
Page 11 of 12
11 MAINTENANCE AND CLEANING
The purpose of this chapter is to provide all the information on maintenance procedures and
frequency required for the Flexible arm lamp with magnifying lens.
INTERVENTION Frequency
Daily Weekly Monthly
1.
General visual inspection
X
2.
Check that plates are clearly visible and
legible X
3.
General cleaning
X
4.
Replacement of lamp(s)
If necessary
1. General visual inspection: check the overall status of the device and, in particular,
the flexible power cable and the presence of any damage or missing parts.
2. Check the legibility of the plates: the plates on the equipment must be perfectly
legible; it is therefore necessary to keep them clean and request a replacement if they
are illegible.
3. General cleaning: cleaning is necessary to free the structure, the cap and the
magnifying lens of dust or dirt.
Risks associated with cleaning
Plastic materials are used in some parts of the lamp. Applying organic solvents (such as
benzene), or other chemicals for cleaning may cause deformation or discolouration.
Clean the device gently, using a soft dry cloth.
4. Replacing bulbs: the bulbs must be replaced if they are burnt and/or damaged. In
this regard:
Put the switch into the "0" position and remove the plug from the power socket;
Unscrew the fixing screws on the bottom, for the closing of the cap and
protective screens, using a screwdriver and remove the screens themselves;
Disconnect the bulb from its housing;
Replace the bulb with an equivalent bulb and "close" the assembly by performing
the above steps in reverse.
fervi.com

HARDWARE
Page 12 of 12
12 TROUBLESHOOTING
The following table shows the type of defect / problem, possible causes, and possible
remedies for the malfunction. The table is a useful aid for the maintenance technician when
looking for problems with the equipment.
Fault Cause Solution
When activating the
switch, the lamp does not
turn on.
Plug inserted incorrectly. Insert the plug correctly.
Level of input voltage is
wrong.
Check that the power output is
correct.
The correct power is not
supplied.
Check the electrical
connections.
13 DECOMMISSIONING
13.1Disassembly and disposal of materials and components
If the equipment is to be scrapped, its parts must be disposed of differently so that they can
be recycled if possible.
Respect the environment!!
Contact a specialist centre for the collection of the materials.
In this regard, divide the materials according to their nature, with the assistance of
specialist companies authorized for waste disposal, in compliance with the requirements
of the law.
fervi.com
Table of contents
Popular Home Lighting manuals by other brands

Springdale Lighting
Springdale Lighting SGT11187 Assembly instructions

Safavieh Furniture
Safavieh Furniture FLL4086A manual

Safavieh Lighting
Safavieh Lighting MARINA TBL4005A manual

Philips
Philips 563901713 user manual

Philips
Philips 37415/86/16 user manual

Kenroy Home
Kenroy Home K/D 2 POLES-3 WAY-150W Use and care guide

JONATHAN Y
JONATHAN Y JYL3034A manual

Safavieh Lighting
Safavieh Lighting ARCHIE IRON FLL4090A manual

FOSCARINI
FOSCARINI Gregg midi Assembly instructions

Triarch
Triarch Indoor Lighting 29322 Assembly instructions

Philips
Philips 69056-31-16 Specifications

Springdale Lighting
Springdale Lighting FTT10004 Assembly instructions