Fingersonic EXP-1 User manual

Rev 1.0 1

Rev 1.0 2
English
Copyright and legal notices
Trademarks
All brands, product and company names and any other registered names and trade marks
mentioned in this manual belong to their respective owners.
Disclaimer
Fingersonic has taken all possible steps to ensure that the information given here is correct
and complete. In no event can Fingersonic accept any liability or responsibility for any loss or
damage to the owner of the equipment, any third party, or any equipment which may result from
use of this manual or the equipment it describes. The information provided in this manual may be
modified at any time without notice. Specifications and appearance may differ from those listed and
illustrated.
The product is ESD sensitive and is sold without casing.
Changes or modifications not expressively approved by the party responsible for compliance
could void user’s authority to operate equipment.
The LCD screens as illustrated in this user manual are for instructional purposes, and may
appear somewhat different from the screens which appear on your device.
Location
Using the unit in the following locations can result in a malfunction:
-Direct sunlight
-Extreme temperature or humidity
-Excessive dust or dirty locations
-Excessive vibrations
-Close to magnetic fields
Interference with other electrical devices
Radios and televisions placed nearby may experience reception interference. Operate this
unit at a suitable distance from radios and televisions.
Unplug all instruments when making connections
To avoid causing damage to the EXP-1 and other devices to which is connected, such as a
hifi system or midi instruments, turn off the power and unplug all related devices before connecting
or disconnecting audio and midi cables.
Headphones caution
To prevent hearing loss, avoid using headphones at high volumes for long periods of time.
Handling
To avoid breakage, do not apply excessive force to the switches or controls.

Rev 1.0 3
Notice regarding disposal (EU only)
If this symbol is shown on the product, manual, battery or package, you must dispose of it in
the correct manner to avoid harm to human health or damage the environment.
Contact your local administrative body for details on the correct disposal method. If the
battery contains heavy metals in excess of the regulated amount, a chemical symbol is displayed
below the symbol on the battery package.
Warranty
The product is warranted to be free from defects in material or workmanship for a period of
12 months from the date of the shipment to you, the customer. In the event of a defect covered by
this limited warranty, Fingersonic will, at its option and free of charge to customer, repair, replace
or refund the purchase price paid.
This limited warranty does not cover the following:
-Alleged defect arises because customer has altered or repaired the product without written
consent or authorization of Fingersonic
-The customer did not follow any applicable instructions for proper storage, usage or
maintenance of this product.
-The customer has failed to notify Fingersonic of any defect where the defects should have
been reasonably apparent on inspection: or
-The customer failed to notify Fingersonic of the defect within 12 months of the shipment to
customer.
-This limited warranty does not cover the shipping cost of the defective product to
Fingersonic neither it covers the cost of shipping the repaired or the replacement product to you.
2017 Fingersonic All rights reserved

Rev 1.0 4
Summary
Copyright and legal notices..........................................................................................................2
Introduction:.................................................................................................................................5
Device overview ..........................................................................................................................7
Basic operation...........................................................................................................................10
Drums section ............................................................................................................................12
Bassline instrument....................................................................................................................15
Piano instrument ........................................................................................................................16
Synth instrument........................................................................................................................17
EXternal Sequencer....................................................................................................................19
Mixer section usage ...................................................................................................................20
Effects ........................................................................................................................................21
USB connectivity usage.............................................................................................................22
Xpansion 1 Port..........................................................................................................................23
Xpansion 2 port..........................................................................................................................25
Context and instruments patches saving/recovering..................................................................26
Quick troubleshooting................................................................................................................30
Midi implementation chart.........................................................................................................32
EXP-1 System Exclusive open source protocol.........................................................................33
Technical specifications.............................................................................................................34

Rev 1.0 5
Introduction:
Firstly, we thank you for choosing and purchasing this EXPerimental unit 1, an innovative
product from FingerSonic. An amazing portable musical instrument containing a very powerful
drums section (10 instruments), a vintage bassline synth, an electronic music oriented piano and a
powerful virtual analog synthesizer engine. All this is controlled by a user friendly 16-step
sequencer with an extra external track allowing to control another instrument with the simple
FaderOs interface. A digital mixer is present to set every instrument level and a special mute
function is featured for easy and quick live remix stage usage.
Although the EXP-1 is designed to be very intuitive to use, reading this manual will give
you better understanding of all the features offered by your new instrument.
The unit has been designed to allow easy and quick music creation. You will be able to
program great patterns and build a complete track without the need of a computer or other
instruments. This is a completely standalone unit.
It is possible to run it on batteries and also an internal speaker is available for total
autonomy. But it is obviously possible to hook it to an amplifier or a pair of headphones. The
presence of USB and MIDI (Xpansion1 in optional) allows the instrument to be interfaced with the
widest range of instruments and devices.
A led matrix allows to quickly select the voice/instrument to play or edit. Two rotary
controls are provided to tune the synths and drums sounds.
A 16 keys keyboard allows to program the patterns or even play live with various modes
available (Sequencer, Live or Arpeggios).
When edited, it is possible to save the complete pattern context on 16 available pattern
memories.
A song mode is also available to assemble your patterns and make a complete song.
For additional information, up to date support and contact our technical team please feel free
to visit the FingerSonic website at:
www.fingersonic.com

Rev 1.0 6
Key features:
Rhythm part is made of 10 drum parts
Drum parts synthesis as some editable parameters
Vintage bassline synthesizer
Electronic and dance music Piano mono voice
3 voices polyphonic analogue modelling synthesizer
15 voices total polyphony
Effect section with a powerful reverb unit
16 synth patches
16 patterns memories
External sequencer to easily control additional synth or sampler
Tempo range from 20 to 200 BPM, with tap mode available.
Song mode to chain patterns together
Led matrix to select voice to work into
128 * 64 Graphic LCD with FingerSonic “mixer style UI” FaderOS
Built in mixer with mute function
Effect section with reverb and possibility of rhythm part exclusion
USB port for MIDI data and SYSEX allowing to save/dump your work
Internal speaker
3.5mm Stereo line/headphone output
Sequencer support both rhythm mode for drum parts and note list mode for synths.
Runs off external AC through USB power (not supplied) or 6 x AA batteries (not supplied)
Standard MIDI jacks 3.5 mm in and out port (Optional Xpansion1/Gold version)
3 x Additional controllers for master volume and tone control (optional/Gold version)
USB connection supports android OS devices as MIDI
Full work context saving with one button press (patches, parameters and patterns)
Open source SYSEX protocol
Midi CC available for real time synth control

Rev 1.0 7
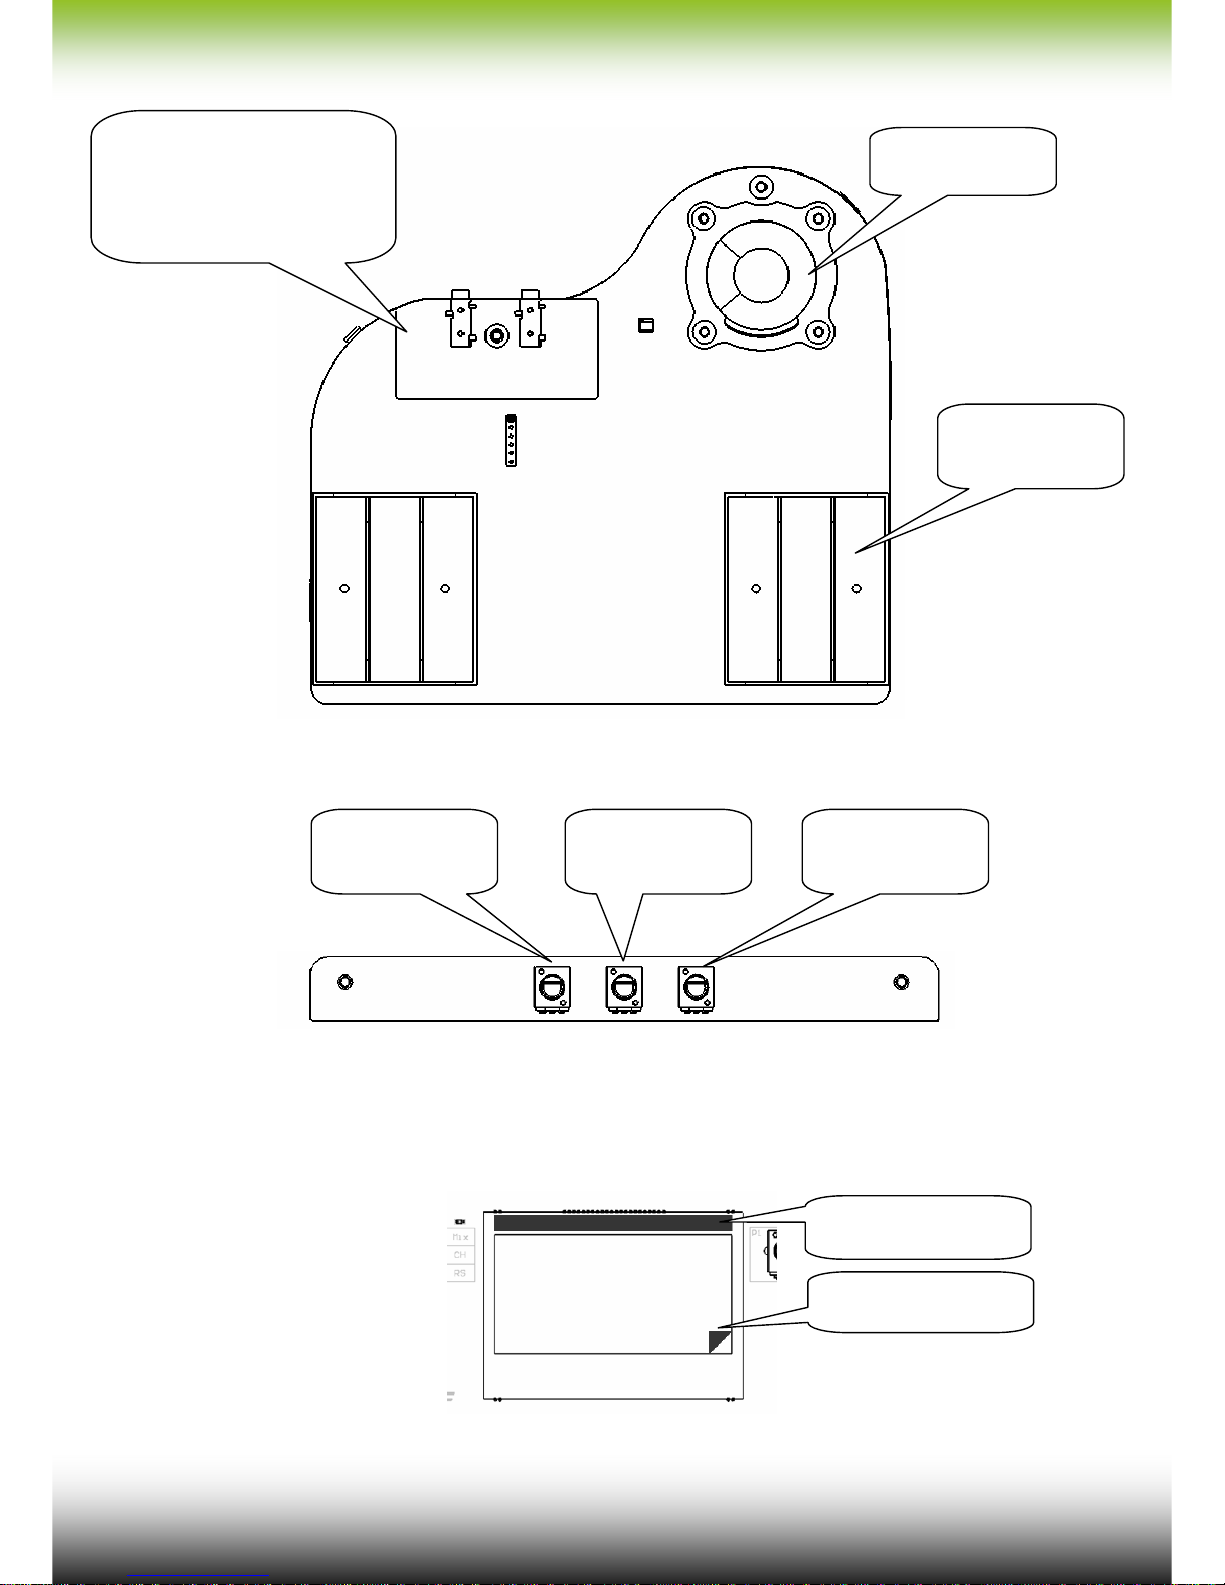
Device overview
EXP-1 is a complete music workstation, the figures hereafter will help you taking
confidence with all the controls and various parts of it:
Note1: some buttons when pressed together activate some special functions
Right select + pattern = synthesizer second/first menu, can be activated when synth instrument is
selected
Right select + save = activate SYSEX Dump. When activated the unit will start to dump the current
pattern context data (patch, parameters and pattern note). You need to have USB midi connected
with a proper listening software to receive the data. SYSEX dump only work via USB midi not via
classic midi port.
Right select + Left select = Restore the factory patch and parameter for the selected pattern.
Right select + Play/stop = Restore the factory patch/parameters and clears the pattern notes and
events.
Note2: When you press Save, EXP-1 will be busy for approximately 1 seconds saving the pattern
context. The controls will not respond during this lapse time.
USB port: use it to
connect to PC or
smartphone through
OTG cable. You can also
power the unit via USB
Headphones/line out:
Connect it to your
headphones or your sound
system. Note: Inserting a
jack disable the internal
speaker
Graphic LCD: Show the
operation of the unit at a
glance thanks to the
FaderOS.
Controls: used to
edit current
selected parameter.
Voice matrix: The
led combination
indicate the currently
selected instrument
Power switch:
Power on or off the
unit when operated
on batteries. When
USB is connected
unit is always on.
Keyboard: Used to
program the pattern step or
as a live playing micro
keyboard.
Step/Tap: Use this
button to select the step
or to tap the tempo when
you are in mix mode.
Right select: select the
parameters which is
affected by the control pot.
Pattern is used to select
one of the 16 patterns
memory. Press save to save
the complete work context
(patch, parameters, pattern)
Left select: select
instrument to edit
Play/stop: play or stop
the sequencer
Song pattern: activate
the song or pattern mode
Rev 1.0 8
Optional Xpansion 2 module:
Important! Protective peel on screen:
You can remove the transparent protective peel on the LCD screen, but it is very important
that you do not remove the black protective adhesive present on top of the screen. Doing so will
void the warranty.
Internal speaker
6 X AA batteries
Xpansion 1: If installed, gives
standard MIDI connectivity to the
device. By using 3.5mm jack to
DIN cable, you can connect a
synthesizer, expander or
keyboard controller.
Master volume,
used to control the
master volume
Treble, used to
adjust the treble
fil
ter
Bass, used to
adjust the bass
filter
Black adhesive, do not
remove
Transparent protective
peel, can be removed

Rev 1.0 9
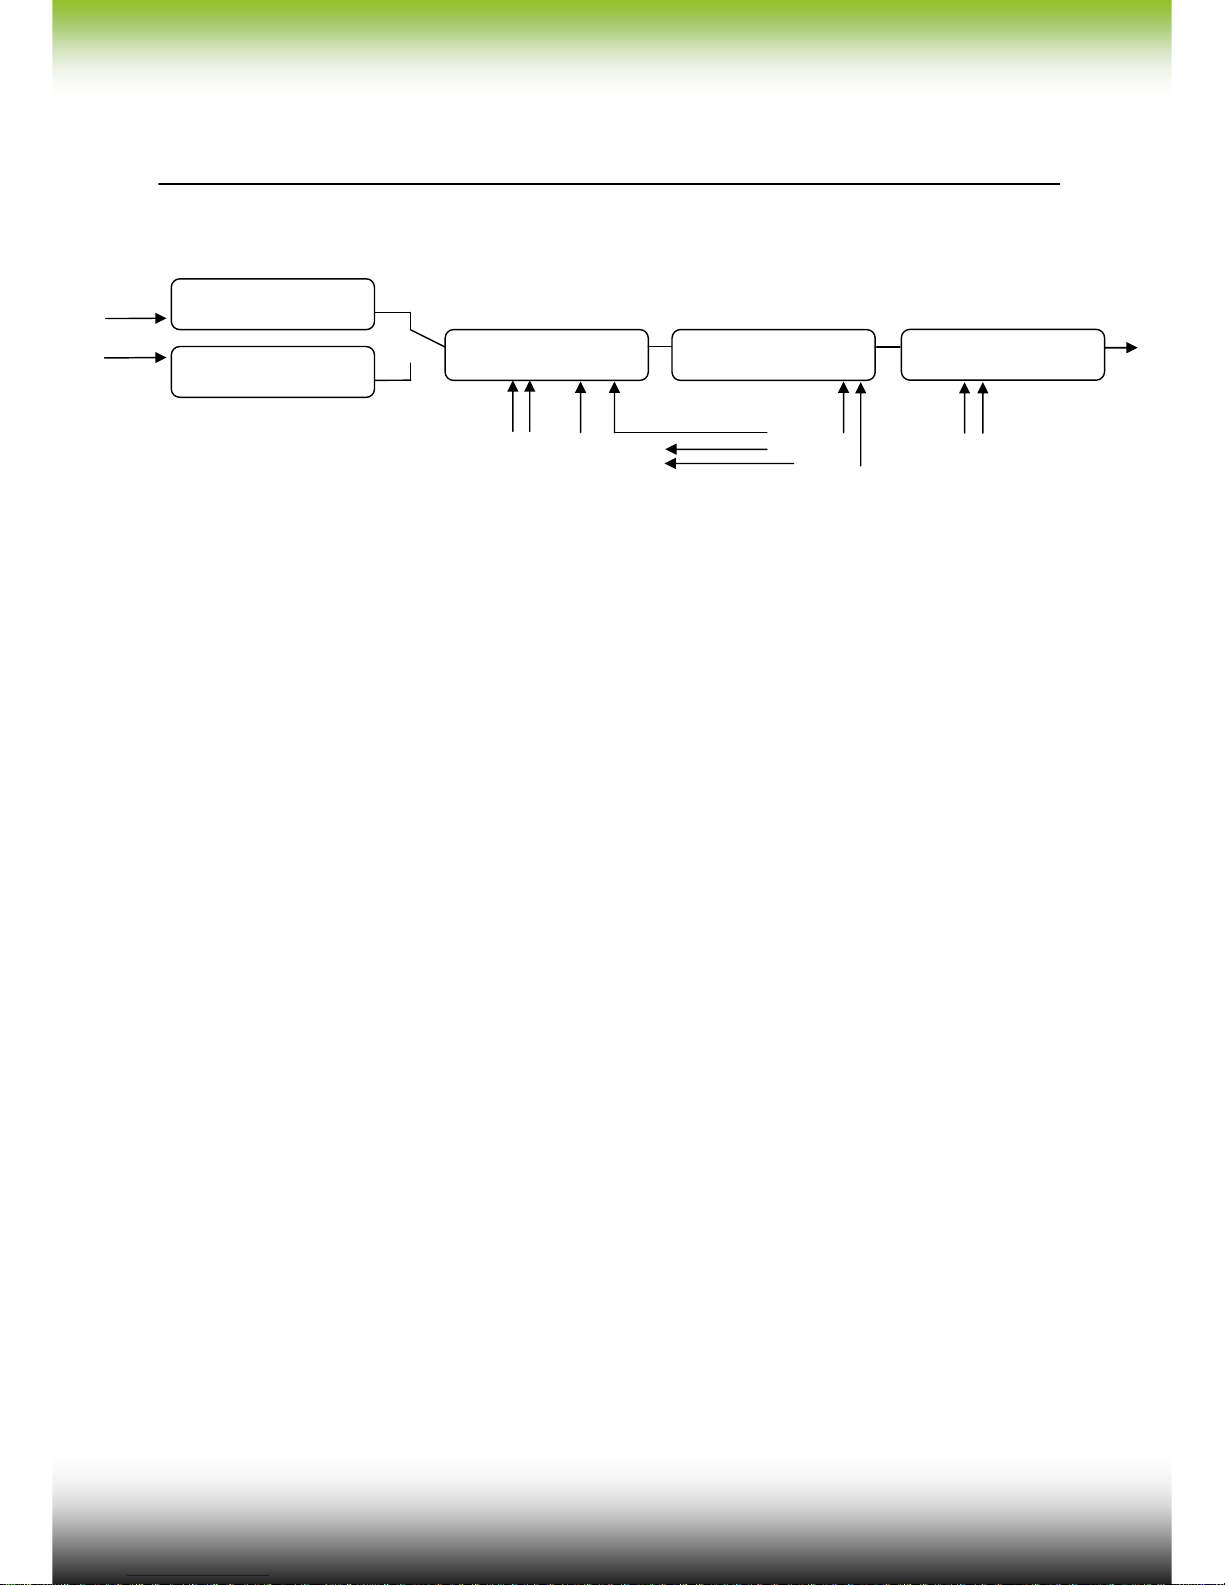
EXP-1 Unit block diagram:
The following charts shows the structure of the EXP-1 unit:
FXB
Sequencer
10 parts drums
PianoBassline Synthesizer
3 x Arpeggiators
Digital mixer 14 channels
Distortion
Midi out
Midi in
Delay
FX
+
FXR
+
Audio out
Final stage
(bass treble)
master vol
Buttons keyboard

Rev 1.0 10
Basic operation
•Powering the unit
The unit can be powered from batteries or through USB. Through USB plug you can power it
with an AC adapter, a computer port, a power bank, etc…
Note about using batteries: the device can be operated from six AA-size R6 alkaline or high
capacity lithium batteries. Insert the batteries in two sets of three. 1.5V non rechargeable and 1.2V
NIMH rechargeable batteries in AA size can be used.
Never mix battery types. All six batteries must be of the same type.
Battery life is dependent on type used. Up to 10 hours should be obtainable.
EXP-1 does not charge the batteries. You must charge them externally
Do not mix cells that have different type of charge
Remove the batteries if not used for a long period of time.
Spent batteries contain hazardous substances and should be disposed in a responsible manner.
Always dispose of used batteries in accordance with local environment and/or recycling guidelines.
When powered from USB the unit is always on. If the batteries are used it is possible to switch
on and off the unit by using the power switch situated under the internal speaker.
•Getting started
Once switched on, the unit is ready to play. First select the pattern you want to hear and press
play to start it.
You can select the instrument to edit by pressing the left select button. The matrix led indicates
you the selected one. When selecting the instrument, note how the graphic LCD content change. It
is in fact showing you the parameters of the current instrument you can edit (instrument page). To
select the parameters to edit on the instrument page, you can use the right select button. The
parameters are selected by couples. The selected couple can then be modified with the two
modifiers potentiometers. The corresponding fader on the display indicate the parameter current
level.
Note that it is possible also to play the voices of the EXP-1 through MIDI (USB or optional
Xpansion1 module). To use the arpeggio feature, you need to start the sequencer to give the tempo.
To program the pattern, there are two different modes corresponding to rhythm voices (drums)
or synthesizer voices.
Rhythm voices: The 16 step leds indicate if the selected drum voice will play the step. To make
the voice play the step or not, simply press the corresponding step button. The Step button is not
used in this case.
Synthesizer voices. The 16 step leds indicate which note will play for the corresponding step.
The corresponding step is indicated on the LCD and can be selected with the step button. To make
the note play, you will also have to program the note on and the note octave (Up Normal or Down).
Once you are used to this logic, it is very easy to program melodies.

Rev 1.0 11
Once you like your work and the pattern is done you can save your work by pressing the save
button. You will recall all the pattern note and events and also the synths patches when you recall
this pattern.
Once you have created some patterns you can decide to create a song. So you will use the song
mode by pressing the song button. The current mode is indicated on the display on the bottom right
(P for pattern or S for song). To assemble your pattern you just have to select the song step with the
step button and pressing the corresponding pattern number on the keyboard (from 1 to 16). You can
assemble like that up to 16 patterns that will automatically play in chain.
•Screen fields
The screen view is divided in various field for easy and quick reading:
Faders, They indicate the
level of the corresponding
parameter (which name is
reported under)
Tempo shown in BPM Step currently edited
(applicable only to
synthesizers)
On the left of the arrow is
shown the pattern currently
played and on the right is
shown the next pattern
Battery level/USB indicator
OK: battery are good
LO: Replace battery
US: USB is plugged
P: Pattern mode
S: Song mode
The name of the parameters
are written from top to down

Rev 1.0 12
Drums section
The drum section is composed of 10 tracks. Each with a different voice:
-BD Bass drum
-SD Snare drum
-LT Low tom
-HT High tom
-RS Rim shot
-CP Hand clap
-CB Cow bell
-CY Cymbal
-OH Open hi hat
-CH Closed hi hat
Each voice allows to edit some synthesis parameters according to its type (example: Snappy
for Snare, Tuning for Bass drum. etc…). There is also a parameter to allow the routing of the drums
through the FX section or not.
Note that parameters are written from top to down on the device screen.
BD screen
GAI: Gain level of the BASS drum
TUN: Tuning of the BASS drum
REV: it is possible to reverse the BASS drum sound with this control
FXR: FX route, it is possible to exclude the drum voices of the reverb effect by activating this
control.
DLF: Delay feedback, adjust the feedback amount going in the delay line.
DLT: Delay time, adjust the time delay
TEM: Tempo, use this fader to adjust the tempo.
SD screen
GAI: Gain level of the SNARE drum
SNA: Snappy level of the SNARE drum
FXR: FX route, it is possible to exclude the drum voices of the reverb effect by activating this
control.
DLF: Delay feedback, adjust the feedback amount going in the delay line.
DLT: Delay time, adjust the time delay.
TEM: Tempo, use this fader to adjust the tempo.
LT screen
GAI: Gain level of the LOW TOM
FXR: FX route, it is possible to exclude the drum voices of the reverb effect by activating this
control.
DLF: Delay feedback, adjust the feedback amount going in the delay line.
DLT: Delay time, adjust the time delay.
TEM: Tempo, use this fader to adjust the tempo.

Rev 1.0 13
HT screen
GAI: Gain level of the HIGH TOM
FXR: FX route, it is possible to exclude the drum voices of the reverb effect by activating this
control.
DLF: Delay feedback, adjust the feedback amount going in the delay line.
DLT: Delay time, adjust the time delay.
TEM: Tempo, use this fader to adjust the tempo.
RS screen
GAI: Gain level of the RIMSHOT
FXR: FX route, it is possible to exclude the drum voices of the reverb effect by activating this
control.
DLF: Delay feedback, adjust the feedback amount going in the delay line.
DLT: Delay time, adjust the time delay.
TEM: Tempo, use this fader to adjust the tempo.
CP screen
GAI: Gain level of the CLAP
FXR: FX route, it is possible to exclude the drum voices of the reverb effect by activating this
control.
DLF: Delay feedback, adjust the feedback amount going in the delay line.
DLT: Delay time, adjust the time delay.
TEM: Tempo, use this fader to adjust the tempo.
CB screen
GAI: Gain level of the COWBELL
FXR: FX route, it is possible to exclude the drum voices of the reverb effect by activating this
control.
DLF: Delay feedback, adjust the feedback amount going in the delay line.
DLT: Delay time, adjust the time delay.
TEM: Tempo, use this fader to adjust the tempo.
CY screen
GAI: Gain level of the CYMBAL
FXR: FX route, it is possible to exclude the drum voices of the reverb effect by activating this
control.
DLF: Delay feedback, adjust the feedback amount going in the delay line.
DLT: Delay time, adjust the time delay.
TEM: Tempo, use this fader to adjust the tempo.

Rev 1.0 14
OH screen
GAI: Gain level of the OPEN HIHAT
TUN: Tuning of the OPEN HIHAT
REV: it is possible to reverse the HIHAT sound with this control
FXR: FX route, it is possible to exclude the drum voices of the reverb effect by activating this
control.
DLF: Delay feedback, adjust the feedback amount going in the delay line.
DLT: Delay time, adjust the time delay.
TEM: Tempo, use this fader to adjust the tempo.
CH screen
GAI: Gain level of the CLOSED HIHAT drum
TUN: Tuning of the CLOSED HIHAT drum
FXR: FX route, it is possible to exclude the drum voices of the reverb effect by activating this
control.
DLF: Delay feedback, adjust the feedback amount going in the delay line.
DLT: Delay time, adjust the time delay.
TEM: Tempo, use this fader to adjust the tempo.
Rev 1.0 15
Bassline instrument
The following charts describes the bassline synth structure:
The Bassline output is then routed to the FX reverb unit and to the final mixer stage.
It is also possible to play the Bassline live from the internal keyboard. Through midi or
USB, it is possible to play it by using MIDI canal 2.
The parameters you can edit from the Bassline are reported as follow:
Note that parameters are written from top to down on the device screen.
BASSLINE screen
CUT: Filter cutoff level.
RES: Filter resonance.
ENV: Envelope modulation control.
DEC: Controls the decay (time note takes to fade).
ACC: Accent of the BASS pattern.
TUN: Tuning of the oscillator.
ON: Switch on or off the note for the active step.
UND: select the octave of the note for the active step (Up, Normal or Down).
AON: Accent on, activate the accent for the active step.
SLI: activate the slide for the active step.
DIS: Distortion effect. By increasing this effect it is possible to obtain very strong acid sound.
GAI: Gain level of the Bassline.
WAV: choose the waveform of the oscillator, set it on top for a sawtooth waveform and on bottom
for a square waveform.
DLF: Delay feedback, adjust the feedback amount going in the delay line.
DLT: Delay time, adjust the time delay.
LS: Play mode
L: Live, you can play from internal or external keyboard. The sequencer is not active.
S: Sequencer, the bassline is played from the sequencer.
FXB: FX route for Bassline. If activated, it is possible to exclude the Bassline voice from the delay
effect.
TEM: Tempo, use this fader to adjust the tempo.
Saw oscillator
Square oscillator VCF VCA
Resonance
CutOff
Tuning
Envelope Decay
Accent
Final stage
Gain
Distortion

Rev 1.0 16
Piano instrument
The Piano voice was specially designed by Fingersonic for electronic music. The piano has a
single voice (mono) to allow the programming of melodies with the sequencer. It is possible to edit
the envelope with two parameters: the attack and the release. By modifying the attack it is possible
to make the instrument percussive (such as piano) or not (to reproduce some kind of violins for
example). The Release instead will be used to simulate a longer sound as for example when the
pedal is pressed on a real acoustic grand piano.
It is possible to play the bassline live from the internal keyboard. Through midi or USB, it is
possible to play it by using MIDI canal 3.
The Piano features an arpeggiator that can be triggered from the internal keyboard or
through USB or midi (canal 3). Remember that the arpeggiator gets the tempo from the sequencer
so, you have to press play to start the arpeggiator and select the appropriate tempo.
The parameters you can edit for the Piano are reported as follow:
Note that parameters are written from top to down on the device screen.
Piano screen
ON: Switch on or off the note for the active step
UND: Select the octave of the note for the active step:
0: B1 to D3, 1: B2 to D4, 2: B3 to D5, 3: B4 to D6.
ARP: Arpeggiator pattern
LAS: Play mode
L: Live, you can play from internal or external keyboard. The sequencer is not active.
A: Arpeggiator, you can play from internal or external keyboard, the sequencer is not active.
S: Sequencer, the piano is played from the sequencer.
OCT: Select the octave of the internal micro keyboard when playing live or arpeggiator. Range is
the same as UND described above.
AAM: Attack amplifier, this is the attack envelope of the piano. You can tune it to make the piano
more or less percussive.
RAM: Release amplifier, this is the release envelope of the piano. You can tune it to make sound
last longer after releasing the note (like if you press the pedal on an acoustic piano).
VOL: Piano voice volume
DLF: Delay feedback, adjust the feedback amount going in the delay line.
DLT: Delay time, adjust the time delay.
TEM: Tempo, use this fader to adjust the tempo.
LOC: Arpeggiator lock function. If activated, the arpeggiator keeps playing even if keys are
depressed.
Rev 1.0 17
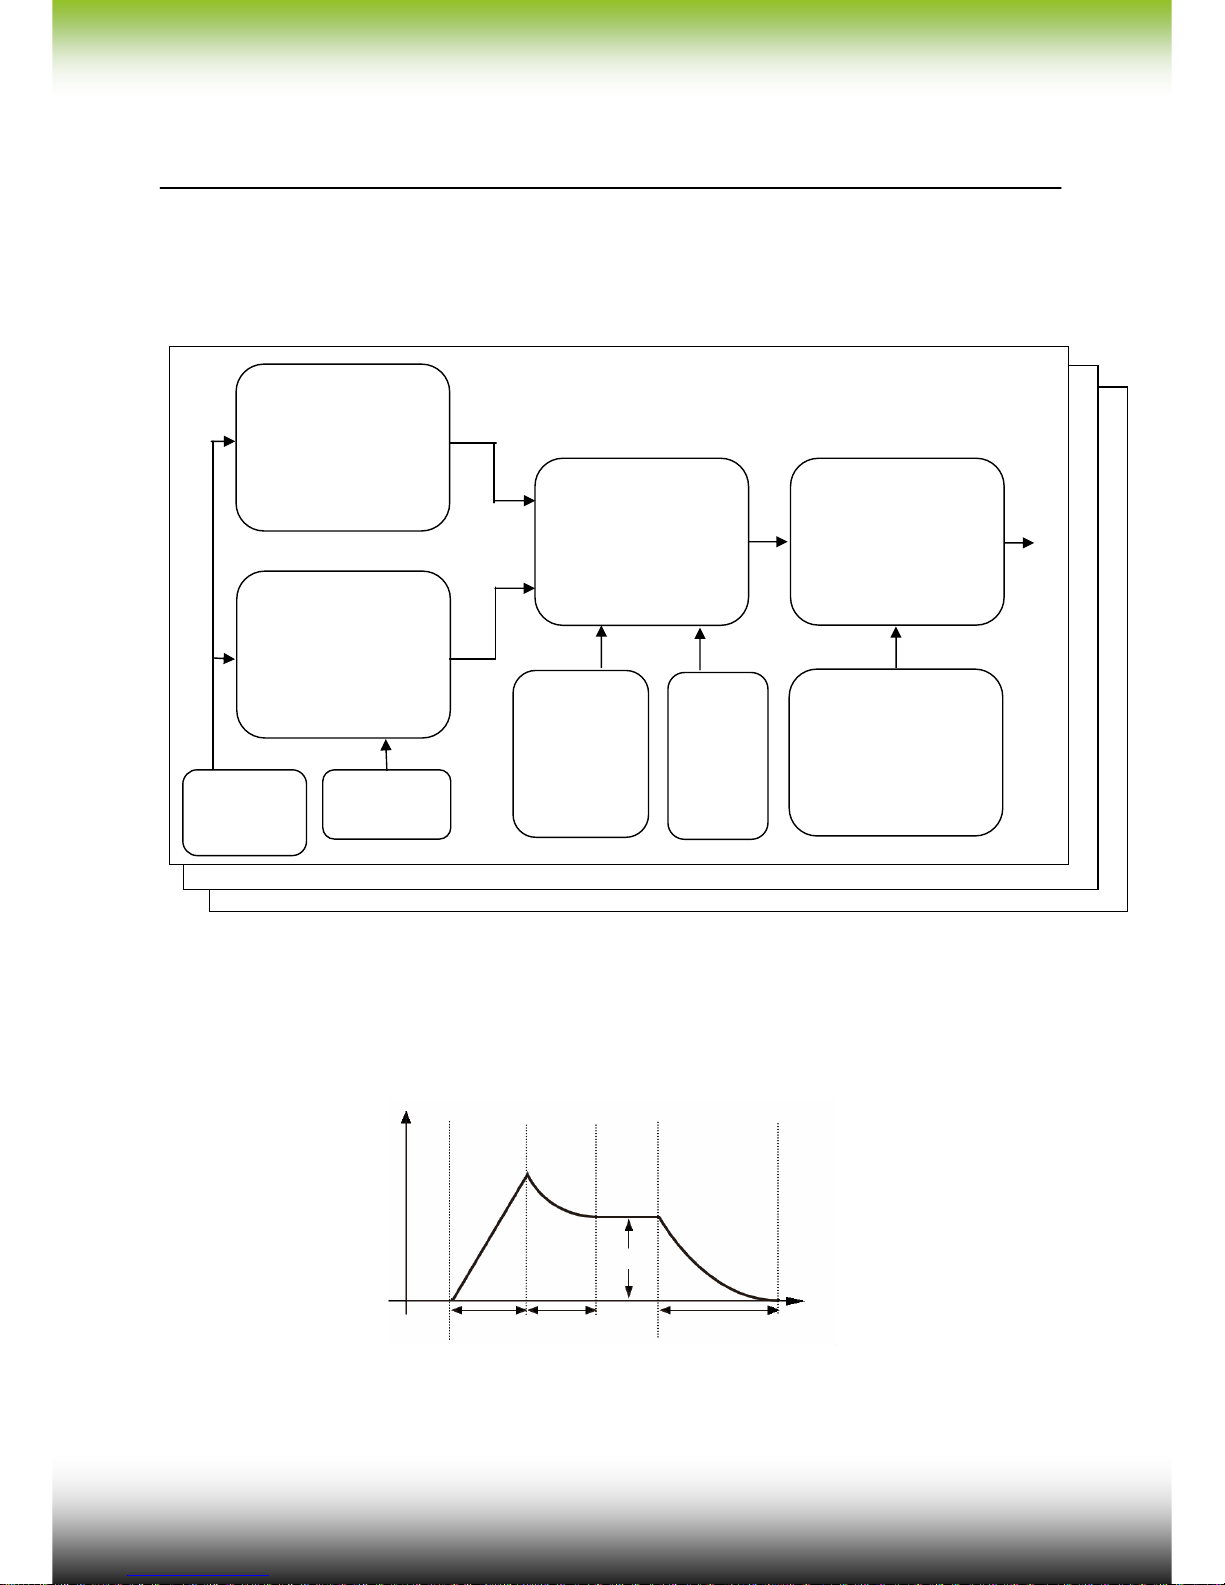
Synth instrument
Your EXP-1 instrument contains a complete 3 voices (2 oscillators per voice for a total of 6
oscillators) analog modelling synthesizer.
Diagram of a synth voice (3 are present)
Envelope generator diagram:
The envelope generator has 4 parameters that can be adjusted to modify the sound dynamics.
It works by changing the amplitude level over time.
VCO1
-Square
-Sawtooth
-Silent
VCO2
-Square
-Sawtooth
-Silent
VCF
-Cutoff
-Reso
VCA
Envelope
generator
ADSR
Envelope
generator
ADSR
LFO2
-Speed
-Depth
LFO1
-Speed
-
Depth
DETUNE
1 2 3
Attack Decay
Sustain
Release
Amplitude
Time
Note off
Note on

Rev 1.0 18
It is possible to play the synthesizer live from the internal keyboard. Through midi or USB it
is possible to play it by using MIDI canal 1.
The synthesizer features an arpeggiator that can be triggered from the internal keyboard or
through USB or midi (canal 1).
The parameters you can edit for the synthesizer are reported as follow:
Note that parameters are written from top to down on the device screen.
Synthesizer screen
The synthesizer screen has 2 pages. It is possible to change page by pressing on Right select +
pattern buttons
Page 1
CUT: Filter cutoff level
RES: Filter resonance
WA1: Waveform of oscillator 1 from bottom to top: Sawtooth. Square, Off.
WA2: Waveform of oscillator 1 from bottom to top: Sawtooth. Square, Off.
AAM: Attack amplifier
DAM: Decay amplifier
SAM: Sustain amplifier
RAM: Release amplifier
AFI: Attack filter
DFI: Decay filter
SFI: Sustain filter
RFI: Release filter
PLS: Pitch Lfo Speed
PLD: Pitch Lfo Depth
FLS: Filter Lfo Speed
FLD: Filter Lfo Depth
OSD: Oscillator 2 Detune
Page 2
ARP: Arpeggiator pattern
LAS: Play mode
L: Live, you can play from internal or external keyboard. The sequencer is not active
A: Arpeggiator, you can play from internal or external keyboard, the sequencer is not active
S: Sequencer, the piano is played from the sequencer
ON: Switch on or off the note for the active step
UND: Select the octave of the note for the active step:
0: B0 to D2, 1: B1 to D3, 2: B2 to D4, 3: B3 to D5, 4: B4 to D6.
SLI: activate the slide for the active step.
OCT: Select the octave of the keyboard when playing live or arpeggiator. Range is the same as
UND described above.
DLF: Delay feedback, adjust the feedback amount going in the delay line.
DLT: Delay time, adjust the time delay
TEM: Tempo, use this fader to adjust the tempo.
LKP: Lock patches. If set, the synths patches will not be loaded when the pattern is changed.
LOC: Arpeggiator lock function. If activated, the arpeggiator keeps playing even if keys are
depressed.

Rev 1.0 19
EXternal Sequencer
The external sequencer allows you to control an external synth, sound module or sampler
easily and with the same friendly FaderOS interface as the other voices of your EXP-1.
This external sequencer works by sending the midi events to the external module. This can
be done through the USB port or through the physical MIDI if the Xpansion 1 module is present.
Live mode
It is possible to use the internal keyboard to send midi message through USB or MIDI port.
A passthrough mode is also present if you use the midi IN Canal 5 (Both USB or MIDI port) all the
midi note on/note off events will be forwarded to Midi OUT Canal 1 (both USB or midi)
All the midi messages from the EXS or the internal keyboard are outputted on canal 1.
You also have a dedicated arpeggiator that can be activated to control the external synth
through midi (both USB and Physical). You can use the internal keyboard or an external keyboard
to control the arpeggiator (You must send the midi events on Canal 5 to the input of the EXS-1 and
the data will be outputted on Canal 1 as it is for all EXS midi events).
Note that parameters are written from top to down on the device screen.
EXS screen
ON: Switch on or off the note for the active step.
UND: Select the octave of the note for the active step:
0: B0 to D2, 1: B1 to D3, 2: B2 to D4, 3: B3 to D5, 4: B4 to D6.
ARP: Arpeggiator pattern
LAS: Play mode
L: Live, you can play from internal or external keyboard. The sequencer is not active
A: Arpeggiator, you can play from internal or external keyboard, the sequencer is not active.
S: Sequencer, the external synth is played from the sequencer.
OCT: Select the octave of the keyboard when playing live or arpeggiator. Range is the same as
UND described above.
VOL: EXS volume level, it is sent through midi to the external sound module. (Note: will work
only if the external synthesizer support volume change).
TEM: Tempo, use this fader to adjust the tempo.
LOC: Arpeggiator lock function. If activated, the arpeggiator keeps playing even if keys are
depressed.

Rev 1.0 20
Mixer section usage
Your EXP-1 is equipped with a special digital mixer console. You can access it by selecting
MIX on the instrument matrix. This Mixer allows you to individually control the voices volume
(note that for External sequencer, the volume is sent as MIDI message to external module). It is also
possible to control the master volume. (if you have the Xpansion2 module you can also control it
from the central potentiometer).
More than that, the mixer allows you to control the reverb FX and also the tempo.
The very nice feature is the mute mode which allows you to use the 16 keys keyboard to
mute the voice individually (only 14 keys are used as the number of voices available. Which is very
useful for live performance for example.
The step button on the bottom left can be used for Tap tempo function when you are in
mixer mode. Just press it 3 time in time with the tempo you want to synchronize to and the EXP-1
will calculate and instantly apply the tempo you tapped.
Note that parameters are written from top to down on the device screen.
MIXER screen
BD: Bass Drum gain level
SD: Snare drum gain level
LT: Low tom gain level
HT: High tom gain level
RS: RimShot gain level
CP: Hand clap gain level
CB: Cowbell gain level
CY: Cymbal gain level
OH: Open hihat tom gain level
CH: Closed hihat level
BAS: Bassline gain level
PIA: Piano gain level
SYN: Synthesizer gain level
EXS: External synthesizer gain level (send through midi output)
DLF: Delay feedback, adjust the feedback amount going in the delay line.
DLT: Delay time, adjust the time delay.
MAS: Master volume. If you already purchase the Xpansion 2 module, you can also tune this
parameter from the central potentiometer.
TEM: Tempo, use this fader to adjust the tempo.
Table of contents


