Finwing Technology Traveler T1160 V2 User manual

USER MANUAL
Finwing Traveler T1160 V2
FINWING TECHNOLOGY
WWW FINWINGHOBBY COM
PATENT PENDING
..

./ .
This manual aims to help direct the user on how to build the Traveler RC plane.
Please visit the finwing cn finwinghobby com official website for more introductions.
Please read through the manual carefully before installation and flying
Warning:
1 This model airplane is not a toy not recommended for children under 14 years old., ,
2. Be cautious and prepared while flying this plane as a range of issues could lead to a crash
including the environment/weather, speed, pilot error, improper building/testing,
interference or other component failures
3. Flying field: Choose an adequate flying space at least 100 meters long/wide and in an unpopulated
and non-built up area for safe flying. This includes avoiding flying over cities or other populated areas.
4. Please don't fly this model airplane in bad weather including rainy and/or windy environments.
5. Remember to unplug your flight/video battery when not in use to avoid any interference to others
who might be on similar channels.
6. Please remember switch on the transmitter first before connecting the battery, and disconnect
the battery first before switching off your transmitter.
7. Keep away from the propeller when the Airplane is powered as it can be dangerous and could
lead to injury. Keep the powered plane away from children at all times to avoid any accidents or injury.
.

Wing Span 1160MM(46")
Lenght 860MM(33 8”).
Wing Area 20.0 sq dm (310.0 sq in) <Main-Wing Area)
Material Color EPP (Black or White) EPO White/
/Black EPP White EPP and EPO the wegiht is variable
FPV Weight Approximately 1.0-1.2kg(2.2Ib-2.6Ib) 3S 4000mah-5200mah
User Feedbacks she is capable of flying with upto 1.3kg, flight time around 30-40 minutes.
Power System <Kits not including Power parts>
Finwing Travelerplane Specifications
Motor 2PCS Brushless Motor CW and CCW Max. 170W Per motor()
ESC 2PCS ESC 15A BEC 2A
Servo 4 PCS 9G Servo
Propeller CW /CCW 6045
Battery Recommend 3S 4000-5200mah
Traveller Suitcase, Aluminium Frame reinforced

H
CG Setting.
Black White EPP and EPO/
LR
Center of Leading edge
Center of Rear edge
Neutralize Elevator control surface first
Plane levelly at a platform measure the stabilizer before ready to fly
P1
Hole
Forward Backward
-+
CG Setting at Hole H.""
LR=
LR=
RLabout 1 2MM<-<-
RLabout 1 2MM>->-
CG Setting at H Backward 2 4MM.-
CG Setting at H Forward 2 4MM.-
Another way is to shim on top plywood of the Vertical wing adjust to R L
if you don t want to move CG forward or backward while R L
=
'≠
It s inaccurate measurement if building not completely done' !
V1 V2
don t use washers for V2 T tail Motor Mounts V1 owners please remove the original washers',-
How to find out the perfect CG ?
Generally most of us measure CG by fingers and inevitable differently by different people
For example if you noticed plane a little nose up flying landing then moving CG A little forward
but if plane likely to be nose down landing then moving CG A little backward 2040mm
,
,.
, . .(.-. )

Fuselage Gluing Covers and Plywood()
Please according to the following stepsbuild
Step 1
gluing shoulder cover
#
Step 2
gluing Plywood
#
Step 3
Locker s Plywood
#
'
Step 4#
Gluing fuselage tail cover
Important Note be sure let glue dry at least 12 hours before installing other parts:
Be careful I m big hole
don t use that small hole one
'
'Be careful I m big hole
don t use that small hole one
'
'
Step Gluing
Motor Mount plywood
#5
P2
Step 3
Locker s Plywood
#
'
Plywood

Wings(/ )Left Right wing is the same
Step 1 gluing Covers#
Step 2
Screws secure the Locker
#
Recommend to reinforce the
Aileron linkage with tapewrapping
Be sure let glue dry at least hours before installing other parts12
Reinforcement carbon tubes has already been pre glued-
Cut off
Please according to the following stepsbuild
P3
#V2 Horizontal wing

T Tail-
Servo Horn
Choose the hole or the second hole won t be
big difference recommend try the top hole
:
'
,
top
P4
#-Tail Boom
Gluing Cover and Carbon Strip
#Vertical wing
Gluing plywood and Carbon Strip
Now please let glue dry about hours
before continuing the next step
8
Cut off

T Tail-
P5
#-Glue vertical wing to the tail boom
Put vertical wing inside immediately
after gluing to all the contact surface
irremovable dry at least 12 hours
Warning Reminder:&
Please must have to glue vertical wing to the tail firmly and irremovable dry at least 12 hours.
this is the only way to secure stabilizers,
there is a horizontal mark line on the vertical wing ,keep it parallel to the tail surface.
it's absolutely dangerous(wrong) dicision if you want to make the vertical stablizer detachable or
removable in future by hot glue, tape, no mattery whatever way you think it's solid..
even if stabilizer not drop but 100% will loose during flight, 100% sure a loosing stabilizer
is a unstable "stabilizer and cause any weird accident, out of control, etc.
A well glued vertical stabilizer won't loose or drop no matter what kind of impact,
stabilizer is still part of the whole tail even if fuselage, mainwing crashed to hundrends of pieces

T Tail-
P6
Use the short wire servos
for rudder and elevator
if you have Finwing Stock
V2 ARF Combo 7 0CM.
:,
'
FYI during my later testing I removed the rudder servo
basically can t tell any difference without rudder
till flying very good without rudder
S

Fuselage Tail EPP EPO&(/)
Wing Lock
Linkage
Linkage
Screw secure the lockers
Note Black EPP White EPP and White EPO is the same:/
Cut off
Cut off
P7
For Metal linkage
For servo Horn
ForWingLock
Φ20.
Φ23.
Φ30.

Fuselage EPP EPO(/ )
Use hobby knife cut a hole let ESC and Servo wire pass through
Note Black EPP White EPP and White EPO is the same:/
ESC pass through the hole like this
P8

Install servos(/-)Fuselage Main Wing
Enlarge the servo bay to have enough
space for the servo arm moving freely
Black EPP White EPP and White EPO is the same/
P9

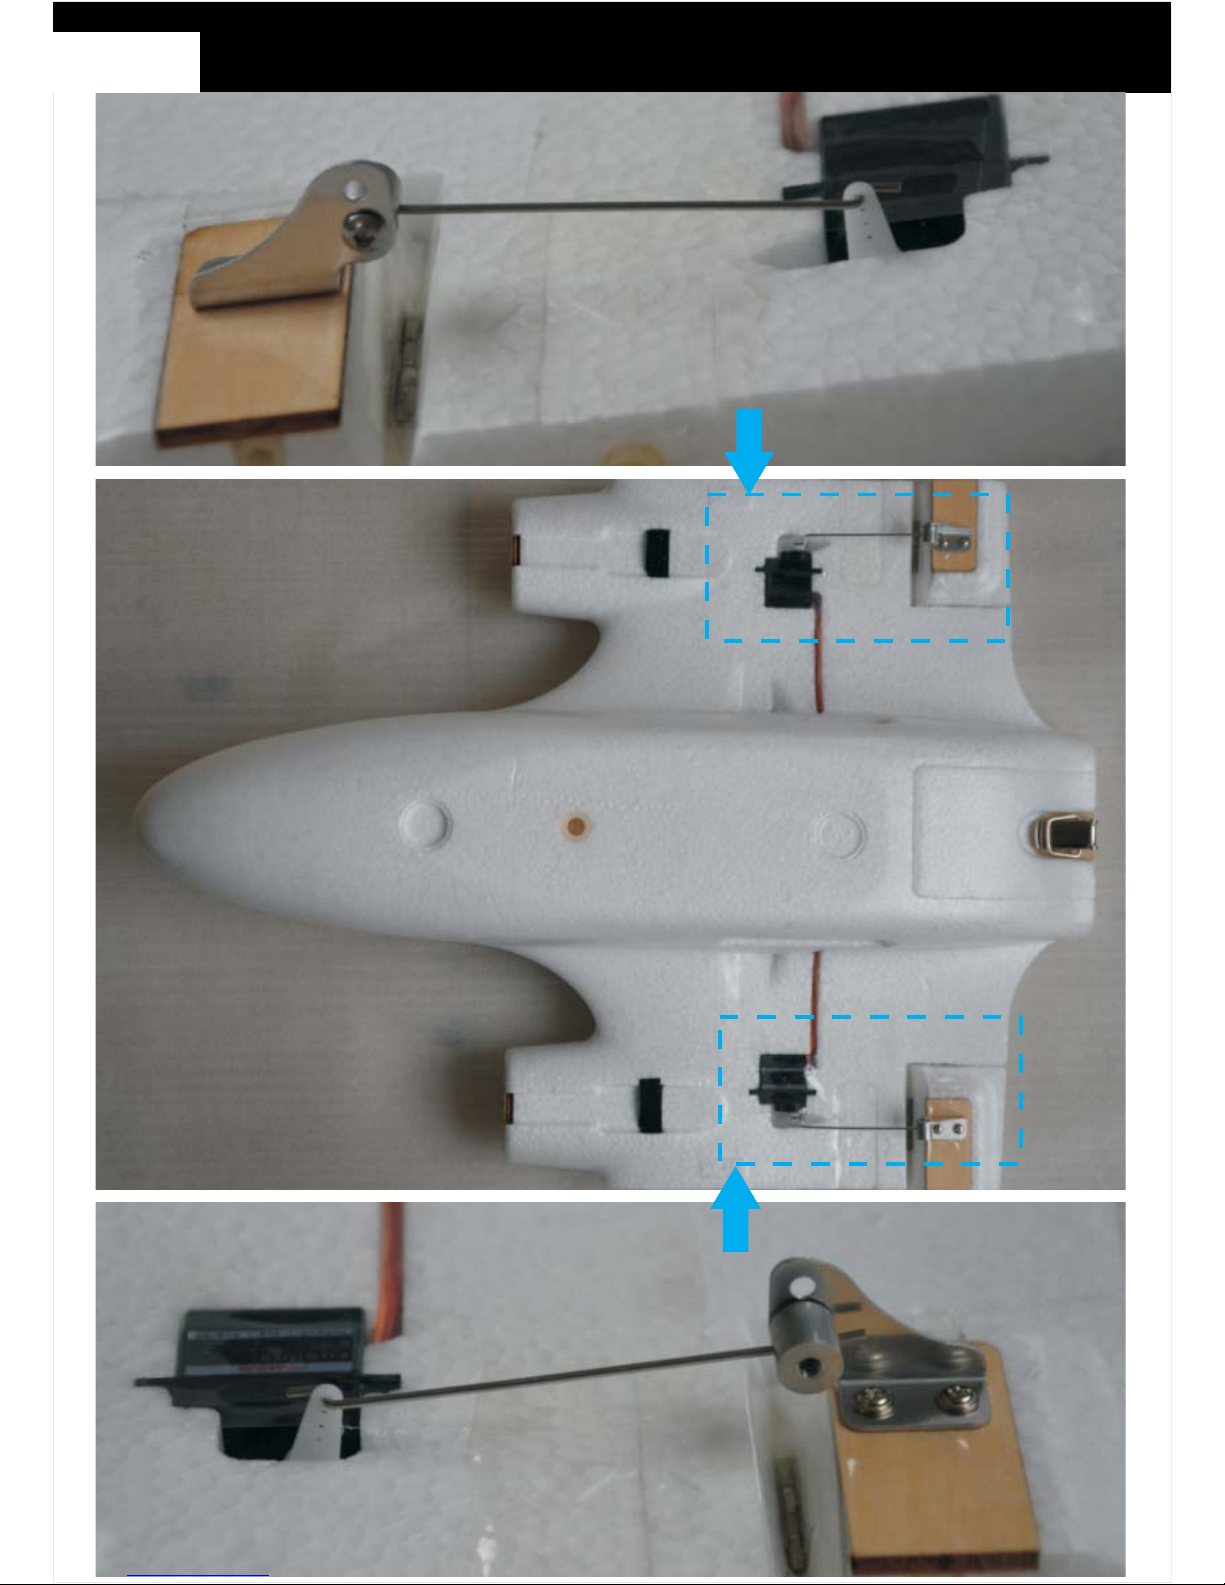
Install servos Main Wing-()
Neutralize servo first
Install servo as photos displayed
Black EPP White EPP and White EPO is the same/
P10
Install servos Main Wing-()
The bottom hole
The holefirst
The holefirst
The bottom hole
P11

P12 Motor ESC Propeller//

Motor ESC Propeller//
Solder in parallel
Note Move the heat shrink tubing inside first:
Black EPP White EPP and White EPO is the same/
P13

Launch Cart
Launch Cart is not must to everybody OPtions only
Good to enjoying rolling take off and beginner
not included by kits ARF
()
</>
Front wheel
4 0 Hole.Φ
Rear wheel
3 0 Hole.Φ
Find out all the parts gluing the metal washers first
,
Φ40.
Φ30.
P14

EVA Cushion
What is this for ?
Use it as cushion if you found the locker become loose
P15

Suggestions
P16
Tail
Main Wing-
Chamfer edges of those carbon tubes
would be more smooth and convenience to deployment

Suggestions
P17
Tail Fuselage cover is possible protruded after gluing
if you found big gap between fuselage and tail boom
use hobby knife cut off few foam of the fuselage cover
-
Please ignore this page if no obvious gap
Good
Other Finwing Technology Toy manuals


Popular Toy manuals by other brands


LaserPegs
LaserPegs ZD 160B Assembly manual

V-tech
V-tech CoComelon Go!Go! SmartWheels JJ's House Track... manual

FREE AIR
FREE AIR Fw190 quick start guide

V-tech
V-tech Crazy Legs Learning Bugs user manual

V-tech
V-tech TOOT-TOOT Cory Carson The Carson Playhouse Parents' guide

V-tech
V-tech Build & Discover Workbench user manual