Fleurette FLEURETTE 2016 User manual

USER MANUAL 2016


CONTENTS
Introduction Page 2
How to use this manual Page 3 - 4
Motorhome manners Page 5 - 6
Water system and gas installation Page 7 - 13
Fresh Water
Preparing to travel
Gas installation
Heating
Waste water
Winterzation
Tank level
Electrical system Page 14 -16
12 V and 220 V supply
Fuses
Electrical unit
Supply diagram
Equipments Page 17 - 18
Hotplate
Extractor hood
WC
Refrigerator
Oven
Food safety record Page 19
Laying-outs Page 20 - 21
Pull-down bed
Television
Sunroof
Dinette sleeping area
Radio - GPS Page 22
Quick repair kit Page 22
Maintenance of the interior Page 23 - 25
(Cushions, windows, mattress….)
Warranty Page 26
Fleurette dealers in France and Europe Page 27 - 28
PAGE 1
Dear Sir, Madam,
Thank you for having chosen FLEURETTE or FLORIUM and for your trust in
FLEURETTE Company.
Our team has taken great care in preparing your motorhome and we hope it will come
to your expectation.
It is very important to read this manual carefully as well as the instructions provided
with all the fittings. The information in this book will make you save time and help you
to know your new motorhome. To ensure greater comfort and to prevent excessive
depreciation of your motorhome, use it properly.
Some equipments listed in the Fiat user manual are not delivered in your motorhome
(bulb box, warning triangles, ...), it is up to you to purchase the equipment.
For your information, the Fleurette plant in Benet (85) is a place dedicated to the
production of motorhomes Fleurette / Florium. Only high-tech interventions are carried
out by our Technical Service, only after an appointment agreed between your dealer
and our after sales service.
Your dealer remains your main contact.
PAGE 2
Your dealer should give you the Fiat user manual, the
chassis maintenance book when your mothorhome is
delivered. We recommend that you take note of the
contents and follow the instructions.

Instructions for use
Seatbelts:
Before use, you must fasten your seat belt. No changes should be made to the
original system. Always use the same belt for one person and never hold a baby or
child on your lap with your seat belt fastened. Replace your seat belts in case of
deterioration. When putting in place back cushions, make sure to reposition the seat
belt in order to use it properly.
The rear seats / facing the road are compatible with child seats approved "Universel“
The rear seats are not suitable for attaching a child seat with ISOFIX
attachments.
Authorized seats facing the road:
When driving, all passengers must be seated facing forward or on the 5th place
opposite (see below). Some models of motorhomes Fleurette / Florium allow the
transformation of their cushions to comply with this rule.
PAGE 3
Original seat Take out the cushions
Check the locking
Lift the back Position the cushions

PAGE 4
Use of motrorhomes:
The motorhomes are designed for RECREATIONAL use and in no way intended to be
used as a living space.
Fresh water capacity while driving:
Pay attention, some vehicles may be limited to respect your motorhome’s maximum
load limit.
Use of gas and safety
The gas installation complies with European Regulations 2001/56 / EC and 2004/78 /
EG and the EN1919 standard. The bottles are placed in the external compartment
provided for this purpose. This compartment has to be locked. The two bottles must be
securely strapped.
A gas circuit control should be done every year by your distributor or an approved
workshop.
A ramp of gas valves allows individual connection of each device.
Taps located under the bed or in the sink cabinet = low profiles
Taps located in the front compartment of the double floor = A-classes
Warning: the validity of the flexible supply hoses (rubber gas pipes) is 5 years.They
have to be changed before the expiry date indicated on them.
Information on Fiat chassis
For all information concerning the original equipment of the vehicle, please refer to the
car manufacturer’s instructions Fiat and / or Alko. You will find instructions on the right
tire pressure, wheel alignment, the engine battery, fuse positions…
For information, the wheel alignment is set by the chassis manufacturer before leaving
the factory.
Warning: Our entire range is equipped with special tires for motor homes.
Safety instructions :
The existence of permanent upper and lower ventilation is essential in order to ensure
constant air renewal. The ventilation devices should nevery be blocked.
Never leave childen unattented in your motorhome.
Make sure you know the location and operation of emergency exits while leaving
escape routes.
In case of fire:
Evacuate occupants
Shut off the gas bottles
Disconnect power
Give the alarm and call the fire department
Use a fire blancket of a fire extinguisher if you can dot it securely

MOTORHOME MANNERS
The camper, used as a means of transport is likened to cars. It meets the traffic
rules applicable to this category of vehicles.
In town centers or in urban areas, it is advisable to park in places:
- That are not densely populated
- That do not impair visibility, nor business
- Where the motorhome will not obstruct traffic
Likewise, when using a motorhome as accomodation in these places you must not:
- Spread to the area around the vehicle
- Cause inconvenience to residents
- Monopolise the public area
- Allow pets to run riot or disturb your neighbours
Wastewater disposal must take place:
• in appropriate places, never near housing, rivers, streams or crops.
• emptying "black water" (lavatory) into the rain water drainage system is strictly
prohibited.
All water drainage valves must be closed whilst travelling. Even fresh water should
be emptied discreetly, to avoid suspicion.
Household garbage must be placed in plastic bags and disposed in designated
places.
By observing all of these common-sense rules, everyone can fully enjoy the
many pleasures to be had by motorhome enthusiasts
Source : Comité de liaison du Camping-Car
3, Rue des Cordelières
75013 PARIS
PAGE 5

PAGE 6
MOTORHOME MANNERS
RESPECT is the name given to the charter of the good motorhome driver
RRespect nature
EAvoid grouping
SPark in the appropriate places
PFavor local trade
EBe courteous and discreet
CCommunicate with others
TKeep all of these commitments
Source : UNIVDL

WATER AND GAS
Fresh water
Your motorhome is equipped with its own fresh
water tank with a capacity of 120l or 150l or
300l according to the models. The tank should
be filled with drinking water.
It is filled through an external nozzle fitted with a
lock cap, located on the side of the vehicle. To
open the cap, turn it counterclockwise to
clockwise.
The inspection door of the fresh water tank is
located on the ground under the living room or
between the passenger seat and the tray.
A blue cap is opened or closed with hand. You
can vent the tank via a sink plug placed in the
tank with an access via the inspection door.
For models Mayflower 70LD, Magister 70LD
and A-Classes under 3T, an handle on the fresh
water tank allows to get a volume of 20 liters:
- Turn the valve ¾ turn in the opposite direction
clockwise for 20 liters.
- Turn 2 turns in the opposite direction of
clockwise to empty the tank.
Depending on the model the pump is located
under the seat or under the bed.
PAGE 7
Vanne 20l ou vidange
Water supply
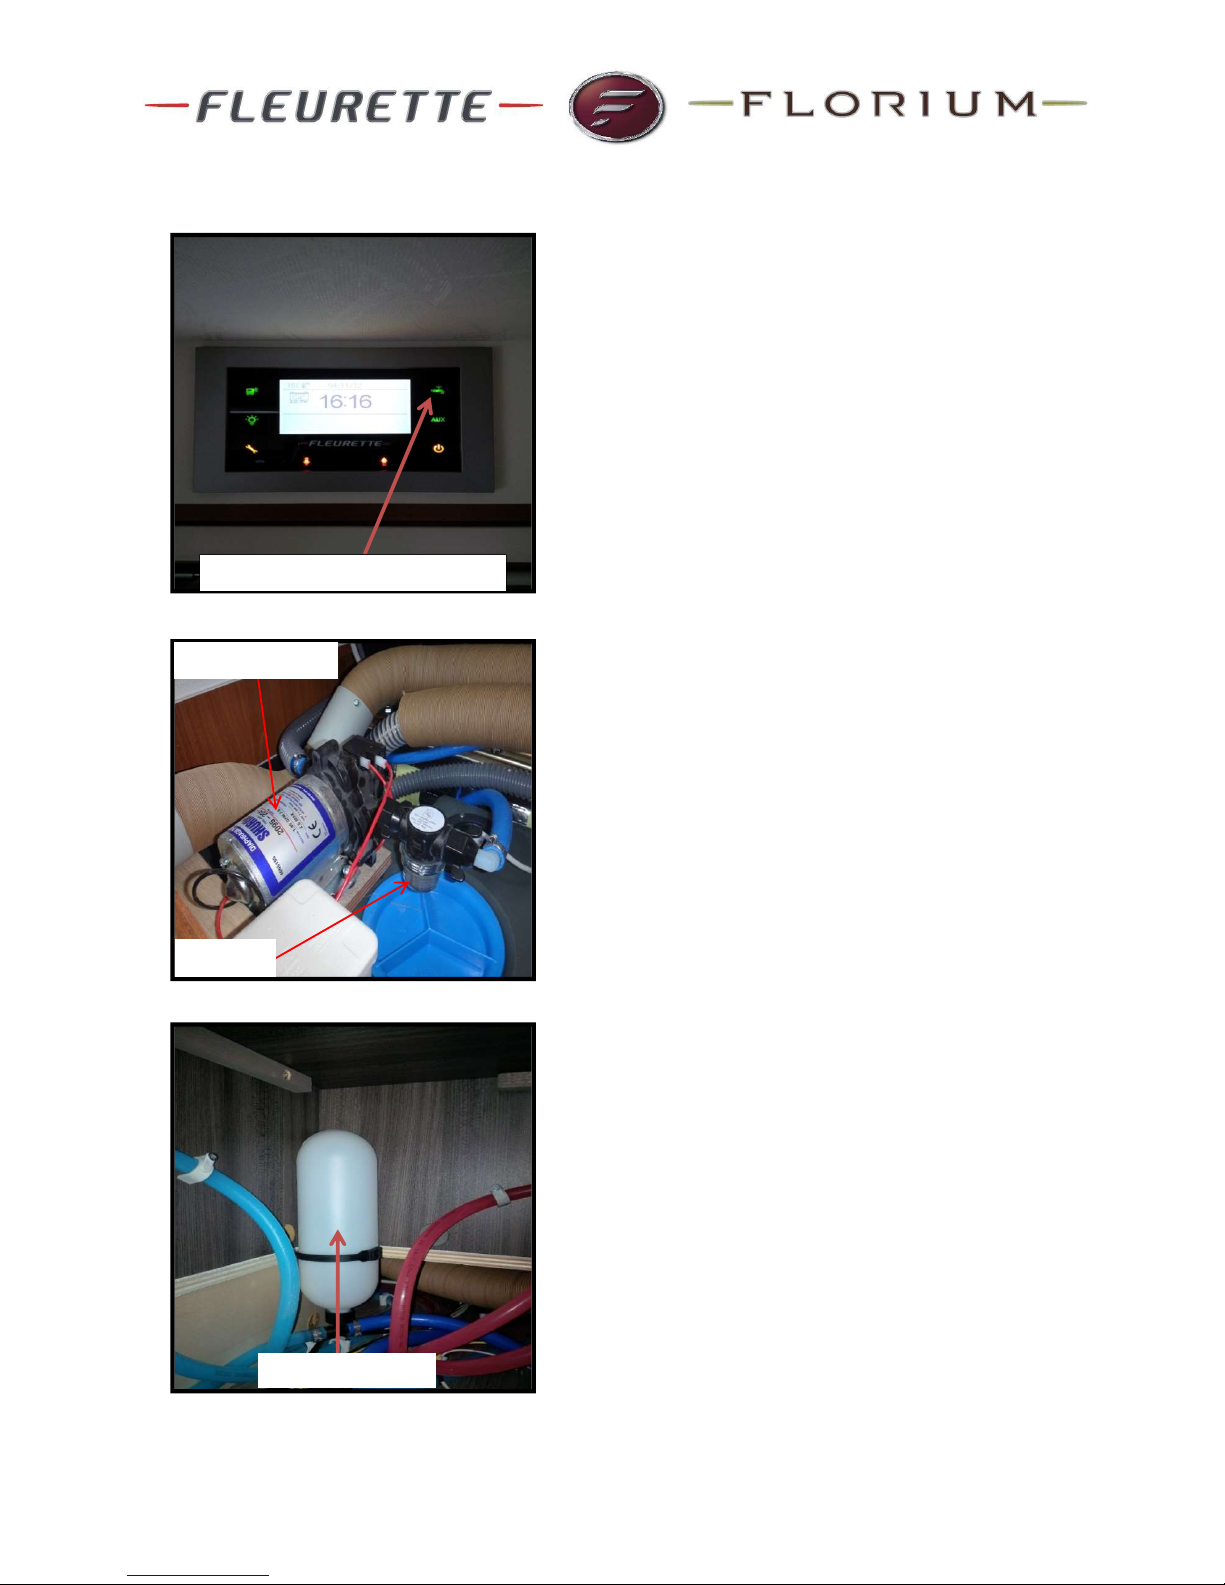
A switch on the control panel activates the
water supply pressure.
(See instructions on the control panel in the
white bag)
The pump sends water (see Nordelettronica
instructions in the white bag) to the sink in the
kitchen, washbasin in the bathroom, the shower
and WC. Before opening a tap, make sure there
is water in the water tank. If not used for a
while, the pump works automatically to maintain
pressure in the system.
The absence of water in the tank may damage
the pump.
The boiler must be full to get hot water. Start the
pump and open the hot water taps to actuate
the valve to release the air. (Heating time=
roughly 30mn)
The metallic filter should be cleaned at the
beginning and end of each season.
To disassemble, purge the water system,
unscrew the bell under the filter and get it out.
Go on tightening the bell by hand and check for
leaks.
The expansion tank located under the kitchen or
under the bed or under the seat (according th
the model) should be emptied every year by
draining the water circuit, tap opened , fresh
water tank emptied and clean in FrostControl
drain position (see Truma documentation).
PAGE 8
Water pump
Filter
Turning on the water
Expansion tank

PAGE 9
Turning on the gas
Starting the system and change over
DuoControl TRUMA :
1/ The bottles must be securely attached using
the straps provided in the cupboard
2/ Check that the hoses are tightly connected to
the flow regulators
3/ Open the valve of the bottle located in the
cupboard
4/ Press the flow regulator reset (press the
green dot)
5/ Actuate the switch in the cab
6/ Select the bottle with the DuoControl gas
inverter
7/ Selector switch : one press, no pump, long
press on the green dot (30 secondes for a
complete opening of the complete mechanism)
and progressive relaxation. Use a thin object for
a maximum pressure.
The DuoControl gas inverser must select one
bottle containing gas.
When the level of bottle 1 drops: gas is pumped
simultaneously in bottles 1 and 2 and the
selector displays both green / red lights on the
selector switch.
When bottle 1is empty : gas is pumped in bottle
2only and the light is red on the system.
At this time, the user can replace the bottle 1,
without interruption of operation.
Your heater is equipped with the TRUMA
FrostControl system. (See page 13 or refer to
the manual of the device). Selector switch
(press 30s)
Taps
PAGE 10
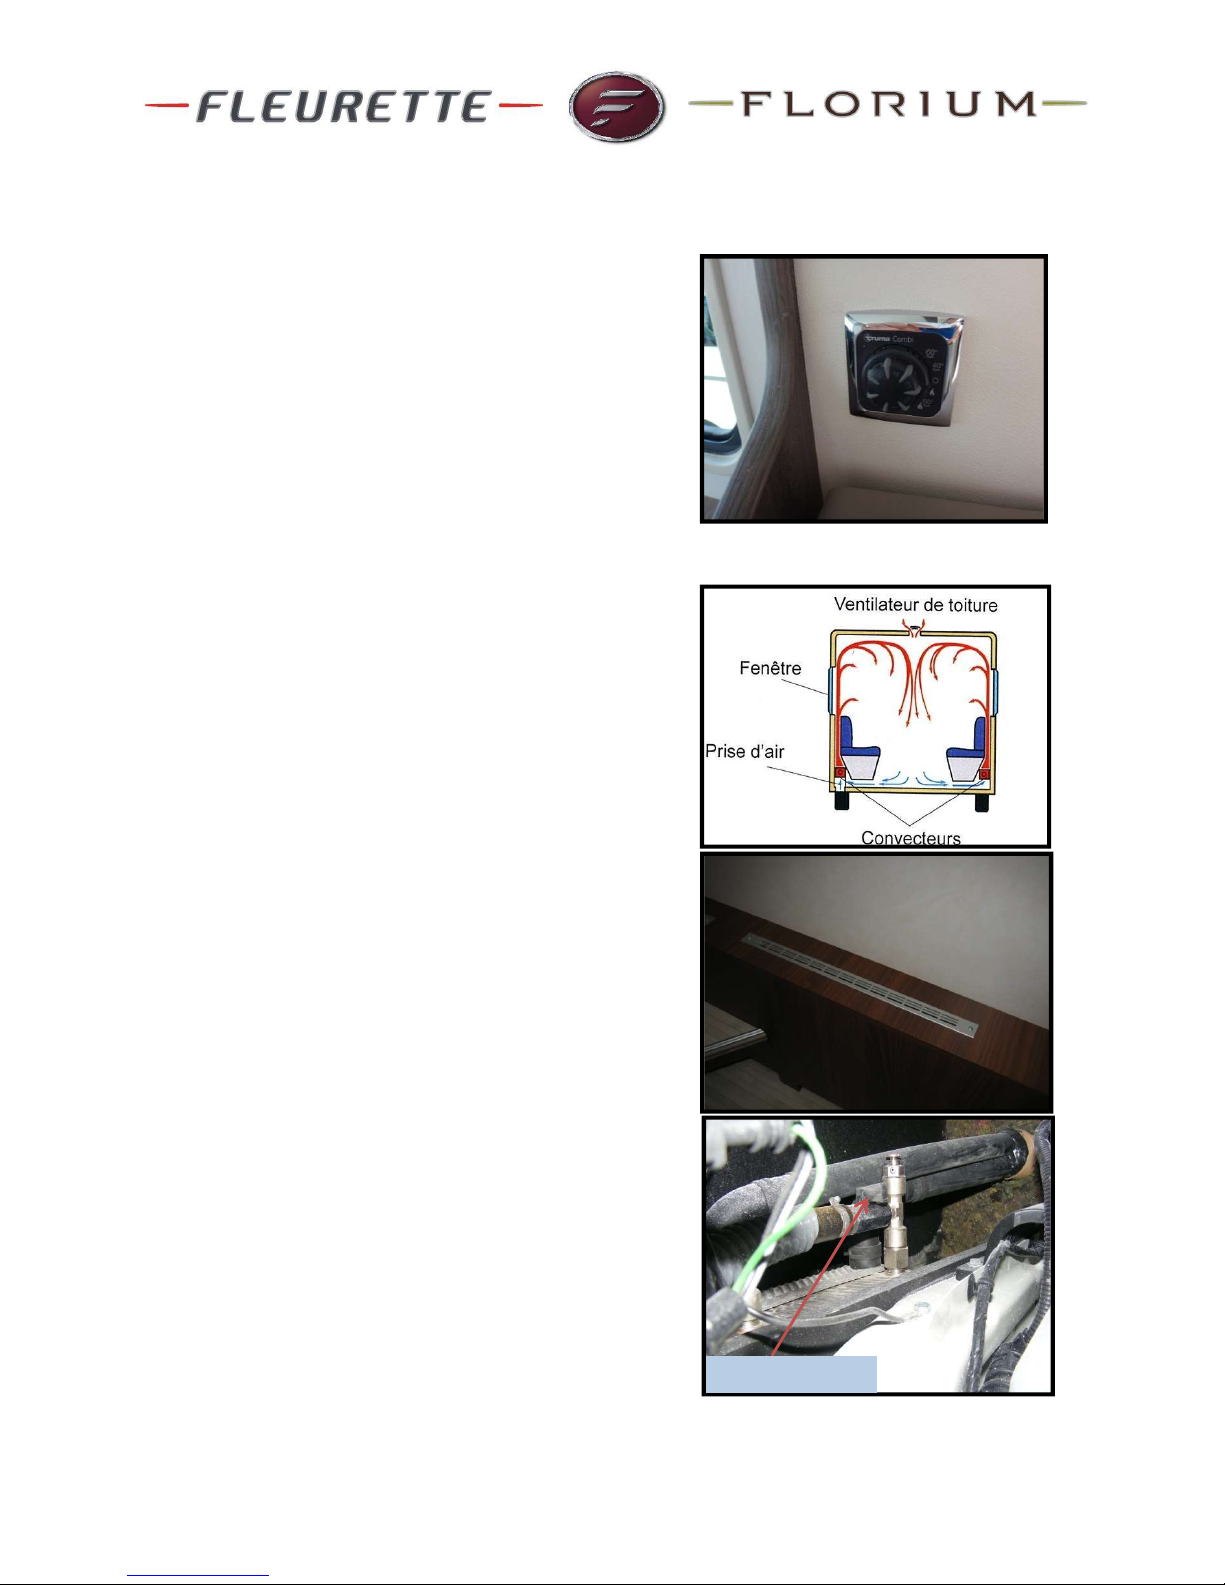
Heating system
The boiler is placed inside the motorhome under
the seat or under the bed.
It is powered by gas and 220V depending on
model. The Truma heating system is optimum for
distribution of warm air through four warm air
outlets. The Alde central heating system is a
hydronic system, with the same heating principle
as in most of our homes.
They are used both for heating and hot water
production.
TRUMA heater
The Truma control panel is located near the main
control panel to select the different modes. (See
specific instructions)
ALDE heater
This boiler is powered by gas and electricity
(220V).
The heat source comprises an LPG boiler with a
230-volt immersion heater, which heats a liquid
mixture consisting of water and glycol. Hot glycol
water circulates around the system through
radiators and pipes by means of a pump. The
pump speed is set to 1.
The heat is spread through the various grids
placed across the cell.
An air blower located under the seat allows to
accelerate the temperature rise in the cell. It can
be controlled on the heating control panel
An interchange with the vehicle engine cooling
system is installed to recover heat when the latter
is in operation.
A stop valve allows to stop this function during the
hot season. It is located in the engine on the right
side behind the beam. The circuit is stopped when
the stop lever is perpendicular to the pipe
Stop valve
PAGE 11
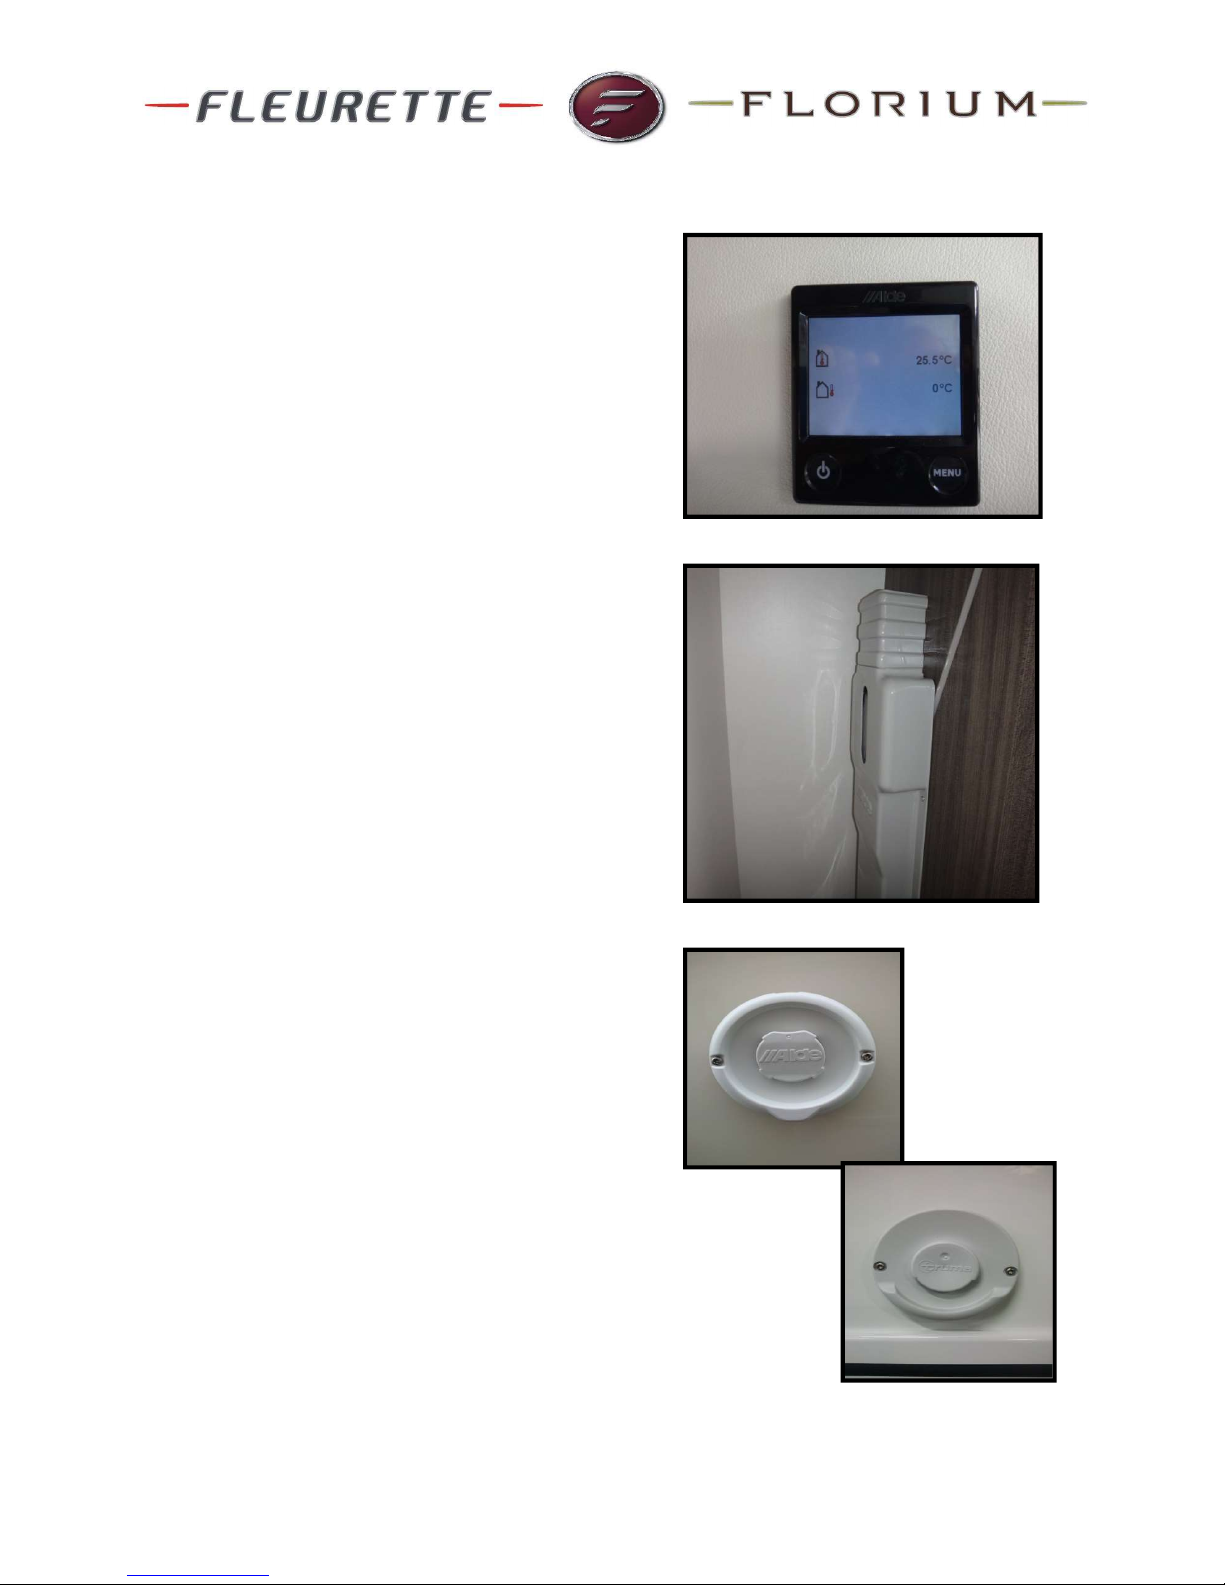
ALDE heater
A control panel is placed near the cell control
pane. It allows you to configure the various
settings. (Refer to ALDEmanual)
The expansion tank is located in the wardrobe.
The fluid level should be checked regularly.
Note: fill up to the "high" to limit the flow noise of
the heat transfer fluid (automotive coolant) in the
expansion tank. This noise can be further
reduced by decreasing the speed of the
circulator. This is adjustable in the control panel
settings (see instructions ALDE)
Warning :
The air exchange grids have to be kepted
cleaned and not obstructed while the gas heater
is working. In case of non-compliance with this
instruction, the CO2 rate could increase and
cause an accident.
The air intake and exhaust ducts of the burnt
gas and the chimney have to be always opened
and clean.
Do not spray water on the chimneys.
The vents must be opened and no objects
should prevent warm air circulation.
Waste water
Waste water draining
The kitchen sink, the wash basin and shower are
equipped with a siphon. Wastewater is collected in a tank
on the back or front of the cell, with a capacity of 100L or
119L according to the models. Filling level is indicated on
the control panel (display 1/3).
After turning off all power supplies, draining is done by
turning the valve, easily accessible, located on the right
side of the vehicle.
A trap door beneath the vehicle allows the inner tank
cleaning.
PAGE 12
Initially set the auxiliary circuit of the motorhome by
activating this function on the control panel.
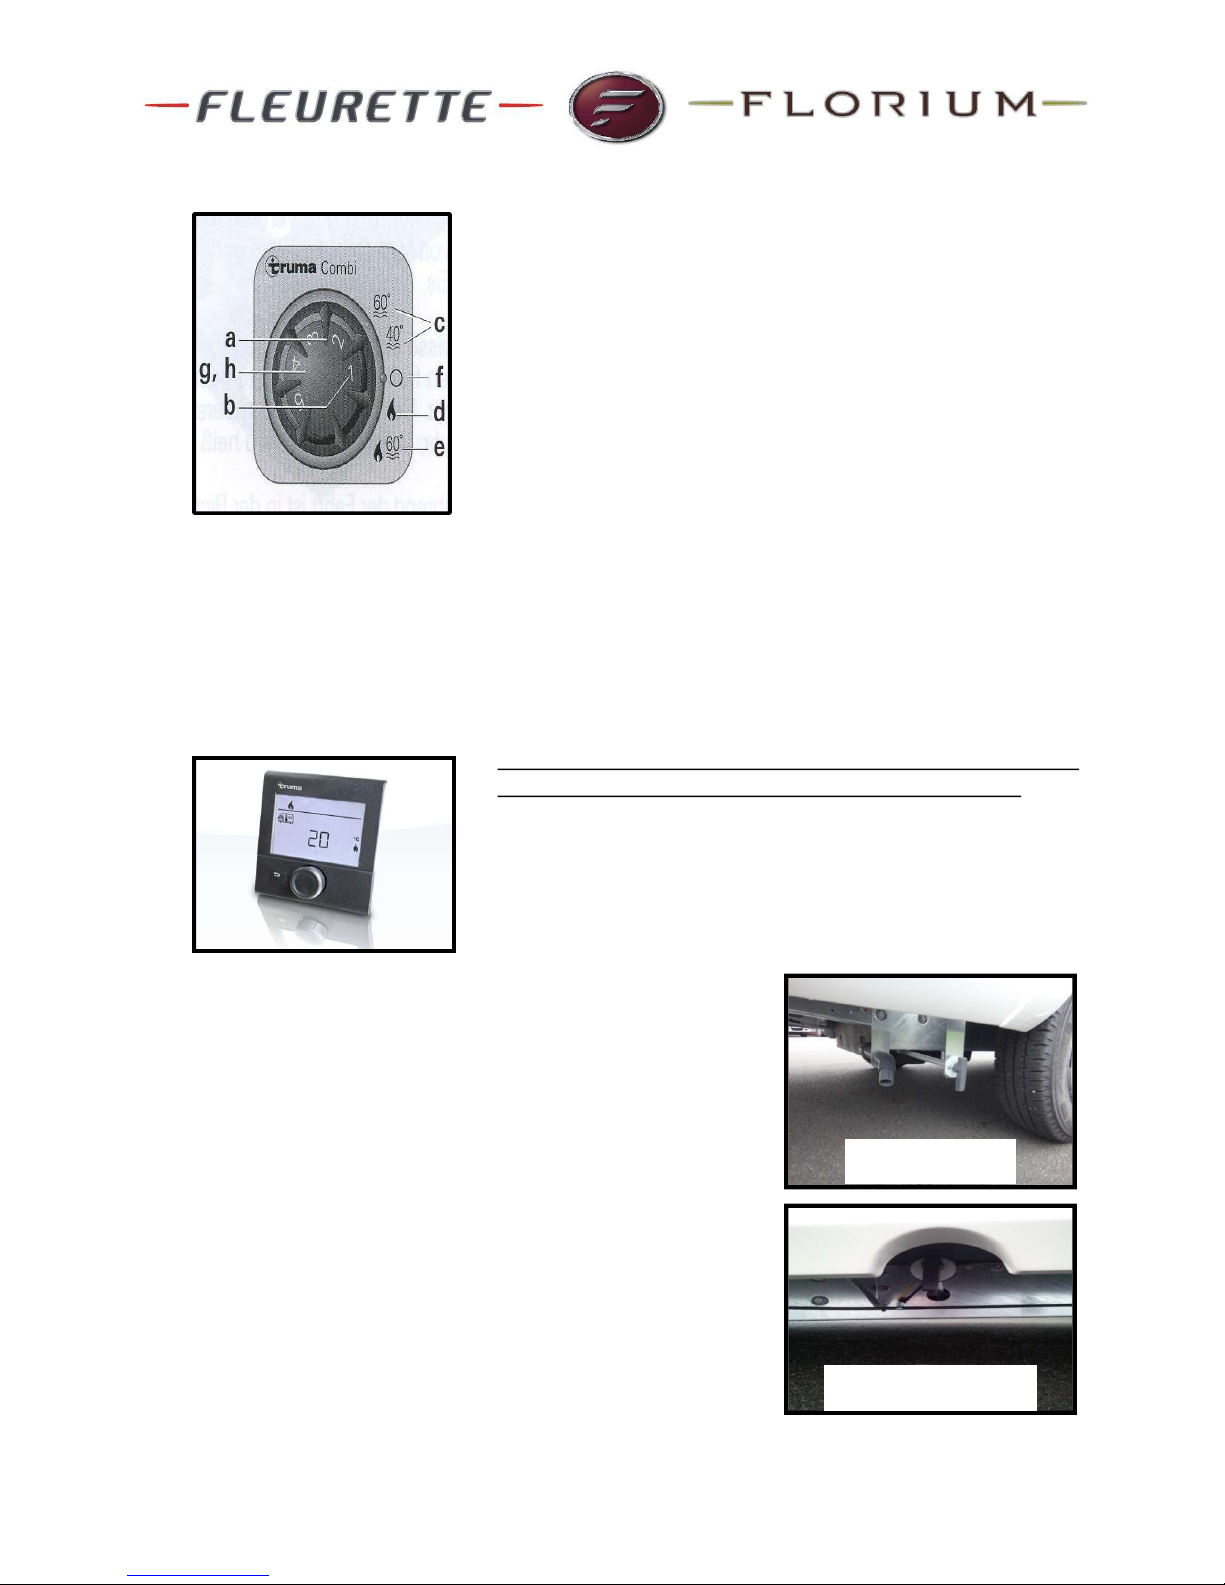
TRUMA HEATER : Combined heating system / water
heater
A - Rotary switch (external ring) to adjust the room
temperature (1-5)
B - Green LED functional display: operational, the timing
to reduce the unit's temperature is activated
C - Water temperature : 40° or 60 °C
D – Without controlled water temperature
E- With controlled water temperature 60 °C
F - Off
G - Yellow or flashing LED functional display : = Heat-up
phase warm water
H - Red LED functional display = Fault
For more information, refer to the specific manual
For models equipped with the boiler combi 6 E, we use a
digital control panel (see specific Truma instructions)
Truma classic control panel
Truma digital control panel CP plus
Low profile
A-Class

Winterization
If your vehicle must remain stationery during
the winter :
1/ Empty the freshwater and wastewater tank
by activating the draining valve
2/ Drain the water heater, turn the pump on
and open the hot water taps. Leave the mixer
taps open in a central position and place the
shower nozzle on the bottom of the shower
tray
2/ Turn the pump on to drain the water from all
the pipes in activating the Truma Frostcontrol
Truma . Turn of 180 ° the drain controller. (See
instructions for the device)
4/ Open the draining valves
5/ Open drainers of two tanks :
Fresh water : drain plug
Waste water : opened valve
6/ Open and clean the pump filter.
Warning: If temperature drops below 4 ° C in
the cell, the safety valve / drain opens and
drains the water heater. It is only when the
ambient temperature is around 7 ° C that we
can close the valve manually
PAGE 13
Water levels
To know the amount of water in each tank,
scroll the menu by pressing until these
arrows appear ↓ ↑. Left tank is the fresh
water tank. Right tank is the waste water
tank.
The inspection hatch is located
under the bed or seats according
to models
Opening / closing of the Truma
FrostControl via the blue dot
To close the valve, turn the
handle and press the blue dot.
Level indicators

ELECTRICITY
12V and 220v
Electrical installations comply with required
standards and regulations.
The power feed is made up of a 12V direct
current part when the vehicle is on the road
and of a 220V alternating current when you
are connected to a plug.
Power is supplied via the standard plug P17
located on the side of your vehicle. It is
recommended to use a patch cable 3 x 2.5
mm²) of maximum 25m.
Warning: Never start a vehicle connected to
230V
The electrical units are located under the
front seat right or left depending on the
model.
Your vehicle is equipped with a 230V circuit
breaker that protects the electrical outlets,
refrigerator, battery charger and the option
Combi / Alde and a differential 30mA.
FUSES
12V electrical distribution is included in a 12V
fuse box in which the fuses are located. This
device distributes the power supplies of each
cell unit.
Note: A low battery damage permanently the
battery and electrical accessories of the
vehicle. The Fleurette warranty can not be
applied
PAGE 14
Electrical unit
Circuit breaker
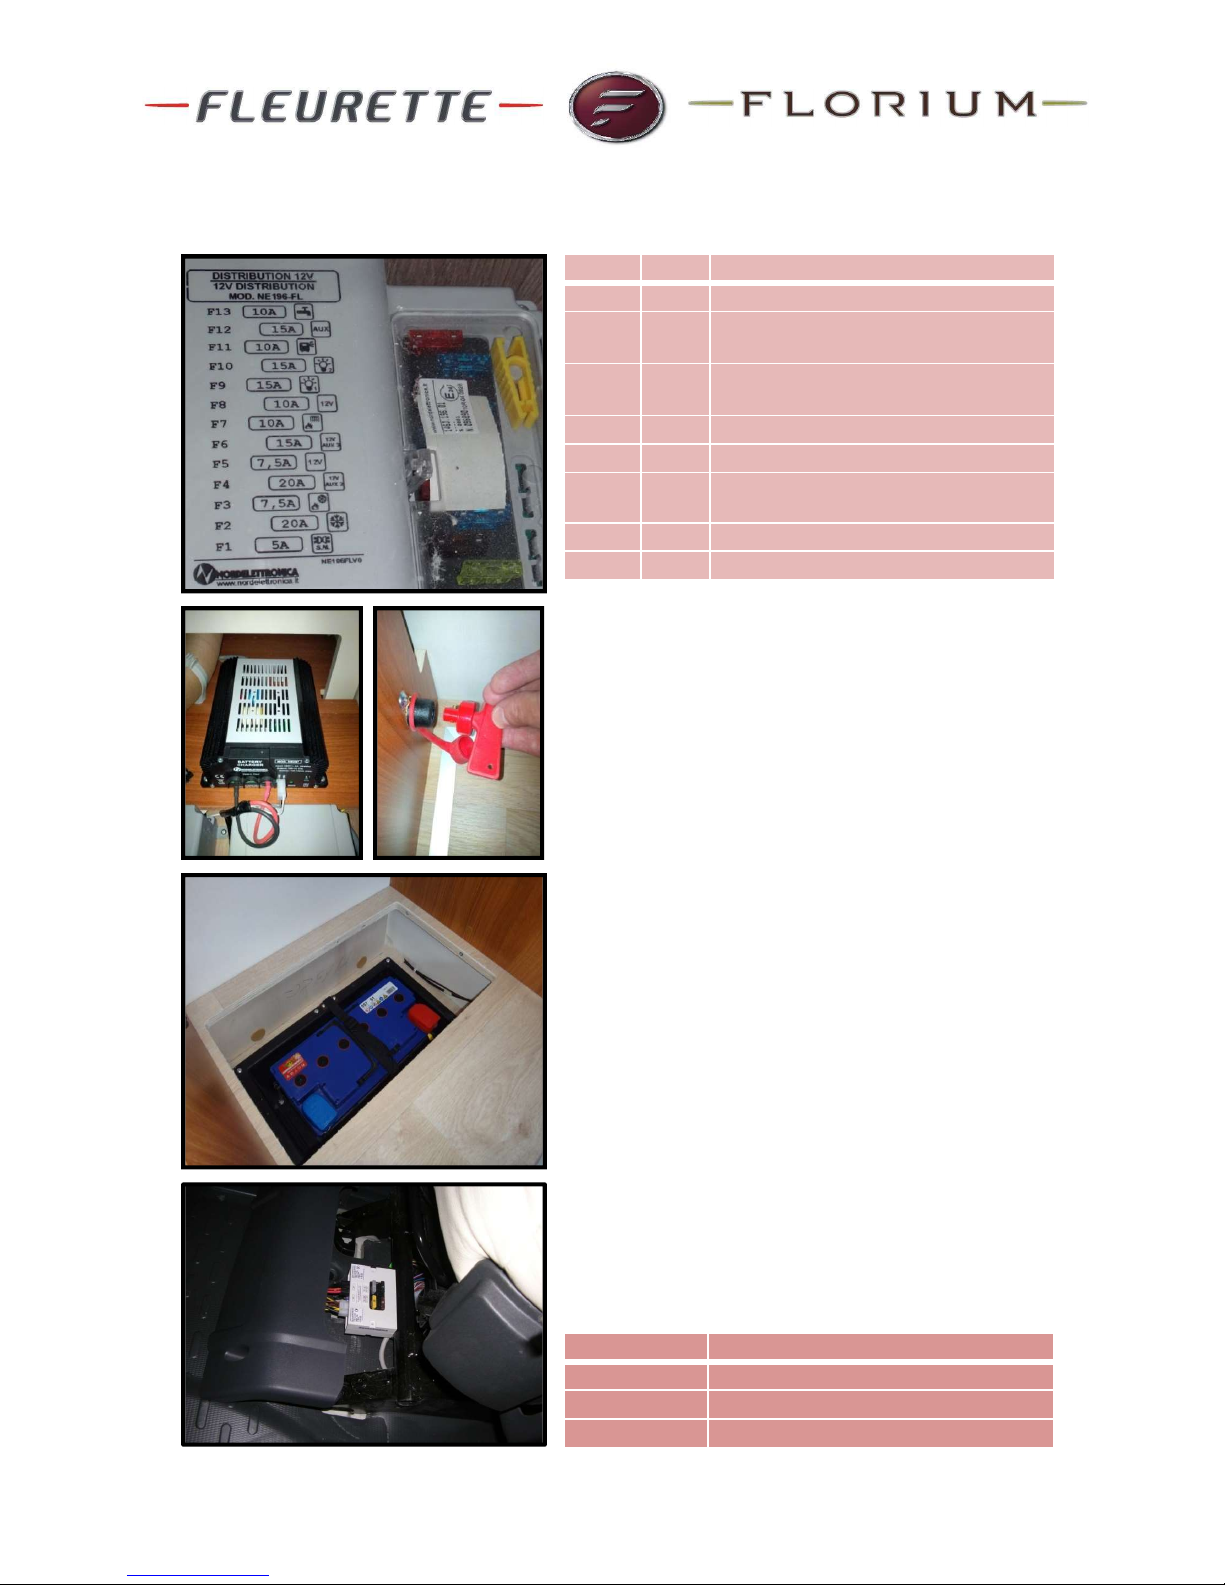
Fuse box:
The battery charger 220V charges the auxiliary
battery when the vehicle is powered by 220V
(photo on the left). To load and complete filling of
the battery, the red key cell circuit breaker must
be removed (to do 1-2 times a year) – picture on
the right.
Note: In this position, the cell is cut off from its
power supply.
Auxiliary battery
It is placed under the seat, it feeds all the light
points and the different devices. Its capacity is
100 amperes per hour. It recharges when the
engine is started via the alternator or when the
vehicle is connected to the 220V through the
battery charger or a solar panel (optional) by the
load limiter panel.
Check the battery voltage with the control panel
On A-Classes, the chassis12V frame is located
under the passenger seat.
It has got 4 fuses:
PAGE 15
F1 5A Side lights
F2 20A Refrigerator power 12V
F6 15A 12V demo (TV furniture and radio)
F7 10A 12V television socket and motor of drop
down bed
F8 10A Pum and 12V socket under the seats
F9 F10 15A Lighting circuit
F11 10A Awning light (does not work when the
vehicle is on the road)
F12 15A Internal charger
F13 10A Fresh water pump + WC
25A Drivers window
7.5A Electrical mirrors right and left
2A Side lights
1A 12 V after contact
PAGE 16
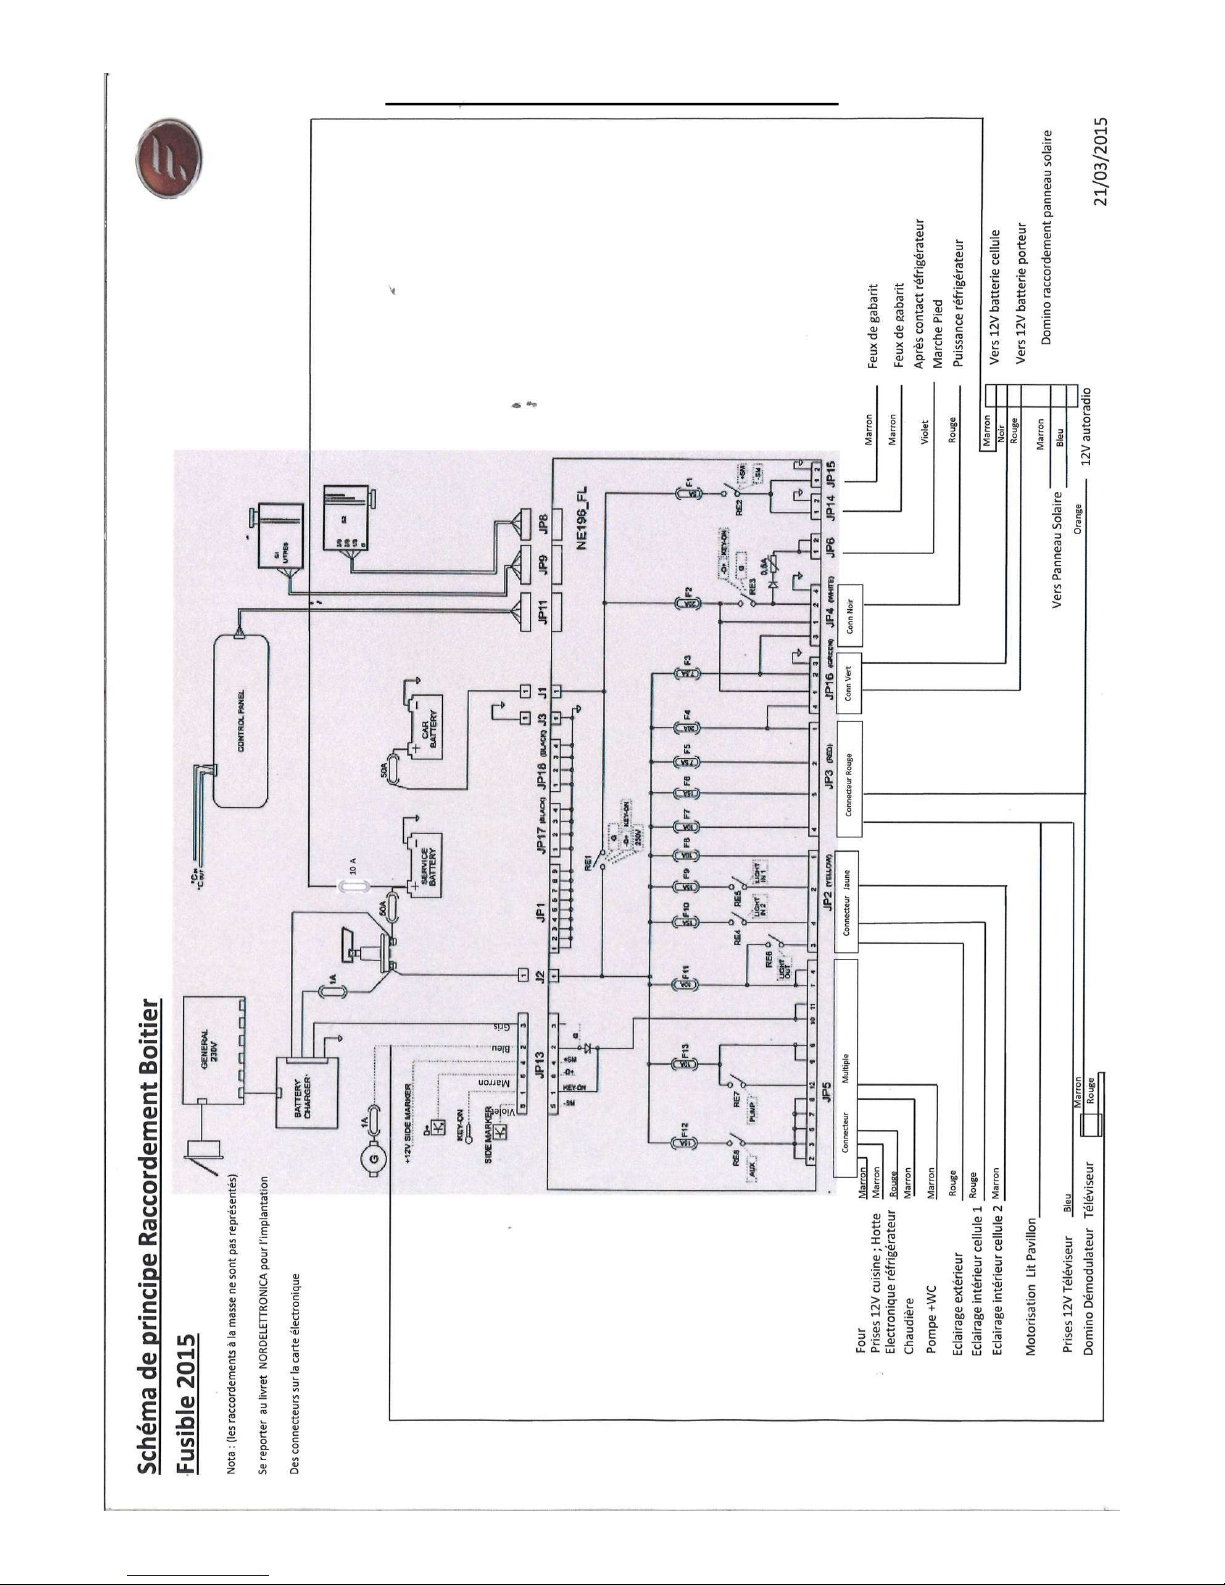
12V box fuses supply diagram
EQUIPMENTS
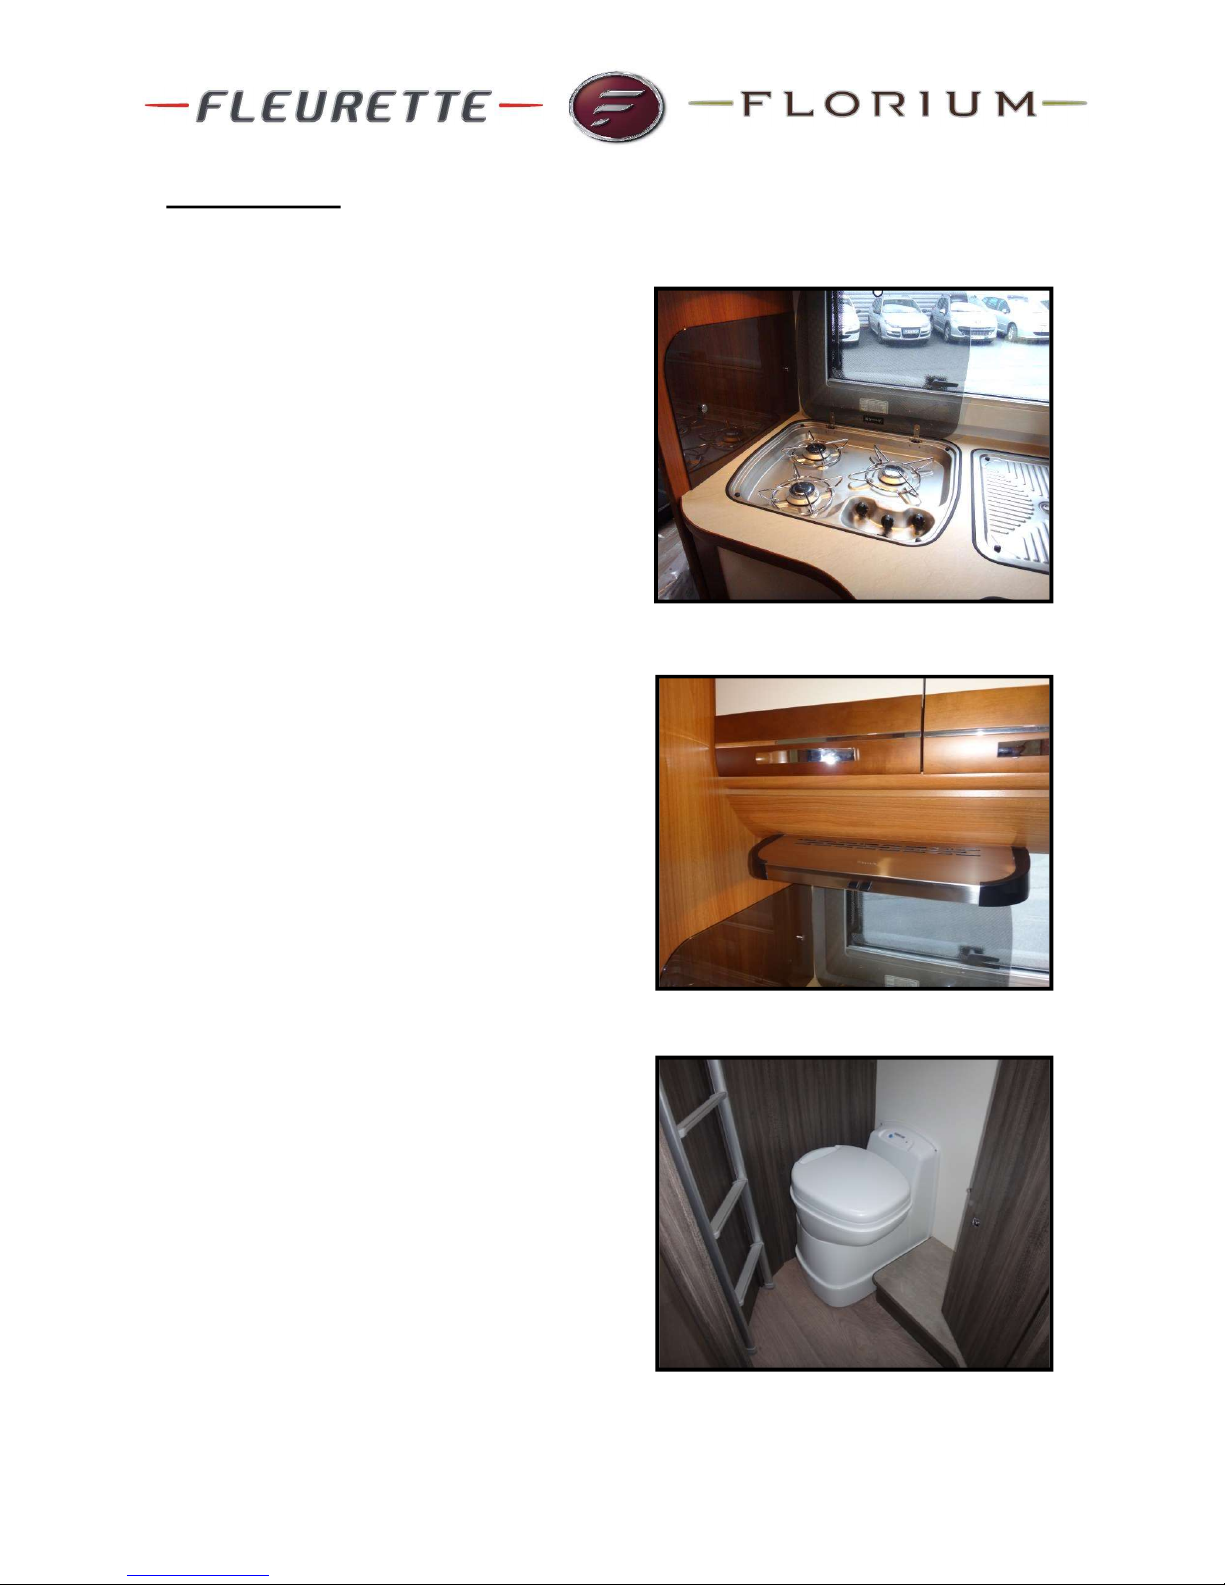
Hotplate:
Switching on : open the gas bottle and the
button of the hotplate
Activate the auxiliary function of the control
panel.
Press the button by turning it slightly to the
left. Light with the electronic lighter, hold the
button down for 10 seconds, then release.
Caution: Do not close the protective cover on
a lit fire (risk of damage).
Extractor hood: Baraldi
To ensure proper operation of the extractor
hood, the aluminium grease filter can be
cleaned in the dishwasher.
Let the filter dry before reassembling
Refer to the device's manual (which is in the
white bag delivered with your Fleurette)
Thetford WC
Motorhomes Fleurette / Florium feature a
W.C. set consisting of a flush toilet and a
cassette.
Refer to the device's manual (which is in the
white bag delivered with your Fleurette)
PAGE 17
PAGE 18
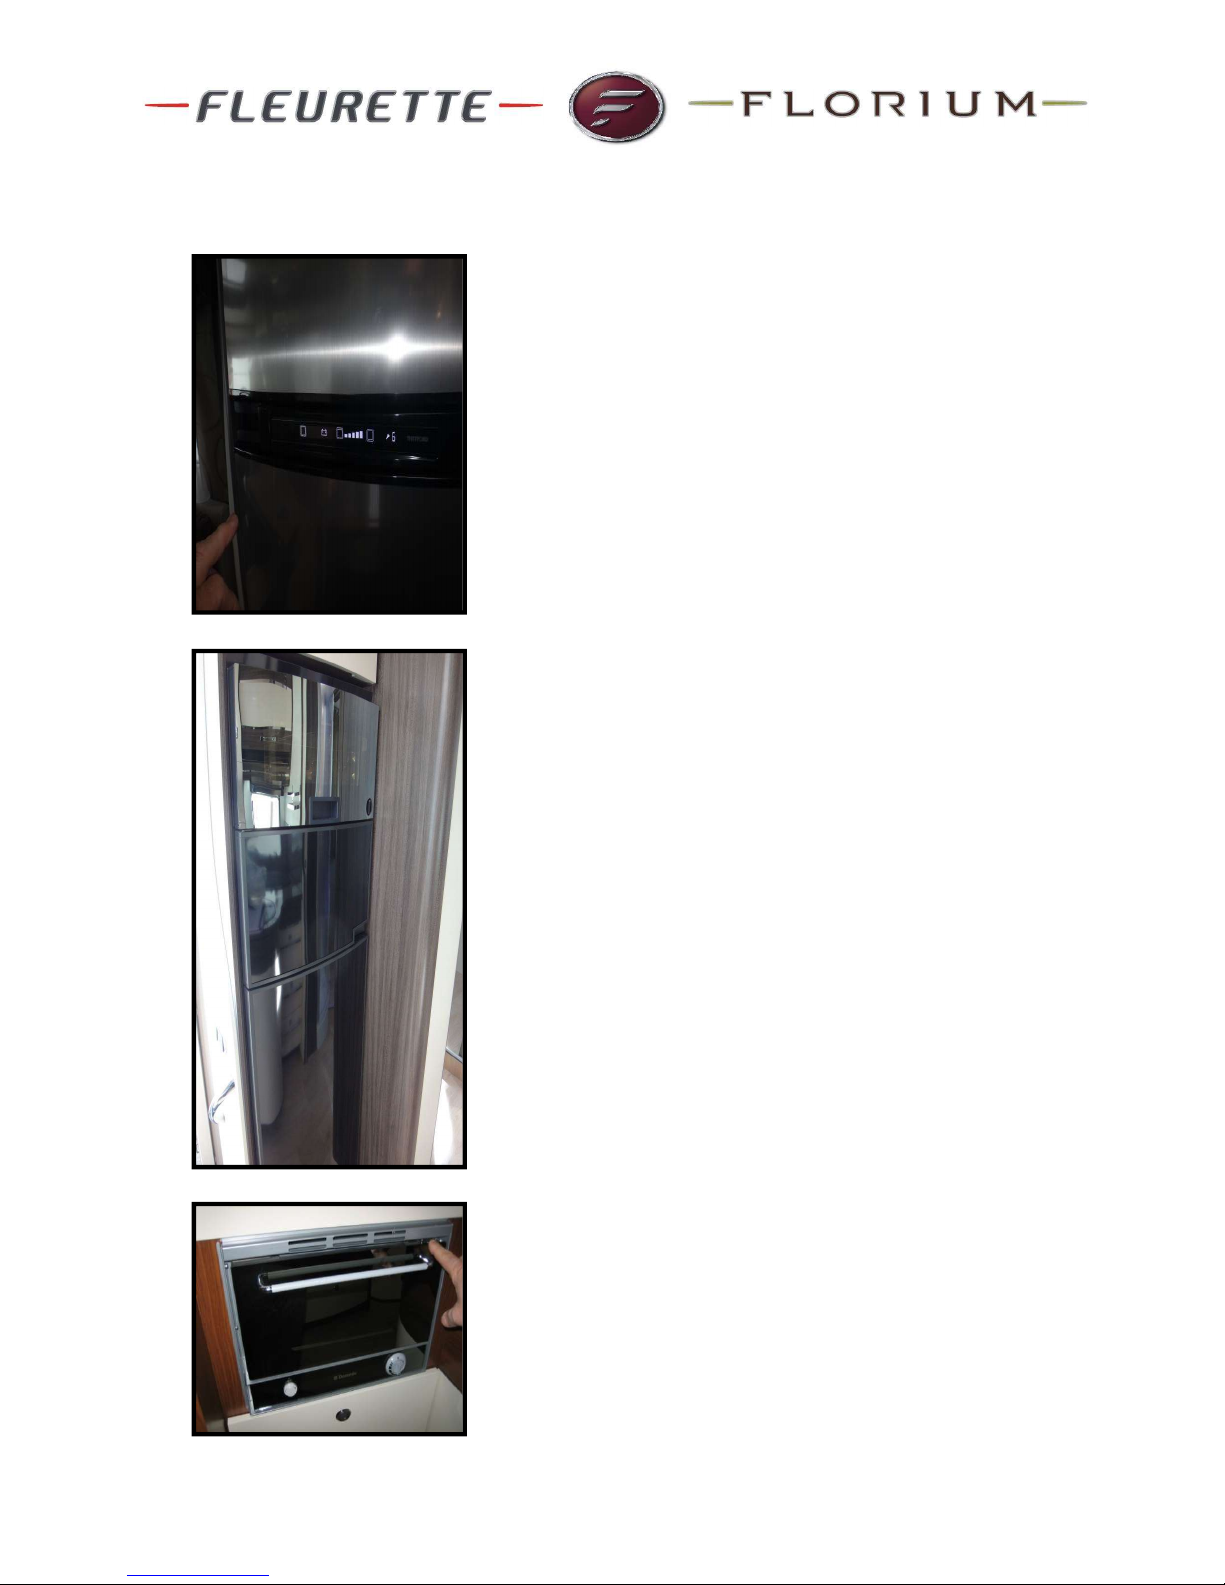
Refrigerator and oven – Tec Tower (Dometic)
Starting the refrigerator : by pressing the "MODE" button,
you can select the desired energy source or let the
automatic mode "AES" (recommended mode for better
use).The AES mode automatically selects the best
source available (in order: 220 V – gas – 12V)
IF THE FRIDGE FAILS TO WORK
Check the following points :
The gas is propane
That all LP-gas valves are opened
That the safety switch is activated and the light is on
The control panel
That the fuse is intact
The refrigerator is level.
Thetford refrigerator
Your refrigerator works by activating the function AUX on
your control panel. For the proper functioning of your
device, put it in ‘Auto’ mode because this function is the
priority energy, refer to the instruction manual. The
refrigerator automatically selects the best source
available (in order: 220 V – gas – 12V)
Operating on 12V is only effective while the engine of the
vehicle is running. The refrigerator uses gas when the
engine is stopped and the power supply is not
sufficient.To secure optimal performance, level your
vehicle before operating the refrigerator (the maximum
inclination must be between -3 ° and 3 °)
Depending on the model of your motorhome, there are 2
types of oven, placed over the refrigerator or under the
kitchen (Photo below)
For the second, be areful to remove the lock to the door.
For ignition, firmly press the button to trigger the piezo
ignition and turn the cooking power.
This manual suits for next models
1
Table of contents


