Flex Waves FW-EQ7 User manual
FlexWaves di Alessandro Belletti - sede legale Vicolo dei Rampini 13, 40026 Imola(BO)
Website: www.flexwaves.com E-mail: [email protected]m
FW-EQ7
FLEX EQ7
User Manual

INTRODUCTION
2
Thank you, and congratulations on your choice of the FW-
EQ7 FLEX-EQ7 Programmable ANALOG 7 Band Equalizer.
Before using this effect, carefully read the section
entitled: “IMPORTANT NOTES”.
These sections provide important information concerning the
proper operation of the pedal. Additionally, in order to feel
assured that you have gained a good grasp of every feature
provided by your new unit, this manual should be read in its
entirety. The manual should be saved and kept on hand as a
convenient reference.
Flex Waves FLEX-EQ7 brings you seven bands of pure
ANALOG circuit EQ ranging from 100Hz to 6.4kHz, ideal for
guitar sounds, with boost/cut of +/- 15dB per band.
This lets you TOTAL control your sound, eliminate unwanted
feedback, give a thin-sounding single-coil the girth to stand up
to a high-output humbucker, turn a vintage one-channel amp
into a two-channel firebreather.
Create scooped-mid death tones, midrange-heavy singing
lead sounds, thunderous lows, crystalline highs.
The Level Slider gives you a great amount of gain, so you can
make a fill or a solo jump to the forefront.
Use it as a boost for solos or to create funky and scooped-
mid rhythm tones. Create raging sustain and feedback while
getting more thunderous low-end out of your rig than you ever
thought possible.
The Flex-EQ1 is 100% Analog Tone digitally controllable, you
create your sounds, you store them and you recall them
whenever you want in a glance.
It covers the frequency spectrum for electric guitar, keyboard,
mic, etc.
FLEX WAVES Guitar Pedals are DESIGNED and MADE in
Italy.
A battery is supplied with the unit.The life of this battery
may be limited, since its primary purpose was enable to
testing.
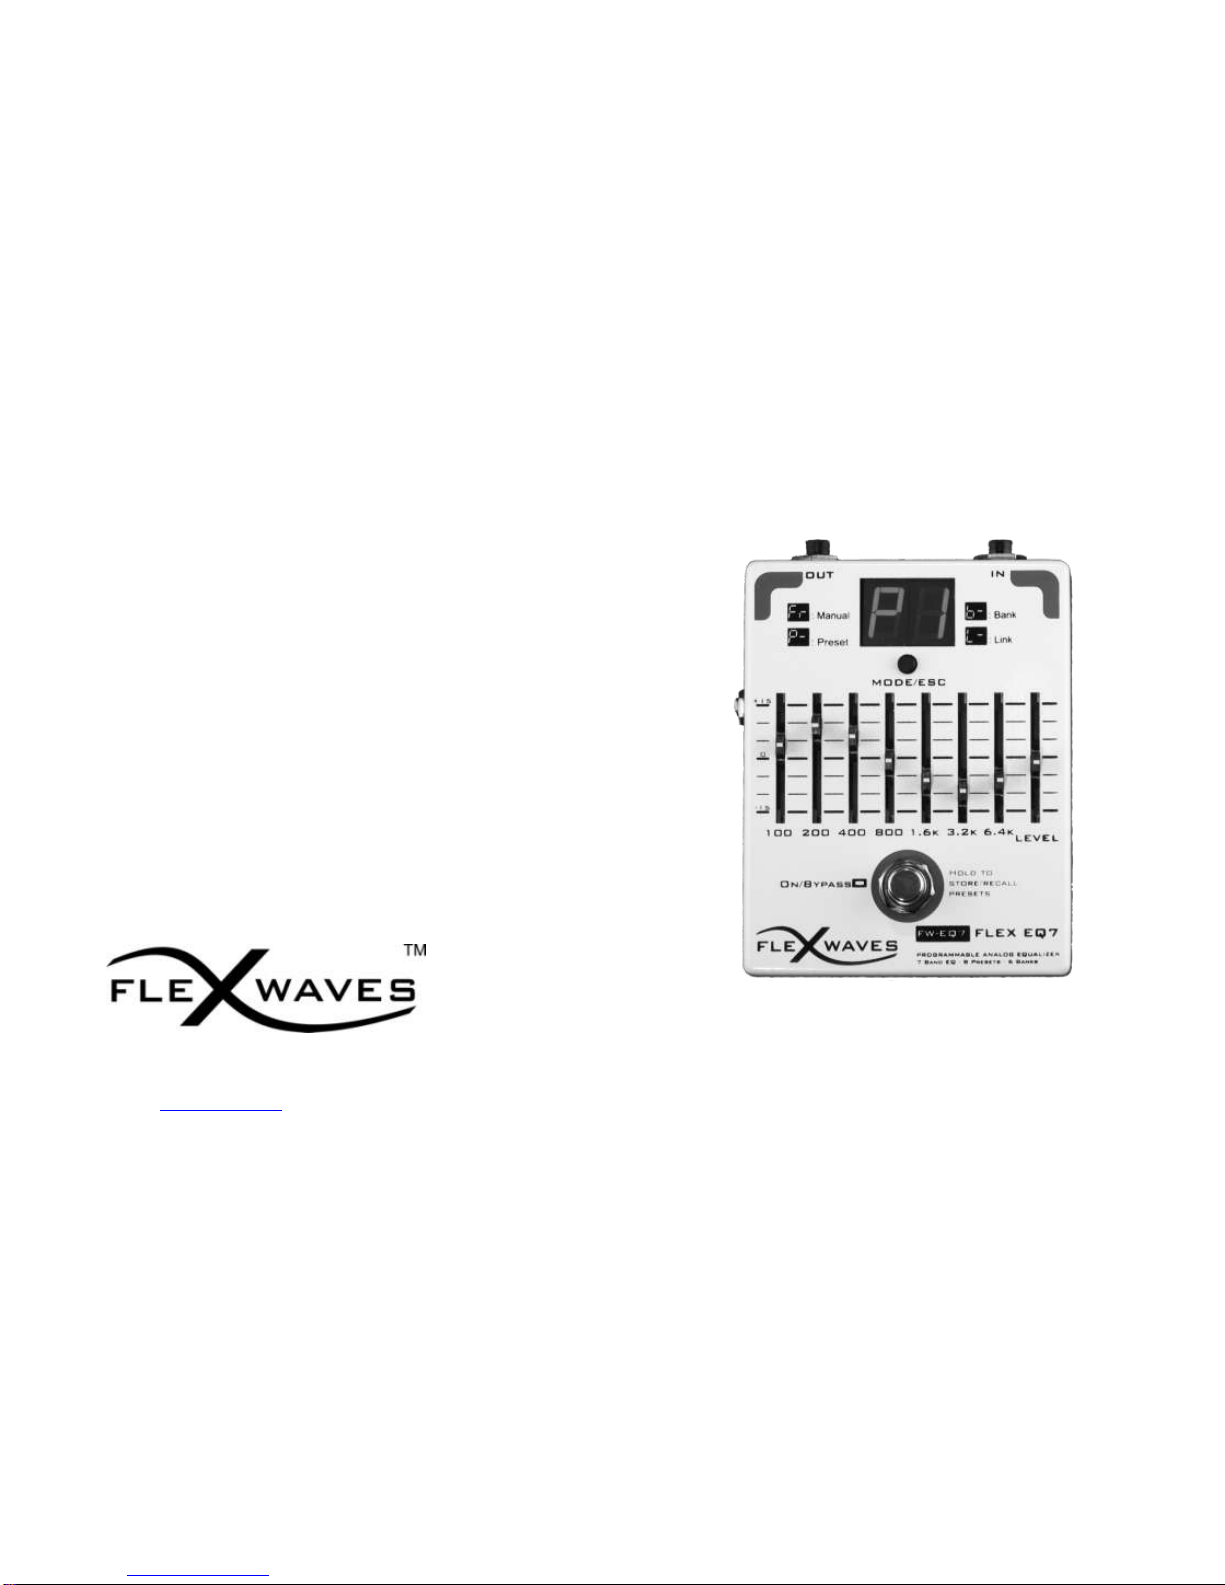
MAIN FEATURES
Analog Programmable Equalizer
7 Band EQ ±15 dB Cut or Boost
8 Custom Presets
6 User Banks
True Bypass
Compact Die Cast Aluminium Box
FW Balanced Cable Link ™Mode to “smart” connect
multiple Flex Waves pedals

PANEL DESCRIPTION
3
Connections
1- IN
1/4” mono jack connections for signal input.
FLEX-EQ7 require 1/4” stereo jack connections for Link
Mode operations.
2- OUT
1/4” mono jack connections for signal output.
FLEX-EQ7 require 1/4” stereo jack connections for Link
Mode operations.
3- Power
The FLEX-EQ7 require 9V DC 200 mA. By using the power
supply, you can play without being concerned about how
much battery power you have left.
Use only the specified AC adaptor
If there is a battery in the unit while an AC adaptor is
being used, the FW-EQ7 will switch over to battery-
powered operation should the line voltage be
interrupted.
To change the battery you need to unscrew the
four screws placed on the bottom panel

PANEL DESCRIPTION
4
Switches
4 - On/Bypass
This footswitch has three functions.
- Press and release immediately for standard on/off function in
Free Set Mode (Manual).
- Hold and release to switch between the presets in Preset
Mode.
- Hold to store a sound into a Preset number (Preset Mode) or
to confirm the bank selection/bank position (Bank Mode).
5- Mode/Esc
The FLEX-EQ7 has four mode of operation, selectable by
pressing the Mode/Esc switch , the modes are: FREE SET
Mode ( Manual ), PRESET Mode, BANK Mode and LINK
Mode.
The switch has also the function of aborting the current
operation like storing a Preset or a Bank.
Sliders
6- Graphic Equalizer sliders
Control 7 octave band from 100 Hz to 6.4 KHz by 15 dB up or
down.
7-Level
The level slider allows to control of FW-EQ7‟s output
loudness, so the pedal can be used also as a signal booster.

OPERATION
5
SETUP MONO
This setup illustrates how to use the Flex-EQ7 pedal in a mono setup (one amp only) .

OPERATION
6
SETUP SEND/RETURN
This example illustrates how to connect your Flex-EQ7 pedal as a send/return effect in an effects loop.

OPERATION
7
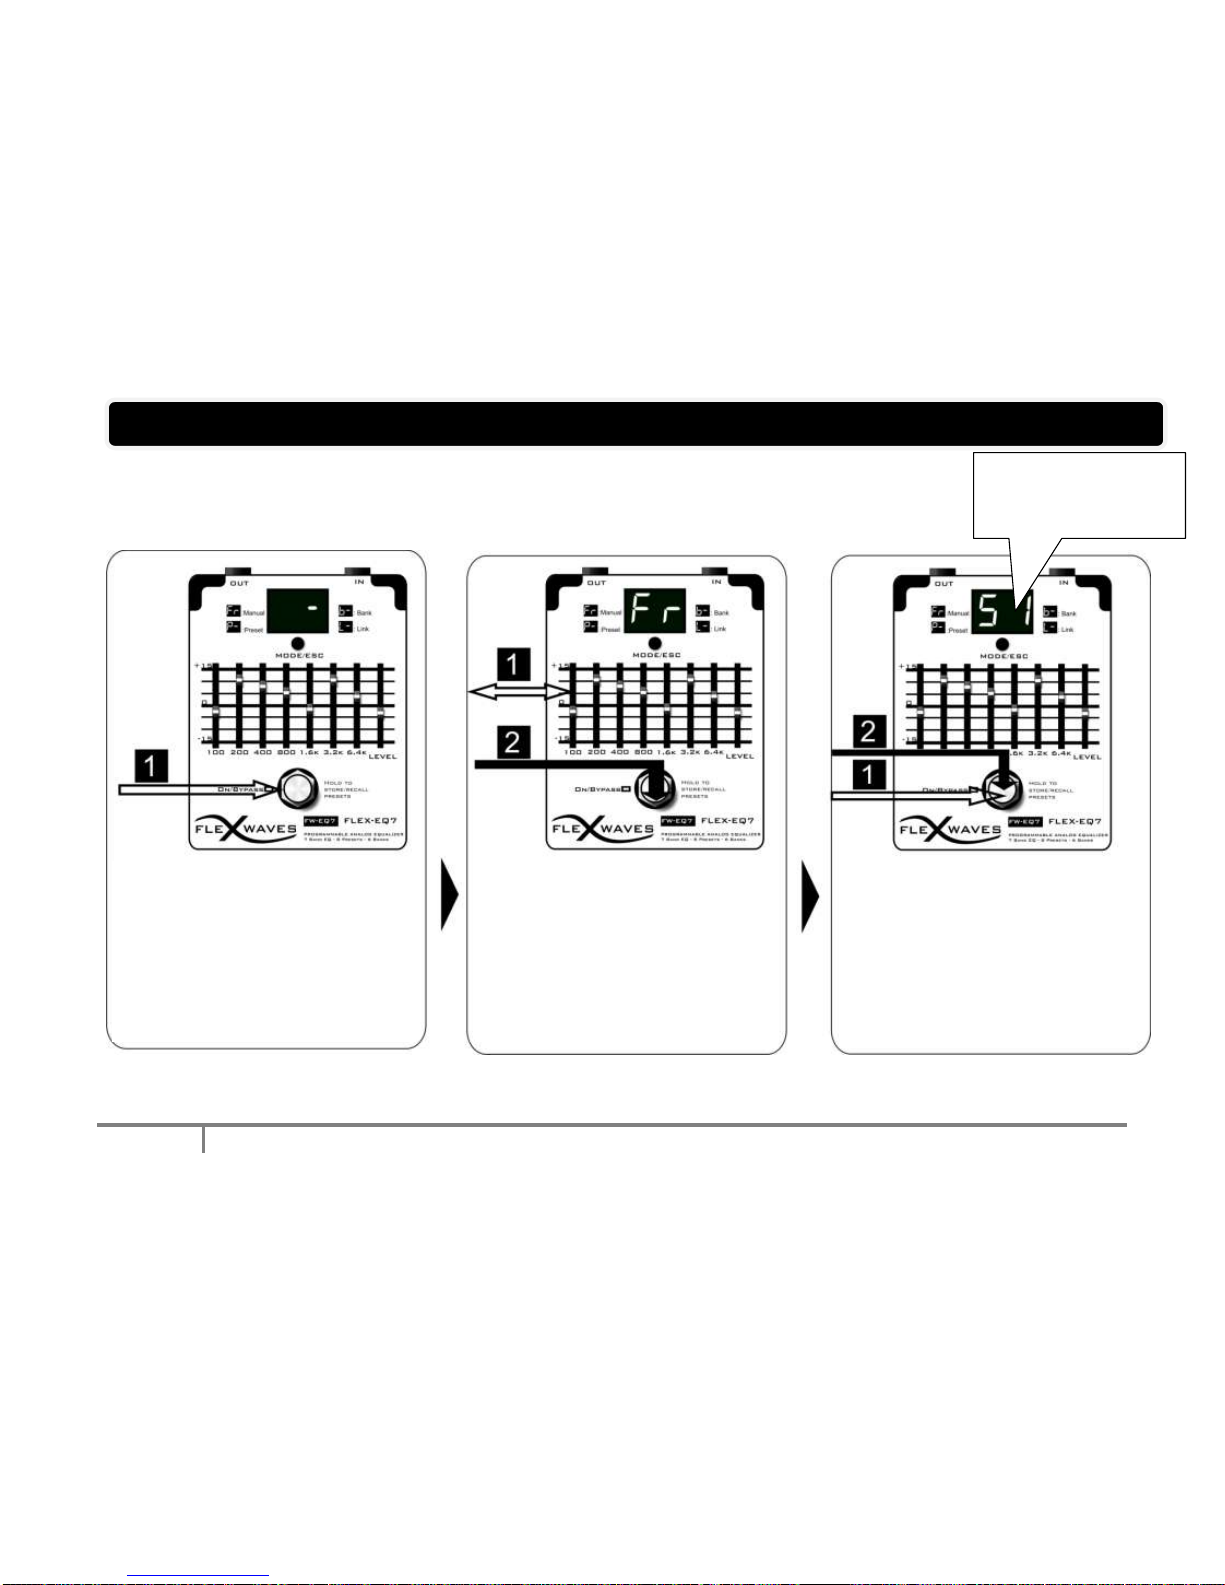
The Flex-EQ7 has four mode of operation, selectable by pressing the Mode/ESC switch, the modes are: FREE
SET Mode (Manual), PRESET Mode, BANK Mode and LINK Mode.
FREE SET Mode (Manual)
When the power is turned on, the default pedal settings are Bypass („ – „ symbol on 7 Segments Display) and
FREE SET Mode.
Each “single” press of the On/Bypass footswitch turns the pedal on or off. When the effect is off ( „ –„ symbol on
display), the sound coming in through the IN Jack is True Bypassed to the OUT jack.
When the effect is on and FREE SET Mode („ Fr „on display ) the pedal plays according to the positions of the
controls.
1. Accent a particular tone range by moving the graphic equalizer sliders. The first three bands adjust the
fundamental and the higher four bands adjust the strength of the harmonic accent.
2. Move the level slider to balance between normal and effect sound.
OPERATION
8
HOW TO STORE A SOUND
Pedal in Free Set Mode and Bypass
1. Single Press on Footswitch to
turn on the effect.
appears on the display
1. Move the sliders to find your
sound
2. Hold On to Store the sound
flashes rapidly
1. Single press on the footswitch to
change Preset Number
2. Hold On the footswitch to confirm
To abort press MODE/ESC
blinking.
When sound stored,
it stops blinking.

OPERATION
9
HOW TO STORE A SOUND
With the Flex-EQ7 you can store the sound settings in presets (8 presets are available) that you can recall in the
PRESET MODE. The data retention of the presets is about 20 years
1
.
1. Single Press of the Footswitch to turn the effect on ( on display).
2. Create the sound you want using knobs.
3. Hold On the footswitch: on the display appears with „1‟ flashing rapidly. stands for "Saving Preset
1"
4. Single Press of the footswitch to select the preset number (numbers from 1 to 8 will appear).
5. Hold On the footswitch to store the sound into the selected preset number.
6. It is possible to abort the storing operation pressing MODE/ESC button before the execution of step 4.
1
Please be aware that all data contained in the unit’s memory may be lost when the unit is sent for repairs and that the contents of
memory can be irretrievably lost as a result of a malfunction, or the improper operation of the unit.

OPERATION
10
HOW TO RECALL A PRESET
1. Press Mode/ESC switch until it
appears : Preset Mode
/Bypass
2. Single Press on the Footswitch
to turn on the effect
appears on the display. The
effect is ON with Preset 1 loaded.
1. Hold on the footswitch to
change the Preset
2. Single Press to On/Bypass

OPERATION
11
PRESET MODE
In the Preset Mode the effect plays according to the recalled preset, so the knobs positions don‟t match the
currently recalled values.
Preset Mode is useful to recall previously stored sounds, 8 presets are available and you may step between the
8 presets by keeping pressed the Footswitch On/Bypass. Bypass is still available simply pressing once the same
footswitch.
HOW TO RECALL A PRESET
1. Effect in Bypass. Press Mode Switch until you enter in PRESET MODE: will appear on the display
2
2. Single Press of the footswitch to turn ON the Preset 1. appears on display.
3. Hold ON the footswitch to change the Preset number. will appear on display.
4. Repeat Step 4 to switch between the 8 available presets.
5. When you recall a preset, single press of the footswitch to return in Bypass (switch OFF the effect).
2
If the effect was On, will appear on the display. It means that you entered in Preset Mode with Preset 1 loaded

OPERATION
12
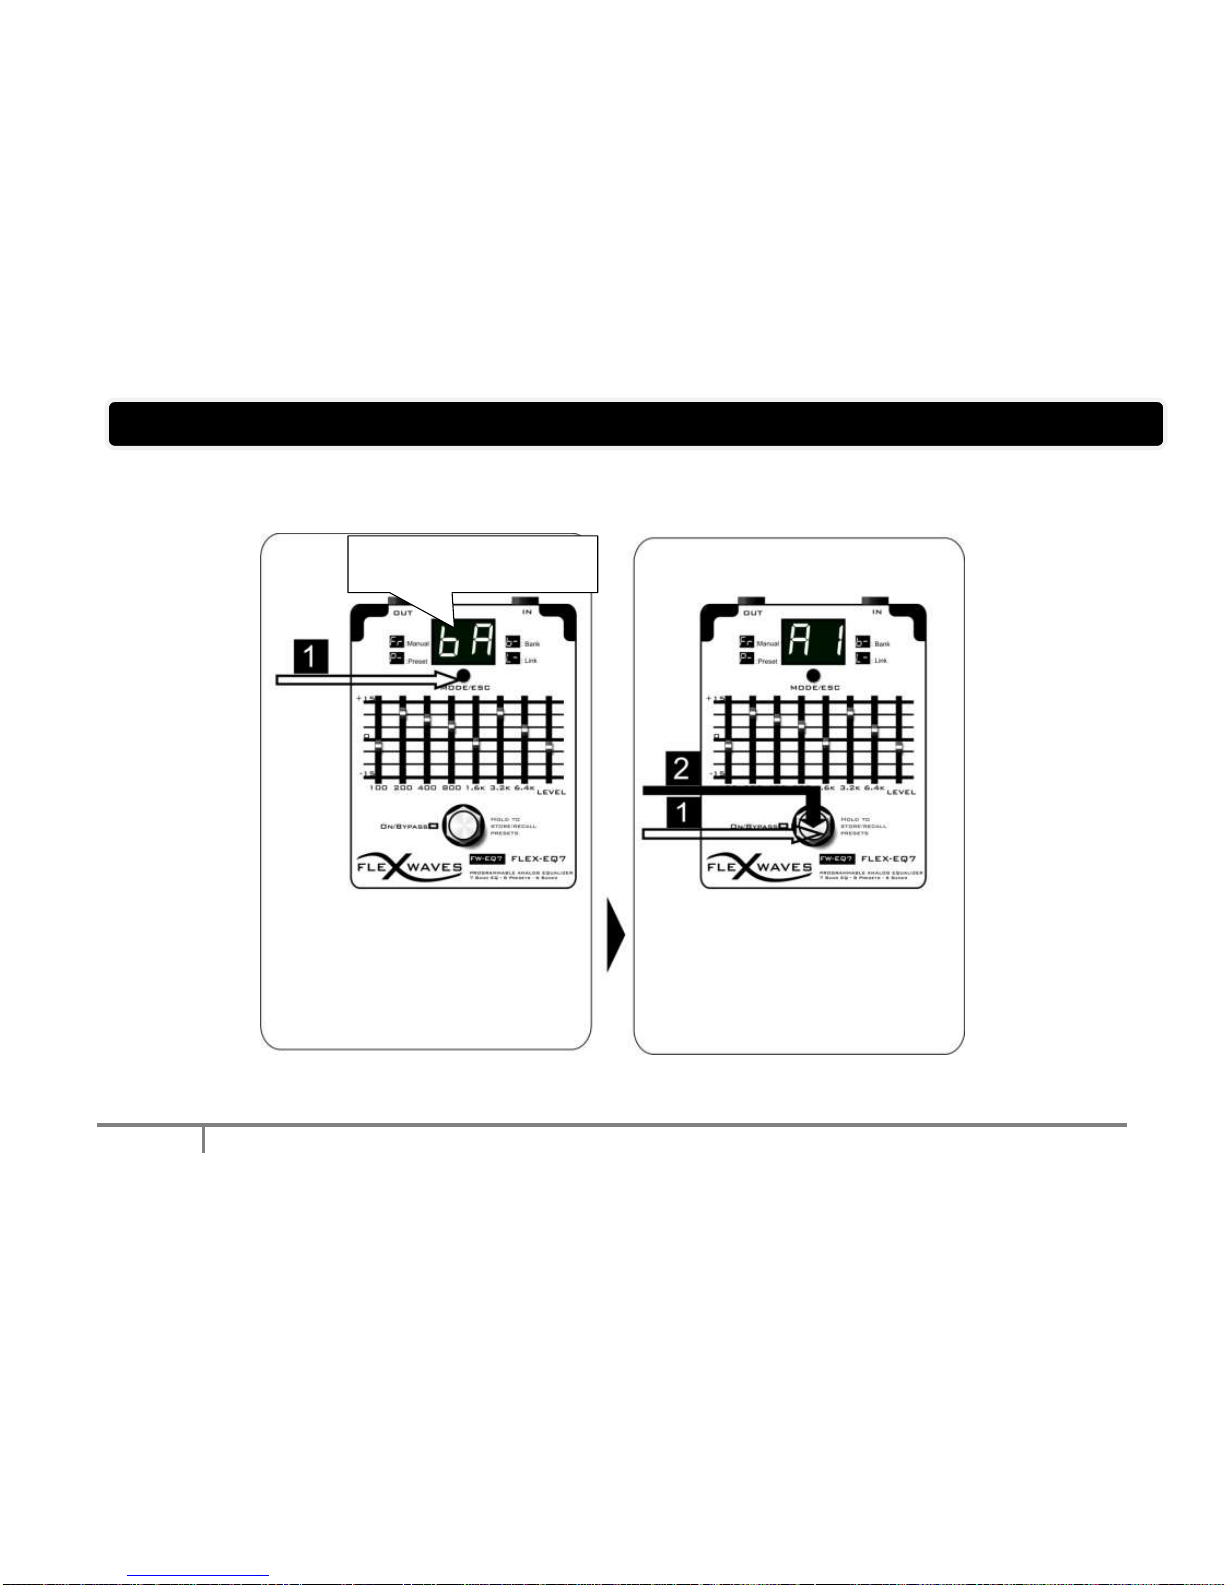
BANK MODE
In Bank Mode the presets can be copied and organized into one of the 6 available Banks:
(Bank A), (Bank B), (Bank C), (Bank D), (Bank E), (Bank Link). The Link Bank is a
reserved bank for the Link Mode feature.
Bank Mode is useful when you have to recall preset in a different order or number than P1..P8.Each Bank has 8
positions that can be programmed with presets. Also the Bypass state ( - ) can be programmed in the bank
positions.
For example assuming that you want to use during a Song A only presets 2,1 and 5 you may prefer not to step
through all eight preset 1-8, so you can program the bank A (bA) only with P2, P1, P5. The preset inside the bA
will be recalled in the order P2-P1-P5.
For the Song B you need Preset 8, Preset 4, Bypass, Preset 3, Preset 5, you can program the Bank B (bb) with
P8, P4, - (Bypass),P3, P5 and so on.
OPERATION
13
Working with Banks –Play Mode
1. Press Mode/ESC switch until it
appears : Bank Play Mode
appears for a few, then it will
appear (default programmed).
appears on the display (default)
1. Single Press on the footswitch
to change the bank position
2. Hold On the footswitch
to change the Bank
appears for a few. It
means you are in Bank A

OPERATION
14
Working with Banks –Play Mode
1. Press Mode Switch until you enter in BANK MODE: appears on the display for few milliseconds, it
means you entered in Bank A.
2. (from default configuration) appears on the display, it means you entered in Bank A with Preset 1
loaded.
3. Single Press of the footswitch to change the bank position. By default the Bank A has been programmed
with Preset 1, Preset 2, Preset 3 and Preset 4, so if you continue to single press the footswitch, on the
display will appear , , ,
4. Hold On the footswitch to change the Bank, when you reach the desired Bank, release the footswitch.
5. stands for Bank Save: it is a reserved Bank that lets you enter in Bank Saving Mode.

OPERATION
15
Working with Banks –Save Mode
1. From Bank Play Mode,
Hold On the footswitch to
change the Bank, release it
as you reach .
stands for Bank Save.
appears on the display
1. Single Press on the
footswitch to change the
Bank to program.
2. Hold On the footswitch
to confirm the selection.
flashes rapidly
1. Single press on the footswitch to
change Preset Number (you can
hear the Preset sound if you play).
2. Hold On the footswitch to
confirm
3. Repeats step 1 and 2 for the
other positions.You can choose
also - Bypass
4. To terminate the Sequence,
select (it stands for Sequence
END). To abort press MODE/ESC
appears for a
few. It means you
are in Bank Save
- blinking.
You must select which Preset to store
in the first position of Bank A.
blinking. Select
the Bank.

OPERATION
16
Working with Banks –Saving Mode
The Bank Saving feature permits you to copy the presets into the bank and to organize your sounds for your gigs, your recording
sessions etc.
In the example below we will program the Bank D with the presets 1,5,2,- (bypass)
1. Hold On the footswitch to change the Bank and release it when you reach (Bank Save). You entered in the Bank
Saving Mode.
Please note that you can abort the operation pressing the MODE/ESC switch button.
2. (with flashing) will appear on the display. First thing you should do is to choose the Bank to program.
Single Press of the footswitch to change the bank selection, Hold ON the footswitch to confirm the selection.
In this example we will program the Bank D, so press S1 until you reach (with flashing) and Hold On the footswitch to
confirm.
3. Next thing you should do is to store the presets in the bank positions.
(flashing) appears on the display. It stands for Position 1 Bypass.
Single Press of the footswitch to change the Preset Number ( if you play you can hear the preset sound): - (Bypass), P1..P8
(Preset 1..8), E (sequence END) are the available choices.
4. Select Preset 1 on position 1 ( withflashing) and Hold On the footswitch to confirm it.
5. Now it will appear on the display (–with –flashing), repeat the step 4 to store into the bank the Preset 5, Preset 2 and
Bypass.
6. On the display it will appear now (with –flashings), you have to terminate the sequence. Single Press of the footswitch
until you reach , E stands for End & Exit, Hold On the footswitch to confirm the sequence end.
7. The pedal automatically exits from Bank Saving Mode and enters in Bank Play Mode, so Bank A with first stored preset will
appear on the display.

OPERATION
17
The Link Mode (FW BALANCED CABLE LINK MODE™)
The FW BALANCED CABLE LINK MODE™ gives you the total control of your sounds using only one footswitch. It‟s like having a
pedalboard.
Program the Link Bank of all the effects (please read
Bank Save explanation).
1. Press Mode/Esc switch until you reach Free Set
(Manual) Mode on Slave 1
2. Press Mode/Esc switch until you reach Free Set
(Manual) Mode on Slave 2
3. Press Mode/Esc switch until you reach Link Mode
All the slaves will automatically switch to Link Mode.
The Flex Waves pedals will load the Preset Number
associated to the first position of the Link Bank.
The first pedal of the chain is the Master and
it controls all the Flex Waves pedals of
the chain.
4. Single Press on the footswitch of the Master
to change the Preset Number associated to the
Bank Link in all every pedal of the chain.
If a slave is ON, you can press its ON/Bypass
footswitch for bypass
Total control of your sounds using only one
footswitch button.

OPERATION
18
LINK MODE (FW BALANCED CABLE LINK)
The FW BALANCED CABLE LINK MODE™ gives you the feature to use the FW Pedals like a pedalboard.
This feature is useful because you can recall the Presets of different FW pedals pressing just the footswitch of the first FW effect.
Flex Waves guitar pedals can be connected together by just a balanced/stereo cable (NO MIDI or other controller devices are
necessary) .
The first pedal of the chain becomes the Master and it controls the other FW effects (the Slaves).
With all pedals in Link Mode, just pressing the stomp switch S1 of the Master, it will change the preset in Link Bank of the Master
AND also the presets of all the Slaves linked together.
Warning
Link Mode features are only available using Balanced/Stereo Cables to link the pedals. Mono Cables can be used but Link
Mode will not be available.
The FW pedals must be linked one after the other to use the Link Mode features.
For a correct usage of the Link Mode, you need to program the Link Bank of all FW pedals connected.
1. Link the FW Pedals with stereo cables in chain (you can buy them on Flex Waves website www.flexwaves.com)
The first pedal of the chain will become the Master.
2. Press the MODE/ESC switch on the FIRST SLAVE pedal (the second pedal connected) until your reach Free Set Mode,
repeat the operation for all the Slave connected (following the order from the first slave to the last slave).
3. Press the Mode Switch on the Master (the FIRST pedal of the chain) to enter in Link Mode from Bank Mode. Automatically
all the Slave pedals will change their mode to Link Mode.
4. Press the Stomp Switch S1 of the Master to change Link Bank Preset of the Master, automatically it will change the presets
of all linked slaves.
5. If a slave is ON, you can press its ON/Bypass footswitch for bypass.

IMPORTANT NOTES
19
Inserting a connecting plug into the INPUT jack will automatically switch the unit on.
The use of an AC adaptor is recommended as the unit’s power consumption is relatively high.
The Flex-EQ7 requires 9V 200mA. Use a regulated power supply with the right polarity to prevent malfunctions or noise
related problems.
To prevent malfunction and/or damage to speakers or other devices, always turn down the volume, and
turn off the power on all devices before making any connections.
Some connection cables contain resistors. When connection cables with resistors are used, the sound level may be
extremely low, or impossible to hear. For information on cable specifications, contact the manufacturer of the cable.
If there are batteries in the unit while an AC adaptor is being used, normal operation will continue should
the line voltage be interrupted (power blackout or power cord disconnection). (quelli a batteria)
Once the connections have been completed, turn on power to your various devices in the order
specified. By turning on devices in the wrong order, you risk causing malfunction and/or damage to
speakers and other devices.
When powering up: Turn on the power to your guitar amp last.
When powering down: Turn off the power to your guitar amp first.
If the power is turned off inappropriately while saving a preset/bank, saved data may be lost.
Link Mode features are available only connecting the Flex Waves pedals in chain using Stereo Audio cable. Please use the
patch cables provided by Flex Waves or similar ones.
It can happens that turning on the unit or inserting the jack in the input port, the Flex EQ7 changes its state in Link Mode (L-
on display). Press the mode switch to change the Mode.
As with all true-bypass effects, switching is not perfectly silent. There may be some popping sound when you switch. A
popping sound is not an indication that the effect is defective or not working. It is the small drawback to the great
improvement in tone that takes place when poorly buffered effects are taken out of the loop (thus made true-bypass).
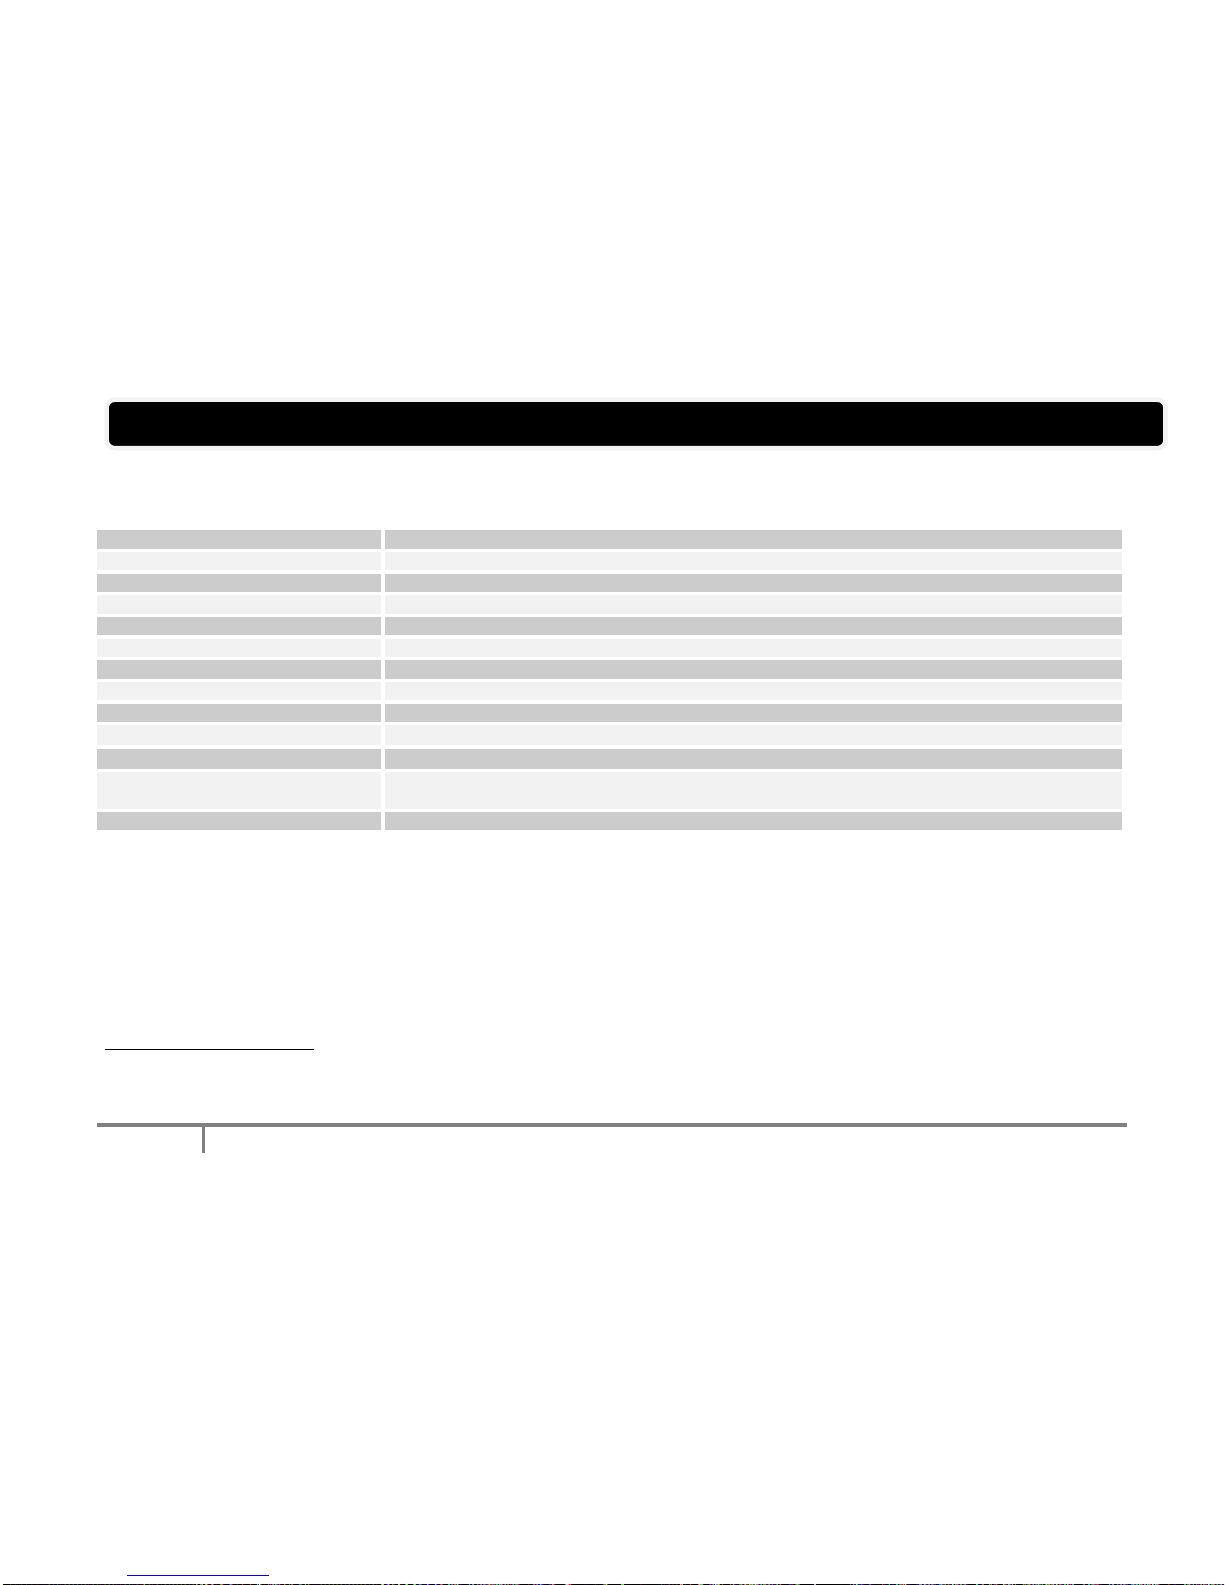
SPECIFICATIONS
20
FW-EQ7 Flex-EQ7 3
Nominal Input Level
-20 dBu
Input Impedance
1 MΩ
Nominal Output Level
-20 dBu
Output Impedance
1 kΩ
Equalizer Control
+/- 15 dB, Level Control: +/- 15 dB
Input Connector
¼” phone jack w. stereo sense
Output Connector
¼” phone jack w. stereo sense
Residual Noise Level
1 kΩ
Power Supply
DC 9 V: Dry Battery 9 V type (6F22/9 V), AC Adaptor
Option
AC adaptor
Dimensions
100 (W) x 120 (D) x 55 (H) mm
3.937(W) x 4.724(D)x 2.165(H) inches
Weight
400g
3
3
In the interest of product improvement, the specifications and/or appearance of this unit are subject to change without prior notice.
This manual suits for next models
1
Table of contents
Other Flex Waves Music Pedal manuals


