Flipper Fidelity FF STN SPK 10 M User manual

FlipperFidelityFF‐STN‐SPK‐10‐M“Flippin’FantasticBigTenInch”
SternSpeakerInstallationInstructions
ThankyouforpurchasingtheFlipperFidelityspeakerkitforaSternPinballmachine.
Yourkitincludesthefollowing:
(1) 10”WooferwithCrossover
(2) 4”Speakerswithwiringharnessandintegratedspacers
(1) 4pinto2pinadaptor(insetphoto)
(1) VolumeControlAssembly(notpictured)
(2) ½”#6WoodScrews
(4)½”FemaletoMaleHexSpacersforProandPremiumOR
(8)½”FemaletoMaleHexSpacersforLE
(2)Insulatedcrimponspadeconnectors
Pleasemakesureallpartsarepresentbeforestartingyour
installation.
Toolsrequiredforkitinstallation:
1/4”nutdriver.
5/16”nutdriver.
11/32”nutdriver.
Wireterminalcrimpingtoolw/wirecutter.
Note:Useofadrilldriverorpoweredscrewdriverisnotrecommended.Avoidover‐tightening.ThefastenersusedbyStern,and
thoseincludedinthiskit,needonlybetightenedenoughtoholdthecomponentinplaceandpreventvibrationwheninuse.
Pleaseallowapproximately30minutestoinstall.Thiskitrequiresnopermanentmodificationtothemachine.Youmaywanttotake
photosofyourparticularmachineintheeventyouwishtoaccuratelyrestoreittoits’originalconfiguration.
StepOne–MachinePreparation.
Makesureyouhaveadequatespaceavailabletoaccessthefrontandbothsidesofthemachine.Makesurethemachineisturned
offandunpluggedfromits’powersource.Toinstallthiskityouwillneedtoremovethetranslitetoaccessthebackboxspeakers,
speakerconnections,andtomountthevolumecontrol.Wooferinstallationrequiresaccesstotheinsideofthebasecabinet.Ifyou
arenotfamiliarwiththeprocedurestoaccesstheseareas,i.e.removalofthetranslite,removaloftheplayfieldglass,andraisingthe
playfieldtotheserviceposition;pleaserefertotheSternowners’manual.
StepTwo–Removetheback‐boxspeakers.
First,removethetranslite.Forsafety,Iwouldfindatowelto
drapeacrossthemachineforthespeaker/displaypaneltorest
on.Thiswillprotectbothyourspeaker/displaypanelandthe
siderailsfromgettingscratched.Laythepanelonitsfront,
spanningacrossthesiderails.Seephoto.Carefullyexaminethe
existinginstallationofthebackboxspeakers.Theflatwires
goingtothefastenersholdingtheexistingbackboxspeakersare
groundstrapswhichmustbereplacedwhenthenewspeakers
areinstalled.Thereisapieceoftapeholdingthespeakerwire
connectingthetwospeakerstogether.Carefullyremovethis
tape.Iliketouseitlater,inthesamemanner,tosecurethenew
wiringharness.

Locatetheexistingspeakerconnectorwhichconsistsoftwofour‐wireAMPconnectors.Disconnecttheconnectorcomingfromthe
speakers.Thisisagoodtimetoinstallthesuppliedfourpintotwopinadapterwithattachedtwopinz‐clip.
Youwillneeda¼”nut‐driverforspeakerremoval.Bothspeakersareattachedtoeachothersobecarefulnottoletonefall.This
couldresultindamagetothemachine.Therearefour11/32”nuts,twoforeachspeaker.Removeallfournutsandsetaside,as
youwillneedtheselater.Oncethenutsareremoved,liftthespeakersoffthestudsandsetaside.Ifinditiseasiertodotheright
onefirst,placethisspeakerinthebackbox,thenremovetheleftspeaker.Thereisonegroundwireattachedtotherightspeaker,
remembertore‐connectitwhenyouplacethenewspeakersinposition.
StepThree–Installationoftheback‐boxspeakers
Includedinthiskitareeither(4)or(8)½”hexspacers.Youwill
needthemforthisstep.Thequantityof(4)areforaProand
Premiumandthequantity(8)areforanLEversion.
Attachthewiringharnesstooneofthe4”speakers,connecting
thebluespadeconnectors;thewideconnectortothewide
terminal(alsomarked“‐“),thenarrowconnectortothenarrow
terminal(alsomarked“+”).Thesystemcamewithfouroreight
½”femaletomalespacerswhichacttoextendthestudsto
accommodatethespacerringonthefrontoftheFlipperFidelity
Speakers.Theseneedtobescrewedontothefouroreightposts
atthispoint.
Then,placethisspeaker(withthewiresattached)totherightof
thedisplay.Thewiresandspeakerterminalswillbeclosesttothe
backbox.Youmaytightenthemwitha¼”nutdriverorsmall
wrench.Afterthespacersareinplaceputthespeakeronthespacers.Thiswilltakealittlemuscle.Theywillgoon,butthespeaker
screwholesaretight.Oncethespeakersareontheposts,thenreplacethefouroriginalscrewstosecurethespeakerstothe
spacers.
Attachtheremainingspeaker,inthesamemanner,totheleftof
thedisplay.Runthewirewiththepinkspadeconnectorsfrom
therightspeakertotheleftspeakerand,followingthesame
convention,carefullypushthemontotheircorresponding
speakerterminals.Ifyoupurchaseda“VolumeControlDelete”
speakersystem,connectthenewspeakerharnesstothe2‐pin
connectorwhereyoudisconnectedthefactoryspeakers,andyou
aredonewiththebackboxspeakers.Proceedtostep5,the
removalofthecabinetspeaker.
StepFour–VolumeControlInstallation.
MountingtheVolumeControl
Severaloptionsexistformountingthevolumecontrol.The
volumecontrolisattachedtoametalL‐bracketwithtwosmall
holesontheside.Youcanmountthevolumecontrolusingthe
two½”#6screwsprovided.Thescrewswillfitsnuglyintothe
holesandcaneasilybedriveninbyhandwitha¼”nutdriver.The
volumecontrolassemblycanbescrewedinanywhereontheright
sideofthebackbox.Iliketoattachitverylow,justbehindthe
speakerpanel.ThisgivesenoughroomtoaddaFlipperFidelity
LEDPanel.
Hereyoucanseethevolumecontrolmountedtothebackbox
speakerpanelusingoneoftheLEDdisplaypanelmounting
screws.

Thevolumecontrolcanbeconvenientlymountedtotheinsideofthe
coindoorwiththeadditionoftheFlipperFidelitySternVolumeControl
CoindoorRelocationKit.ContactFlipperFidelityforkitdetailsandpricing.
ConnectingtheVolumeControl.
Therearetwowirescomingoffthevolumecontrol.Oneis2”
shorterthantheother.Theshorterwirehasaz‐clipattachedto
it.Thisshorterwireconnectstotheconnectorcomingoffyour
newbackboxspeakers.Thelongerwireconnectstothelead
comingofftheboard.(Thisiswhereyoudisconnectedthestock
speakersandinsertedthe4pintotwopinadaptor.)
StepFive–Removalofthebasecabinetspeaker.
Locatethespeakerinthebaseofthecabinetbyraisingthe
playfieldtotheserviceposition.Cutthewiresgoingtotheexisting
woofer.Youwillwanttocutthemasclosetothespeaker
terminalsaspossible.Usinga5/16”nutdriver,removeallfour
nutsholdingthespeakerinplaceandremovethespeaker.Place
thespeakerasideasyounolongerwillbeusingthis.Keepthe
nutsasyouneedtheseinthenextstep.
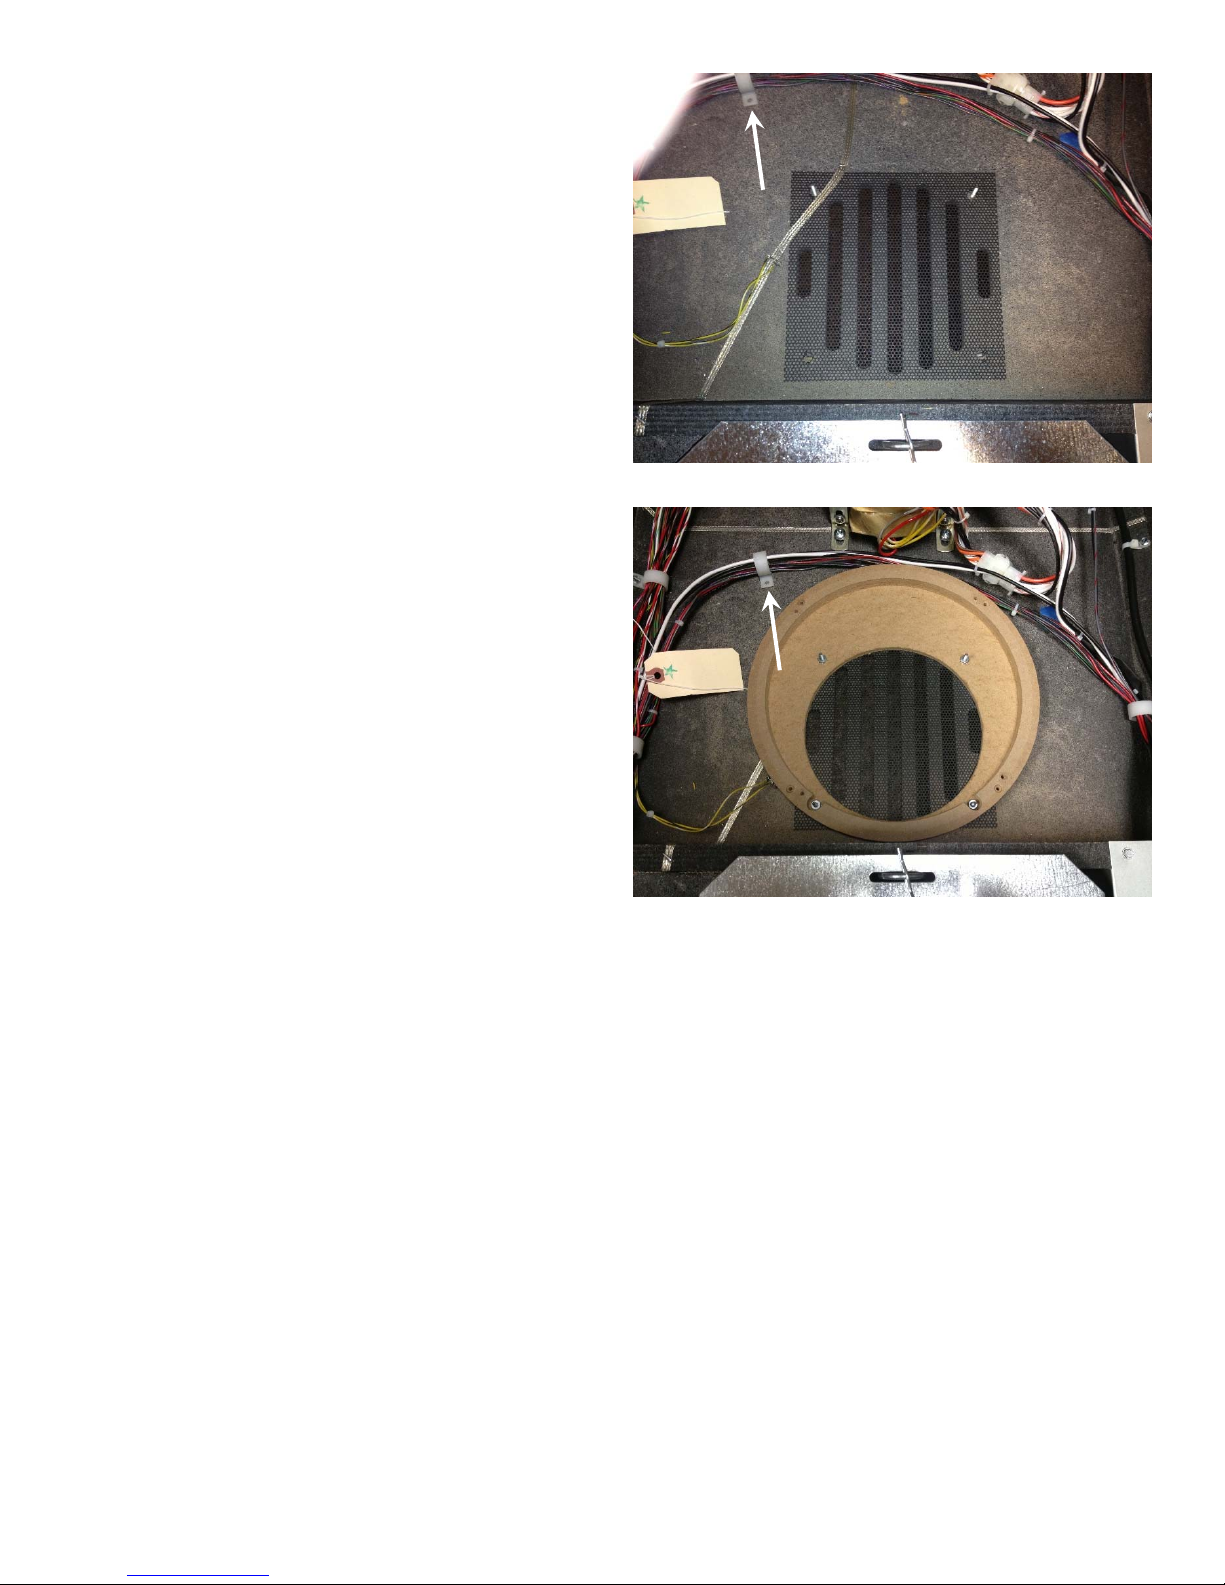
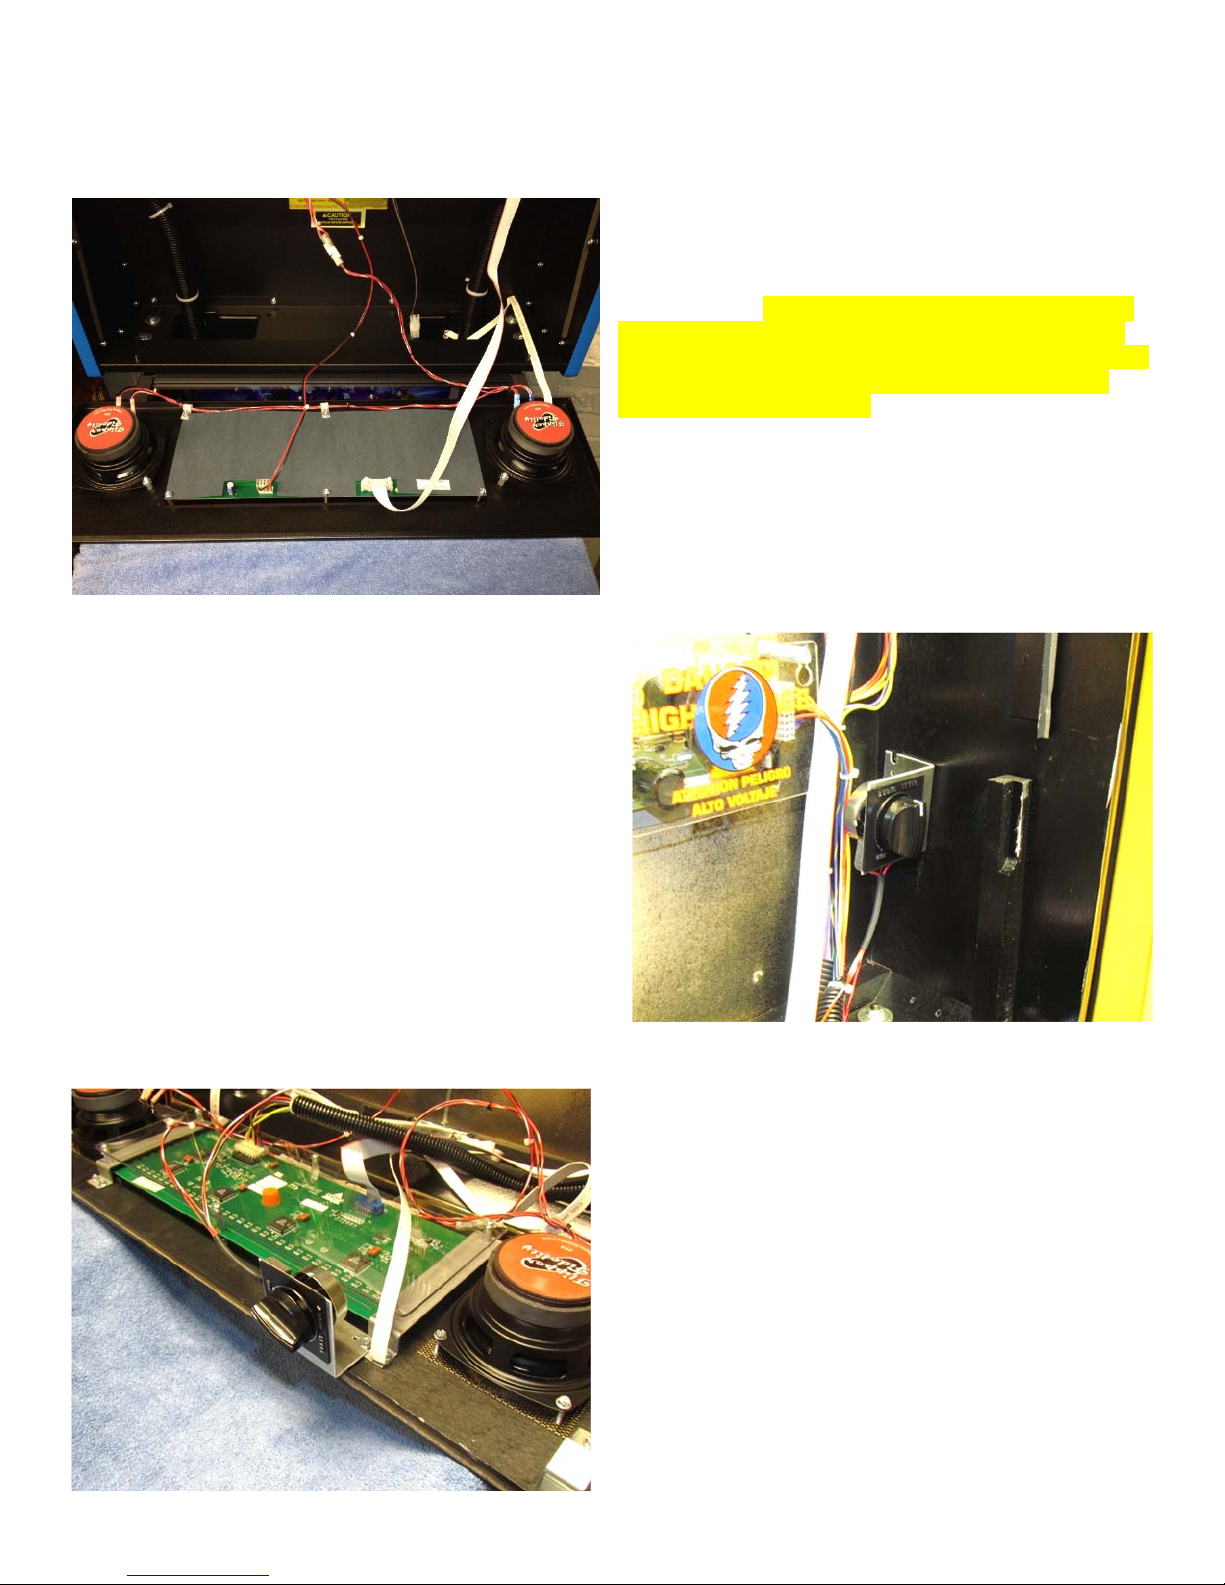
StepSix–Installingthewooferspacer/adaptor.
Testfitthewooferspacer,lookingforinterferencewiththe
bundleofwirescrossingthebasecabinetjustinfrontofthelarge
powertransformer.Itmaybenecessarytoremoveorrelocatethe
nyloncablestraptogainclearance(seephotos).Someofthe
wiresmaynothaveenoughslacktoclearthespacer.Inthatcase,
removethosewiresfromthebundleandre‐routethemalongthe
woodstringeratthebackofthecashdrawer.Onceyouhave
resolvedanyclearanceissues,fastenthespacerinplacewiththe
nutssavedfromtheremovaloftheoriginalwoofer.
StepSeven–Installingthenewwoofer.
Yournewwoofermountstothespacerringwiththefour#8screws.Iliketohavethex‐overtotheleftofthespeakerasshown
below.Crimpthefemalespadeterminalsontotheexistingspeakerwire.Thewirewiththewhitestripeconnectstothe“neg”
terminalonthewoofer.Hereiswhereyouhaveachoice.Thenewwooferhastwopositiveterminals.The“high”isthestandard
input.Itinnowayaffectstheoutputofthewoofer.The“low”reducesthewooferoutputbyabout4db,aminorreduction,buta
reduction.Thisisawaytofurthertunethesoundtoyourliking.Trythehighsettingfirst,thentrythelow.Leaveitwhereyoulike
itbest.

StepSeven–Adjustthevolumecontrol.
Thiswillbedonetotaste.Remember,thevolumecontrolyoujustinstalledaffectsonlythebackboxspeakers.Themachinevolume
controlaffectsallspeakers,thusitcanbethoughtofasamastervolumecontrol.Isuggestsettingthemachinevolumesomewhere
between45and54,dependingondesiredimpact.Thenadjustthebackboxspeakervolumetoobtainagoodoverallbalance.
Thankyouforyourpurchase.Ifneededcontactmeat:
MichaelPupo
610.223.4082


