Flipper Bally System 11 User manual

FlipperFidelityWilliams/Bally“System11”SpeakerInstallation
Instructions
ThankyouforpurchasingtheFlipperFidelityspeakerkitforaWilliams/BallySystem11Pinballmachine.Yourkitshouldincludethe
following:
(1) 5”Speaker
(1)6”Speaker
(1) 5”speakerspacer
(1) Backboxspeakerwiringharness
(2) Speakerwiringharnessadaptors
(1) VolumeControlAssembly
(1) 8”Wooferwithcrossoverattached
(1) Wooferspacer
(4) 1”#8panheadscrews
(2) ½”#6hexheadscrews
(4) ½”#8Phillip’strussheadscrews
Pleasemakesureallpartsarepresentbeforestarting
yourinstallation.
Toolsrequiredforkitinstallation:
1/4”nutdriver.
5/16”nutdriver
MediumPhillip’sscrewdriver
Note:Useofadrilldriverorpoweredscrewdriverisnotrecommended.Avoidover‐tightening.ThefastenersusedbyWilliams/
Bally,andthoseincludedinthiskit,needonlybetightenedenoughtoholdthecomponentinplaceandpreventvibrationwhenin
use.
Pleaseallowapproximately30minutestoinstall.Thiskitrequiresnopermanentmodificationtothemachine.Youmaywanttotake
photosofyourparticularmachineintheeventyouwishtoaccuratelyrestoreittoits’originalconfiguration.
StepOne–MachinePreparation.
Makesureyouhaveadequatespaceavailabletoaccessthefrontandbothsidesofthemachine.Makesurethemachineisturned
offandunpluggedfromits’powersource.To
installthiskityouwillneedtoremovethe
translitetoaccessthebackboxspeakers,speaker
connections,andtomountthevolumecontrol.
Wooferinstallationrequiresaccesstotheinside
ofthebasecabinet.Ifyouarenotfamiliarwith
theprocedurestoaccesstheseareas,i.e.removal
ofthetranslite,removaloftheplayfieldglass,and
raisingtheplayfieldtotheserviceposition;please
refertotheWilliams/Ballyowners’manual.
StepTwo‐Back‐boxspeakerremoval.
First,removethetranslite.Forsafety,Iwould
findatoweltodrapeacrossthemachineforthe
speaker/displaypaneltoreston.Thiswillprotect
bothyourspeaker/displaypanelandthesiderails
fromgettingscratched.Laythepanelonitsfront,
spanningacrossthesiderails.Seephoto.
Carefullyexaminetheexistinginstallationofthe
backboxspeakers.Notetheroutingofthestock
wiring.Thegreenwiregoingtooneofthe
fastenersholdingtheexistingbackboxspeakersisagroundwirewhichmustbere‐attachedwhenthenewspeakersareinstalled.
B

Youwillneedtodisconnectthespeaker
wiringfromtwoareas:thelower‐right
2‐pinconnector(B),locatedatthe
speakers,and,asinglepinconnector
(A),locatedwithinthewiringinthe
backbox.Keeptabsonthisconnector
asyouwillbeconnectingittothenew
wiringharnessadaptorinalaterstep.
Now,workingyourwaybacktothe
speakers,removetheharnessfromthe
variousclipsandremovetheharness
fromthebackbox.
StepThree–Installationoftheright3”speaker.
UsingaPhillipsheadscrewdriver,removebothspeakers.Placethespeakersandtheirwiringharnessaside,asyouwillnolonger
needthem.Holdontothescrews,asyouwillneedthesetoinstallthenewspeakers.Startwiththerightspeaker,thentheleft.The
fourpicturesbelowshowtheprocess.Reusethefouroriginalscrewstomountthe5”adaptor,thenusethefoursupplied½”screws
tomountthespeaker.
A
B

StepFour–Installationoftheleft6”speaker.
Nowinstalltheleftspeaker.Thisisadirectfit.Reusetheoriginalscrewsforthisspeaker.Keepinmindyouneedtoreattachthe
groundwires.
Atthispointbothspeakersshouldbeinstalledwheretheoriginalsoncewere.Routethenewwiringthroughthenylonclipsonthe
speakerpanel,andmaketheconnectionwithpoint“A”usingthe2‐pinadaptor.Ifyoupurchasedaspeakersystemwith“Volume
ControlDelete”youarefinishedwiththebackboxspeakers,continuetoStep6.
StepFive–Installingthevolumecontrol.
MountingtheVolumeControl.
Severaloptionsexistformountingthevolumecontrol.The
volumecontrolisattachedtoametalL‐bracketwithtwosmall
holesontheside.Youcanmountthevolumecontrolusingthe
two½”#6screwsprovided.Thescrewswillfitsnuglyintothe
holesandcaneasilybedriveninbyhandwitha¼”nutdriver.The
volumecontrolassemblycanbescrewedinanywhereontheright
sideofthebackbox.Hereit’sshownmountedhighontheright
side,justinfrontofthemetalbackplane.
ThevolumecontrolcanbemountedanywherewiththeadditionoftheFlipperFidelityWPCVolumeControlRelocationKit.Shownin
theleftphoto,itisusedtorelocatethevolumecontroltothebasecabinet,makingthevolumecontrolaccessiblethroughthecoin
door.Atrightitisshownattachedtothecoindoor.ContactFlipperFidelityforkitdetailsandpricing.
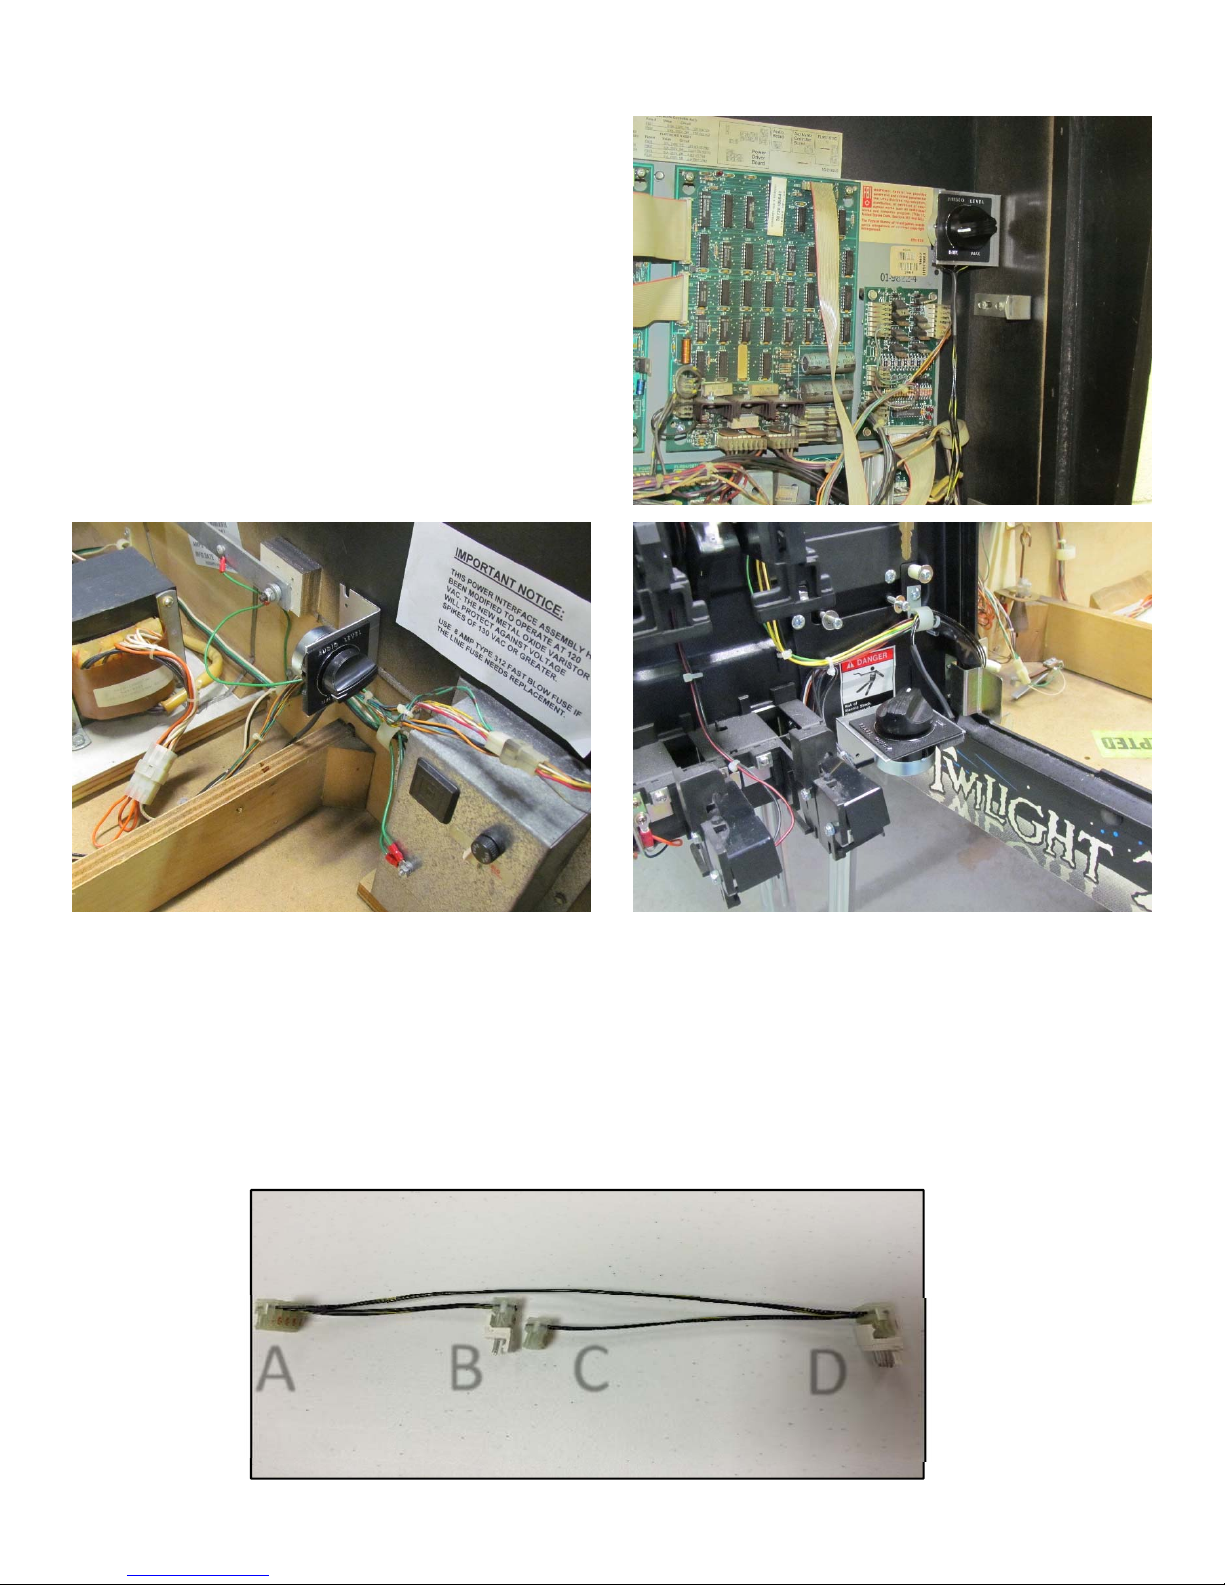
Connectingthevolumecontrol.
Connectthewiringharnessadaptortothe4‐pinconnectoronthelower‐rightcorneroftheaudioboard(A).Connecttheone‐pin
connectortotheexistingconnector(B).
ABCD

Connectingthevolume
controlleads.
Theshorterleadfromthe
volumecontrolisconnected
totheleadcomingfromthe
backboxspeakerwiring
harness(B).Thelongerlead
fromthevolumecontrolis
connectedtothewiring
harnessadaptor(C).The
volumecontrolandthe
wiringharnessadaptorare
providedwithwhite“z‐clip”
adaptorspre‐installedinthe
properpositionsto
eliminatethepossibilityof
makingawrongconnection.Routethewirethroughexistingclipsandcoilupanyexcesslengthofwire.Re‐installthe
speaker/displaypanelandbackglass.Youarereadytomoveontothewooferinstallation.
StepSix–Removalofthebasecabinetspeaker.
Locatethespeakerinthebaseofthecabinetbyraisingtheplayfieldtotheserviceposition.Thespeakerisheldinplacewithfour
nuts.Disconnectthetwowires,andremoveallfournutsandwasherstoremovethespeaker.Placethespeakerasideasyouno
longerwillbeusingthis.Keepthenutsasyouwillneedtheseinthenextstep.Seephotosbelow.
A
B
C
D
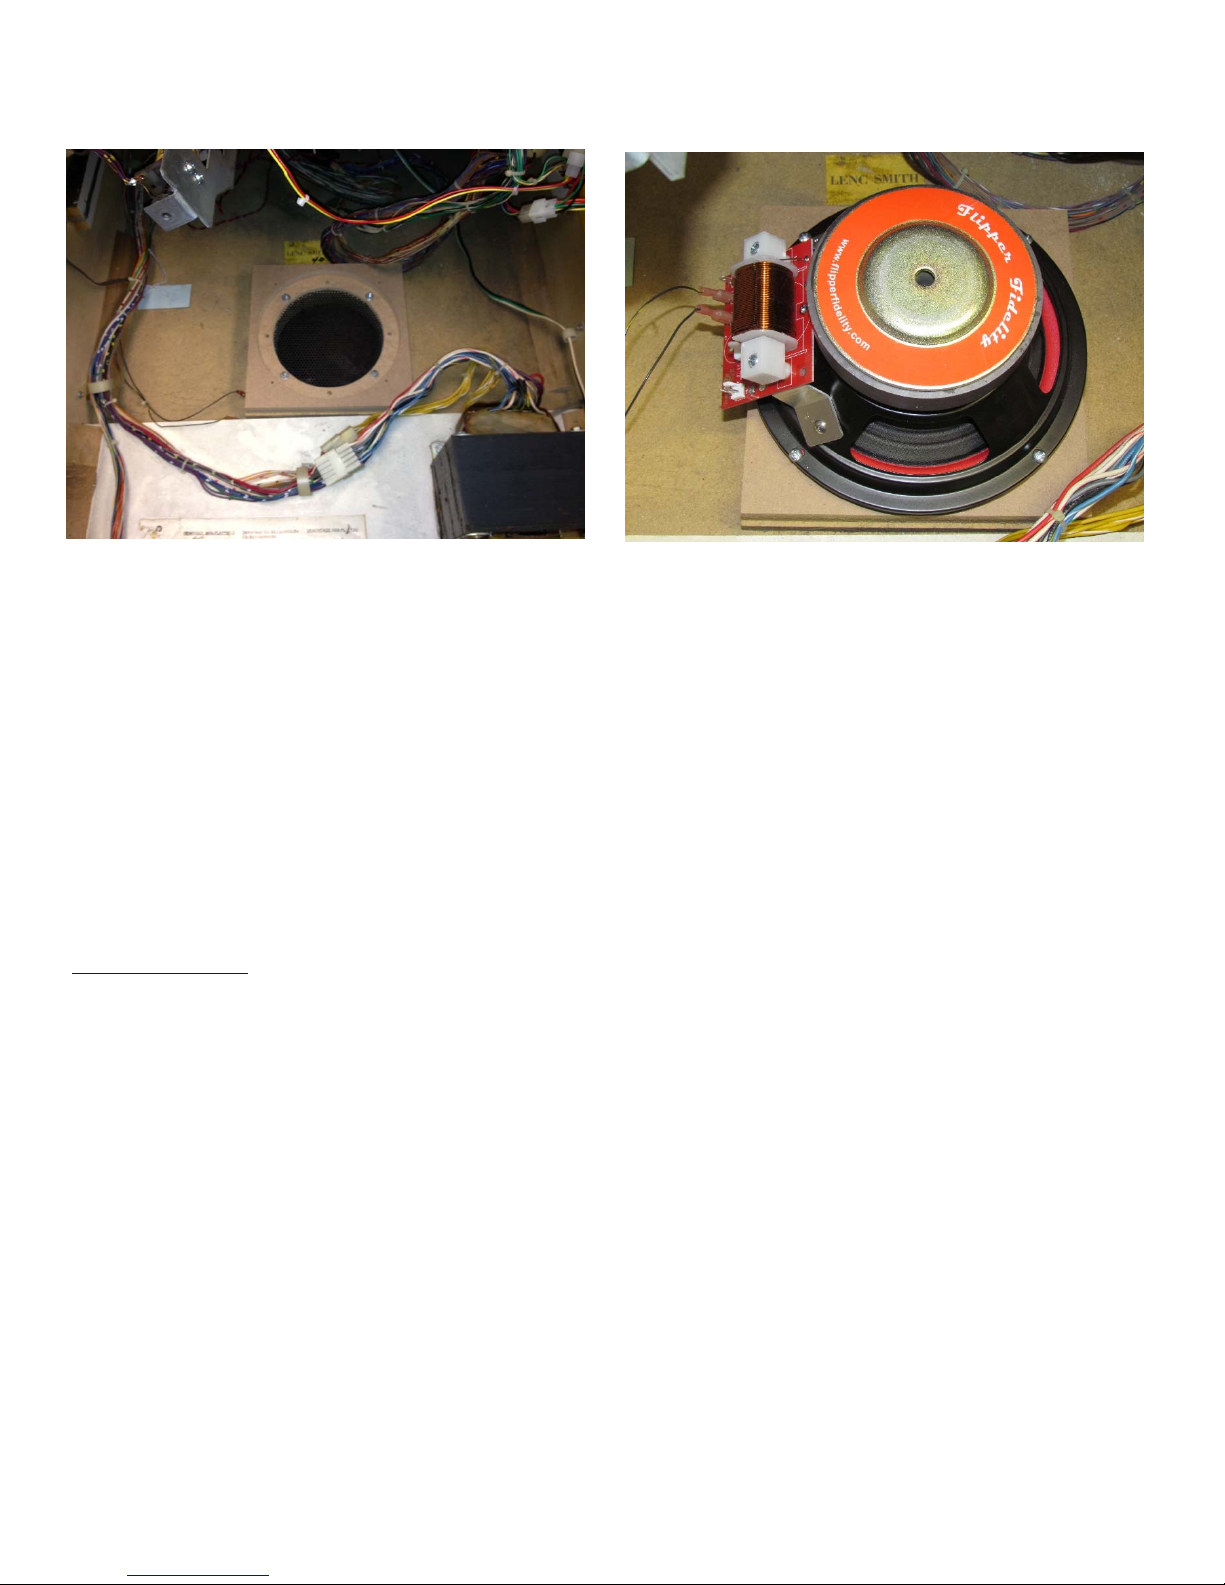
StepSeven–Installingthewoofer.
Usetheoriginalnutsandwasherstoattachthespacertothefourstuds.Seephoto.
Mountthewoofertothespacerusingthefour1”#8panheadscrews.Iliketohavethex‐overtotheleftofthespeakerasshown.
Connecttheexistingspeakerwirestothetapsonthenewspeaker;black/yellowtothepositiveterminal,andsolidblacktothe
negativeterminal.Thereisalowandhighpositiveterminalonthecrossover.The“high”isthestandardinput.Itinnowayaffects
theoutputofthewoofer.The“low”reducesthewooferoutputbyabout4db;aminorreduction,butareduction.Thisisawayto
furthertunethesoundtoyourliking.Trythehighsettingfirst,thentrythelow.Leaveitwhereyoulikeitbest.
StepEight–Adjustthevolumecontrol.
Thiswillbedonetotaste.Youwillneedtofindahappymediumbetweenthemachineselectronicvolumeandthelevelcontrol
suppliedwiththekit.Isuggestsettingthemachinesvolumeatabout15,andthelevelcontrolatitslowestvolume.Slowlyraisethe
levelcontroluntilthewooferandtheback‐boxspeakerssoundabouteven.Fromhereyouwanttofinetunethetwocontrolsuntil
youachievetheamountofbassyoudesire.
Thankyouforyourpurchase.Ifneeded,contactmeat:
MichaelPupo
610.223.4082
Table of contents


