Fluid 8004576B User manual

1
HDMI DVD Player
with USB
Instruction Manual
Please read this User Manual carefully to ensure proper use of this product and keep this manual for future reference.
8004576B
Up
converting
DVD/DVD+/-R/
DVD+/-RW/CD/
CD-R/CD-RW/Kodak
picture formats
HDMI
1080p


1
Contents
Important Safety Instructions ..........................................................2-5
FCC/ICES-003 .....................................................................2
About Discs..............................................................................6
Product Overview........................................................................7
Remote Control Overview ..............................................................8-9
Operating the Remote Control ..........................................................10
Battery Installation ...............................................................10
Remote Control Operation Range .................................................10
Connections ........................................................................ 11-13
Connecting To TV Through VIDEO Output Jacks ...................................11
Connecting To TV Through YUV Output Jacks .....................................11
Connecting To TV Through 5.1-CHANNEL Output Jacks............................12
Connecting To TV Through HDMI Output .........................................12
Connecting To TV Through COAXIAL Output Jack..................................13
Connecting To USB Port ..........................................................13
Operating Systems.................................................................. 14-18
Playback of a DVD ............................................................ 14-16
Playback of a CD .................................................................17
JPEG (picture) Discs Operation ....................................................18
System Setup ....................................................................... 19-20
General Setup Page ..............................................................19
Audio Setup Page ................................................................19
Dolby Setup Page ................................................................20
Video Setup Page ................................................................20
Preference Setup Page............................................................20
Care and Maintenance ..................................................................21
Troubleshooting ........................................................................22
Specifications...........................................................................23
Warranty ...............................................................................24
2
CAUTION
RISK OF ELECTRIC SHOCK
DO NOT OPEN
CAUTION:
• THISDIGITALVIDEODISCPLAYEREMPLOYSA
LASERSYSTEM.
• TOENSUREPROPERUSEOFTHISPRODUCT,
PLEASEREADTHISOWNER`SMANUALCAREFULLY
ANDRETAINFORFUTUREREFERENCE.
• SHOULDTHEUNITREQUIREMAINTENANCE,
CONTACTANAUTHORIZEDSERVICEPROVIDER.
• MISUSEOFCONTROLS,ADJUSTMENTSTOTHE
UNITORTHEPERFORMANCEOFPROCEDURES
OTHERTHANTHOSESPECIFIEDHEREINMAY
RESULTINHAZARDOUSRADIATIONEXPOSURE.
• TOPREVENTDIRECTEXPOSURETOLASER
BEAM,DONOTTRYTOOPENTHEENCLOSURE.
VISIBLELASERRADIATIONMAYBEPRESENT
WHENTHEENCLOSUREISOPENED.
•DONOTSTAREINTOBEAM.
WARNING:
TOREDUCETHERISKOFFIREORELECTRICSHOCK,
DONOTEXPOSETHISPRODUCTTORAINOR
MOISTURE.
WARNING:
TOREDUCETHERISKOFFIREORELECTRIC
SHOCK,ANDANNOYINGINTERFERENCE,USETHE
RECOMMENDEDACCESSORIESONLY.
SURGE PROTECTORS:
It is recommended to use a surge protector for AC
connection.LightningandpowersurgesARENOT
covered under warranty for this product.
CAUTION:TOREDUCETHERISKOFELECTRICSHOCK,
DONOTREMOVECOVER(ORBACK).NOUSER-
SERVICEABLEPARTSINSIDE.REFERSERVICINGTO
QUALIFIEDSERVICEPERSONNEL.
The FCC Wants You to Know
This equipment has been tested and found to comply with the
limitsforaClassBdigitaldevice,pursuanttoPart15oftheFCC
Rules. These limits are designed to provide reasonable protection
against harmful interference in a residential installation.
Thisequipmentgenerates,usesandcanradiateradio
frequencyenergyand,ifnotinstalledandusedinaccordance
withtheinstructions,maycauseharmfulinterferenceto
radiocommunications.However,thereisnoguaranteethat
interference will not occur in a particular installation.
If this equipment does cause harmful interference to radio or
televisionreception,whichcanbedeterminedbyturningthe
equipmentoandon,theuserisencouragedtotrytocorrect
the interference by one or more of the following measures:
•Reorientorrelocatethereceivingantenna.
•Increasetheseparationbetweentheequipmentand
receiver.
•Connecttheequipmentintoanoutletonacircuitdierent
from that to which the receiver is connected.
•Consultthedealeroranexperiencedradio/TVtechnicianfor
additional suggestions.
Anychangesormodicationsnotexpresslyapprovedby
the party responsible for compliance could void the user’s
authority to operate the equipment. Where shielded interface
cables have been provided with the product or specied
additional components or accessories elsewhere dened to
beusedwiththeinstallationoftheproduct,theymustbe
used in order to ensure compliance with FCC regulation.
This Class B digital apparatus complies with Canadian
ICES-003.
The lightning ash with arrowhead symbol within an equilateral
triangle is intended to alert the user to the presence of uninsulated
dangerous voltage within the product’s enclosure that may be of
sucient magnitude to constitute a risk of electric shock to persons.
Theexclamationpointwithinanequilateraltriangleisintended
to alert the user to the presence of important operating and
maintenance (servicing) instructions in the literature accompanying
the appliance.
DANGER:Invisibleandhazardouslaserradiationwhenopenand
interlockfailedordefeated.Avoiddirectexposuretobeam.
Important Safety Instructions
WARNING:
USEUNDERSUPERVISIONOFANADULTDUETOLONGCORD
ThisunithasalongACcordorotherlongcordthatcaneasilybetrippedonorpulledon,causinginjury,
Pleasemakesureitisarrangedsoitwillnotdrapeoveratabletop,etc.whereitcanbepulledonby
children or tripped over accidentally.
EXERCISE CAUTION AS UNIT HAS SHARP POINTS.
ManufacturedunderlicensefromDolbyLaboratories.
Dolbyandthedouble-DsymbolaretrademarksofDolbyLaboratories.

3
Beforeusingtheunit,besuretoreadalloperatinginstructionscarefully.Pleasenotethatthesearegeneral
precautionsandmaynotpertaintoyourunit.Forexample,thisunitmaynothavethecapabilitytobe
connected to an outdoor antenna.
1) Read these instructions.
All the safety and operating instructions should be read before the product is operated.
2) Keep these instructions.
The safety and operating instructions should be retained for future reference.
3) Heed all warnings.
All warnings on the product and in the operating instructions should be adhered to.
4) Follow all instructions.
All operating and use instructions should be followed.
5) Do not use this apparatus near water.
Donotusethisproductnearwaterandmoisture,forexample:nearabathtub,washbowl,kitchensinkor
laundry tub; in a wet basement; or near a swimming pool.
6) Clean only with dry cloth.
Unplug this product from the wall outlet before cleaning. Do not use liquid cleaners or aerosol cleaners.
Use a dry cloth for cleaning.
7) Do not block any ventilation openings. Install in accordance with the manufacturers instructions.
Slots and openings in the cabinet and in the back or bottom are provided for ventilation to ensure reliable
operation of the product and to protect it from overheating. These openings must not be blocked or
covered.Theopeningsshouldneverbeblockedbyplacingtheproductonabed,sofa,rugorothersimilar
surface. This product should never be placed near or over a radiator or heat source. This product should
not be placed in a built-in installation such as a bookcase or rack unless proper ventilation is provided or
the manufacturer’s instructions have been adhered to.
8) Do not install near any heat sources such as radiators, heat registers, stoves, or other apparatus
(including ampliers) that produce heat.
9) Do not defeat the safety purpose of the polarized or grounding-type plug. A polarized plug has two
blades with one wider than the other. A grounding type plug has two blades and a third grounding
prong. The wide blade or the third prong are provided for your safety. If the provided plug does not
t into your outlet, consult an electrician for replacement of the obsolete outlet.
10) Protect the power cord from being walked on or pinched particularly at plugs, convenience
receptacles, and the point where they exit from the apparatus.
11) Only use attachments/accessories specied by the manufacturer.
12) Use only with the cart, stand, tripod, bracket, or table specied by the manufacturer,
or sold with the apparatus. When a cart is used, use caution when moving the cart/
apparatus combination to avoid injury from tip-over.
Anapplianceandcartcombinationshouldbemovedwithcare.Quickstop,excessiveforce
and uneven surfaces may cause the appliance and cart combination to overturn.
13) Unplug this apparatus during lightning storms or when unused for long periods of time.
Toprotectyourproductfromalightningstorm,orwhenitisleftunattendedandunusedforlongperiods
oftime,unplugitfromthewalloutletanddisconnecttheantennaorcablesystem.Thiswillprevent
damage to the product due to lightning and power-line surges.
14) Refer all servicing to qualied service personnel. Servicing is required when the apparatus has
been damaged in any way, such as power-supply cord or plug is damaged, liquid has been spilled or
objects have fallen into the apparatus, the apparatus has been exposed to rain or moisture or does
not operate normally, or has been dropped.
15) Power source
This product should be operated only from the type of power source indicated on the marking label.
Ifyouarenotsureofthetypeofpowersupplytoyourhome,consultyourappliancedealerorlocalpower
company.
Forproductsintendedtooperatefrombatterypower,orothersource,refertotheoperationinstructions.
16) Power lines
An outside antenna system should not be located in the vicinity of overhead power lines or other electric
lightorpowercircuits,orwhereitcanfallintosuchpowerlinesorcircuits.Wheninstallinganoutside
antennasystem,extremecareshouldbetakentokeepfromtouchingsuchpowerlinesorcircuitsas
contact with them might be fatal.
Important Safety Instructions

4
17) Overloading
Donotoverloadwalloutletsandextensioncordsasthiscanresultinariskofreorelectricshock.
18) Object and liquid entry
Neverpushobjectsofanykindintotheproductthroughopeningsastheymaytouchdangerousvoltage
pointsorshortoutpartsthatcouldresultinreorelectricshock.Neverspillorsprayanytypeofliquidon
the product.
19) Outdoor antenna grounding
Ifanoutsideantennaisconnectedtotheproduct,be
sure the antenna system is grounded so as to provide
some protection against voltage surges and built up
staticcharges.Section810oftheNationalElectricCode
ANSI/NFPA70providesinformationwithrespectto
propergroundingofthemastandsupportingstructure,
grounding of the lead-in wire to an antenna discharge
product,sizeofgroundingconductors,locationof
antenna-dischargeproduct,connectiontogrounding
electrodes and requirements for the grounding
electrodes.
20) Service
Donotattempttoservicethisproductyourselfasopeningorremovingcoversmayexposeyouto
dangerousvoltageorotherhazards.Referallservicingtoqualiedservicepersonnel.
21) Replacement parts
Whenreplacementpartsarerequired,besuretheservicetechnicianusesreplacementpartsspecied
bythemanufacturerorthosethathavethesamecharacteristicsastheoriginalparts.Unauthorized
substitutionsmayresultinreorelectricshockorotherhazards.
22) Safety check
Uponcompletionofanyserviceorrepairstothisproduct,asktheservicetechniciantoperformsafety
checks to determine that the product is in proper operating condition.
23) Wall or ceiling mounting
The product should be mounted to a wall or ceiling only as recommended by the manufacturer.
24) Damage requiring service
Unplug this product from the wall outlet and refer service to qualied service personnel under the
following conditions.
a) When the power-supply cord or plug is damaged.
b) Ifliquidhasbeenspilledorobjectshavefallenintotheproduct.
c) Iftheproducthasbeenexposedtorainorwater.
d) Iftheproductdoesnotoperatenormallybyfollowingtheoperatinginstructions.Adjustonlythose
controlsthatarecoveredbytheoperatinginstructions,asanadjustmentofothercontrolsmayresult
indamageandwillrequireextensiveworkbyaqualiedtechniciantorestoretheproducttoits
normal operation.
e) If the product has been dropped or the cabinet has been damaged.
f) Whentheproductexhibitsadistinctchangeinperformance-thisindicatesaneedforservice.
25) Note to CATV system installer
ThisreminderisprovidedtocalltheCATVsysteminstaller’sattentiontoArticle820-40oftheNECthat
providesguidelinesforpropergroundingand,inparticular,speciesthatthecablegroundshallbe
connectedtothegroundingsystemofthebuilding,asclosetothepointofcableentryaspractical.
NOTE:
Refer all servicing to qualied service personnel. Servicing is required when the unit has been damaged
in any way such as the following: the power-supply cordor plug has been damaged, liquid has been
spilled into unit, the unit has been exposed to rain or moisture, the unit has been dropped or the unit
does not operate normally.
Important Safety Instructions

5
NOTES ON HANDLING:
• WhenshippingtheDVDplayer,alwaysusethe
original shipping carton and packing materials.
Formaximumprotection,repacktheunitasit
was originally packed at the factory.
• Donotusevolatileliquids,suchasinsect
spray,neartheDVDplayer.Donotleave
rubber or plastic products in contact with the
DVD player for a long time. They will leave
marks on the nish.
• The top and rear panels of the DVD player
may become warm after a long period of use.
This is normal and not a malfunction.
• WhentheDVDplayerisnotinuse,besureto
remove the disc and turn o the power.
NOTES ON LOCATING THE DVD
PLAYER:
• When you place this DVD player near a
TV,radioorVCR,theplaybackpicture
may become poor and the sound may be
distorted.Inthiscase,movetheDVDplayer
awayfromtheTV,radioorVCR.
NOTES ON CLEANING:
Useasoft,dryclothforcleaning
• Forstubborndirt,soaktheclothinaweak
detergentsolution,wringwellandwipe.Usea
dry cloth to wipe it dry. Do not use any type
ofsolvent,suchasthinnerandbenzene,asthis
may damage the surface of the DVD player.
• If you use a chemical-saturated cloth to clean
theunit,followthatproduct’sinstructions.
NOTES ON MOISTURE CONDENSATION:
Moisture condensation damages the DVD
player. Please read the following carefully.
• Moisturecondensationoccurs,forexample,when
you pour a cold drink into a glass on a warm day.
Drops of water form on the outside of the glass.
Inthesameway,moisturemaycondenseonthe
opticalpick-uplensinsidethisunit,oneofthe
most crucial internal parts of the DVD player.
Moisture condensation occurs during the
following cases:
• When you bring the DVD player directly from a cold
place to a warm place.
• When you use the DVD player in a room where you
justturnedontheheater,oraplacewherethecold
wind from the air conditioner directly hits the unit.
• lnthesummer,whenyouusetheDVDplayerina
hotandhumidplacejustafteryoumovedtheunit
from an air conditioned room.
• When you use the DVD player in a humid place.
Do not use the DVD player where moisture
condensation may occur.
• lfyouusetheDVDplayerinsuchasituation,itmay
damagediscsandinternalparts.Removethedisc,
connect the power cord of the DVD player to the
walloutlet,turnontheDVDplayerandleaveitON
fortwoorthreehours.Aftertwoorthreehours,the
DVD player will have warmed up and evaporated
any moisture. Keep the DVD player connected to
the wall outlet and moisture condensation will
seldom occur.
Important Safety Instructions
Power Source
Insert the AC plug (with 2 blades) into a conveniently located AC outlet rated at
120V~60Hz.
NOTE: The AC plugsuppliedwiththeunitispolarizedtohelpminimizethe
possibilityofelectricshock.IftheACplugdoesnottintoanonpolarizedAC
outlet,donotleorcutthewideblade.Itistheuser’sresponsibilitytohavean
electrician replace the obsolete outlet.
Warning:
Cleaningandadjustmentoflensesand/or
other components of playback mechanism
should be performed by a qualied service
technician.
WHAT’S IN THE BOX?
1xInstructionManual
1xRemoteControl
2xAAASizeBatteriesfor
Remote Control
1xAVConnectionCable

6
PLAYABLE DISCS:
The following discs can be played back on this DVD player:
DISC TYPES:
DVD
Data on most DVDs is divided into sections called titles and
thenintosubsectionscalledchapters,eachofwhichisgiven
a title or chapter number. Some features of this DVD player
will not operate with some DVD discs as they are preset. If
afunctionyouselecteddoesnotrunasdesired,refertothe
manual accompanying the DVD disc.
Compatible with DVD/DVD±R/DVD±RW/Kodak Picture
JPEG/MP4.
AUDIO CD:
DataonanaudioCDisdividedintosectionscalledtracks,
each of which is given a track number.
Compatible with CD/CD-R/CDRW/MP3.
IMPORTANT:
ItisimportantthatyoureadthemanualthataccompaniestheDVDdisc,astherearefeaturesthat
areontheDVDplayerthatcannotbeusedwithcertainDVDs.Therearealsoextrafeaturesonthe
DVDdiscthataredierentforeachDVDdisc,sotheyarenotexplainedinthisowner’smanual.
This player conforms to the NTSC and PAL color systems. However, if you are in the USA,
Canada or Mexico, leave this setting on NTSC. If incorrectly set to PAL, theTV picture may roll
vertically. In this case, set the TV system to NTSC as specied.
Notes on Copyright:
Itisforbiddenbylawtocopy,broadcast,show,broadcastoncable,playinpublicandrent
copyrightedmaterialwithoutpermission.DVDvideodiscsarecopyprotected,andanyrecordings
made from these discs will be distorted. This product incorporates copyright protection
technology that is protected by method claims of certain U.S. Patents and other intellectual
propertyrightsownedbyMacrovisionCorporation,andisintendedforhomeandotherlimited
viewingusesonly,unlessotherwiseauthorizedbyMacrovisionCorporation.Reverseengineering
or disassembly is prohibited.
Region management information:
This DVD Player is designed and manufactured to respond to the Region Management Information
that is recorded on a DVD disc. If the Region number described on the DVD disc does not
correspondtotheRegionnumberofthisDVDplayer,thisDVDplayercannotplaythatdisc.You
may not be able to play back some DVD video discs on this player if they were purchased from
outside your geographic area or made for business purposes. When you try to play back an
unauthorizeddisc,WrongRegionappearsontheTVscreen.
About Discs
THEREGIONNUMBERFORTHISDVDPLAYERIS:
See below for information regarding region numbers. 1

7
Product Overview
Front View
Rear View
1. ( )PowerON/Standby
Button
2. Disc Tray
3. Remote Control Receiver
4. LEDDisplay
1. PowerCableto120V~60HzPowerSource
2. 5.1 Channel Jack
3. DigitalCoaxialAudioOutputJack
4. HDMI Output
5. LeftAudioOutputJack
6. Right Audio Output Jack
7. Composite Video Output Jack
8. Y/PbCb/PrCrOutputJack
5. ( ) Open/Close Button
6. USB Port
7. ( ) Previous Button
8. ( ) Play/Pause Button
9. ( )NextButton

8
Remote Control
1. OPEN/CLOSE BUTTON
Opens and closes the disc tray.
2. 09 BUTTONS
To locate a title / chapter / track /specic time
or enter parental control.
10+ Button To select and switch to a track
that is higher than 10.
3. MENU BUTTON
To display the DVD root menu.
4. BUTTONS
Press to navigate and make selections for
on-screen menus.
ENTER Button
To confirm the selection or current operation.
5. PREV / NEXT BUTTONS
Toskiptotheprevious/nexttitle/chapter/
track.
6. F.RWD / F.FWD BUTTONS
To perform fast reverse / fast forward playback.
7. PLAY/PAUSE BUTTON
To start and pause the playback.
8. OSD BUTTON
To display the current playback information.
9. SUBTITLE BUTTON
To select one of the subtitle languages
programs on a DVD (if available).
10.DVD/USB
1. Power-on the unit.
2. Make sure no disc has been inserted.
3. Insert a USB memory inside the USB slot.
4. Press USB button the player will read the
multimedia les located on the USB memory .
11. ANGLE BUTTON
To switch between multiple camera angles
programmed on a DVD (if available).
12. ZOOM BUTTON
To enlarge a picture on the screen.
13. REPEAT BUTTON
To toggle between dierent repeat modes.
14. AB BUTTON
To repeat the playback from point A to point B
on a disc.
15. PROGRAM BUTTON
To play the contents of the disc in the order you
want by programming the track to be played.
16. CLEAR BUTTON
Erases all programmed content in memory.
ss t

9
Remote Control
17. POWER BUTTON
Turns the power on or restores the DVD player to
standby mode.
18. VOL +/ BUTTONS
To increase and decrease volume.
19. MUTE BUTTON
To mute and restore your DVD sound output.
20. SETUP BUTTON
ToaccessorexittheSETUPmenu.
21. TITLE BUTTON
Go to title menu.
22. AUDIO BUTTON
To change the audio mode.
23. STOP BUTTON
To stop the playback.
24. VIDEO BUTTON
To change the video output mode.
25. WIDE BUTTON
Adjuststheaspectratio.
26. STEP BUTTON
To play or move the playback forward frame by
frame.
27. SLOW BUTTON
Pressrepeatedlytoenterslowplayback,andcycle
between dierent speeds.
28. TIME BUTTON
To skip directly to a specic time / title / chapter /
track on a DVD.
29. RANDOM BUTTON
Press to select a random chapter.

10
Battery Installation
1. Press the tabs on the back door and lift o.
2. InserttwoAAAsizebatteries(included)intothebattery
compartment as shown in the illustration and follow the (+) and
(–) polarity symbol markings inside the battery compartment.
3. Replace the battery door.
BATTERY PRECAUTIONS:
• Improperorincorrectuseofbatteriesmaycausecorrosion
orbatteryleakage,whichcouldcausere,personalinjuryor
damage to property.
• Onlyusethebatterytypeindicatedinthismanual.
• Whenthebatteriesareexhausted,theremotewillnotfunction.Replaceboth
batteries at the same time with new ones.● Do not install new batteries with used
onesanddonotmixdierenttypesofbatteries.
• Donotdisposeofusedbatteriesasdomesticwaste.Disposeoftheminaccordance
with local regulations.
HANDLING THE REMOTE CONTROL:
• Takecareofyourfingernailswhenyoupressandholdthebatteryreleasetab.
• Donotdroporcauseimpacttotheremotecontrol.
• Donotspillwateroranyliquidontheremotecontrol.
• Donotplacetheremotecontrolonawetobject.
• Donotplacetheremotecontrolunderdirectsunlightornearsourcesofexcessive
heat.
• Removethebatteryfromtheremotecontrolwhennotinuseforalongperiodof
time,asitcouldcausecorrosionorbatteryleakageandmayresultinphysicalinjury
and/or property damage including fire.
Remote Control Operation Range
Point the remote control at the DVD player no more than 5 metres from the remote
control sensor and within 60° of the front of the DVD player. The operating distance may
vary depending on the brightness of the room.
Operating the Remote Control

11
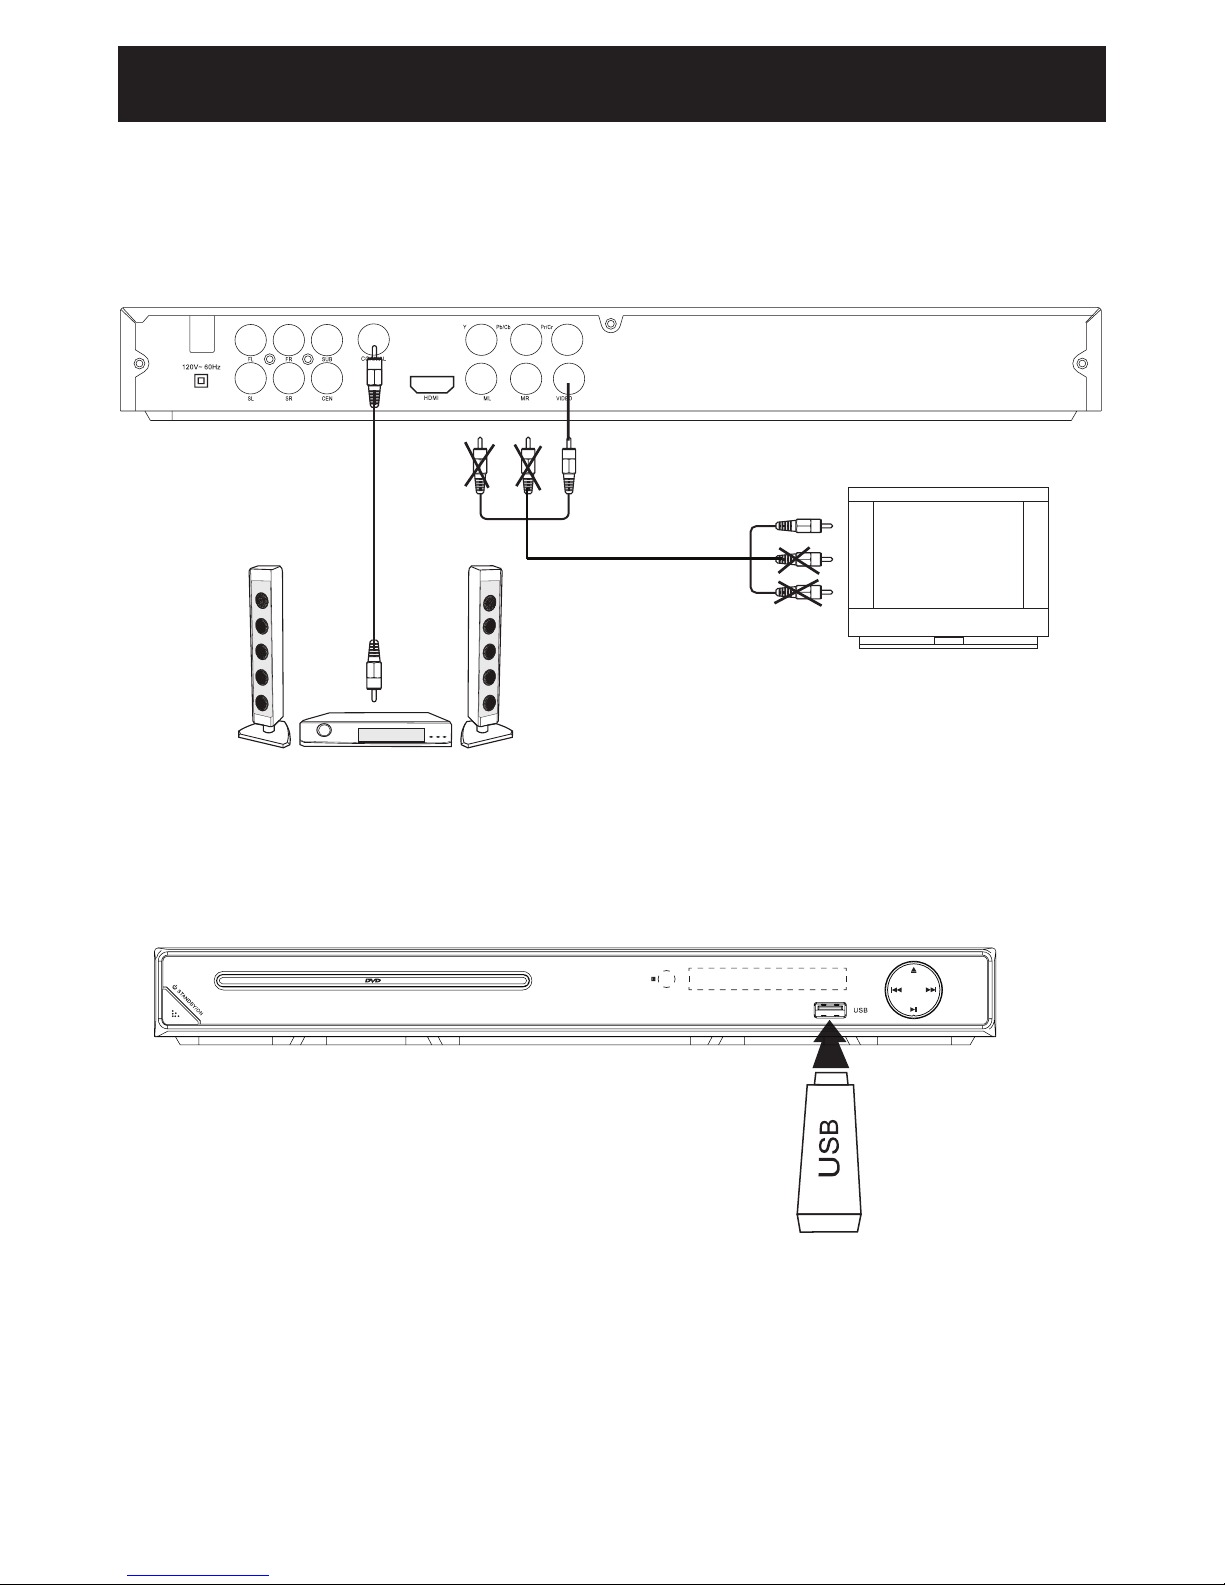
Connecting To TV Through VIDEO Output Jacks
(A/V connection cable included)
Connecting To TV Through YUV Output Jacks
(YUVconnectioncablenotincluded)
Connections
Television
Television
Yellow
Yellow
Y
Yellow
Yellow
Red Red
Pb/Cb
Red
Red
White White
Pr/Cr
White
White

12
Connections
Connecting To TV Through 5.1-CHANNEL Output Jacks
(5.1-Channel connection cable not included)
Connecting To TV Through HDMI OUTPUT
(connection cable not included)
Television
Television
Amplier
Yellow
HDMI
Yellow
Red
Red
White
White
LeftFront
Speaker
Right Front
Speaker
Right Surround SpeakerLeftSurroundSpeaker
Center Speaker
Subwoofer
13
Connections
Connecting To An External Audio Amplier
Through Coaxial Output Jack
(Coaxialconnectioncablenotincluded)
Connecting to USB Port
1. If a disc is loaded, press the DVD/USB button on remote control,“detecting device” and “Waiting”
will appear on display, then the USB files will appear.
(if no USB inserted, press DVD/USB button, then “Not find device” will appear).
2. Press navigation button to select the desired files and press ENTER button to confirm to play.
3. Press the DVD/USB button on remote control to switch to disc playing,“loading”will appear soon,
then the disc will play automatically.
Television
(with built-in digital audio recorder)
Yellow
Yellow
Red
Red
White
White

14
Playback of a DVD
Unless otherwise stated, all operations described are based on Remote Control use.
1. Insert the AC plug (with the two blades) from the DVD player to a conveniently
located AC outlet. The POWER indicator on the front of the cabinet will light.
2. ConnecttheDVDplayertotheexternalTV(seeillustrationsonpages11to13).
Turn on the TV and set to the corresponding input source.
3. Press the POWER button to turn the player on.
4. Press the OPEN/CLOSE button to open the disc tray. Place the disc in the center of
tray with the label side face up. Close the tray by pressing the OPEN/CLOSE button.
The unit will start playback automatically.
5. Press the STOP button to stop playback. The player will remember the point where
disc was stopped. If you press the PLAY/PAUSEbutton,playbackwillstartfrom
thispoint.Tostopplaybackcompletelyortostartagainfromthebeginning,press
the STOP button twice.
Note:Iftheplayerwillnotbeusedforalongperiodoftime,turnotheplayerby
unpluging the AC Cord from the wall outlet.
SEARCH
Duringplayback,presseitherthe F.FWD button or the F.RWD to move the DVD
forwardorbackwardatdouble2x,speedtolocateaspecicsection.Repeatedlypress
thesebuttonsandthespeedwillincreaseto4x,8x,16xand32x,thenresumenormal
playback.Youcanalsoresumenormalplaybackbypressingthe PLAY/PAUSE button
on the remote control or the PLAY/PAUSE button on the unit.
Note: This function is not available on all discs.
SKIP
Whileadiscisplaying,youcanskipforwardorbackwardachapterortrackatanytimeby
pressing the PREV or NEXT button.
SUBTITLE:
Press the SUBTITLE button repeatedly to select the subtitle language or turn the subtitle
menu o. This function isnot available on all discs.
DVD MENU:
Press the MENUbutton,themenuofthecurrentDVDwillappearonthescreen.Pressthe
, , , directionbuttonstoselectthedesiredoption,andthenpresstheENTER button
to conrm the selection. This function is not available on all discs.
TITLE
Press the TITLEbutton,thetitlemenuofthecurrentDVDwillappearonthescreen.
Use the , , , directionbuttonstoselectthedesiredoption,thenpresstheENTER
button to conrm the selection. This function is not available on all discs.
Operating Systems

15
OSD ON SCREEN DISPLAY
Duringplayback,presstheOSD button repeatedly to read the information of playback status.
ZOOM
DuringtheplaybackoftheDVDdisc,presstheZOOMbuttontoenlargeorminimize
pictures. Each time the ZOOMbuttonispressed,thepictureenlargesinsequence.
ANGLE
If the multi-angle icon “ ”appearsonthescreen,itmeansmorethanonesceneis
available on the current DVD. Press the ANGLE button repeatedly to select the desired
scenes. This function is not available on all discs.
VOLUME ADJUSTMENT
1. Press the VOL +/–buttonstoadjustthevolume.
2. Press the MUTEbuttontoswitchthesoundo,theplayerwilldisplayMUTE.
Press the MUTE button again or the VOL +/– buttons to cancel this function.
WIDE
PresstoswitchtheaspectratiotoNormal/PS,Normal/LB,andWIDEtotyourTVdisplay.
VIDEO OUTPUT
Press the VIDEO button repeatedly to select dierent video output modes.
Notes:
If the settings are incorrect there will be no picture on.
Press the VIDEO button repeatedly until the screen turns to normal.
SLOW
1.Duringplayback,presstheSLOW button to enter slow forward status. There are 4 speeds
available:1/2,1/4,1/8and1/16.
2. Press the PLAY/PAUSE button to resume normal playback.
STEP
Duringmovieplayback,presstheSTEP button repeatedly to play the movie frame by
frame. Resume normal playback by pressing the PLAY/PAUSE button on the remote
control or play/pause button on the unit.
REPEAT
Press the REPEAT button repeatedly to select dierent repeat modes.
Press Once: Chapter (Repeat Chapter)
Press Twice: Title (Repeat Title)
Press Three Times : All (Repeat All)
Operating Systems
16
Operating Systems
A-B REPEAT
Repeat a section between points A and B within a Title / Chapter / Track.
1. Press the A-B button to choose a starting point A.
2. Press the A-B button again to set an ending point Band complete the setting. The
selected section A-B will be repeated.
3. Press the A-Bbuttonthethirdtimetocancelandexit.
RANDOM
Press RANDOM button to play the files randomly.
TIME
1. During playback, press the TIME button to search the title / chapter / track in the disc.
2. Press the TIME button again to display the search menu.
3. Press the buttons repeatedly to select the selected item / time / title / chapter.
4. Press the 0 - 9 buttons to select the search item / time / title / chapter, for example:
• Time search
To search 16 min 50 seconds: Input 1, 6, 5 and 0.
To search 1 hr 14 min: Input 1, 1, 4, 0 and 0.
• Title / Chapter GOTO (Only DVD)
To go to Title 1:
Input 1 in the highlighted title column.
To go to Chapter 2: Press the button and input 2.
5. Press the ENTER button to play.
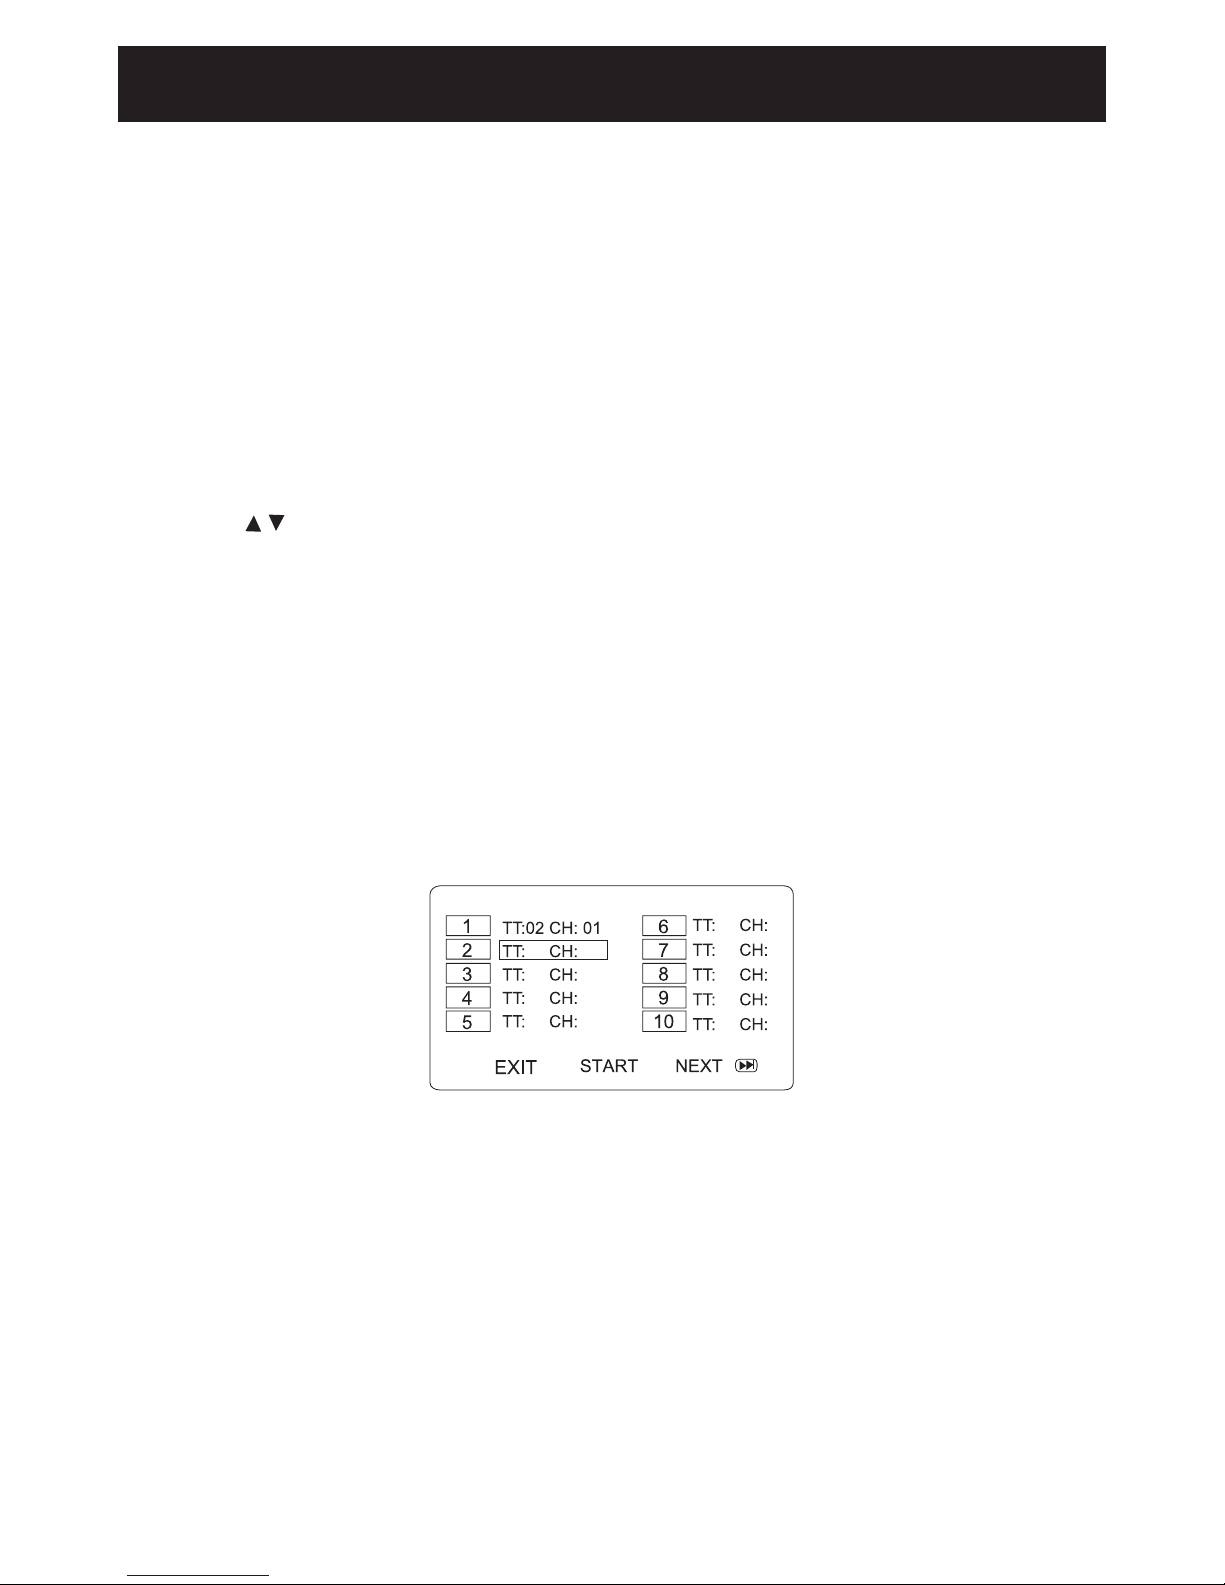
PROGRAM DVD
1. During DVD playback, press the PROG button, the program menu will appear as follows:
2. Use the direction and numeric buttons to select and set the desired 20 Title, Chapter
you want. (During setting, press the “CLEAR” button to clear the incorrect input.)
3. Use the direction button to select and highlight the“START”button on the screen,
then press the ENTER button to start program playback.
4. Press PROG again to exit.

17
Operating Systems
Playback of a CD
1. Press the POWER button to turn the player on.
2. Press the OPEN/CLOSE button to open the disc tray. Place the disc in the center of
tray with the label side face up. Close the tray by pressing the OPEN/CLOSE button.
The unit will start playback automatically.
3. Press the STOP button to stop playback. The player will remember the point where
disc was stopped. If you press the PLAY/PAUSEbutton,playbackwillstartfrom
thispoint.Tostopplaybackcompletelyortostartagainfromthebeginning,press
the STOP button twice.
RANDOM
Press RANDOM button to play the les randomly.
REPEAT
Press the REPEAT button repeatedly to select dierent repeat modes.
Press Once: Track
Press Twice: All
A-B REPEAT
Repeat a section between points A and B within a Track.
1. Press the A-B button to choose a starting point A.
2. Press the A-B button again to set an ending point Band complete the setting. The
selected section A-B will be repeated.
3. Press the A-Bbuttonathirdtimetocancelandexit.
TIME
Duringplayback,presstheTIME button to search the track in the disc.
AUDIO
Press the AUDIO button repeatedly to select the available language/sound channels.
This function is not available on all discs.
PROGRAM (CD)
1.DuringCDplayback,pressthePROG button,theprogrammenuwillappearasfollows:
2.Usethedirectionandnumericbuttons,selectandsetthedesired20tracksyouwant.
(Duringsetting,pressthe“CLEAR” button to clear the incorrect input.)
3. Use the direction button to select and highlight the “START” button on the screen
thenpresstheENTERbuttontostartprogramplayback.
4. Press PROGagaintoexit.
18
Operating Systems
JPEG (picture) Discs Operation
1. Press the POWER button to turn the player on and place the disc into the player as
previously instructed. The folder/le list will appear on the screen.
2. Use the , , , directionbuttonstohighlightthedesiredfolder,thenpressthe
ENTER button to conrm. The le list will appear on the screen.
3. Use the , , , directionbuttonstohighlightthedesiredle,thenpressthe
ENTER button to start playback.
• PressthePROG button repeatedly to change the slideshow eect.
• DuringtheplaybackofJPEGdiscs,presstheZOOM until “100%” is displayed on the
screen,thenpress or toenlargeorminimizeinthefollowingorder:
50%,75%,100%,125%,150%,200%.
Toresumenormalviewing,presstheZOOM button on the remote control until the
picture on the screen becomes normal.
• Pressthe , , , buttons to scroll around.
- Rotate 360° - Rotate 270° - Rotate 180° - Rotate 90°
REPEAT
Duringplayback,presstheREPEAT button repeatedly to select.
Single: Press once to play the current picture and stop.
Repeat One: Press twice to play the current picture repeatedly.
Repeat Folder: Press a third time to play the pictures in the current folder
repeatedly.
Repeat O: Press a fourth time to resume normal play.
Notes:
The disc loading period of JEPG discs may be longer than loading DVD discs.
The operation is similar to DVD disc playing.
Important Notes:
• Somediscsmaytakeafewsecondstoload.Ifadiscisinsertedincorrectly,dirty,or
damaged,“NODISC”willappearinthedisplay.
• Alwaysholdthediscwithouttouchingeitherofitssurfaces.Wheninsertingadisc,
positionitwiththeprintedtitlesidefacingup,alignitwiththeguidesandplaceitin
its proper position.
• ItisimportantthatyoureadthemanualthataccompaniestheDVDdiscasthereare
features that are on this DVD player that cannot be used with certain DVDs. There are
alsoextrafeaturesthataredierentforeachDVDdiscthatarenotexplainedinthis
owner’s manual.
Table of contents
Other Fluid DVD Player manuals


