manuals.online logo
Brands
  1. Home
  2. •
  3. Brands
  4. •
  5. Fluke
  6. •
  7. GPS
  8. •
  9. Fluke DATAPAQ Oven Tracker XL2 User manual

Fluke DATAPAQ Oven Tracker XL2 User manual

Running a temperature profile
2
1Charge MemoryPaq battery
See last page.
Reset the
MemoryPaq
Resetting empties the logger’s memory and prepares
it to receive fresh data. NB This is not necessary if:
•You previously selected single-run mode and wish to
use the same collection parameters, or
•You previously selected multiple-run mode and have
performed nine or fewer runs.
Connect the logger to the PC and reset the logger
with Insight.
Quick Reference Guide
Oven Tracker®XL2with
Set data-recording
to start when
Transducer
Interface is
plugged into
MemoryPaq, or
when temperature
rises to a given
level.
Select sample
interval.
GREEN: OK
YELLOW: Caution
RED: Recharge battery
Check battery status.
SmartPaq gives
instant quality
assurance on
removal from
the oven. Click to
enable and to set
pass/fail criteria.
You may download after each profile run (single-run
mode)or perform up to 10 runs before downloading
them all (multiple-run).
Assemble the system
•Connect all thermocouples to
the Transducer Interface.
•Plug Transducer
Interface into
the MemoryPaq,
and check the
status LEDs
(see last page).
WARNING
All thermocouples must be plugged into the
Transducer Interface before the Transducer
Interface is attached to the MemoryPaq.
•Place logger into heatsink in the thermal
barrier.
•Fit the barrier
lid and secure its
catches with the
locking pins, if
fitted.
Collect data
•Attach probes to the product or
test-piece.
•Send the system through the oven
and collect at exit.
WARNING
Wear heat-resistant gloves.
•Remove logger from the barrier and leave
to cool.
•Disconnect the Transducer Interface and
MemoryPaq, and check SmartPaq LED for
pass/fail.
If using multiple-run mode, repeat steps
3and 4to perform a maximum of 10 runs.
3
4
5Download data
•Attach logger to the PC and
select download.
•If using a process file, select one when
prompted.
•Save the data and print a report.
See the Oven Tracker XL2 User Manual, and Insight™
Help system, for full details of these procedures.
Key functions of Insight Oven Tracker
Reset the logger
Before a profile run, set the data-collection
parameters: sample interval, multiple or single-
run mode, telemetry, trigger mode and SmartPaq
operation.
Download data
After a profile run, transfer collected
temperature data from the run to the PC.
Wizards
Select a wizard to guide you, step by step,
through various operations.
Paqfile tabs Open multiple profiles,
and switch between them.
Tolerance curve
Provides an envelope
of acceptability against
which to compare the
temperature profile
(see Help).
Movable splitter bar
Choose how much of the screen
to devote to the graph or to the
data.
Analysis Window
Analysis modes selected
by tabs (see opposite).
Data in red cells is out of
tolerance.
Memos Add comments:
select Edit > Memos.
Probe toolbar Click probes to remove them
from the display and from the analysis.
Probe Window Display a picture of
your product, showing probe positions:
select Process > Process Details.
Oven zone markers
Oven bar and mimics
Display a distance axis and
summary of the oven’s
features: select View >
Graph Options.
Mouse-operated zooming
Drag out an area to zoom into.
The data grid and analysis then
apply to that section of the data
alone.
Alarms
A ‘fail’ indicates
out-of-tolerance
analysis data
(see opposite)or
problems during the run.
Pass
Fail
Print report
Print a comprehensive report of the data and
its analysis. To customize the report, select File >
Print Options.
Mouse right-click
Right-click on the graph to
show a menu of commonly used
options, including:
Overlay Overlay different
temperature profiles and/or tolerance
curves on the same graph for direct
comparison.
Adjust Oven Start Reposition the
markers for oven start and process end
in a paqfile.
Copy Exports a paqfile’s data to the
Windows clipboard – as text or as
spreadsheet data.
Zoom Zoom into different parts of the temperature profile.
Process files
*
Create template
files that specify
the details of your
process. Apply them
to your data to permit
rapid interpretation and
analysis.
*Feature available in Oven Tracker
Professional only
Help
In any dialog, press the Help button for
information
specific to the operation you are performing.
See Insight’s Help system for full details
of these and many other functions.
•Open a Paqfile.
•Setup a new process,
or a new oven, product
or recipe.
•Create a new tolerance
curve to compare with
your data.
•Reset the logger.
•Download data.
•Use Statistical Process
Control to identify
trends in your profile
results.
•Setup Datapaq Value
analysis (see opposite).
Statistical Process Control
Identify trends in your analysis results over time.
Save the results
For future use, save the results of your
profile run as a paqfile.
Email the results
Send the profile results as an email. In case the
email recipient does not have Insight, the email contains
a link to download free Paqfile Viewer software with
which to view the temperature profile.
Rise/Fall and Slopes
*
Calculates and analyses the rates
of heating and cooling for each
probe.
Peak Difference
Data for the two probes which
recorded temperatures with the
biggest difference at any single point
in the profile.
Ramp Up
Calculates the profile slope over a given
time range, and gives the time taken to
reach a given cure temperature.
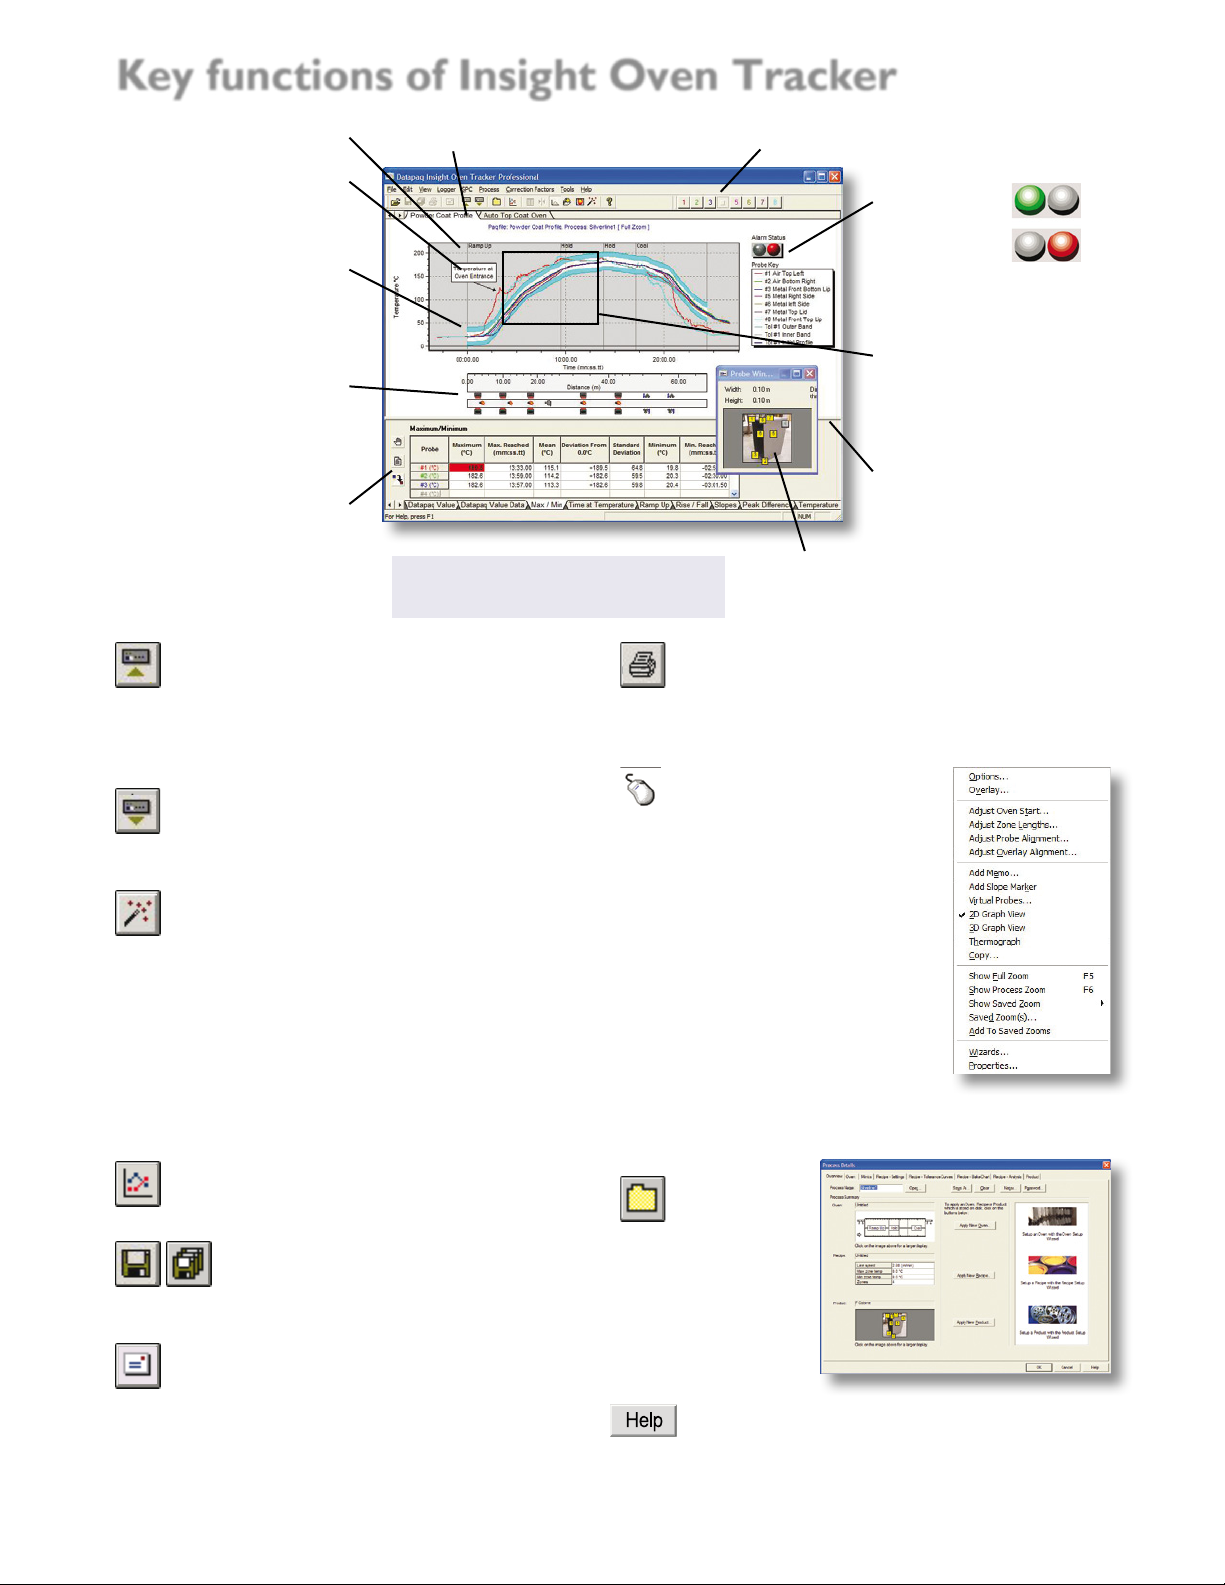
Maximum/Minimum
Analyse the maximum
and minimum
temperatures
achieved by each probe.
Time at Temperature
Calculate the time at which a
specified temperature is reached,
and the time for which the
product was at, or above, that
temperature.
View Data
Display the raw temperature data for
any point in the profile.
•Click on the probe-trace of interest.
•Drag the vertical bar to the appropriate position
and read time and temperature information.
Alarms
See when and why an alarm condition
is triggered, caused by out-of-tolerance
analysis results or by (e.g.) logger going
over temperature, low battery or invalid
measurements.
Datapaq Value
Insight compares the coating manufacturer’s recommended
curing time/temperature with the actual time/temperature
values experienced by the product and generates an
index of cure which indicates the degree of compliance.
•Input cure-schedule information from your coating supplier: click the
Options button , or use the Wizard .
Assess the Datapaq Value obtained during a profile run:
•Generally, near 100 indicates cure OK
•Significantly less than 100 indicates under-cure
•Significantly greater than 100 indicates over-cure
From quality-assurance tests, find the range of Datapaq Values (e.g. 80–140)
which gives you acceptable coating cure-quality. Datapaq Value then becomes
a rapid means of ensuring that the process is in control.
Area Under Curve
Calculates the area which lies below
the temperature profile curve
but above a threshold temperature.
Temperature Difference Data
*
Display the difference in
temperature between
any two probes throughout
the temperature profile.
The analysis options
Temperature
above which
coating damage
is possible.
Three coating cure schedules (low, mid and
high Time at Temperature settings).
Temperature
at which curing
(cross-linking)
starts.
See Insight’s Help system for full
details of using the analysis modes.
For each analysis mode, click
on the Options button in the
Analysis Window to select
parameters for that analysis.
Click button to edit the
probes’ names.
Bakechart
*
A graphical
alternative to
Datapaq Value,
comparing the cure results with
an envelope of acceptable time/
temperature values (Oven Tracker
Professional only).
The Bake Chart Data tab shows
the data as a table.
The Datapaq Value Data * tab shows the Datapaq Value for every data
point in the profile run, in both in numerical and graphical form.
*Feature available in Oven Tracker Professional only.
Battery status LED
When flashing yellow once per second, battery is
at 20% or less of maximum charge. Battery must
be recharged.
Alpha numeric display
SmartPaq LED
If SmartPaq parameters have been setup for a pass/
fail analysis on removal from the oven (see page 1),
the LED shows green for pass, red for fail.
Alphanumeric
display
(see above)
Logger status LEDs
Red Green Meaning
Flashes 5 times (once
per second), then
stops
Off Communications lead has established
connection between logger and
powered-up PC, or
Logger has been reset with default reset
parameters (see User Manual)
Flashing together with
green LED (once per
second)
Flashing together with red
LED (once per second)
Awaiting connection to Transducer
Interface after being reset
Flashing, alternating
with green LED, at
sample interval *
Flashing, alternating with red
LED, at sample interval *
Logger awaiting trigger (i.e. after
Transducer Interface has been
connected, if temperature trigger has
been set)
Off Flashing at sample interval * Logger acquiring data
Flashing every 5
seconds
Off Logger has data in memory which has
not been downloaded
Double flash together
with green LED
(every 5 seconds)
Double flash together with
red LED (every 5 seconds)
In multiple run mode, MemoryPaq is
awaiting connection to the Transducer
Interface to start the next run
*Flashing interval will actually fall in range 0.5–5 s.
Display Meaning
Number
(e.g. 0.5, 50)
Sample interval (in seconds).
Sample intervals up to 9.9 s
are shown to one decimal
place.
Sample interval too long to
fit on display.
One Transducer Interface
connected (displayed briefly
on connection).
Two Transducer Interfaces
connected (displayed briefly
on connecting to Dual
Interface Block).
Flashing
Memory full, or contains data
from 10 runs. Data must be
downloaded before logging
can resume.
Display Meaning
Flashing
alternately
Logger communicating
with PC.
Snaking
lights
SmartPaq calculation in
progress.
Internal error: perform
a hardware reset to
reboot logger with default
parameters (see User
Manual). Contact Datapaq
if problem persists.
Display Meaning
Error – Logger is hotter
than 45ºC (113ºF)
(see User Manual).
Error – At least one
probe is hotter than
trigger temperature; thus
data-recording cannot
be triggered by rising
temperature.
Error – All thermocouples
are open circuit, or no
thermocouples connected.
Error – MemoryPaq and
Transducer Interface not
communicating properly
when connected together.
Connect them again.
Error – Disconnect
and re-connect
communications lead.
XL2 status displays
Battery charging
1. Plug the charger into the
electricity supply.
2. Connect the
charger lead to
the charging
socket on the
MemoryPaq.
Battery charging LED
(next to charging socket) shows
red when charging is in progress,
green when charging is complete.
A full charge is delivered within
2 hours.
To conserve battery, the logger will
power-off temporarily (LEDs will stop
operating) if it is inactive for 5 minutes.
www.datapaq.com
© 2013 Datapaq (MA5650 Rev B ) 7/2013
Datapaq, the Datapaq logo and OvenTracker
are registered trademarks of Datapaq.
Specifications subject to change without notice.
The Worldwide Leader in Temperature Profiling
Europe and Asia
DATAPAQ Limited
Lothbury House Cambridge Technopark
Newmarket Road, Cambridge
CB5 8PB, UK
Tel: +44 1223 652 400
Fax: +44 1223 652 401
E-mail: [email protected].uk
North and South America
DATAPAQ Inc.
3 Corporate Dr.
Unit 1
Derry, NH 03038, USA
Tel: +1 603 537 2680
Fax: +1 603 537 2685
E-mail: [email protected]

Other manuals for DATAPAQ Oven Tracker XL2

1

Other Fluke GPS manuals

Fluke DATAPAQ SolarPaq User manual

Fluke

Fluke DATAPAQ SolarPaq User manual

Popular GPS manuals by other brands

MiFleet MF730 installation guide

MiFleet

MiFleet MF730 installation guide

MikroTik TG-BT5-OUT manual

MikroTik

MikroTik TG-BT5-OUT manual

Teltonika FMT100 installation guide

Teltonika

Teltonika FMT100 installation guide

MICODUS MV501G user manual

MICODUS

MICODUS MV501G user manual

Sony NV-U73T Firmware version 3.02 instruction manual

Sony

Sony NV-U73T Firmware version 3.02 instruction manual

Cambridge Audio DVD55RWI Quick reference guide

Cambridge Audio

Cambridge Audio DVD55RWI Quick reference guide

Tobii Pro Spectrum user manual

Tobii Pro

Tobii Pro Spectrum user manual

Prestigio GeoVision 430 user manual

Prestigio

Prestigio GeoVision 430 user manual

Rand McNally Foris 850 user manual

Rand McNally

Rand McNally Foris 850 user manual

Skypatrol TT8540 user guide

Skypatrol

Skypatrol TT8540 user guide

Treesat FMC150 installation instructions

Treesat

Treesat FMC150 installation instructions

Kenwood KNA-G421 instruction manual

Kenwood

Kenwood KNA-G421 instruction manual

Garmin GPS Beginner's guide

Garmin

Garmin GPS Beginner's guide

Icom GP-270 Operator's manual

Icom

Icom GP-270 Operator's manual

Rand McNally TND 765 user manual

Rand McNally

Rand McNally TND 765 user manual

Xexun XT-009 user manual

Xexun

Xexun XT-009 user manual

GPS TrackMaker reference guide

GPS

GPS TrackMaker reference guide

JVC KV-PX701 instructions

JVC

JVC KV-PX701 instructions

manuals.online logo
manuals.online logoBrands
  • About & Mission
  • Contact us
  • Privacy Policy
  • Terms and Conditions

Copyright 2025 Manuals.Online. All Rights Reserved.