FOCO FGE-HR-300W4000K User manual
Parameters
Cautions:
1 Can not use the electric generator to test the LED lamp.
2 Please abide by related country, regional and local law and regulations when install this fixture.
3 To avoid electrical shock and damage, please do not install the lights in raining days.
Notices:
1 To prevent from electric shock or fire risk, the installation must be conducted by operator who have
professional electrical knowledge.
2 Please wear gloves to avoid injury before installing lamps.
3 During or after installation, if there are situations such as smoke, fire in the wires or lamps, please
turn off the power immediately and notify relevant personnel of an overhaul.
Installation - surface mounting:
1. Please find a professional to install the LED sports light.
2. lamp installation and wiring must be operated in case of power failure.
3. Do not disassemble any part of the fixing device.
4. Please do not use corrosive solution to clean the LED sports light. Please use a dry rag.
5. Please refer to the lamp label for product specifications.
Rated Current
Part No.
FGE-HR-300WYYK 300W 3.3A
4.4A
5.5A
6.6A
8.8A
11A
13.2A
400W
500W
600W
300W
400W
500W
600W
800W
1000W
1200W
800W
1000W
1200W
FGE-HR-400WYYK
FGE-HR-500WYYK
FGE-HR-600WYYK
FGE-HR-800WYYK
FGE-HR-1000WYYK
FGE-HR-1200WYYK
AC100-277V 50/60Hz
AC277-480V 50/60Hz
Input Voltage
Frequency
Power
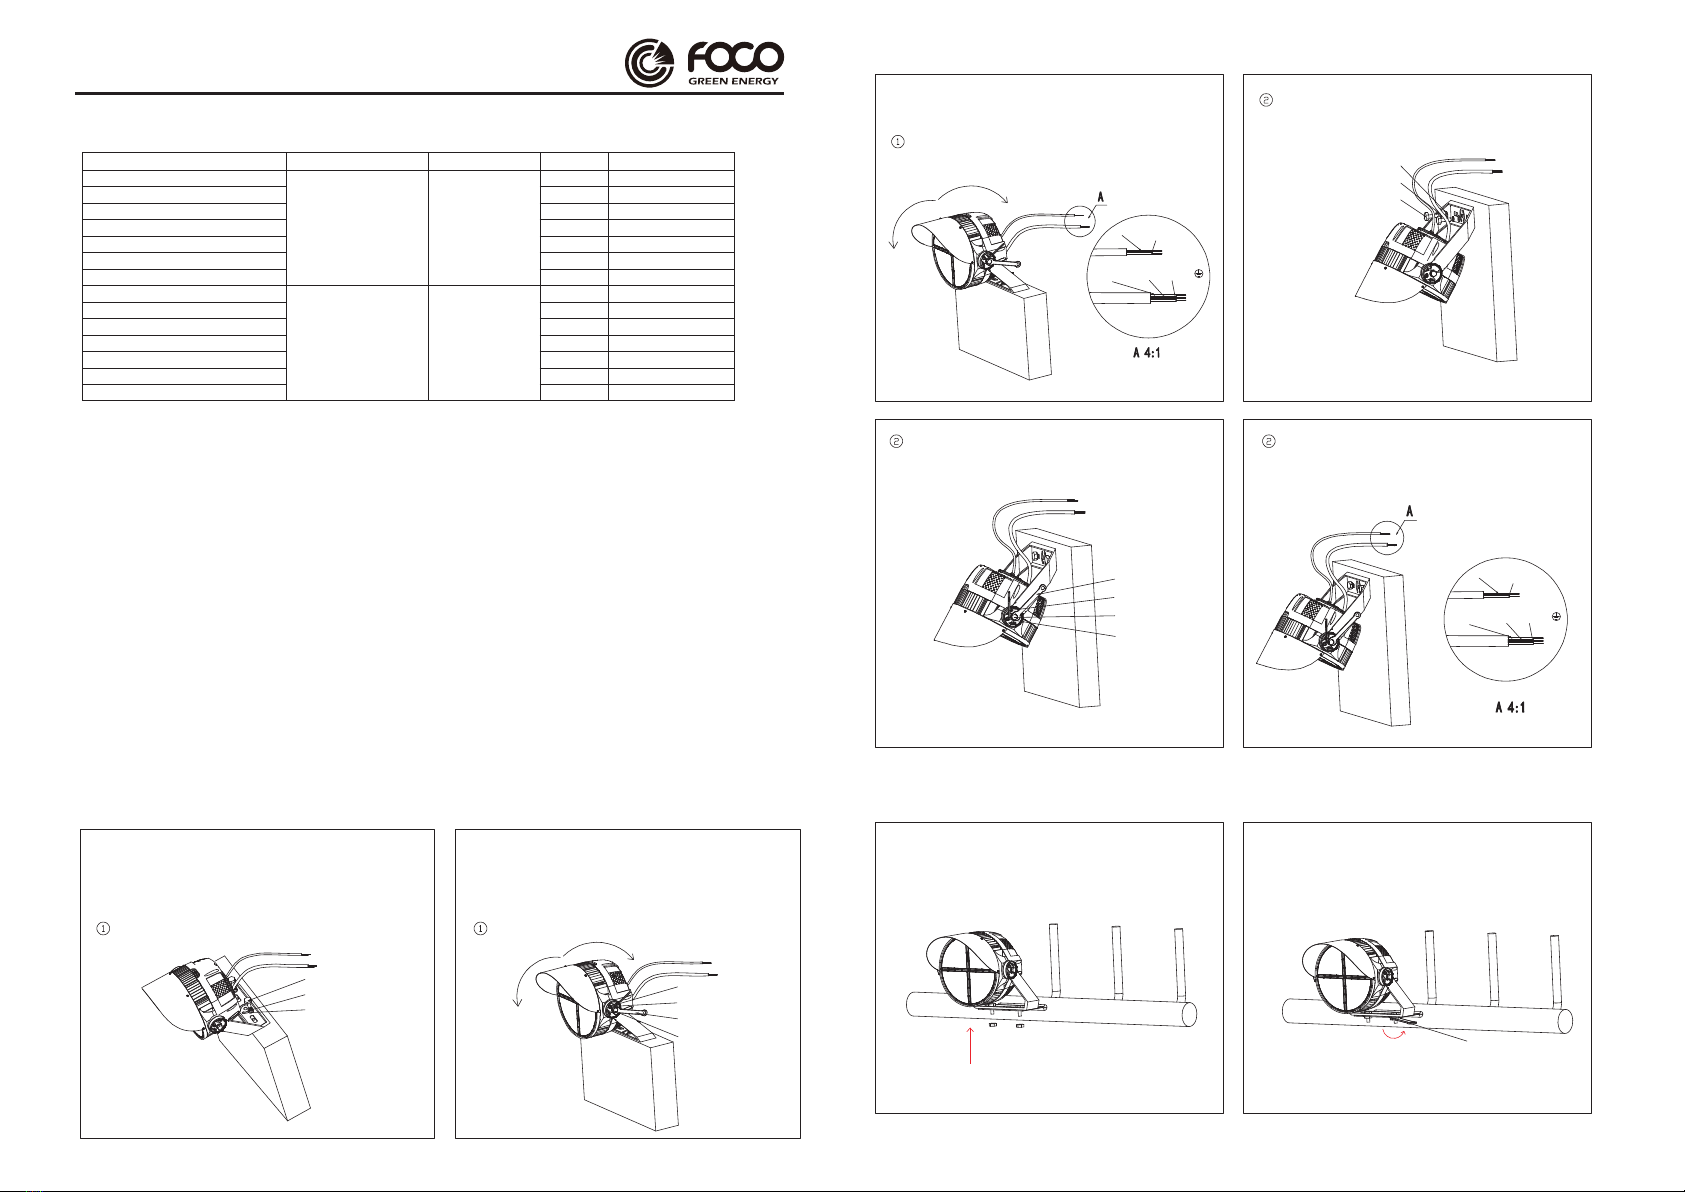
Installation Instruction:
INSTALLATION INSTRUCTION
1. Align the holes of the bracket with the mounting
holes already reserved on the wall, put on the flat
washers and spring washers,Bolt. Tighten the bolt
to lock into the wall (upside or front-side)
2. Loosen the bolts and screws on both sides with
a wrench and allen wrench, turn the fixture to the
proper angle, then tighten the bolts and screws
back to finish installation.
Lock into upside Wall
bolt
spring washer allen wrench
wrench
bolt
screws
flat washer
Lock into upside Wall
FGE-HR-300WYYK
FGE-HR-400WYYK
FGE-HR-500WYYK
FGE-HR-600WYYK
FGE-HR-800WYYK
FGE-HR-1000WYYK
FGE-HR-1200WYYK
YYK represents the CCT: 4000K, 5000K, 5700K.
1.19A
1.59A
1.99A
2.38A
3.18A
3.97A
4.77A
3. Wiring Diagram: Input wire (three cores): black,
white, green Dimming wires: (two cores): purple, gray
bolt
spring washer
allen wrench
wrench
bolt
screws
flat washer
Lock into upside Wall
Lock into front-side Wall
Lock into front-side Wall Lock into front-side Wall
purple DIM+
black L white N green
gray DIM-
purple DIM+
black L white N green
gray DIM-
1. Make the bracket face aim to the installation hole ,put
on the flat washer, spring washer and screw bolt, screw
the nut from bottom to top.
2. Fasten the screw nut clockwise with provided wrench.
wrench
Installation Instruction( mounted on the light pole )

Laser Sighting Device Installation Instruction
allen wrench
laser sighting device
laser diode
"L" bracket
laser diode
snap slot
4.Put the “L” bracket into slot of laser diode,
and use hexagon wrench to fix the rest screw
on each side.
3. Loosen the bolt and screw on both side of light by using
wrench and hex driver,rotate the light to the proper angle
and fasten the screws.
4.Wiring Diagram: Input wire (three cores): black, white,
green Dimming wires: (two cores): purple, gray.
wrench
screw bolt
hex driver
A
purple DIM+ gray DIM-
black L white N green
A 4:1
1. Put the laser sighting device into the laser
diode.
3.Snap the side of the "L" bracket that is
without slot into the laser diode snap slot.
5.Insert the assembled laser sighting
equipment into the slot of the power
supply cover.
2. Choosing the hexagon wrench,to tight the
middle screw of the laser diode.
allen wrench
hexagon socket head
cap screws (SHCS)
the slot for power
supply cover
Warning
1. Before starting use of the light, please check if the light was damaged during transportation. If any damage shown,
pleases do not install or use it.
2. The products itself and all its components should not be mechanically stressed.
3. Installation must not damage or destroy conducting paths or other parts of the product.
4. Installation of LED product (with power supplies)needs to be made with regard to all applicable electrical and safety standards.
Only qualified personnel should be allowed to perform installations.
5. Correct electrical polarity needs to be observed. Wrong polarity may damage or destroy the LED products.
6. If fixing on metallic or otherwise conductive surfaces, there should be an electrical insulator between the product and the mounting surface.
7. All LEDs are static sensitive. Precautions should be taken to ensure that LEDs are well protected from ESD during handing,
even though the chips are safe in low static-electric discharge events.
8. DO NOT operate LEDs in reverse bias.
9. Damaged by corrosion will not be honored as a materials defect claim. It is the user's responsibility to provide suitable protection
against corrosive agents such as moisture and condensation and other harmful elements.
10. Identify Positive (+)and negative (-)outputs of the power supply by using a multimeter.
11. Electrical connection should be in a dry area unless adequately sealed.
12. This product series emits high light output. DO NOT look directly into the light emitting area. Direct exposure to the light over
an extended time period may harm eyes.
13. If the external flexible cable or cord of this luminaire is damaged, it shall be exclusively replaced by the manufacturer or his
service agent or a similar qualified person in order to avoid a hazard.
1. MIN 105°C SUPPLY CONDUCTORS / LES FILS D’ALIMENTATION 105°C MIN
2. SUITABLE FOR WET LOCATIONS / CONVIENT AUX EMPLACEMENTS MOUILLÉS
3. CAUTION - RISK OF FIRE. CAUTION - RISK OF SHOCK.
ATTENTION – RISQUE D’INCENDIE. ATTENTION – RISQUE DE CHOC.
4. THIS PRODUCT MUST BE INSTALLED INACCORDANCE WITH THEAPPLICABLE INSTALLATION CODE BYA PERSON
FAMILIAR WITH THE CONSTRUCTION AND OPERATION OF THE PRODUCT AND THE HAZARDS INVOLVED.
CE PRODUIT DOIT ÊTRE INSTALLÉ SELON LE CODE D’INSTALLATION PERTINENT, PAR UNE PERSONNE
QUI CONNAÎT BIEN LE PRODUIT ET SON FONCTIONNEMENT AINSI QUE LES RISQUES INHÉRENTS.
This marking indicates that this product should not be disposed with other household wastes throughout the EU. To prevent possible
harm to the environment or human health from uncontrolled waste disposal, recycle it responsibly to promote the sustainable reuse
of material resources. To return your used device, please use the return and collection systems or contact the retailer where the
product was purchased. They can take this product for environmental safe recycling.
Correct Disposal of this product
6.Press the wireless laser button, the laser will be constant on.If it is a wired button,
then need to long presee until it is on. Laser will turn off when release the button.
7.After completed the installation of laser device,
then find and confirm the lighting spot on the
ground, and make a good mark.
8.Turn on the laser device, then adjust the angle of
stadium light, to make sure the laser can point at the
marked place on the ground. Secure the bolt
and screws by using the wrench and inner hexagon
screwdriver, to complete the final installation.
(1)the wireless laser button
(2)the wired laser button
Mark position
allen wrench
Bolt
Wrench
hexagon socket head
cap screws (SHCS)
the wireless
laser button the wired
laser button
This manual suits for next models
20
Popular Outdoor Light manuals by other brands

Kichler Lighting
Kichler Lighting HELEN 37536 instructions

Thorn
Thorn OXANE L installation instructions

esotec
esotec Solar Globe Light multicolor 20 operating instructions

mitzi
mitzi HL200201 ELLIS Assembly and mounting instructions

HEPER
HEPER TILA S AFX 3 Module Installation & maintenance instructions

Designplan
Designplan TRON 180 installation instructions


BEGA
BEGA 84 253 Installation and technical information

HEPER
HEPER LW8034.003-US Installation & maintenance instructions

HEPER
HEPER MINIMO Installation & maintenance instructions

LIGMAN
LIGMAN BAMBOO 3 installation manual

Maretti
Maretti TUBE CUBE WALL 14.4998.04 quick start guide

Maxim Lighting
Maxim Lighting Carriage House VX 40428WGOB installation instructions