Forma Scientific 3658 User manual

Forma Scientific, Inc.
P.O. Box 649
Marietta, Ohio 45750
U.S.A.
Telephone: (614) 373-4763
Telefax: (614) 373-4189
________________________________________
Models:
3658/3659, 3660/3661
and 3662/3663
Laboratory Refrigerator
Manual No. 7003658
IMPORTANT!
READ THIS INSTRUCTION MANUAL.
Failure to read, understand and follow the instructions in this manual may result in
damage to the unit, injury to operating personnel and poor equipment performance.
Caution: All internal adjustments and maintenance must be performed by
qualified service personnel.
March 1994

Forma Scientific, Inc.
______________________________________________________________________________
ii
The material in this manual is for information purposes only. The contents and the
product it describes are subject to change without notice. Forma Scientific, Inc. makes no
representations or warranties with respect to this manual. In no event shall Forma
Scientific, Inc. be held liable for any damages, direct or incidental, arising out of or
related to the use of this manual.
Forma Scientific, Inc.
______________________________________________________________________________
iii
The Occupational Safety and Health Administration (O.S.H.A.) has revised Section 1910-
147, The Control Of Hazardous Energy (Lockout/Tagout).
Hazardous energy may be: electric, air, hydraulic, water, steam, gravity, spring & all
other equally hazardous energy.
This revised regulation, states that you will de-energize all potential sources of energy (may
be more than one energy source) prior to performing service or maintenance on any
equipment. It also states that a lock shall be placed on the de-energized control, along with a
verified test (use of a voltmeter or other equipment) to insure no accidental starts. If you are not
familiar with this regulation, review the O.S.H.A. Regulation, Section 1910-147.
In field service, full compliance with this regulation is difficult at best. Troubleshooting must
often be performed with hazardous energy applied; therefore extreme caution must be followed
during these troubleshooting steps. Only Qualified Personnel Must Perform This Work. This
phase of the repair work must be coordinated through the customer's facilities maintenance
department or designated person.
When performing service or maintenance as an outside contractor/worker, follow the
Outside Work Force's Lockout/Tagout system. Be alert for new types of lockout/tagout
devices.
√Always use the proper protective equipment (clothing, gloves, goggles etc.).
√Always dissipate extreme cold or heat, or wear protective clothing.
√Always follow good hygiene practices.
√Each individual is responsible for his/her own safety.
For your safety adhere to all DANGER and CAUTION statements.
Danger: This word is used to call attention to immediate hazards of
equipment or conditions which, if not avoided, could result in personal
injury, loss of life or property damage.
Caution: This word is used to call attention to potential hazards of
equipment or conditions which, if not avoided, could
result in personal injury, loss of life or property damage.

Forma Scientific, Inc.
______________________________________________________________________________
v
DO YOU NEED INFORMATION OR ASSISTANCE ON FORMA SCIENTIFIC
PRODUCTS?
If you do, please contact us 8:00 A.M. to 5:00 P.M. (Eastern Standard Time) at:
1-614-373-4763 Direct
1-800-848-3080 Toll Free, U.S. and Canada
1-614-373-4189 FAX
29-8205 Telex
International customers please contact your local sales group.
Forma's Customer Service Group can provide information on pricing, give you quotations,
take your order and provide delivery information on major equipment items.
The Forma Product Service Group can supply technical information about proper setup,
operation or troubleshooting of your equipment and fill your needs for spare or replacement parts or
provide you with on-site service.
Whatever Forma products you need or use, we will be happy to discuss your applications or
problems. If you are experiencing technical problems, working together, we will help you locate the
problem and, chances are, correct it yourself .... over the telephone without a service call.
When more extensive service is necessary, you can count on Forma Scientific, Inc. for on-the-
spot repairs by our trained professional field technicians. In addition to checking the reported problem, our
technicians also check basic operation, such as:
Control Calibrations Electrical Circuits
Temperature Recorders
CO2Levels Blowers/Fans
Compressors R.H. Levels
The following cities and their surrounding areas are covered by Direct Service personnel:
Atlanta, GA
Chicago, IL
Denver, CO
Hartford, CT
Los Angeles, CA
Newington, NH
Philadelphia, PA
San Francisco, CA
Washington, PA
Austin, TX
Columbus, OH
Detroit, MI
Memphis/Nashville, TN
New York City, NY
Raleigh/Durham, NC
St. Louis, MO
Boston, MA
Dallas/Ft. Worth, TX
Ft. Pierce, FL
Lexington, KY
Newark, NJ
Orlando, FL
San Diego, CA
Washington, DC
In the areas listed above, where service coverage is by Direct Service personnel, we offer
our Bi-Annual Performance Check. This program provides a complete checkout of your
equipment twice a year and keeps minor problems from becoming major ones. If you are
located in one of the areas listed above, and you would like to know more about our Bi-Annual
Performance Check, please contact our Product Service Department on the Toll-free 800
number.

Forma Scientific, Inc.
______________________________________________________________________________
vii
TABLE OF CONTENTS
SECTION 1 - RECEIVING
1.1 Preliminary Inspection
1.2 Visible Loss or Damage
1.3 Responsibility for Shipping Damage
SECTION 2 - INSTALLATION AND START-UP
2.1 Location and Unpacking
2.2 Leveling and Wall Mounting the Unit
2.3 Connecting to Power
2.4 Installing the Shelves
2.5 Start-Up Procedure
SECTION 3 - CONTROLS AND INDICATING DEVICES
3.1 Temperature Control Dial
3.2 Defrost Indicator
3.3 High and Low Temperature Alarm
3.4 Door Ajar Indicator
3.5 Audible Alarm Switch
3.6 Interior Lights Switch
3.7 Digital Display
3.8 Defrost Indicator (Left and Right)
3.9 Refrig Indicator (Left and Right)
SECTION 4 - ROUTINE MAINTENANCE
4.1 Defrosting the Unit
4.2 Cleaning the Drain Evaporation Tray and the Condenser
Filter
4.3 Cleaning the Unit

Forma Scientific, Inc.
______________________________________________________________________________
viii
SECTION 5 - TROUBLESHOOTING
SECTION 6 - SPECIFICATIONS
SECTION 7 - PARTS LIST
SECTION 8 - SCHEMATICS
SECTION 9 - WARRANTY INFORMATION

Forma Scientific, Inc.
______________________________________________________________________________
1-1
SECTION 1 - RECEIVING
1.1 Preliminary Inspection
This item was thoroughly inspected and carefully packed prior to shipment and all
necessary precautions were taken to ensure safe arrival of the merchandise at its
destination. Immediately upon receipt, before the unit is moved from the receiving area,
carefully examine the shipment for loss or damage. Unpack the shipment and inspect
both interior and exterior for any in-transit damage.
1.2 Visible Loss or Damage
If any loss or damage is discovered, note any discrepancies on the delivery receipt.
Failure to adequately describe such evidence of loss or damage may result in the carrier
refusing to honor a damage claim. Immediately call the delivering carrier and request
that their representative perform an inspection. Do not discard any of the packing
material and under no circumstances move the shipment from the receiving area.
1.3 Responsibility for Shipping Damage
For products shipped F.O.B. Marietta, Ohio, the responsibility of Forma Scientific,
Inc. ends when the merchandise is loaded onto the carrier's vehicle.
On F.O.B. Destination shipments, Forma Scientific's and the carrier's responsibility
ends when your Receiving Department personnel sign a free and clear delivery receipt.
Whenever possible, Forma Scientific, Inc. will assist in settling claims for loss or
in-transit damage.

Forma Scientific, Inc.
______________________________________________________________________________
2-1
SECTION 2 - INSTALLATION AND START-UP
2.1 Location and Unpacking
Locate the unit on a firm, level surface in an area of minimum ambient temperature
fluctuation. Avoid installing the unit near heat-emitting appliances, as heat can shorten
component life and cause inefficient refrigeration.
Chamber temperature is maintained through the circulation of forced air, therefore
the air inlet grill at the bottom front of the cabinet must never be blocked. Allow 4-5
inches of clearance at the back of the unit to reduce power consumption and allow free
air circulation.
Avoid placing the unit in a contaminated area where there is an excessive amount
of dust or where chemicals or gases are present.
Caution: A dedicated, grounded electrical outlet must be provided for the
unit. Consult a qualified electrician for further information.
Remove the packing material and tape. Leave the refrigerator door open for a short
time so that air can circulate freely inside.
2.2 Leveling and Wall Mounting the Unit
Use the adjustable mounts on the bottom front of the unit for leveling and
stabilizing the cabinet. Turn the levelers counterclockwise until they make firm contact
with the floor.
Note: On Models 3662 and 3663, it is especially important that the center leveler be
adjusted correctly to assure cabinet stability.
Two wall mounts are attached to the top rear of the unit. Remove the wall mounts
and reverse their position. Attach the brackets to the wall. A special bolt-nut is supplied
for concrete walls.
2.3 Connecting to Power
Connect the unit to a dedicated, grounded power source using the three-prong
power plug. Refer to the electrical data plate on the unit for electrical specifications.
Forma Scientific, Inc.
______________________________________________________________________________
2-2
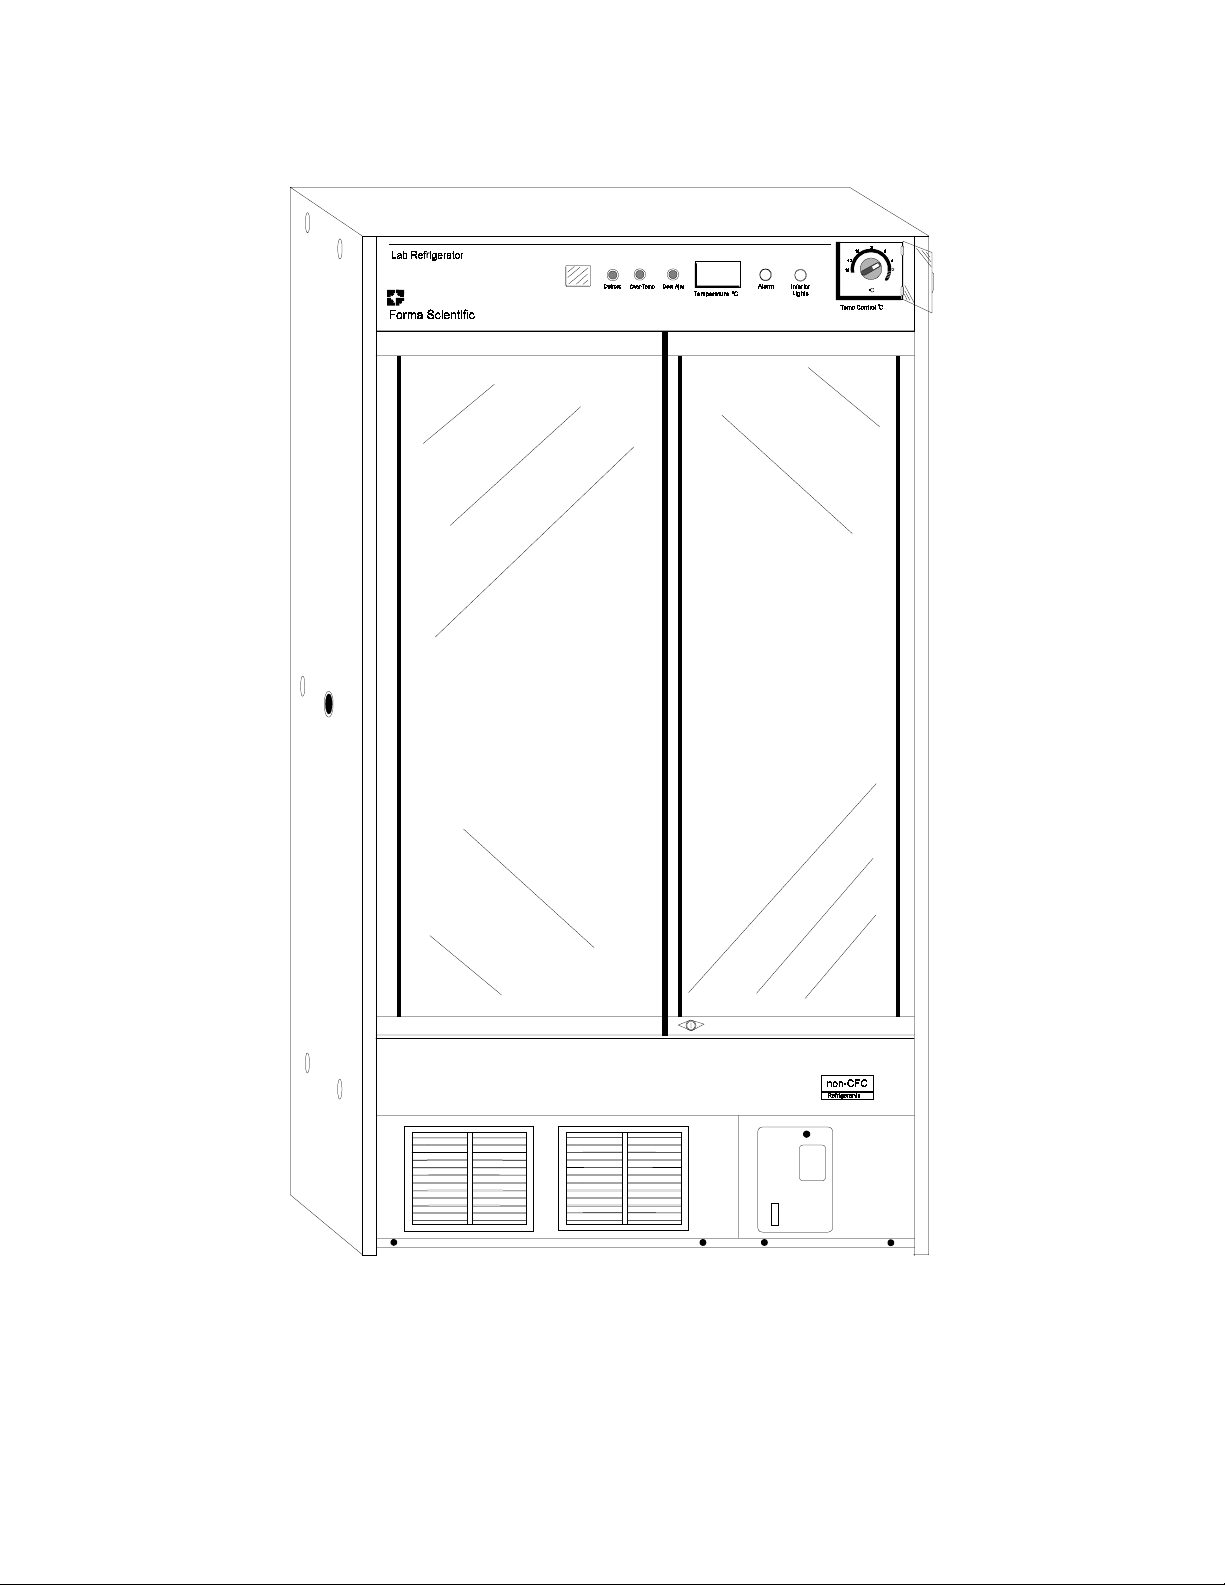
Laboratory Refrigerator
Models 3658/3659 and 3660/3661
Forma Scientific, Inc.
______________________________________________________________________________
2-3
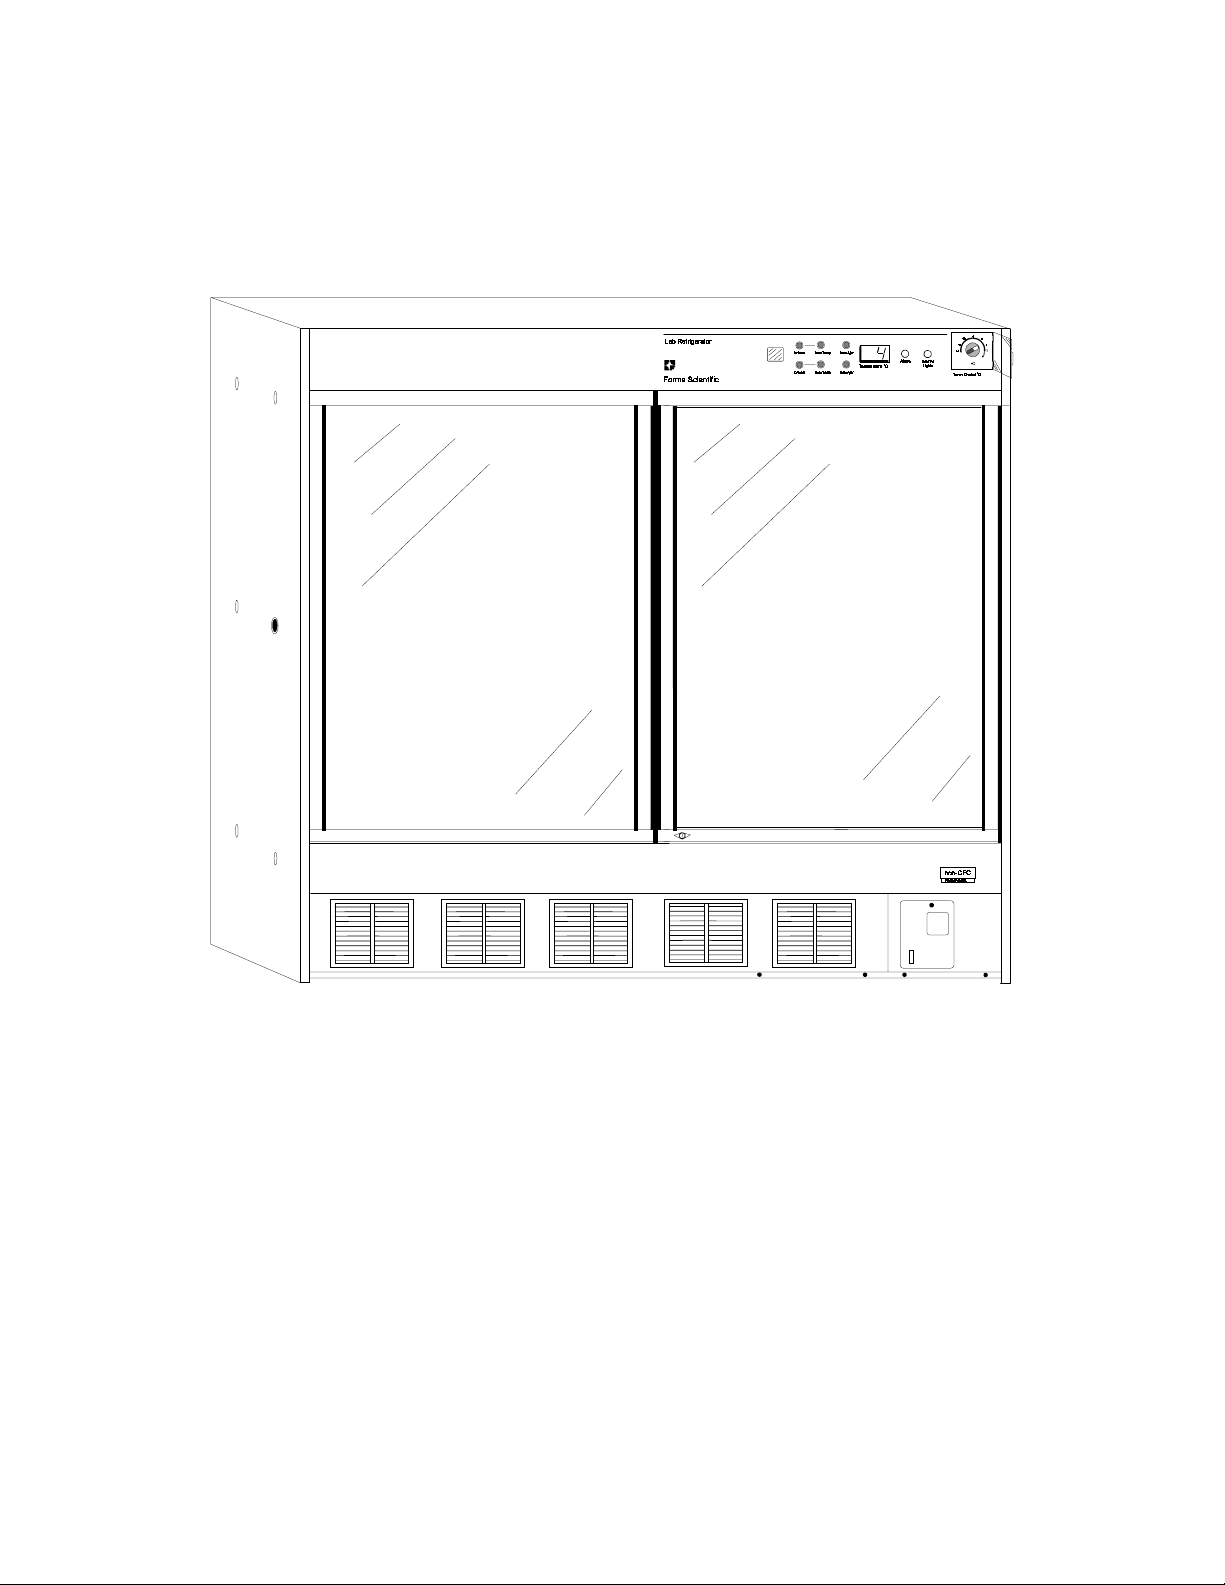
Laboratory Refrigerator
Models 3662 and 3663

Forma Scientific, Inc.
______________________________________________________________________________
2-4
2.4 Installing the Shelves
Adjust the shelves to suit the height of the items placed inside by inserting the shelf
support clips into the slots at the desired level. Make sure that the shelves are secure
before placing product on them.
2.5 Start-Up Procedure
1. After connecting the unit to a power source, set the temperature control dial to the
desired setpoint.
Note: When the unit is plugged in the audible alarm will sound. To temporarily
silence the alarm, place the alarm switch in the "out" position.
Alarm switch position: in = on, out = off.
2. Allow the chamber temperature to cool down to setpoint.
3. Turn the fluorescent light on to check its operation, then turn it off during normal
operation.
4. Make sure that the unit functions properly before placing product in the chamber.
Add warm product to the chamber gradually to prevent excessive temperature rise
and subsequent activation of the alarm system. Allow enough space between the
items to permit adequate air circulation.
5. When the chamber temperature reaches the setpoint, turn the alarm switch on.
Note: Although the refrigerator will operate at under 2°C, it is not suitable for
prolonged use at this range. Always set the thermostat above +2°C. When
running the unit at the top of the range (+14°C), the audible alarm may
sound, however this does not indicate a malfunction. The audible alarm
switch may be switched off.

Forma Scientific, Inc.
______________________________________________________________________________
3-1
SECTION 3 - CONTROL AND INDICATING DEVICES
(Refer to Figures 3-1 for Models 3658/3659 and 3660)
3.1 Temperature Control Dial
The operating temperature of the
refrigerator is set by a control dial on
the front of the cabinet. The
temperature may be set between +2°C
and +14°C.
3.2 Defrost Indicator
The refrigerator has a defrost system which operates automatically. The defrost
light indicates when defrosting is taking place.
3.3 High and Low Temperature Alarm
a. High Temperature
If the chamber temperature rises above +15°C, the alarm system will activate. The
overtemp indicator will light, the digital temperature display will flash. If the alarm
switch is ON (switch button pushed in), the audible alarm will also sound. If the
chamber temperature rises to +20°C, power to the heater and fan circuit also will turn
off.
Note: During start-up, if the ambient temperature is high, it is normal for the overtemp
indicator to stay lit until the chamber temperature drops below the high temperature
alarm point. Make sure that the light goes out before loading the refrigerator with
product.
b. Low Temperature
If the chamber temperature falls below 0°C, the alarm system will activate. The
temperature display will flash and, if the alarm switch is ON (switch button pushed
in), the audible alarm will also sound. If the chamber temperature falls below
-2°C, the defrost heaters will turn on to prevent freezing.

Forma Scientific, Inc.
______________________________________________________________________________
3-2
3.4 Door Ajar Indicator
The Door Ajar indicator lights whenever the refrigerator doors are opened. If the
door remains open for 30 seconds, the audible alarm will sound.
3.5 Audible Alarm Switch
When the audible alarm switch is set to off (switch button out), the audible alarm
will not sound. When the switch is on (switch button in), the audible alarm sounds:
•When the inside temperature is above +15°C.
•When the inside temperature is below 0°C.
•If the door remains open for 30 seconds.
3.6 Interior Lights Switch
The interior lights switch controls power to the fluorescent lights inside the
chamber.
Note: The light should be off during normal refrigerator operation and turned on when
viewing the inside of the chamber.
3.7 Digital Thermometer
The digital thermometer displays the chamber temperature. The display flashes
when the temperature is below 0°C, or above +15°C, or when the door is kept open for
more than 30 seconds.
Figure 3-1, Control Panel
Models 3658/3659 and 3660/3661

Forma Scientific, Inc.
______________________________________________________________________________
3-3
Figure 3-2, Control Panel
Models 3662/3663
(Refer to Figure 3-2)
3.8 Defrost Indicators (Left and Right
Side)
Both sides of the refrigerator have
a defrost system which operates
automatically. The appropriate defrost
light indicates when defrosting is
taking place.
3.9 Refrigeration Indicators (Left and
Right Side)
Both refrigeration units have
indicating lights which light when the
units are operating.
Note: The right side indicator
will light first. The left
side will light about 10
seconds later.

Forma Scientific, Inc.
______________________________________________________________________________
4-1
SECTION 4 - ROUTINE MAINTENANCE
4.1 Defrosting the Unit
The defrost heaters automatically defrost the refrigerator. No additional defrosting
is necessary. The defrost indicator lights when the refrigeration system is defrosting.
4.2 Cleaning the Drain Evaporation Tray and the Condenser Filter
(Refer to the instruction label on the left, front of the unit.)
Clean the drain evaporation tray and condenser filter every three months.
a. Cleaning the Drain Evaporation Tray
Note: Models 3662 and 3663 have two evaporation trays and two condenser filters.
1. Remove the two thumb screws securing the bottom front cabinet cover.
2. Remove the cover and clean it.
3. Remove the evaporation tray and empty any water in it.
4. Clean the tray using a mild detergent and lukewarm water. Rinse the tray
thoroughly and return it to the refrigerator.
b. Cleaning the Condenser Filter
To prevent dust from clogging the condenser, a filter is installed above the
evaporation tray.
1. Grasp the filter and pull it forward. Clean with water and return it to its original
position.
2. After cleaning both the evaporation tray and the condenser filter, secure the
bottom front cover by aligning the three pins at the top of the cover and by
installing the two thumb screws.

Forma Scientific, Inc.
______________________________________________________________________________
4-2
4.3 Cleaning the Unit
Caution: Never splash water on the outside of the unit, as water can cause
malfunctioning of the electronic components. Do not clean the
unit with scrubbing brushes, acid, benzene, thinner, powdered
soap, cleanser or hot water. These agents can damage the
cabinet's finish.
Plastic and rubber parts can be damaged by these materials, especially volatile
agents such as benzene. When a mild detergent is used to clean the unit, rinse (twice)
thoroughly with distilled water (50K Ohm to 1M Ohm).
Caution: Always unplug the unit before beginning the cleaning procedure.
1. Remove all shelves from the chamber.
2. Clean the interior with a soft cloth soaked in a mild detergent. Rinse the interior
surface at least twice with sterile distilled water (50K Ohm to 1M Ohm).
Caution: Purity of the distilled water used in cleaning must be within the 50K
Ohm to 1M Ohm range to protect, and prolong the life of the
stainless steel. The use of tap water or distilled water outside the
specified range will decrease the operating life of the unit and
will void the warranty.
3. Wipe up any water that has collected on the bottom of the unit.
4. Replace the shelves.

Forma Scientific, Inc.
______________________________________________________________________________
5-1
SECTION 5 - TROUBLESHOOTING
Problem Possible Cause
No Refrigeration •Check electrical power
•Electric power has failed or the freezer's
electric cord has been pulled.
Poor Refrigeration •Temperature control not properly set
•Too many unfrozen items in the chamber
•Frost on the evaporator
•Freezer door opened and closed frequently
•Back of the freezer touching the wall
Alarm System Activated •Door not closed tightly
•Too many unfrozen items in the chamber
After Service
If the unit continues to operate unsatisfactorily, contact the Forma Scientific, Inc.
Service Department with the following information:
•A description of the problem, as specific as possible
•Refrigerator model
•Serial number
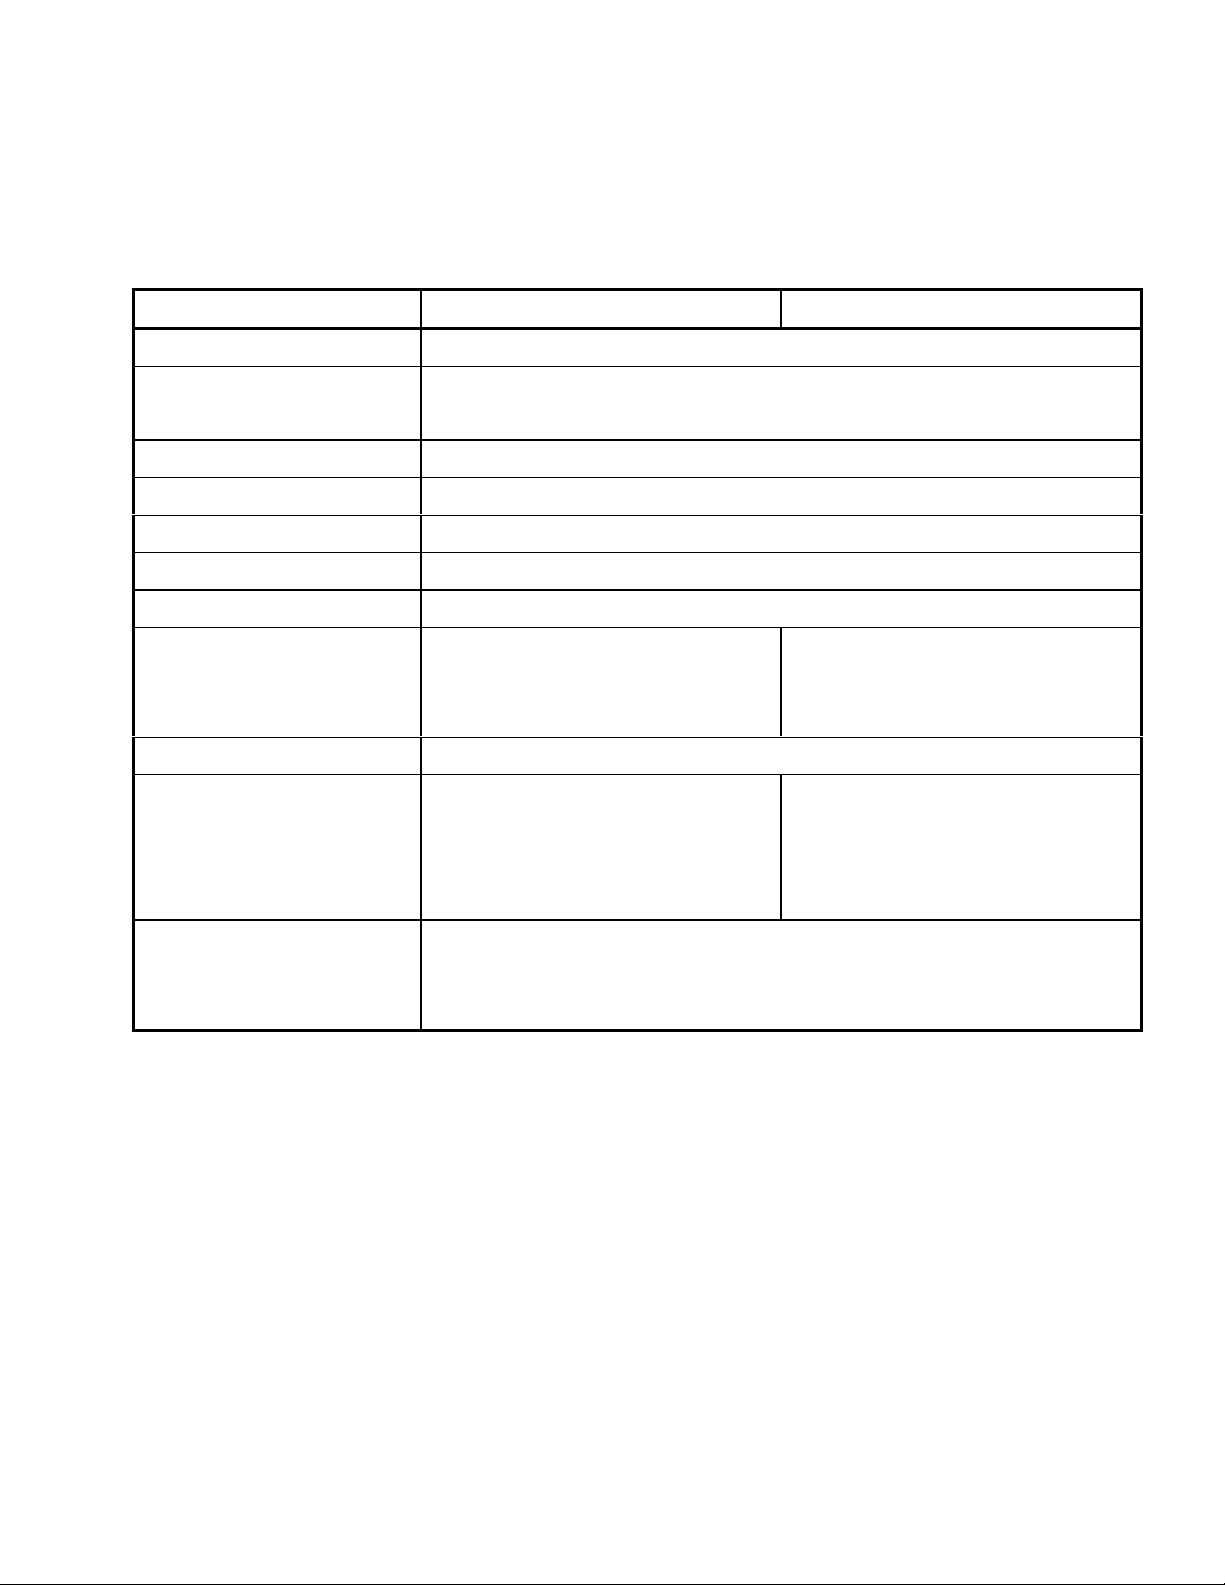
Forma Scientific, Inc.
______________________________________________________________________________
6-1
SECTION 6 - SPECIFICATIONS
Model 3658 (3659) Model 3660 (3661)
Operating Temperature +2°C (+35.6F) to +14°C (+57.2°F)
Temperature Control Direct setting temperature controller with digital temperature
readout, readable to the nearest degree C.
Refrigeration 1/3 HP air cooled compressor
Capacity 17 cu. ft. (486 liters)
Interior Dimensions 31.5"W x 51.19"H x 18.31" F-B (80.01cm x 130.02cm x 46.51cm)
Exterior Dimensions 35.44"W x 70.5"H x 23.63" F-B (90.02cm x 179.07cm x 60.02cm)
Interior Light One 20W fluorescent light with control panel-mounted switch
Shelving Includes five adjustable zinc-
plated shelves
Includes five adjustable wire
shelves and five roll-out baskets
with safety catches
Insulation 1.88" (4.77 cm) Non-CFC foamed-in-place polyurethane
Electrical Model 3658: 115 VAC, 1 PH, 60
HZ, 5.7 FLA
Model 3659: 220 VAC, 1 PH,
50 HZ, 3.0 FLA
Model 3660: 115 VAC, 1 PH, 60
HZ, 5.7 FLA
Model 3661: 220 VAC, 1 PH,
50 HZ, 3.0 FLA
Shipping Weight
(Nominal)
Motor: 482 lbs (219 kg)
Air/Container: 482 lbs (219 kg)
Ocean: 482 lbs (219 kg)

Forma Scientific, Inc.
______________________________________________________________________________
6-2
SPECIFICATIONS
Model 3662 (3663)
Operating Temperature +2°C (+35.6F) to +14°C (+57.2°F)
Temperature Control Direct setting temperature controller with digital temperature
readout, readable to the nearest degree C.
Refrigeration Two separate 1/3 HP air cooled compressor
Capacity 36.5 cu. ft. (1034 liters)
Interior Dimensions 66.88"W x 51.19"H x 18.31" F-B (169.88cm x 130.02cm x 46.51cm)
Exterior Dimensions 70.88"W x 70.5"H x 23.63" F-B (180.04cm x 179.07cm x 60.02cm)
Interior Light One 40W fluorescent light with control panel-mounted switch
Insulation 1.88" (4.77 cm) Non-CFC foamed-in-place polyurethane
Shelving Includes five adjustable zinc-plated shelves and five roll-out baskets
with safety catches
Electrical Model 3662: 115 VAC, 1 PH, 60 HZ, 11 FLA
Model 3663: 220 VAC, 1 PH, 50 HZ, 5.5 FLA
Shipping Weight
(Nominal)
Motor: 821 lbs (372 kg)
Air/Container; 821 lbs (372 kg)
Ocean: 821 lbs (372 kg)

Forma Scientific, Inc.
______________________________________________________________________________
7-1
SECTION 7 - PARTS LIST
Models 3658/3659 and 3660/3661
Stock # Description
227258 Power Relay
227610 Compressor
227296 PCB Assembly
227613 Starting Relay
227614 Overload Relay
227299 Alarm Relay
227300 Starting Capacitor
227302 Defrost Thermostat
227303 Hi-Temp Thermostat
227304 Power Transformer
227305 Condensing Fan Motor
227306 Cooling Fan Motor
227307 Thermal Fuse
227308 Ballast
227309 Lamp Switch
227310 Alarm Switch
227311 Door Switch
227312 Audible Alarm
227296 Lamp
This manual suits for next models
5
Table of contents


