Fostex EX12 User manual

Model EX12
DVD-RAM drive unit with built-in HDD
Owner’s Manual
Introduction
Thank you very much for purchasing the Fostex Model EX12.
The EX12 is a DVD-RAM drive unit dedicated to the PD-6. It in-
corporates a 12-cm DVD-RAM drive with a 2.5-inch HDD.
By connecting the EX12 to your PD-6, you can use two more drives
dedicated to the PD-6, in addition to the PD-6 internal DVD-RAM
drive.
Before using the EX12, read this manual carefully. We would be
very happy if the unit is helpful to you.
<Note>
To use the EX12, the PD-6 software version must be V2.00 or higher.
If the software version of your PD-6 is lower than V2.00, ask your
local Fostex dealer or sale office for upgrade.
The built-in HDD is formatted in the "Normal" mode when shipped.
This means, the HDD is divided into eight partitions, each of which
reserves approximately 4.7 GB capacity.
For details about how to use the EX12 with the PD-6, see "V2.0 supple-
ment" supplied with the PD-6.
フォステクスカンパニー
国内営業・企画販促グループ
〠196-0021 東京都昭島市武蔵野3-2-35
☎042-546-6355 FAX. 042-546-6067
© PRINTED IN JAPAN AUG. 2004 8288 507 000 FX
FOSTEX CO.
3-2-35, Musashino, Akishima-shi, Tokyo, Japan 196-0021
FOSTEX AMERICA
15431, Blackburn Avenue, Norwalk, CA 90650, U. S.A.
USBUSB
USBUSB
USB ポートポート
ポートポート
ポート(PC(PC
(PC(PC
(PC 接続用)接続用)
接続用)接続用)
接続用)
● コネクタ:USBSeriesBReceptacle
● ピン・アサイン:
1:VBUS,2:D-(DATA),3:D+(DATA),4:GND
外形寸法外形寸法
外形寸法外形寸法
外形寸法
●386(W)x94(H)x231(D)mm
電源/消費電力電源/消費電力
電源/消費電力電源/消費電力
電源/消費電力
●AC100〜 240V 38W
●DC12V 3A
本体重量本体重量
本体重量本体重量
本体重量
●約4.3kg
付属品付属品
付属品付属品
付属品
●ラックマウント・アダプタx2
●ACケーブル
●DCケーブル(PD-6との接続用)
●クッション材
●PD-6ゴム足固定ネジ x2
●DVD-RAM ディスク x1
●WindowsPC用ドライバー・ソフトCD
主な仕様主な仕様
主な仕様主な仕様
主な仕様
メディアメディア
メディアメディア
メディア
● 12cmDVD-RAMドライブ
● 2.5インチ HDD内蔵(40GB)
入出力入出力
入出力入出力
入出力
DC12VINDC12VIN
DC12VINDC12VIN
DC12VIN
● コネクタ:XLR-4-32タイプ(オス)
● ピン・アサイン:
1:GND,2:NC,3:NC,4:+12˜18V
DC12VOUT(PD-6DC12VOUT(PD-6
DC12VOUT(PD-6 用出力端子)用出力端子)
用出力端子)用出力端子)
用出力端子)
● コネクタ:XLR-4-31タイプ(メス)
● ピン・アサイン:
1:GND、2:NC、3:NC、4:+12˜18V
IEEE1394IEEE1394
IEEE1394IEEE1394
IEEE1394 ポートポート
ポートポート
ポート(PC(PC
(PC(PC
(PC 接続用)接続用)
接続用)接続用)
接続用)
● コネクタ:1→ FireWire400(4pin)
2→ FireWire400(6pin)
● ピン・アサイン(FireWire4004pin):
1:TPB-,2:TPB+,3:TPA-,4:TPA+
● ピン・アサイン(FireWire4006pin):
1:VP,2:VG,3:TPB-,4:TPB+,5:TPA-,6:TPA+

CAUTION: TO REDUCE THE RISK OF ELECTRIC SHOCK,
DO NOT REMOVE COVER (OR BACK).
NO USER - SERVICEABLE PARTS INSIDE.
REFER SERVICING TO QUALIFIED SERVICE PERSONNEL.
CAUTION
RISK OF ELECTRIC SHOCK
DO NOT OPEN
10. Power Sources - The appliance should be connected to a
power supply only of the type described in the operating
instructions or as marked on the appliance.
11. Grounding or Polarization - The precautions that should be
taken so that the grounding or polarization means of an
appliance is not defeated.
12. Power Cord Protection - Power supply cords should be
routed so that they are not likely to be walked on or pinched
by items placed upon or against them, paying particular
attention to cords at plugs, convenience receptacles, and
the point where they exit from the appliance.
13. Cleaning - The appliance should be cleaned only as
recommended by the manufacturer.
14. Nonuse Periods - The power cord of the appliance should
be unplugged from the outlet when left unused for a long
period of time.
15. ObjectandLiquidEntry-Careshouldbetakensothatobjects
donotfallandliquidsarenotspilledintotheenclosurethrough
openings.
16. Damage Requiring Service - The appliance should be
serviced by qualified service personnel when:
A. The power supply cord or the plug has been damaged; or
B. Objectshavefallen,orliquidhasbeenspilledintotheappliance;
or
C. The appliance has been exposed to rain; or
D. The appliance does not appear to operate normally or exhibits
a marked change in performance; or
E. The appliance has been dropped, or the enclosure damaged.
17. Servicing - The user should not attempt to service the
appliancebeyondthatdescribedintheoperatinginstructions.
All other servicing should be referred to qualified service
personnel.
18. The appliance should be situated away from drops of water
or spray of water.
19. Objects containing liquid such as vase must not be put on
the appliance.
20. The appliance is not completely isolated from the power
supply even if the power switch is at off position.
The lightning flash with arrowhead symbol, within an
equilateral triangle, is intended to alert the user to the
presence of uninsulated "dangerous voltage" within the
product's enclosure that may be of sufficient magnitude to
constitute a risk of electric shock to persons.
The exclamation point within an equilateral triangle is
intended to alert the user to the presence of important
operating and maintenance (servicing) instructions in the
literature accompanying the appliance.
CAUTION:
TO PREVENT ELECTRIC SHOCK, MATCH WIDE BLADE
OF PLUG TO WIDE SLOT, FULLY INSERT.
ATTENTION:
POUR EVITER LES CHOCS ELECTRIQUES,
INTRODUIRE LA LAME LA PLUS LARGE DE LA FICHE
DANS LA BORNE CORRESPONDANTE DE LA PRISE
ET POUSSER JUSQU' AU FOND.
An appliance and cart combination should be moved with
care. Quick stops, excessive force, and uneven surfaces
may cause the appliance and cart combination to overturn.
7. WallorCeiling Mounting-The applianceshouldbemounted
to a wall or ceiling only as recommended by the
manufacturer.
8. Ventilation - The appliance should be situated so that its
location or position dose not interfere with its proper
ventilation.
Forexample,the appliance should not besituatedon a bed,
sofa, rug, or similar surface that may block the ventilation
openings; or, placed in a built-in installation, such as a
bookcaseor cabinet that mayimpede the flow of air through
the ventilation openings.
9. Heat - The appliance should be situated away from heat
sources such as radiators, heat registers, stoves, or other
appliances (including amplifiers) that produce heat.
"WARNING"
"TO REDUCE THE RISK OF FIRE OR ELECTRIC
SHOCK, DO NOT EXPOSE THIS APPLIANCE TO RAIN
OR MOISTURE."
SAFETY INSTRUCTIONS
1. Read Instructions - All the safety and operating instructions
should be read before the appliance is operated.
2. Retain Instructions - The safety and operating instructions
should be retained for future reference.
3. Heed Warnings - All warnings on the appliance and in the
operating instructions should be adhered to.
4. FollowInstructions-Alloperatinganduseinstructionsshould
be followed.
5. Water and Moisture - The appliance should not be used
nearwater - for example, neara bathtub, washbowl, kitchen
sink, laundry tub, in a wet basement, or near a swimming
pool, and the like.
6. Carts and Stands - The appliance should be used only with
a cart or stand that is recommended by the manufacturer.
EX12EX12
EX12EX12
EX12 単独で単独で
単独で単独で
単独で PCPC
PCPC
PC と接続と接続
と接続と接続
と接続
EX12DVD-RAMディスクのオーディオ・ファイルをPCへインポートします(注意:内蔵HDDのオー
ディオ・ファイルはインポートできません)。
PCPC
PCPC
PC 側の側の
側の側の
側の IEEE1394IEEE1394
IEEE1394IEEE1394
IEEE1394
またはまたは
またはまたは
または USBUSB
USBUSB
USB ポートへ接続ポートへ接続
ポートへ接続ポートへ接続
ポートへ接続
29
PD-6PD-6
PD-6PD-6
PD-6 にに
にに
にEX12EX12
EX12EX12
EX12 を搭載してを搭載して
を搭載してを搭載して
を搭載して PCPC
PCPC
PC と接続と接続
と接続と接続
と接続
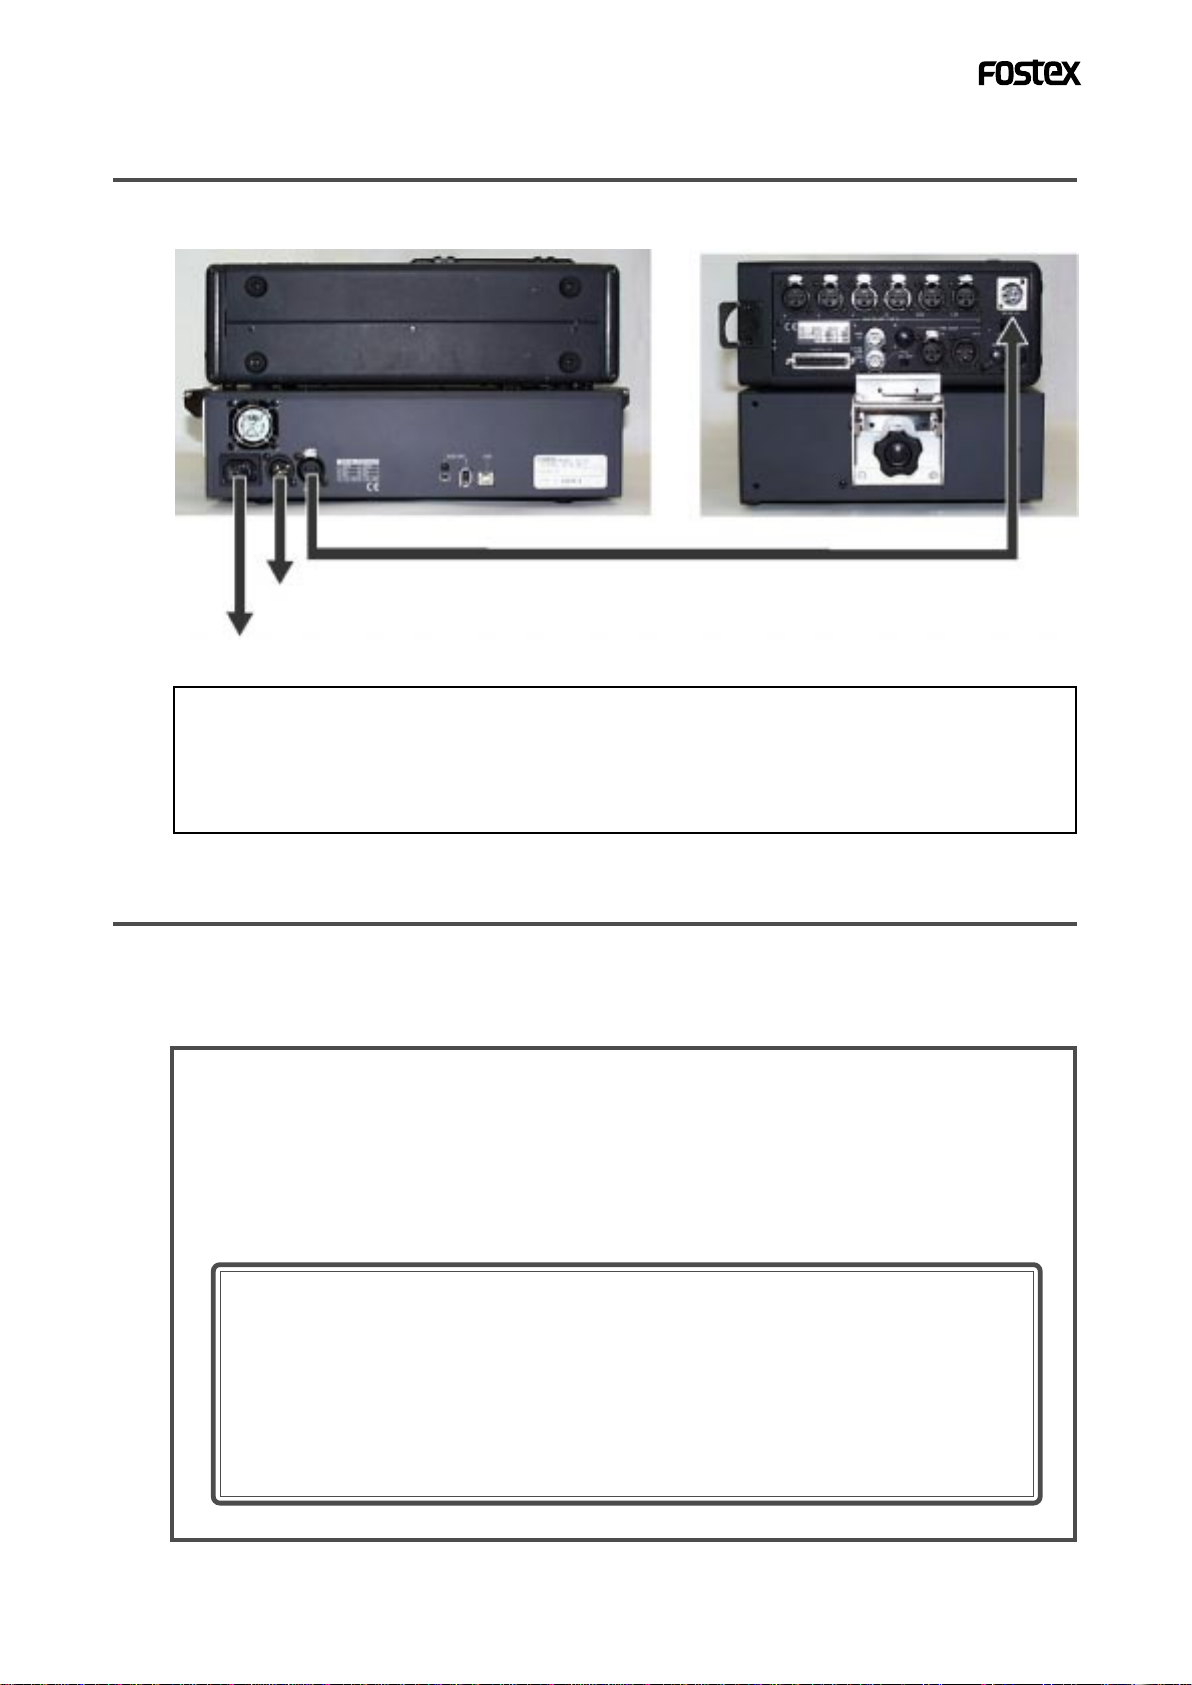
下記例のようにPD-6 と EX12をディージー・チェーンすることで、PD-6 本体のDVD-RAMディスク、
およびEX12 のDVD-RAMディスクのオーディオ・ファイルを PCへインポートすることが可能です。
また、PC側に複数のIEEE1394ポートが装備されている場合は、PD-6およびEX12からそれぞれPCの
IEEE1394ポートに接続する方法もあります。
PCPC
PCPC
PC 側の側の
側の側の
側の IEEE1394IEEE1394
IEEE1394IEEE1394
IEEE1394 へ接続へ接続
へ接続へ接続
へ接続
PD-6PD-6
PD-6PD-6
PD-6 のの
のの
のIEEE1394IEEE1394
IEEE1394IEEE1394
IEEE1394
<使用時の注意><使用時の注意>
<使用時の注意><使用時の注意>
<使用時の注意>
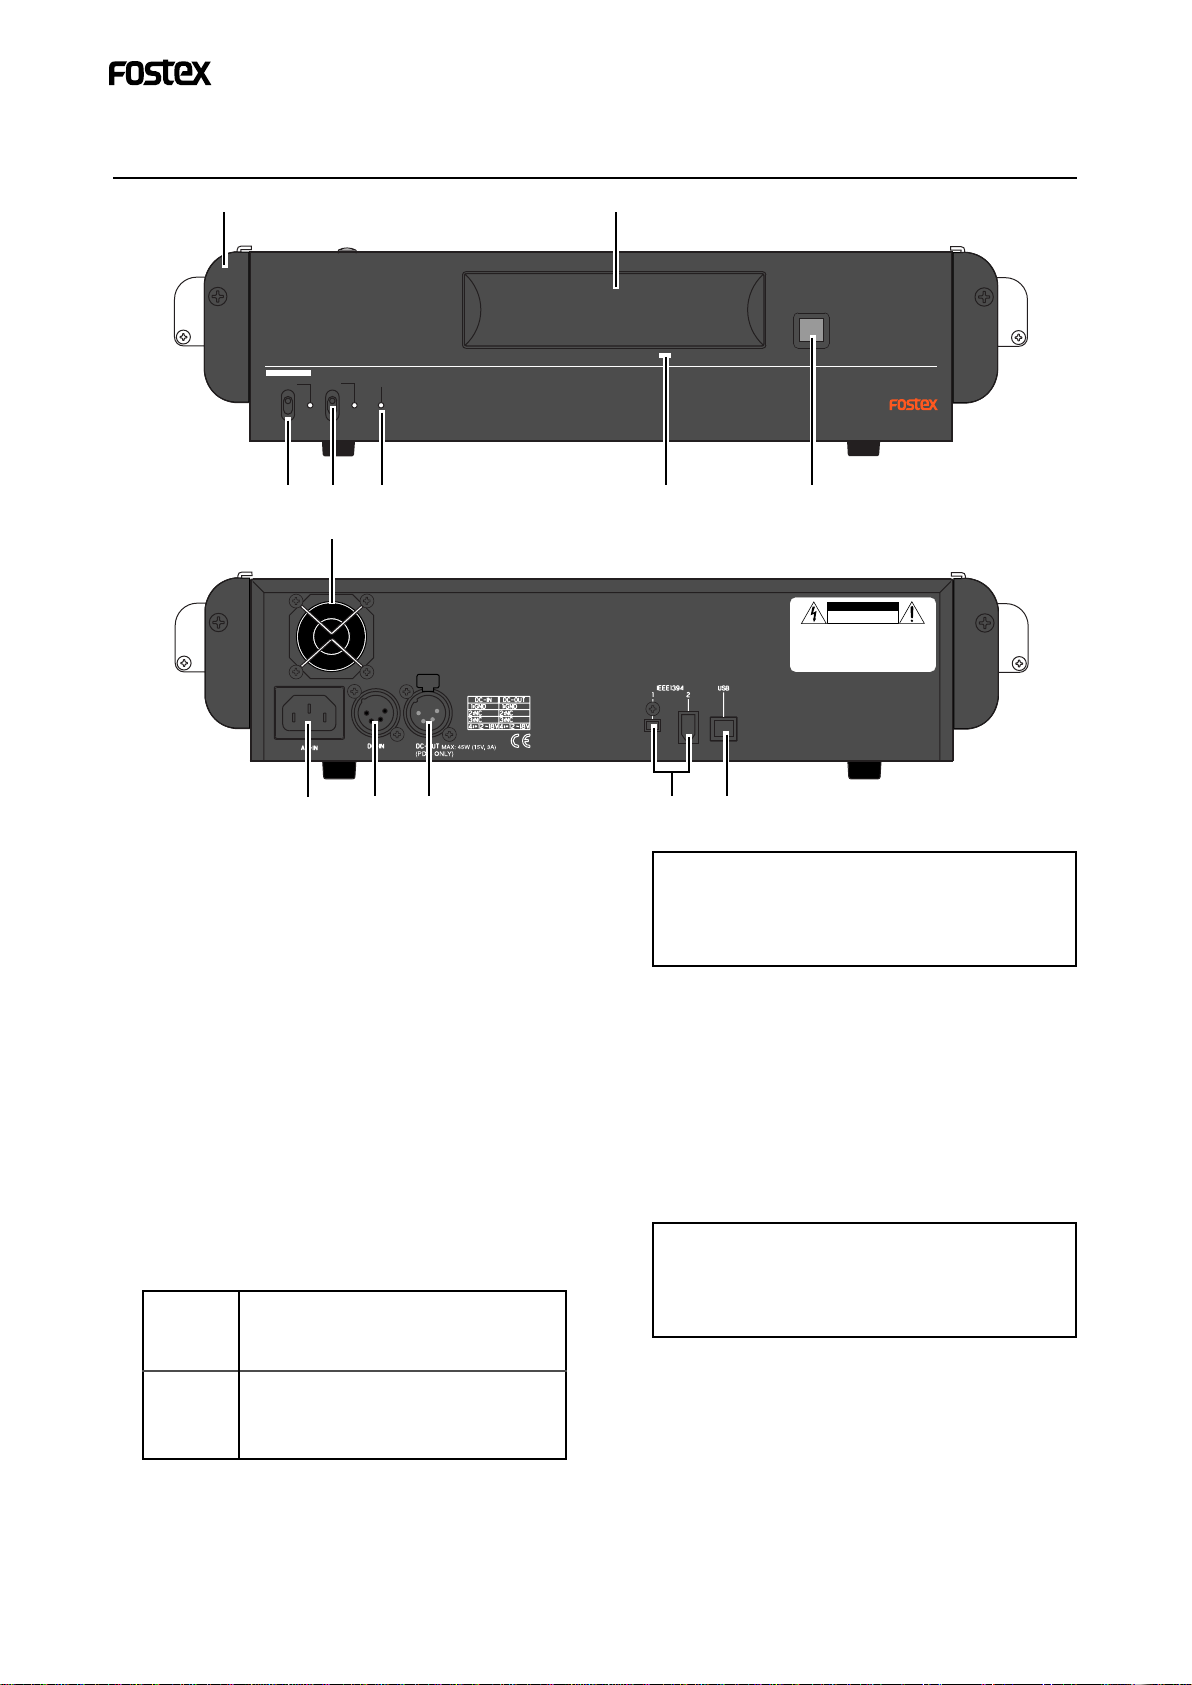
●EX12フロント・パネル部の出力切り換えスイッチをIEEE1394/USBIEEE1394/USB
IEEE1394/USBIEEE1394/USB
IEEE1394/USBに設定する。
●IEEE1394またはUSBいずれかを使ってPCと接続する(2つ同時には使用しない)。
<使用時の注意><使用時の注意>
<使用時の注意><使用時の注意>
<使用時の注意>
●PD-6にEX12が接続されている場合、[PD-6,IEEE1394/USB]切り換えスイッチの切り換えは、両機の電
源をOFFにしてから行ってください
●PD-6の UTILITY モードにあるIEEE1394メニューをCONNECTCONNECT
CONNECTCONNECT
CONNECTに設定する。

38
電源ケーブルの配線電源ケーブルの配線
電源ケーブルの配線電源ケーブルの配線
電源ケーブルの配線
PD-6およびEX12への電源供給は、本機に付属しているACケーブル/DCケーブルを使って、下記図
のように接続します。
付属の付属の
付属の付属の
付属の ACAC
ACAC
AC ケーブルを接続ケーブルを接続
ケーブルを接続ケーブルを接続
ケーブルを接続
オプションのオプションの
オプションのオプションの
オプションのACAC
ACAC
AC アダプタ使用時に接続アダプタ使用時に接続
アダプタ使用時に接続アダプタ使用時に接続
アダプタ使用時に接続本機付属の本機付属の
本機付属の本機付属の
本機付属のDCDC
DCDC
DC ケーブルで接続ケーブルで接続
ケーブルで接続ケーブルで接続
ケーブルで接続
Precautions
•Make sure that the voltage of your AC power outlet matches the voltage
requirements printed on the unit.
•When disconnecting the AC cable, make sure that the unit [POWER] switch is
set to "OFF".
Disconnecting the AC cable while the power is "ON" may damage data
because the unit always transfers data between the current card and memory.
•While the unit is accessing the DVD-RAM disk or internal HDD (for example,
during recording), never turn off the power. Make sure that the unit
completely stops accessing the disk before you turn off the power.
Otherwise, recorded data may be lost, as well as the DVD-RAM disk and
internal HDD may be damaged.
Note that Fostex assumes no responsibility on data loss or whatsoever due to use of
the unit.
•Fostex is not responsible for any "direct damage" or "indirect damage" caused
by using the unit.
•Do not let water or other liquid, or metal objects such as pins, accidentally
enter the inside of the unit (especially inside of the card slots) because this
may lead to electric shock or damage. Should water enter the inside of the
unit, turn off the power, unplug the AC cable, and consult your dealer or the
nearest FOSTEX service station.
•Do not drop the unit or give it a strong shock. The internal circuits may be
damaged. Although the unit is designed to operate outside, handle the unit
with great care because it is a precision machine.
•To prevent possible electric shock and damage to the unit, do not remove the
cover or reach the inside of the unit.
•When using the supplied carrying belt, to prevent the unit from dropping
accidentally, make sure that it is attached to the unit correctly.
<使用時の注意><使用時の注意>
<使用時の注意><使用時の注意>
<使用時の注意>
●PD-6に EX12 が接続されている場合、EX12 の電源をON にしてから PD-6 の電源をONしてください。
●PD-6にEX12が接続されている場合、[PD-6,IEEE1394/USB]切り換えスイッチの切り換えは、両機の電
源をOFFにしてから行ってください
<<
<<
<PCPC
PCPC
PC と接続してご使用になる場合の注意>と接続してご使用になる場合の注意>
と接続してご使用になる場合の注意>と接続してご使用になる場合の注意>
と接続してご使用になる場合の注意>
PCPC
PCPC
PCと接続してご使用いただくには、と接続してご使用いただくには、
と接続してご使用いただくには、と接続してご使用いただくには、
と接続してご使用いただくには、
本機に付属の専用ドライバー本機に付属の専用ドライバー
本機に付属の専用ドライバー
((
((
(CD-ROMCD-ROM
CD-ROMCD-ROM
CD-ROM))
))
)
、、
、、
、またはまたは
またはまたは
または
市販の市販の
市販の市販の
市販のDVD-RAMDVD-RAM
DVD-RAMDVD-RAM
DVD-RAM ライティングライティング
ライティングライティング
ライティング・・
・・
・ソフトをソフトを
ソフトをソフトを
ソフトを PCPC
PCPC
PC へインストールしてください。へインストールしてください。
へインストールしてください。へインストールしてください。
へインストールしてください。
なお、なお、
なお、なお、
なお、専用ドライバー専用ドライバー
専用ドライバー専用ドライバー
専用ドライバー((
((
(まま
まま
またた
たた
たはは
はは
は市市
市市
市販販
販販
販のの
のの
のDVD-RAMDVD-RAM
DVD-RAMDVD-RAM
DVD-RAMライティングライティング
ライティングライティング
ライティング・・
・・
・ソフト)ソフト)
ソフト)ソフト)
ソフト)がインストーがインストー
がインストーがインストー
がインストー
ルされている状態でも、ルされている状態でも、
ルされている状態でも、下記下記
下記下記
下記OSOS
OSOS
OS によってはによっては
によってはによっては
によってはRead/WriteRead/Write
Read/WriteRead/Write
Read/Write が制限されますのでご注意くが制限されますのでご注意く
が制限されますのでご注意くが制限されますのでご注意く
が制限されますのでご注意く
ださい。ださい。
ださい。ださい。
ださい。
[USB][USB]
[USB][USB]
[USB]ポート使用時ポート使用時
ポート使用時ポート使用時
ポート使用時::
::
:
WindowsXP、Windows2000---------------------------------------------------> Read/Writeが可能
MacintoshOSX、OS9.2.1、OS9.2.2-------------------------------------------> Readのみ可能
[IEEE1394][IEEE1394]
[IEEE1394][IEEE1394]
[IEEE1394]ポート使用時ポート使用時
ポート使用時ポート使用時
ポート使用時::
::
:
WindowsXP、Windows2000、WindowsME、Windows98SE-------> Read/Writeが可能
MacintoshOS9.2.1、OS9.2.2----------------------------------------------------> Read のみ可能
PCPC
PCPC
PC との接続との接続
との接続との接続
との接続
本機単独、またはPD-6へ取り付けた状態でパソコンと接続し、記録したオーディオ・ファイル・データ
をパソコンへ取り込みます。なお、パソコンと接続する際には、下記注意事項をよくお読みください。
具体的なPC との接続例は、次ページに記載しています。
Precautions on installation
• Do not install the unit in the following conditions.
•in a extremely hot or cold place
•in a moist place
•in a shaky or unstable place
•in a dusty place
•in a strong magnetic field or near a device which generates a magnetic field
•in the direct sunshine
•in the direct rain or water
• Notes on moisture condensation
When you bring the unit from a cold place to a warm place, moisture may
condense on the drive, display, panels, etc. In such a case, leave the unit for a
while until it warms up and evaporates any moisture.

4 7
Names and functions
OPEN/CLOSE
EX12 EXTERNAL DRIVE UNIT
IEEE1394/USB
HD
PD-6
ON
OFF
POWER
12
3
45
6
7
8
910
1112
13
TO RAIN OR MOISTURE.
SHOCK, DO NOT EXPOSE THIS EQUIPMENT
TO REDUCE THE RISK OF FIRE OR ELECTRIC
WARNING:
NE PAS OUVRIR
RISQUE DE CHOC ELECTRIQUE
AVIS:
RISK OF ELECTRIC SHOCK
DO NOT OPEN
CAUTION
1) Fastenings
The left and right fastenings are used to fasten the
EX12 and PD-6 when stacking them up. (See the next
page for details.)
2) Disk tray
You can set a DVD-RAM disk on the tray.
3) [OPEN/CLOSE] key
Pressing this key opens or closes the disk tray.
Do not press this key while the disc is being accessed,
which may destroy the disc contents.
4) Access indicator
Flashes while the DVD-RAM disk is being accessed.
5) [HD] indicator
Flashes while the built-in HDD is being accessed.
6) PD-6/IEEE1394 USB select switch
Selects "PD-6" or "IEE1394 USB" according to the
situation.
7) Power switch
Turns on or off the power of the unit.
8) Cooling fan
9) [USB] port
Used to connect to a PC via USB.
10) [IEEE1394] ports
Two IEEE1394 connectors of different types are
provided. You can use either of the connectors
according to your PC.
PD-6
IEEE1394
USB
Set the selector to this position when ex-
porting a file recorded on a DVD-RAM
disk set on the EX12 to your PC.
Set the selector to this position when you
use the EX12 as a recording/playback
drive for the PD-6. 11) [DC OUT (PD-6 ONLY)] connector
Used to connect to the [DC IN] connector of the PD-6
using the DC cord supplied with the EX12.
12) [DC IN] connector
Used to connect to the external DC power supply.
13) [AC IN] connector
Used to connect to the supplied AC cord.
<Notes>:
Never use the IEEE1394 and USB ports
simultaneously.
Also note that you cannot use the [USB] and
[IEEE1394] ports while the selector is set to
"PD-6".
<Note>:
While the EX12 is in operation (i.e. during
recording or playback using the EX12 HDD or DVD-
RAM drive, or while exporting or importing data),
do not switch the selector position, which may
cause malfunction.
9)9)
9)9)
9) 左右の固定ネジを締め付けます。左右の固定ネジを締め付けます。
左右の固定ネジを締め付けます。左右の固定ネジを締め付けます。
左右の固定ネジを締め付けます。
ハンガーの金具が外れないよう、固定ネジを締め付け
ます。過度な力を入れ過ぎないよう注意してください。
左右のハンガーがしっかり固定されていることを確認
します。
ここまでの手順で、PD-6本体への搭載が終了です。こ
の後次ページを参照して、電源ケーブルを接続します。
7)7)
7)7)
7) ケーブルを接続した後、ケーブルを接続した後、
ケーブルを接続した後、ケーブルを接続した後、
ケーブルを接続した後、EX12EX12
EX12EX12
EX12 本体を本体を
本体を本体を
本体をPD-6PD-6
PD-6PD-6
PD-6
に重ね合わせます。に重ね合わせます。
に重ね合わせます。に重ね合わせます。
に重ね合わせます。
<注意><注意>
<注意><注意>
<注意>::
::
:重ね合わせるとき、PD-6のゴム足凹部
とEX12の凸部金具が、完全に勘合するようにして
ください。勘合が不完全だと、グランドへの導通が
行われず、正常に動作しなかったり、ノイズ発生の
原因となります。
8)8)
8)8)
8) EX12EX12
EX12EX12
EX12 の両サイドにある固定ハンガーでの両サイドにある固定ハンガーで
の両サイドにある固定ハンガーでの両サイドにある固定ハンガーで
の両サイドにある固定ハンガーでPD-PD-
PD-PD-
PD-
66
66
6を固定します。を固定します。
を固定します。を固定します。
を固定します。
ハンガーの移動金具を上に持ち上げ、PD-6の匡体部分
に引っ掛けます。
金具を引っ掛けた後、固定用アングルを上に持ち上げ
るようにして、ロックします。
同じ要領で、反対側のハンガーも固定します。

Cushion
56
PD-6PD-6
PD-6PD-6
PD-6 へのマウント手順へのマウント手順
へのマウント手順へのマウント手順
へのマウント手順
1)1)
1)1)
1) PD-6PD-6
PD-6PD-6
PD-6 底部にあるカバーを外します。底部にあるカバーを外します。
底部にあるカバーを外します。底部にあるカバーを外します。
底部にあるカバーを外します。
2)2)
2)2)
2) PD-6PD-6
PD-6PD-6
PD-6 底部にあるゴム足を固定しているネジ底部にあるゴム足を固定しているネジ
底部にあるゴム足を固定しているネジ底部にあるゴム足を固定しているネジ
底部にあるゴム足を固定しているネジ
((
((
(22
22
2箇所)箇所)
箇所)箇所)
箇所)
を、を、
を、を、
を、
本機に付属しているネジに付け本機に付属しているネジに付け
本機に付属しているネジに付け
替えます。替えます。
替えます。替えます。
替えます。
<注意><注意>
<注意><注意>
<注意>::
::
:ゴム足を固定しているネジは、必ず付属
のネジと交換してください。この作業が行われてい
ないと、PD-6へEX12を搭載したとき、グランド
への導通が不完全となり正常に動作しなくなりま
す。
3)3)
3)3)
3) EX12EX12
EX12EX12
EX12上部にあるカバー固定ネジ上部にあるカバー固定ネジ
上部にあるカバー固定ネジ上部にあるカバー固定ネジ
上部にあるカバー固定ネジ
((
((
(22
22
2箇所)箇所)
箇所)箇所)
箇所)
をを
をを
を
取り外し、取り外し、
取り外し、取り外し、
取り外し、カバーを開きます。カバーを開きます。
カバーを開きます。カバーを開きます。
カバーを開きます。
<注意><注意>
<注意><注意>
<注意>::
::
:取り外したネジは、この後の手順でクッ
ションを固定するときに使用します。
紛失しないようご注意ください。
クッション
4)4)
4)4)
4) 先に外してある固定ネジを使って、先に外してある固定ネジを使って、
先に外してある固定ネジを使って、先に外してある固定ネジを使って、
先に外してある固定ネジを使って、
付属のク付属のク
付属のク付属のク
付属のク
ッション材を図の位置に固定します。ッション材を図の位置に固定します。
ッション材を図の位置に固定します。
6)6)
6)6)
6) PD-6PD-6
PD-6PD-6
PD-6 をを
をを
をEX12EX12
EX12EX12
EX12 本体に載せ、本体に載せ、
本体に載せ、本体に載せ、
本体に載せ、図の要領で接続図の要領で接続
図の要領で接続図の要領で接続
図の要領で接続
ケーブルのコネクタをケーブルのコネクタを
ケーブルのコネクタをPD-6PD-6
PD-6PD-6
PD-6 に接続します。に接続します。
に接続します。に接続します。
に接続します。
コネクタの向きに注意してください。コネクタの向きに注意してください。
コネクタの向きに注意してください。
5)5)
5)5)
5) EX12EX12
EX12EX12
EX12本体の中から接続ケーブルを取り出し本体の中から接続ケーブルを取り出し
本体の中から接続ケーブルを取り出し本体の中から接続ケーブルを取り出し
本体の中から接続ケーブルを取り出し
ます。ます。
ます。ます。
ます。
How to stack the PD-6 and EX12 together
1) Remove the blank panel at the bottom of the
PD-6.
2) Replace the two screws for fixing the rubber
feet at the bottom of the PD-6 with the screws
supplied with the EX12.
<Note>:
Never forget to replace the screws
for fixing the rubber feet. Otherwise, the PD-
6 may malfunction or generate a noise be-
cause of imperfect grounding.
3) Remove the two screws for fixing the cover at
the top of the PD-6, and open the cover.
<Note>:
The removed screws are used later
for fixing the cushion. Be sure not to lose
them.
4) Fix the supplied cushion using the fixing screws
which are removed in the previous step.
6) Put the PD-6 on the EX12 and plug the
connector of the cable to the PD-6, as shown
below. Make sure to plug the connector in the
correct direction.
5) Pull out the connection cable from inside the
EX12.

各部の名称と機能各部の名称と機能
各部の名称と機能各部の名称と機能
各部の名称と機能
OPEN/CLOSE
EX12 EXTERNAL DRIVE UNIT
IEEE1394/USB
HD
PD-6
ON
OFF
POWER
12
3
45
6
7
8
910
1112
13
TO RAIN OR MOISTURE.
SHOCK, DO NOT EXPOSE THIS EQUIPMENT
TO REDUCE THE RISK OF FIRE OR ELECTRIC
WARNING:
NE PAS OUVRIR
RISQUE DE CHOC ELECTRIQUE
AVIS:
RISK OF ELECTRIC SHOCK
DO NOT OPEN
CAUTION
1)1)
1)1)
1) 固定ハンガー固定ハンガー
固定ハンガー固定ハンガー
固定ハンガー
本機とPD-6本体を固定するときに使用します(詳
細は次ページを参照)。
2)2)
2)2)
2) ディスクディスク
ディスクディスク
ディスク・・
・・
・トレイトレイ
トレイトレイ
トレイ
DVD-RAMディスクをセットします。
3)3)
3)3)
3) [OPEN/CLOSE][OPEN/CLOSE]
[OPEN/CLOSE][OPEN/CLOSE]
[OPEN/CLOSE]キーキー
キーキー
キー
ディスク・トレイを開閉するときに押します。
ディスクがアクセス中は、むやみに押さないでくだ
さい。ディスク内容を壊すことがあります。
4)4)
4)4)
4) インジケータインジケータ
インジケータインジケータ
インジケータ
DVD-RAMディスクがアクセス中、点滅します。
5)5)
5)5)
5) [HD][HD]
[HD][HD]
[HD]インジケータインジケータ
インジケータインジケータ
インジケータ
内蔵HDDがアクセス中、点滅します。
6)6)
6)6)
6) PD-6/IEEE1394USBPD-6/IEEE1394USB
PD-6/IEEE1394USBPD-6/IEEE1394USB
PD-6/IEEE1394USB 切り換えスイッチ切り換えスイッチ
切り換えスイッチ切り換えスイッチ
切り換えスイッチ
7)7)
7)7)
7) パワーパワー
パワーパワー
パワー・・
・・
・スイッチスイッチ
スイッチスイッチ
スイッチ
本機の主電源をオン/オフします。
8)8)
8)8)
8) 冷却ファン冷却ファン
冷却ファン冷却ファン
冷却ファン
9)9)
9)9)
9) [USB][USB]
[USB][USB]
[USB]ポートポート
ポートポート
ポート
USBを使ってPCと接続するとき使用します。
10)10)
10)10)
10) [IEEE1394][IEEE1394]
[IEEE1394][IEEE1394]
[IEEE1394]ポートポート
ポートポート
ポート
2 種類の IEEE1394コネクタを用意しています。
接続するPCに合わせてご使用いただけます。
PD-6
IEEE1394
USB
EX12のDVD-RAMディスクに記録
されたファイルを PC へ取り込むと
き、このポジションに切り換えます。
PD-6に搭載して記録/再生ドライ
ブとして使用するとき、このポジ
ションに切り換えます。
11)11)
11)11)
11) [DCOUT(PD-6ONLY)][DCOUT(PD-6ONLY)]
[DCOUT(PD-6ONLY)][DCOUT(PD-6ONLY)]
[DCOUT(PD-6ONLY)]コネクタコネクタ
コネクタコネクタ
コネクタ
このコネクタは、PD-6との接続専用です。
本機に付属のDCコネクタ・ケーブルを使い、PD-
6の[DCIN]コネクタと接続します。
12)12)
12)12)
12) [DCIN][DCIN]
[DCIN][DCIN]
[DCIN]コネクタコネクタ
コネクタコネクタ
コネクタ
外部DC電源を入力します。
13)13)
13)13)
13) [ACIN][ACIN]
[ACIN][ACIN]
[ACIN]コネクタコネクタ
コネクタコネクタ
コネクタ
付属のACケーブルを接続します。
<注意><注意>
<注意><注意>
<注意>::
::
:IEEE1394ポートと、USBポートは
同時に使用しないでください。また、PD-6に
本機を接続して[PD-6/IEEE1394USB]切り換
えスイッチをPD-6ポジションに設定したと
きは、[USB]および[IEEE1394]ポートは使用
できません。
<注意><注意>
<注意><注意>
<注意>::
::
:PD-6に搭載している状態で使用中、
絶対にスイッチを切り替えないでください。正
常に動作しなくなることがあります。
56
9) Fasten the fixing screw of each fastening.
Confirm both the left and right fastenings are
fixed tightly.
7) After connecting the cable, stack the PD-6 on
the EX12.
<Note>:
When stacking the PD-6 on the EX12,
make sure to perfectly fit the dent of PD-6
rubber feet to the metallic projections of each
EX12. Otherwise, the PD-6 may malfunction
or generate a noise because of imperfect
grounding.
8) Use the fastenings on both the left and right
sides of the EX12 to fastening the PD-6.
After hanging the projection on the PD-6, lift
up the fixing angle until it is locked.
Now you complete stacking the EX12 and PD-6
together.
The next step is to connect the power cords.
See the next page.
Pull up the metallic projection of each fasten-
ing and hang it on the PD-6.(The following pic-
tures show the example of the left side.)
Fasten the fixing screw of each fastening so that
the fastening may not be off. Be careful not to
apply excessive force.

7
●
Connecting the power cords
Connect to the AC outlet using the supplied AC cord.
This connector is used when using the external DC power supply.
Make connection using the supplied DC cord.
To supply power to the PD-6 and EX12, connect the AC and DC cords supplied with the
EX12, as shown below.
<Notes>
• When the EX12 is connected to the PD-6, turn on the EX12 first, followed by the PD-6.
• When the EX12 is connected to the PD-6, make sure that both the PD-6 and EX12 are turned
off before you switch the selector (for selecting [PD-6 IEEE1394] or [USB]) on the EX12 front
panel.
<Notes for using the EX12 with your PC>
To use the EX12 with your PC, install the dedicated driver (on the supplied CD-
ROM) or commercially available DVD-RAM writing software to your PC.
Also note that even if the dedicated driver (or commercially available DVD-RAM
writing software) is correctly installed, the Read/Write functions are limited de-
pending on OS, as below.
When using the [USB] port:
Windows XP, 2000 --> Both "Read" and "Write" are possible.
Macintosh OSX, OS9.2.1, OS9.2.2 --> Only "Read" is possible
When using the [IEEE1394] port:
Windows XP, 2000, ME, 98SE --> Both "Read" and "Write" are possible.
Macintosh OSX, OS9.2.1, OS9.2.2 --> Only "Read" is possible.
PC connection
By connecting the EX12 to your PC regardless of whether the EX12 is connected to the PD-
6 or not, you can export the EX12 audio file data to your PC. Read the following notes
carefully before making connection. See also the next page for the connection examples.

8
Connecting the EX12 alone to your PC
To the IEEE1394 or USB
port on your PC
<Notes for using>
• Set the selector on the EX12 front panel to "IEEE1394/USB".
• Connect the EX12 to your PC via the IEEE1394 or USB port. Never use both ports together.
By connecting the EX12 to your PC, you can export an audio file on a DVD-RAM disk set to
the EX12. Note that you cannot export an audio file on the EX12 internal HDD.
Daisy-chaining the PD-6, EX12 and PC
To the IEEE1394 port
on the PC
IEEE1394port onthe
PD-6
<Notes for using>
• When the EX12 is connected to the PD-6, make sure that both the PD-6 and EX12 are turned
off before you switch the selector (for selecting [PD-6 IEEE1394] or [USB]) on the EX12 front
panel.
• Set the "IEEE1394" menu item in the Utility mode of the PD-6 to "CONNECT".
By making "daisy chain" of the PD-6, EX12 and PC as shown below, you can export an audio
file on a DVD-RAM disk set to the PD-6 or EX12.
If your PC has more than one IEEE1394 port, you also can connect the PD-6 and EX12
individually to the IEEE1394 ports on the PC.

USB port (for PC connection)
Connector: USB Series "B" receptacle
Pin assignment:
1: VBUS, 2: D- (DATA), 3: D+ (DATA),
4: GND
External dimensions:
386 (W) x 94 (H) x 231 (D) mm
Power requirement/power consumption:
100~240 VAC, 38W
12VDC 3A
Weight
Approx. 4.3 kg
Supplied accessories
* A pair of rack mount adaptors x2
* AC cord x1
* DC cord (for connection to the PD-6) x1
* Cushion x 1
* Fixing screws x2
* DVD-RAM disk x1
* DVD-RAM Driver Software (for windows) x1
Main specifications
Internal drives:
12-cm DVD-RAM drive and 2.5-inch HDD (40 GB)
Inputs/Outputs:
DC12V IN
Connector: XLR-4-32 type (male)
Pin assignment:
1: GND, 2: NC, 3: NC, 4: +12~18 V
DC12V OUT (PD-6 ONLY)
Connector: XLR-4-31 type (female)
Pin assignment:
1: GND, 2: NC, 3: NC, 4: +12~18 V
IEEE1394 port (for PC connection)
Connector: 1: FireWire 400 (4-pin)
2: FireWire 400 (6-pin)
Pin assignment (FireWire 400, 4-pin):
1: TPB-, 2: TPB+, 3: TPA-, 4: TPA+
Pin assignment (FireWire 400, 6-pin):
1: VP, 2: VG, 3: TPB-,
4: TPB+, 5: TPA-, 6: TPA+
9
DVD-RAM disk
Rack mount adaptor (x2)
Fixing screw (x2)
Cushion
AC connect cable
DC connect cable
DVD-RAM
Driver Software

Declaration of EC Directive
ThisequipmentiscompatiblewiththeEMCDirective (89/336/EEC)-Directive onapproximationof membernation'sordinance
concerning the electromagnetic compatibility and with the Low Voltage Directive (73/23/EEC) - Directive on approximation
of member nation's ordinance concerning electric equipment designed to be used within the specified voltage range.
The Affect of Immunity on This Equipment
FOSTEX DISTRIBUTORS LIST IN EUROPE
* Including non-EU countries (as of October, 2003)
<ITALY>
NAME: Proel S. p. A.
ADD: Zona Via Alla Ruenia, 37/43 64027 -Sant’Omero
(Teramo), Italy
TEL: (+39) 0861-81241, FAX: (+39) 0861-887862
<THE NETHERLANDS>
NAME: IEMKE ROOS AUDIO B. V.
ADD: Kuiperbergweg 20, 1101 AG Amsterdam, The
Netherlands
TEL: (+31) 20-697-2121, FAX: (+31) 20-697-4201
<NORWAY>
NAME: Fitzpatrick
ADD: P. B. 4316 Nydalen, 0402 Oslo, Norway
TEL: (+47) 23 400 380, FAX: (+47) 23 400 389
<PORTUGAL>
NAME: Caius - Tecnologias Audio e Musica, Lda.
ADD: Praca do Bom Sucesso, No 61 Bom Sucesso Trade
Center, Escritorio 701/702, 4150 - 146 Porto, Portugal
TEL: (+351) 22-608-06-10, FAX: (+351) 22-608-06-29
<SPAIN>
NAME: Letusa S. A.
ADD: C/Laguna 10, 28923 Alcorcon, Madrid, Spain
TEL: (+34) 91-4862800, FAX: (+34) 91-6414597
<SWEDEN>
NAME: TTS Scandinavia AB
ADD: Kavallerivagen 24, 172 48 Sundbyberg, Sweden
TEL: (+46) 8-59798000, FAX: (+46) 8-59798001
<SWITZERLAND>
NAME: Audio Bauer Pro AG
ADD: Bernerstrasse-Nord 182, CH-8064 Zurich,
Switzerland
TEL: (+41) 1-4323230, FAX: (+41) 1-4326558
<UK>
NAME: SCV London
ADD: 40 Chigwell Lane, Oakwood Hill Industrial Estate,
Loughton, Essex IG10 3NY U. K.
TEL: (+44) 20-8418-0778, FAX: (+44) 20-8418-0624
<AUSTRIA>
NAME: ATEC Audio-u. Videogeraete VertriebsgesmbH.
ADD: Im Winkel 5, A-2325 Velm, Austria
TEL: (+43) 2234-74004, FAX: (+43) 2234-74074
<BELGIUM>
NAME: General Audio
ADD: Albert Temmerstraat 21, 1731 Zellik, Belgium
TEL: (+32) 2-4630650, FAX: (+32) 2-4661500
<DENMARK>
NAME: SC Sound ApS
ADD: Malervej 2, DK-2630 Taastrup, Denmark
TEL: (+45) 4399-8877, FAX: (+45) 4399-8077
<FINLAND>
NAME: Noretron Oy Audio
ADD: P. O. Box 22, FIN-02631 Espoo, Finland
TEL: (+358) 9-5259330, FAX: (+358) 9-52593352
<FRANCE>
NAME: Sennheiser France
ADD: 128 bis, avenue Jean-Jaures, 94851 Ivry-sur-Seine
Cedex, France
TEL: (+33) 1 4987 0300, FAX: (+33) 1 4987 0324
<GERMANY>
NAME: Mega Audio GmbH
ADD: Stromberger Str. 32, D-55411 Bingen, Germany
TEL: (+49) 6721-94330, FAX: (+49) 6721-32046
<GREECE>
NAME: Bon Studio S. A.
ADD: 6 Zaimi Street, Exarchia, 106.83 Athens, Greece
TEL: (+30) 210-3809-605, 606, 607, 608
FAX: (+30) 210-3845-755, 210-3827-868
<ICELAND>
NAME: I. D. elrf. electronic Ltd.
ADD: ARMULA 38 108 REYKJAVIK, ICELAND
TEL: (+354) 588 5010, FAX: (+354) 588 5011
Inthe electricalfasttransient/burstrequirements, surge, conducteddisturbancesbyradio-frequency fields,powerfrequency
magnetic field, radiate electromagnetic field requirements and static electricity discharging environment, this could be
affected by generation of noise in some cases.
The affect of the European Specification EN61000-6-1 (coexistence of electromagnetic waves - common
immunity specification) on this equipment are as shown below.
10
Table of contents
Other Fostex DVD Drive manuals