Fraserway RV C-Medium 2021 User manual

Instruction Manual
ENGLISH
RV Type:
C-Medium

Page | 1
CANADIAN TRAFFIC RULES AND ROAD SIGNS.................................................................................. 2
TRAFFIC RULES.......................................................................................................................................................................... 2
ROAD SIGNS ............................................................................................................................................................................. 4
CABIN............................................................................................................................................. 5
IGNITION SWITCH ...................................................................................................................................................................... 5
BATTERY BOOST SWITCH............................................................................................................................................................. 5
AUTOMATIC TRANSMISSION ........................................................................................................................................................ 5
TOW/HAUL.............................................................................................................................................................................. 5
CRUISE CONTROL....................................................................................................................................................................... 5
PARKING BRAKE (EMERGENCY BRAKE/HAND BRAKE) ....................................................................................................................... 6
HEATED SIDE MIRRORS............................................................................................................................................................... 6
VEHICLE CARE AND MAINTENANCE................................................................................................. 6
GASOLINE ................................................................................................................................................................................ 6
ENGINE OIL .............................................................................................................................................................................. 6
TIRES ...................................................................................................................................................................................... 6
VEHICLE SPECIFICATIONS ................................................................................................................ 8
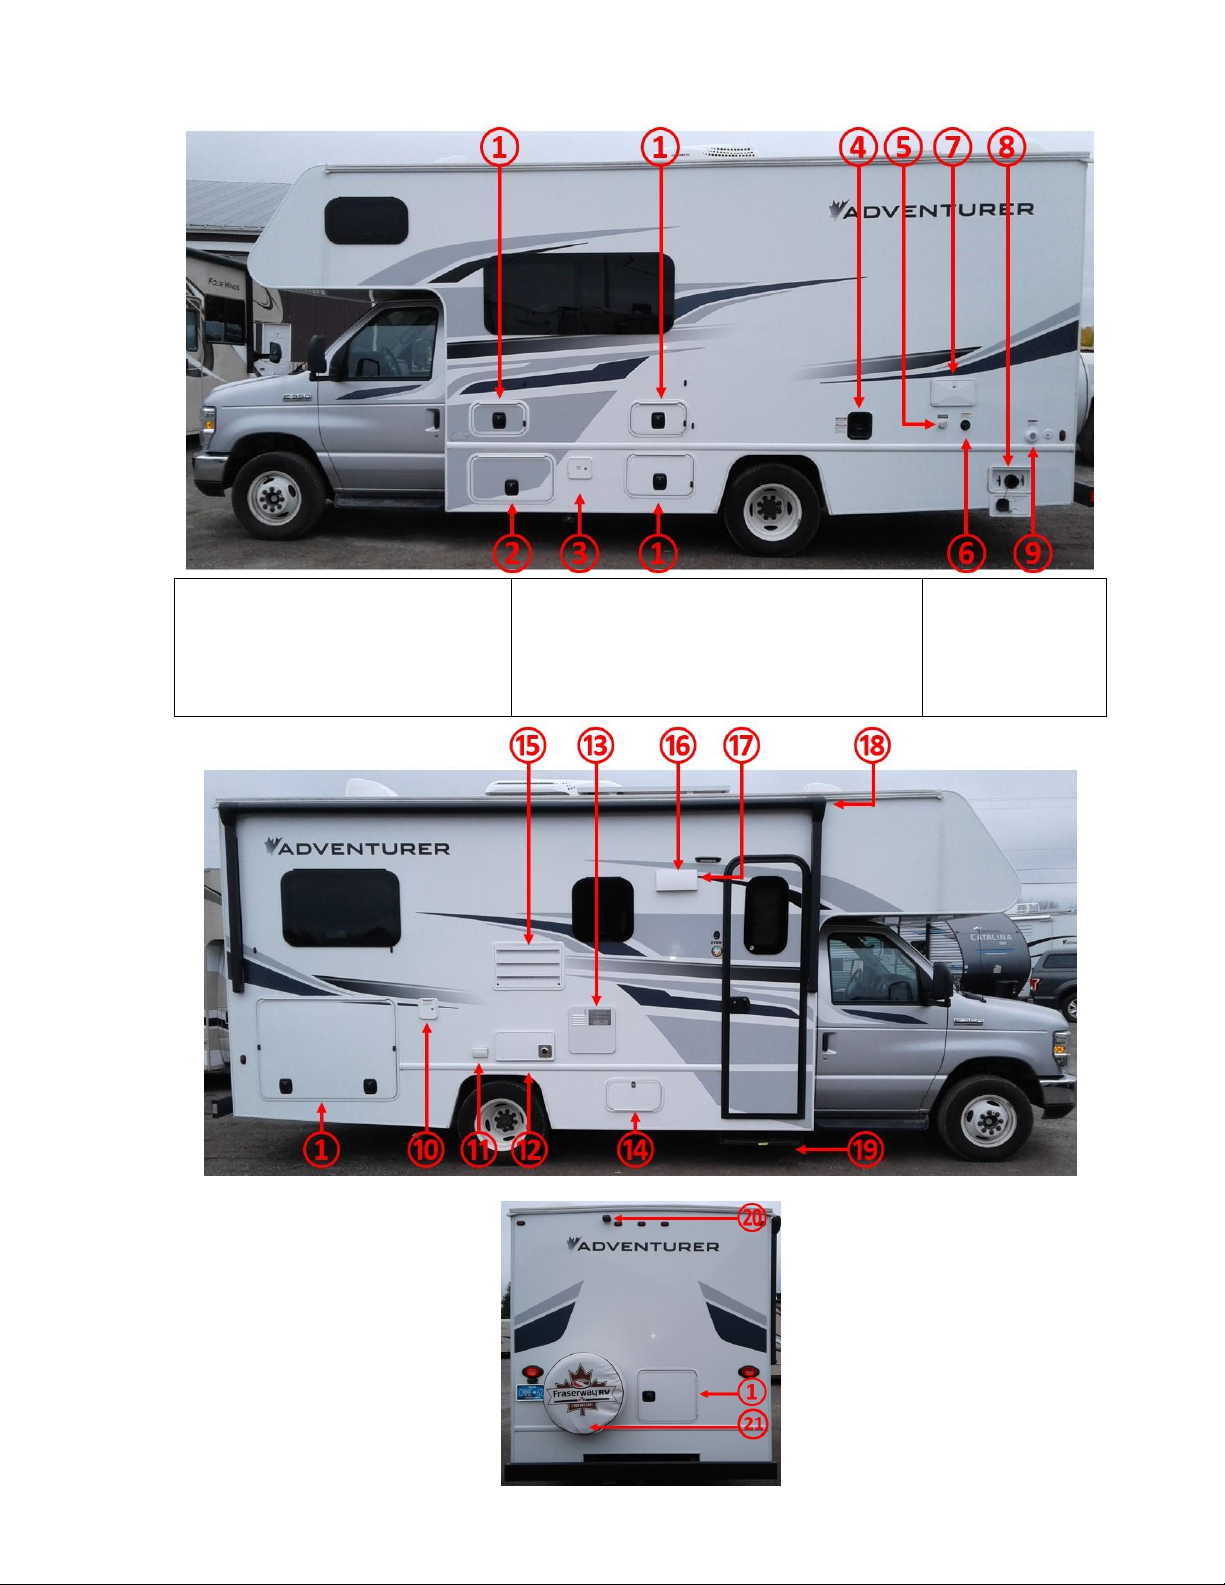
EXTERNAL VIEW.............................................................................................................................. 9
AWNING.................................................................................................................................................................................. 9
ELECTRICAL SYSTEM ................................................................................................................................................................. 10
GENERATOR ........................................................................................................................................................................... 11
PROPANE TANK....................................................................................................................................................................... 13
WATER SYSTEM ...................................................................................................................................................................... 13
TOILET................................................................................................................................................................................... 15
WASTEWATER......................................................................................................................................................................... 16
HEATING/AIR CONDITIONING .................................................................................................................................................... 16
DINETTE TABLE/BED COMBINATION............................................................................................................................................ 17
COOKING AREA ....................................................................................................................................................................... 17
FRIDGE .................................................................................................................................................................................. 19
SAFETY EQUIPMENT ..................................................................................................................... 22
SMOKE DETECTOR/CARBON MONOXIDE ALARM ........................................................................................................................... 22
FIRE EXTINGUISHER.................................................................................................................................................................. 22
PROPANE DETECTOR/ALARM..................................................................................................................................................... 22
RETURNING THE VEHICLE.............................................................................................................. 23

Page | 2
CANADIAN TRAFFIC RULES AND ROAD SIGNS
TRAFFIC RULES
ALCOHOL AND DRUGS
Permitted blood alcohol levels are mandated by the provinces and territories. Please do not drive under the
influence of alcohol and/or drugs!
TRAFFIC LIGHTS
Traffic lights are suspended across the intersection. Left turn arrows indicate that you can safely turn
left while the oncoming traffic is still stopped at a red light.
After you have come to a complete stop and made sure the intersection is clear of all vehicles, cyclists and
pedestrians, you may turn right despite a red light in the U.S. and Canada except for the island of Montreal in
Québec. Exceptions are often limited to certain times and clearly posted as below.
Example on the left: Turning right is prohibited on red.
Example on the right: Turning right is prohibited from Monday to Friday, 7AM - 9AM and
4PM - 6PM (no matter whether there are traffic lights or not).
SEAT BELT
Canadian and U.S. laws require driver and all passengers to be seated with the seat belt fastened when the
vehicle is in motion.
SPEED LIMITS
The Speed limit in most urban areas is 50 km/h, and on highways either 80 or 100 km/h, unless otherwise
posted.
PEDESTRIANS
Canadian drivers are usually very polite and considerate. Pedestrians have the right of way.
DRIVER'S LICENSES
We require your national license for RV rentals. Foreign licenses are generally accepted in Canada. However,
we recommend carrying an international driver's license in addition, unless your original license is issued in
English or French.
GPS SYSTEMS AND HEIGHT RESTRICTIONS
Your RV's external dimensions and gross vehicle weight (GVW) are shown on a windshield sticker and in the
manual. GPS systems do not provide any information on height restrictions on your planned route. Always
check restriction signs for tunnels, overpasses, gas stations, roof constructions, ferries, etc.! Drive-thrus at fast
food outlets or entry ways to hotels/motels are generally too low for RV’s!
As a general rule: the minimum clearance must be 3.70 m or 12 ft. for all of our vehicles.
HOV LANE (HIGH OCCUPANCY VEHICLE LANE)
HOV lanes are for vehicles with two or more people inside. These lanes may only be used by vehicles
that carry the minimum required number of people. The HOV lane symbol is a diamond,
which is indicated on many HOV signs and above all, on HOV lanes. Example of signs:
Left: HOV lane for buses and vehicles with at least 3 people starts here.
Right: From 5AM to 11PM, this lane is an HOV lane for buses and vehicles with at least 3
people only. During the time from 11PM to 5AM, this lane may also be used by vehicles with fewer people.

Page | 3
Fraserway RV’s allowed on HOV lanes:
•Van Conversion
•Truck Camper
•C-Small
Fraserway RV’s NOT allowed on HOV lanes:
•Adventurer 4, Overlander
•C-Medium, C-Large, C-XLarge
•A-Class
PARKING
Regulations vary from province to province. As a general rule, parking is only permitted in the driving direction
of the traffic lane. Parking is not permitted within 6 meters either side of:
-Pedestrian crossings
-Stop signs
-Traffic control signals
-Curves or corners
-Fire hydrants
-Entrance/Exit of hotels, theatres, public meeting places, schools, fire departments, playgrounds
CAUTION:
A yellow curb side generally marks a no-parking zone. If your vehicle uses more payable parking
spots, you have to pay for the number of spots used!
EMERGENCY VEHICLES
If a police car, fire truck or ambulance with flashing lights and/or sirens is approaches (from ahead or the rear),
pull over to the right and wait until the vehicles have passed.
If you are stopped by a police car, pull over to the right, remain seated, open the window and wait for the
officer to approach. Keep your hands visible on the steering wheel and follow the orders of the officer.
STOP SIGNS
You must always come to a complete stop at the stop line. The driver that arrived at a 4-way stop
first has the right-of-way. When two cars arrive at the same time, yield to the car on your right-hand
side. The same rule applies if traffic lights are not working. Canadians are usually disciplined and
courteous. Only one car at a time can cross the intersection.
TOLL BRIDGES
If you are aware that you have crossed a toll bridge on your journey, please inform us upon return
of the RV to avoid additional administrative charges. Fraserway RV will be billed directly by the
company responsible for collecting the toll fee.
Some crossings will require direct payment on the spot. Please use the truck lane to avoid any height
restriction issues.
ACCIDENTS
Most accidents happen while parking the RV. This damage can be easily avoided if a passenger gets out of the
vehicle to help the driver manoeuvering by giving directions.
Never settle or admit any wrong-doing at the accident scene! If needed call the Police. If possible make notes,
take pictures and exchange information with the other party.
Always call our OnRoad-Service and fill in the accident report, which you will find in the "Emergency" section of
the instruction manual. The police will not attend to minor accidents without personal injury.

Page | 4
SCHOOL BUSES Canadian school buses are yellow. They signal to stop all traffic (no passing!) using
flashing red lights and/or a swing-out stop sign. It is against the law to pass a stopped
school bus. All traffic must come to a halt to ensure children can get on and off the bus
safely. Once the signals have been turned off and/or the stop sign has been pulled, the
traffic can move again in both directions. Failure to obey this traffic rule is a serious
offence. Only if the road is separated by a median, can the oncoming traffic slowly proceed without stopping.
ROAD SIGNS
One way street
Pedestrians are not allowed to cross the
street here.
Crossing the road is only permitted at
crosswalks.
Do not enter.
Vehicles parked in this zone without a
permit will be towed.
Road is closed. The arrow points in the
direction of the detour.
From this point, do not change lanes until
further notice.
Authorized vehicles only (buses, emergency
vehicles, etc.).
No parking on either side of the sign. If the
arrow points in one direction only, do not
park on the side it points to.
No stopping on either side of the sign.
This road or lane is for bicycle use only.
This road or lane is for buses only.
Private property. No parking.
Turn headlights on and remove sunglasses
(common at tunnel entrances).
No parking from 8:30AM to 5:30PM. Parking
is allowed during the remaining hours.
No parking except on Sundays and on
holidays.
No parking. Loading zone.
Parking on both sides of sign daily 8:30AM -
5:30PM for 2 hours. Parking disks are not
used in Canada.
Drivers travelling in opposite directions
share the centre lane for left turns.
On multi-lane highways: Sign in combination
with exit signs means that a lane ends and
becomes the exit lane.
Control signal: Placed over lanes to indicate
which ones are open for driving. Here:
RED = do not drive in Right lane.
YELLOW: Move into one with a green arrow.
If flashin yellow over all lanes: Slow down
and proceed with caution.
Green arrow: Drive in this lane.

Page | 5
PROGRAMMING
1. Enable cruise control by pressing the ON ①button.
2. Accelerate by pressing SET ACCEL ③until reaching the desired speed. Release the button and the
speed will be maintained. Alternatively, the foot pedal can be used to increase speed, then briefly
press the SET ACCEL ③button to maintain the speed automatically.
3. After each time the brake pedal is depressed, the vehicle will lose speed. Press RES ②and the
vehicle’s speed will automatically resume to its previously set level.
4. Press the COAST ④button to decrease the speed to a lower setting.
5. Press the OFF ⑤button to turn cruise control off.
CABIN
All vehicles are equipped with an automatic transmission, power steering and power brakes. The V8 engine
displacement is 5.4 litres and an output of 255 horsepower, the V10 6.8 litres and of 305 horsepower.
IGNITION SWITCH
The ignition switch has 5 different key positions:
POSITION A (ACCESSORY)
allows the electrical accessories such as the radio to operate while the engine is not running.
POSITION B (LOCK)
turns off the engine and locks the steering wheel in place.
POSITION C (OFF):
The ignition is off.
POSITION D (ON):
All electrical circuits are operational. Warning lamps and indicators are illuminated.
POSITION E (START)
cranks the engine. Please release the key as soon as the engine starts.
BATTERY BOOST SWITCH
The Battery Boost Switch enables jump-starting the engine from the coach batteries
when the engine battery is drained. This switch is located to the left of the steering
wheel ①or at the driver’s seat below the recline handle ②. If the battery is too low
to start the engine, press and hold the Battery Boost/Auxiliary Start switch while
turning the ignition switch and release it when the engine starts.
AUTOMATIC TRANSMISSION
The gear selector is to the right of the steering wheel. The instrument cluster displays its current position. Your
foot must be depressing the brake pedal to shift from P (park) to R (reverse) or D (drive). The gear selector has
the following positions:
P
PARK
to start or turn off the engine. The key can only be pulled in this position.
R
REVERSE
to reverse the vehicle. The rear-view camera is activated automatically.
N
NEUTRAL
Select this position for towing only!
D
DRIVE
Most efficient for all normal driving conditions.
4
4th gear
For improved traction
2
2nd gear
To accelerate on slippery surfaces.
1
1st gear
Allows for maximum engine breaking. Does not shift into 1st gear at high speeds!
CAUTION:
We strongly recommend to use D in all driving situations!
TOW/HAUL
The Tow/Haul function optimizes the shifting performance and reduces the potential for
transmission overheating or failure due to excessive shifting when driving in mountainous
areas. This provides extra power when going uphill and braking assistance from the engine
when going downhill to reduce the risk of overheating the vehicle’s brakes. Select this
function by pressing the button at the end of the shift lever.
CRUISE CONTROL
The RV is equipped with Cruise Control. The minimum speed required for its use is 50 km/h. We do not
recommend using Cruise Control on mountain roads because it would cause irregular shifting and accelerating
resulting in excess transmission wear and increased fuel consumption.

Page | 6
PARKING BRAKE (EMERGENCY BRAKE/HAND BRAKE)
①Parking brake release lever (pull to release).
②To engage the parking brake, press the foot pedal.
③Hood release lever (pull to open hood).
HEATED SIDE MIRRORS
Your RV is equipped with heated side mirrors. The switch ①is located on the driver’s door (above
the mirror control ②). Leave the switch in the OFF position unless you need to defrost the mirrors
to avoid the draining of your engine battery.
VEHICLE CARE AND MAINTENANCE
GASOLINE
The engine requires REGULAR UNLEADED GAS (Octane 87). Please use big-brand
stations for refuelling, such as Esso, Shell, Chevron, Husky, Petro Canada, Irving, etc. The
fuel available at independent stations is often of a lower quality which can cause
problems by clogging fuel pumps, etc., resulting in trip disruption and expensive repairs.
ENGINE OIL
The engine oil level must be checked every 1500 kms. The engine should be cold when its oil level is checked.
ONLY SAE 5W30 OIL can be used for topping up. Please keep receipts for oil that is purchased for
reimbursement upon return of the vehicle. Thank you for your care and attention.
CAUTION:
The renter is liable for ALL damage resulting from use of improper fuel, oil, or other engine fluids.
If you have any questions, doubts or concerns, please call our OnRoad-Service.
OIL CHANGE INDICATOR LIGHT ILLUMINATES
We change the oil of our vehicles every 12,000 kms according to the manufacturer’s recommendation. The oil
change light may illuminate earlier as it is programmed to a different schedule. The odometer reading of the
last oil change is indicated on a sticker on the windshield. If the window sticker indicates that an oil change is
due, please call our OnRoad-Service for direction to an authorized auto repair shop. Please keep receipts for all
oil purchases and present them for reimbursement upon return of the vehicle.
TIRES
TIRE CHECK
Please check the tire pressures regularly. The tires should be cold when the pressure is checked!
Recommended tire pressure (cold): 55 PSI (front) –80 PSI (rear)*
*The recommended tire pressure is also indicated on the tires and/or on a sticker inside the driver-side door
frame. The wheel nuts should be visually checked every time you leave a campground.
CHANGING THE TIRES
Tires should only be changed by authorized personnel of the FORD Road-Side Assistance program or of KalTire
24-Hour Service. Please contact our OnRoad-Service whenever a tire change is required. These numbers are
listed in the "Emergency" appendix. Please only attempt to change a wheel if there is no way to contact us for

Page | 7
assistance. Changing a wheel is at your own risk. The wheel nuts of the changed wheel must be checked after
100 kms or sooner and retightened if necessary. Failure to do so could cause serious accidents.
WARNING:
The renter is liable for damages resulting from improper tire change or non-performed checks.
STORAGE LOCATION FOR TIRE CHANGE TOOLS
The tools needed for the tire change can be found in one of the rear outside compartments of the motorhome.

Page | 8
VEHICLE SPECIFICATIONS
Motorhome Class
Class C –MH23RB
Chassis
Ford E350
Engine
Eight or Ten-cylinder (V8/V10)
Roof air conditioner
Yes
Microwave
Integrated in convection oven
Convection oven
Yes
Oven
No
3-point-seat belts at dinette
Yes
Bathroom vent
Yes
TV
No
DVD player
No
Rear dual tires
Yes
Generator
Yes
Side slide-out
No
Rear slide out
No
Sleeps
5
Seat belts
6
Fuel type
Gasoline
Engine oil type
5W30 oil
Bumpers
Steel
Locking lug nuts
Not available
Number of axles
2
Spare tire
Yes, located at the back of the RV
Tire size
225/75RX16E
Tire pressure
Front tires: 520 kPa/75 psi
Rear tires: 450 kPa/65 psi
Jack/Tools
Located in the rear outside compartment on the passenger side.
Fire extinguisher
Yes, located next to the entrance door.
Sewer hose
Located on the driver's side in the compartment labelled "Sewer Hose".
Dimensions & weight
Metric system
Imperial system
Height (incl. all superstructures)
340 cm
11‘2”
Width
250 cm
8’2”
Length
721 cm
23’8”
Gross vehicle weight (GVW - i.e. weight incl. full fuel, propane, wastewater and water tanks,
maximum number of persons allowed, and luggage)
6,577 kg
14,500 lbs
Fill capacity
Metric system
Imperial system
Freshwater tank
115 litres
30 gallons
Grey water tank
98 litres
26 gallons
Black water tank
85 litres
22 gallons
Fuel tank (gasoline)
140 litres
37 gallons
Propane Tank
87 litres
23 gallons
Total weight of all tanks when full
525 litres
138 gallons
Interior specifications
Beds
Included
Metric system
Imperial system
Overcab bed
Yes
135 cm x 203 cm
53” x 80”
Rear bed
Yes
145 cm x 200 cm
57” x 79”
Dinette bed
Yes
113 cm x 167 cm
44” x 66”
Pull-out sofa bed
No
-
-
Interior room height
200 cm
6’6”

Page | 9
EXTERNAL VIEW
1. Storage compartments
2. Generator
3. Sewer hose storage
4. Fuel tank (regular unleaded gas, Octane 87)
5. City water connection
6. Sewer flusher (please do not use!)
7. Outside shower
8. Sewer system (connection, black and grey water valves)
9. 110V power connection for electrical hook-up
10. Freshwater tank/potable water
11. Power outlet with reset button
12. Furnace fan –caution: HOT!
13. Water heater cover –caution: HOT!
14. Propane tank
15. Fridge vent cover
16. Extractor hood vent
17. Porch light
18. Awning
19. Entrance step
20. Back up camera
21. Spare tire

Page | 10
IMPORTANT:
•Never use the awning in stormy weather or in strong winds!
•The awning must be retracted when the RV is left unattended.
•Before extending the awning make sure that sufficient space is available.
•Do not reposition the vehicle with the awning extended, and always be sure the awning is retracted before driving!
•Ensure that the awning lighting is switched off when not needed it or when its retracted as it draws power from the coach
battery if left switched on.
•There is a wind sensor in the awning, powered by 2 watch batteries. If the batteries are getting low a sensor will start to beep or
cause the awning to move on its own. If this occurs simply shut off the awning’s main power switch until the next operation of
the awning.
•If the awning will not extend or retract simply turn off the main power switch of the house batteries, wait 10 seconds and then
turn it back on again. This will reset the electric system and the awning should operate again.
①Awning Power on ②Awning Extend ③Awning Retract ④Awning Power OFF ⑤Awning light
12V appliances: Lighting, water heater and pump, fan heater, awning, bathroom vent, fridge.
AWNING
Our vehicles are equipped with an awning. The operating switches are located next to the entrance door.
ELECTRICAL SYSTEM
12V DUAL BATTERY SYSTEM
The RV is equipped with a 12V dual battery system. The vehicle battery (provides power to the engine and
driver's cabin) and coach batteries (providing power to the living area of the motorhome) are both charged by
the alternator while you are driving but discharge independently from each other. The coach batteries of your
motorhome are located under one of the entrance door steps.
BATTERY SWITCH POSITION
The main switch for turning the coach batteries on and off is located directly next to the side
entrance door at floor level. This switch must be in the ON position to supply 12-volt power to the
appliances and living area. When there is no power in the living area, always check to see if this
switch may have been set to OFF accidentally and reset to ON if necessary.
HOOK-UP TO THE POWER GRID (110V)
A power cable is provided with the RV for connecting the vehicle to the 110V power hook-up at
campsites. The regular plug is for a 30AMP connection which is standard at most campgrounds.
An adapter is provided for occasions when only 15AMP connection is available. All electrical
appliances in the RV and the hook up at the campsite should be switched OFF before you
connecting the RV. Use the 110V hook-up whenever possible in order to preserve and recharge
the coach batteries. After connecting the power cable ①, tighten the black ring ② to prevent
accidental unplugging. The coach batteries will recharge while the vehicle is connected to the
electrical hook-up. If the fridge is set to Automatic, it automatically adjusts to the 110V power
supply when you connect the vehicle to the campground's power hook-up.
CONVERTER
A power converter automatically converts 110V power to 12V power for use by 12V appliances. The converter
is located in the fuse box. No manual operation is required as it is fully automatic.
CAUTION:
Any damage as a result of improper operation of the awning is the renter's sole responsibility.
CAUTION:
Please do not overload the coach batteries. They cannot sufficiently recharge if they lose too much
voltage. Once the charge has reached a very low level, the alternator can no longer recharge them
simply by driving. In that case they must be recharged using the exterior power cable (110V) on
the campground for at least 8 hours. We are not responsible for any cost or lost time due to
overloaded coach batteries.

Page | 11
FUSES & FUSEBOX
The fuses for the internal 12V or 110V power circuit are located in the fuse
box ①at the main bed (floor level).
12V PLUG-IN (BLADE-TYPE) FUSES ②
The 12V plug-in fuses protect the inside and outside lighting, water heater, water
pump, heater fan, fans, bathroom vent, fridge, and awning. If an appliance doesn’t
work, a fuse might be blown. When the connecting wire in the middle of the fuse is
broken the fuse has to be changed. Our motorhomes are equipped with spare fuses
which are usually placed in one of the kitchen drawers.
110V BREAKERS ③
The 110V fuses secure power to the microwave, convection oven, roof air conditioner and AC power
outlets. If one of these appliances does not work, this may be due to a tripped breaker. Please check,
and if this is the case, first fully switch the breaker into the OFF position and then back into the ON position.
POWER OUTLETS & RESET BUTTON
By connecting to a 110-volt power supply or with the help of the generator, the living area is supplied
with power and the built-in sockets can be used. If your sockets still do not work, the reset button ①
located in the exterior socket on the passenger side may have popped out. Push it back in and now
check the sockets.
MICROWAVE/CONVECTION OVEN
A minimum of 110V/15AMP hook-up is required to operate the microwave/convection oven. If a 15AMP
connection is used and, in addition to the convection oven, other 110V appliances are turned on, there is a risk
of a circuit overload, which might cause the main fuse (110V breaker) to trip. To operate multiple 110V
appliances we recommend a 30AMP connection.
ROOF AIR CONDITIONER
A 110V/30AMP hook-up is required to run the air conditioner.
Troubleshooting: Power Supply
Problem
Cause/Solution
No power from the power outlets
-Vehicle is not connected to 110V
-110V power source at campground is not working
-Broken power cord
-Tripped breaker
-Reset button tripped
No power at all in the living area or
only when the engine is running
-Main power switch is OFF (page 11, battery switch position)
-Coach battery level is too low and the batteries need to be charged by
driving or connection to 110V
Smell of rotten eggs
Please open all windows and doors, turn off the propane, and check if
there is a leak in the propane system. If this is not the case, your coach
batteries may have been overloaded. A propane leak must be repaired in
a repair shop, and an overheated battery must be replaced. Please
contact our OnRoad-Service, and we will make an appointment for you.
GENERATOR
The motorhome is equipped with an integrated generator supplying your vehicle with
110V power (AC) even when it is not connected to the power grid on the campground.
The generator will also charge the coach batteries. Powered by gasoline from the RV’s
gas tank, the generator consumes approximately 3.5 litres per operating hour. The

Page | 12
generator does not start or switches off automatically as soon as the fuel level drops below ¼. Please do not
use generators while driving!
To turn ON the generator
Turning the Generator OFF
1. Turn off all electrical devices.
2. Press the switch STOP/PRIME ③and hold it for approximately 10 seconds after the red
light ②came on.
3. Now Press the switch to the START position ①until the generator starts.
4. After 30 to 40 seconds, you will hear a beeping sound coming from the microwave. The
power circuit is now closed.
1. Turn off all electrical devices.
2. Press the STOP switch ③and the generator will
stop.
Troubleshooting: Generator
Problem
Cause/Solution
Generator does
not start
-The fuel tank level is below ¼.
-Start button pressed not long enough. Has to be pressed for approx. 10 seconds
(sometimes longer).
-Weak coach battery. Start the engine and then the generator.
-Blown or burnt fuse. Please check the fuses in the box and on the generator, and
replace fuses if required
Fuse is tripped
The circuit is overloaded. If too many appliances are used simultaneously, the fuse may
be tripped while the generator is running. Please turn off the appliances, check the 110V
breaker in the fuse box, and restart the generator. If all breakers in the fuse box are in
the ON position, please check the breaker right on the generator (see picture below).
SAFETY INSTRUCTIONS:
1. Never use the generator compartment as storage. Keep the compartment clean and dry at all times.
2. Do not use the generator when the motorhome is parked in high grass or in scrubby terrain because the
heat of the exhaust fumes can cause a fire in dry conditions.
3. Do not touch the generator while it is running or shortly after until it cools down.
SOLAR SYSTEM
The RV is equipped with a solar system on the roof, which recharges the coach battery
when exposed to sunlight. The solar system is automated and does not require manual
operation. Please do not make any changes to the default settings on the control panel.
INTERIOR CONTROL PANEL
We currently have two different control panels in our RV’s. Please see the models below.
①
Water pump
②
Water heater
③
Water heater control LED
④
Entrance light
⑤
Porch light
⑥
Tank indicator switches
⑦
Tank indicators
①
Please remove the green generator cover to check the breaker (small
black lever) on the side of the generator. There is also a start switch
above it directly on the generator.
②
START switch
③
Generator breaker

Page | 13
PROPANE TANK
Stove top burners, water heater, furnace and the generator in DIESEL
operated RVs are fuelled by propane. The RV is equipped with an integrated
propane tank located underneath the vehicle. Main valve ①, tank inlet ②and
level indicator ③are located directly on the tank.
We provide the first tank of propane. It may be necessary to refill the
propane tank as required during a trip at your own cost. Propane can be refilled at many gas stations and
some private campgrounds. The service personnel will do the refilling for you. Self-service of propane is
prohibited for safety precautions. The propane tank does not need to be full when you return the vehicle.
Troubleshooting: Propane
Problem
Cause/Solution
Propane operation of
appliances does not work.
-The propane valve on the tank is closed. Please open the valve.
-The propane tank is empty. Please refill.
No propane supply after the
main valve has been turned
open following refilling or a
ferry trip.
Please open the valves very slowly because otherwise the safety shut-off valve,
may be triggered preventing the propane from flowing to the end devices.
Allow 1 to 2 minutes for the propane to reach the devices. If the shut-off valve
has been triggered, please close the propane tank valve (turn lock). Then
reopen the propane tank valve slowly.
Propane alarm is triggered
or there is a smell of sulfur
or rotten eggs inside the RV.
Immediately close the main valve on the propane tank. There may be a leak in
the system. Open doors and windows so that any propane can escape to the
outside. Avoid open fire under any circumstances until the smell has dissipated,
and do not operate any electrical switches. The system must be inspected by a
technician. If there is no problem with the propane system, the smell may
indicate a coach battery overload or short circuit. If this is the case, you should
be able to see a white powder (sulphuric acid) on or around the battery. Please
do NOT touch it, because the acid is corrosive! Please call our OnRoad-Service
so that we can arrange for an appointment with a technician.
WATER SYSTEM
FRESHWATER TANK (POTABLE WATER/TANK FILL)
The RV is equipped with an integrated freshwater tank. Please refer to the "Vehicle Specifications" chapter for
tank capacities. The water tank must be refilled regularly from the outside using a water hose. The tank inlet is
labelled "Potable Water" or "Tank Fill".
CAUTION:
If used properly, propane use is very safe. Nevertheless, all of our vehicles are equipped with a
propane detector that triggers an alarm when an elevated concentration of propane is detected
in the air. Propane is highly flammable and explosive. Therefore, please be sure to strictly follow
the operating instructions for all propane-operated devices in the vehicle.
If you notice a typical smell of sulfur or rotten eggs, or if the propane alarm sounds, extinguish all
open flames immediately, do not operate any electrical switches, and please close the main valve
of the propane tank. Then immediately open all windows and doors. Once the alarm stops, make
sure that all switches on the propane cooker are properly turned off, i.e., are in the OFF position.
In such cases, avoid open fire under all circumstances!
Prior to refuelling, propane refilling or ferry rides, the main valve of the propane tank MUST be
closed. All propane-operated appliances, such as the fridge, stove and heater, must first be
turned off.

Page | 14
CAUTION:
Never empty the freshwater tank entirely because this may damage the water pump. Renters are
liable for damage expense and/or loss of time resulting from insufficient water tank level.
Troubleshooting: Freshwater Tank
Problem
Cause/Solution
Freshwater tank
remains empty
despite refilling.
Be sure not to confuse the freshwater tank inlet (passenger side) with the city water
connection or the sewer flush (both at the driver side). The freshwater tank does not
automatically refill through the city water connection but must be refilled separately.
WATER PUMP To draw water from the water tank for freshwater supply,
the water pump switch needs to be in the ON position. The
switch for the water pump is on the battery and tank
indicator panel.
Please turn off the pump while you are driving, if you do not
use it for an extended time when you are using the city
water connection. It may overheat and you will be liable for
any resulting damages.
Troubleshooting: Water Pump
Problem
Cause/Solution
Water pump does not
start.
1.The 12 Volt plug-in fuse is blown. Please check the 12V plug-in fuses and replace
where necessary.
2.The battery voltage is too low. Please check the coach battery level on the battery
and tank indicator panel, and if necessary, recharge the battery.
3.The pump is faulty. Please call our OnRoad-Service.
Constant “grunting”
sound from the pump.
1.Water tank is empty. Please refill.
2.Loose connection in the water system. Please call our OnRoad-Service.
CITY WATER CONNECTION
The RV can be connected directly to the pressurized freshwater system of the campground with the provided
water hose and pressure regulator. Please note the following steps:
1. Please ask the campground staff for the water pressure at their sites. Use of the pressure regulator is
required for pressures of 40 PSI or higher.
2. Connect one end of the water hose to the city water connection at the driver side of the RV.
3. Connect the other end of your water hose to the water pressure regulator and the regulator to the water
tap of the camp site when the water pressure is 40 PSI or higher. If the pressure is lower than 40 PSI,
connect the other end of the hose directly to the tap. Please use regulator when pressure is not known.
4. Please open the water tap of the camp site half a turn only to avoid excess pressure on the water lines of
the RV when not using the pressure regulator.
5. Open all water taps of your RV slowly to ventilate the pipes.

Page | 15
WATER HEATER The RV is equipped with a propane-operated water heater. The water
heater cannot be refilled manually but fills automatically using the cold
water available in the internal freshwater tank or city water connection.
Turn the water heater switch ① on. The red LED ②will illuminate and go
off after approx. 15 seconds. You can hear that the propane flame ignites
at the heater. The water reaches a temperature of approx. 50°C to 60°C
(120°F to 140°F) and requires a heating time of approx. 20 - 30 minutes.
Troubleshooting: Water Heater
Problem
Cause/Solution
The water heater LED does
not illuminate when the water
heater is turned on.
-Water is already hot.
-12V plug-in fuse for the water heater has blown.
-Reset needed at the water heater itself
The water heater does not
work at all.
-Not enough propane.
-Not enough power because coach battery level is too low.
SHOWER In some RV’s the shower is connected with the faucet of the wash basin. The connecting
piece between hose and faucet has a plastic nozzle (left picture). Pull this nozzle up so
that the water is diverted to the shower head. All shower heads have a slider (right
picture). It stops the water flow temporarily to help save water while having a shower.
Troubleshooting: Shower
Problem
Cause/Solution
The water in the shower
does not run off.
-The grey water tank is full. Please empty it as soon as possible.
-The shower drain is clogged up. Please remove any residue blocking the drain.
OUTSIDE SHOWER
Only biodegradable shower gels and shampoos are permitted for outside shower use. These products are
available at outdoor and camping stores. Please consider the environment and follow these rules.
TOILET
CHEMICALS
The use of chemicals in the black water tank prevents clogging and ensures thorough drainage. The chemicals
deodorize and decompose waste. They are available in liquid, powder, and tablet form and should be added
after each time the black water tank has been drained. Drop the chemicals through the toilet along with two
buckets of water or hold the flushing lever of the toilet open with the water pump running for 10 seconds so
the chemicals dissolve and activate.
Troubleshooting: Toilet
Problem
Cause/Solution
The toilet is
clogged up.
-The black water tank might be full. Please empty it at the dump station of your campground
or a Sani dump.
-Pour some hot water into the toilet. It will flow to the wastewater tank and should help
dissolve solid waste quickly. It only works if no objects are causing the problem.
CAUTION:
It is important that the water heater is turned off while you are driving!
CAUTION:
Only use biodegradable or 1-layered toilet paper. Do NOT dispose of diapers, hygiene articles, Q-
tips, etc. in the toilet UNDER ANY CIRCUMSTANCES! Avoiding this prevents clogging, repairs and
time loss that would be at the renter’s expense.

Page | 16
WASTEWATER
The RV is equipped with two separate wastewater tanks. The grey water tank holds the wastewater drained
from the sinks and shower. The black water tank holds waste flushed down the toilet. Please use plenty of
water with each flush of the toilet to prevent clogging.
The tank capacities are limited. Tanks must therefore be emptied regularly.
EMPTYING THE WASTEWATER TANKS
Troubleshooting: Wastewater Tanks
Problem
Cause/Solution
The RV is hooked up to the city water
connection and water comes out of the toilet
and/or the ventilation pipe on the roof.
You accidentally connected the water hose to the sewer flush.
Turn off the water and connect the hose to the "City Water"
hook-up.
The wastewater tanks are indicated to be full
although they have just been emptied.
-Paper, grease or food can get stuck on the sensors inside the
tank causing false readings.
-There is no clog if water can be heard running through the
sewer hose.
HEATING/AIR CONDITIONING
The RV furnace runs on propane. However, the fan runs on electrical power. The fan will operate on both 12V
and 110V (shore power). It is preferable to have a power hook-up in order to heat the RV.
CAUTION:
-Don’t let your heater run for an extended period of time WITHOUT being on shore power. If
your vehicle is not connected to a 110V power grid, the heater/fan can overload the system. The
fan consumes a lot of power and can quickly drain the coach batteries. The renter is liable for
repairs due to battery overload and/or any time loss.
-The RV will need 110V/30AMP in order to operate the roof air condition.
THERMOSTAT
Furnace and air conditioner are operated by a joint thermostat. The display indicates the mode and the room
temperature. The display of this Dometic Capacitive Touch Thermostat will come on when the mode button is
pressed once. It will show the Inside Temperature in OFF mode only!
CAUTION:
-NEVER leave the vehicle unattended while draining the wastewater tank.
-Do not leave the drain valves open, even if you have a permanent sewer connection, as it will
eventually clog up the system. Any resulting damage is the responsibility of the renter.
-The wastewater can only be emptied at designated disposal stations. These DUMPING, SANI or
DISPOSAL stations can be found on most campgrounds, at some gas stations and rest areas
along main roads and highways. The wastewater tanks should be emptied regularly (every two
or three days).
Grey water drain pipe
1. Remove cap.
2. Screw on sewer hose using bayonet joint.
3. Put sewer hose in dump pit.
4. Open black valve, leave it open.
5. Open grey valve, leave it open.
6. Flush with at least 2 buckets of water through the toilet.
7. Close grey and black drain valve.
8. Remove and store sewer hose.
9. Close cap.
Black water drain pipe
Valve
Valve

Page | 17
Fan Mode Setting:
Press the mode key ①until the fan mode (Fan) is activated. Press the key ②or ③to set the
fan to low (LOW), high (HIGH) or automatic (AUTO) speed. We recommend using the AUTO
setting!
Mode of Operation:
Press the mode button ① to switch between the available air conditioning (COOL) and heating (HEAT) modes.
To change the setting, press the ③key to increase the setting and the ②key to decrease it.
The air conditioning unit in the ceiling of the RV has no controls. Use sliders (O)to open or
close vents.
Troubleshooting: Heater
Problem
Cause/Solution
The heater blows cold air.
-The set temperature has already been reached
-Main valve of propane tank is closed
-Propane tank is empty
-Fan setting is on LOW or HIGH, please turn to AUTO!
If fridge and stove are working there is no problem with the propane supply!
The heater fan does not start.
-Empty coach batteries.
-Loose wire/contact in thermostat. Please call our OnRoad-Service.
Furnace fan comes on and
shuts off after 20-30 seconds
-Sail switch needs to be cleaned, please call our OnRoad-Service at 1-866-
535-6601 for further instruction.
DINETTE TABLE/BED COMBINATION
Our motorhomes dinette area can be converted into a
bed. Below the tabletop is a lever, which needs to be
flipped from right to left. You can manually fold down the
table by applying light pressure on the tabletop. The
newly created surface is covered with the provided
cushions to form a bed.
COOKING AREA
STOVE
The stove is propane operated. The burners have no safety valves and the propane is
flowing when an element is turned up but has not been lit. Please always make sure
that the flames of the burners are not extinguished by a draft of air or the like and
propane escapes unnoticed. Turn the knob of the corresponding burner ①or ③
counter clockwise and ignite the escaping gas on the burner using the ignition button
(spark) ②, a match or a lighter. To turn a burner off, turn the corresponding knob
back to OFF. Be sure that the knob clicks locked and can no longer be turned.
CONVECTION OVEN
Your RV is equipped with a convection oven. Please note that it only works if you are hooked up 110V power or
the generator is running.

Page | 18
KITCHEN TIMER
1. Press " Kitchen Timer " , "0:00" is displayed.
2. Press the number keys to set the timing within the range of 99 minutes and 99 seconds.
For example: set kitchen timer as 12 minutes and 12 seconds, please press "1,2,1,2" in turn.
3. Press " Start/+30SEC." to confirm; time will count down and display.
4. When time counts to "0", the buzzer will sound 5 times and the oven will turn back to the normal state.
MICROWAVE COOKING
There are 10 power levels available for choosing. Keep on pressing "Power" to choose the power.
Level
10
9
8
7
6
5
4
3
2
1
Power
100%
90%
80%
70%
60%
50%
40%
30%
20%
10%
Display
PL10
PL9
PL8
PL7
PL6
PL5
PL4
PL3
PL2
PL1
Example: If you want to use 80% microwave power to cook for 10 minutes, you can operate as the following steps:
1. Press "Power" once, the oven will display "PL10".
2. Press "Power" twice again to choose 80% power, the oven will display "PL8".
3. Press the number buttons of "1","0","0","0" in order, the oven will display "10:00"
4. Press " Start/+30SEC." to start cooking, ":" will light and the "Micro." indicator will flash.
GRILL/MICRO + GRILL COMBINATION COOKING
1. Press the "Grill" button once to choose the grill function, the oven will display "G-1" and " Grill " indicator
will light. (Press twice or thrice to choose the combination function with "G-2" or "G-3" displaying)
2. Set the cooking time. Example: Set 12 minutes 50 seconds, press "1", "2", "5", "0" in order.
3. Press " Start/+30SEC. " to start cooking. Time counts down, ":" will light and " Grill " indicator will flash.
Note: If half the grill time passes, oven sounds twice. This is normal. It denotes turning food over in order to
have a better effect of grilling food.
CONVECTION COOKING
The convection cooking can let you cook the food as a traditional oven. Microwave is not used. It is recommended that you should preheat the oven to
the appropriate temperature before placing the food in the oven. There are ten temperatures of convection: 100F,150F,250F,275F,300F,325F,350F,
375F,400F,425F.
WITH OREHEATING CONVECTION
1. Press the "CONVEC." once, the oven will display "100". "F" and " Conv."indicator will light. (Press the convection temperature key to select the
temperature you need.)
2. Press " Start/+30SEC. " button to start preheating. When the oven reaches the temperature set the buzzer will ring twice.
3. Press the number keys to set cooking time. Once the temperature arrives, door must be opened and then closed to input the cooking time.
4. Press the "Start/+30SEC." button to start cooking. " Conv." indicator will flash, ":" will light, and cooking time will count down.
CONVECTION COOKING (WITHOUT PREHEAT FUNCTION)
1. Press the "Convec" once, the oven will display "100". "F" and " Conv." indicator will light. (Press the convection temperature key to select the
temperature you need.)
2. Press the "Convec" button to confirm the temperature.
3. Press the number keys to set cooking time.
4. Press the "Start/+30SEC." button to start cooking. " Conv." indicator will flash, ":" will light, time will count down.
CONVECTION ROAST COOKING
1. Press " Roast" once, the oven will display "325F", and the "Micro.", "Conv." Indicator will light. (Press the convection temperature key to select the
temperature you need.)
2. Press " Roast" button to confirm the temperature.
3. Press the number keys to set cooking time.
4. Press " Start/+30SEC. " button to start cooking, ":" will light, and cooking time will count down.
DEFROST BY WEIGHT
1. Press "Defrost" once, the oven will display "dEF1"."Micr." ,"Defrost" indicators will light.
2. Press the number keys to set defrosting weight within the range of 4 to 100 oz., and "Oz" will light.
3. Press " Start/+30SEC. " button to start defrosting, and "Oz" will disappear.
CONTROLS AT A GLANCE
①
Convection
⑦
Number Keys/Convection Temperature Keys
②
Grill
⑧
Clock Setting
③
Roast
⑨
Stop/Clear
④
Power in %
⑩
Express Cook
⑤
Defrost
⑪
Kitchen Timer
⑥
Auto Menu:
Popcorn/Potato/Beverages
Dinner Plate/Fresh and freezed vegetables
Convection Menu:
Roast Chicken/Cake/Pizza
⑫
Start/+30SEC
Display
Microwave
Grill
G-1
-----
100%
G-2
36%
64%
G-3
55%
45%
CLOCK SETTING
When the microwave oven is electrified, oven will display "0:00", buzzer will ring once. Input time should be 1:00-12:59.
Example: To set 12:12
1. Press the " Clock" button, and the buzzer will ring once.
2. Press the number keys: "1","2","1","2" in order.
3. Press " Clock" to finish clock setting. ":" will flash, and the time will light.

Page | 19
DEFROST BY TIME
1. Press "Defrost" twice, the oven will display "dEF2"."Micr." ,"Defrost" indicators will light.
2. Press the number keys to set defrosting time. The max. time is 99 minutes 99 seconds.
3. Press " Start/+30SEC. " button to start defrosting.
MULTI-STAGE COOKING
A maximum of two stages of cooking can be set. If one of the stages is defrosting, then it should be put in the first stage. The buzzer will ring once after
each stage cooking and the next stage will begin. Auto menu cooking cannot be set as one of the multi-stage.
Example: Cooking with 100% microwave power for 5 min., then 70% microwave power for 10 min. Steps are: Press "Power" once, "PL10" is displayed;
1. Press number keys "5","0","0" to adjust the cooking time as you need;
2. Press "Power" four times to choose 70% microwave power, "PL7" is displayed;
3. Press number keys "1","0","0","0" to adjust the cooking time as you need.
4. Press "Start/ +30 SEC." to start cooking.
SPEEDY COOKING
1. In waiting state, instant cooking at 100% power level can be started by selecting cooking time from 1 to 6 minutes by pressing numeral pads1 to 6.
Press " Start/ +30 SEC. " to increase the cooking time 30 seconds by each added pressing; the maximum cooking time is 99 minutes and 99 seconds.
2. In waiting state, instant cooking at 100% power level with 30 seconds' cooking time can be started by pressing " Start/ +30 SEC. ". Each press on the
same button will increase cooking time by 30 seconds. the maximum cooking time is 99 minutes and 99 seconds.
AUTO MENU COOKING
1. In waiting state, press the button of "Popcorn", "Potato", "Beverage", "Dinner Plate", "Fresh Vegetable", "Frozen Vegetable", "Roast Chicken",
"Cake" or "Pizza" to choose the function and weight of food as you need.
2. Press "Start / +30 SEC." to start cooking.
LOCK-OUT FUNCTION FOR CHILDREN
Lock: Press "STOP/CLEAR" for 3 seconds, there will be a long "beep" denoting entering into the children-lock state.
Unlock: In locked state, press “STOP/CLEAR" for 3 seconds, there will be a long "beep" denoting that the lock is released.
STATE INQUIRY
1. During cooking, press "Convec", "Power", "Grill" to check the responding power, and the power will be displayed for 2-3 seconds;
2. During cooking, press "Clock " to check the current time, and the time will be displayed for 2-3 seconds.
Preset functions
Function
Weight (OZ)
Weight (g)
Display
Function
Weight (OZ)
Weight (g)
Display
Popcorn
1.75
50 g
1.75 OZ
Frozen
Vegetable
4.00 OZ
≈ 115 g
4.00 OZ
3
85 g
3.00 OZ
8.00 OZ
≈ 225 g
8.00 OZ
3.5
100 g
3.50 OZ
16.00 OZ
≈ 450 g
16.00 OZ
Potato
1 portion
1
Roast Chicken
16.00 OZ
≈ 450 g
16.00 OZ
2 portions
2
24.00 OZ
≈ 680 g
24.00 OZ
3 portions
3
32.00 OZ
≈ 910 g
32.00OZ
Beverage
≈ 8.80
≈ 250 g
1
40.00 OZ
≈ 1130 g
40.00 OZ
≈ 17.60
≈ 500 g
2
48.00 OZ
≈ 1360 g
48.00 OZ
≈ 26.40
≈ 750 g
3
Cake
16.00 OZ
≈ 450 g
16.00 OZ
Dinner Plate
8.00 OZ
≈ 225 g
8.00 OZ
Pizza
10.00 OZ
≈ 285 g
10.00 OZ
12.00 OZ
≈ 340 g
12.00 OZ
22.00 OZ
≈ 625 g
22.00 OZ
16.00 OZ
≈ 450 g
16.00 OZ
Note: Cake menu is under convection cooking with 325F-preheat
function, and you should preheat first following the auto menu
operation, when the oven reaches the temperature, it will stop working
and sound to remind opening the door to put cake in, then press "Start
/ +30 SEC." to start cooking. You should use the grill rack when roasting
chicken in order to have a better effect of cooking.
Fresh Vegetable
4.00 OZ
≈ 115 g
4.00 OZ
8.00 OZ
≈ 225 g
8.00 OZ
16.00 OZ
≈ 450 g
16.00 OZ
FRIDGE
AUTOMATIC VS. PROPANE MODE
When you set your fridge to AUTOMATIC mode it automatically selects the available energy source; this
means, if you are hooked up to the 110 V power, the fridge runs on 110V (AC). If no hook-up is available, it runs
on PROPANE (LP). We generally recommend setting the Automatic mode. If the fridge is set to Propane (LP), it
exclusively runs on propane and does not automatically switch to AC when hooked up to the 110V power grid.
Table of contents
Other Fraserway RV Motorhome manuals
Popular Motorhome manuals by other brands

Explorer Group
Explorer Group Avante 362 Owner's handbook

Auto-Sleepers
Auto-Sleepers Peugeot Kemerton manual

Carefree
Carefree FREEDOM OTD AWNING installation manual

NewMar
NewMar Super Star owner's guide

Tiffin Motorhomes
Tiffin Motorhomes Allegro Bus 2011 owner's manual

Capron
Capron Sunlight A68 2018 instruction manual