FRIEDLAND FGGA0501WWE User manual

© Novar Electrical Devices and Systems Limited (a Honeywell Company) 2013 50083164-001
The Arnold Center, Paycocke Road, Basildon, Essex, SS14 3EA (UK) Rev. A
IP Camera |
FGGA0501WWE / FGGA05* Series / HIS5A
ENGLISH Installation and Operation Manual 2
DEUTSCH Installations- und Bedienungshandbuch 13
NEDERLANDS Installatie- en bedieningshandleiding 24
FRANÇAIS Manuel d'installation et d'utilisation 35
ESPAÑOL Manual de instalación y funcionamiento 46
ITALIANO Manuale di installazione e uso 57
PORTUGUÊS Manual de instalação e funcionamento 68

2
Table of Contents
1Intended use ........................................................................................................................................................................... 3
2Safety ...................................................................................................................................................................................... 3
2.1 Product.......................................................................................................................................................................... 3
2.2 Power supply unit.......................................................................................................................................................... 3
2.3 Installation..................................................................................................................................................................... 3
3Description.............................................................................................................................................................................. 3
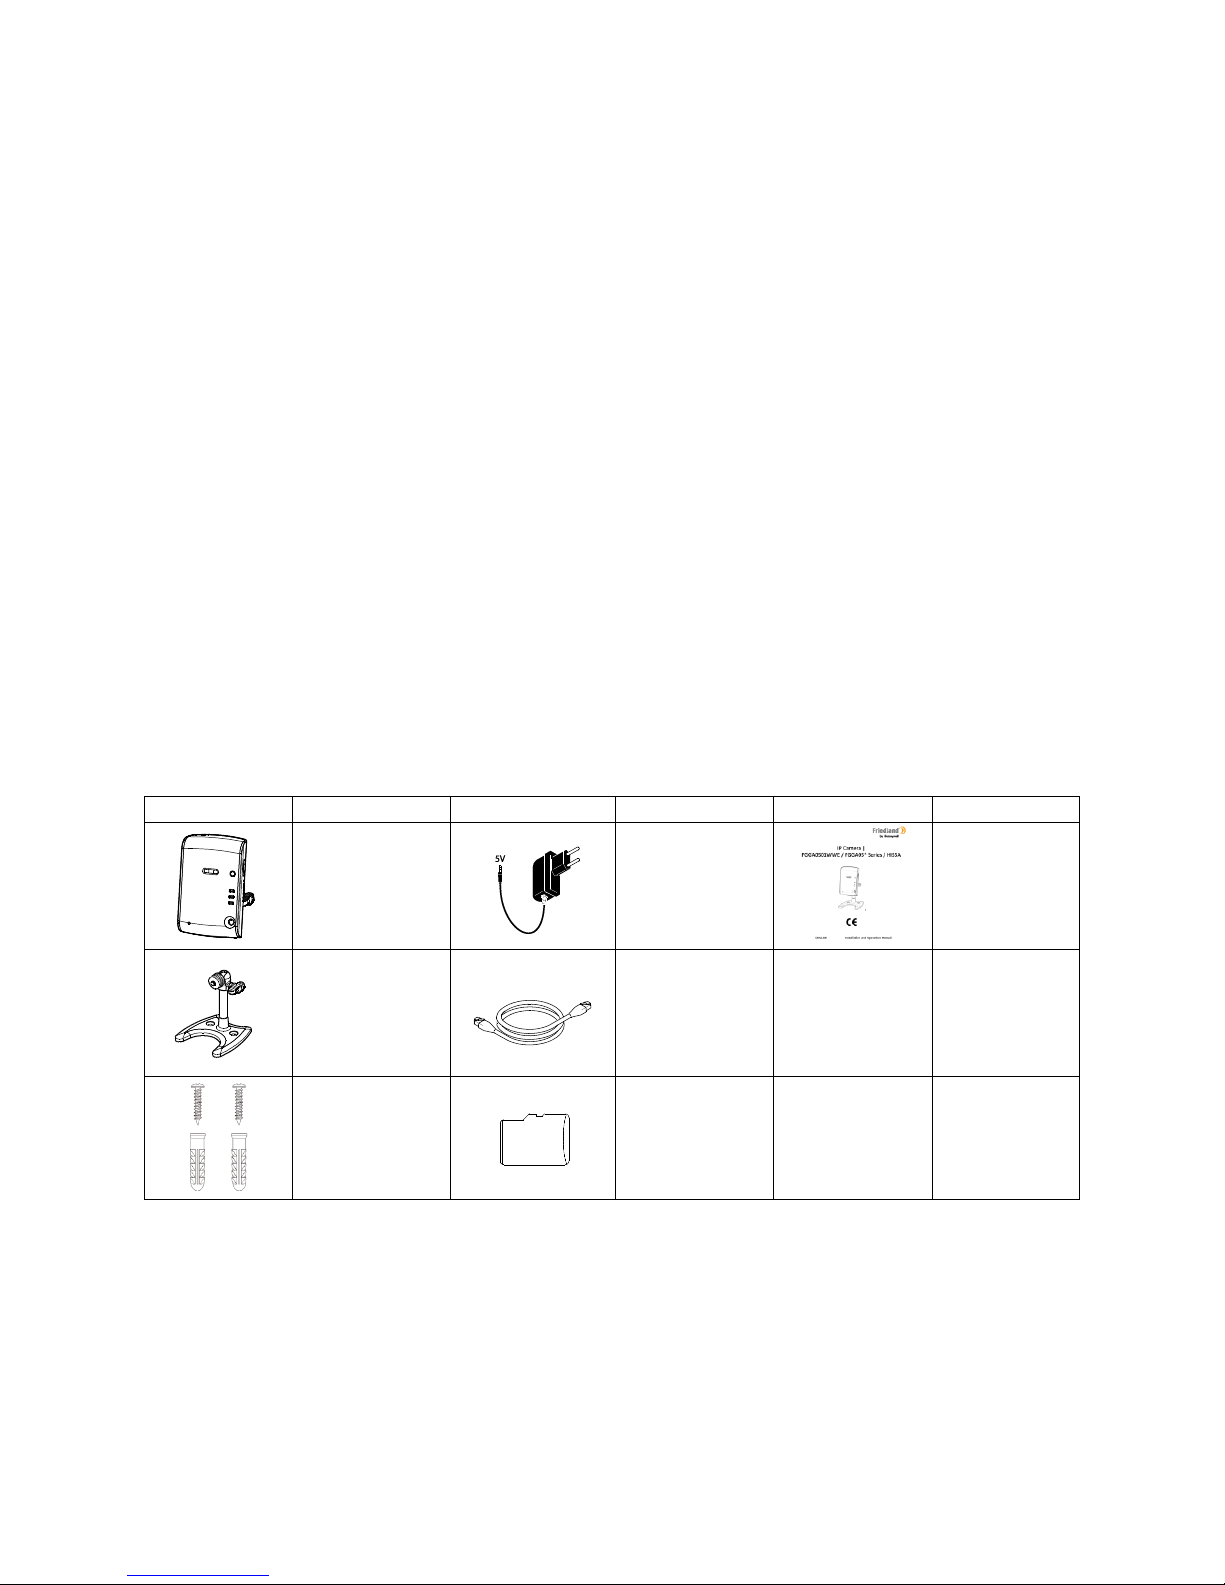
3.1 Package contents........................................................................................................................................................... 3
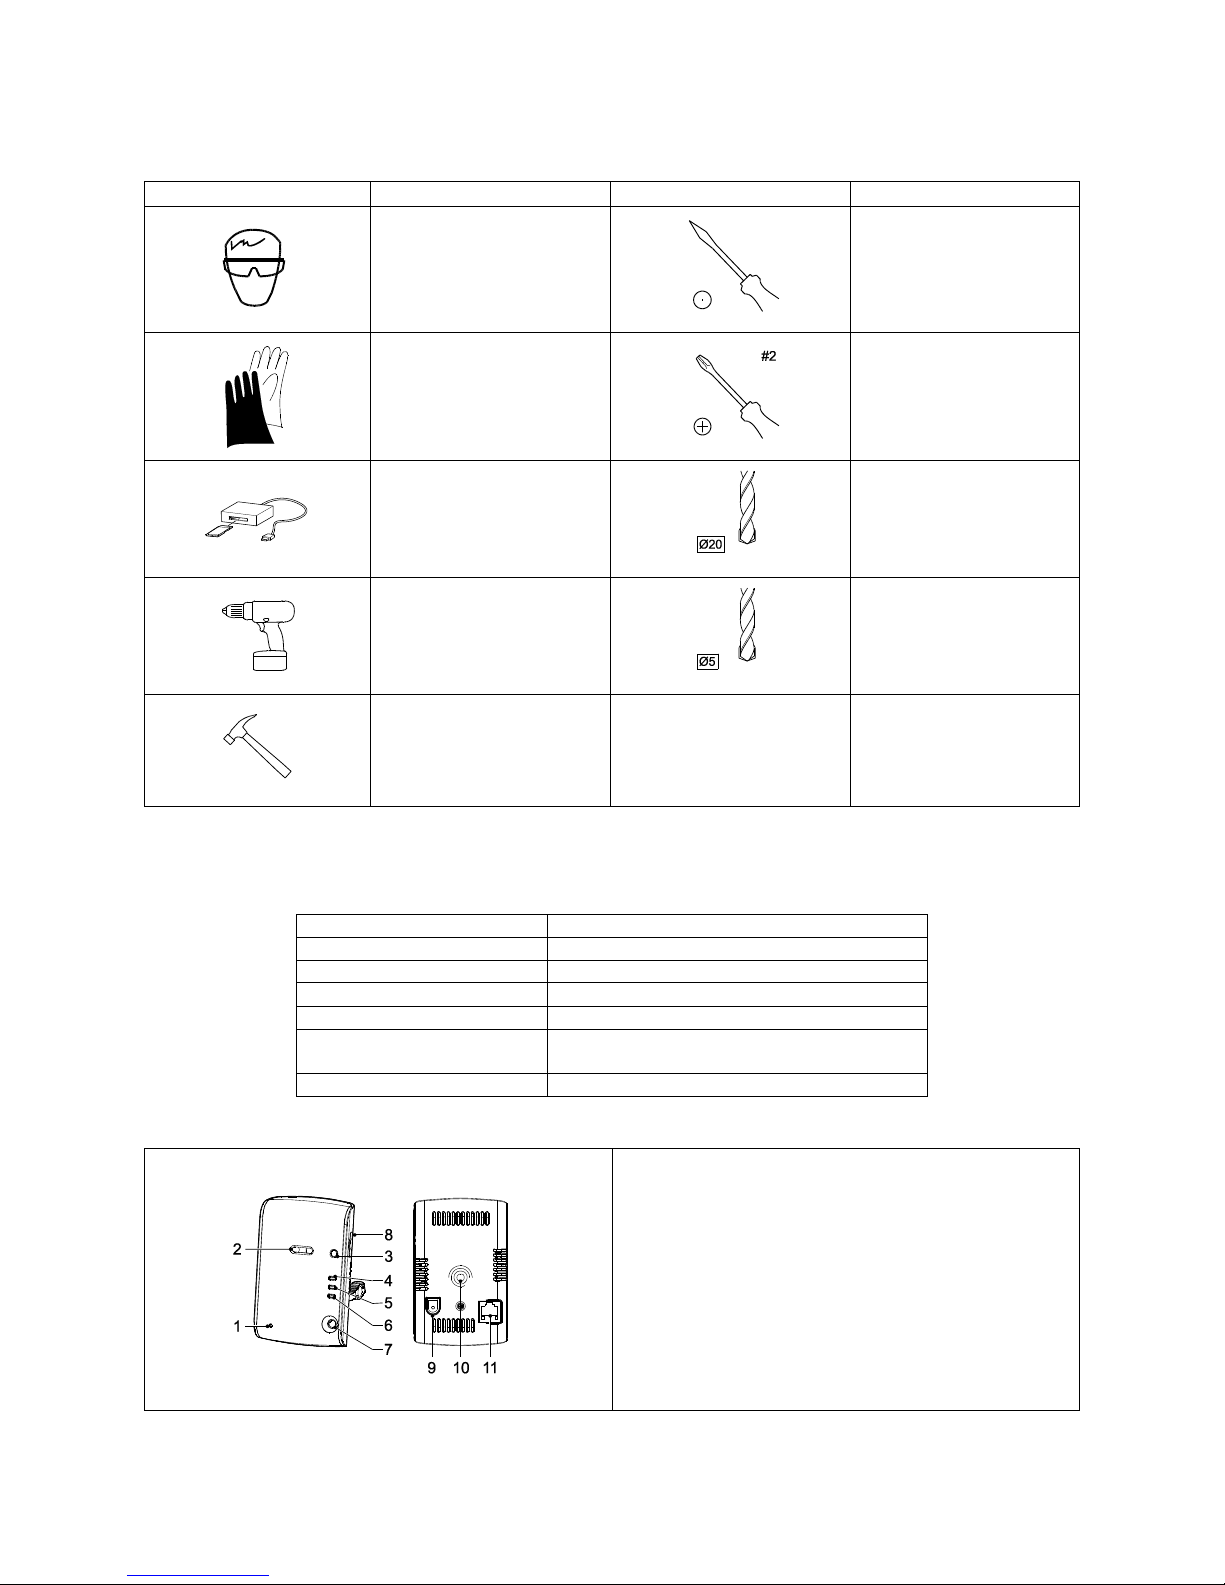
3.2 Required tools ............................................................................................................................................................... 4
3.3 System requirements .................................................................................................................................................... 4
4Overview ................................................................................................................................................................................. 4
5Installation .............................................................................................................................................................................. 5
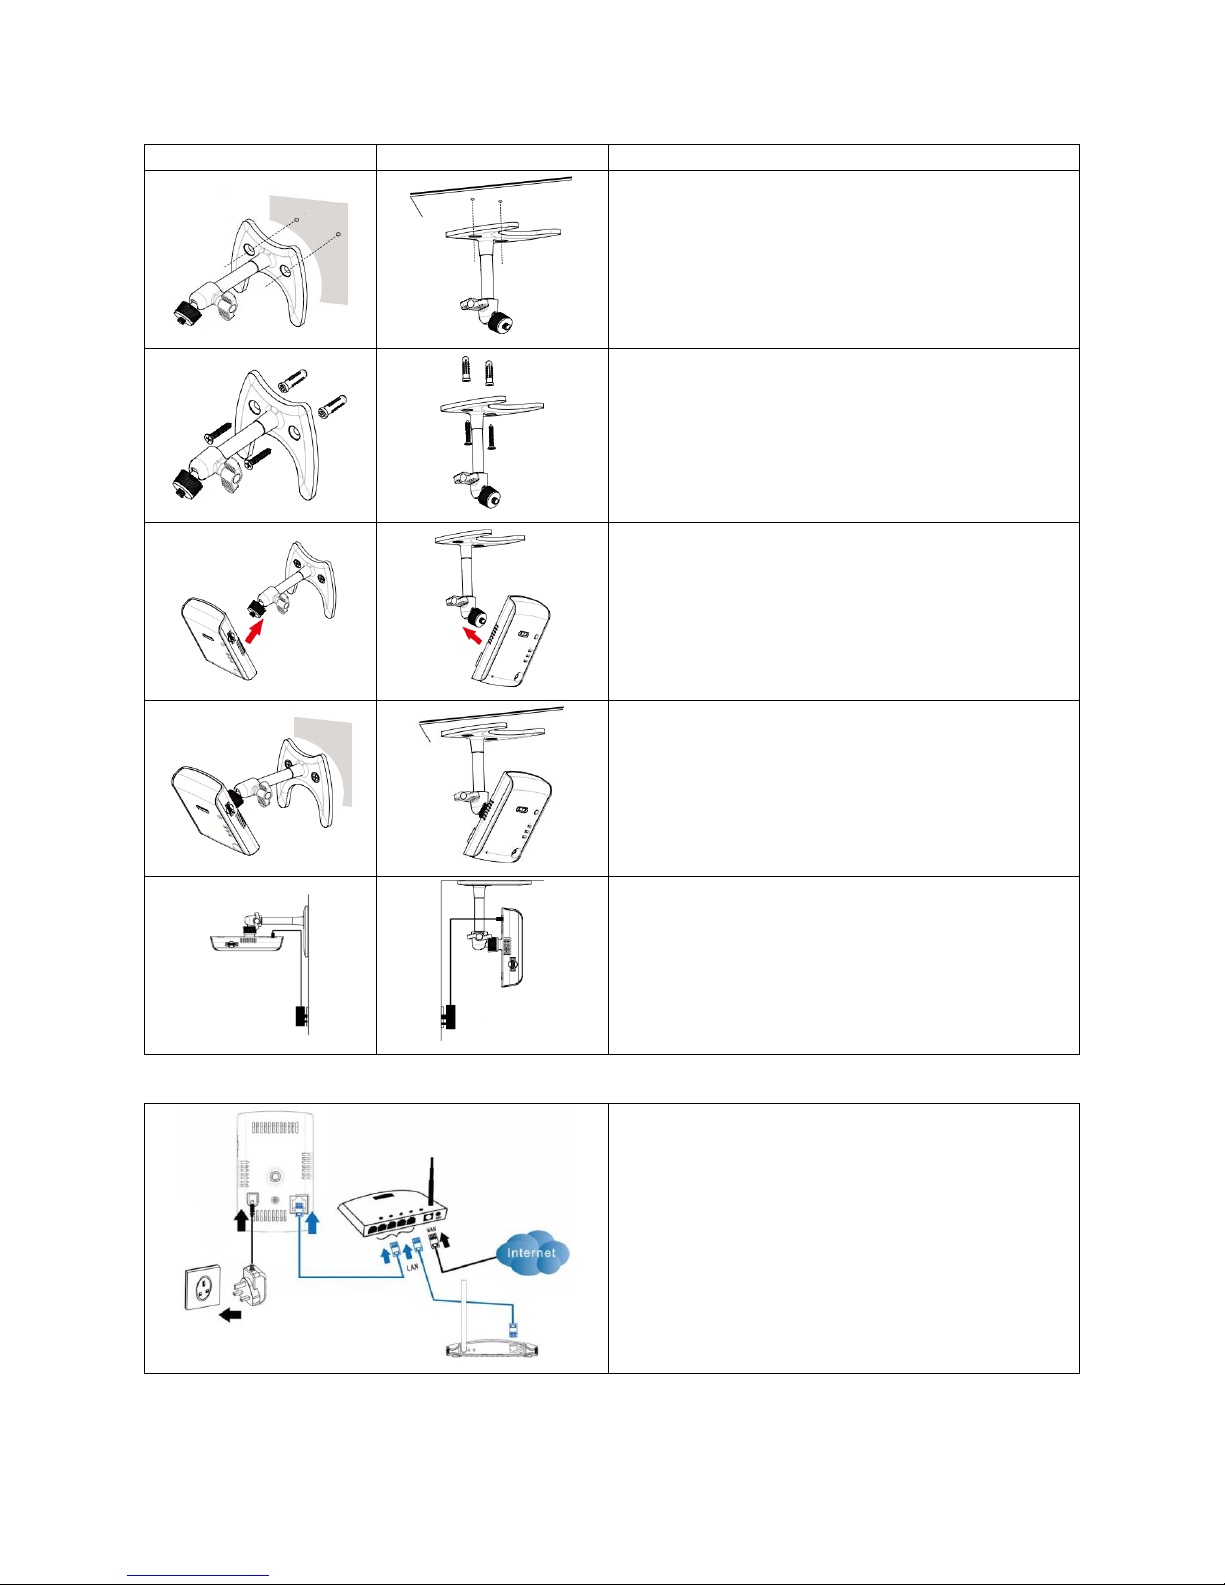
5.1 Assembling the camera ................................................................................................................................................. 5
5.2 Installing the camera ..................................................................................................................................................... 5
5.3 Electrical installation ..................................................................................................................................................... 6
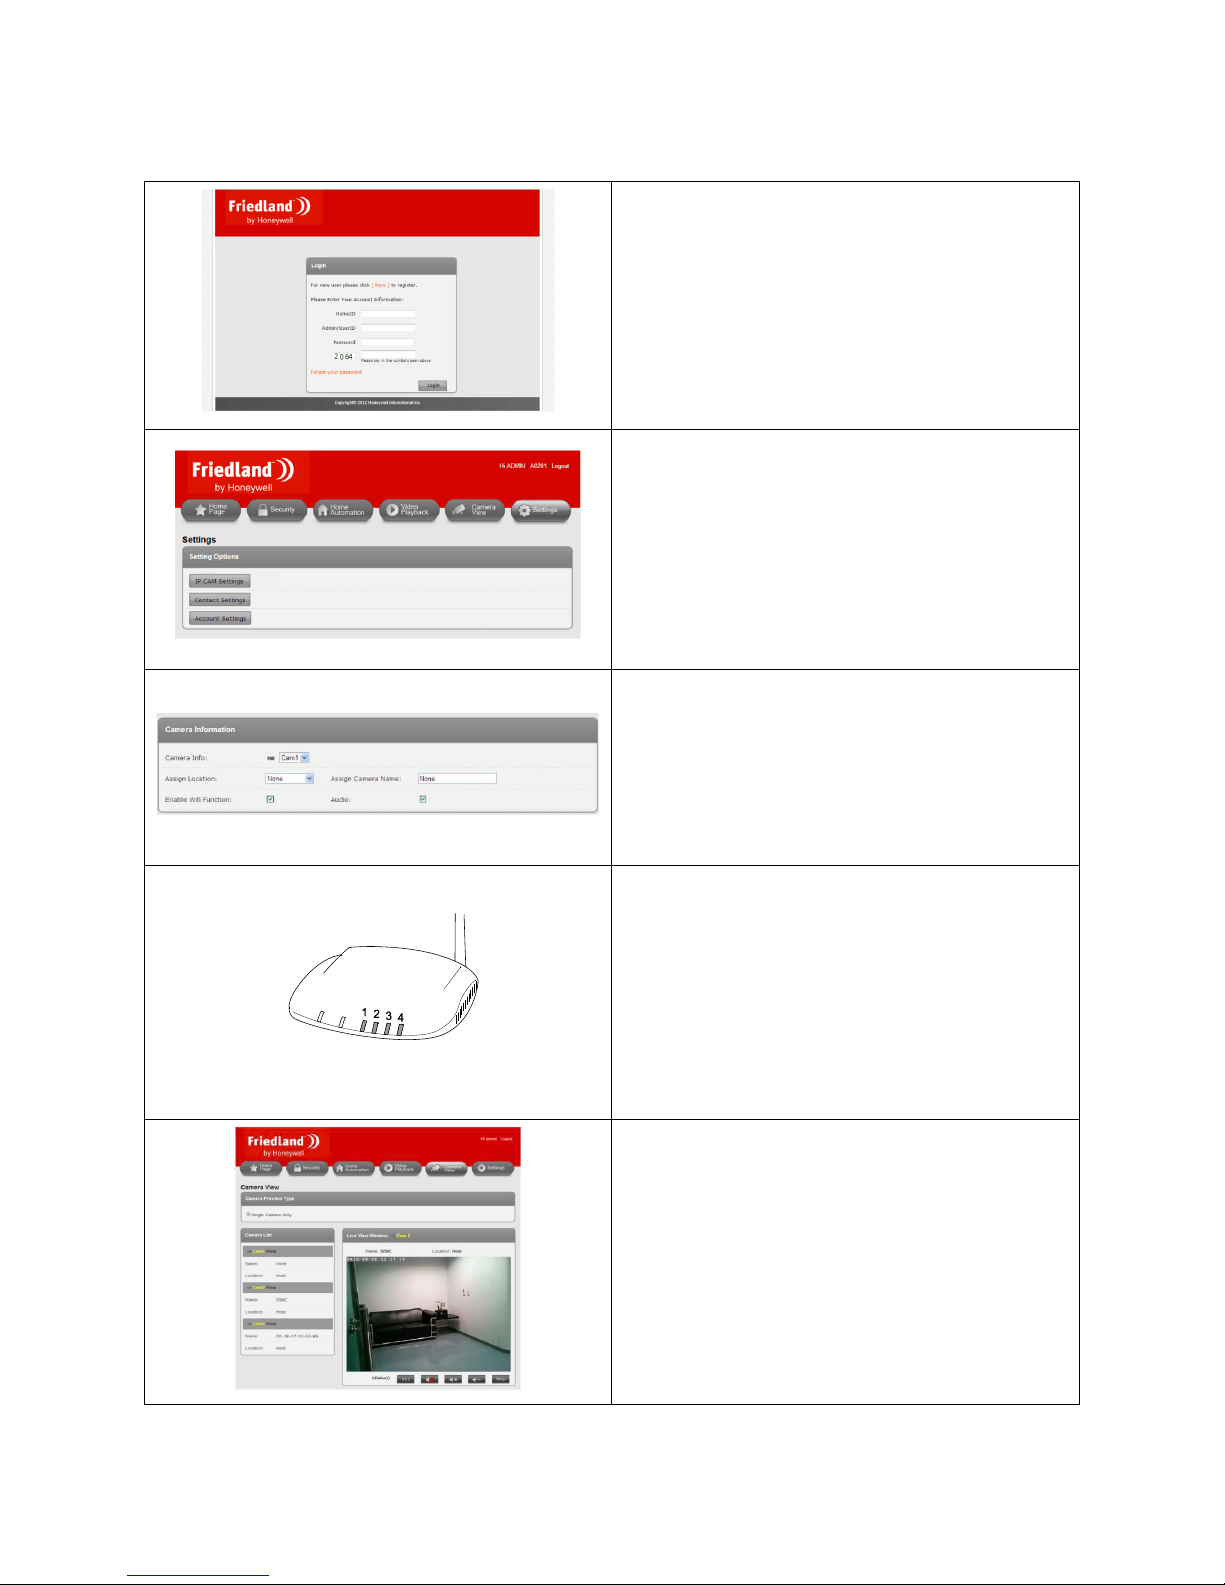
5.4 Viewing video from the camera .................................................................................................................................... 7
6Wireless connection setup...................................................................................................................................................... 8
6.1Wireless connection (router without WPS button) ....................................................................................................... 8
6.2 Wireless connection (router with WPS button) ............................................................................................................ 9
7Operation ................................................................................................................................................................................ 9
7.1 Live-viewing the camera................................................................................................................................................ 9
7.2 Recording video to the Micro SD card ........................................................................................................................... 9
7.2.1 Manually recording video ......................................................................................................................................... 9
7.2.2 Recording video with security detectors .................................................................................................................. 9
7.3 Playing back video files from the Internet................................................................................................................... 10
7.4 Backing up video files from the Micro SD card on the PC ........................................................................................... 10
7.5 Playing back video files stored on the PC .................................................................................................................... 10
8Troubleshooting.................................................................................................................................................................... 11
9Technical data ....................................................................................................................................................................... 11
10 Disposal and recycling........................................................................................................................................................... 12
11 EC declaration of conformity................................................................................................................................................. 12
12 Guarantee ............................................................................................................................................................................. 12
13 Customer support ................................................................................................................................................................. 12

1Intended use
The FGGA0501WWE / FGGA05* Series / HIS5A kit is a wireless indoor IP camera. You can view and capture video and store it on
a memory card.
2Safety
2.1 Product
Keep all safety warnings and instructions for future reference.
Obey the local regulations applicable to the installation of the product.
Install the devices in dry, well-ventilated environments (exception for external components). Do not install the
devices in humid environments (e.g. bathrooms).
Do not expose the devices to direct sunlight or high temperatures.
Do not attempt to open the devices.
2.2 Power supply unit
Make sure that the mains voltage corresponds to the voltage on the rating plate.
Do not try to replace the charger unit with a regular mains plug.
2.3 Installation
Wear safety gloves when drilling into walls.
Wear safety glasses when drilling into walls.
Make sure that there are no electrical wires and water pipes when drilling into walls.
Position ladders onto a level and stable surface and at a safe angle.
3Description
3.1 Package contents
Part
Description
Part
Description
Part
Description
Wireless camera
(1x)
Power adaptor
(5V/1A)
Manual
Camera stand
(1x)
Ethernet cable
(RJ45 / 0.5m)
(1x)
Fasteners
(1x)
Micro SD card
(1x)
Note:
If you replace the supplied Micro SD card, make sure that the new Micro SD card is formatted into FAT32 format on a Windows
PC before inserting it into the camera.

4
3.2 Required tools
Tool
Description
Tool
Description
Safety glasses
Bradawl
Safety gloves
Phillips screwdriver
(#2)
Memory card reader for PC
(if PC has no built-in memory
card reader)
Masonry drill bit
(20 mm)
Electric drill
Masonry drill bit
(5 mm)
Hammer
3.3 System requirements
You must install and set up a GlobalGuard home alarm system and create an online account before you install the
FGGA0501WWE / FGGA05* Series / HIS5A kit.
Operating system
Windows XP / Windows Vista / Windows 7
Web browser
Internet Explorer 6.x (or higher)
Central processing unit (CPU)
Pentium 4: 1 GHz (or higher)
VGA card resolution
800x600 (or higher)
Video memory size
128 Mb (or higher)
Internet bandwidth
512 kbps
(recommended upload speed for 1 camera)
Memory card
Micro SD: 4 GB (included) / 32 GB (supported)
4Overview
1. Microphone
2. Lens
3. WPS button
4. Micro SD card indicator (yellow)
5. Ethernet connection indicator (blue)
6. Internet connection indicator (red)
7. Infrared LED
8. Memory card holder
9. Power jack
10. Mounting point for camera stand
11. Ethernet jack

5
5Installation
5.1 Assembling the camera
1. Assemble the camera stand.
2. Tighten the camera (1) onto the camera stand. Set the
camera to the correct angle. Tighten the knob (2).
3. Loosen the thumbscrew (3).
4. Set the camera (1) to the correct position.
5. Tighten the thumbscrew (3).
5.2 Installing the camera
The camera has a built-in infrared LED to allow you to view at night for 24-hour surveillance. The LED will automatically activate
at night and the picture viewed will turn to black and white. The night vision range is up to 10 metres. If necessary, use a lamp
to improve night vision.
Position the camera in view of a door/window contact detector or a PIR movement detector. The camera can record video
after a security detector has been triggered by an intruder provided the camera has been setup with same location setting as
the security detector.
The camera has an open-field radio-frequency operating range of up to 100 metres. The amount by which the wireless range
will reduce depends on the obstruction between the camera and the wireless router. The effect on the range of multiple walls
is cumulative.
Wall type
Range reduction
Dry-lined partition wall
10-30%
Single-layer brick wall
20-40%
Double-layer brick wall
30-70%
Metal panel/radiator
90-100%

6
Wall
Ceiling
1. Use the camera stand to mark the position of the
mounting holes on the wall or the ceiling.
2. Drill mounting holes (5 mm) into the wall or the ceiling
according to the mounting slots in the camera stand.
3. Insert a supplied wall plug into each mounting hole.
4. Tighten the camera stand to the wall using the supplied
screws.
5. Tighten the camera onto the camera stand. Set the
camera to the correct angle. Tighten the knob.
6. Loosen the thumbscrew.
7. Set the camera to the correct position.
8. Tighten the thumbscrew.
9. Connect the power adaptor to the camera.
10. Switch on the camera.
11. Check the live-view video from the website.
12. If necessary, adjust the camera angle.
5.3 Electrical installation
1. Connect the camera as shown.
The Internet connection indicator lights continuously to
indicate that the Internet connection is successful.
Note:
The camera must be connected to the same local network as
the IP gateway to ensure recording.

7
5.4 Viewing video from the camera
1. Log in to the website
https://GlobalGuard.Friedland.co.uk on your PC.
a) Enter your account information:
“Home ID”, “Admin/User ID”, ”Password”.
b) Enter the 4-digit code.
c) Click “Login”.
2. Add the new camera:
a) Click “Settings”.
b) Click “IP CAM Settings”.
c) Click “Add IPCAM” to add a new camera.
d) Enter the MAC address of the camera.
(The MAC address is printed on the camera.)
Note:
Follow the on-screen instructions for registering the camera
to operate with your system correctly.
3. Assign advanced settings to the camera:
- “Camera Info”: camera number(automatically
assigned to the camera)
- “Assign Location”: camera location
- “Assign Camera Name”: camera name
- “Enable Wifi Function”: to switch the Wi-Fi
function on/off.
- “Audio”: to switch the audio on/off.
The indicator on the IP gateway comes on to indicate that the
new camera has been added to your system:
Note:
The 4 indicators s the connection status of up to 8 cameras:
- If you connect camera 1-4, indicators 1-4 will become
green.
- If you add camera 5, indicator 1 will become orange
(etc.).
- If you disconnect camera 1 but camera 5 is still active,
indicator 1 will become red (etc.).
4. Click “Camera View”.
5. Select the camera.
6. Click “View”.

8
6Wireless connection setup
6.1 Wireless connection (router without WPS button)
1. Log in to the website
https://GlobalGuard.Friedland.co.uk on your PC.
2. Click “Settings”.
3. Click “IP CAM Settings”.
4. Select the camera (1).
5. Select the Wi-Fi function (2).
6. Select the audio (3).
7. Enter the wireless security settings (4):
- Wireless Network: Enter the name of the
wireless network of the router (SSID).
- Security Type: Select “None”, “WEP” or
“WPA/WPA2-PSK”.
- WEP Mode: Select “64-bit (5 char)”, “64-bit
(10 hex)”, “128-bit (13 char)” or “128-bit (26 hex)”.
Enter the WEP key.
- WPA-PSK Mode: Select “TKIP” or “AES”. Enter
the WPA-PSK key.
Note: “WPA2-PSK” is also supported. “WPA
Enterprise” and “WPA2 Enterprise” are not supported.
8. Click “Apply” (5) to save the changes. Wait for
approximately one minute.
Note:
The IP camera must be connected to the same local
network as the IP gateway.
9. Disconnect the Ethernet cable from the camera to
start the wireless connection. The indicators on the
camera come on and go off alternately. Within one
minute, the indicators on the camera will go off and
the camera will restart.
If the wireless connection has been established, the
Ethernet connection indicator will flash and the
Internet connection indicator and the Micro SD card
indicator will light continuously.
Note:
-If you change the camera to another location, disconnect the power adaptor from the wall socket, move the camera to the
required location and connect the power adaptor to the wall socket again. If you move the camera much further away from
the wireless router, check the signal strength of the wireless connection using the signal strength meter on your PC or
smartphone as a guide.
-If you use the wired Ethernet connection, connect the Ethernet cable to camera again. If the wireless connection between
the camera and the router is poor, a wired connection may also be required.

9
6.2 Wireless connection (router with WPS button)
1. Disconnect the Ethernet cable from the camera to start
the wireless connection.
2. Press and release the WPS button on the router. Within
one minute, press and release the WPS button on the
camera. The indicators on the camera come on and go
off alternately. Within one minute, the indicators on the
camera will go off.
If the wireless connection has been established, the
Ethernet connection indicator will come on.
7Operation
7.1 Live-viewing the camera
1. Log in to the website
https://GlobalGuard.Friedland.co.uk on your PC.
2. Click “Camera View”.
3. Select the camera.
4. Click “View”.
Note:
The Apple/Android GlobalGuard apps can be used to view
cameras connected to your system. Download and install the
app from the App Store (Apple) or from Google Play
(Android). Use your login details for your GlobalGuard online
account to sign in.
7.2 Recording video to the Micro SD card
7.2.1 Manually recording video
1. Click “REC” to start recording for approximately 30 seconds.
2. Click “REC” again 1x to stop recording.
7.2.2 Recording video with security detectors
If a door/window contact detector or a PIR movement detector is triggered while your alarm system is armed, the IP gateway
will locate the corresponding IP camera in the same location and inform it to start recording for approximately 30 seconds.
Note:
If the camera location is set to “None”, it will record whenever any detector is triggered.
All cameras will record when the control panel detects event conditions of “Panic”, “Tamper”, “Fire” and “Duress”
regardless of the location the camera is set to.

10
7.3 Playing back video files from the Internet
1. Log in to the website
https://GlobalGuard.Friedland.co.uk on your PC.
2. Click “Video Playback”.
3. Select the camera.
4. Click the icon to refresh the playback list.
5. Click the file name.
Video file name format
A
B
C
D
E
F
G
2011
12
27
15
32
40
000
Year
Month
Day
Hour
Minute
Second
suffix to
file name
7.4 Backing up video files from the Micro SD card on the PC
1. Remove the Micro SD card from the camera.
2. Insert the Micro SD card into a suitable memory card reader for your PC.
- If your PC can read Micro SD cards directly, insert the Micro SD card into the built-in memory card reader.
- If your PC cannot read Micro SD cards directly, use a suitable external memory card reader.
3. After your PC detects the storage device, copy the folder with the video files onto a location on your PC.
4. If the process is completed, remove the Micro SD card from the memory card reader.
5. Insert the micro SD card into the camera.
6. Switch off the camera, wait for a few seconds and switch on the camera again to make sure that the camera can reboot
its functionality correctly.
7.5 Playing back video files stored on the PC
If video files are stored on your PC, you can play back the files on the PC using the GlobalGuard CamPlay software.
1. Launch Internet Explorer on your PC.
2. Go to the website “https://GlobalGuard.Friedland.co.uk”.
3. Download the GlobalGuard CamPlay software and the GlobalGuard software manual.
4. Install the software.
5. Open the software.
6. Refer to the section “GlobalGuard Camplay software” in the GlobalGuard software manual.
Note: Not all features of the GlobalGuard CamPlay software are applicable for the GlobalGuard Camera.

11
8Troubleshooting
PROBLEM
CAUSE
SOLUTION
The Internet connection indicator
on the camera flashes.
The internet connection is not working
correctly.
Make sure that the internet connection is
working correctly.
The picture quality is poor when
the camera is connected to the
router through wireless
connection.
The camera is installed too far from the
router.
Install the camera closer to the router.
Too many devices are connected to the
router.
Disconnect some devices from the router.
The video can be viewed remotely,
but the video quality is poor and
the video sometimes disconnects
and connects again by itself.
The Internet bandwidth (connection
speed) is not large enough.
Upgrade for a better internet connection
from your Internet service provider (ISP).
The camera requires a minimum upload
speed of 512 kbps.
A loud whistling sound from the
camera can be heard on the PC.
The camera is installed too close to the
PC.
1. Decrease the speaker volume on the PC.
2. Decrease the camera volume.
9Technical data
Operating voltage
DC: 5 V / 1 A
Operating conditions
Operating temperature
0 °C ~ 50 °C (indoor use only)
Relative humidity
20% ~ 80%
Wireless interface
IEEE 802.11n
90-150 Mbps
IEEE 802.11g
6-54 Mbps
IEEE 802.11b
1-11 Mbps
Transmitter power
14.5 dBm typically at 802.11g
17.5 dBm typically at 802.11b
Receiver sensitivity
54 Mbps: typically -73 dBm at 10% PER
11 Mbps: typically -86 dBm at 10% PER
Antenna gain
0.01 dBi
Communication range
100 m (in open space)
Image sensor
RGB VGA 1/4 inch CMOS
Separate image sensors for day and night
Automatic exposure control
Automatic white balance
Automatic brightness control
Automatic antenna gain control
Light sensitivity
0.2 Lux (infrared LED off)
0.0 Lux (infrared LED on, 10 m)
Lens / viewing angle
3.2 mm
F2.0
Viewing angle: 60.3°
Fixed iris
Separate lenses for day and night
Night vision range
10 m (max.)
Video compression
H.264
Baseline profile level 3.1
Display resolution
VGA: 640x480
QVGA: 320x420
Memory card
Micro SD: 4 GB (included) / 32 GB (supported)
Video recording capacity
Approximately 300 video clips of 33 seconds (2GB)

12
10 Disposal and recycling
The product is classified by the Waste Electrical or Electronic Equipment (WEEE) directive. The product and the batteries of the
monitor should not be disposed of with other household or other commercial waste. At the end of its useful life, the packaging
and the product should be disposed of via a suitable recycling centre. For information on available facilities, please contact your
local authority or retailer from where the product was purchased.
11 EC declaration of conformity
Novar ED&S hereby declares that the product is in compliance with the essential requirements and other relevant provisions of
the Radio and Telecommunications Terminal Equipment (R&TTE) directive (1995/5/EC).
12 Guarantee
Novar ED&S undertakes to replace or repair at its discretion goods, should they become defective within 2 year solely as a
result of faulty materials and workmanship.
Understandably, if the product has not been installed, operated or maintained in accordance with the instructions, if the
product has not been used appropriately or if any attempt has been made to rectify, dismantle or alter the product in any way,
the guarantee will be invalidated.
The guarantee states Novar ED&S entire liability. The guarantee does not extend to cover consequential loss or damage or
installation costs arising from the defective product. The guarantee does not in any way affect the statutory or other rights of a
consumer and applies to products installed within the EU only. If an item develops a fault, the product must be returned to the
point of sale with:
1. Proof of purchase.
2. Full description of the fault.
3. All relevant batteries (disconnected).
13 Customer support
For further product information and full installation manuals where applicable go to www.friedlandproducts.com
Service Helpline
UK & Northern Ireland
0844 736 9149
Monday to Friday
9:00 am - 5:00 pm
The phone calls are charged
at the national rate of the
service providers.

13
Inhaltsverzeichnis
1Bestimmungsgemäßer Gebrauch.......................................................................................................................................... 14
2Sicherheit .............................................................................................................................................................................. 14
2.1 Produkt........................................................................................................................................................................ 14
2.2 Netzgerät..................................................................................................................................................................... 14
2.3 Installation................................................................................................................................................................... 14
3Beschreibung......................................................................................................................................................................... 14
3.1 Verpackungsinhalt....................................................................................................................................................... 14
3.2 Erforderliche Werkzeuge............................................................................................................................................. 15
3.3 Systemanforderungen................................................................................................................................................. 15
4Übersicht............................................................................................................................................................................... 15
5Installation ............................................................................................................................................................................ 16
5.1 Montage der Kamera................................................................................................................................................... 16
5.2 Installation der Kamera ............................................................................................................................................... 16
5.3 Elektroinstallation ....................................................................................................................................................... 17
5.4 Betrachten des Videos der Kamera ............................................................................................................................. 18
6Funkverbindungs-Setup ........................................................................................................................................................ 19
6.1 Funkverbindung (Router ohne WPS-Taste) ................................................................................................................. 19
6.2 Funkverbindung (Router mit WPS-Taste).................................................................................................................... 20
7Bedienung ............................................................................................................................................................................. 20
7.1 Live-Kameraansicht ..................................................................................................................................................... 20
7.2 Aufzeichnen von Video auf die Micro-SD-Karte .......................................................................................................... 20
7.2.1 Manuelles Aufzeichnen von Videos........................................................................................................................ 20
7.2.2 Aufzeichnen von Video durch Melder .................................................................................................................... 20
7.3 Wiedergabe von Videodateien aus dem Internet ....................................................................................................... 21
7.4 Sicherung von Videodateien von der Micro-SD-Karte auf dem PC.............................................................................. 21
7.5 Wiedergabe von Videodateien, die auf dem PC gespeichert sind............................................................................... 21
8Fehlersuche........................................................................................................................................................................... 22
9Technische Daten.................................................................................................................................................................. 22
10 Entsorgung und Wiederverwertung...................................................................................................................................... 23
11 EG-Konformitätserklärung .................................................................................................................................................... 23
12 Garantie ................................................................................................................................................................................ 23
13 Kundenbetreuung ................................................................................................................................................................. 23

1Bestimmungsgemäßer Gebrauch
Beim Satz der Serie FGGA0501WWE / FGGA05* / HIS5A handelt es sich um ein IP-Kamera ((LAN/WLAN) für geschlossene
Räume. Es bietet Ihnen die Möglichkeit, Videos anzuschauen, aufzuzeichnen und auf einer Speicherkarte abzuspeichern.
2Sicherheit
2.1 Produkt
Bewahren Sie sämtliche Sicherheitshinweise und Anweisungen zur künftigen Bezugnahme auf.
Beachten Sie die für die Installation des Produkts geltenden regionalen Richtlinien.
Installieren Sie die Geräte in einer trockenen, gut belüfteten Umgebung (mit Ausnahme der externen Komponenten).
Installieren Sie die Geräte nicht in einer feuchten Umgebung (z.B. Badezimmer).
Setzen Sie die Geräte keiner direkten Sonneneinstrahlung oder hohen Temperaturen aus.
Versuchen Sie nicht, die Geräte zu öffnen.
2.2 Netzgerät
Vergewissern Sie sich, dass die Netzspannung mit der Spannung auf dem Typenschild übereinstimmt.
Versuchen Sie niemals, das Ladegerät gegen einen normalen Netzstecker auszutauschen.
2.3 Installation
Tragen Sie beim Bohren in Wände Sicherheitshandschuhe.
Tragen Sie beim Bohren in Wände eine Schutzbrille.
Vergewissern Sie sich beim Bohren in Wände, dass keine elektrischen Leitungen und Wasserrohre vorhanden sind.
Stellen Sie Leitern auf ebenem und stabilem Boden und in einem sicheren Winkel auf.
3Beschreibung
3.1 Verpackungsinhalt
Teil
Beschreibung
Teil
Beschreibung
Teil
Beschreibung
IP-Kamera
(1x)
Netzadapter
(5 V/1 A)
Handbuch
Kamerahalter
(1x)
Ethernet-Kabel
(RJ45 / 0,5 m)
(1x)
Befestigungsteile
(1x)
Micro-SD-Karte
(1x)
Hinweis:
Wenn Sie die mitgelieferte Micro-SD-Karte austauschen, vergewissern Sie sich, dass die neue Micro-SD-Karte im FAT32-Format
auf einem Windows PC formatiert wurde, bevor Sie sie in die Kamera einsetzen.

15
3.2 Erforderliche Werkzeuge
Werkzeug
Beschreibung
Werkzeug
Beschreibung
Schutzbrille
Vorstecher
Sicherheitshandschuhe
Kreuzschraubendreher
(#2)
Speicherkartenlesegerät für
PC
(falls der PC kein eingebautes
Speicherkartenlesegerät hat)
Steinbohrer
(20 mm)
Bohrmaschine
Steinbohrer
(5 mm)
Hammer
3.3 Systemanforderungen
Sie müssen eine GlobalGuard Hausalarmanlage installieren und einrichten und ein Online-Konto erstellen, bevor Sie den Satz
der Serie FGGA0501WWE / FGGA05* / HIS5A installieren.
Betriebssystem
Windows XP / Windows Vista / Windows 7
Web-Browser
Internet Explorer 6.x (oder höher)
Prozessor (CPU)
Pentium 4: 1 GHz (oder höher)
VGA-Karten-Auflösung
800x600 (oder höher)
Grafikkartenspeichergröße
128 Mb (oder mehr)
Internetbandbreite
512 kbps
(empfohlene Hochladegeschwindigkeit für 1 Kamera)
Speicherkarte
Micro-SD: 4 GB (im Lieferumfang) / 32 GB (unterstützt)
4Übersicht
1. Mikrofon
2. Linse
3. WPS-Taste
4. Anzeige für Micro-SD-Karte (gelb)
5. Ethernet-Verbindungsanzeige (blau)
6. Internet-Verbindungsanzeige (rot)
7. Infrarot-LED
8. Speicherkartensteckplatz
9. Spannungsversorgungsbuchse
10. Befestigungspunkt für Kamerahalter
11. Ethernet-Buchse

16
5Installation
5.1 Montage der Kamera
1. Montieren Sie die Kamera auf den Kamerahalter.
2. Schrauben Sie die Kamera (1) auf den Kamerahalter.
Stellen Sie die Kamera auf den richtigen Winkel ein.
Ziehen Sie den Knopf (2) an.
3. Lösen Sie die Rändelschraube (3).
4. Stellen Sie die Kamera (1) auf die richtige Position ein.
5. Ziehen Sie die Rändelschraube (3) an.
5.2 Installation der Kamera
Die Kamera hat eine eingebaute Infrarot-LED, die die Nachtsicht zur 24-Stunden-Überwachung ermöglicht. Die LED schaltet
nachts automatisch ein und das Bild wechselt auf schwarz/weiß. Der Nachtsichtbereich beträgt bis zu 10 Meter. Verwenden Sie
ggf. eine Lampe, um die Nachtsicht zu verbessern.
Positionieren Sie die Kamera im Sichtbereich eines Tür-/Fensterkontakts oder eines PIR-Bewegungsmelders. Die Kamera kann
Videos aufzeichnen, nachdem ein Melder von einem Eindringling ausgelöst wurde - vorausgesetzt, dass die Kamera mit den
gleichen Ortseinstellungen wie der Melder eingerichtet wurde.
Die Kamera hat im Freien eine Funk-Reichweite von bis zu 100 Metern. Die Verringerung des Funkbereichs hängt von der
Behinderung zwischen Kamera und Funk-Router ab. Bei mehreren Wänden nimmt die Auswirkung auf den Bereich zu.
Wandtyp
Bereichseinschränkung
Trockenbau-Trennwand
10-30%
Einzelschicht-Mauerwerk
20-40%
Doppelschicht-Mauerwerk
30-70%
Metallplatte/Heizung
90-100%

17
Wand
Decke
1. Verwenden Sie den Kamerahalter, um die Position der
Befestigungslöcher an der Wand oder Decke zu
markieren.
2. Bohren Sie entsprechend der Montageschlitze im
Kamerahalter Befestigungslöcher (5 mm) in die Wand
oder Decke.
3. Stecken Sie die mitgelieferten Dübel in jedes
Befestigungsloch.
4. Befestigen Sie den Kameraständer mit den
mitgelieferten Schrauben an der Wand.
5. Schrauben Sie die Kamera auf den Kameraständer.
Stellen Sie die Kamera auf den richtigen Winkel ein.
Ziehen Sie den Knopf an.
6. Lösen Sie die Rändelschraube.
7. Bewegen Sie die Kamera in die richtige Position.
8. Ziehen Sie die Rändelschraube an.
9. Verbinden Sie den Netzadapter mit der Kamera.
10. Schalten Sie die Kamera ein.
11. Kontrollieren Sie das Live-Video auf der Webseite.
12. Stellen Sie ggf. den Kamerawinkel ein.
5.3 Elektroinstallation
1. Schließen Sie die Kamera wie angegeben an.
Die Internet-Verbindungsanzeige leuchtet
kontinuierlich, um anzuzeigen, dass die Internet-
Verbindung erfolgreich hergestellt wurde.
Hinweis:
Die Kamera muss mit dem gleichen lokalen Netzwerk wie der
IP-Gateway verbunden werden, um die Aufzeichnung
sicherzustellen.

18
5.4 Betrachten des Videos der Kamera
1. Melden Sie sich auf der Webseite
https://GlobalGuard.Friedland.co.uk mit Ihrem PC an.
a) Geben Sie Ihre Kontoinformation ein:
"Home-ID", "Admin/Benutzer-ID", "Passwort".
b) Geben Sie den 4-stelligen Code ein.
c) Klicken Sie auf "Login".
2. Fügen Sie die neue Kamera hinzu:
a) Klicken Sie auf "Settings" ["Einstellungen"].
b) Klicken Sie auf "IP CAM Settings" ["IP-
Kameraeinstellungen"].
c) Klicken Sie auf "Add IPCAM" ["IP-Kamera
hinzufügen"], um eine neue Kamera hinzuzufügen.
d) Geben Sie die MAC-Adresse der Kamera ein.
(Die MAC-Adresse ist auf der Kamera aufgedruckt.)
Hinweis:
Folgen Sie den Anweisungen auf dem Bildschirm, um die
Kamera registrieren zu lassen, so dass sie einwandfrei mit
Ihrer Anlage arbeitet.
3. Weisen Sie der Kamera die erweiterten Einstellungen zu:
- "Camera Info": Kameranummer (wird der Kamera
automatisch zugewiesen)
- "Assign Location": Kameraort
- "Assign Camera Name": Kameraname
- "Enable Wifi Function": schaltet die Wi-Fi-Funktion
ein/aus.
- "Audio": schaltet den Ton ein/aus
Die Anzeige am IP-Gateway leuchtet auf, um anzuzeigen, dass
die neue Kamera in der Anlage aufgenommen wurde:
Hinweis:
Die 4 Anzeigen weisen auf den Verbindungsstatus von bis zu
8 Kameras hin:
- Wenn Sie Kamera 1-4 verbinden, werden die Anzeigen
1-4 grün.
- Wenn Sie Kamera 5 hinzufügen, wird Anzeige 1 orange
(usw.).
- Wenn Sie Kamera 1 trennen, aber Kamera 5 ist noch
aktiv, wird Anzeige 1 rot (usw.).
4. Klicken Sie auf "Camera View" ["Kameraansicht"].
5. Wählen Sie die Kamera.
6. Klicken Sie auf "View" ["Ansicht"].

19
6Funkverbindungs-Setup
6.1 Funkverbindung (Router ohne WPS-Taste)
1. Melden Sie sich auf der Webseite
https://GlobalGuard.Friedland.co.uk mit Ihrem PC an.
2. Klicken Sie auf "Settings" ["Einstellungen"].
3. Klicken Sie auf "IP CAM Settings" ["IP-
Kameraeinstellungen"].
4. Wählen Sie die Kamera (1).
5. Wählen Sie die Wi-Fi-Funktion (2).
6. Wählen Sie Audio (3).
7. Geben Sie die Funk-Sicherheitseinstellungen (4) ein:
- Funk-Netzwerk: Geben Sie den Namen des Funk-
Netzwerks des Routers (SSID) ein.
- Sicherheitstyp: Wählen Sie "Keiner", "WEP" oder
"WPA/WPA2-PSK".
- WEP-Modus: Wählen Sie "64-bit (5 Zeichen)",
"64-bit (10 hex)", "128-bit (13 Zeichen)" oder
"128-bit (26 hex)". Geben Sie den WEP-Schlüssel ein.
- WPA-PSK-Modus: Wählen Sie "TKIP" oder "AES".
Geben Sie den WPA-PSK-Schlüssel ein.
Hinweis: "WPA2-PSK" wird ebenfalls unterstützt.
"WPA Enterprise" und "WPA2 Enterprise" werden
nicht unterstützt.
8. Klicken Sie auf "Apply" ["Bestätigen"] (5), um die
Änderungen zu speichern. Warten Sie ca. eine Minute.
Hinweis:
Die IP-Kamera muss mit dem gleichen lokalen Netzwerk
wie der IP-Gateway verbunden werden.
9. Trennen Sie das Ethernet-Kabel von der Kamera, um
die Funkverbindung zu starten. Die Anzeigen an der
Kamera gehen abwechselnd an uns aus. Innerhalb
einer Minute gehen die Anzeigen an der Kamera aus
und die Kamera startet neu.
Wurde die Funkverbindung hergestellt, blinkt die
Ethernet-Verbindungsanzeige und die Internet-
Verbindungsanzeige und die Micro-SD-Karten-Anzeige
leuchten kontinuierlich.
Hinweis:
-Wenn Sie die Kamera an einem neuen Ort montieren, trennen Sie den Netzadapter von der Wandsteckdose, bringen Sie die
Kamera zum gewünschten Ort und verbinden Sie den Netzadapter wieder mit der Wandsteckdose. Wenn Sie die Kamera
viel weiter vom Funk-Router weg bewegen, kontrollieren Sie die Signalstärke der Funkverbindung mit dem
Signalstärkemesser Ihres PCs oder Smartphones als Richtlinie.
-Wenn Sie die festverdrahtete Ethernet-Verbindung nutzen, schließen Sie das Ethernet-Kabel wieder an der Kamera an. Ist
die Funkverbindung zwischen der Kamera und dem Router schlecht, kann ebenfalls eine festverdrahtete Verbindung
erforderlich sein.

20
6.2 Funkverbindung (Router mit WPS-Taste)
1. Trennen Sie das Ethernet-Kabel von der Kamera, um die
Funkverbindung zu starten.
2. Drücken Sie auf die WPS-Taste am Router und lassen Sie
sie los. Drücken Sie innerhalb einer Minute auf die WPS-
Taste an der Kamera und lassen Sie sie los. Die Anzeigen
an der Kamera gehen abwechselnd an uns aus.
Innerhalb einer Minute gehen die Anzeigen an der
Kamera aus.
Wurde die Funkverbindung hergestellt, leuchtet die
Ethernet-Verbindungsanzeige auf.
7Bedienung
7.1 Live-Kameraansicht
1. Melden Sie sich auf der Webseite
https://GlobalGuard.Friedland.co.uk mit Ihrem PC an.
2. Klicken Sie auf "Camera View" ["Kameraansicht"].
3. Wählen Sie die Kamera.
4. Klicken Sie auf "View" ["Ansicht"].
Hinweis:
Die Apple/Android GlobalGuard Apps können verwendet
werden, um die mit Ihrer Anlage verbundenen Kameras zu
betrachten. Laden Sie die App beim Apple Store oder bei
Google Play (Android) herunter. Verwenden Sie Ihre
Anmelde-Details für Ihr GlobalGuard Online-Konto, um sich
anzumelden.
7.2 Aufzeichnen von Video auf die Micro-SD-Karte
7.2.1 Manuelles Aufzeichnen von Videos
1. Klicken Sie auf "REC" ["AUFZEICHNEN"], um eine ca. 30 Sekunden lange Aufzeichnung zu starten.
2. Klicken Sie erneut 1x auf "REC" ["AUFZEICHNEN"], um die Aufzeichnung zu stoppen.
7.2.2 Aufzeichnen von Video durch Melder
Wird ein Tür-/Fensterkontakt oder ein PIR-Bewegungsmelder ausgelöst, während Ihre Alarmanlage scharfgestellt ist, lokalisiert
das IP-Gateway die entsprechende IP-Kamera des gleichen Orts und informiert diese, eine Aufnahme mit ca. 30 Sekunden
Länge zu starten.
Hinweis:
Wird der Kameraort auf "None" ["Keiner] eingestellt, wird aufgezeichnet, sobald ein beliebiger Melder ausgelöst wird.
Alle Kameras zeichnen auf, wenn das Bedienfeld Ereignisbedingungen wie "Panik", "Sabotage", "Feuer" und "Bedrohung"
feststellt - und zwar unabhängig vom Ort, auf den die Kamera eingestellt ist.
This manual suits for next models
1
Table of contents
Languages: