Furrion NV2200 User manual


1
Contents
1. PRECAUTIONS ............................................................................................................................. 3
2. FEATURES ..................................................................................................................................... 4
Disc (DVD/CD/VCD) ...................................................................................................................... 4
Radio (AM/FM) ............................................................................................................................... 4
Bluetooth ........................................................................................................................................ 4
USB ........ ......................................................................................................................................... 5
CHASSIS ......................................................................................................................................... 5
GENERAL ........................................................................................................................................ 5
NAVIGATION .................................................................................................................................. 5
CAMERA ......................................................................................................................................... 6
INSTALLATION AND USAGE REQUIREMENTS ..................................................................... 6
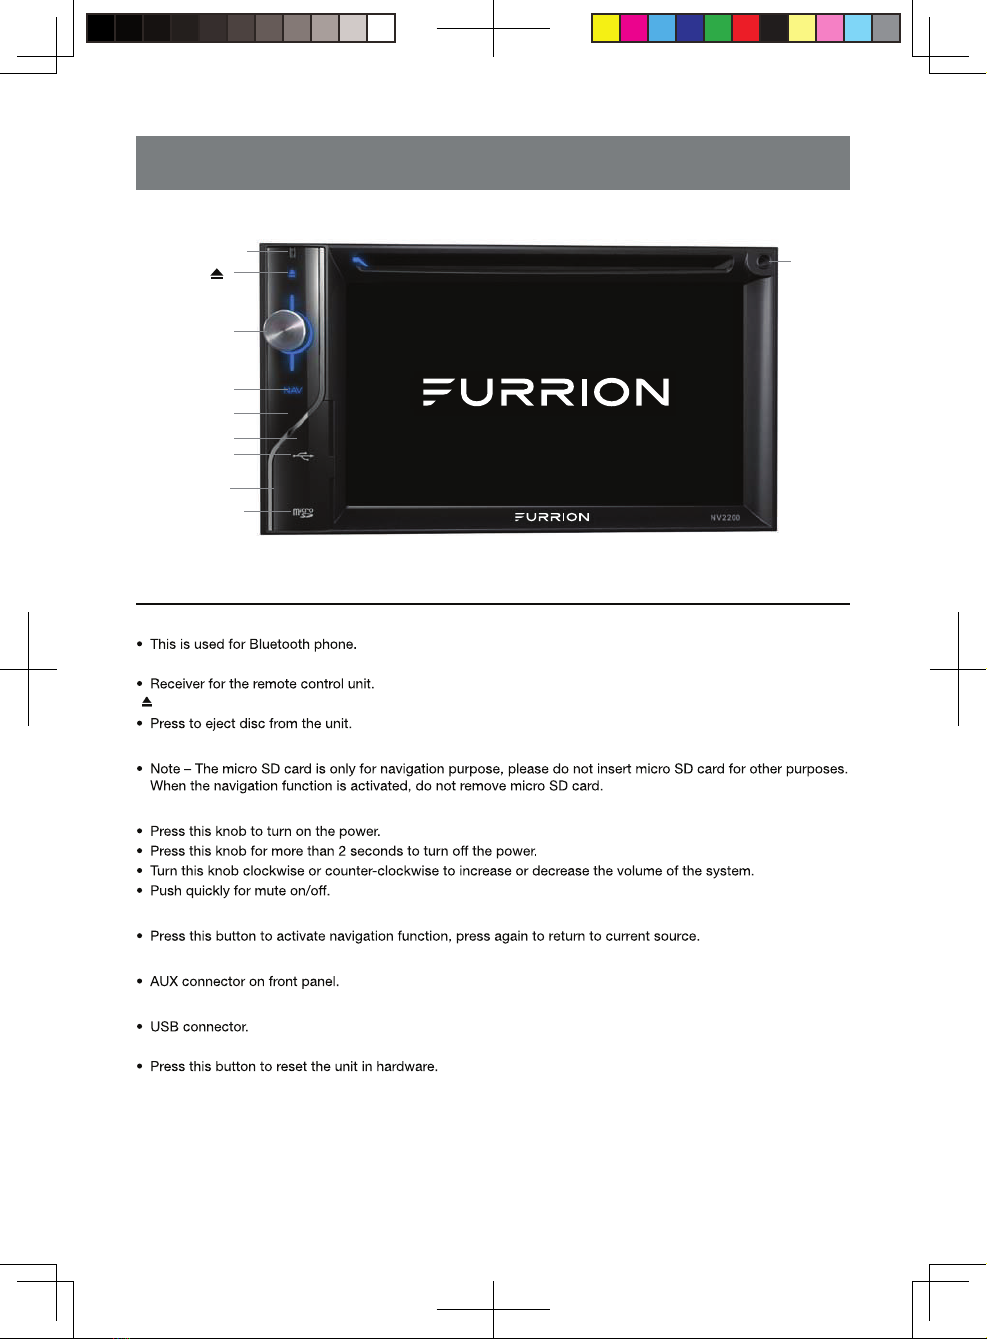
3. OPERATIONAL PANEL .............................................................................................................. 7
FUNCTIONS OF BUTTONS ........................................................................................................ 7
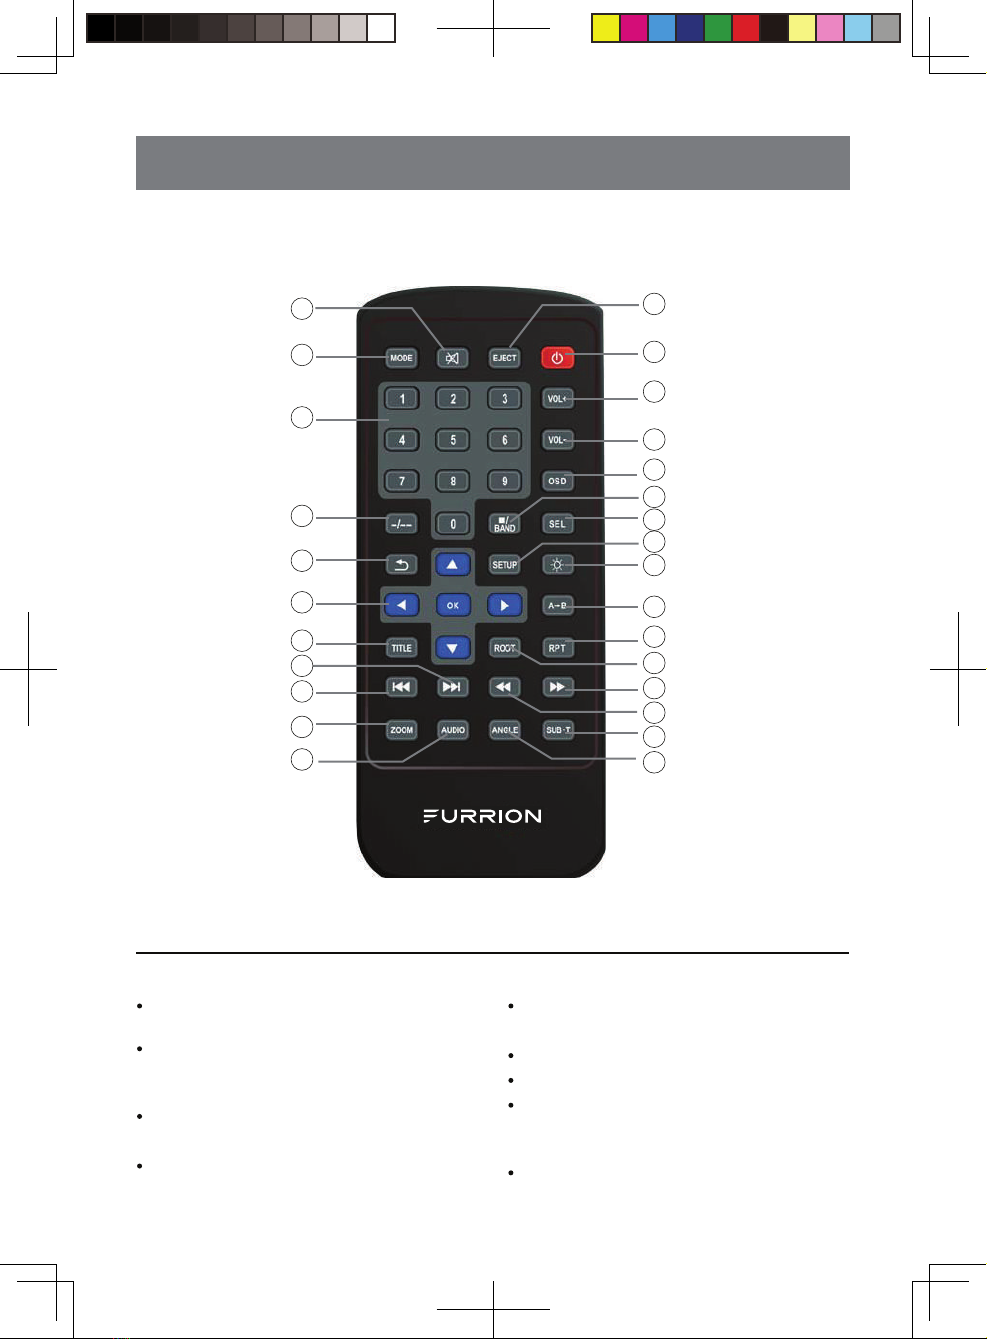
4. REMOTE CONTROL .................................................................................................................... 8
REMOTE CONTROL FUNCTIONS ............................................................................................. 8
5. WHEEL KEY STUDY .................................................................................................................. 10
6. MAIN MENU .................................................................................................................................. 11
SCROLLING THE MENU ............................................................................................................. 11
MOVING THE ICON POSITION ................................................................................................. 11
7. DISC VIDEO PLAYER OPERATIONS .................................................................................... 12
DVD SYSTEM SETUP ................................................................................................................... 12
WATCH A DISC ............................................................................................................................. 12
EJECT A DISC ............................................................................................................................... 12
DVD PLAYER MODE SCREEN ................................................................................................... 12
DVD PLAYER MENU OPERATION ............................................................................................ 12
Title Menu ....................................................................................................................................... 13
VIDEO FILES PLAYBACK ............................................................................................................ 14
VIDEO FILES PLAYER MODE SCREEN ................................................................................... 14
VIDEO FILES PLAYER MENU OPERATION ............................................................................ 14
8. DISC AUDIO PLAYER OPERATION ...................................................................................... 16
WATCH A DISC / EJECT A DISC ............................................................................................... 16
CD PLAYER MODE SCREEN ..................................................................................................... 16
CD PLAYER MENU OPERATION .............................................................................................. 16
MP3 / WMA Playback Menu ....................................................................................................... 18
9. AUDIO SETUP .............................................................................................................................. 19
EQ SETUP MENU ......................................................................................................................... 19
10. USB AUDIO OPERATIONS .................................................................................................... 20
Notes on Using USB Memory Device ...................................................................................... 20
SELECT USB AUDIO MODE ....................................................................................................... 20
PLAY AUDIO FILES IN USB MEMORY ..................................................................................... 20
11. USB VIDEO OPERATIONS ...................................................................................................... 22
Notes on Using USB Memories ................................................................................................. 22
Select USB Video Mode .............................................................................................................. 22
Playing Video Files in USB Memory ......................................................................................... 22
PLAY PICTURE FILES IN USB MEMORY ............................................................................... 23
12. BLUETOOTH AUDIO PLAYER OPERATIONS ................................................................... 25
Selecting the Bluetooth Audio Mode ........................................................................................ 25
Bluetooth Audio Player Settings ................................................................................................ 25
Registering your Bluetooth Audio Player (Pairing) .................................................................. 25
Selecting the Bluetooth Audio Player ....................................................................................... 26
Control the Bluetooth Audio Player ........................................................................................... 26
13. BLUETOOTH TELEPHONE OPERATIONS
......
..............................
......
...........................
.......
..... 27
Select the BT Phone Mode ......................................................................................................... 27
8226M-FU_Usermanual_.indd 1 2014-11-24 11:57:32

2
Bluetooth Telephone Settings .......................................................................................... 27
Registering Your Cellular Phone (Pairing) ......................................................................... 28
Select the Cellular Phone .................................................................................................. 28
Obtain Phone Book Data .................................................................................................. 28
Telephone Operations ...................................................................................................... 28
14. RADIO OPERATIONS .................................................................................................... 30
15. AUX ............................................................................................................................... 32
16. CAMERA INPUT OPERATIONS ................................................................................... 32
17. SETUP OPERATIONS ................................................................................................... 33
General Setup Menu ......................................................................................................... 33
Video Setup Menu ............................................................................................................ 33
Audio Setup Menu ............................................................................................................ 33
Navigation Setup Menu .................................................................................................... 33
Others Setup Menu ........................................................................................................... 33
18. REPLACE REMOTE CONTROL BATTERIES ............................................................... 35
CAUTIONS ........................................................................................................................ 35
19. TROUBLESHOOTING GUIDE ....................................................................................... 36
GENERAL .......................................................................................................................... 36
TFT SCREEN .................................................................................................................... 36
TUNER .............................................................................................................................. 37
MP3 ........ ........................................................................................................................... 37
CD PLAYER ........................................................................................................................ 37
REMOTE CONTROL ......................................................................................................... 37
20. SPECIFICATIONS .......................................................................................................... 38
21. WIRE CONNECTION GUIDE ......................................................................................... 40
8226M-FU_Usermanual_.indd 2 2014-11-24 11:57:32

WELCOME
Thank you for purchasing this Furrion®NV2200. Before operating your new appliance, please
read these instructions carefully. This instruction manual contains information for safe use, installation
and maintenance of the appliance.
Please keep this instruction manual in a safe place for future reference. This will ensure safe use and
reduce the risk of injury. Be sure to pass on this manual to new owners of this appliance.
The manufacturer does not accept responsibility for any damages due to not observing these
instructions.
If you have any further questions regarding our products, please contact us at support@furrion.com
adjustments
attempt to
make repairs yourself

4
2. FEATURES
Disc (DVD/CD/VCD)
Radio (AM/FM)
Bluetooth
•12cmdisctypesupported:DVD-Video,DVD±R/RW,CD-DA,CD-R,andCD-RW.
•Supportaudioformat:MP3,KodakPhotoCD,AAC,WMA,M4A.
•ID3tagcompatible.
•16Mbitelectronicshockproof:3secondsDVDvideo/10secondsCDaudio.
•Break-pointmemoryfunction.
•Allareacodesupported.
•FunctionsonDVD:play,pause,stop,previouschapter,nextchapter,fastforward,fastbackward,
subtitleselection,audioselection,A-Brepeat,sceneselection.
•FunctionsonCD:play,pause,previoustrack,nexttrack,randomplay,repeatplay,track
selection.
•FunctionsonVCD:play,pause,previouschapter,nextchapter,fastforward,fastbackward,
subtitleselection,audioselection,aspectratioselection,A-Brepeat.
•Supportpictureformat:JPEG.
•Functionsonpicture:pictureselection,automaticplay,pause,previouspicture,nextpicture.
•Supportvideoformat:MPEG1/2/4,AVI,FLV,DAT,VOB,OGM,ASF(supportmaximum
resolution 720p).
•Functionsonvideo:videoselection,play,pause,previousvideo,nextvideoandaspectratio
selection.
•USA/Europe/LatinAmerica/AsiaFrequencySpacing.
•30stationpresets(18FM/12AM).
•5bands(FM1/FM2/FM3/AM1/AM2).
•Automaticsearch(startatthecurrentfrequencytosearchallFMandAMstationsautomatically,
30ofthemwiththestrongestsignalwouldbestoredinthestationpresets).
•Searchandplay(startatthecurrentfrequencytosearchallFMandAMstationsautomatically,
everysearchedstationwillbeplayedfor10secondsbeforesearchingforthenextstation).
•Stationpresetstorage(storethecurrentstationtoapresetmemoryinaband).
•Presetstationrecall(recallapresetstationinaband).
•Local/Distance.
•SupportHFP,A2DPandAVRCP.
•Supportexternalmicrophone.
•Mainfunctions:
Direct dial (on screen keypad)
Missed call list
Received call list
Dialed call list
Phone book
Bluetoothaudio(play,pause,previoustrack,nexttrack)
•Functionsduringphoneconversation
End call
8226M-FU_Usermanual_.indd 4 2014-11-24 11:57:32

5
Transfer to phone (transfer a call back to mobile phone)
Mute
Keypad
Redial
•When a call is received, the unit will mute audio output and pause disc play, and switch to
Bluetooth conversation screen.
• Support maximum capacity: 32GB.
• USB 1.0 and USB 2.0 compatible.
• Support audio format: MP3, WAV, AAC, FLAC, WMA, APE.
• Functions on audio: play, pause, previous track, next track, random play, repeat play, track
selection.
• Support picture format: JPEG, JPG, GIF, PNG, BMP.
• Functions on picture: play, pause, previous picture, next picture, picture selection.
• Support video format: MPEG 1 / 2 / 4, XivD, MP4, MOV, AVI, WMV, ASF, FLV, MKV, VOB, DAT,
MPG OGM, RM, RMVB (support maximum resolution 720p).
• Functions on video: play, pause, previous video, next video, aspect ratio selection, video
selection.
• Double DIN (mountable).
• Fixed front panel.
• 6.2” high definition TFT LCD.
• 800 x 3 (RGB) x 480 resolution.
• Front / Rear USB input.
• Front A/V aux input for portable media.
• Front micro SD reader.
• Rear composite video and audio output.
• Rear subwoofer output.
• Rear composite video and audio input.
• Rear camera video and audio input.
• Touch screen calibration mode.
• Steering wheel key controls.
• Built-in Bluetooth with microphone, providing Hands-Free operation (dial / answer / phone book /
call list synchronization), and A2DP for streaming audio from your smartphone or other Bluetooth
compatible devices.
• Built-in 4 x 25Watt RMS output
• Automatic antenna control.
• Pre Amplifier Control.
• Only insert the Furrion map SD to use navigation function. For more information or to purchase
maps, please visit: www.furrion.com/maps.
• Latest map guarantee (limited time only – within 30 days of initial activation).
CHASSIS
GENERAL
NAVIGATION
USB
8226M-FU_Usermanual_.indd 5 2014-11-24 11:57:32

6
CAMERA
INSTALLATION AND USAGE REQUIREMENTS
•Whencameraandsignalwireisconnectedandoperatedproperly,CAMERAmodewillbe
activatedautomaticallywhenthereissignal.
•ImageDisplayofAutomaticCarReversingFunctioninShutdownMode.
•Operationtemperature:-20to+70degreeCelsius.
•Storagetemperature:-30to+80degreeCelsius.
•Operationvoltage:10.5–16.0VDC,negativeground.
•Fuse:15-amps.
•Standbycurrent:ACCOFF≤5mA.
•DINchassisdimensions:178mmx153mmx100mm.
8226M-FU_Usermanual_.indd 6 2014-11-24 11:57:32

8
4. REMOTE CONTROL
1- [POWER] Button
Press this button to power on when the unit is power
off.
Press this button more than 1 second to power off
when the unit is power on.
2- [EJECT] Button
Press to eject disc from the unit.
3- [MUTE] Button
Mute or unmute the speaker.
4- [MODE] Button
Press this button to switch between sources.
5- [0 - 9] Buttons
Use in the key pad screen to select the radio.
Use to select the track in the track list screen.
Press to enter DVD video chapters/titles in the key
pad screen.
6- [VOL+] Button
Increase volume.
REMOTE CONTROL FUNCTIONS
1
7
8
10
9
14
15
16
17
18
23
22
24
25
2
6
3
4
5
11
12
13
20
27
26
19
21
8226M-FU_Usermanual_.indd 8 2014-11-24 11:57:33

7
3.OPERATIONAL PANEL
FUNCTIONS OF BUTTONS
[POWER/VOL]
[NAVI]
[IR]
[Cover]
[USB]
[RESET]
[MICRO SD SLOT ]
[AUX IN]
[ ]
[MICROPHONE]
[IR] SENSOR
[] EJECT
[MICRO SD SLOT]
[POWER / VOL] KNOB
[NAVI] BUTTON
[AUX IN]
[USB] PORT
[RESET] BUTTON
[MICROPHONE]
8226M-FU_Usermanual_.indd 7 2014-11-24 11:57:32

9
7- [VOL-] Button
•Decrease volume.
8- [OSD] Button
•Touch button on DVD Player mode screen, playback
status is displayed on screen.
9- [SEL] Button
•Press to enter audio setting.
10- [STOP/BAND] Button
•Short Press to stop video and audio media.
•Long press to switch to next band alternately.
11- [SEARCH] Button
•Press this button to open chapter or title search
window while playing DVD and USB.
12- [BACK] Button
•Press this button to quit main menu if current screen
is main menu.
13- [ ], [ ], [ ], [ ] [OK] Buttons
•Press UP/DOWN/LEFT/RIGHT for cursor movement
in main menu or setting mode.
•From the main menu, you can select your desired
source or change your settings.
•Press OK to the entered data in the key pad
screen or enter the item the cursor is on.
14- [SETUP] Button
•Press this button to enter the main setting menu or
return current resource.
15- [PIC] Button
•Press this button to enter monitor brightness setting.
16- [A-B] Button
•Press to start demo playback from A to B.
17- [RPT] Button
•Press to perform chapter repeat / title repeat / repeat
off while playing DVD mode.
•Press to perform repeat track / repeat all while
playing CD.
•Press to perform repeat track / repeat folder / repeat
all while playing audio or video on disc.
•Press to perform repeat track / repeat folder / repeat
all while playing audio or video in USB memory.
18- [ROOT] Button
•Press to go to the root menu on the DVD.
19- [TITLE] Button
•Press to go to the title menu on the DVD.
20- [ ] Button
•Press to seek the next available lower station in
Tuner mode.
•Press to select the next lower chapter number in
DVD video mode.
•Press to select the next lower track in CD, USB
Video, USB Audio mode.
21- [ ] Button
•Press to seek the next available higher station in
Tuner mode.
•Press to select the next higher chapter number in
DVD video mode.
•Press to select the next higher track in CD, USB
Video, USB Audio mode.
22- [ ] Button
•Press to manually select the next lower station in
Tuner mode.
•Press to perform fast-backward searching. Press
again to change the speed to 2X, 4X, 8X or up to 32X.
23- [ ] Button
•Press to manually select the next higher station in
Tuner mode.
•Press to perform fast-forward searching. Press again
to change the speed to 2X, 4X, 8X or up to 32X.
24- [SUB-T] Button
•Press to switch next available subtitle while playing
DVD.
25- [ANGLE] Button
•Press to switch the different angle while playing DVD.
(Not all DVD disc support this function).
26- [AUDIO] Button
•Press to switch the audio channel of the disc while
playing DVD.
27- [ZOOM] Button
•Press to turn on and zoom in while playing DVD. You
can zoom in up to 4X (Not all DVD disc support this
function).
8226M-FU_Usermanual_.indd 9 2014-11-24 11:57:33

10
5. WHEEL KEY STUDY
1.Touch the [Setup] button on the Main Menu.
2.Touch the [Others] button.Thebelowmenuis
displayed.
3.Touchthe[WheelKeyStudy]button.Thebelow
menuwillbedisplayed.
1-Restudy
2-Mode1
3-Mode2
4-Source
5-Previous
6-Volume+
7-Endacall
8-Mute
9-Next
10-Volume-
11-Call
1
9
2
8
3
10 11
4 5 6 7
8226M-FU_Usermanual_.indd 10 2014-11-24 11:57:33

11
6.MAIN MENU
1-Radio---TouchthebuttontodisplaytheRadio
mode.
2-AUX1---TouchthebuttontodisplaytheAUX1
mode.
3-USBAudio---TouchthebuttontodisplaytheUSB
Audiomode.
4-DiscAudio---TouchthebuttontodisplaytheDisc
Audiomode.
5-BluetoothAudio---Touchthebuttontodisplaythe
BluetoothAudiomode.
6-Camera---TouchthebuttontodisplaytheCamera
mode.
7-Back---Touchthebuttontodisplaycurrentplay
mode.
8-Setup---TouchthebuttontodisplaytheSetup
menu.
9-Telephone---Touchthebuttontodisplaythe
Telephonemode.
10-AUX2---TouchthebuttontodisplaytheAUX2
mode.
11-USBVideo---TouchthebuttontodisplaytheUSB
Videomode.
12-DiscVideo---TouchthebuttontodisplaytheDisc
Videomode.
13-Navi---TouchthebuttontodisplaytheNavigation
mode.
14-Background---Touchthebackgroundtodisplay
theMainMenu.
15-Clock
SCROLLING THE MENU
• Flickingtorightorleftitwillswitchtonextorprevious
pageofMainMenu.
MOVING THE ICON POSITION
1.TouchanyicononMainMenumorethan3seconds,
theiconwilloatonMainMenu.
2.Scrollingtheoatingicontoanypositionyouwant.
1
9
2
10
3
11
57 8
13
4
12
6
14 15
8226M-FU_Usermanual_.indd 11 2014-11-24 11:57:34

12
7. DISC VIDEO PLAYER OPERATIONS
DVD SYSTEM SETUP
Note: If the setup operation is made in the middle of DVD
video play, the disc will re-start from the beginning.
WATCH A DISC
1. To read a disc:
•Insert the disc into the center of the disc insertion
slot with label side facing up.
CAUTION – For your safety, the driver should
not insert or eject a disc, touch the opera-
tional panel while driving.
Note:
Do not insert foreign objects into the disc insertion slot.
If there is difficulty inserting the disc, there may be
another disc in the system, or the system may require
service.
8cm discs are not allowed.
2. Disc starts playing automatically.
EJECT A DISC
•To eject a disc press eject [ ] button to eject the
disc. The play mode then switches to the Radio
mode.
•If the disc is left in the ejected position for 15
seconds, the disc is automatically reloaded. In this
case, the play mode will remain in the Radio mode.
Note: If you force a disc into the system before automatic
reload, it may damage a disc.
DVD PLAYER MODE SCREEN
•Touch any place of the screen to display DVD Video
menu, touch the screen again to return the playback.
The display will return to the playback screen, if you
do not touch the screen for 7 seconds.
1 - Previous Chapter / Fast Backward button
2 - Play / Pause
3 - Next Chapter / Fast Forward button
4 - Subtitle switching button
5 - Repeat switching button
6 - Direct chapter or title searching button
7 - Audio Channel switching button
8 - Menu List button
9 - Total time
10 - Open/Close the hidden functions button
11 - Seek bar
12 - Elapsed playing time
13 - Return button (to Main Menu)
14 - System time
15 - Title information
16 - Chapter information
17 - A-B button
18 - Angle button
19 - Info button
DVD PLAYER MENU OPERATION
•Select the buttons displayed in the DVD Player Menu
by direct touching it.
Play/Pause Playback
1. Touch [ ] button to pause during playback.
2. Touch [ ] button again to resume playback.
Skip a Chapter
1. Touch [ ] or [ ] button during playback.
•Chapters are skipped down or up from current
location, as many times as the button is touched,
and playback starts.
Skip by Seek Bar
•Touch [ ] on seek bar and drag it to any
position where you want to start playback.
Fast Forward / Fast Backward
1. Touch [ ] or [ ] button and hold 2 seconds to
start fast backward or fast forward during playback.
The playback speed starts at 2x, then will increase
to 4x, 8x and up to 32X. Release the button will
continue playing with normal speed.
Note:
During fast forward and fast backward operation, there is
no audio reproduced.
The fast forward and fast backward speed may differ
depending on the disc.
14
15 111613
1 2 3 4 58
9
10
76
12
19
18
17
8226M-FU_Usermanual_.indd 12 2014-11-24 11:57:34

13
Search
1. In the DVD Video menu, touch [ ] button. The
keypad screen appears with the chapter/title
number input mode.
• Touch [Chapter] button turns the keypad to the
chapter number input mode.
• Touch [Title] button turns the keypad to the title
number input mode.
Title: A large segment to divide the data area of the
disc.
Chapter: A small segment to divide the data area of
the disc.
2. Input the number of the chapter/title that you want
to play with the [0] to [9] key.
3. Touch [ ] button.
• Playback starts from the scene of the input chapter
number or title number.
Note:
If the input chapter/title number does not exist or
searching with a chapter/title is not allowed, the screen
image will not change.
4. Touch [ ] button to close the keypad.
Repeat Playback
1. In the DVD Video menu, touch [ ] button.
2. Touch [ ] button once for Repeat Chapter, again
for Repeat Title.
3. Touch [ ] button again to turn off the repeat
playback.
Title Menu
1. In the DVD Video menu, touch [ ] button during
playback.
• Depending on the disc, the title menu may not be
called.
2. Touch [ ] on the title menu screen.
3. Select the items in the title menu screen by [ ]
directional buttons.
• Depending on the disc, items may not be selected
with the directional buttons.
4. Touch [ ] button to on the selected item.
5. Touch [ ] button.
6. Touch [ ] button to close the title menu screen.
Audio Switch
• For discs with two or more audio languages
recorded, you can switch among the audio
languages during playback.
1. In the DVD Video menu, touch [ ] button during
playback.
• Each time you touch the button, you can switch
among audio languages.
• It may take time to switch among audio languages.
Depending on the disc, up to 8 kinds of audio
languages may be recorded. For detail, see
the mark of the disc: ( indicates that 8 audio
languages have been recorded).
When the power is turned on and when the disc is
changed to a new one, the audio languageset as
factory default is selected. If that audio language
has not been recorded on disc, the audio language
is specified on the disc.
Depending on the disc, audio switch may be
completely impossible or impossible on some
scenes.
Subtitle Switch
• For discs with two or more subtitle languages
recorded, you can switch among the subtitle
languages during playback.
1. In the DVD Video menu, touch [ ] button to select
a subtitle during playback. Each time you touch the
button, you can switch among subtitles.
• It may take time to switch among subtitles.
Depending on the disc, up to 32 kinds of subtitles
may be recorded. For detail, see the mark of the
disc: ( indicates that 8 kinds of subtitles have
been recorded).
8226M-FU_Usermanual_.indd 13 2014-11-24 11:57:35

14
When the power is turned on and when the disc is
changed to a new one, the subtitle set as factory
default is selected. If that subtitle has not been
recorded on disc, the subtitle is on the
disc.
Depending on the disc, subtitle switch may be
completely impossible or impossible on some
scenes.
2. To turn off subtitles, repeat touching [ ] until
subtitles are turned off.
Display Playback Status
• Touch [ ] button on DVD Player mode screen,
playback status is displayed on screen.
VIDEO FILES PLAYBACK
• This system can play video files (AVI/MP4…etc.)
stored on disc
VIDEO FILES PLAYER MODE SCREEN
1. After disc with video is loaded, touch [Disc
Video] button on Main Menu to show video
player mode screen.
2. Touch the screen of the playing video to display
Video Files Player menu, touch the screen again to
return the playback screen. The display will return to
the playback screen, if you do not touch the screen
for 7 seconds.
1 - Elapsed playing time
2 - Previous Track / Fast Backward button
3 - Play/Pause button
4 - Next Track / Fast Forward button
5 - Switch next available subtitle
6 - Repeat button
7 - Direct chapter or title searching button
8 - Audio button
9 - List Mode button
10 - Total time
11 - System time
12 - Playback information
13 - Return button (to Main Menu)
14 - Seek bar
15 - A-B button
16 - Angle button
17 - Info button
18 - Open/Close the hidden functions button
VIDEO FILES PLA YER MENU
OPERA TION
• You can select the button displayed in the Video
Files Player menu by directly touching it.
Play/Pause Playback
1. Touch [ ] button to pause during playback.
2. Touch [ ] button again to resume playback.
Switch to Previous/Next File
1. Touch [ ] or [ ] button during playback to play
previous/next
Skip by Seek Bar
• Touch [ ] on seek bar and drag it to any position
where you want to start playback.
Fast Forward / Fast Backward
1. Touch [ ] or [ ] button and hold 2 seconds to
start fast backward or fast forward during playback.
The playback speed starts at 2x, then will increase
to 4x, 8x and up to 32X. Release the button will
continueplayback with normal speed.
Note:
During fast forward and fast backward operation, there is
no audio reproduced.
The fast forward and fast backward speed may differ
depending on the disc.
Repeat Playback
• The repeat set as the factory default is Repeat All.
1. In the Video Files Player menu, touch [ ] button.
2. Touch [ ] button once for Repeat Track, again for
Repeat Folder.
3. Touch [ ] button again for Repeat All.
Audio Switch
• For video with two or more audio channels,
you can switch among the audio channels during
playback.
1. Touch [ ] button during playback.
1112
2 3 4 5 67 8 9
13
1 10
15 18
16
17
14
8226M-FU_Usermanual_.indd 14 2014-11-24 11:57:35

15
• Eachtimeyoutouchthebutton,youcanswitch
among audio languages.
• Itmaytaketimetoswitchamongaudios.
Dependingonthevideoles,switchingmaybe
impossible.
Subtitle Switch
• Forvideoleswithtwoormoresubtitles,youcan
switchamongthesubtitlesduringplayback.
1. Touch the [ ] button to select a subtitle during
playback.
• Eachtimeyoutouchthebutton,youcanswitch
amongsubtitles.
• Itmaytaketimetoswitchamongsubtitles.
Dependingonthevideoles,switchingmaybe
impossible.
Video Files List
• IntheVideoFilesPlayermenu,touchthe[ ]
buttontodisplayvideoleslistscreen.Videoles
listoperationsisalmostsameasDiscAudioPlayer
mode.PleaserefertoCDPlayerOperations.
8226M-FU_Usermanual_.indd 15 2014-11-24 11:57:35

16
8. DISC AUDIO PLA YER OPERA TION
9
7
WATCH A DISC / EJECT A DISC
Please refer to DISC VIDEO PLA YER OPERA TIONS –
WATCH A DISC and EJECT A DISC.
CD PLA YER MODE SCREEN
1. After disc is loaded, the play mode is automatically
engaged.
2. If disc has been loaded, you can touch [Disc Audio]
button on Main Menu to display CD Player Mode
screen.
1 - Pr evious Track / Fast Backwar d button
2 - Play / Pause button
3 - Next Track / Fast Forward button
4 - Song Title
5 - System time
6 - Total time
7 - button
8 - Current play mode
9 - Return button (to Main Menu)
10 - Repeat button
11 - Playback track information
12 - Album information
13 - Elapsed playing time
14 - Option button
15 - Scan Start / Stop button
16 - Direct searching button
17 - Close option menu button
CD PLA YER MENU OPERA TION
You can select the button displayed in the CD Player
menu by directly touching it.
Play/Pause Playback
1.Touch [ ] button to pause during playback.
2.Touch [] button again to resume playback.
Switch to Pr evious/Next File or T rack
Touch [ ] or [ ] button during playback to play
previous /next
• Touch [ ]
]
button starts playback from the
beginning of the next track.
• Touch [button starts playback from the
beginning of the current track. When this button is
touched again within 5 seconds, playback starts
from the beginning of previous track.
Fast Forwar d /Fast Backwar d
1.Touch [ ] or [ ] button and hold more than
2 seconds to start fast backwar d or fast forward
during playback. The playback speed starts at 2x,
then will increase to 4x, 8x, and up to 32X. Release
thebutton will continue playback with normal speed.
Note:
• The fast forward and fast backward speed may differ
depending on the disc.
Repeat Playback
* The repeat set as the factory default is Repeat All.
Touch [] button switch between Repeat Folder
Repeat All and Repeat Track.
Shuffle Playback
1. Touch [ ] button to the tracks during
playback.
2. Touch this button again to turn off playback.
Track Selection on T rack List Scr een
1. Touch the track title on the display list. The selected
track will start playing.
2. When the desired track is not displayed, touch and
the track list up or down.
3. Touch the desired track title button. The
corresponding track is started playback.
Tracks Scan
1. Touch [ ] button to show [ ] button.
2. Touch [ ] button during playback.
• It will play from the next track, and each track will
display for 10 seconds.
3. Touch [ ] button.
• It will continue playback from the current track.
4
10
11
14
1
12
36
2
17
85
15
16
8226M-FU_Usermanual_.indd 16 2014-11-24 11:57:36

17
• []buttonwillswitchto[ ] button.
• Thefunctionwillscanalltracksorderlyincurrent
folderonce.Afterscanstoppedplaybackwill
continue.
Track Number Search
Thisoperationallowssearchingusingthetrack
numbers recorded on the CDs.
1. Touch [ ]buttontoshow[ ] button.
2. Touch [ ]button.Thenumericalkeypadwillappear
on the screen.
3.Inputthetracknumberthatyouwanttoplayback
with[0] to [9] key and touch [ ] button.
Playbackstartsfromthetrackoftheinputtrack
number.
• Iftheinputtracknumberdoesnotexistorsearching
withtracknumberisnotallowed,thescreenimage
willnotchange.
• Touch the [ ]buttonwillclosethenumerical
keypad.
• Touch [ ]buttonwillclosetheoptionwindowand
display playback screen.
Compressed Audio Playback
This system can play audio files stored on disc. MP3
/ WMA
Tag Display Function
This unit is an ID3 Tag compatible model
ThisunitsupportsID3Tagsoftheversion2.4,2.3,1.1
and 1.0.
Indisplaying,thisunitgivesprioritytotheversion2.4
and 2.3 Tags.
Note:
•Some CDs recorded with CD-R / RW may not be
usable.
MP3 / WMA Tag Titles Display
Taginformationcanbedisplayedforcompressed
audiolecontainingTaginformation.
MP3:title,artist,album
WMA:artist
Precautions for MP3 Disc Creation
• Fileextensions
1.Alwaysaddaleextension“.MP3”or“.mp3”to
anMP3le,and“.WMA”or“.wma”toaWMAleby
usingsinglebyteletters.Ifyouaddaleextension
otherthanspeciedorforgettoaddthesele
extension,thelecannotbeplayed.Inaddition,ifyou
useuppercaseandlowercaseletters(capitaland
smallletters)mixedforleextensions,normalplay
may not be possible.
2. Files other than MP3 / WMA data cannot be played.
Playingleswithaformatnotsupportedwillbe
skipped,andthescan,randomandrepeatplayback
mode may be cancelled.
• Files and Discs Not Supported
Filesanddiscswiththefollowingextensionsarenot
supported:*.AAC,*.DLF,*.M3U,*.PLS,*.MP3PRO
les,leswithDRM,opensessiondiscs.
• Logical Format (File system)
1.WhenwritingMP3/WMAleonadisc,please
select*ISO9660level1orlevel2(withoutincluding
expansionformat)”asthewritingsoftwareformat.
Normalplaybackmaynotbepossibleifthediscis
recordedonanotherformat.
2.Thefoldernameandlenamecanbedisplayedas
the title during MP3 / WMA play.
• Entering File and Folder Names
Names using the code list characters are the only
lenamesandfoldernamesthatcanbeenteredand
displayed.Usinganyothercharacterwillcausethele
andfoldernamestobedisplayedincorrectly.
• Electronic Shock Protection
CD-DA(CDA)10seconds
45secondsforMP3recordedat44.1kHz,128kbps
90secondsforWMArecordedat44.1kHz,128kbps
• Folder Structure
Adiscwithafolderhavingmorethan8hierarchical
levelswillconictwiththeISO9660andplaybackwill
be impossible.
• Number of Files and Folders
1.Themaximumallowablenumberoffoldersis255
(includingrootdirectory);themaximumallowable
numberoflesis512(max.255perfolder).This
representsthemaximumnumberoftracksthatcanbe
played back.
2.Tracksareplayedintheorderthattheywere
recordedontoadisc.(Tracksmightnotalwaysbe
played in the order displayed on the PC).
• Somenoisemayoccurdependingonthetypeof
encodersoftwareusedwhilerecording.
• IncaseofatrackrecordedatVBR(variablebitrate),
thedisplayfortheplaytimeofthetrackmaybe
slightlydifferentfromtheactualplaytime.Also,the
recommendedvalueofVBRrangesfrom32kbpsto
320kbps.
8226M-FU_Usermanual_.indd 17 2014-11-24 11:57:36

18
MP3 / WMA Playback Menu
1. Repeat Playback
While playing MP3 / WMA touch [ ] button can
switch between Repeat Folder, Repeat All and Repeat
Track.
2. Folder
Touch the title of folder, play list will show and
folders in the selected folder.
3. Current Folder
• Showing title of current folder.
• The number on the folder symbol is the number of
and folders number in current folder.
• Touch [ ] button, play list will show and
folders in upper folder.
* Other operations about playing MP3 / WMA are
almost same as CD Player mode.
1
3
2
8226M-FU_Usermanual_.indd 18 2014-11-24 11:57:36

19
1. Touch [Setup] button on the Main Menu screen.
TheSetupMenuscreenwillbedisplayed.
2. Touch [Audio] button.
3. Touch [EQ] button.
EQ SETUP MENU
ThismenuincludesMode,Reverb,Loudness,Treble,
MiddleBassandSubwoofer.
1-Mode:Choosethedesiredmode:Standard,Jazz,
Pop,Classical,Rock,News,Urban,Rave,Movies,
Techno,andUser.
2-Reverb:Choosethedesiredmode:Off,
Livingroom,Hall,Concert,CaveBathroom,andArena
3-Loudness:Choosethedesiredloudnessfrom0
to 20.
4-Treble:Choosethedesiredtreblefrom-14to14
(only in User mode).
5-Middle:Choosethedesiredmiddlefrom-14to14
(only in User mode).
6-Bass:Choosethedesiredmiddlefrom-14to14
(only in User mode).
7-Subwoofer:Choosethedesiredloudnessfrom
-20to20.
8-ScrollDown:ScrolldowntobottompartofEQ
Setup menu.
9-Band/General:Choosebetweenbandorgeneral
settings (only in User mode).
10-Balance/Fader:Choosethedesiredvolumefor
leftandright,frontandrearspeaker.
11-Systemtime
12-ScrollUp:ScrolluptotoppartofEQSetupmenu.
13-Return:ReturntoAudioSetupmenu
14-Bluetoothstatusindicator
7
6
10
1
5
4
3
2
8 9
11141213
9. AUDIO SETUP
8226M-FU_Usermanual_.indd 19 2014-11-24 11:57:37
Other manuals for NV2200
2
Table of contents
Popular GPS manuals by other brands

Socket
Socket Bluetooth GPS Nav Kit quick start guide

Bryton
Bryton Rider 500 quick start guide

Latitude
Latitude SkyNode S100 Installation and operation manual

Garmin
Garmin 400W-Series Operating handbook

Thitronik
Thitronik Pro-finder Operating and installation instructions

Magellan
Magellan NAV6000 user manual