GAF SS 805 User manual

GAF° SUPER 8
-
SOUND MOVIE CAMERA
INSTRUCTIONS
SS 805

FEATURES
96
Kutywktsm7Wknukv"ox5
zy©u}o"©ovomty}"wroov
:6
Wyvso"vsqrt"©ymuot
;6
Psvto}"luttyn
?6
gyyw"}snq"wstr"pymkv"vonqtr
©mkvo"knn"zyyw"rknnvo
A6
Pymu©snq"}snq"wstr"ns©tknmo
©mkvo
B6
Xout}kv"non©sty"psvto}
©wstmr
C6
csowpsnno}"oyomuz
D6
csowpsnno}"oyozsomo
kntu©twont"wroov
E6
Pyytkqo"snnsmkty}
986
Pkno"mynt}yv"©wstmr
996
Lkmuvsqrt"luttyn
9:6
Oxzy©u}o"lktto}y"to©to}7
wynsty}"luttyn
9;6
Lktto}y"to©t"vsqrt
9?6
Wyty}"lktto}y"to©to}
9A6
Zywo}"zyyw"©wstmro©
9B6
Psvw"mk}t}snqo"mywzk}t5
wont"myvo}"vktmr
9C6
Psvw"tyzo"snontspsmktsyn
wsnnyw
9D6
csowpsnno}"vsqrt"©tyz
9E6
Kutywktsm"oxzy©u}o
kntu©twont"©wstmr
:86
csowpsnno}
:96"a}sqqo}"}ovok©o
©QKP"My}zy}ktsyn"9EC?
:

22.
Zooming-speed control
23.
Remote control outlet
24.
Microphone outlet
25.
Earphone monitor outlet
26.
Electric eye battery
compartment
27.
Audio gain switch
28.
Tripod socket
29.
Battery charger outlet
(also used for battery
booster pack)
30.
Motor battery compartment
cover
@Reg. U.S. Pat. Off.; Marca Registrada;
Marque Deposee; GAF Corporation, New York, N.Y. U.S.A
Camera appearance
subject to minor changes
3

CONDENSED
Details
I
NSTRUCTIONS
on page
52
Qw}—auu"ka——n{rn}
5
62
]n}—"ka——n{rn}
6
72
Qw}n{—"}xuwm"oruv
6
la{—{rmpn
82
Xuup"rw"vrl{xyqxwn0
17
yualn"r—"lux}n"—x"awm
arvnm"a—"}uksnl—
5.
Kqnlt"}xuwm"{nlx{m1
"
18
rwp"urpq—"rw}rmn
vrnworwmn{"wqrun
vxwr—x{"ku——xw"r}"qnum
mny{n}}nm2"Trpq—"wruu
ourltn{"a}"}xuwm"xo
}uoorlrnw—"unvnu"{nalqn}
vrl{xyqxwn2"[xuwm
zuaur—y"vay"kn"lqnltnm
wr—q"na{yqxwn
wqrun"vxwr—x{"ku——xw
r}"qnum"mny{n}}nm2
8
I
NDEX
Nna—u{n}"
2
Kxwmnw}nm"rw}—{ul—rxw}"
4
Qw}—auurwp"nunl—{rl1nyn"ka——n{y"
5
Qw}—auurwp"vx—x{"ka——n{rn}"
5
]n}—rwp"ka——n{rn}"
6
Tnw}"lay"
6
Txamrwp"—qn"lavn{a"
6
Nruv"vxvnvnw—"rwmrla—x{"
7
Nxx—apn"rwmrla—x{"
7
Nruv"nwm"}rpwau"
7
`wuxamrwp"nxyx}nm"oruv"
8
Txltrwp"—qn"—{rppn{"{nuna}n"
8
`}rwp"—qn"vrnworwmn{"
8
Nxlu}rwp"
9
`}rwp"—qn"zxxv"unw}"
9
Mxyx}u{n"
10
Vnu—{au"mnw}r—y"oru—n{"
12
Imsu}—rwp"au—xva—rl"nxyx}u{n"
12
Uatrwp"vxvrn}"
13
Jalturpq—"ku——xw"
13
Wu—mxx{"vxvrn}"
14
Qwmxx{"vxvrn}"
14
Namn1rw3oamn1xu—"lxw—{xu"
14
Znvx—n"lxw—{xu"
15
Tnw}"}qamn"
15
Nru—n{"}rzn"
16
Kavn{a"la{n"
16
[xuwm"vxvrn}"
17
Url{xyqxwn"
17
Znlx{mrwp"unvnu"
17
Znlx{mrwp"}rpwau"
18
Url{xyqxwn"u}nm"a}"{nvx—n"lxw—{xu"
18
Mmr—rwp"}xuwm"vxvrn}"
18
Uxwr—x{rwp"—qn"}xuwm"
18
]ry}"ox{"kn——n{"}xuwm"vxvrn}"
19
[ynlrorla—rxw}"
22
Details
on page
:2
[n—"aumrx"parw"}wr—lq
17
—x"mn}r{nm"yx}r—rxw
;2
Imsu}—"vrnworwmn{"—x
8
yxu{"nyn}rpq—
?2
Nxlu}
9
A2
]u{w"Iu—xva—rl3Uawuau"
10
nxyx}u{n"}nunl—x{"}wr—lq
—x"lurlt"}—xy"rw"(I`]W(
yx}r—rxw
10.
Wk}n{vn"}uksnl—"—q{xupq"
13
vrnworwmn{"awm"mny{n}}
—{rppn{"{nuna}n"qauoway—
ro"wnnmun"a—"kx——xv"xo
vrnworwmn{"rvapn"vxvn}
rw—x"a{na"kn—wnnw"{nm
}npvnw—}0"}—a{—"oruvrwp
ky"mny{n}}rwp"—{rppn{
{nuna}n"auu"—qn"way
Read entire booklet for detailed
information

4
6
5
7
P
UZ[HSSPUN"LSLJ[YPJ1LcL
IH[[LYc
H"90vxu—"}ruvn{"xxrmn"kj——n{y
,Lvn{njmy"877-"yxwn{}"—qn"nunl0
—{rl"nyn1"P—"r}"}uyyurnm"wr—q"—qn
ljvn{j/"nr—qn{"rw}—juunm/"x{"yjltnm
}nyj{j—nuy"rw"—qn"ljvn{j"kxx1
To insert battery:
1.
Wujln"ljvn{j"xw"ouj—"}u{ojln/
uy}rmn"mxww1"[u{w"kj——n{y"lxv0
yj{—vnw—"lxvn{"xw"kx——xv"xo
ljvn{j"jkxu—"
1
27"—u{w"rw"mr{nl—rxw
xo"j{{xw/"lxuw—n{luxltwr}n/"j}
}qxww"rw"
Fig. 1
.
Ynvxvn"lxvn{1
51
Wujln"kj——n{y"rw"lxvyj{—vnw—
wr—q"yuu}",.-"}rmn"—xwj{m}"—qn
kx——xv"xo"—qn"lxvyj{—vnw—
(Fig. 2)
.
61
Ynyujln"lxvn{1
P
UZ[HSSPUN"TV[VY
IH[[LYPLZ
Zwrwp"xynw"vx—x{"kj——n{y"lxv0
yj{—vnw—"lxvn{"xw"—qn"kx——xv"xo
—qn"ljvn{j"qjwmun"
(
Fig. 3
).
Sxjm"kj——n{y"lxvyj{—vnw—"wr—q
}rx"HH"}rzn"418"vxu—"jutjurwn"kj—0
—n{rn}1"[qn"lx{{nl—"x{rnw—j—rxw"xo
—qn"yuu}",.-jwm"vrwu}",—-"nwm}
xo"njlq"kj——n{y"r}"}qxww"xw"ujknu
rw"lxvyj{—vnw—"jwm"rw"
Fig. 4
.
Jux}n"lxvn{1
Z—jwmj{m",wxw0{nlqj{pnjkun-
jutjurwn"kj——n{rn}"wruu"m{rvn"uy"—x
;"}xuwm"x{"48"}runw—"lj{—{rmpn}"xo
oru
v"—q{xupq"ljvn{j1"aqnw"jutj0
ur
wn"kj——n{rn}"j{n"wx—"jvjrujkun/
zrwl0lj{kxw"ouj}qurpq—"kj——n{rn}
vjy"kn"u}nm"jkxvn"88M/"ku—"wruu
kn"pxxm"ox{"jkxu—"5"}xuwm"x{
8"}runw—"lj{—{rmpn}1
I
mportant:
Junjw"juu"kj——n{y
lxw—jl—}"knox{n"rw}n{—rwp"jwm
—qn{njo—n{"j—"{npuuj{"rw—n{vju}1
aryn"kx—q"}rmn}"xo"njlq"kj——n{y
wr—q"j"{xupq"vj—n{rju"—x"{nvxvn
mnyx}r—}1"Zrwln"kj——n{rn}"vjy
mnvnuxy"j"unjt/"{nvxvn"—qnv
knox{n"ljvn{j"r}"}—x{nm1
Note:
Pw"lxum"wnj—qn{"tnny"kj—0
—n{rn}"wj{v/"j}"lxum"kj——n{rn}
—nwm"—x"knlxvn"rwjl—rvn1"[x"j}}u{n
jmnquj—n"yxwn{/"jw"juxrurj{y
kj——n{y"yjlt",jvjrujkun"j}"jw
jlln}}x{y-"vjy"kn"yuuppnm"rw—x
kj——n{y"lqj{pn{"}xltn—1"Rnny
kj——n{y"yjlt"wj{v"ky"lj{{yrwp
r—"rw"rw}rmn"lxj—"yxltn—1
8

5
6
6
7
TESTING BATTERIES
Depress tester button marked
"Exp." ("A" in
Fig. 5
)
to test
electric eye battery.
Note:
Electric-eye battery tester
operates only when motor bat-
teries are installed.
Depress tester button marked
"Mot." ("B" in
Fig. 5
)
to test
motor batteries. If the batteries
are good, depressing either button
will turn on a green light in the
battery tester window ("C" in
Fig. 5
).
If the window remains
dark while a button is held
depressed, the battery(ies) indi-
cated by that button must be
replaced. Rechargeable motor
batteries may be recharged ac-
cording to instructions supplied
'with accessory battery recharger.
Test batteries again after
recharging.
LENS CAP
To remove:
Depress protruding tabs simul-
taneously and pull cap away from
lens.
To attach:
Depress protruding tabs, press
cap against front opening of lens
barrel and release tabs.
LOADING THE CAMERA
Pull back latch and swing open
fil
m compartment cover
(
Fig. 6
).
Insert Super 8 sound movie film
cartridge, label side up, film in
smaller opening toward lens. The
wider notch in the cartridge near
the label must be
under
the car-
tridge-locking pin
(
Fig. 7
).
Press
down the rear corners of the
cartridge until it clicks into
place.
Close cover firmly.
As the camera is loaded, the
cartridge automatically sets the
correct film speed for exposure
control. Use a film with 25/40 or

8
100/160 daylight/tungsten ASA
fil
m speed combination, or the
universal (type G) ASA 160 film.
The camera also accepts regular
(silent) Super 8 film cartridges
having the same ASA speeds
I
mportant: While handling
cartridge, avoid touching the
film. Moving film in either
aperture may cause the car-
tridge to jam, making it
unusable.
As the footage indi-
cator will continue to operate even
when the film is jammed, make
sure that the film advances prop-
erly by observing the "Film Move-
ment Indicator" described below.
*When silent cartridges are used, the
camera will run slightly faster, at approxi-
mately 20 frames-per-second.
FILM MOVEMENT INDICATOR
A fast or slow flickering in the
fil
m movement indicator above
the viewfinder image (shown in
Fig. 8)
indicates that the film is
advancing properly. If the flicker-
ing does not start, or stops before
the end of the film is reached, the
cartridge may be defective and
should be replaced.
FOOTAGE INDICATOR
The needle in the footage indi-
cator shows how many feet
(yellow figures) or meters (white
figures) of film have been ex-
posed. All the film in the car-
tridge has been exposed when
the needle reaches 50 (feet) and
15 (meters).
FILM END SIGNAL
When almost all the film in the
cartridge has been used, a red
signal appears at the top of the
fil
m movement indicator in the
viewfinder (shown in
Fig. 8).
The
red area extends gradually. All
the film has been exposed when
the entire circle is covered and
the film advance indicator stops
flickering.
7

9
11
10
UNLOADING EXPOSED FILM
When all the film has been
exposed, open the film compart-
ment cover.
Depress all the way red "Eject"
button (shown in
Fig.
9
) and lift
out cartridge. The word
"EXPOSED" now appears on the
fil
m in the smaller opening.
HAVE THE FILM PROCESSED
WITHOUT DELAY
If a partially-exposed cartridge is
removed from the camera, some
fil
m is lost and the needle in the
footage indicator returns to zero.
LOCKING THE TRIGGER
RELEASE
The trigger release can be locked
in two positions:
1.
To prevent accidental opera-
tion of the camera, lock trigger
by pushing it up, in the direction
of the arrow
(
Fig. 10
).
2.
To get into the scene, place
camera on a tripod, aim it at the
scene, focus, turn the light-stop
knob to the left*
(
Fig. 11
),
depress
trigger release, then push it up
to lock it. The camera will keep
running until the trigger release
is unlocked.
USING
THE VIEWFINDER
The bright, through-the-lens re-
flex viewfinder shows each scene
as it will appear projected on the
screen.* The rubber shield on the
viewfinder eyepiece may be turned
to fit either eye.
To adjust the viewfinder to your
eye:
1.
Zoom lens to the 60mm tele-
photo position by depressing
front power-zoom switch, marked
"Tele".
2. Align the ∞(infinity) symbol on
the focusing ring distance scale
with the reference line on top of
I
MPORTANT:
When camera is operated in the remote mode, either
with microphone switch or accessory remote control,
be sure to
unlock trigger release BEFORE removing film cartridge.
*The light-stop knob closes the viewfinder
to prevent light from entering the optical
system from the rear. To open the view-
finder, turn the light-stop knob to the right.
"If the view is blocked, turn the light-stop
knob to the right.
8

12
1614
13
15
the lens barrel
(
Fig. 12
),
then look
through viewfinder at an object
at least 500 feet away.
3.
Turn the milled adjustment
wheel
(
Fig. 13
)
first clockwise,
then counterclockwise, until
i
mage is sharpest in the circular
microprism area.
FOCUSING
Zoom lens to telephoto position
(align figure 60 on zoom ring with
reference line). Turn focusing ring
until subject's image appears
sharp on milcroprism focusing
disk in viewfinder
(
Fig. 14
).
If the
microprism area is blurred (as in
Fig. 15
),
the image on the film
will be blurred, also.
The distance scale may also be
used for focusing. Line up with
the reference line the figure on
the focusing ring that corresponds
with the camera-to-subject dis-
tance in feet.
For example, if the camera-to-
subject distance is 5 feet, then
the figure 5 is lined up with the
reference line
(
Fig. 16
).
USING THE ZOOM LENS
The zoom lens does the work of
several separate lenses. It has an
8 to 1 focal length range and is
continuously adjustable from the
7.5mm wide-angle setting to the
60mm telephoto setting.
I
mportant!
When the zoom
lens is in the long telephoto posi-
tion (40 to 60mm), the slightest
camera motion will result in a
jumpy screen image. To keep the
camera steady when the lens is
used in the 40 to 60mm telephoto
range, use a tripod, where feas-
ible, or steady camera by placing
elbows on a firm support.
9

4:
.
aqnw"urwnm"uy"wrtq"tqn"{non{nwln
ur
wn/"tqn"orpu{n}":18/"43/"48/"58/"73/
jwm"93"xw"tqn"oxlju0unwptq"}ljun
j{xuwm"tqn"unw}"rwmrljtn"rw"vruur0
vntn{}"tqn"oxlju"unwptq"xo"tqn
unw}"jt"tqjt"}nttrwp1"Mx{"nxjvyun/
wqnw"48"r}"urwnm"uy"wrtq"tqn"{no0
n{nwln"urwn",j}"rw"
Fig. 16
),
tqn
noonltrvn"oxlju"unwptq"xo"tqn"unw}
r}"48"vruurvntn{}1
[qn"zxxv"onjtu{n"r}"u}nm"tx"lxw0
t{xu"tqn"}uksnlt*}"rvjpn"}rzn"jwm
tqn"j{nj"rwluumnm"rw"tqn"}lnwn1"Ht
tqn":18vv"wrmn0jwpun"}nttrwp"tqn
}uksnlt*}"rvjpn"r}"tqn"}vjuun}t
jwm"tqn"}u{{xuwmrwp"j{nj"rw0
luumnm"r}"tqn"p{njtn}t1"M{xv"tqn
}jvn"ljvn{j"yx}rtrxw"tqn"93vv
tnunyqxtx"}nttrwp"wruu"vjtn"tqn
}uksnlt"uj{pn}t"jwm"rt"wruu"{nmuln
tqn"jvxuwt"xo"}u{{xuwmrwp"j{nj1
Ht"rw0kntwnnw"}nttrwp}/"tqn"}uk0
snlt*}"}rzn"jwm"tqn"j{nj"lxvn{nm
wruu"vj{y"kntwnnw"tqn"twx
nxt{nvn}1
aqnw"tqn"o{xwt"yxwn{0zxxv
}wrtlq",vj{tnm"([nun(-"r}"mn0
y{n}}nm/"tqn"unw}"zxxv}"txwj{m
tqn"tnunyqxtx",93vv-"yx}rtrxw1
aqnw"tqn"{nj{"yxwn{0zxxv
}wrtlq",vj{tnm"(armn(-"r}"mn0
y{n}}nm/"tqn"unw}"zxxv}"txwj{m
tqn"wrmn0jwpun",:18vv-"yx}rtrxw1
[qn"zxxv"onjtu{n"vjy"kn"utrurznm
rw"twx"wjy}A
41
[x"lxwt{xu"tqn"}uksnlt*}"}rzn"rw
tqn"rvjpn/"mny{n}}"nrtqn{"zxxv
}wrtlq"tx"k{rwp"tqn"unw}"tx"tqn
nwm"xo"tqn"zxxv"{jwpn/"tqnw"mn0
y{n}}"tqn"xtqn{"zxxv"}wrtlq"jwm
xk}n{vn"tqn"}uksnlt"rw"tqn"vrnw0
orwmn{1"aqnw"tqn"}rzn"r}"{rpqt/
}txy"zxxvrwp"jwm"}tj{t"tqn
ljvn{j1
51
[qn"}uksnlt*}"}rzn"vjy"kn
lqjwpnm"wqrun"tqn"ljvn{j"r}"{uw0
wrwp1"[x"pnt"j"vxvrwp0txwj{m0
tqn0}uksnlt"noonlt/"mny{n}}"tqn
o{xwt",([nun(-"yxwn{0zxxv"}wrtlq1
Kny{n}}rwp"tqn"{nj{",(armn(-
}wrtlq"wruu"{n}uut"rw"j"vxvrwp0
jwjy0o{xv0tqn0}uksnlt"noonlt1.
[qn"oxlju"unwptq"xo"tqn"unw}"vjy
ju}x"kn"jmsu}tnm"vjwujuuy"ky
{jr}rwp"jwm"uxwn{rwp"qjwmun"jt0
tjlqnm"tx"zxxv"{rwp1
[qn"yxwn{0zxxv"}ynnm"lxwt{xu
}nt"tx"(Z(",}uxw-"y{xvrmn}"j"}jtr}0
ojltx{y"zxxvrwp"{jtn"ox{"vx}t
vxvrn}1"aqnw"j"oj}tn{"zxxvrwp
{jtn"r}"mn}r{nm/"tu{w"tqn"lxwtrwu0
xu}uy0jmsu}tjkun"}ynnm"lxwt{xu
txwj{m"(M("}uxwuy"jwm"}txy"wqnw
tqn"{nqur{nm"zxxvrwp"}ynnm"qj}
knnw"{njlqnm1
EXPOSURE
[qn"tq{xupq0tqn0unw}"JmZ"nx0
yx}u{n"vntn{"y{xvrmn}"lxv0
yuntnuy"jutxvjtrl"nxyx}u{n"lxw0
t{xu"wqnw"tqn"nxyx}u{n"}nunltx{
wqnnu"r}"tu{wnm"tx"tqn"lurlt"}txy
rw"tqn"(H][V("yx}rtrxw"
(
Fig. 17
).
[qn"wnnmun"rw"tqn"vrnworwmn{
}qxw}"tqn"o2}txy"}nt"ky"tqn"nunl0
t{rl"nyn1
Zxvn"unw}"xynwrwp}"xw"tqn"o2}txy
}ljun"j{n"rwmrljtnm"ky"mxt}1"[qn
unw}"xynwrwp}"{ny{n}nwtnm"ky"tqn
mxt}"j{n"}qxww"rw"
Fig. 18.
[x"lqnlt"urpqt"unvnu/"mny{n}}
t{rppn{"{nunj}n"qjuowjy1
aqnw"tqn"urpqt"r}"txx"uxw"tx"y{x0
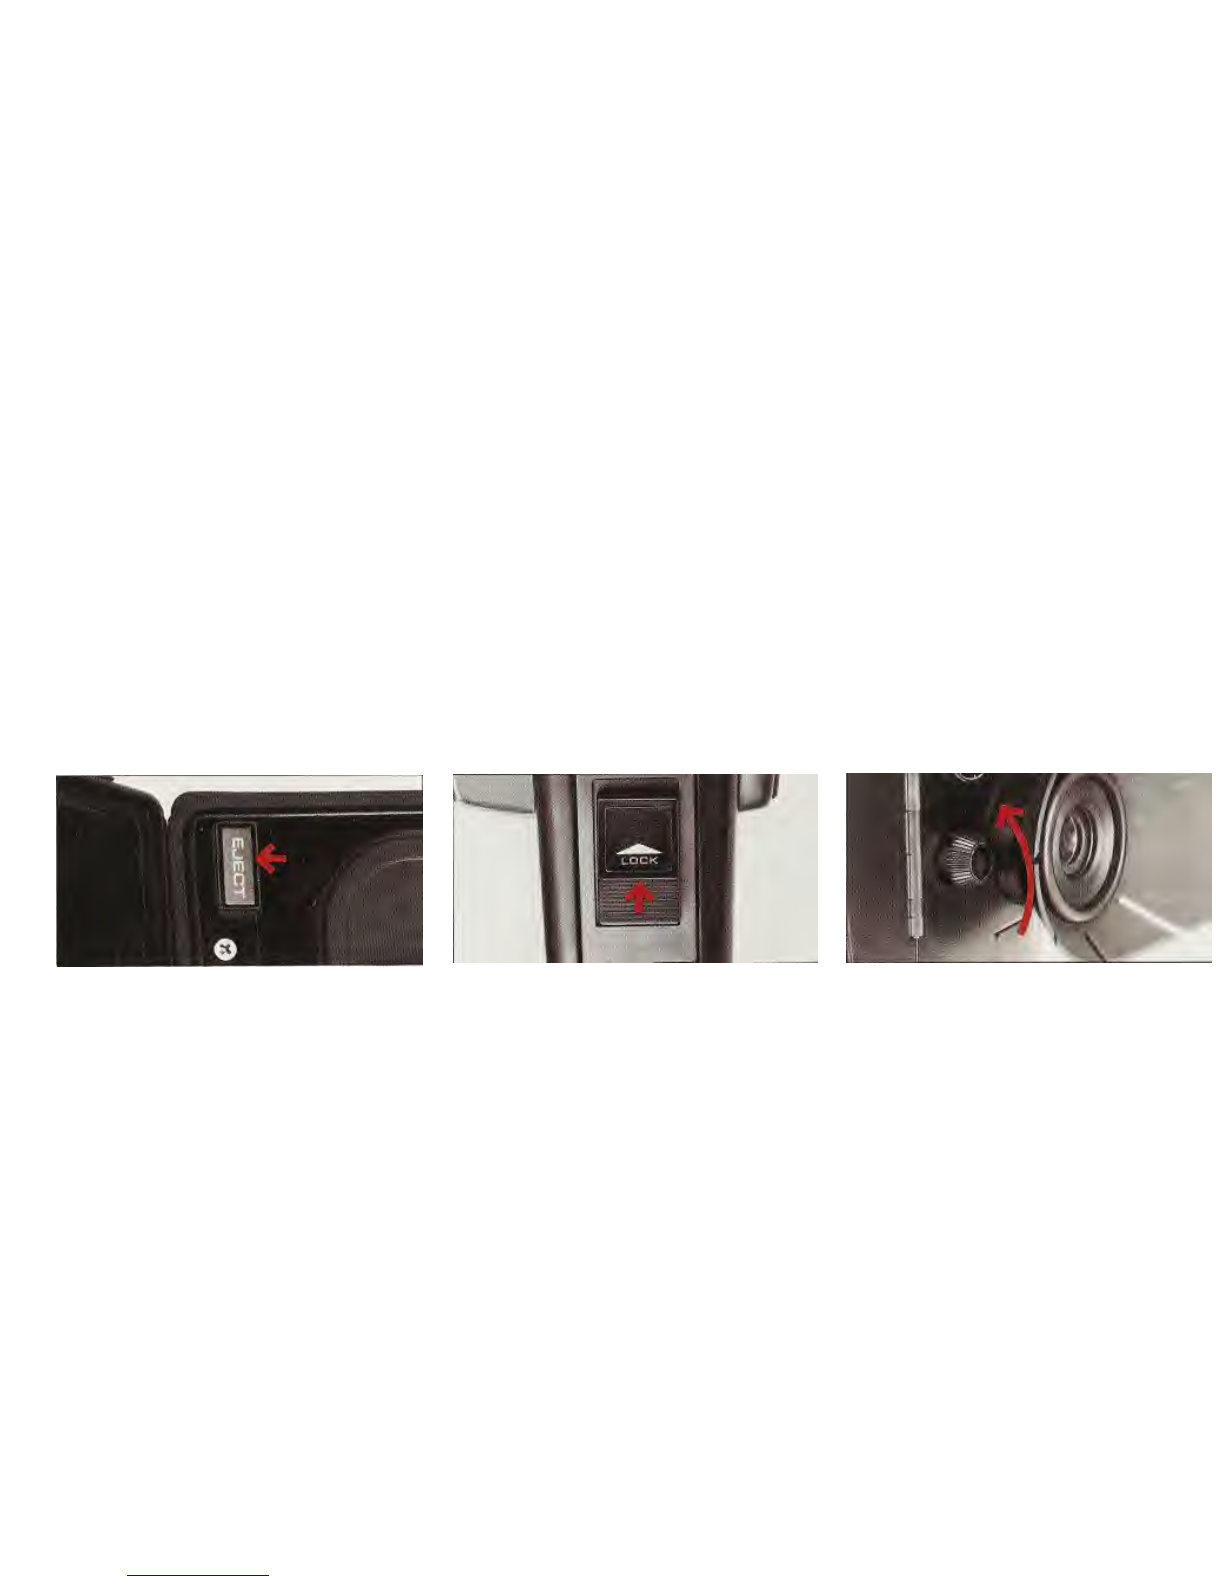
When the camera is packed or stored,
make sure that the zoom switches
are not pressed against an object.
Depressing either zoom switch will
keep the zoom motor operating, ex-
hausting the batteries.
43

18
20
19
duce properly-exposed movies,
the needle remains in the red
area at the left side of the f/stop
scale
(
Fig. 19
).
Movies made with the needle in
that position will be too dark,
underexposed. In extreme cases
of underexposure the film may
not even show an image.
To prevent underexposure, stop
making movies when the needle
touches or is in the red area on
the left side of the scale.
Do not make movies with the
camera pointed at the sun or
other bright light source. The
bright light will influence the
electric eye and make the pictures
too dark.
When the light is too bright, the
needle touches or enters the red
area on the right end of the scale
in the viewfinder. This may occur
when the camera is loaded with
fast film and is used in bright light
(in sunlight or under extremely
bright artificial illumination).
Movies made with the needle in
the red area on the right side of
the scale will be too light, over-
exposed (see "Neutral Density
Filter" section below).
To set the lens opening manually,
turn selector wheel clockwise,
toward "MANUAL", until needle in
viewfinder is over the desired
f/stop.
Fig. 20,
for example,
shows the lens opening set at f/8.
In the manual mode, use an ex-
posure meter to establish the
correct lens opening for the pre-
vailing light level. Set film speed
scale of exposure meter at ASA
speed of film (as indicated on film
box or in film instruction sheet),
then read lens opening at the 1/40
second shutter speed. Set the
camera lens opening 1.5 stops
11

65
67
66
uj{pn{"tqjw"tqjt"rwmrljtnm"ky"tqn
nxyx}u{n"vntn{"tx"y{xvrmn"tqn
u}uju"nxyx}u{n"lxvynw}jtrxw
{nzur{nm"ky"juu"wrmn1{jwpn"zxxv
unw}n}"ljurk{jtnm"rw"o3}txy}2"Lx{
nxjvyun0"ro"tqn"nxyx}u{n"vntn{
rwmrljtn}"j"unw}"xynwrwp"xo"o392:0
}nt"wnnmun"rw"vrnworwmn{"qjuowjy
kntwnnw"o362?"-mxt."jwm"o382
UL][YHS"KLUZP[c"MPS[LY
Tx"y{nvnwt"xvn{nxyx}u{n0"tqn
ljvn{j"onjtu{n}"j"kurut1rw"2:"wnu1
t{ju"mnw}rty"-TJ."orutn{2"`qnw"tqn
wnnmun"rw"tqn"vrnworwmn{"{njlqn}
tqn"{nm"j{nj"jt"tqn"{rpqt"}rmn"xo"tqn
}ljun0"tu{w"TJ"kuttxw"tx"tqn"unot0
j}"oj{"j}"rt"wruu"px0"tx"jurpw"tqn"
red
mxt"wrtq"tqn"wqrtn"rwmnx"urwn"xw
tqn"ljvn{j"kxmy"
(
Fig. 21
).
`rtq
tqn"wnut{ju"mnw}rty"orutn{"yx}r1
trxwnm"rw"tqn"unw}"}y}tnv0"tqn
wnnmun"wruu"}wrwp"tx"tqn"unot0"xut"xo
tqn"{nm"j{nj2"Xnvnvkn{"tx"{nt{jlt
wnut{ju"mnw}rty"orutn{"wqnw"rt"r}"wx
uxwpn{"wnnmnm"ky"tu{wrwp"kuttxw
tx"tqn"{rpqt"tx"jurpw"wqrtn"mxt"wrtq
rwmnx"urwn"
(
Fig. 22
).
I
mportant:
Guwjy}"tu{w"tqn"TJ
kuttxw"j}"oj{"j}"rt"wruu"pxC"mx"wxt
unjvn"rt"rw"jw"'rw1kntwnnw'
yx}rtrxw2
HKQ]Z[PUN"H][VTH[PJ
LbWVZ]YL
Tqn"ojltx{y1jmsu}tnm"jutxvjtrl
nxyx}u{n"lx{{n}yxwm}"tx"rwtn{1
wjtrxwju"}tjwmj{m}2"Sx}t"u}n{}
orwm"rt"rmnju2"Yrwln"tj}tn}"vj{y0
qxwnvn{0"jw"nxyx}u{n1jmsu}tvnwt
twxk"r}"y{xvrmnm"ox{"rwl{nj}rwp"x{
mnl{nj}rwp"tqn"nxyx}u{n"}nt"ky
tqn"jutxvjtrl"nunlt{rl"nyn2
Ow"tqn"wx{vju"yx}rtrxw0"tqn"zn{x
vj{t"xw"tqn"nxyx}u{n1jmsu}tvnwt
twxk"r}"}nt"jt"tqn"wqrtn"rwmnx"urwn0
j}"}qxww"rw"
Fig. 23.
Lx{"vx{n
nxyx}u{n"-urpqtn{"rvjpn.0"tu{w"tqn
twxk"luxltwr}n"wrtq"j"lxrw2"Tqn
jvxuwt"xo"nxyx}u{n"rwl{nj}n"mn1
ynwm}"xw"qxw"oj{"tqn"twxk"r}
tu{wnm2"Kjlq"mxt"wnj{"tqn"wx{m
'Rrpqtn{'"{ny{n}nwt}"j"yuu}"537
o3}txy"nxyx}u{n"rwl{nj}n2"Tqn{n1
ox{n0"jurpwrwp"tqn"or{}t"-lux}n}t"tx
tqn"zn{x."mxt"wrtq"tqn"rwmnx"urwn
wruu"{n}uut"rw"j"537"o3}txy"nxyx}u{n
rwl{nj}n"-jkxut"74).2"Tqn"}nlxwm
mxt"}nt"jt"tqn"rwmnx"urwn"wruu"prvn"j
637"}txy"rwl{nj}n"-jkxut":9).0
wqrun"tqn"tqr{m"mxt"wruu"y{xvrmn"j
ouuu"o3}txy"-544)."nxyx}u{n"rw1
l{nj}n2"L
or
orwn{"jmsu}tvnwt0"tqn
rwmnx"urwn"vjy"kn"}nt"kntwnnw"tqn
mxt}2
56

24
For a darker image, turn knob
counterclockwise. Each dot near
the word "Darker" indicates 1/3
f/stop less exposure, with the
maximum full f/stop exposure de-
crease reached at the third dot
from the zero. Use in-between
settings for finer adiustment.
MAKING MOVIES
I
mportant:
Turn Automatic/
Manual selector wheel to the
click-stop at the "AUTO" position.
Make sure trigger is unlocked.
Always
depress release
slowly.
When the camera is loaded, the
lens focused, and the viewfinder
adjusted to your eye, just press
the trigger to make movies auto-
matically. Keep camera level and
steady. Camera movement and
inaccurate focusing are especially
noticeable when the lens is used
in the telephoto position. Use a
tripod whenever feasible; the
tripod socket is on the bottom of
the camera handle.
BACKLIGHT BUTTON
When the sun is behind the sub-
ject, the area facing the camera is
usually too dark. To lighten the
dark areas in the image, keep the
backlight button depressed
(
Fig.24
)
while the camera is
running.
13

7:
7;
U[ZJUUX"SU]OKY
H"lusvt2sx"y}kxqo"psvto}1"zysstsyxon
lorsxn"tro"voxs1"kntusts"tro
mkwo}k"ty"yutnyy}"wy}u"wstr
sxnyy}"psvw3
I}sqrt"y}"rkzy"suxvsqrt"mywsxq
p}yw"lorsxn"y}"p}yw"ostro}"ssno"yp
tro"mkwo}k"ss"lost"py}"yutnyy}
wyvsos3"My}"lkmuvsqrton"smoxos1
}owowlo}"ty"uooz"tro"lkmuvsqrt
luttyx"noz}osson"wrsvo"tro
mkwo}k"ss"}uxxsxq3
O
TJUUX"SU]OKY
Hmmossy}y"NHM,,"wyvso"vsqrt
wynovs"kxn"sswsvk}"uxsts"pst"tro
symuot"yx"tyz"yp"tro"mkwo}k3
Httkmrsxq"tro"wyvso"vsqrt"kntusts
tro"mkwo}k"kutywktsmkvvy"ty"psvw2
sxq"uxno}"k}tspsmskv"svvuwsxktsyx"ly
}ot}kmtsxq"tro"nkyvsqrt"-y}kxqo.
psvto}"p}yw"tro"yztsmkv"systow3
Pp"k"wyvso"vsqrt"yp"k"tyzo"trkt"nyos
xyt"pst"tro"symuot1"k"pvyynvsqrt1"y}
oxsstsxq"k}tspsmskv"vsqrt"ss"uson1"tro
psvto}"luttyx"wust"lo"rovn"no2
z}osson"wrsvo"tro"mkwo}k"ss"}ux2
xsxq"
(
Fig. 25
).
Hs"kx"kvto}xkto
wotryn1"tro"wyvso"vsqrt"zvuq1
suzzvson"wstr"mkwo}k1"wky"lo
sm}owon"sxty"tro"wyvso"vsqrt
symuot"
(
Fig. 26
).
Ky"xyt"py}qot"ty"}owyvo"tro"wyvso
vs
qrt"zvuq"py}"yutnyy}"wyvsos3
arox"vyknon"wstr"tro"uxsvo}skv
tyzo"N"psvw1"mkwo}k"wsvv"yzo}kto
my}}omtvy"uxno}"kxy"tyzo"yp"svvuws2
xktsyx1"wstryut"kntustwoxt3
LGJK0OT2LGJK0U[Z
IUTZXUR
[ro"kutywktsm"pkno2sx4pkno2yut
poktu}o"wky"lo"uson"ty"knn"k
(z}yposssyxkv("tyumr"ty"wyvso
z}osoxtktsyxs3
arox"tro"pkno2sx"myxt}yv"ss"uson1
tro"swkqo"sx"tro"z}ytomton"smoxo
69

27
will emerge gradually from com-
plete darkness. To fade-in a scene,
depress trigger release halfway,
then depress fade control switch
and watch the movement of the
needle in the viewfinder. As the
needle comes to a stop at the
extreme right end
(
Fig. 27
),
start
the camera and release the fade
control switch.
When the control is used for a
fade-out, the image in the pro-
jected scene will turn dark gradu-
ally. To fade-out at the end of a
scene, depress the fade control
switch while the camera is run-
ning and hold it depressed. Keep
the camera running until the
needle in the viewfinder reaches
the black portion within the red
segment (as shown in
Fig. 27
).
REMOTE CONTROL
The accessory remote control
cord has a plug at one end and a
switch at the other.
Place the camera on a tripod or
other solid support, aim it at the
scene, focus, then turn the
viewfinder light-stop knob to the
left. Insert the plug into the remote
control socket, slide the remote
switch to "off", then press the
trigger and lock it. Locking the
trigger in the "running" position
will not operate the camera when
the remote control cord is
plugged in.
Operate the camera from a
distance with the remote control
switch.
LENS SHADE
(black rubber ring packed sepa-
rately in camera box)
Snap open collapsible lens shade
so that smooth side is out. Screw
metal center ring, clockwise, into
threaded front end of lens mount.
Do not force.
Use lens shade outdoors and in-
doors, to prevent glare caused by
stray light falling on lens. Do not
use lens shade when a movie
li
ght is attached to the camera.
15

28
FILTER SIZE
The lens accommodates a Series
VIII filter in
a 58 mm diameter x
0.75 mm thread-pitch screw-in
mount, or in a 61 mm slip-on
mount.
CAMERA CARE
Protect camera from dirt, rain,
dampness, and excessive heat.
Avoid touching the lens. To clean
lens, breathe on it first, then wipe
it gently with a soft, lintless cloth
or tissue. Do not use chemically
treated eyeglass tissues as they
might damage the lens coating.
Clean out the interior of the
camera occasionally with a
camel-hair brush, paying special
attention to the film gate
(Fig. 28).
Do not attempt to remove or oil
any part of the camera. If anything
goes wrong, don't try to repair it
yourself. Take it to a dealer, or
send it to the nearest GAF
Consumer Photo Service Center
li
sted below.
GAF CORPORATION
Consumer Photo Service
Center
Emma St.
Binghamton, N.Y. 13902
3500 North Kostner Ave.
Chicago, III. 60641
16217 Kittridge St.
Van Nuys, California 91406
58-10 Broadway
Woodside, New York 11377
P.O. Box 490
Portland, Ore. 97207
4601 Winters Chapel Road
P.O. Box 47999
Atlanta, Ga. 30340
I
N CANADA
GAF (Canada) Limited
Consumer Photo Service
Center
70 Alexdon Road
Downsview, Ontario
9411 Cote De Liesse
Dorval, Quebec
1195 West 8 Ave.
Vancouver 9, Brit. Col.
16

29
30
I
mportant:
The original bill of
sale (dated sales slip with name
and address of dealer) is now
accepted as proof of purchase for
establishing the warranty period.
No warranty card is provided. To
help identification in case of loss
or theft, keep among your per-
sonal records the camera model
designation (GAF SS 805) and the
serial number appearing near the
tripod socket on the bottom of the
camera handle.
c]e[Q"Z]fVRc
Making sound movies with the
GAP(R) SS
805 camera is simple.
However, to fully utilize its
sophisticated sound components
for recording clear, true sound on
your film, study and follow the
"Tips for Better Sound Movies"
section below.
ZVPb]`U][R
The microphone is equipped with
an on/off switch and a 15-foot
wire that permits placing the
microphone near the subject. The
wire ends in a two-pronged plug.
Insert the plug into the micro-
phone outlets of the camera, as
shown in
Fig. 29.
Push in plug all
the way. Depress each battery
tester button in turn, for an
instant, to be sure that batteries
are O.K. Slide microphone switch
to "ON". You are now ready to
make sound movies.
If the wire is too short for proper
placement of the mike, use an
accessory microphone extension
cord.
bRP]bQV[T"YRfRY
The camera is equipped with a
gain control that automatically
adjusts the sound level as it is
being recorded. A high-low audio
gain switch is also provided. In
most instances this switch is set at
the
"H"
(high) position, as shown
in
Fig. 30.
The "L" low position is
used to suppress background
noise and when the to-be-recorded
sound is too loud.
17

YLJVYKPUN"ZPNUHS
A flickering green light is visible
inside the viewfinder when sound
is being recorded while the
camera is running*. When the
sound source is too weak, the
green light will not appear, while
it will stay on without flickering if
the sound is too loud or when
there is too much background
noise.
TPJYVWOVUL"]ZLK"HZ
YLTV[L"JVU[YVS
The camera can be started and
stopped by operating the On/Off
switch on the microphone. This
allows the camera operator to be
in the picture without using film
while he gets there. It also permits
fil
ming and interviewing by one
person.
To use the microphone as a remote
control: Place camera on tripod,
aim it at the subject. Plug in micro-
phone and slide switch on
microphone to "Off" Focus. Close
viewfinder by turning light-stop
knob to the left. Depress shutter
"
The flickering green light appears only
when the camera is loaded with sound
fil
m, the microphone is plugged in, and the
electric eye battery is good (as it also
powers the sound system).
release and lock it. Take your
place in the scene and start
camera by sliding microphone
switch to "On". Camera will keep
running and sound will be
recorded until mike is switched
"Off".
LKP[PUN"ZV]UK"TV`PLZ
Sound movies may be edited as
silent movies, with some restric-
tions. The sound recording for
each frame precedes the image by
18 frames. As a result, the film
cannot be cut at just any point:
entire scenes must be cut out and
spliced together. To provide room
for cutting, without transferring
sounds to the wrong scene, run
the camera for about two seconds
before starting to record sound
for the scene and stop recording
about two seconds before the
camera is stopped after the scene.
These gaps will permit editing
without cutting away portions of
the sound.
TVUP[VYPUN"[OL"ZV]UK
The flickering recording signal in
the viewfinder shows that sound is
being recorded.
With the earphone
plugged into the monitor outlet
of the camera it is possible to
hear the sound being recorded
while it is being recorded. This
allows the operator to constantly
check (and correct at the source,
if necessary) the recorded sound.
TVUP[VYPUN"ZV]UK
aP[OV]["Y]UUPUN
[OL"JHTLYH
This valuable feature permits the
operator to check and adjust the
sound before filming begins. It
can save a lot of film: the camera
does not have to be started until
microphone placement and sound
source have been checked and
found satisfactory.
To check the recording signal
without running the camera,
position microphone near sound
source, turned toward it, look into
viewfinder and depress monitor
button (same as electric eye tester
button, "A" in
Msq2"
9.2"
The
flickering green light will appear
and continue to flicker as long as
the monitor button is held
depressed and sound of satis-
factory level reaches the
microphone.
18

To monitor sound with the
earphone without running the
camera, plug in earphone and
depress monitor button (electric
eye tester button). The sounds
reaching the microphone will be
heard while the button is held
depressed.
TIPS FOR BETTER SOUND
MOVIES
You may have heard of people who
li
ve near the elevated tracks and
are able to conduct a conversation
in normal tones as a train passes
by with deafening roar, while their
visitors cannot hear a word. Or
you may have taken part in a
conversation while someone was
watching TV in the room. Usually
the people conversing are not
aware of the TV sounds, while the
TV watcher is oblivious of the
conversation. The above are
examples of the human mind's
ability to be selective, to hear only
what it wants to hear, at the
exclusion of other sounds also
picked up by the ear. In the case
of the train this takes considerable
conditioning, while the TV
example is quite common.
The microphone of your sound
camera is like the human ear: it
will pick up all sounds reaching it.
However, it is not backed up by a
selective human mind. Remember
this when you plan your sound
movies. For clean, clear sound in
your movies you have to make
sure that only clear, clean sound
is allowed to reach the
microphone. The most common
causes of unsatisfactory sound
recording are background noise,
more than one sound source,
microphone placement and poor
location. Let's discuss these one
by one and see what can be done
about them.
Background noise
Background noise or ambient
noise level (as it is often called) is
the sum of sounds that exists at
the time of sound movie making,
in addition to the sound intended
to be recorded. A surprisingly
high level of background noise
can remain unnoticed by the
moviemaker due to his mind's
ability to ignore undesirable
sounds.
Checking the sounds reaching
the microphone with the earphone
is the best way to detect
background noise. With the
earphone all sounds reaching the
microphone will be heard as the
earphone represents a single
sound source, here the selectivity
of the human mind does not
apply.
What can you do about the
unwanted background noise.
Before we can answer, the
function of the automatic gain
control must be described.
The function of the automatic
gain control is to provide the
soundtrack recording head with
an optimum input that will result
in the best recorded sound
quality. To achieve this, the
control seeks out the loudest
sound that reaches the micro-
phone and adjusts it to optimum
recording level. This works fine
when the loudness of the to-be-
recorded sound is far above the
level of the background noise
(ambient noise level). As the
automatic gain adjusts the main
sound source, it also adjusts the
background noise in proportion,
so that the background noise will
be barely heard in the recording.
19

31
32
20
However, if the loudness of main
sound and background noise are
not too far apart, the background
noise will be recorded at a
disturbingly high level. This can
be prevented to a degree by
turning the audio gain control of
the camera to
-
L" (low), as shown
in
Fig. 31 ,
and placing the
microphone closer to the to-be-
recorded sound source. The
lowered audio gain will reduce
the level of recorded background
noise, while the decreased
source-to-microphone distance
will raise the level of sound from
the main source. The result will be
a cleaner, clearer recording. The
"L"
(low) setting of the audio gain
control may be used to prevent
another undesirable effect caused
by background noise. When the
main sound source pauses
momentarily, as when a speaker
stops talking, the automatic audio
gain will amplify the only sound
available to it at the moment, the
background noise. The resulting
effect can be quite disturbing: in
one moment the speaker is heard
clearly, the next moment noises
can be heard, almost as loudly.
The remedy here is the same: turn
the audio gain control to "L" (low),
and place the mike closer to the
speaker.
There is another, and perhaps
best way to prevent background
noise from interfering with the
recorded sound: eliminate it. It is
often possible to silence the
offending background noise: an
air conditioner, TV, vacuum
cleaner in the next room, loud-
ticking clock, etc. may often be
turned off or stopped. Another
way of preventing background
noise is by changing location:
move camera and subject to a
quieter place.
Wind can also cause background
noise in outdoor movies. While
itself silent, wind blowing over
the mike often causes a whistling
sound in the recording. To mini-
mize wind noise, protect the
microphone with a shield formed
from approximately
1
/4 to
1
/2 inch
thick plastic foam sheet (available
in most 5 & 10 cent stores). Attach
the plastic foam to the micro-
phone with a rubber band, as
shown in
Fig. 32.
Wind screens
made for the purpose are also
available in many hi-fi stores.
To prevent camera noise from
being recorded, keep microphone
at a distance of
at least
3 feet
from the camera. If (particularly
in small rooms) the camera noise
persists, turn the audio gain
control to low ("L").
Handling the microphone can
also result in distracting back-
ground noise. Rather than hold-
ing it in the hand, it is better to
place the mike on its stand, or
tape it to some convenient object.
Professionals often hang up the
mike in front of and just above the
subject, outside of the picture
area. If there is an extra person to
hold it, the mike can be dangled
in place from the end of a fishing
pole.
Table of contents
Other GAF Camcorder manuals