Gamma Vacuum TSP User manual

2915 133rd Street West • Shakopee, MN 55379 • (p) 952.445.4841 • (t) 800.237.3603• (f) 952.445.7615
Titanium Sublimation Pump & Remote
TSP Pump Controller Users Manual
PN 900016, Rev C
Specification information is located on our website at:
www.gammavacuum.com
ISO 9001:2000 Certified

TSP & Remote TSP Controller Users Manual
2
Table of Contents
General Information................................................................................................................................................. 3
TSP Specifications................................................................................................................................................ 5
Remote TSP/NEG Controller Specifications......................................................................................................... 6
Approvals .............................................................................................................................................................. 7
Installation................................................................................................................................................................ 8
Receiving and Unpacking...................................................................................................................................... 8
Safety Notices....................................................................................................................................................... 8
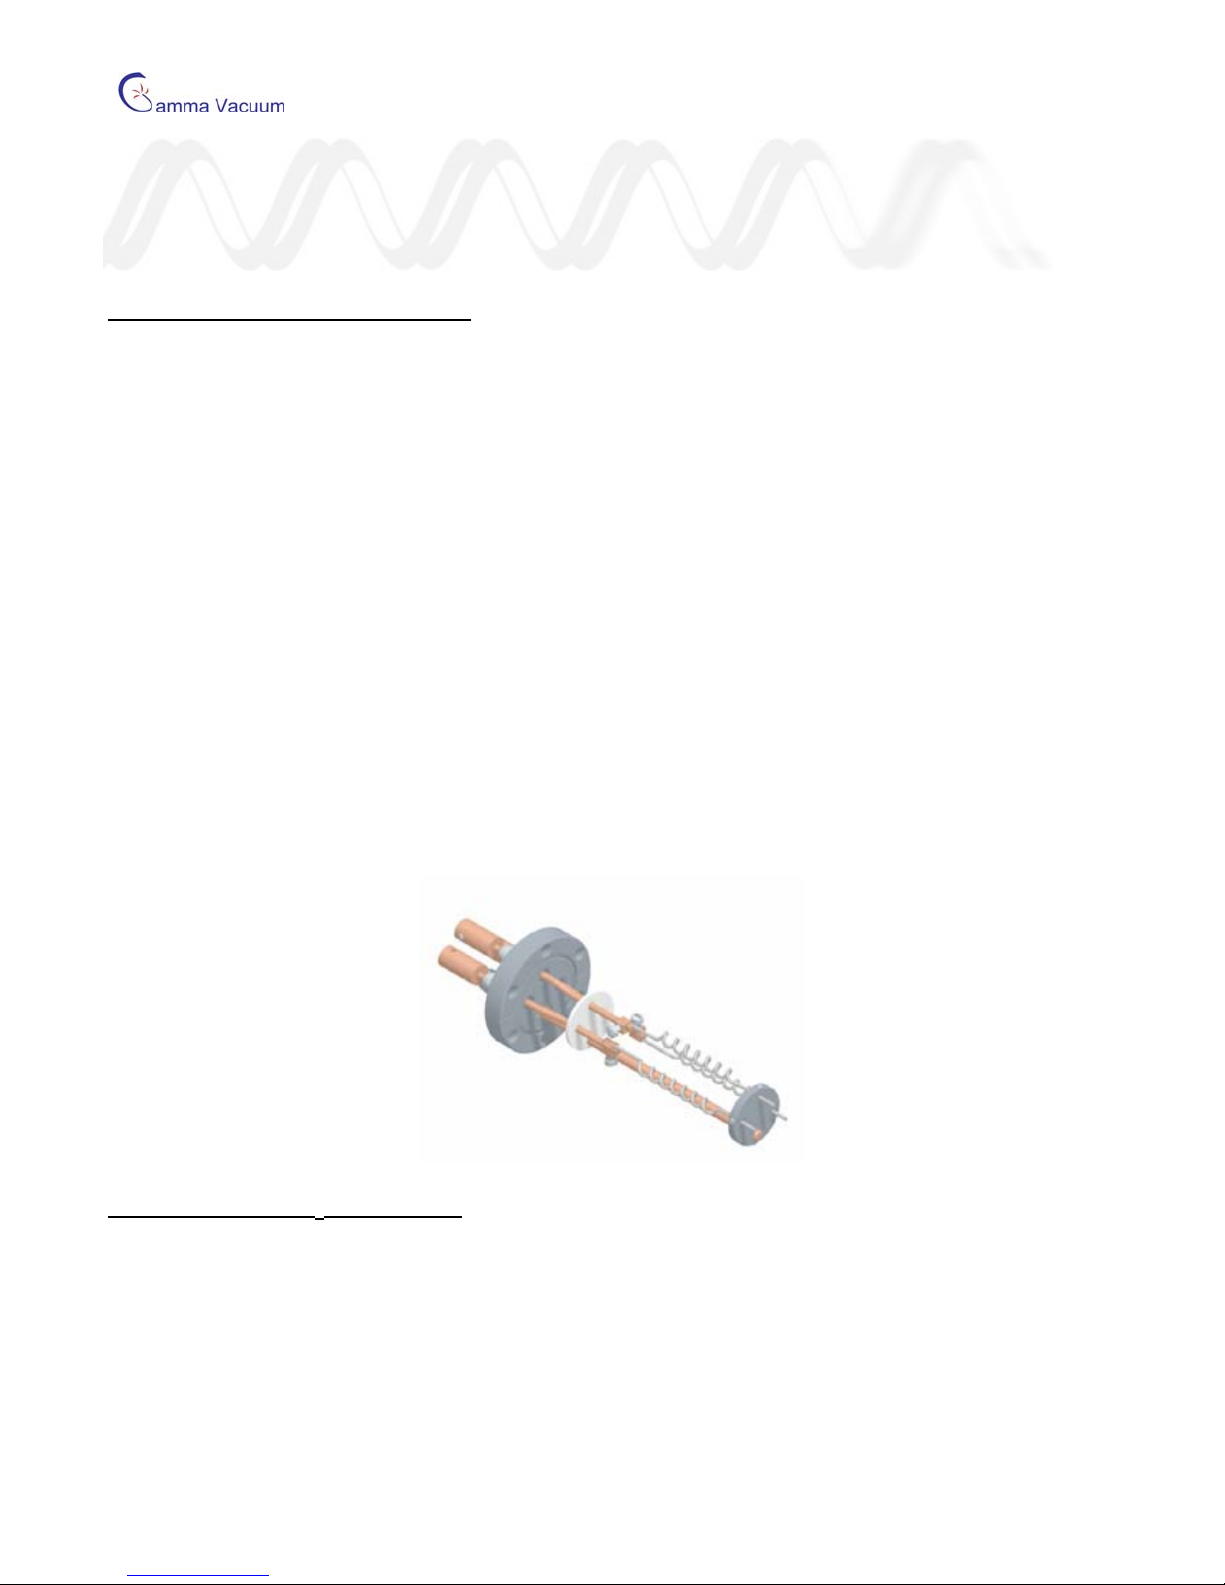
TSP Installation Procedure ................................................................................................................................... 9
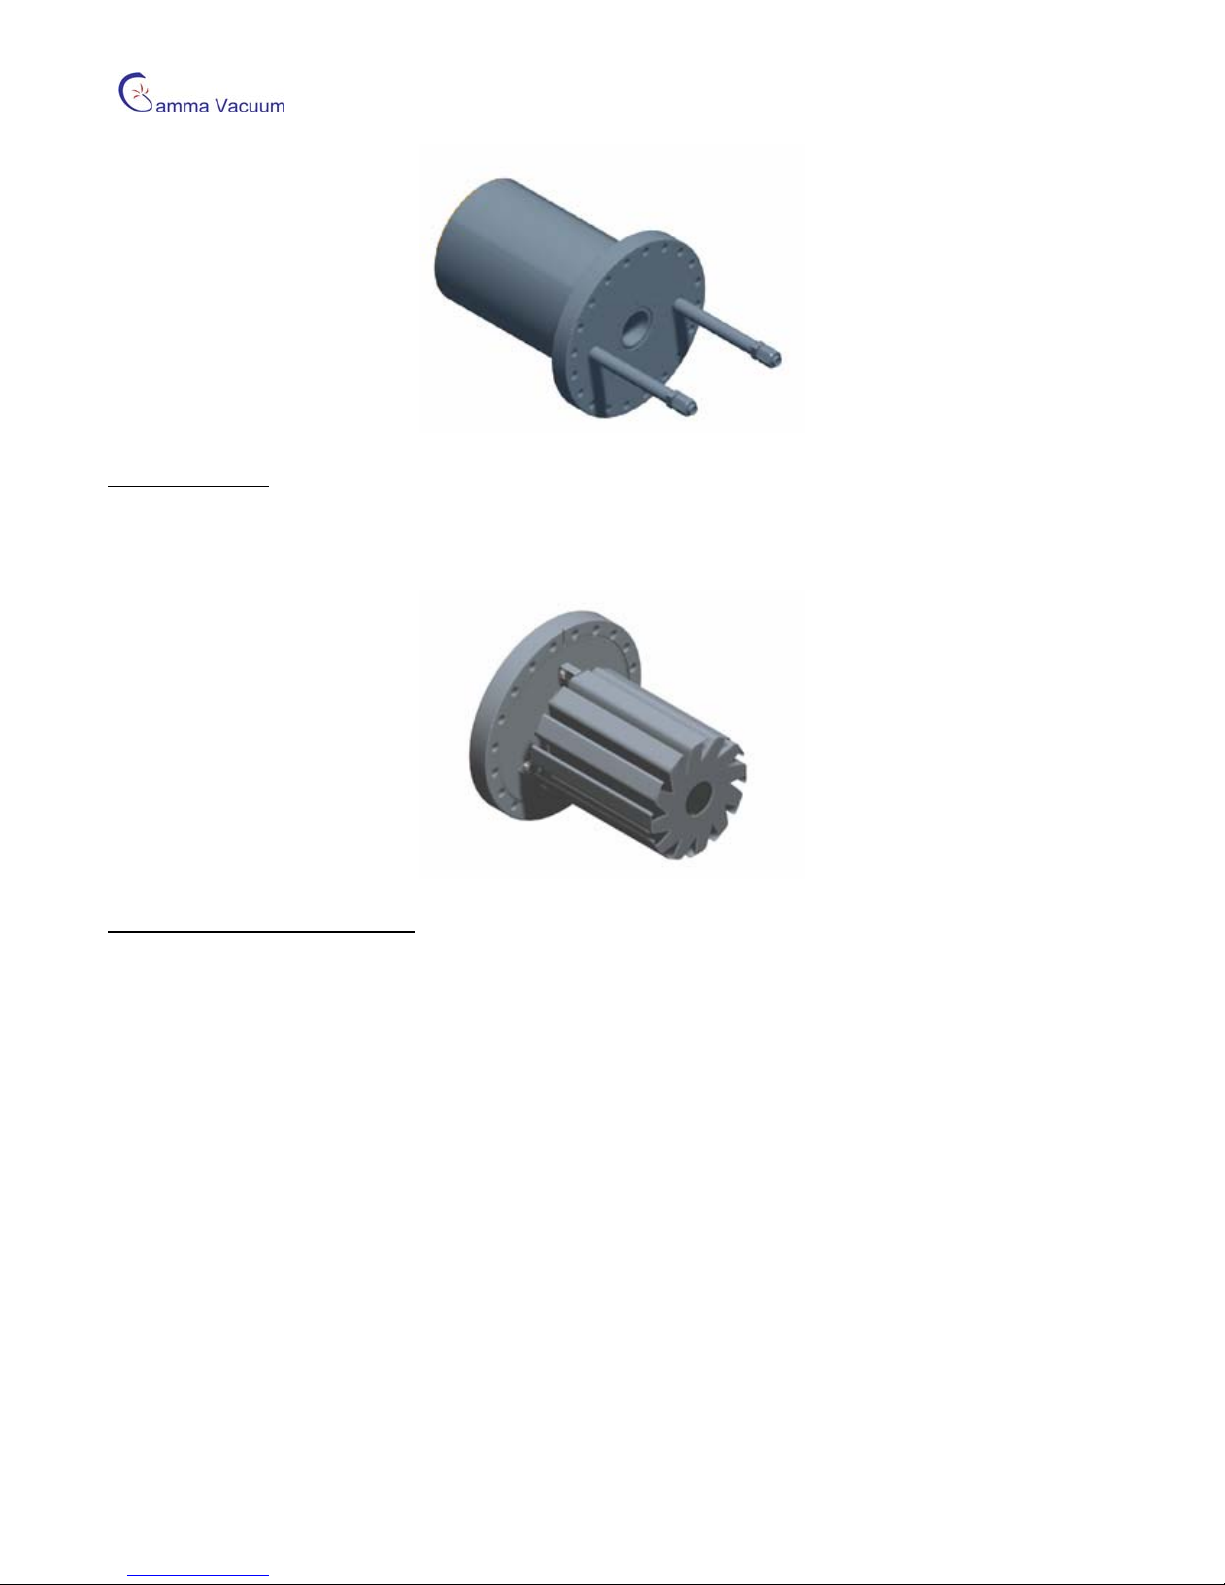
Remote TSP Controller Installation Procedure................................................................................................... 10
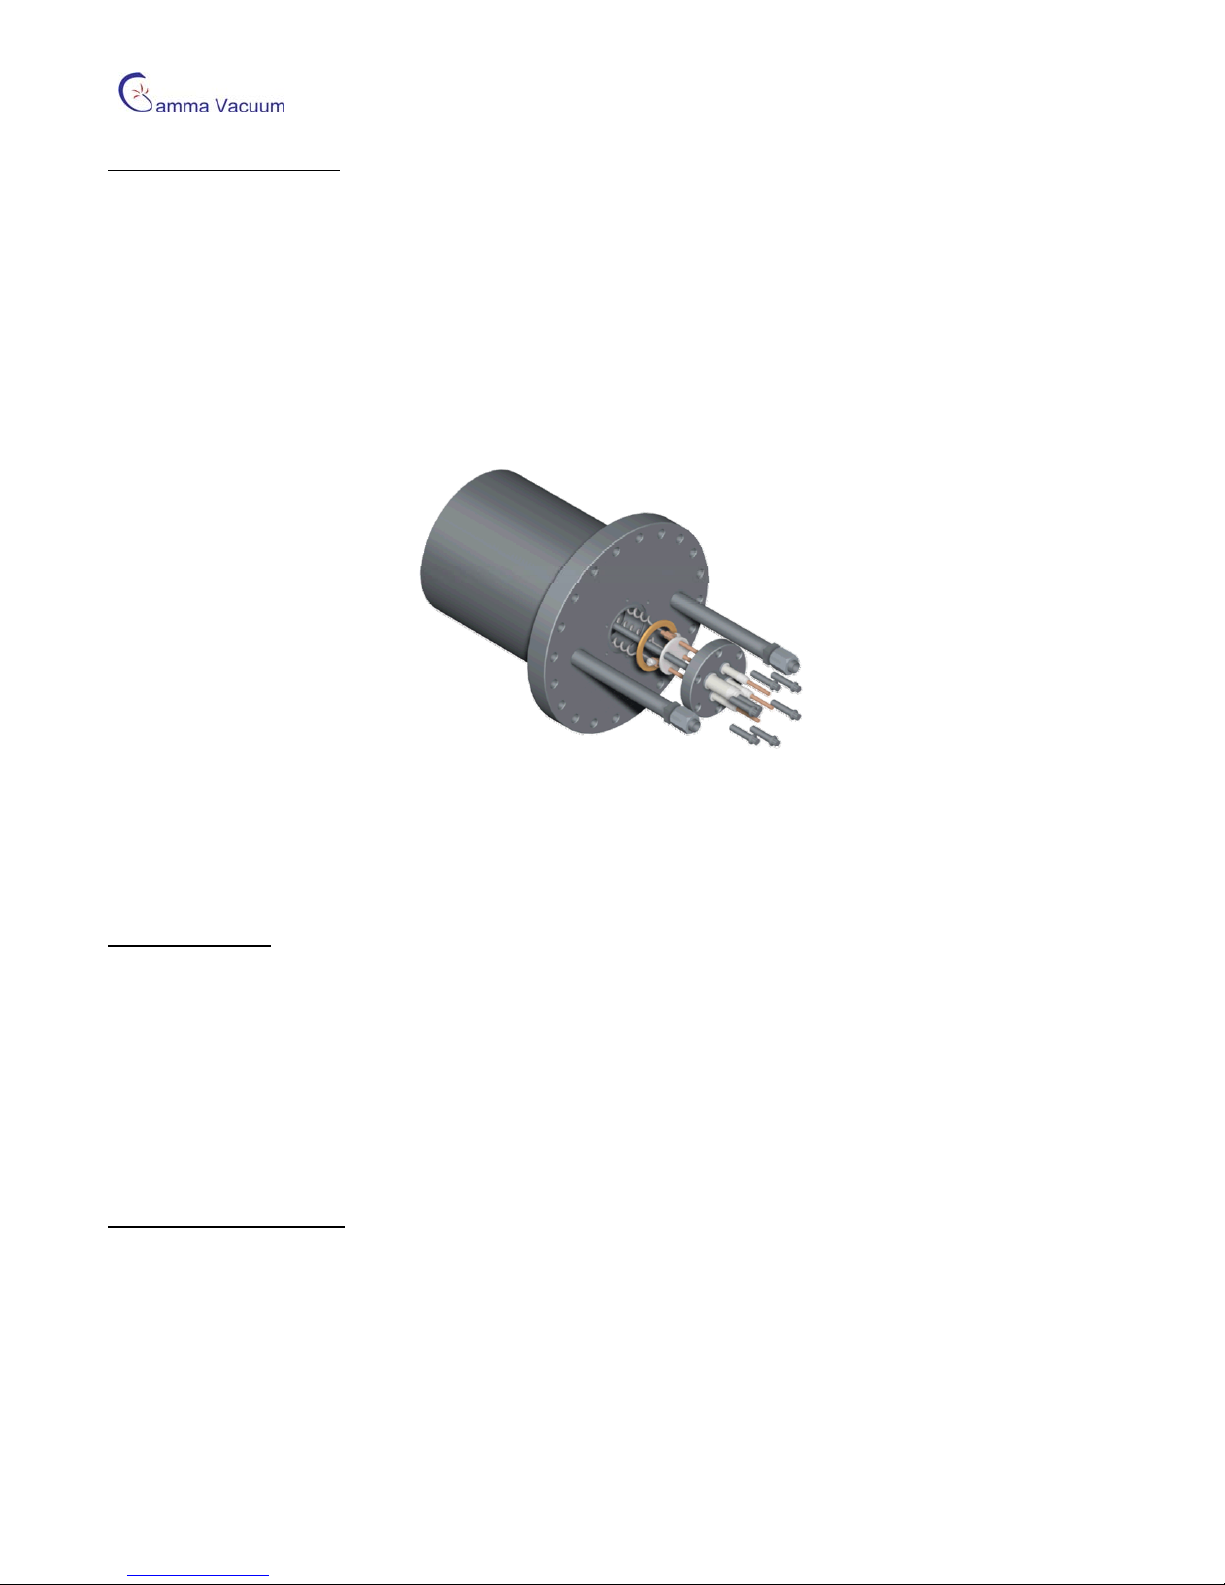
Dual TSP Installation Procedure......................................................................................................................... 11
Remote TSP Controller Operation....................................................................................................................... 12
Description .......................................................................................................................................................... 12
Menu Display....................................................................................................................................................... 12
TSP Configuration (Config) Menu....................................................................................................................... 13
TSP Settings Menu ............................................................................................................................................. 15
TSP Sublimation Screen..................................................................................................................................... 17
Procedures and Additional Information.............................................................................................................. 18
Cold Start Procedure........................................................................................................................................... 18
Degassing Filament Procedure........................................................................................................................... 18
Normal Operation................................................................................................................................................ 18
Titanium Consumption ........................................................................................................................................ 19
Filament Replacement Procedure....................................................................................................................... 19
TSP Controller Connections................................................................................................................................. 20
Description .......................................................................................................................................................... 20
Power Input, J1 ................................................................................................................................................... 20
MPC/MPCe Controller, J2 (J2/J3 for Dual only).................................................................................................. 20
MPCe Serial Interface, J112 (MPCe Backpanel)................................................................................................ 21
Warranty & Service................................................................................................................................................ 24
Service................................................................................................................................................................. 24
Warranty.............................................................................................................................................................. 24
Returning Material............................................................................................................................................... 26
Return Material Authorization Form.................................................................................................................... 27

TSP & Remote TSP Controller Users Manual
3
General Information
Titanium Sublimation Pump (TSP)
The Titanium Sublimation Pump (TSP) is designed to be used in high to extreme vacuum environments although
it can be operated over a wide range of pressures. TSPs effectively remove chemically active gases and are
excellent in combination with an ion pump. The amount of gettering material evolving from an ion pump is directly
proportional to the pressure and atomic weight of the gas molecules. Therefore, at low pressures there is not
sufficient gettering material to remove light gases (e.g. hydrogen). TSP operation is relatively insensitive to
system pressure and has no difficulty emitting gettering material at low pressure. In most ultra-high and extreme-
high vacuum systems, hydrogen is the primary load contributor. Hydrogen removal is greatly aided with the use
of a TSP.
The TSP is a getter type pump and sublimes titanium from its filaments. The sublimed titanium coats the line-of-
sight surfaces surrounding the filaments. The titanium serves to capture chemically-reactive (non-noble) gases.
Sublimation requires heating of the elements which raises the vacuum system temperature temporarily raising
system pressure. Therefore, the TSP should be operated intermittently. The film deposited will capture gases
permanently for a long period after firing.
The TSP does not effectively remove all gases (mainly noble) from the system and therefore should be used in
conjunction with other vacuum pumps (e.g. ion pump).
Due to the conductive nature of the titanium film, it is a good practice to eliminate line of sight from the TSP to the
rest of the vacuum system. If the film coats electrical insulators (e.g. the ceramic insulators of the sputter-ion
pump) it will create an electrical path which can lead to electrical leakage or shorts.
Liquid Nitrogen (LN2) Cryoshroud
A cryo shroud provides capture and hold of H20 & CO2 pumping when cooled with LN2. It provides a surface for
sublimated titanium while preventing line of sight migration of Ti. Cryo shrouds can be used with and without
coolants. Recommended coolants include: water, and LN2(liquid nitrogen). When used with LN2, hydrogen
pumping speed is increased by a factor of 6.5.

TSP & Remote TSP Controller Users Manual
4
Ambient Shield
An ambient sublimation shield provides a surface for sublimated titanium while preventing line of sight migration
of Ti. It is low cost and is smaller than the cryo shield.
Remote TSP/NEG Controller
The remote TSP/NEG option allows control of a TSP (titanium sublimation pump) or NEG (non-evaporable
getter). The remote controller operates in conjunction with the DIGITEL Ion Pump Power Supply Line. It has the
capability of operating up to 8 filaments total in any TSP configuration (independently, 3 or 4 filaments per TSP).
The remote TSP/NEG controller system consists of:
•Remote TSP/NEG Control unit
•control cable from the DIGITEL MPC to the Remote TSP/NEG Control
•high-current cable from the Remote TSP/NEG Control to the TSP/NEG

TSP & Remote TSP Controller Users Manual
5
TSP Specifications
Temperature (max): Bakeable to 250°. Includes adapter cables for mating with the TSP
controller.
Number of Filaments 3 Spiral design
Filament Material: mm (in.) 85% titanium, 15% molybdenum alloy wire
Total length of each wire: mm
(in.) 219 (8.6)
Coiled length of wire: mm (in.) 117 (4.6)
Weight per filament 3.1 to 3.5g
Filament life up to 20 hours depending on operating conditions (pressure, current)
Maximum current 50A at 8 VAC
High Current
Cable (s)
(included with Remote
TSP Controller)
Communications
Cable
(pn: 380049, 380050 or
380085)
DIGITEL MPCe Remote TSP Controller
TSP1
TSP2
(optional)

TSP & Remote TSP Controller Users Manual
6
Remote TSP/NEG Controller Specifications
The Remote TSP Controller specifications match the Digitel MPCe specifications with the following additions:
Parameter Specification
Number of Independent TSPs 1 or 2 (up to 4 filaments per TSP)
Control Modes Manual, Programmed
Auto Filament Advance Disabled, Next, Rotate
Power Control Watts or Amps
Power Output (max) 75 Amps (1000 watts)
Voltage Output (max) 14 volts
Power Ramp Rate (amps/sec) 5
Dimensions Single, WxHxD: 138 mm (5.4") x 292 mm (11.5") x 219 mm (8.6")
Double, WxHxD: 175 mm (5.4") x 292 mm (11.5") x 219 mm (8.6")
Input Power 120 +/- 10% or 240 +/- 10%, configurable
Line frequency 48 to 62 Hz. No adjustment necessary
Maximum Humidity 50%
Maximum Operating Temperature 40 C

TSP & Remote TSP Controller Users Manual
7
Approvals
TSP Products are shown to meet the intent of Directive 89/336/EEC for Electromagnetic Compatibility and Low-
Voltage Directive 73/23/EEC for product Safety. Compliance was demonstrated to the following specifications as
listed in the Official Journal of the European Communities:
EN 50081-1 Emissions
•EN 55011 Class A radiated and Conducted Emissions
EN 50082-1 Immunity
•IEC 801-2 Electrostatic Discharge Immunity
•IEC 801-3 RF Electromagnetic Field Immunity
•IEC 801-4 Electrical Fast Transient/Burst Immunity
Low Voltage Directive 73/23/EEC
•EN 61010-1 Safety requirements for electrical equipment for measurement, control and laboratory use

TSP & Remote TSP Controller Users Manual
8
Installation
Receiving and Unpacking
Check the equipment received against the packing list enclosed to insure that all items shipped have been
received. If there are any shortages, notify the carrier and Gamma Vacuum. Save all packaging material for
inspection.
Inspect for any obvious damage. If the equipment is damaged in any way, a claim should be filed with the carrier
(one copy to Gamma Vacuum). If equipment is to be retuned for inspection or repair, authorization must be
obtained from Gamma Vacuum Prior to reshipping. Instructions for return will be provided at that time.
Safety Notices
WARNING: GAMMA VACUUM CONTROL UNITS DESIGNED FOR ION-PUMP OPERATION
ARE CAPABLE OF DELIVERING 7000 VDC UNDER OPEN CIRCUIT OR LOW PRESSURE
OPERATING CONDITIONS. GAMMA VACUUM PRODUCTS ARE DESIGNED AND
MANUFACTURED TO PROVIDE PROTECTION AGAINST ELECTRICAL AND MECHANICAL
HAZARDS FOR THE OPERATOR AND THE AREA SURROUNDING THE PRODUCT.
OBSERVE ALL INFORMATION IN THIS SECTION.
Installation procedures are for use by qualified and authorized personnel who have experience working with
voltages greater than 50 volts. To avoid personal injury, do not perform any installation or service procedures
unless qualified to do so.
There are no serviceable parts inside the Remote TSP Controller.
Do not operate the control without a proper electrical ground or near water. The control may be damaged and its
safety reduced, if it is operated outside of its specifications.

TSP & Remote TSP Controller Users Manual
9
Product Safety Labeling
WARNING:
SHOCK HAZARD.
CAN CAUSE
INJURY OR
DEATH. REMOVE
POWER BEFORE
SERVICING.
ALERTE:
RISQUE DE CHOC.
PEUT CAUSER DES
BLESSURES OU LA
MORT. RETIRER
LA SOURCE
D’ALIMENTATION
AVANT LE
SERVICE.
警告:
点検・修理の際は
必ず全ての電源を
お切りください。
使用者が感電した
り、死亡、または
重傷を負う危険が
あります。
安全警告:
触电危险。触电可
能导致受伤或死亡。
请于维修前去掉电
源。
ADVERTENCIA:
PELIGRO POR
DESCARGA. PUEDE
CAUSAR LESIÓN O
INCLUSO LA
MUERTE. RETIRE Y
DESCONECTE LA
FUENTE DE
ALIMENTACION
ELECTRICA, ANTES
DE PROCEDER AL
SERVICIO DE
REPARACIÓN,
MANTENIMIENTO O
REVISION INTERNA.
ACHTUNG:
GEFAHR ELEKTRISCHER
SCHLÄGE. VERLETZUNGS-
ODER LEBENSGEFAHR.
TRENNEN SIE ALLE
ELEKTRISCHEN
ANSCHLÜSSE VON DER
SPANNUNGSVERSORGUNG
BEVOR SIE ARBEITEN AN
DEM GERÄT AUSFÜHREN
WARNING:
HEAVY OBJECT.
TO AVOID
MUSCLE STRAIN
OR BACK INJURY,
USE LIFTING AIDS
AND PROPER
LIFTING
TECHNIQUES
WHEN REMOVING
OR REPLACING.
ALERTE:
OBJET LOURD.
POUR EVITER UNE
TENSION
MUSCULAIRE OU
UN MAL DE DOS,
UTILISER DES
AIDES ET DES
TECHNIQUES DE
LEVAGE
APPROPRIEES
POUR
L’ENLEVEMENT
OU LE
DEPLACEMENT.
警告:
大変重い装置です
。筋挫傷、背部損
傷等を防ぐ為、移
動や移設の際は適
切な技術や補助機
器等を使用してく
ださい。
安全警告:
重物。为避免肌肉
拉伤或背部受伤,
当移动或归位时请
使用起重设备以及
适当的起重技术。
ADVERTENCIA:
OBJETO PESADO.
PARA EVITAR UN
SOBRE-ESFUERZO
MUSCULAR O DAÑO
FÍSICO, UTILIZE LA
AYUDA DE
ELEVADORES Y
TÉCNICAS
APROPIADAS PARA
EL MANEJO DE
OBJETOS PESADOS,
CUANDO LO
TRANSPORTE,
DESPLAZE O
CONSIDERE
REEMPLAZARLO.
ACHTUNG:
SCHWERES OBJEKT. ZUR
VERMEIDUNG VON
MUSKELZERRUNGEN
ODER RÜCKENSCHÄDEN
BEIM TRANSPORT
GEEIGNETE
HUBVORRICHTUNGEN UND
HEBETECHNIKEN
VERWENDEN.
WARNING:
READ AND
UNDERSTAND
OPERATOR’S
MANUAL BEFORE
USING THIS
MACHINE.
FAILURE TO
FOLLOW
OPERATING
INSTRUCTIONS
COULD RESULT IN
INJURY OR
DAMAGE TO
EQUIPMENT.
ALERTE:
LIRE ET
COMPRENDRE LE
MANUEL
D’OPERATION
AVANT D’UTILISER
CETTE MACHINE .
NE PAS SUIVRE
LES
INSTRUCTIONS
D’OPERATION
PEUT CAUSER DES
BLESSURES OU
DES DEGATS A
L’EQUIPEMENT.
警告:
この装置を使用さ
れる前に必ず取扱
説明書を熟読し理
解した上でご使用
ください。取扱説
明書の通り操作を
しなかった場合、
装置が損傷、破損
することがありま
す。
安全警告:
在使用这台机器前,
请务必阅读并理解
“操作员手册
(指南)”。如果
未能遵循操作步骤
说明,将可能导致
设备的损坏。
ADVERTENCIA:
LEA, ESTUDIE, Y
ENTIENDA BIEN EL
MANUAL DE
OPERACION, ANTES
DE USAR ESTA
MAQUINARIA. UNA
FALLA POR NO
SEGUIR LAS
INSTRUCCIONES
OPERATIVAS,
PUDIERA RESULTAR
EN DAÑO O
PERJUICO DEL
EQUIPO.
ACHTUNG:
LESEN UND VERSTEHEN
SIE DIE
BEDIENUNGSANLEITUNG
BEVOR SIE DAS GERÄT IN
BETRIEB NEHMEN.
FEHLBEDIENUNGEN
KÖNNEN ZU
VERLETZUNGEN FÜHREN
ODER DIE AUSRÜSTUNG
BESCHÄDIGEN.
TSP Installation Procedure
If purchased as part of an ion pump, the TSP and corresponding shield come pre-installed. Refer to this section if
the TSP and shield are purchased separately.
Required Items
You need the following items to install the TSP:
•Cyroshroud, ambient sputter shield or suitable 2 ¾” CFF vacuum system port.
•2 ¾”, 3 3/8” and/or 8” CFF gaskets, washers, bolts and nut plates (provided with new equipment purchase).
•Corresponding wrenches for CFF bolts.

TSP & Remote TSP Controller Users Manual
10
Installation Procedure
Perform the following procedure to install the TSP and shield:
1. Place the 2 ¾” or 3 3/8” gasket on the corresponding shield port.
2. Insert the TSP in the corresponding shields (cryo shown) 2 ¾” or 3 3/8” port through the gasket.
3. Insert bolts through TSP flange into shield and tighten according to standard CFF procedures.
4. Place 8” CFF gasket on the proper inlet port to the vacuum system.
5. Insert the TSP/Shield assembly into the port through the gasket.
6. Insert 8” CFF bolts with washers through shield and into the mating port connections,
7. Secure with nut plates if required.
8. Tighten according to standard CFF procedures.
Remote TSP Controller Installation Procedure
The Remote TSP Controller requires a communication cable with the DIGITEL MPCe for proper operation.
Required Items
You need the following items to install the TSP:
•DIGITEL MPC
•Communications cable (Gamma part numbers: 380049, 380050 or 380085)
•M4 hex wrench
•Phillips screw driver
•5/16” hex driver, slotted screw-driver, or adjustable wrench
•Assembled TSP/Cryoshroud or TSP/Ambient Sputter Shield assembly
Single TSP Procedure
Perform the following procedure to install the TSP and shield:
1. Place the Remote TSP Controller in the desired location. The Remote TSP Controller can be mounted using
the installed bracket.
2. Connect the communications cable to the J505 connection on the back panel of the MPCe.
3. Route the communications cable from the MPC to the Remote TSP Controller.
4. Connect the communications cable to the J2/TSP1 connection on the Remote TSP Controller.

TSP & Remote TSP Controller Users Manual
11
5. Route the high current cable to the TSP.
6. If installed, remove the strain relief shroud from the TSP connection using a Philips screw driver.
7. Place the shroud over the high current wires and around the cable. Loosen the wire clamp if necessary.
8. Connect the common high current wire to the longest copper connection and secure with the M3 set screw.
9. Connect remaining high current wires in the preferred order using the M3 set screw. The orientation of the
wires to the connectors is not relevant for proper TSP operation and is governed by technician preference.
10. Reinstall the protective shroud.
11. Insert IEC power plug in to J1 connection on Remote TSP Controller.
12. Turn on power to the MPC.
Dual TSP Installation Procedure
Follow the above procedure with these exceptions:
1. Branch the communications cable at the controller end using a splitter cable (Gamma part number 390718) to
the J2 (TSP-1 Control) and J3 (TSP-2 Control) connections.
2. Route the TSP1 and TSP2 high current cables to the respective TSP locations.

TSP & Remote TSP Controller Users Manual
12
Remote TSP Controller Operation
Description
The Remote TSP Controller user interface is conducted through the MPCe front panel. For more information on
how to use the MPCe, refer to the MPCe/LPCe Users Manual (pn 900015).
Menu Display
The TSP parameters are controlled through the MPCe Menu screen. The TSP functions are separated into 2
areas.
1. TSP Config (configuration): This section displays and controls possible hardware configurations. For
example, how many TSPs and how many filaments each TSP has.
2. TSP Settings: This section displays and controls possible operation modes of the TSP and their
parameters. For example, which TSP is configured with which pump and do they operate in manual or
programmed mode.

TSP & Remote TSP Controller Users Manual
13
TSP Configuration (Config) Menu
The configuration menu applies to the hardware settings of the TSP(s) attached to the Remote TSP Controller.
Upon entering this screen, the Remote TSP controller can automatically scan the available hardware and
determine the configuration automatically by pressing the Re-Scan button. The configuration detected can be
manually overwritten.
Re-Scan
The Re-Scan button initiates a scan of the TSP hardware and automatically sets the TSP Configuration selected
based on the hardware detected. In the event that a scan does not select the appropriate TSP Configuration,
manually enter the desired configuration using the TSP Configuration pull down menu.
Note: Re-Scanning will activate all installed filaments.
TSP Configuration
The TSP configuration pull down menu allows the current number of TSPs (1 or 2) and the current number of
filaments (3 or 4) to be viewed and selected when automatically scanned or manually overwritten.

TSP & Remote TSP Controller Users Manual
14
Filament Status
This area of the screen represents the current filament status through a graphical representation using the
following symbols:
•A black filled-circle represents the selected filament (filament 1 in the above example).
•A black open circle represents a detected filament (filament 2 in the above example).
•An ‘X’ represents a filament that was previously detected. The controller assumes the filament to be burned
out or not installed (filament 3 in the above example). .
•A white open circle indicates that a filament has not been detected on that high current wire (filament 4 in the
above example).
•A forward slash ‘/’ indicates that the filament is installed, but is not achieving the desired level of current. This
often occurs during the end of the filament life prior to it burning out (filament 5 in the above example). .
Independent Filament Operation
Selecting this box overrides the TSP configuration and forces each filament to be treated as an independent TSP
(a one to one relationship). This option disables any programmed TSP parameters and can only be operated in
manual TSP mode.
History
This view shows the filament on-time and current status of each filament. These parameters can be cleared for
each filament by selecting the filament in the Select Filament pull-down menu and pressing the Clear button.

TSP & Remote TSP Controller Users Manual
15
Degas
The TSP degass feature can be customized to specific amperage and on time values. While degassing, the
actual levels are displayed. The degass routine ramps voltage up slowly for each active filament independently
and maintains the set amperage for the set on-time.
Note: Degassing will activate all installed filaments.
TSP Settings Menu
The TSP settings menu allows control over software parameters for firing the TSP through the Remote TSP
controller. Control mode can be set to either programmed or manual Available options depend on the control
mode selected.
Programmed Mode Parameters
The available parameters in programmed control mode are:

TSP & Remote TSP Controller Users Manual
16
1) Settings for TSP, selects if the shown parameters are for TSP1 or TSP2 (each TSP can be set for either
manual or programmed).
2) Control Source, determines which supply (1 or 2) the current TSP responds to for pressure limits. If “None” is
selected, the TSP program will activate regardless of any pump pressure.
3) Auto Advance, this feature determines if and what type of auto advance is used between filament firings. The
available auto-advance options are:
a) Disabled, fires consistently on one TSP until it is burned out and does not activate another filament.
b) Balance, fires the active filament, then sets the active filament to the next sequential filament. When the
last filament is reached, the rotation starts again at the first filament.
c) Next, fires the active filament until it can no longer fire, assumed it to be burned out, and then advances
to the next sequential filament.
4) Level (A), when in edit mode, this value determines the maximum amperage or wattage applied to the
filament. Amps or watts can be selected in the edit screen.
5) On Time, sets the number of seconds the TSP fires at the programmed level.
6) Cycle Period, the time in minutes between each TSP firing while within pressure limits. This can be set to an
automated scale in the edit mode that changes the period based on pressure according the to following table:
Pressure (mbar) Cycle Period (minutes)
1 x 10⁻⁶ 10
1 x 10⁻⁷ 20
5 x 10⁻⁸ 30
1 x 10⁻⁸ 60
5 x 10⁻⁹ 200
1 x 10⁻⁹ 400
5 x 10⁻¹⁰ 600
1 x 10⁻¹⁰ 800
7) Active Filament, determines the next filament to fire.
8) Upper Limit, if the pump pressure is higher than this pressure limit the TSP will not fire.
9) Lower Limit, If the pump pressure is lower than this pressure limit the TSP will not fire.
10) Number of Cycles, how many times the TSP fire. This can be set to infinite in the edit menu.
Manual Mode Parameters
The available parameters in manual control mode are (unavailable options are grayed out):

TSP & Remote TSP Controller Users Manual
17
1) Settings for TSP
2) Level (A)
3) Auto Advance
4) Active Filament
See above section for detailed descriptions
TSP Sublimation Screen
Programmed and Manual Mode
Once the TSP has been properly configured and the settings entered, the TSP will show the appropriate
parameters in the TSP firing screen. This screen is entered by pressing the TSP button in the lower right hand
corner of MPCe units equipped with the TSP option.
In manual mode, a button allows for the direct control of firing TSP1 or TSP2 if configured.

TSP & Remote TSP Controller Users Manual
18
Procedures and Additional Information
Cold Start Procedure
This procedure is used when the pump is started after exposure to any pressure above 3.3 Pa (including
atmospheric pressure).
1. Check to see that the ion pump power supply and TSP Control are properly connected and that the
system is tightly sealed.
2. Begin the roughing procedure for the system.
3. Perform the Degassing Filament Procedure.
4. Start the ion pump (if available).
5. The roughing valve can normally be closed when the ion pump has started. This is indicated by an ion
pump voltage of 2000V or greater.
NOTE: The titanium film that evaporates during Step 3 provides very high pumping speeds for certain gases.
This results is faster starting for the ion pump and faster pump down at higher pressures (down to 1E-6 Pa),
where ion pump speeds are slower.
Degassing Filament Procedure
New filaments or ones that have been up to air must be outgassed into the roughing system. The following
procedure forces the major gas load from the filaments out of the system. A slight release of gas occurs each
time a filament is cycled ON, which is quickly pumped away by the ion pump.
1. Rough the system to a pressure of 0.25 Pa or lower.
2. Initiate the degas procedure from the TSP Configuration Menu.
Normal Operation
The amount of sublimated titanium that is required during normal operation is a function of the gas load in the
system. In some applications, such as thin film deposition, considerable titanium is required. In others, such as
space simulation where the outgassing load is small, only an occasional layer of fresh titanium is required. The
requirements of each application are best learned by experience. Use the information in this subsection as a
guide.
NOTE: During operation the filament current should be set at 48 Amps for a 30-second cycle time. Current levels
lower than 47 Amps sublimate less titanium and current levels above 50 Amps tend to shorten filament life.

TSP & Remote TSP Controller Users Manual
19
Titanium Consumption
The consumption of titanium is a function of pressure experienced At higher pressures, the titanium combines
with a relatively large quantity of gas. The rate of arrival of gas molecules at the surface is greater than the rate of
arrival of titanium. Under these conditions, all the molecules of titanium combine with a gas molecule before the
next monolayer of metal is deposited. At low pressures nused titanium can be covered before it combines with a
gas molecule. Therefore it is desirable at lower pressures to deposit a thin film of titanium and allow it to pump
before covering up that layer. After a period of time, the residual pumping effect of the titanium decays and a
fresh layer of material should be deposited.
Filament Replacement Procedure
Gamma Vacuum offers a replacement filament kit (pn 360028). This kit is required to perform filament
maintenance of the TSP. The kit consists of:
•12 spiral titanium/molybdenum alloy filaments
•24 stainless steel screws (newer TSPs only require 12 of these)
•24 copper lugs (newer TSPs only require 12 of these)
•Four 2 ¾” and three 3 3/8” silver plated gaskets (for use with either a 3 or 4 filament TSP
respectively)
•Wrench (a special wrench designed to prevent bending of posts during filament installation)
To replace the filaments:
1. Turn off the power to the TSP.
2. Vent the system. Use dry nitrogen if possible.
3. Remove the TSP from the vacuum system.
4. Remove the existing filaments by unscrewing the attached screws and/or set screws.
5. Clean electrical contacts of the filament holder using a wire brush suitable for vacuum use (e.g. clean
stainless steel). If the wire brush does not clean them, sand blasting may be necessary.
Caution: Premature filament failure may result if the contacts are not sufficiently cleaned.
6. Rotate the filament so that it is as far as possible from the center (current return) post.
Caution: Bending the filaments away from the center post after they have been tightened (step 6)
may cause early failure.
7. Secure the filaments with the new copper lug. Use the special wrench provided (or use a pliers) to
hold the lug while it is being tightened to prevent the filament holder from bending and putting a pre-
stress on the cold filament.
8. Reinstall the TSP per the Installation Procedure section of this manual.
9. Follow the Degassing Filament Procedure in this manual. Then, the filaments are ready for normal
operation.

TSP & Remote TSP Controller Users Manual
20
TSP Controller Connections
Description
The figure below shows the Remote TSP Controller connections.
Single and Dual Remote TSP Controller
Power Input, J1
The J1 location is dedicated to input power. It is a standard IEC interface. Prior to attaching input power, verify
the proper voltage of the unit is 120 or 240 volts by observing product labeling . This information is available on
the serial number block of the unit and near the J1 connection.
Contact Gamma Vacuum if a change in input power is required.
MPC/MPCe Controller, J2 (J2/J3 for Dual only)
The Remote TSP/NEG Controller is supplied with a 15-pin Sub-D connector to facilitate communications between
the MPC and Remote TSP/NEG Controller. The mating connection on the MPC/MPCe is J505.
NOTE: A Y cable is required for Dual TSP Remote TSP Controller operation. Connections are made
according to labels on Y cable.
Table of contents
Popular Water Pump manuals by other brands

Edwards
Edwards EXPT instruction manual

EINHELL
EINHELL GC-SP 2275 Original operating instructions

Dover
Dover Wilden Original Series Engineering, operation & maintenance

SKC
SKC Pocket Pump TOUCH operating instructions

Grundfos
Grundfos ALPHA Pro Installation and operating instructions

Sandpiper
Sandpiper DRILLERS DMF3S Service and operating manual

Eaton
Eaton 220 Service manual

Howden
Howden Roots RAM Series Installation, operation & maintenance manual

AL-KO
AL-KO BMP 14001 Translation of the original instructions for use

Linear Technology
Linear Technology 2041A quick start

Becker
Becker VTLF 2.200 operating instructions

Larius
Larius New Excalibur Operating and maintenance instruction