Garrison 311438113 User manual
Model:
311438113
311438115
Ambient Temperature Range for Unit Operation
Choosing the Right Location
Other Features
Storage
personal
Your air conditioner should be used in such a way that it is protected from moisture, such as
condensation, splashed water, etc. Do not place or store your air conditioner where it can
fall or be pulled into water or any other liquid. Unplug immediately if it occurs.
When the water drainage function is not in use, keep the upper and the lower drain plug firmly
to the unit to avoid choking.When the drain plug is not in use, store it carefully to prevent
children from strangling.
This appliance can be used by children aged 8 years and above and people with reduced
physical, sensory or mental capabilities or lack of experience and knowledge if they have been
given supervision or instruction concerning use of the appliance in a safe way and understand
the hazards involved. Children shall not play with the appliance. Cleaning and user maintenance
shall not be done by children without supervision (applicable for European countries).
This appliance is not intended for use by persons (including children) with reduced physical,
sensory or mental capabilities or lack of experience and knowledge, unless they have been
given supervision or instruction concerning use of the appliance by a person responsible for
their safety. Children should be supervised to ensure that they do not play with the appliance.
Children must be supervised around the unit at all times (applicable for other countries
except European countries).
main power supply.
To reduce the risk of fire or electrical shock, do not use this fan with any solid-state speed control device.
Contact the authorized service technician for repair or maintenance of this unit.
Contact the authorized installer for installation of this unit.
Do not use hazardous chemicals to clean or come into contact with the unit. Do not use the unit
in the presence of flammable substances or vapors, such as alcohol, insecticides, petrol, etc.
Always contact a qualified person to carry out repairs. If the damaged power supply cord must
be replaced with a new power supply cord, obtain it from the manufacturer. Do not try to repair it.
Hold the power plug by its head when taking it out.
Note about Fluorinated Gases (not applicable to the unit using R290 refrigerant)
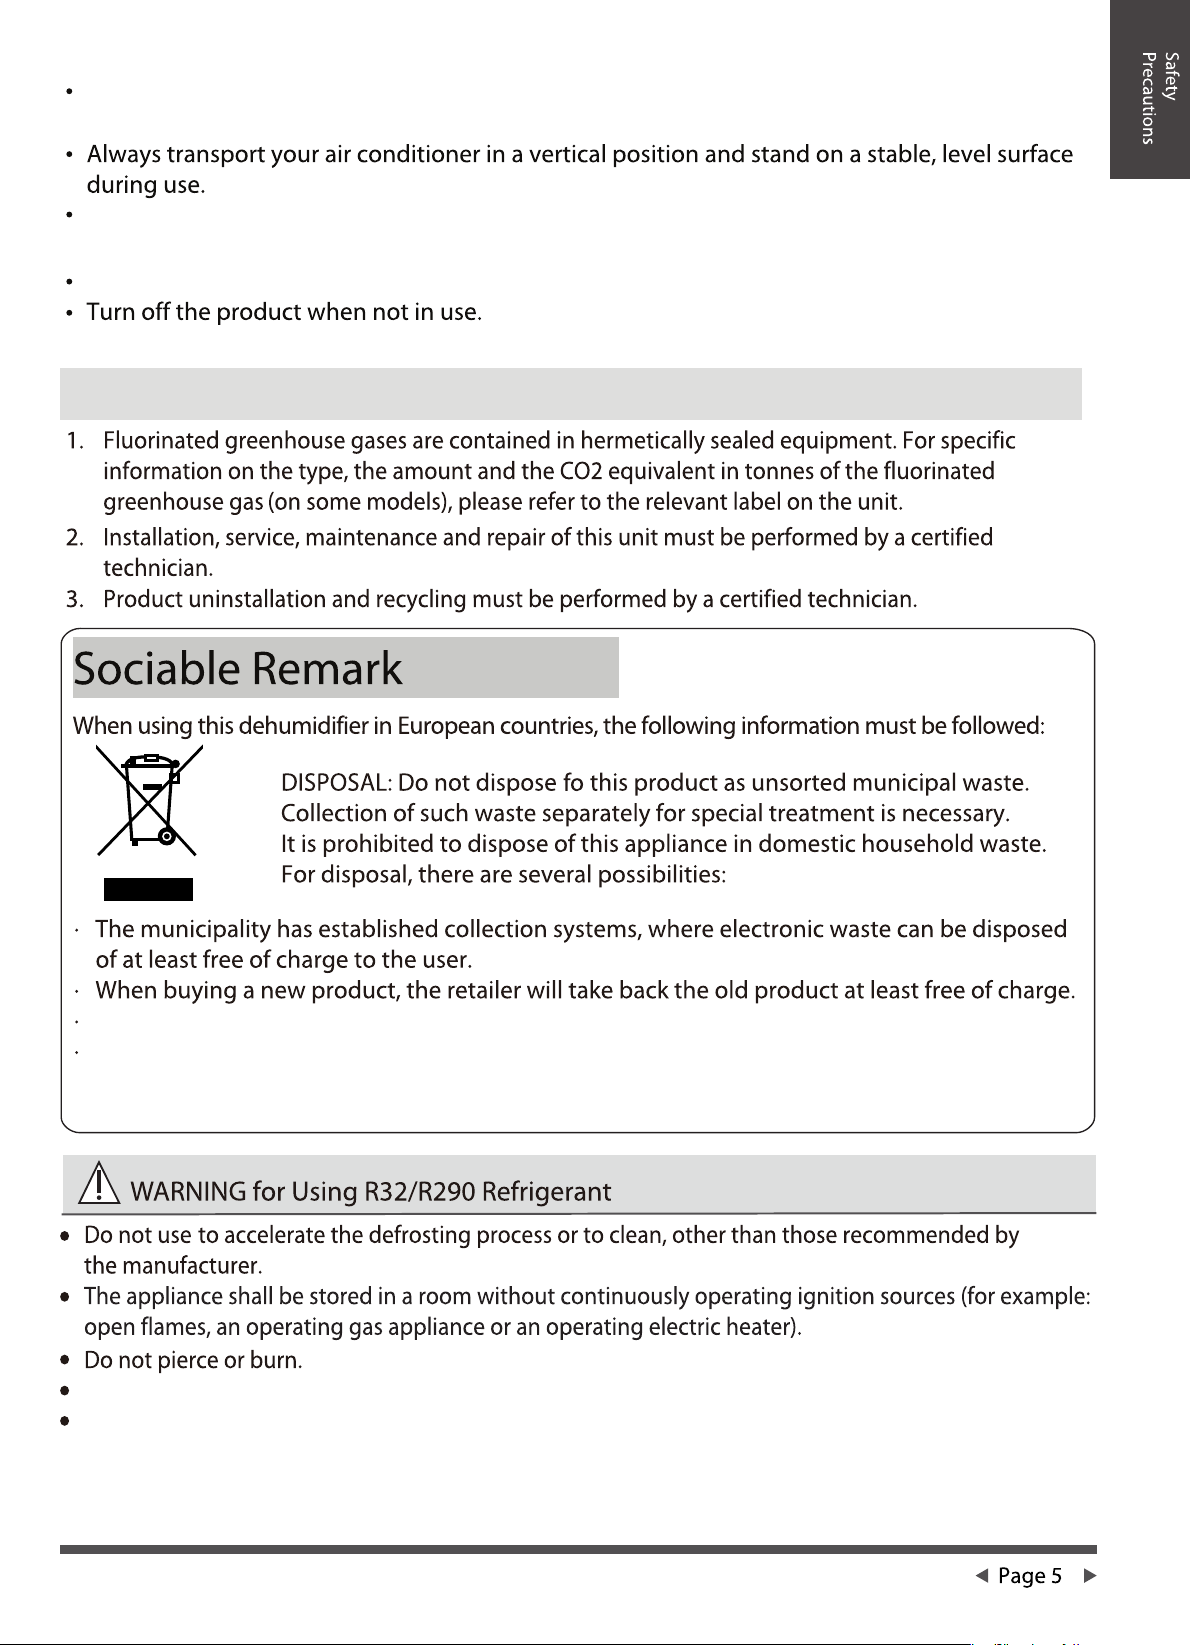
The manufacturer will take back the old appliance for disposal at least free of charge.
As old products contain valuable resources, they can be sold to scrap metal dealers. Wild
disposal of waste in forests and landscapes endangers your health when hazardous
substances leak into the groundwater and find their way into the food chain.
Be aware that the refrigerants may be odorless.
Appliance should be installed, operated and stored in a room with a floor area according to the amount
of refrigerant to be charged.For specific information on the type of gas and the amount,please refer
to the relevant label on the unit.When there are differences between the label and the manual on
the minimum.room area description,the description on the label shall prevail.

Amount Amount
Compliance with national gas regulations shall be observed. Keep ventilation openings clear of
obstruction.
Any person who is involved with working on or breaking into a refrigerant circuit should hold a valid
certificate from an industry-accredited assessment authority, which authorizes their competence
to handle refrigerants safely in accordance with an industry-recognized assessment specification.
Please follow the instruction carefully to handle, install, clear and service the air conditioner to avoid
any damage or hazard. Flammable refrigerant R32 is used within the air conditioner.When maintaining
or disposing of the air conditioner, the refrigerant (R32 or R290) shall be recovered properly to avoid
being directly discharged to the air.
No open fire or device/switch that could generate spark/arcing shall be around the air conditioner
to avoid igniting the flammable refrigerant Please follow the instruction carefully to store or maintain
the air conditioner to prevent mechanical damage.
Flammable refrigerant R32 is used in air conditioner. Please follow the instruction carefully to avoid
hazards.For specific information on the type of gas and the amount,please refer to the relevant
label on the unit.

Explanation of symbols displayed on the unit (for units that adopt R32/R290 refrigerant only):
This symbol shows that information, such as the operating manual or installation
manual,is available.
1.Transport of equipment containing flammable refrigerants
See transport regulations
2.Marking of equipment using signs
See local regulations
3.Disposal of equipment using flammable refrigerants
See national regulations.
4.Storage of equipment/appliances
The storage of equipment should be in accordance with the manufacturer's instructions.
5.Storage of packed (unsold) equipment
Storage package protection should be constructed such that mechanical damage to the equipment
inside the package will not cause a leak of the refrigerant charge.The maximum number of pieces of
equipment permitted to be stored together will be determined by local regulations.
6.Information on servicing
1) Checks to the area
Prior to beginning work on systems containing flammable refrigerants, safety checks are necessary to
ensure that the risk of ignition is minimized. For repair to the refrigerating system,the following
precautions shall be complied with prior to conducting work on the system.
2) Work procedure
Work shall be undertaken under a controlled procedure so as to minimize the risk of a flammable gas or
vapor being present while the work is being performed.
3) General work area
All maintenance staff and others working in the local area shall be instructed on the nature of work
being carried out.Work in confined spaces shall be avoided.The area around the workspace shall be
sectioned off.Ensure that the conditions within the area have been made safe by control of flammable
material.
4) Checking for presence of refrigerant
8) Checks to the refrigeration equipment
Where electrical components are being changed, they shall be fit for the purpose and to the correct
specification.The manufacturer's maintenance and service guidelines shall be followed at all times.
If in doubt, consult the manufacturer's technical department for assistance.The following checks shall
be applied to installations using flammable refrigerants:
Refrigeration pipe or components are installed in a way where they are unlikely to be exposed
to any substance which may corrode refrigerant containing components,unless the components are
constructed of materials that are inherently resistant to being corroded or are suitably protected
against being corroded.

like
recalibration
Storage
that
-
minimize
-
Labeling
When removing refrigerant from a system,either for servicing or decommissioning,it is recommended
that all refrigerants are removed safely.When transferring refrigerant into cylinders, ensure that only
appropriate refrigerant recovery cylinders are employed.Ensure that the correct number of cylinders
for holding the total system charge is available.All cylinders to be used are designated for the recovered
refrigerant and labeled for that refrigerant (i.e.special cylinders for the recovery of refrigerant).Cylinders
hall be complete with pressure relief valve and associated shutoff valves in good working order. Empty
recovery cylinders are evacuated and,if possible, cooled before
ensure
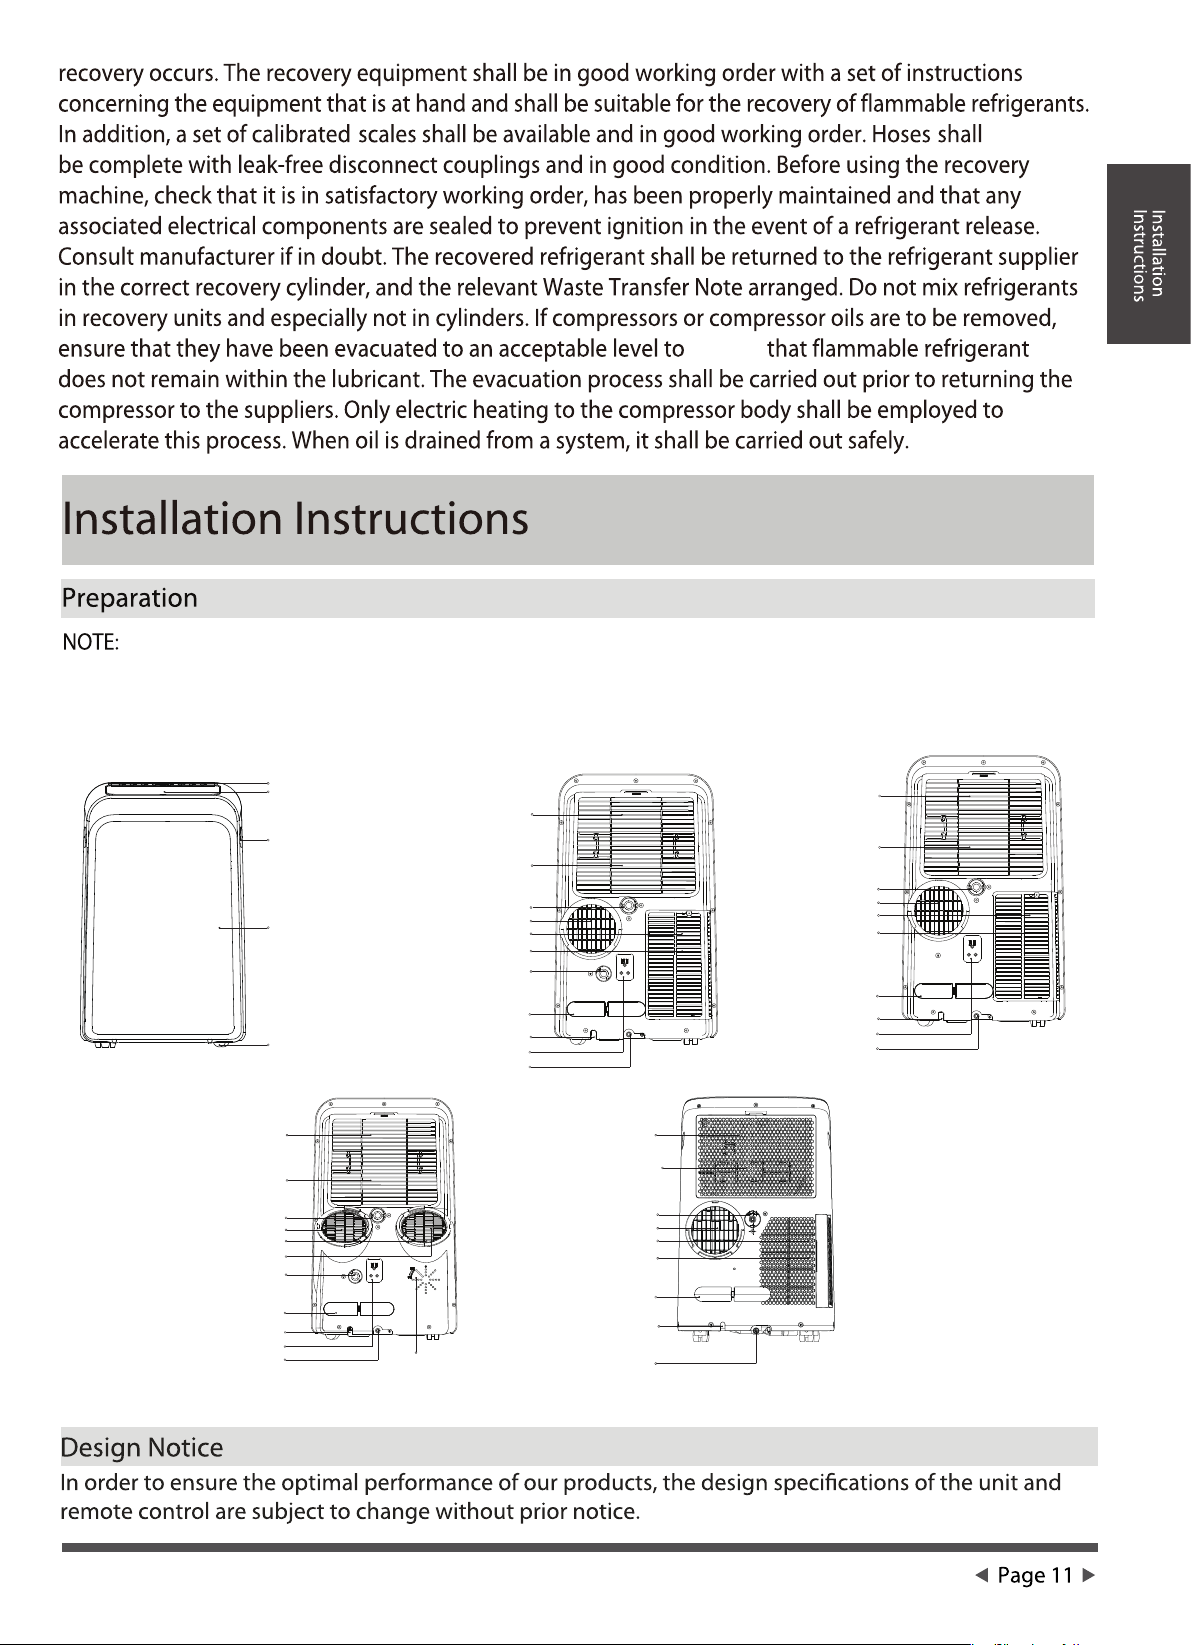
All the illustrations in the manual are for explanatory purposes only.Your machine may be slightly different.
The actual shape shall prevail.The unit can be controlled by the unit control panel or with the remote
controller.This manual does not include Remote Controller Operations,see the <<Remote Controller
Instruction>> packed with the unit for details.
Control panel
Horizontal louver blade
(Swing automatically) Upper air filter
(Behind the grille)
Upper air intake
Upper air filter
(Behind the grille)
Upper air intake
Drain outlet
Air outlet
Lower air filter
Lower air intake
Drain outlet
(Only for pump
Heating mode)
Power cord buckle
Power cord outlet
Power plug socket
Bottom tray
Drain outlet
Vent control
Upper air filter
Upper air intake
Drain outlet
Air outlet
Lower air filter
Lower air intake
Power cord buckle
Power cord outlet
Bottom tray
Drain outlet
Upper air filter
(Behind the grille)
Upper air intake
Drain outlet
Air outlet
Lower air filter
Lower air intake
Power cord buckle
Power cord outlet
Power plug socket
Bottom tray
Drain outlet Rear
Rear
Rear Rear
Drain outlet
Air outlet
Lower air filter
Lower air intake
Drain outlet
(Only for pump
Heating mode)
Power cord buckle
Power cord outlet
Power plug socket
Bottom tray
Drain outlet
Handle
(Both sides)
Panel
Caster
Front
Model A
Model B Model C
Model A1

Ambient Temperature Range for Unit Operation
The exhaust hose and adapter must be installed or removed in accordance with the usage mode. For
COOL, HEAT(heat pump type) or AUTO mode, the exhaust hose must be installed. For FAN, DRY or HEAT
(electrical heat type) mode, the exhaust hose must be removed.
The unit must be installed near a grounded plug,and the collection tray drain
(found on the back of the unit) must be accessible.
DO NOT cover the Intakes,outlets or remote signal receptor of the unit,as this
could cause damage to the unit.
The energy rating and noise information for this unit is based on the standard installation using an unextended
exhaust duct (Diameter:150mm,Length:1.5m) without window slider adapter or wall exhaust adapter A.
The unit with a 3m extended exhaust duct runs by using 2 exhaust ducts (Diameter:150mm, Length:1.5m
+ Diameter: 130mm,Length:1.5m).The energy rating and noise information for unit with a 3m extended
exhaust duct is not assessed (for some models).
We recommend that operating the unit at room temperature below 35°C .The reason is that there is a risk that
units with a 3m extended exhaust duct not work at room temperature above 35°C under some extreme
conditions,such as the lower air intake becoming 50% blocked.
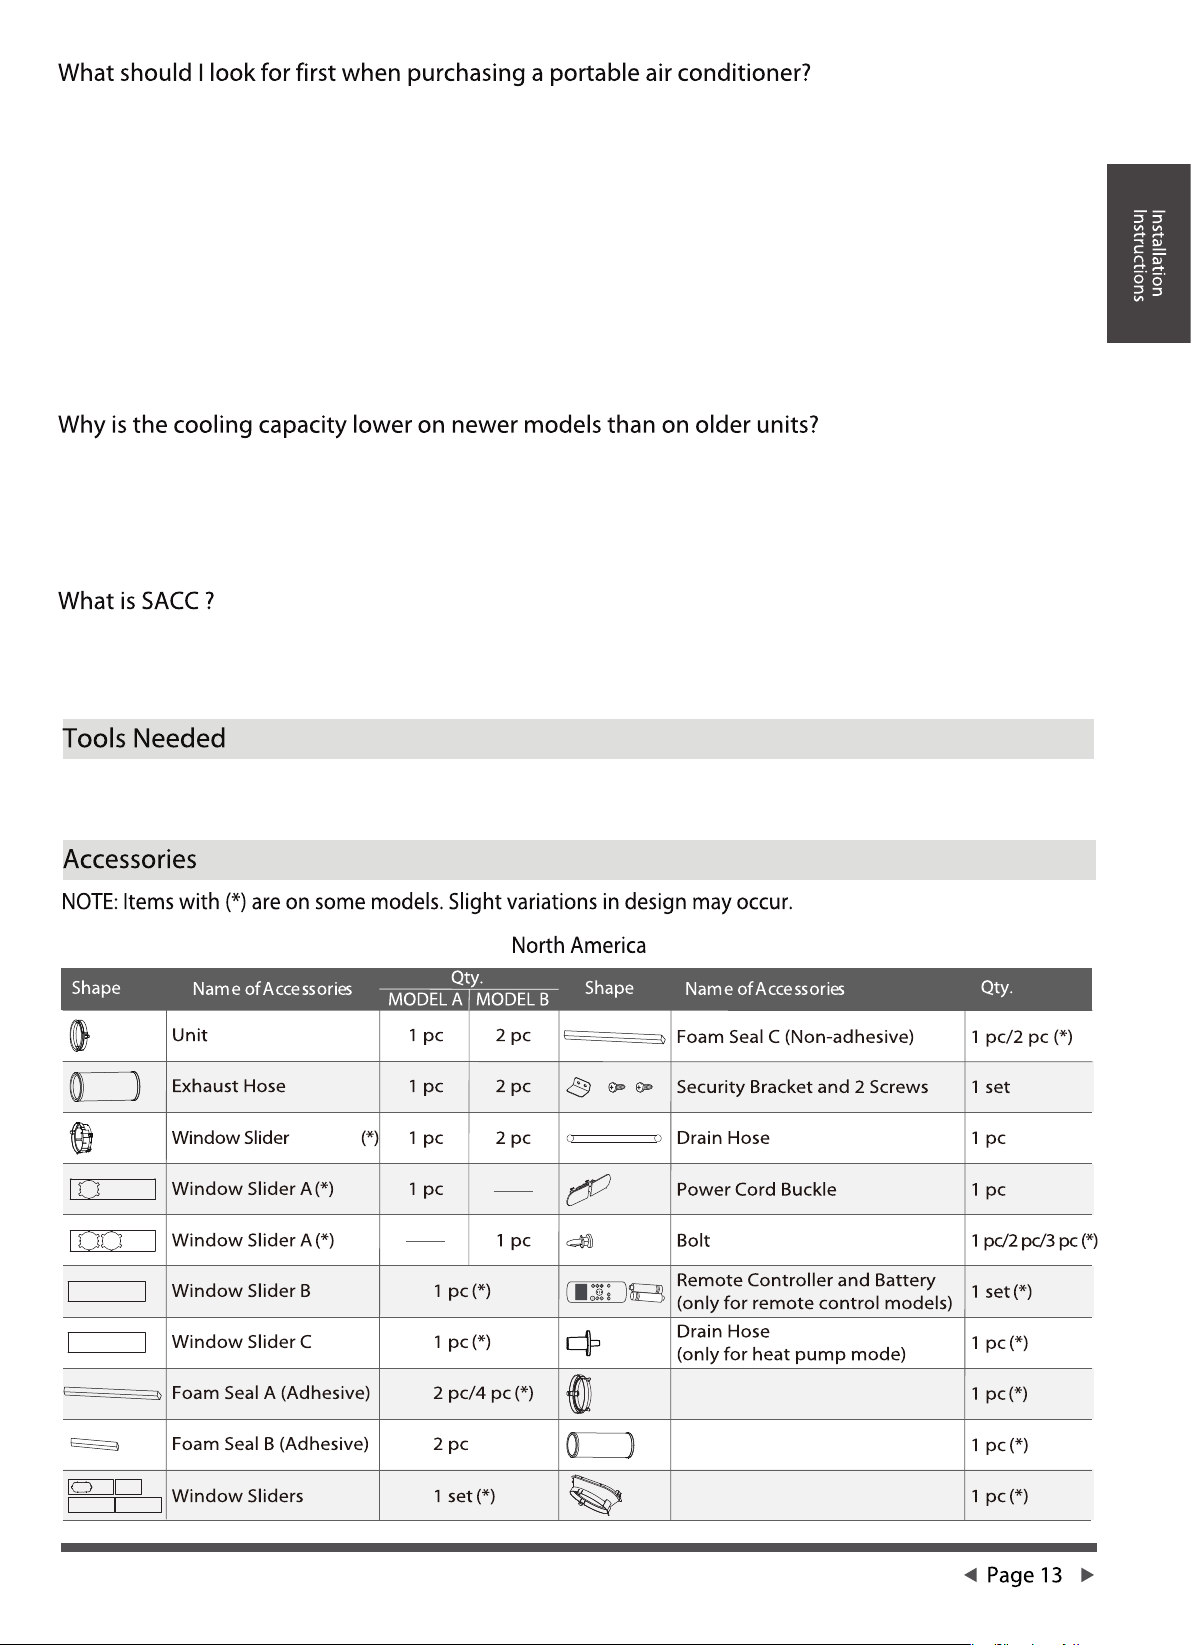
Because of a new federal test procedure for portable air conditioners, you may notice that the
cooling capacity claims on portable air conditioner packaging are significantly lower than that of
models produced prior to 2017.This is due to changes in the test procedure, not to the portable
air conditioners themselves.
How to Stay Cool with a New Portable Air Conditioner (for models that comply with the
requirements of the US Dept. of Energy)
The right air conditioner helps you cool a room efficiently. An undersized unit won't cool adequately,
while one that's too large will not remove enough humidity, leaving the air feeling damp.To find
the proper air conditioner, determine the square footage of the room you want to cool by
multiplying the room length by its width.You also need to know the air conditioner's BTU (British
Thermal Unit) rating, which indicates the amount of heat it can remove from a room. A higher
number means more cooling power for a larger room. Be sure you are comparing only newer
models as older models may appear to have a higher capacity, but are actually the
same. Be sure to“size up”if your portable air conditioner will be placed in a sunny room, in a
kitchen or in a room with high ceilings. After you’ve found the right cooling capacity for your
room, you can look at other features.
Federal regulations require manufacturers to calculate cooling capacity based on a specific test
procedure, which was changed this year. Models manufactured before 2017 were tested under
a different procedure and cooling capacity is measured differently for modern models than those
in prior years. So, while the BTUs may be lower, the actual cooling capacity of the air
conditioners has not changed.
SACC is the representative value of Seasonally Adjusted Cooling Capacity, in BTU/h, as determined
in accordance with the DOE test procedure at title 10 Code of Federal Regulations (CFR) 430,
subpart B, appendix CC and applicable sampling plans.
-Medium Philips screwdriver;Tape measure or ruler; Knife or scissors;
-Saw (to shorten window adapter on some models for narrow windows)
Adapter
Adapter
Adapter
Exhaust Hose Adapter
Extended Exhaust Hose
Air exhaust passage
Adapter
Adapter
Adapter
Adapter
adapter adapter
adapter
adapter adapter A
adapter
Adapter A
Adapter B
Extended Exhaust Hose
Extended Exhaust Passage
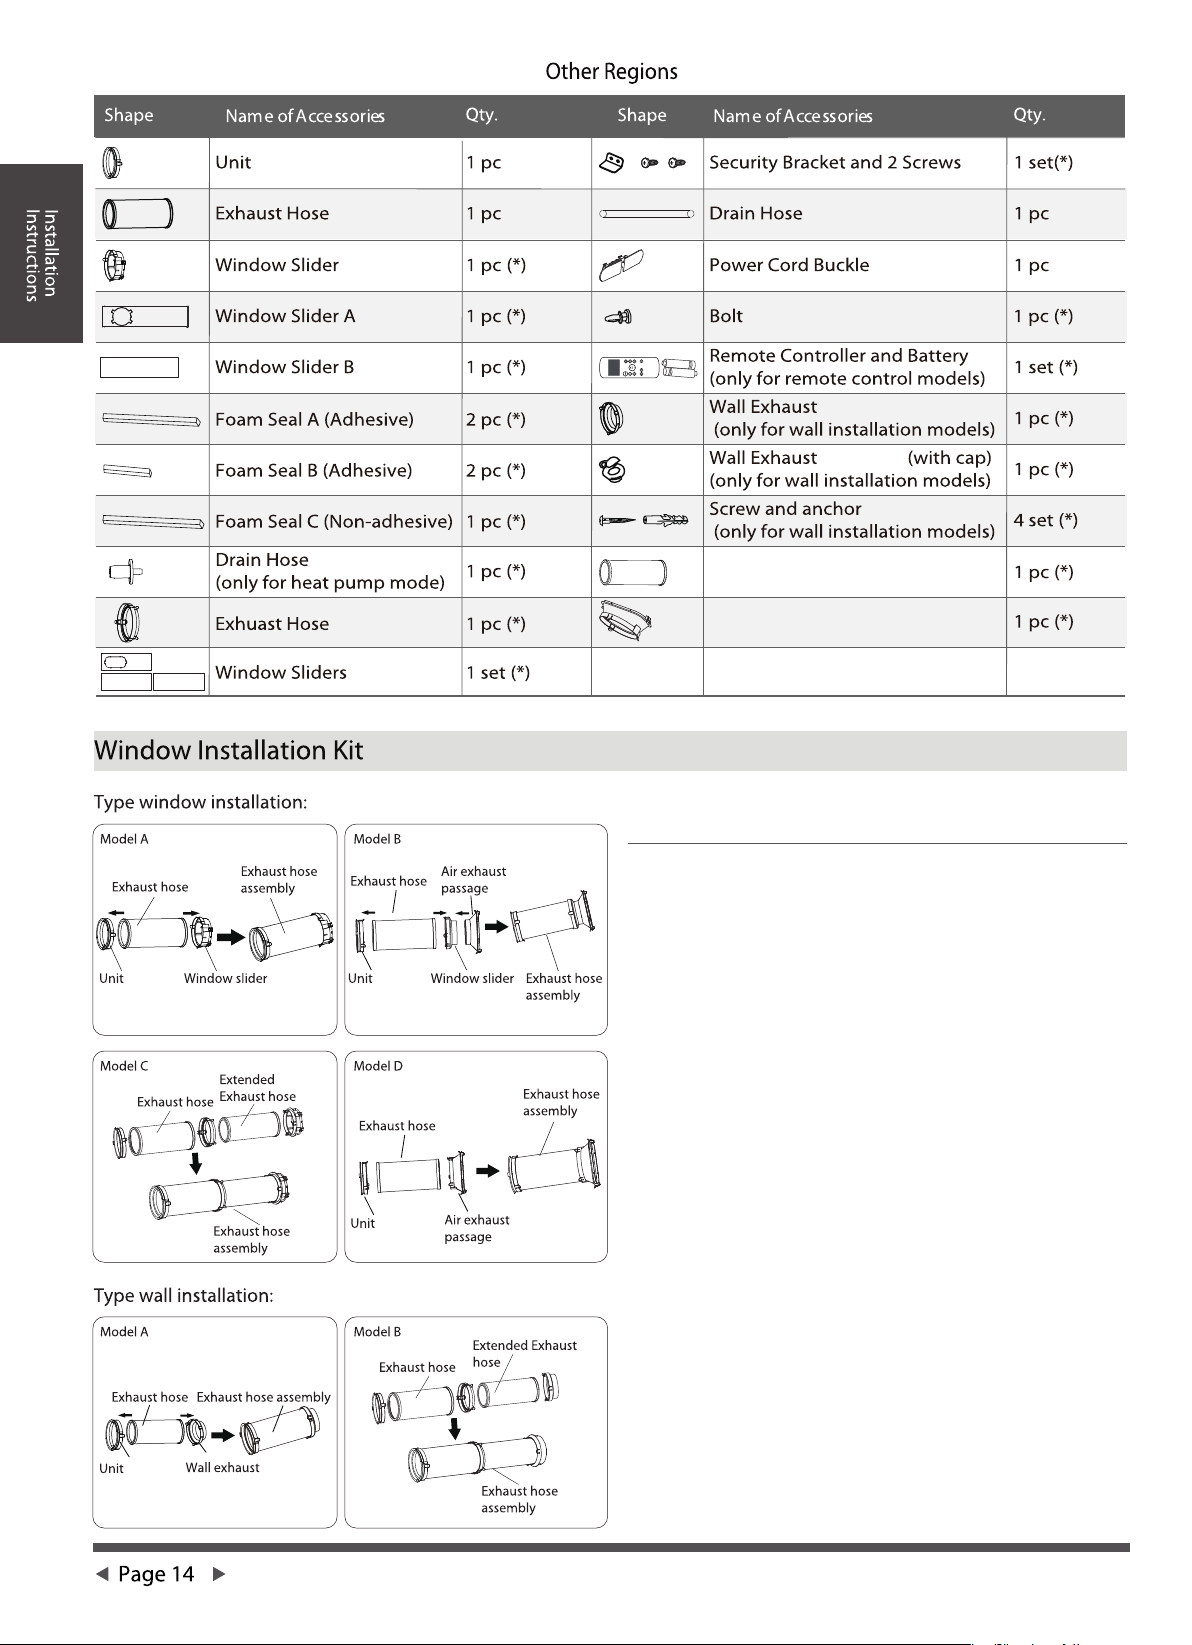
Step One: Preparing the Exhaust Hose Assembly
Press the exhaust hose (or extended exhaust hose)
into the window slider adapter (or wall exhaust
adapter) and unit adapter,clamp automatically by
elastic buckles of the adapters.
adapter

adapter
Adapter
Step Two: Install the Exhaust Hose Assembly to
the Unit.
Insert unit adapter of the Exhaust hose assembly
into the lower groove of the air outlet of the unit
while the hook of the adapter is aligned with the
hole seat of the air outlet.Slide down the exhaust
hose assembly along the arrow direction for
installation.
NOTE: Once the exhaust hose assembly and adjustable window slider are prepared,choose from one of
the following installation methods.

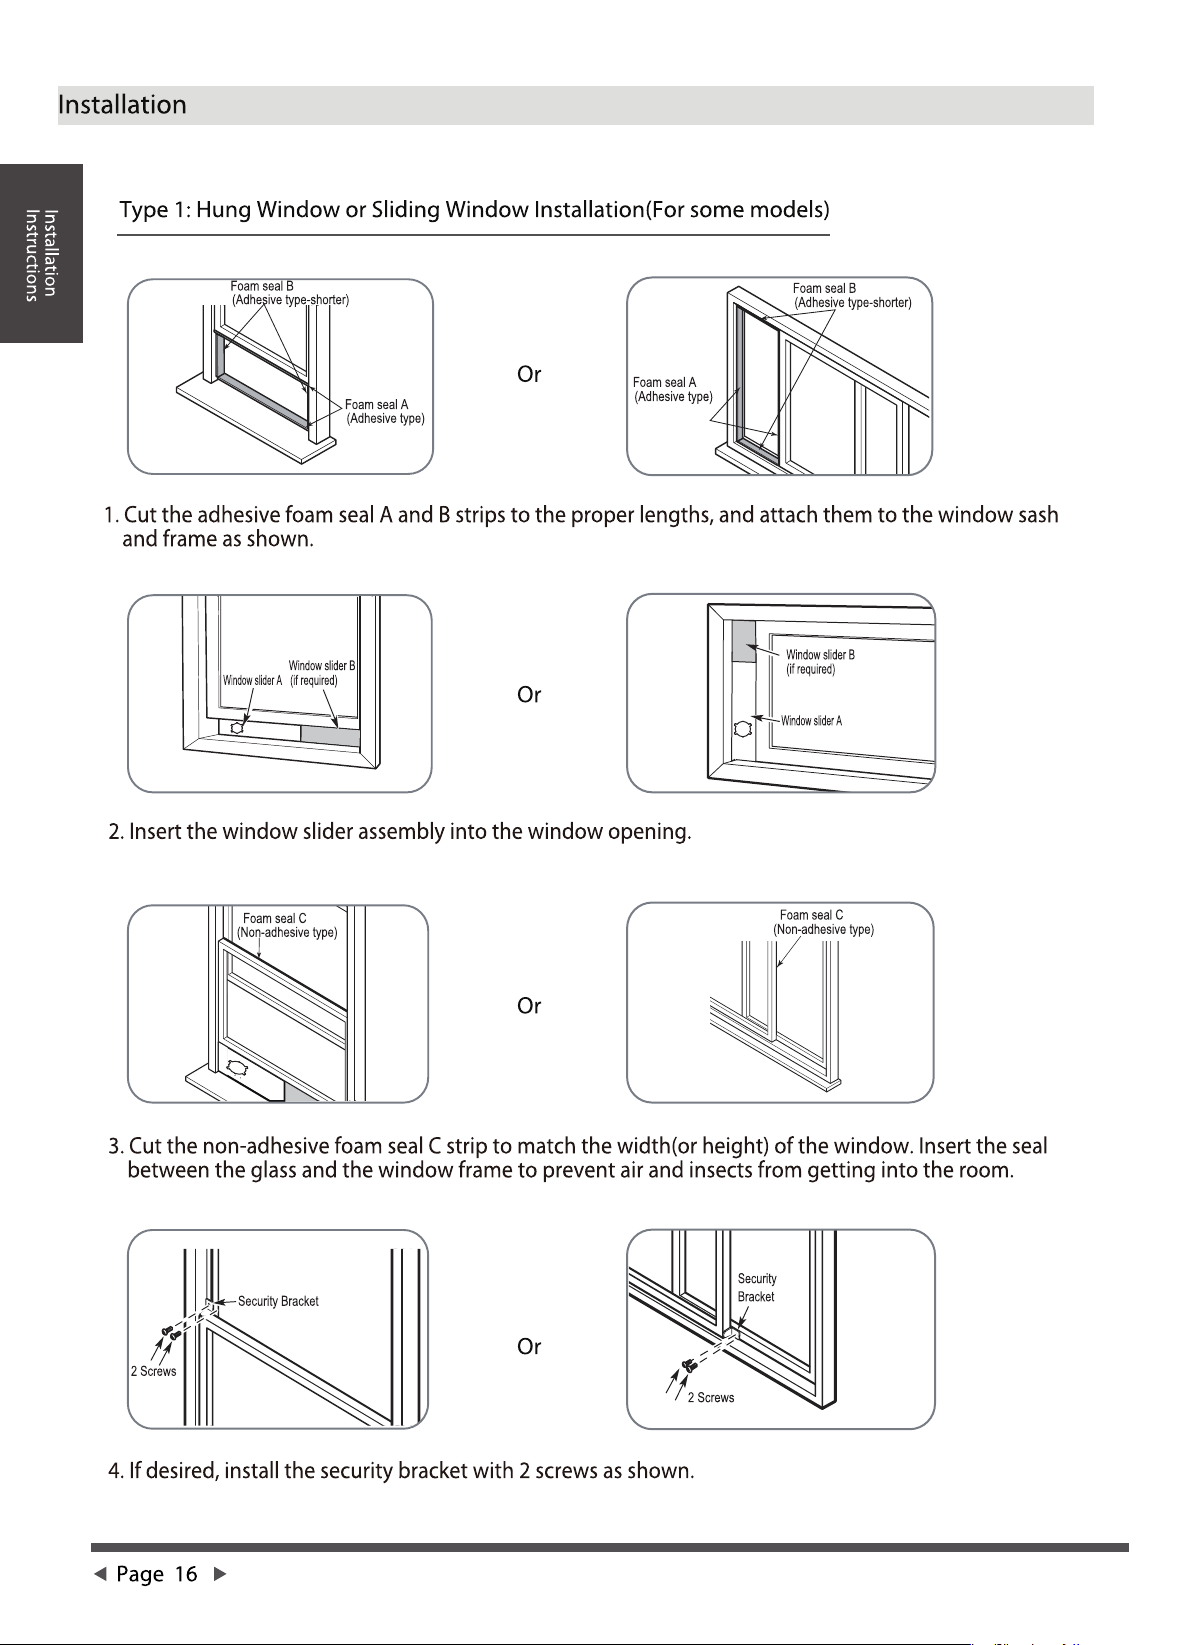
1. Cut a125mm (4.9inch) hole into the wall for the wall exhaust adapter B.
2. Secure the Wall Exhaust adapter B to the wall using the four anchors and screws provided in the kit.
3. Connect the exhaust hose assembly (with wall exhaust adapter A) to the Wall wall exhaust adapter B.
NOTE:To ensure properfunction,DO NOT overextend or bend the hose.Make sure that there is no obstacle
around the air outlet of the exhaust hose (in the range of 500mm) in order for the exhaust system to work
properly.All the illustrations in this manual are for explanatory purposes only.Your air conditioner may be
slightly different.The actual shape shall prevail.
The vent control is located at the back of the air
conditioner.The OPEN position removes stale air from
the room and exhausts it to the outside.Fresh air is
drawn in through normal passages in the home.When
not circulating the room air,set vent control to
CLOSE position.Thisfunction is only applicable for
MODEL B.
adapter
adapter
adapter
adapter
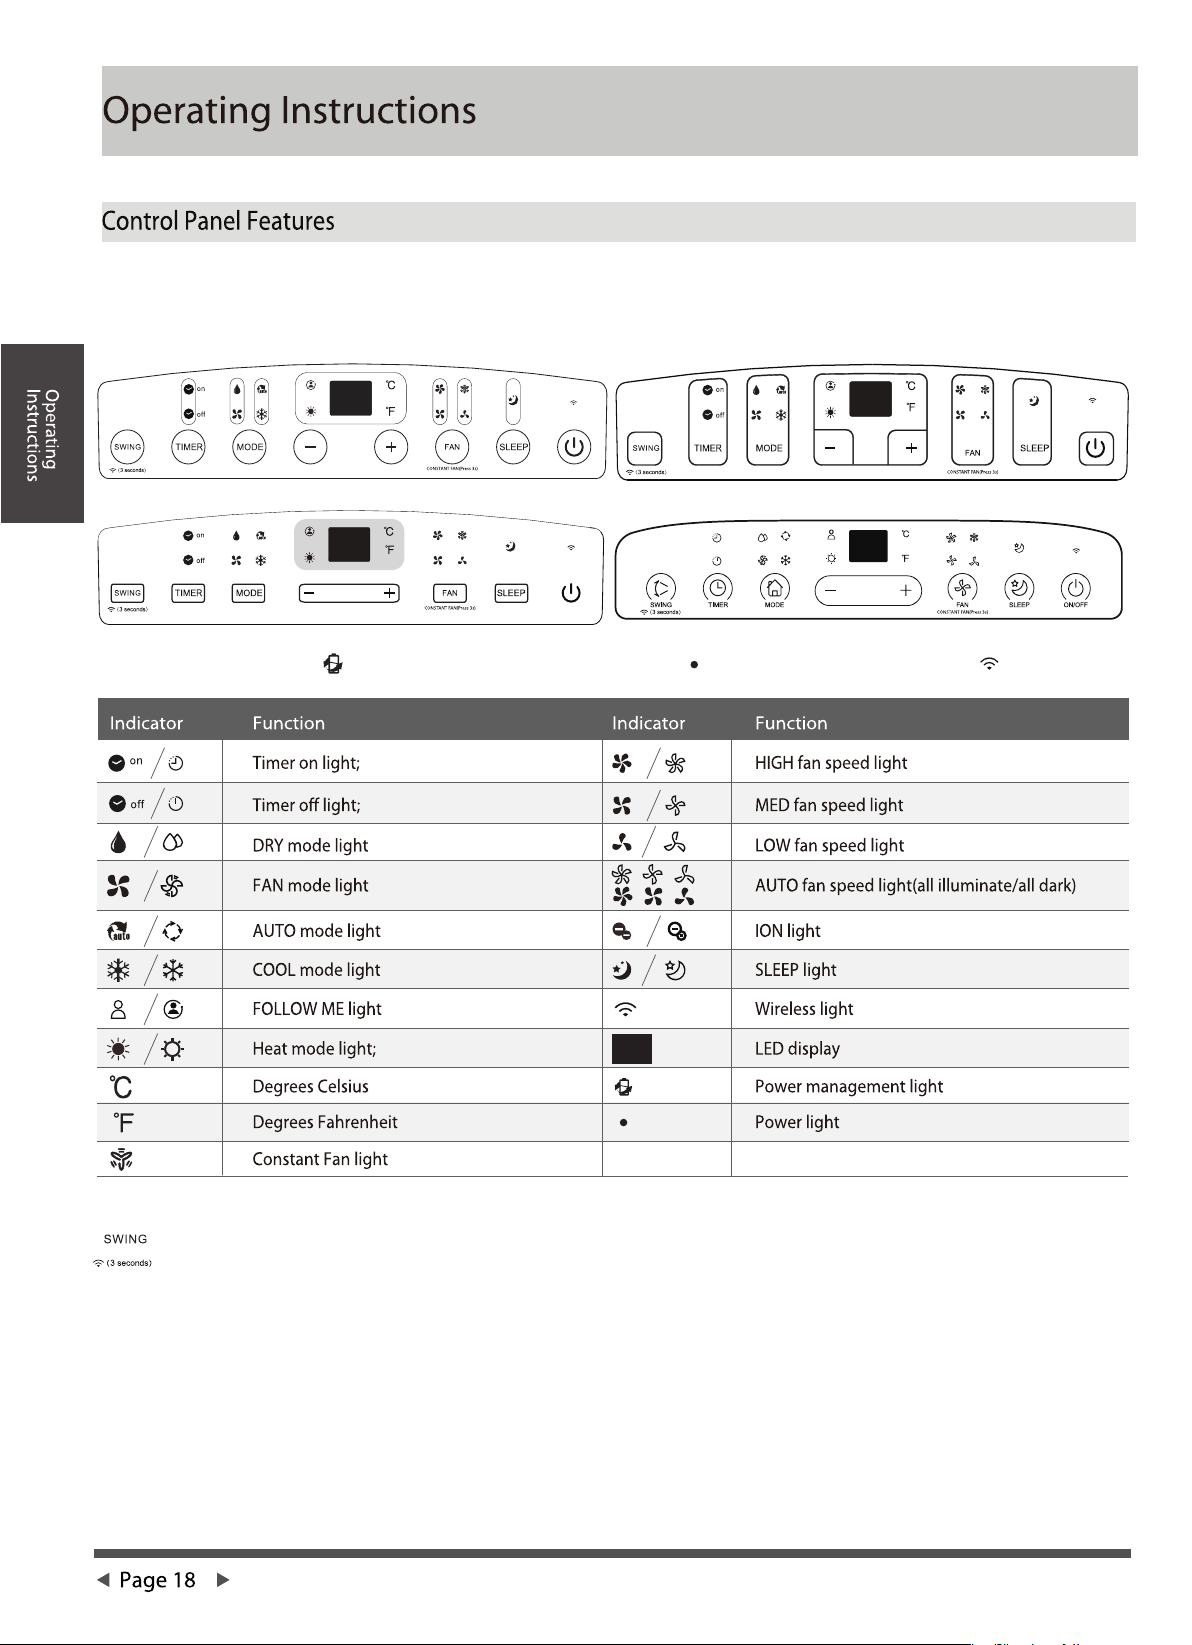
NOTE:The following control panel diagrams are for explanatory purposes only.The control panel of the unit you
purchased may be slightly different.Your machine may not contain some indicators or buttons.The actual shape
shall prevail.
NOTE:On some models, is used instead of °F.On some models, (power light) is used instead of (WIRELESS light).
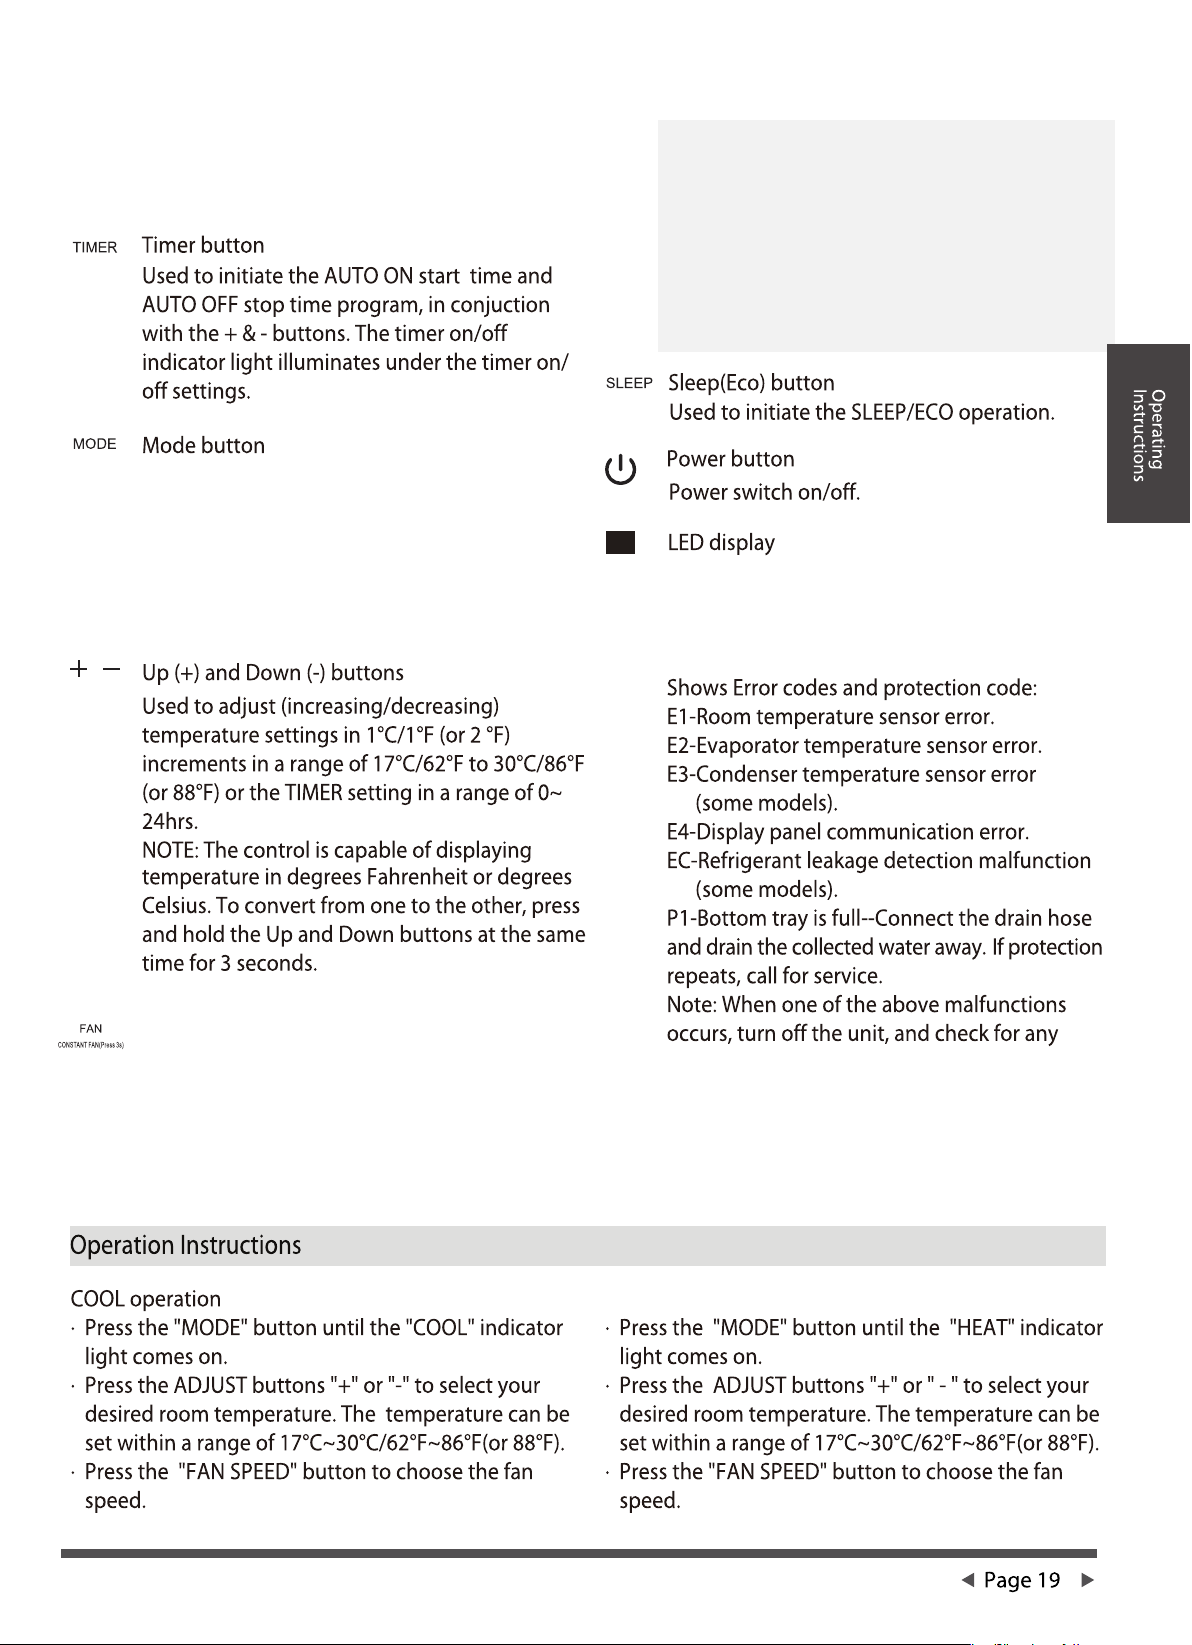
Swing/Wireless(On some models) Button
Used to initiate the Auto swing feature.When the
operation is ON,press the SWING button to stop
the louver at the desired angle.
Used to initiate the Wireless function.To use the
Wireless function for the first time,press and
hold the SWING button for 3 seconds to initiate
the Wireless connection mode.The LED DISPLAY
shows 'AP' to indicate you can set Wireless
connection.If connection(router) is successful
within 8 minutes,the unit will exit Wireless
connection mode automatically and the Wireless
indicator illuminates.If connection fails within 8
minutes,the unit exits Wireless connection mode
automatically.After Wireless connection is
successful,you can press and hold SWING and
DOWN (-) buttons at the same time for 3 seconds
to turn off Wireless function and the LED DISPLAY
shows 'OF' for 3 seconds. Press SWING and UP(+)
buttons at the same
time to turn on Wireless function and the LED
DISPLAY shows 'ON' for 3 seconds.
NOTE:When you restart the Wireless function,
it may take some time to connect to the
network automatically.
Selects the appropriate operating mode.Each
time you press the button,a mode is selected
in the following sequence: AUTO, COOL,
DRY,FAN and HEAT (cooling only models
without).The mode indicator light illuminates
under the different mode settings.
Fan/Constant fan(On some models) button
Controls the fan speed. Press to select the fan
speed in four steps-LOW, MED,HIGH and AUTO.
The fan speed indicator light illuminates under
different fan settings.Selecting AUTO fan
speed darkens all the fan indicator lights.On
some models,selecting AUTO fan speed
illuminates all the fan indicator lights
NOTE: In cooling or DRY mode,press the button
for 3 seconds to turn the constant fan function
on or off. When the function is turned on, the
constant fan light will illuminate, identifying
the fan's continuous run for cooling.When the
function is turned off, the constant fan light will
go out, identifying the fan cycle runs with
compressor stoppage.
Shows the set temperature in °C or °F("°F"
doesn't display for some models) and the
Auto-timer settings.While on DRY and FAN
modes,it shows the room temperature.
obstructions.Restart the unit.If the malfunction
is still present,turn off the unit and unplug the
power cord.Contact the manufacturer,its
service agents or a similarly qualified person for
service.
HEAT operation (not included with cooling only models)

in a
AUTO mode will automatically select cooling,
heating(cooling only models without) or fan
only operation depending on what temperature
you have selected and the room temperature.
The air conditioner will control room temperature
automatically based on the temperature point set
by you.
Do not put the duct in a window.
FOLLOW ME/TEMP SENSING feature (some models)
NOTE:This feature can only be activated from the
remote control.The remote control serves as a
remote thermostat
,
allowing for precise
temperature control at its location.
initiate the Auto-off stop program and illuminate the
TIMER OFF indicator light.Press the up or down
button to select the desired time.Press the TIMER
button again within 5 seconds to initiate the Auto-on
start program and illuminate the TIMER ON indicator
light.Press the up or down button to select the
desired Auto-on start time.
When the unit is off,press the Timer button to initiate
the Auto-on start program.Press it again within 5
seconds to initiate the Auto-off stop program.
Press or hold the up or down button to change the
Auto time in half-hour increments up to 10 hours,
then in 1-hour increments up to 24 hours.The
control will count down the time remaining until
start.
The system will automatically revert back to display
the previous temperature setting if there is no
operation in a 5-second period.
Turning the unit on or off at any time or adjusting
the timer setting to 0.0 will cancel the Auto Start/
Stop timer program.
Press this button to increase (cooling) or decrease
(heating) the selected temperature by 1°C/2°F (or
1°F) in 30 minutes.The temperature will then increase
(cooling) or decrease (heating) by another 1°C/2°F(or
1°F) after an additional 30 minutes.This new
temperature will be maintained for 7 hours before it
returns to the originally selected temperature.This
ends the Sleep/Eco mode and the unit will continue
to operate as originally programmed.
Other Features
To activate the Follow Me/Temp Sensing feature, point
the remote control at the unit and press the Follow Me/
Temp Sensing button.The remote control will send this
signal to the air conditioner until the Follow Me/Temp
Sensing button is pressed again.If the unit does not
receive the Follow Me/Temp Sensing signal during
any 7-minute interval,the unit will exit the Follow
Me/Temp Sensing mode.
If the unit breaks off unexpectedly due to the power
being cut,it will restart with the previous function
setting automatically when the power resumes.
This manual suits for next models
1
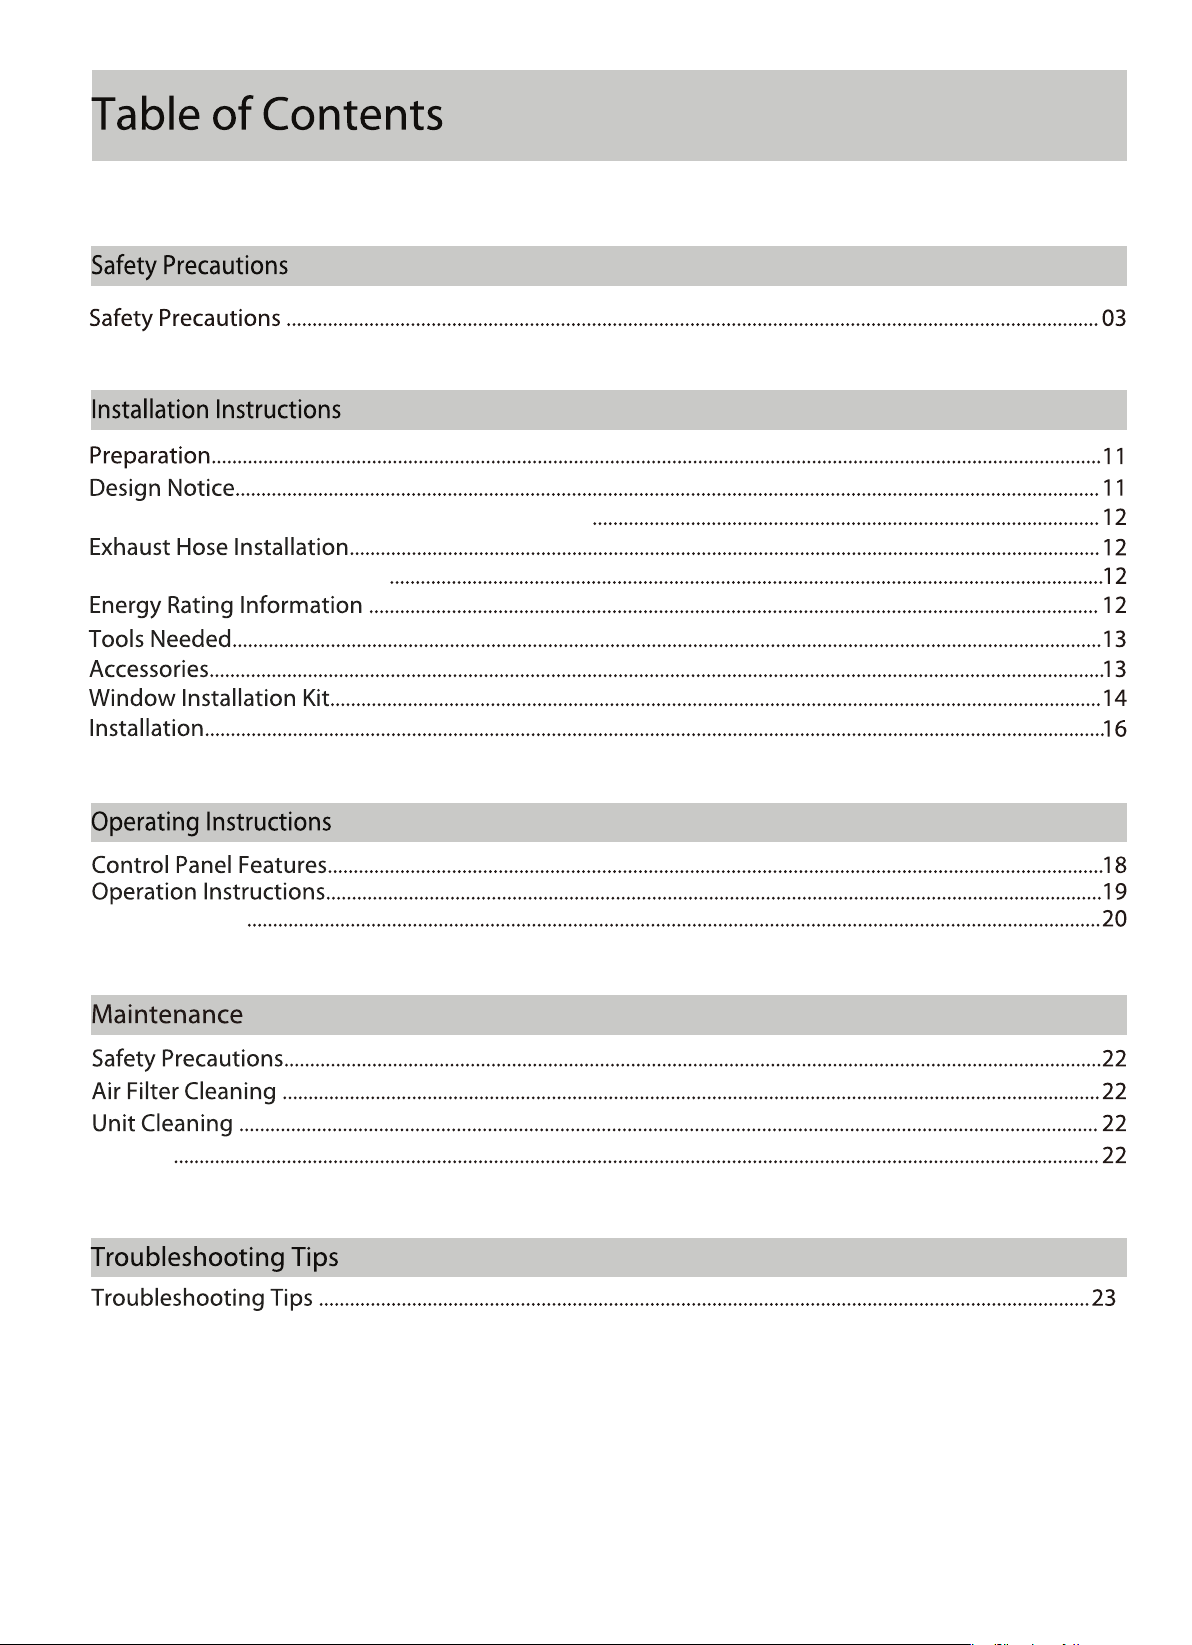
Table of contents
Other Garrison Air Conditioner manuals

Garrison
Garrison 311410571 User manual

Garrison
Garrison 043-5486-2 User manual

Garrison
Garrison 1028303 User manual

Garrison
Garrison 043-6127-2 User manual

Garrison
Garrison 5440 User manual

Garrison
Garrison 043-5488-8 User manual

Garrison
Garrison 2477821 User manual

Garrison
Garrison 043-5494-2 User manual

Garrison
Garrison 3554190 User manual


