Gen2wave RP70A BIO User manual
V1.1
RP70A BIO User's Guide
Gen2wave
This document is proprietary and confidential. No part of this document may be disclosed in
any manner to a third party without the prior written consent of Gen2wave

2
Copyrights
The products described in this document may include copyrighted computer programs. Laws in
countries preserve for certain exclusive rights for copyrighted computer programs. Accordingly,
any copyrighted computer programs contained in the products described in this document may
not be copied or reproduced in any manner without the express written permission.
© 2019 Gen2wave All Rights Reserved
No part of this document may be reproduced, transmitted, stored in a retrieval system, or
translated into any language or computer language, in any form or by any means, without
the prior written permission.
Furthermore, the purchase of our products shall not be deemed to grant either directly or
by implication, estoppel or otherwise, any license under the copyrights, patents or patent
applications, except for the normal non-exclusive, royalty-free license to use that arises
by operation of law in the sale of a product.
Disclaimer
Please note that certain features, facilities, and capabilities described in this document may not
be applicable to or licensed for use on a particular system, or may be dependent upon the
characteristics of a particular mobile subscriber unit or configuration of certain parameters.
Please refer to your contact for further information.
Trademarks
Gen2wave and the Gen2wave logo are registered trademarks of Gen2wave

3
Table of Contents
Copyrights ................................................................................................................................................ 2
1. Overview .............................................................................................................................................. 4
2. Getting Started .................................................................................................................................... 8
3. Basic Function ................................................................................................................................... 13
4. Applications ....................................................................................................................................... 19
5. Using the Scanner ............................................................................................................................. 22
6. Using the Camera ............................................................................................................................. 25
7. Using the MRZ/NFC/Smart Card ...................................................................................................... 27
8. Using the Fingerprint/Iris ................................................................................................................... 29
9. Wireless ............................................................................................................................................. 30
10. Settings ............................................................................................................................................ 39
4
1. Overview
1) Specifications
Perfomance
Characteristics
CPU Hexa core CPU
Cortex A72 Dual-core 1.8GHz, Cortex A53 Quad core 1.4Ghz
RAM 4GB
ROM 32GB (64GB / 128GB optional)
OS Android 8.1 Oreo
Integrated
Radios
Wireless WAN LTE, HSPA+
Wireless LAN IEEE 802.11 a/b/g/n/ac (2.4, 5GHz)
Bluetooth Bluetooth 4.2 BLE
GPS AGPS (GLONASS optional)
DATA CAPTURE Camera Front Camera : 2MP / Rear Camera : 13MP Auto Focus
LED Flash
1D/2D Imager 2D Imager (SW Decoder) : Zebra SE4710
RFID NXP PN548 HF 13.56MHz, Read Tag : 14443A/B, 15693
SAM 2 SAM Slot
OCR (MRZ) Font : OCR B
MRZ Lines : 1 line : IDL, CAN, etc
2 line : ID2 cards, ePP
3 line : eID
Fingerprint Module : BM-Slim 2 (Suprema)
Sensor Type : Optical Sensor
Sensing Area : 16.5mm(W) x 21.0mm(L)
Pixel Resolution : 500 ppi
Gray Scale : 256 level
Output Image Format : RAW, BMP, WSQ, ISO 19794-4
Format : FBI PIV certified, FBI Mobile ID FAP 20 certified
Contact Smart Card Contact type Smart Card Reader (gemalto) : ISO7816
Iris Recognition
(Opal)
Camera : 5MP B&W CMOS sensor
Operating Range : 320±0mm (11"~14")
Resolution : Above 160 pixel/cm
Iris Capture Volume : 130mm x 45mm x 80mm
Illumination : IR LED
Image : 2592 x 920 x 30 Frame
Physical
Characteristics
Demensions 213mm(H) x 195.3mm(W) x 30.55mm / 21mm : Minimum Thickness (D)
Weight 850g
Display 7.0Inch / HD(1280x800)
Display Visibility 700 nits (cd/m2)
Touchpannel Capacitive Touch / 10 point multi touch / Gorilla Glass 3
Keypad 3 Front Key / 5 Side Key (Programmable)
Battery Built in Battery : Li-Polymer, 3.7V, 10,050mAh
ExpansIon Slot MicroSDXC upto 2TB supported
Communication Tablet side : USB3.0 Host, USB2.0 Client(OTG)
Extension 10pin connector : Serial, USB2.0 Host
I/0 25pin connector : USB2.0 Host, HDMI, Serial, Ethernet (with cradle)

5
ETC Audio Dual Speaker, MIC
Jack DC jack, USB3.0 Host, USB2.0 Client, 3.5phi Ear-Mic Jack
IO connector POGO 25 pin (Power, RS232, USB 3port, HDMI, Ethernet)
Extention pin POGO 10 pin
LED Front 2 LED : Charging, Power
Sensor Acceleration Sensor, Compass, Ambient Light Sensor
Power DC Jack 5V / 5A Adaptor
Use time Stand-by time : > 150hr Working time : > 8hr
User Environment Operating Temp -20℃~ 50℃
torage Temp -30℃~ 70℃
umidity Non-condensing, 93%
Drop 1.2m
2) Package
NOTE: Items in the box may be changed according to the purchase order.

6
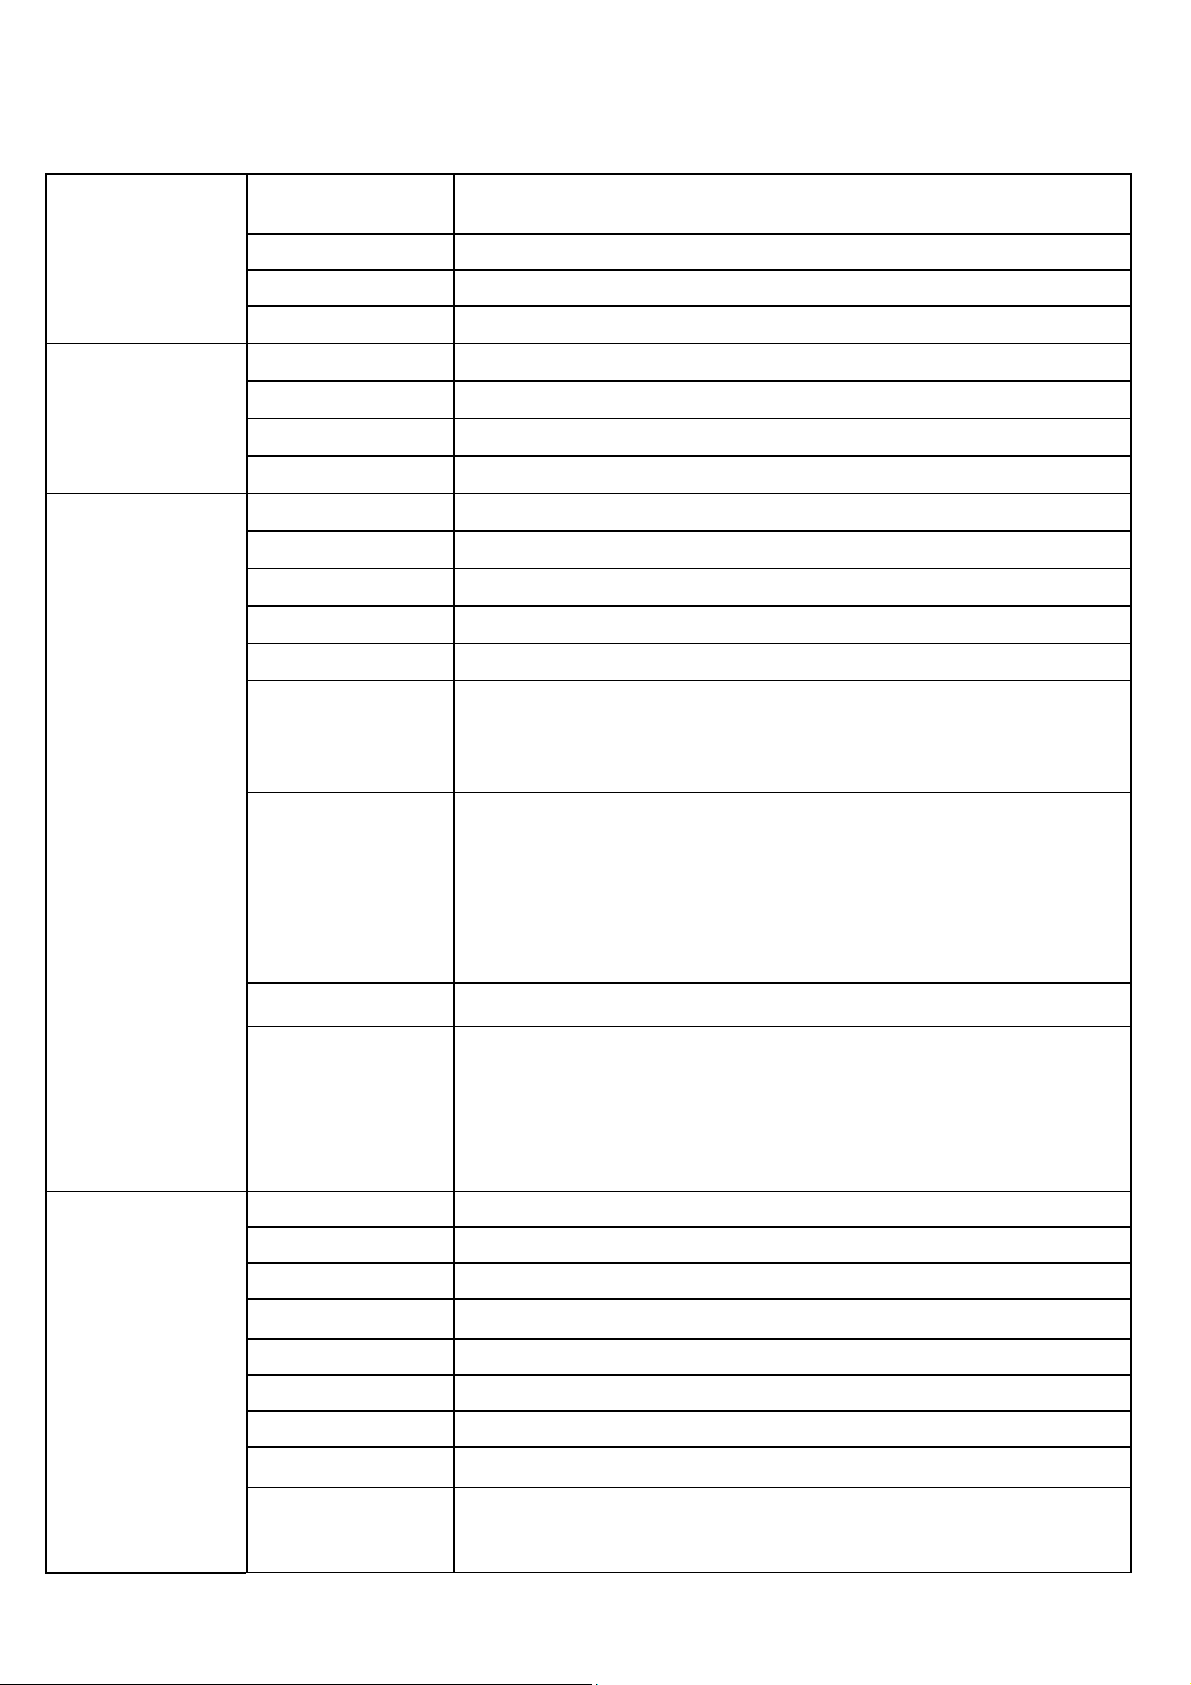
3) Device Features
7

8
2. Getting Started
1) Installing Cards
There are 4 slots to insert 1 micro SIM, 2 micro SAM and 1 micro SD cards in the back of your device.
A.
Micro SD card is required for external storage.
B.
Micro SIM card is required for using mobile services.
C.
Micro SAM card is required for security transactions that are made through your device.
IMPORTANT:
All cards should be purchased separately if necessary. The specifications
may differ from the countries where the device is purchased.
Contact your sales representative for more information.
A.
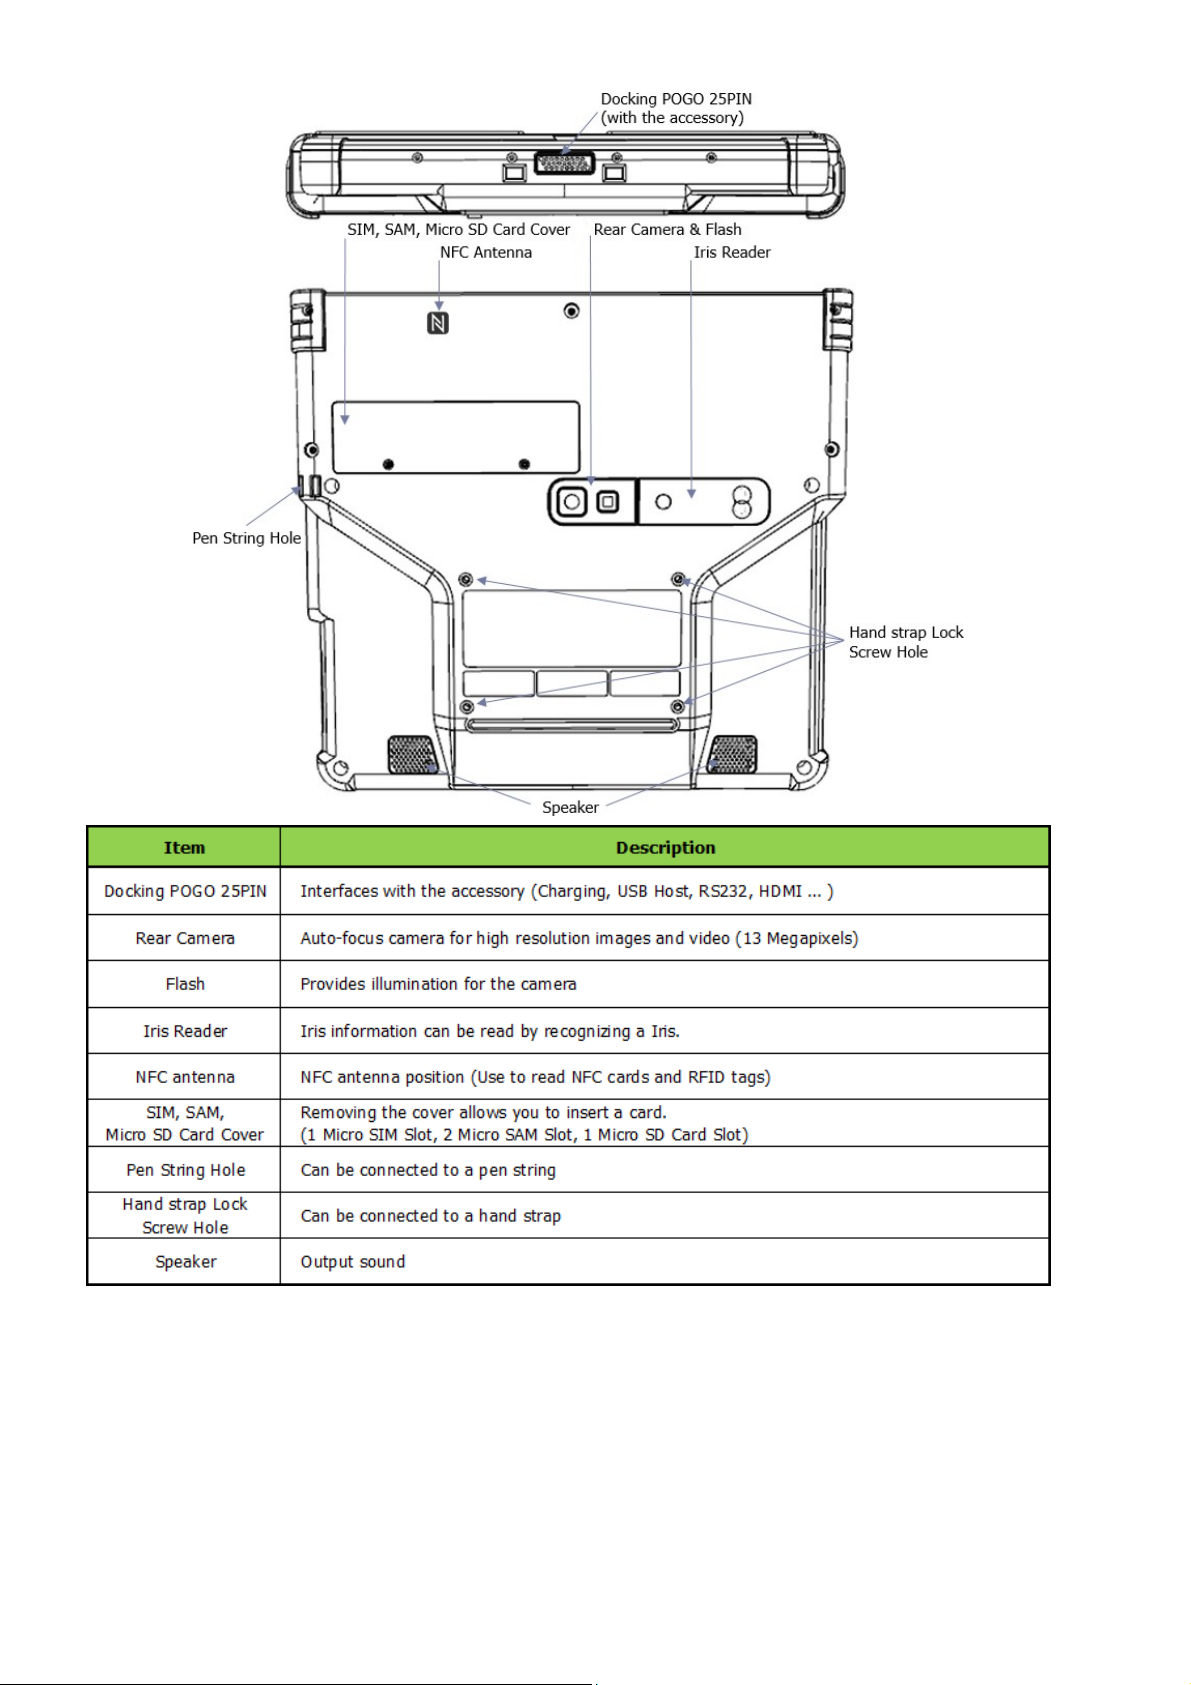
How to Insert SIM/SAM cards and a MicroSD card
(1) Remove the two screws on the SIM, SAM, Micro SD Card Cover. (Driver Plus Type)
(2) Slide the locker of “SIM, SAM or Micro SD cards” upwards until you hear a “click” sound and
then open the locker .
(3) Slide the “SIM, SAM or Micro SD cards” into the card slot as shown in the picture.
9
(4) Cover the locker and slide it downwards to lock it until when you hear a “click” sound.
(5) Put the cover on the RP70A BIO and tighten the screws.
B.
“SIM, SAM or Micro SD cards” can be removed in the reverse order.
Caution : If you install or change SIM card when device is turned on, you should reboot
the device afterward.
3) Charging the Device
Before using the RP70A device for the first time, charge the main battery until the green
Charging/Battery Status LED remains lit (see below picture for charge status indications).
To charge the device, use a cable or a cradle with the appropriate power supply.
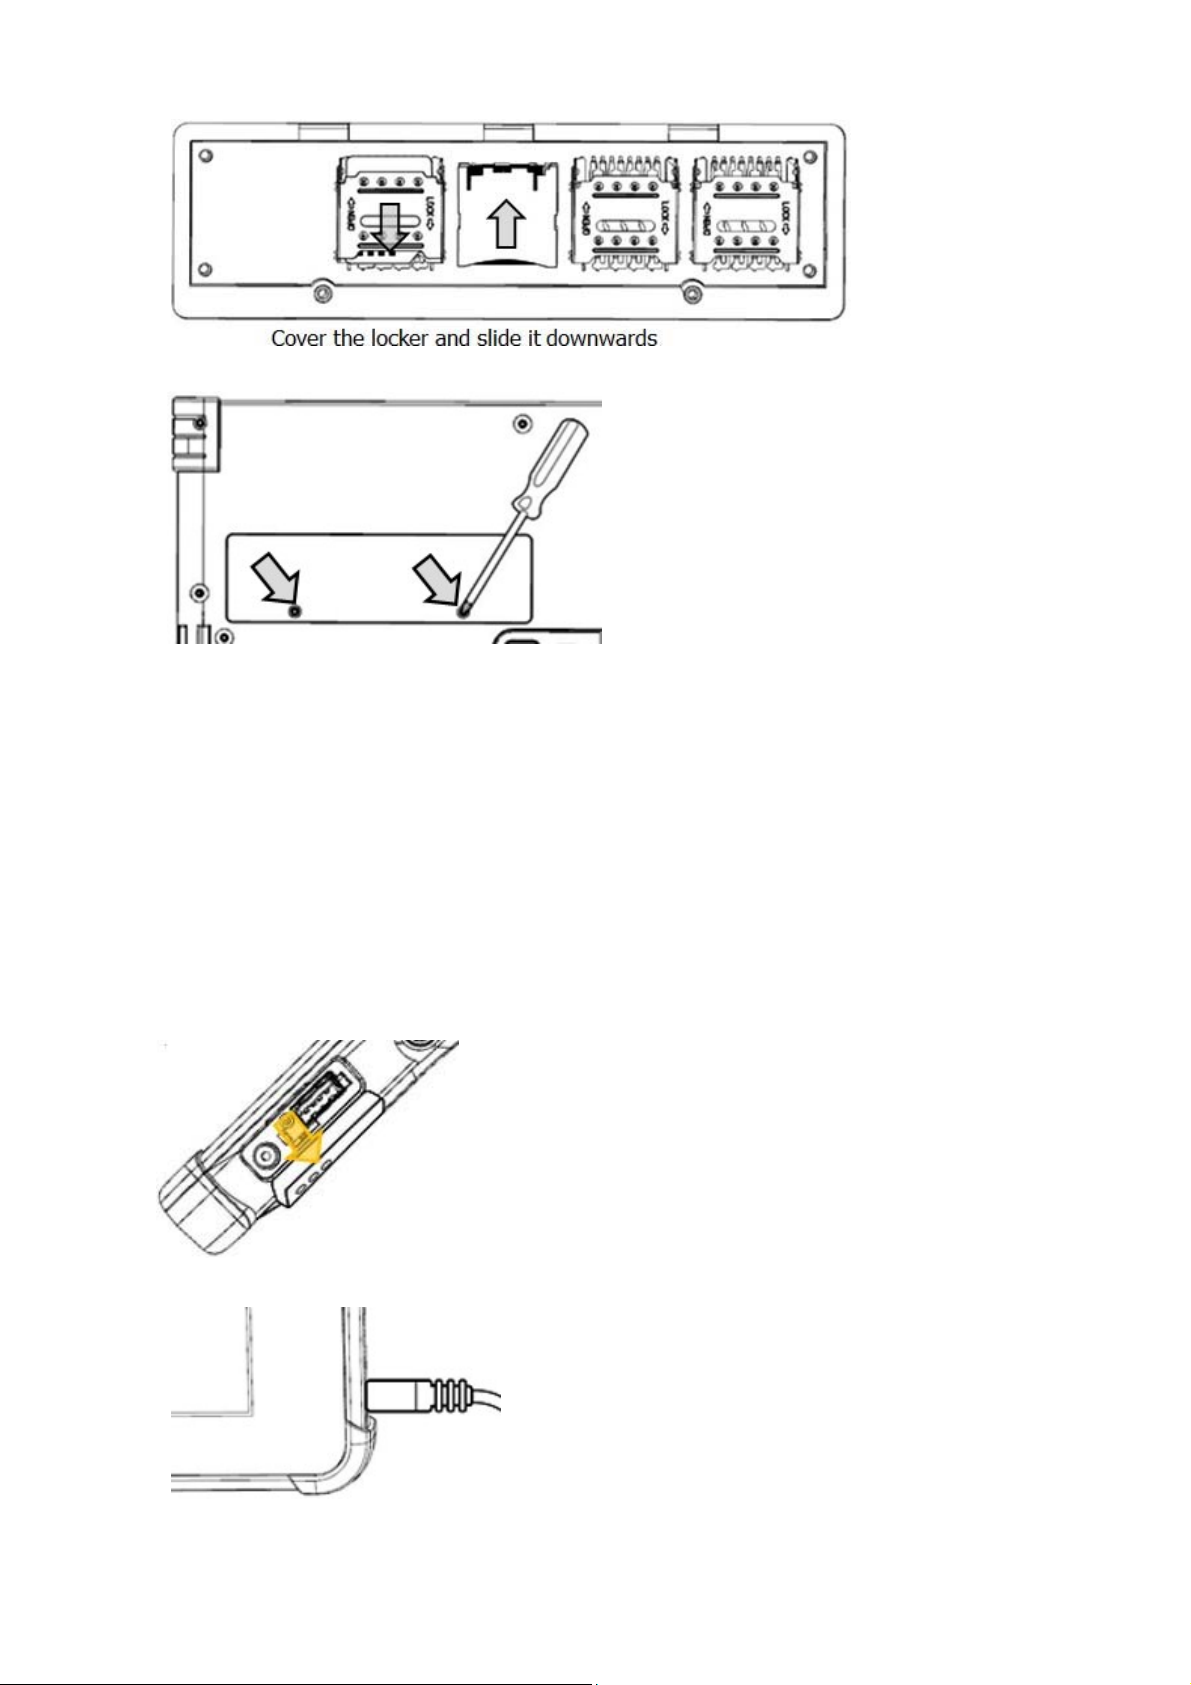
A.
To charge with the direct DC jack.
(1) Open the “USB & DC Jack” Cover.
(2) Insert the DC Jack in the DC Jack hole.

10
(3) Battery LED indicates as follows
OFF : Not Charging Red LED : Charging Green LED : Fully Charged
CAUTION
Do not use any other charger except one (5.0V / 5.0A) provide.
Make sure to handle it gentle; damage with excessive force may cause no warranty.
Risk of explosion if battery is replaced by an incorrect type. Dispose of used batteries according
to the instructions.
When attached battery is completely discharged, plug charger to main body, then reset the device to
check if screen is back on.
B.
To charge with the direct Micro USB.
(1) Use a USB charger to charge the terminal from a power outlet or connect the cable to a
high-power USB port to charge from a host device.
(2) Insert the micro 5pin jack in the micro 5pin hole.
(3) The Charging/Battery Status LED red while charging, then turns LED green when fully charged.
OFF : Not Charging Red LED : Charging Green LED : Fully Charged
CAUTION
Adapter voltage must be 5V and current is 2A or higher recommended.
Charging the battery though a USB port of PC or laptop, or using non recommended output adaptor
takes more time.
When you use the device for the first time or after not using for long period of time, please charge
enough time before using.
Even though you connect the charger, the device may not turn on in the very low voltage state.
Please charge the device for 30 minutes ~ 1 hour first.
The device will turn on automatically and the charge LED will turn on red.
4) Power
A.
Power on the Device
Press the Power button to turn on the device.
Android Logo appear on a screen, and the Power LED turns on after a short while.
Other manuals for RP70A BIO
1
Table of contents
Other Gen2wave Tablet manuals

Popular Tablet manuals by other brands

Laser
Laser MID-1060 Quick operation guide

MUNBYN
MUNBYN IRT09J Easy setup guide

Motorola
Motorola MC3090R - Win CE 5.0 Professional 520 MHz quick start guide

Dell
Dell Latitude ST Setup and features information

Lenovo
Lenovo IdeaTab S6000L Hardware Maintenance Manual

Venturer
Venturer WT9L11 quick start guide


