GENERAL RADIO COMPANY 1398-A User manual


OPERATING INSTRUCTIONS
Type
1396-A
PULSE
GENERATOR
Form
1398-0100A
ID-
1032
March,
1966
Copyright
1966
by
General Radio Company
West Concord, Massachusetts,
USA
GENERAL RADIO COMPANY
WEST CONCORD, MASSACHUSETTS, USA

TABLE OF CONTENTS
..............................................
Section
1
INTRODUCTION 1
.................................................
1.1 Purpose 1
.......................................
1.2 General Description 1
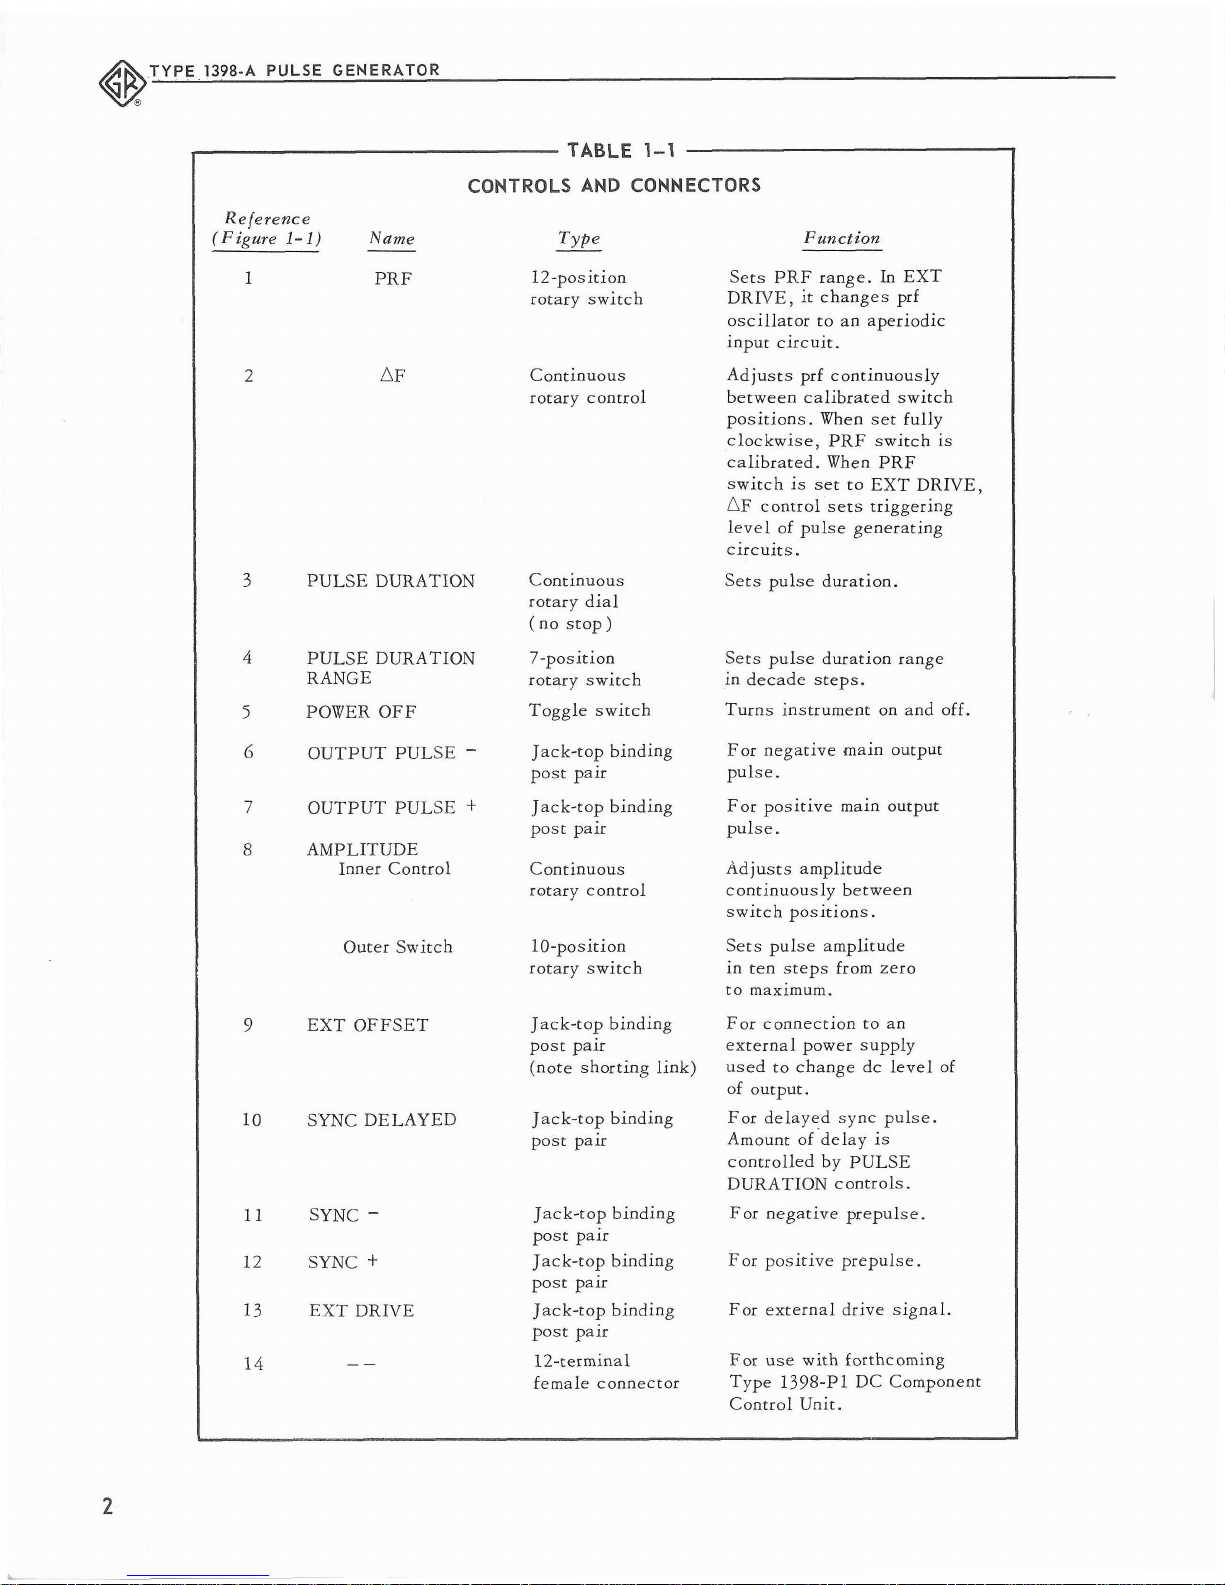
1.3 Controls and Connectors
...................................
1
.....................................
1.4 AccessoriesSupplied 1
....................................
1.5 Accessories Available 1
Section
2
INSTALLATION
..............................................
5
2.1 Cooling
.................................................
5
2.2 Power Supply
............................................
5
2.3 Rack Mounting
...........................................
5
.....................................
Section
3
OPERATING PROCEDURE
6
.......................................
3.1 Definition of Terms 6
..................................
3.2 Normal Internal Operation 7
3.3 Normal External Operation
.................................
7
...................................
3.4 PRF vs Pulse Duration
9
..............
3.5 Precautions for Very Long
or
Very Short Pulses
9
......................................
3.6 Rise and Fall Times 10
..............................
3.7 External Load Considerations 10
.....................
3.8 Output Dc Component
-
Dc Translation 11
.........................
3.9 Locking
on
High Frequency Signals 12
.....................................
3.10 Count-Down Operation 12
....................................
3.1
1
Single-Pulse Operation 12
..................................
3.12 Use
as
a
Delay Generator 12
................................
3.13 Use for Complex Waveforms 13
.................................
Section
4
PRINCIPLES OF OPERATION
14
.................................................
4.1 General 14
........
4.2 Input and PRF Oscillator Circuit
-
External Operation 14
........
4.3 Input and PRF Oscillator Circuit
-
Internal Operation 15
...........................
4.4 Output Pulse and Timing Circuits 16
............................................
4.5 Power Supply
19
................................
Section
5
SERVICE AND MAINTENANCE
20
.................................................
5.1 Warranty 20
...................................................
5.2 Service 20
.........................................
5.3 Removal of Cover 20
......................................
5.4 Routine Maintenance 20
....................................
5.5 Trouble-Shooting Notes 21
...............................................
5.6 Waveforms 23
.................................
5.7 Voltages .and Resistances 22
.....................................
5.8 Calibration Procedure 23
...............................................
Parts
Lists
and Schematics
28

SPECIFICATIONS
PULSE REPETITION FREQUENCY
Internally Generated:
2.5 c/s to 1.2 Mc/s, with calibrated points
in a 1-3 sequencefrom 10c/s to 300 kc/s, and 1.2Mc/s, all
+
5%.
Continuous coverage with an uncalibrated control.
Externally Controlled:
Aperiodic, dc to 2.4 Mc/s with 1-V, rms,
input (0.5V at 1 Mc/s and lower); input impedance at 0.5 V,
rms, approximately 100kD shunted by 50 pF. Output pulse is
started by negative-going input transition.
OUTPUT-PULSE CHARACTERISTICS
Duralion:
100ns to 1s in
7
decade ranges, +5y0 of reading or
+2y0of full scaleor
+
35 ns, whichever isgreater.
\\
Rise and Fall Times:
Less than 5 ns into 50 or 100
0;
typically
60 ns
+
2 ns/pF external load capacitance into
1
kD (60V).
Voltage:
Positive and negative 60-mA current pulses available
simultaneously. Dc coupled, dc component negative with respect
to ground. 60 V, peak, into 1-kD internal load impedance for
both negative and positive pulses. Output controlhas 10steps
plus continuous adjustment.
Overshoot:
Overshoot and noise in pulse, less than 10yoof ampli-
tude with correct termination.
Ramp-off:
Less than 1
%.
Synchronizing Pulses:
Prepulse:
Positive and negative
8-V,
approx, pulses of 150-ns
duration.
If
positive sync terminals are shorted. negative pulse
can be increased to approximately 50
V.
Sync-pulsesource impedance:
positive
-
approx 300 D;
negative
-
approx 1kD.
Delay-Sync Pulse:
Consists of a negative-going transition of
approximately 5 V and 100-ns duration, coincident with the late
edge of the main pulse. Duration control reads time between
prepulse and delayed syncpulse. Thisnegative transition is imme-
diately followed by a positive transition of approximately 5 V
and 150ns to reset theinputcircuits of afollowingpulse generator.
(See oscillogram.)
Stability:
With external-drive terminals short-circuited, prf jitter
and pulse-duration jitter are each 0.04~0.(Jitter figuresmay vary
somewhat with range switch settings, magnetic fields, etc.)
Power Required:
105 to 125, 195 to 235, or 210 to 250 V, 50 to
60 c/s, 90 W.
Accessories Available:
TYPE
1217-P2 Single-Pulse Trigger, rack-
adaptor panel.
MECHANICAL DATA
Convertible-Bench Cabinet.
Net
Weight
lb
kg
14Yz
1
7.0
Depth
in
mm
8%
1
210
Width
in
mm
12
1
305
Shipping
Weight
lb
kg
18
1
8.5
Height
in
mm
5%
1
135

INTRODUCTION
INTRODUCTION
1.1
PURPOSE.
The Type 1398-A Pulse Generator is a gen-
eral-purpose pulse source intended primarily for labora-
tory use. The repetition rates of the pulses may be
either internally controlled, at frequencies from 2.5 c/s
to 1.2 Mc/s, or externally controlled at frequencies up
to 2.4 Mc/s.
In addition to the main positive and negative out-
put pulses, the instrument also supplies synchronizing
pulses that correspond to the beginning and end of the
main pulse. The early sync pulse
(
prepulse )is intended
chiefly for synchronizing an oscil~oscopewhile the late
pulse (delay pulse
)
is intended to make the instrument
an accurate time-delay generator.
1.2
GENERAL DESCRIPTION.
The Type 1398-A comprises three main circuit
groups:
(1) A combination input circuit and oscillator that
establishes the repetition rate of the main pulse.
(2) A combination pulse-timing and output circuit
that establishes the duration and amplitude of the
main pulse.
(3) A power supply that provides regulated voltage
for the other two circuit groups.
The repetition frequency, duration, and amplitude
of the main output pulse are adjustable by front-panel
controls. Theinstrument, which
is
housed in a convert-
ible-bench cabinet, may be used as supplied as a
bench instrument or may be quickly and easily adapted
for use in a relay-rack. (Refer to paragraph 2.3.)
1.3
CONTROLS AND CONNECTORS.
See Figure
1-1
and Table
1-1
for the location and
the description of the controls and connectors used on
the Type 1398-A.
1.4
ACCESSORIES SUPPLIED.
One instruction book,form number 1398-0100.
One power cord, part number 4200-9622.
1.5
ACCESSORIES AVAILABLE.
Type 1217-P2 Single-PulseTrigger, catalognumber
1217-9602. Used to generate single pulses. See Figure
1-2 and paragraph 3.11.4 for further details.
Type 480-P312 Relay-Rack Adaptor Set, catalog
number 0480-9632. Used to rack-mount theType 1398-A.
Refer to paragraph 2.3 for further details.

,TYPEl398-A PULSE GENERATOR
[ABLE
1-1
S
AND CONN
Function
Sets PRF range. In EXT
DRIVE, it changes prf
oscillator to an aperiodic
input circuit.
Continuous Adjusts prf continuously
rotary control between calibrated switch
positions. When set fully
clockwise, PRF switch is
calibrated. When PRF
switch is set to EXT DRIVE,
flF
control sets triggering
level of pulse generating
circuits.
PULSE DURATION Continuous Sets pulse duration.
rotary dial
(no stop)
Sets pulse duration range
rotary switch in decade steps.
POWER OFF Toggle switch Turns instrument on and off.
OUTPUT PULSE
-
For negative main output
OUTPUT PULSE
+
Jack-top binding For positive main output
AMPLITUDE
Inner Control Continuous Adjusts amplitude
rotary control continuously between
switch positions.
Outer Switch 10-position Sets pulse amplitude
rotary switch in ten steps from zero
to maximum.
EXT OFFSET Jack-top binding For connection to an
post pair external power supply
10 SYNC DELAYED Jack-top binding For delayed sync pulse.
post pair Amount of delay
is
controlled by PULSE
DURATION controls.
11
SYNC
-
Jack-top binding For negative prepulse.
post pair
12 SYNC
+
Jack-top binding For positive prepulse.
post pair
13 EXT DRIVE Jack-top binding For external drive signal.
post pair
12-terminal For use with forthcoming
female connector Type 1398-P1 DC Component
Control Unit.

-
--
INTRODUCTION
Figure 1-1. Type 1398-A Pulse Generator.
Figure 1-2. Type 1217-P2
Single-Pulse Trigger.

@
TYPE 1398-A PULSE GENERATOR
RUBBER
FOOT
WlNG SCREW
LOCKWASHER
WlNG
Figure 2-1. Rack Mounting: Preparation
of instrument for attachment of wings.
Figure 2-2. Rack Mounting: Wing assembly.

SECTION
2
2.1 COOLING.
It
is
important that the interior of the instrument
be adequately ventilated; therefore make sure the air
holes in the cover, especially those on the right side,
are not blocked.
2.2 POWER SUPPLY.
Connect the pulse generator to a source of power
as indicated by the legend at the input socket at
the rear of the instrument, using the power cord pro-
vided. While normally connected for 115-volt operation,
the transformer input circuit
is
so arranged that one
can make the conversion from 115-volt to 215-volt
operation simply by throwing a switch located directly
below the input socket. To do this, unscrew the two
clamp fastners on the back of the instrument and slide
off the dust cover. Flip the switch over so that the
white indicator
is
on the
195-
235-volt side. The circuit
can also be adapted to accommodate a 230-volt line.
To do this, set the line voltage switch to the 195- to
233-volt position, and remove the two wires from ter-
minal 2L, which
is
on the same panel as the line volt-
age switch, and connect them to terminal 2. For instru-
ments changed to 215-volt or 230-volt operation, name-
plates (Type LAP166E5 for 215-volt operation, Type
LAP166E2 for 230-volt operation) may be ordered from
General Radio.
2.3
RACK
MOUNTING.
The pulse generator can be rack-mounted by
means of a Type 480-P312 Relay-Rack Adaptor Panel
Set (catalog number 0480-9632). The adaptor panels
are finished in charcoal gray crackle paint to match the
front panel of the instrument and come complete with
the necessary hardware to mount the instrument in the
rack. To make the installation, proceed as follows:
(a.) Remove the rubber feet. Retain the screws.
(b.) Remove and retain the screws that secure the
front panel to the aluminum end frames (see Figure
2-1).
(c.) Remove the spacers between the front panel and
the end frames.
(d.) Install two clips on each wing using lock wash-
ers and nuts provided (seeFigure 2-2).
(e.)
Attach the wings to the instrument with the front
panel screws removed in step b
(
see Figure 2-3
).
(f.) The assembly
is
now ready co be rack-mounted
in
a
standard 19-inch relay rack.

@
TYPE 1398-A PULSE GENERATOR
SECTION
3
OPERATING PROCEDURJE
3.1
DEFINITION OF TERMS.
main pulse..
...................
.The principal output of the instrument; available at the OUT-
PUT PULSE binding posts.
prepulse..
.....................
.The positive or negative sync pulse supplied just before the
start of the main pulse; available at the SYNC +and SYNC
-
binding posts.
delayed pulse
...................
The pulse coincidentwith the end of the mainpulse; available
at the DELAYED SYNC binding posts.
internal operation..
.............
The mode where pulse repetition frequency
is
determined by
the pulse generator itself and controlled by the
PRF
controls
on the front panel.
external operation
...............
The mode where pulse repetition frequency
is
determined by
an external signal source; the pulse generator generates
pulses only when triggered by signals applied to the EXT
DRIVE
binding posts.
duty ratio..
....................
.The ratio of pulse aonn time to the total time of the period
established by the prf setting; duty ratio, in percent
=
prf
x
duration
x
100.

-
--
OPERATING PROCEDURE
3.2
NORMAL INTERNAL OPERATION.
3.2.1 PRF ADJUSTMENT.
Pulse repetition frequency
is
adjusted by the
PRF controls (1 and 2, Figure 1-I), over a range of
2.5 c/s to 1.2 Mc/s. The PRF switch
is
calibrated to
indicate prf correctly only when the AF control
is
fully
clockwise. When the AF control
is
fully counterclock-
wise, the prf
is
lowered well below the next lower PRF
switch setting. The range of adjustment of the OF con-
trol
is
more than enough to span any one of the ranges
set by the PRF switch and thus affords continuous
coverage of the prf range of 2.5 c/s to 1.2 Mc/s. It
is
important to remember, however,that the only calibrated
frequencies are those indicated by the PRF switch
positions, and that these are accurate only when the AF
control
is
fully clockwise.
3.2.2 PULSE-DURATION ADJUSTMENT.
Duration of the main pulse
is
adjusted by the
PULSE DURATION controls (3 and 4, Figure 1-1).
The RANGE switch (4) selects one of seven decade
ranges and the range selected
is
covered by the PULSE
DURATION dial (3). This control consists of a knob
linked by
a
slow-motion drive to
a
dial that
is
calibrat-
ed from
1
to
11
in tenths of a unit. The overlap beyond
the decade span ensures continuous coverage of all
durations.
3.2.3 AMPLITUDE ADJUSTMENT.
Amplitude of the main pulse
is
adjusted by the
large AMPLITUDE switch, which varies the amplitude
from zero to maximum in ten steps, and by the small
amplitude control (concentric with the switch
)
which
facilitates continuous adjustment between steps. The
positions of the larger switch correspondstochanges in
in output impedance in 100-ohm steps.Thus a setting of
five indicates that the output impedance
is
about 500
ohms. When both controls are fully clockwise, the am-
plitude
is
60 volts and the output impedance
is
one
kilohm.
3.2.4 FAMILIARIZATION PROCEDURE.
The best way to become familiar with the pulse
generator
is
to connect it to an oscilloscope and watch
the pulses themselves. The procedure
is
as follows:
a. Connect the OUTPUT PULSE
t
binding post to
the oscilloscope vertical input by means of open
leads or a probe.
b. Connect the SYNC +binding post to the oscillo-
scope sync or trigger input.
c. Connect any of the ground binding posts to the
oscilloscope ground.
d. Be sure that the link across the EXT OFFSET
binding post
is
firmly connected to both posts.
e. Adjust the oscilloscope trigger controls to trigger
on the %volt, 100-ns, positive prepulse of theType
1398-A.
f. Set the oscilloscope sweep rate controls for a
2-ms/div sweep rate.
g.
Set the oscilloscope vertical gain controls for
about 40 volts/cm sensitivity.
h. Set the PRF switch to
1
kc/s.
i.
Set the AF control fully clockwise.
j.
Set the PULSE DURATION dial to 5.
k. Set the PULSE DURATION RANGE switch to
100
ps-1
ms.
1. Set the AMPLITUDE control fully clockwise.
The oscilloscope should now display a 1-kc
square-wave from the pulse generator. Use the PULSE
DURATION dial toshorten and tolengthen thepulse and
then set the PULSE DURATION RANGE switch to the
next lowerrange Decrease theprf first by turning the OF
control counterclockwise and then by setting the PRF
switch to the next lower position. Adjust the oscillo-
scope sweeprate control tokeep both thepulse duration
and frequency under observation. Todecrease pulse am-
plitude, turn the AMPLITUDE control counterclockwise.
If the oscilloscope has a dc-coupled vertical am-
plifier, set it for dc, disconnect the pulse, and estab-
lish the ground reference trace. Now reconnect the pos-
itive main pulse and vary its amplitude. Then move the
connector from the
+
OUTPUT PULSE to the
-
OUT-
PUT PULSEbinding post and vary the amplitude again.
Note that the pulse contains a dc component that
is
negative with respect to ground. The positive pulse
starts from -60 volts and rises to ground during
its
active interval. The negative pulse starts from ground
and fal!s to -60 volts during its active interval.
If, during any of the above procedures, the pulse
is
defective or the pattern becomes confused, check to
make sure that the pulse duration has not been made
too long for the pulse repetition frequency and that an
oscilloscope with a dc-coupled vertical amplifier
is
used to observe pulses of very long duration.
3.3
NORMAL EXTERNAL OPERATION.
3.3.1 DRIVING-SIGNAL REQUIREMENTS.
TheType 1398-Awill produce externally triggered
pulses at frequencies from dc to 2.4 Mc/s. The driving
signal should be applied to the EXT DRIVE terminals,
and should be at least
0.5
volt,rms, up to 500 kc/s and
at least
1
volt,rms, from 500 kc/s to 2.4
MC/S.
Exces-
sive driving voltages at frequencies above 1.5 Mc/s
may overload the triggering circuits. If the unit fails to
trigger, reduce the driving voltage. With optimum driving
voltage the unit will trigger to frequencies typically as
high as 2.5 Mc/s.

@
TYPE
1398-A
PULSE GENERATOR
Figure
3-1.
Typical
sensitivity-vs-frequency
characteristics.
3.3.2
EXTERNAL DRIVE PROCEDURE.
For external operation, set the PRF switch to
EXT DRIVE and apply the external driving signal to
the EXT DRIVE binding posts. The AF control now be-
comes a triggering level adjustment; the input circuits
are set for maximum sensitivity when this control is
centered.
The input circuit is dc-coupled, and the pulse
generator will operate from pulses at any low frequency
desired. The input signal must therefore either be at a
dc potential close to ground or be ac-coupled, with an
external blocking capacitor.
3.3.3
OPERATION WITH OSCILLOSCOPE.
trigger, adjust the AF control until triggering is re-
established. When no further adjustment of the
AF
control will re-establish triggering, the triggering
threshold has been reached (this should be at about
0.3 volt, p-to-p, to 1 kc/s
).
A plot of typical sensi-
tivity
is
given in Figure 3.1.
g. Reset the generator amplitude to 1 volt, rms. If
possible, display its output waveform and the Type
1398-A output pulse simultaneously on the oscillo-
scope.
h. Adjust the
AF
control and observe the starting
point of the pulse. Note that the
AF
control adjusts
the phase at which the pulse is formed, and that the
pulse always starts during the negative-going input
To observe external operation on an oscilloscope transition.
proceed as follows:
a. Set up the equipment to display a 1-kc square
wave, as described in paragraph 3.2.4, a to 1.
b. Set the PRF switch to EXT DRIVE.
c. Connect an adjustable audio-frequency generator
to the EXT DRIVE binding posts and set the gener-
ator to produce a 1-kc signal of at least
1
volt, rms.
d. Center the AF control (now used as a triggering
level control). The oscilloscope should display a
square wave as described in paragraph 3.2.4.
e. Decrease the frequency of the audio-frequency
generator. Note that the external generator controls
the prf of the Type 1398-A.
f. Reset the audio-frequency generator to
1
kc/s and
reduce its amplitude. When the Type 1398-A fails to
TABLE
3
-
1
DURATION ACCURACY
VS
DUTY RATIO
Duty Ratio Accuracy
0 to 20%
f2%
of full scale with
with DURATION dial at 1 to 4.
k5% of reading
with DURATION dial
at
5 to 10.
135ns with durations of
0.1 to 0.7~~.
20 to 50% +lo%of reading.
I
Over 50% Inaccurate.
I

OPERATING PROCEDURE
3.4
PRF VS PULSE DURATION.
3.4.1 DUTY RATIO LIMITS DURATION ACCURACY
There is no restriction on the duty ratio of the
Type 1398-A. (Duty ratio is the ratio of the pulse
"
on"
time to the total time of the period established by the
prf setting; duty ratio in percent
=
prf xduration
x
100.)
Therefore, the PULSE DURATION controls may be
mistakenly set for a duration longer than the total
period (period
is
the reciprocal of prf
).
The instrument
cannot be damaged by such settings, but the user may
be confused by the resulting oscilloscope display.
Refer to Table 3-1 for duration accuracy versus duty-
ratio specifications.
3.4.2 DURATION LESS THAN 50% OF PERIOD.
The accuracy of the DURATION control settings
is preserved if the duty ratio is 50% or less (pulse
duration is 50% or less of total time of period). Table
3-2 lists the 50%-of-period figures for each PRF control
setting.
3.4.3 DURATION GREATER THAN 50% OF PERIOD.
When the pulse occupies more than 50 percent of
the total period, the dial reading of duration is erron-
eous. This effect is due to insufficient recovery time
for the pulse-forming circuits but can
be
circumvented
by the reversal of the OUTPUT PULSE polarity.
For example: A 1-kc, 600 ps positive pulse
is
desired. From Table 3-2 it can be seen that 600
ps
exceed the 500 ps maximum duration given for a
PRF
control setting of 1 kc/s (actual duty ratio 103
x
6
x
10
x
lo2
=
60%). But, from Figure 3-2, it also can be
seen that a positive duration of 600
,US
can be obtained
TABLE 3-2
50%-OF-PERIOD FIGURES
I
50%
of Period (Durations inaccurate
PR
Con'r01
/m
DORATON
controi setti~gs
I
(AF
control fully clockwise) longer than those listed)
3.4.4 DURATION EQUAL TO PERIOD.
When the DURATION controls call for a pulse
exactly equal to the pulse period, the instrument fails
completely, and both duration and prf are indeterminate.
3.4.5 DURATION GREATER THAN PERIOD.
When the duration is set longer than the pulse
period, the pulse timing circuits will "count down
",
producing one pulse for each 2,3,4,
...
n input periods.
In general, the pulse duration will not be precisely
controllable due to lack of recovery time. However,
such frequencydivision may be useful in some applica-
tions and itshould be remembered that the Type 1398-A
can be used as a frequency divider of arbitrary scale
by such operation.
if connection is made to the -OUTPUT PULSE binding
3.5
~RECAUT~ONS
FOR
VERY
LONG
post rather than to the +OUTPUT PULSE binding post
OR VERY SHORT PULSES.
and if the DURATION controls are set to 400 ps pulse
(total period minus 600 ps). The duty ratio for a 1-kc,
3-50' GENERAL-
400-ps pulse is 40%; therefore the
DURATION
control When pulses of very long or very short duration
accuracy is preserved. are to be produced and observed, special attention must
~PERIOD=IOOO~~~
+OUTPUT
PULSE
OV
-
(INACCURATE)
-
60V
j4
1
I
DURATION
CONTROLS
SET
TO
600ps
DURATION
INACCURATE
BECAUSE DUTY
RATIO
EXCEEDS
50%
~PERIOD=~O~~~,
,
-OUTPUT
PULSE
OV-
(
ACCURATE)
-
60V
f'
11598-21
DURATION
CONTROLS
SET
TO
400ps
DURATION
ACCURATE
BECAUSE
DUTY
RATIO
IS
LESS
THAN
50%
Figure
3-2.
Circumvention of
50%
duty-ratio limitation at
1
kc/s
by
reversal
of
OUTPUT PULSE polarity.

@
TYPE 1398-A PULSE GENERATOR
be given to the equipment setup and interconnections.
Bandwidth considerations are fundamental and oscillo-
scopes with the desired frequency response must be
chosen as indicators.
3.5.2 LONG PULSES- LOW-FREQUENCY RESPONSE.
An oscilloscope with a frequency response to dc
is necessary to observe very long pulses. The low-
frequency cutoff of most oscilloscopes that do not have
dc amplifiers
is
about
5
or 10 c/s, and these oscillo-
scopes will exhibit
"
ramp-off effects with pulse dura-
tions over 10 milliseconds. (Ramp-off is the slope on
the
flat
top and bottom.) Almost any indicator has
adequate high-frequency response for long-duration
pulses becuase the "flats" are usually of more interest
than are the rapid rise and fallvoltage transitions. The
Type 1398-A uses a direct-coupled output system and
will not cause ramp-off at any duration.
3.6
RISE AND FALL TIMES.
The Type 1398-A has very short rise and fall
times (typically
5 ns
)
of output current into the internal
1-kilohm loads and their associated straycapacitances.
The internal stray capacitances are about 40 pF, which
results in open-circuit rise and fall times of about 90 ns
across the internal 1-kilohm load. The rise and fall
times increase linearly with external capacitance and
and decrease linearly with external resistance
-
the
final transition time is about 2.2
RC.
The intrinsic rise
time can therefore be observed only if a resistance of
100ohms or less is connected across the output binding
posts. With an open-circuit connection, the Type 1398-A
output circuit
is
capacitance-limited, the voltage tran-
sition varies exponentially with time, and no overshoot
is possible. Because of this important feature, the
Type 1398-A can be used to check almost any amplifier
system for overshoot
-
including any oscilloscope whose
input impedance is over 1 kilohm.
3.5.3 SHORT PULSES-HIGH-FREQUENCY RESPONSE.
For further information on rise and fall times,
Faithful reproduction of very short pulses or of
refer
paragraph
3.77
the rapidly changing voltage of the leading or trailing
edge of such a pulse requires wide-bandwidth amplifier
3.7
EXTERNAL LOAD CONSIDERATIONS.
and indicator systems. For example, when a pulse with The output circuits of the pulse generator are as
a rise time of 0.05 ps
is
displayed
on
an oscilloscope stable aspossible
for
an instrument of such simplicity.
whose amplifier has a rise time of 0.05 fis, the indi- Some imDortant
Doints
to
remember
are:
cated rise time will be 0.07 ps. For a system with n
(1)
The output tubes act as current sources that
individual components of specified rise time, the equa- produce 60-rnA pulses into
a
parallel combination of
tion for over-all rise time1
is
the AMPLITUDE control resistors and whatever ex-
ternal load is
c0nnecte.d to the instrument.
(1)
(2)
The pulses are direct-coupled to the OUTPUT
PULSE binding posts and therefore contain a nega-
The rise time of an amplifier system, TI, is related to tive dc component of 60 mA.
the 3-dB bandwidth,
B,
by the equation (2), where the
factor of 0.35 should be used if the overshoot is less
than 10 percent.'
With very short pulses, it is necessary to take care in
the wiring of system components. Short, direct wires
should be used for both signal and ground paths if open
wiring
is
used, and coaxialcables should be terminated
properly. A common sign of an improperly connected
ground or of an inductive loop in the wiring is the pres-
ence of high-frequency ringing (damped oscillation) on
the pulse transitions.
'
Valley,
G.
E.,
and
Wallrnan,
Henry,
"Vacuum
Tube Ampli-
fiers,
I'
Radiatiolz
Laboraiory
Series,
Vol
18,
McGraw-Hill,
1948,
p
77.
lbid,
p
80.
OUTPUT
Figure 3-3. Equivalent circuit for Type 1398-A
output system feeding high load impedance.
Figure 3-3 shows an equivalent circuit for the
Type 1398-A output system as it appears when feeding
a high external load impedance (e.g., a 12-pF, 10-
megohm oscilloscope probe). The pulses from this cir-
cuit will be capacitance-limited by the 50-11s RC time
constant, and a rise time of about 100 ns results
(Figure 3-4c). The appearance of a brief pulse at out-
put settings of 0.6 volt and
6
volts is shown in Figure
3-4 a and b, respectively.

OPERATING PROCEDURE
0.6 volt, peuk-to-peak, into 10
5
volts, peok-to-peak, into 100 36 volts, peak-to-peak, into 1
ohms; 0.1 ps/cm. ohms; 0.1 ps/cm. kilohm, 0.1 ,us/cm.
Figure 3-4. Pulses from circuit of Figure
3-3.
Two important features should be noted from the
above:
(1)
the rise time can be controlled with no ter-
mination and maximum output, by the addition of fixed
external capacitance according to the equation
Tr
(ns)
=
2.2
(40pF
+
C,,,)
(3)
and (2) the ultimate rise time can be realized only by
termination of the instrument either externally by
placing a 50-0 resistor across the output terminals, or
internally by setting the output impedance to 50
0
(
AMPLITUDE switch at 0.1, AMPLITUDE control cen-
tered), or both, as shown in Figure 3-5. Here the time
constant of the output circuit
is
about 1.5 ns, and the
fast rise and fall of the current pulse can be observed.
OUTPUT
40-pF
!
lka
INTERNAL?;
0
--I,
-
-
-
mT
Figure 3-5. Equivalent circuit for
achieving ultimate rise time.
In this connection, the transitions will typically be
less than 5ns. SeeFigure 3-6 for the typical appearance
of waveforms under t~rminatedconditions.
3.8
OUTPUT DC COMPONENT-DC TRANSLATION.
In certain applications it may be desirable to
remove or to change the dc component of the main out-
put pulse. If it is necessary only to remove the dc
component, and if the pulses are fairly short and the
circuit impedances high, the desired result may be ob-
tained simply by addition of an external coupling ca-
pacitor large enough to prevent ramp-off for the desired
pulse duration. If the above conditions do not hold, or
if it is necessary to introduce dc offset, an external
power supply can be connected to the OFFSET ter-
minal. Such
a
connection will allow the dc component
level to be shifted by as much as 20 volts in either the
positive or the negative direction since the voltage of
power supply is then applied to the plate load resistors
of the output tubes, thus changing their quiescent
-
voltage levels.
The AMPLITUDE control
is
adjusted until a 20-
volt swing is attained
as
measured on
an
oscilloscope.
Then an adjustable positive power supply is connected
to the EXT OFFSET terminal and its voltage
is
adjust-
ed until the dc output of the pulse generator is zero
as
measured on a dc voltmeter. Alternatively, the voltages
needed for the desired offset may be precalculated and
set accordingly. For instance,
if
the duty ratio (refer to
paragraph 3.4.1) is 50%, the required offset voltage
is
+
10 volts for a twenty-volt pulse. A
+
10-volt power
supply
is
connected to the EXT OFFSET terminal and,
using only
a
dc voltmeter, the AMPLITUDE control ad-
justed so that the dc level is zero.
NOTE
Do not apply more than
k
20 volts to the
EXT OFFSET terminal, as voltages ex-
ceeding this level may damage the output
tubes.
3-volt, 5-,us pulse; 50-ohm
termination. As in (a), but with open-cir-
cuit terminotion,60-volt pulse.
Figure 3-6. Typical waveforms under terminated conditions.

@
TYPE 1398-A PULSE GENERATOR
3.9 LOCKING ON HIGH FREQUENCY SIGNALS.
3.9.1 FREQUENCY DIVIDER ACTION.
If anexternal signal
is
applied to theEXT DRIVE
binding posts and the PRF switch
is
set to one of the
numbered positions, the internal oscillator of the Type
1398-A will lock on the external signal. For instance,
if a 50-kc signal
is
applied at the EXT DRIVE termin-
als
and the PRF
is
set to nearly 10kc/s the main pulse
of the Type 1398-A can be locked at the external
frequency of 50 kc/s. In other words, the pulse genera-
tor
is
operating as a 5-to-l frequency divider and
supplies one output pulse for every five input pulses.
Thepulse generator can be phase-locked in thismanner
to frequencies well above the maximum prf of the inter-
nal oscillator.
3.9.2 OBSERVATION WITH OSCILLOSCOPE.
To observe the above action, connect an oscillo-
scope and an audio-frequency generator to the Type
1398-A as described in paragraph 3.3.3. If possible,
observe the waveform of the external generator on the
oscilloscope, together with the Type 1398-A output.
Then proceed asfollows
a.
Set the PRF switch to
1
kc/s.
b. Set the AF control fully clockwise.
c. Set the external generator to
1
kc/s.
d. Set the output amplitudeof the external generator
to minimum and then increase it until the Type
1398-A locks
.
e. Set the frequency of the external generator to
2kc/s, 3kc/s,
4
kc/s, etc., and each time advance
the signal amplitude to lock the pulse generator. In
this way the pulse generator can be locked at very
high ratios.
3.10 COUNT-DOWN OPERATION.
When the duration
is
set longer than the pulse
period, the pulse timing circuits will "count down
",
producing one pulse for each 2,3,4,
...
n input periods.
In general, the pulse duration will not be precisely
controllable, owing to lack of recovery time.
3.11 SINGLE-PULSE OPERATION.
3.11.1 METHODS.
There are three ways by which one can produce a
single pulse:
(1.) By rotating the AF control with the PRF switch
set to EXT DRIVE.
(2.) By touching the EXT DRIVE binding post.
(3.) By usingthe Type 1217-P2Single-PulseTrigger.
The following three paragraphs explain each
method in detail.
3.11.2 ROTATION OF AF CONTROL.
Set the PRFswitch to EXT DRIVE and rotate the
AF control about 20 or 30 degrees clockwise from its
center position and then reverse the direction of rota-
tion. An output pulse will be produced as the AF con-
trol
is
moved counterclockwisepast the center position.
Very little rotation
is
necessary to reset and to start the
input circuits. Be careful not to touch the EXT DRIVE
binding post because a pulse burst may be produced by
the injected hum.
3.11.3 TOUCHING EXT DRIVE BINDING POST.
Set the PRF switch to EXT DRIVE and set the
AF control near the center of its range. A single pulse
will be produced when the EXT DRIVE binding post
is
touched. This method
is
useful onlyfor very long pulses
because the driving signal
is
a burst of noise or hum.
3.11.4 TYPE 1217-P2 SINGLE-PULSE TRIGGER.
The most convenient way to produce single pulses
is
to use
a
pushbutton actuating-circuit such as the
Type 1217-P2 Single-Pulse Trigger, shown pictorially
in Figure 1-2 and schematically in Figure 3-7. To use
it, set the PRF switch to EXT DRIVE and set the AF
control between three-quarters clockwise and fully
clockwise.
100
kn
1.5V DRIVE
f
O.1LJF O.'PF TERMINAL
I
I
NORMALLY OPEN
-
-
Figure
3-7.
Schematic diagrom
of
the
Type 1217-P2 Single-Pulse Trigger.
To produce a main pulse when the switch opens,
connect the negative banana plug of the Type 1217-P2
(arrowhead terminal in Figure 3-7) to the EXT DRIVE
binding post of the Type 1398-A.
To produce a main pulse when the switch closes,
reverse the double banana plug of the Type 1217-P2 so
the positive banana plug (ground symbol in Figure 3-7
)
is
connected to the EXT DRIVE binding post of the
Type 1398-A.
3.12 USE AS
A
DELAY GENERATOR.
The delayed sync pulse from the Type 1398-A
can be used to operate the input circuits of a second
Type 1398-Awith a minimum of adjustment. The delayed

OPERATING PROCEDURE
pulse consists of a negative-going transition of about
3.13
USE FOR COMPLEX WAVEFORMS.
5 volts and 100-ns duration, followed immediately by a Since the output circuit of the Type 1398-A
is
positive transition of about
5
volts and 150-ns duration. essentially a current source feeding a resistive load,
The initial negative-going transition will trigger the the outputs of two or more pulse generators can be
input circuits and start the main pulse of
a
following directly, paralleled to produce complex additive wave-
Type 1398-A. The positive-going transition will then forms. The output impedance of n pulse generators so
reset the input circuits of the second Type 1398-A to paralleled
is
1000/n ohms and the peak voltage
is
still
prepare it for the next delayed pulse. Figure 3-8 shows 60volts. A complexwaveform and the system to produce
connections and timing waveforms of such a system. it are shown in Figure
3-9.
TYPE 1210-C UNIT TYPE 1398-0, TYPE 1398-A
R-C OSCILLATOR PULSEGENERATOR#l PULSE G€NERATOR.*2
TYPE
1210-C
TYPE 1398-8
,#I
PREPULSE
TYPE 1398-A
,*
I
MAIN PULSE(NEG1
I
L
TYPE 1398-A
#
1
DELAYED
PULSE
h
TYPE 1398-A
#
2
MA'IN
PULS~
INSa-61
Figure 3-8. Connection of two Type 1398-A's
as a delay generator.
TYPE 1398-A$I
TYPE 1398-8 TYPE 1398-A TYPE 1398-A
PULSE GENERATOR,#I PULSE GENERATORP2 PULSE GENERATOR,#3
TYPE 139&A,X2
V
A
v
0
0 000
o*-
00000 op
-
TYPE 1398-A,X3
Figure 3-9. System for producing the complex waveform shown.
-a
0
00
0
00
00000
09
-4
0
0000
0--
I
-
-
C
OUTPUT
I
-
-
-
-

@.
TYPE 1398-A
PULSE
GENERATOR
SECTION
4
PRINCIPLES
OF
OPERATION
4.1
GENERAL.
(See
Figure
4-1.)
The Type 1398-A
is
composed of three basic sec-
tions:
(1)
the input and prf oscillator circuit, (2) the
output pulse circuit, and
(3)
the power supply. The
first two sections are shown in block diagram form in
Figure 4-1.
Externally or internally generated positive pulses
from the input and prf oscillator circuit trigger the
output pulse circuit. The output pulse circuit, in
turn, produces positive and negative pulses that ap-
pear at the OUTPUT PULSE binding posts.
A
detailed
analysis of each circuit is contained in the following
paragraphs.
4.2
INPUT AND PRF OSCILLATOR CIRCUIT
-
EXTERNAL OPERATION.
4.2.1
GENERAL.
Let us first consider the circuit as an aperiodic
input circuit, i.e., with the
PRF
switch set to EXT
DRIVE, as shown in Figure 4-2. In this mode, the cir-
cuit converts an external signal, applied to the EXT
DRIVE binding posts, to
a
positive pulse, which ap-
pears at the output, pin
6
of V102.
INPUT
AND
pRF-l
(-
OUTPUT PULSE CIRCUIT
FCILLATOR
CIRCUIT
1
-3
-+DELAYED
SYNC
AMPLITUDE
V105
POWER
n
~~sITIvEOUTPUT
STARTQlo3
----C
AMPLIFIER
-$&+C
-NEGATIVE OUTPUT
V106
SYNC POSITIVE SYNC
AMPLIFIER
VlOlB
Y
SYNC
Figure
4-1.
Block diagram
of
the Type 1398-A Pulse Generator.

PRINCIPLES OF OPERATION
-VOLTAGE AMPLIFIER
.-I(-
SCHMITT
CIRCUIT-
t150V
I'
+150V
+
150V
TO OUTPUT
PULSE
CIRCUIT
Figure
4-2.
Simpl
of the input and
-
150V
4.2.2 SCHMITT CIRCUIT.
V102A and
B
form a Schmitt trigger circuit.
Whether or not V102B
is
on (conducting) depends on
the voltage at the grid of V102A. When V102A's grid
voltage is considerably less then
+
50 volts, V102B
will be on. V102BYsgrid voltage
is
set at about +50
volts by R113 and R115. If the grid voltage of V102A
is
raised toward
+
50 volts, it will begin to turn on. As
V102A goes on, its plate voltage will begin to fall,
lowering the grid voltage on V102B and lowering the
common cathode voltage. As the cathode voltage falls,
the plate current of V102A increases. This regenerative
action will terminate only when V102B
is
completely
off and V102A completely on.
To turn V102B back on, the grid voltage of V102A
must be lowered to a level below that at which the
switching first took place. This voltage hysteresis
effect is shown in Figure 4.3. WhenV102B switches off,
its rapidly falling plate current produces the triggering
pulse, which is used to initiate the main pulse and
which serves as the pre-pulse for the
SYNC
terminals
after amplification by VlOlB. This pulse
is
produced
when V102A is turned on by a positive voltage applied
to its grid. The pre-pulse is therefore produced when a
negative transition occurs at the grid of VlOlA.
4.2.3 QUIESCENT CONDITIONS.
In the absence of an input signal, the grid of
VlOlAwill be at ground potential, and its plate voltage
will be around +60volts. Whether or not V102A will
be on will depend upon the setting of R103, the AFand
trigger-threshold control. When this control is adjusted
ified schematic diagram
prf oscillator circuit.
for maximum trigger sensitivity(centered),the quiescent
voltage at the grid of V102A will lie in the center of
the hysteresis region. Input signals applied to the EXT
DRIVE terminals are amplified by VlOlA and cause
V102 to switch. The exact phase at which the output
trigger will be formed
is
determined by the setting of
R103. Maximum sensitivity will be obtained when the
amplified signal is centered in the hysteresis region.
A single pulse can be produced (paragraph 3.4.2)
by rotation of the
AF
control through its centered posi-
tion. This rotation simply sets and resets the Schmitt
trigger.
4.3
INPUT AND PRF OSCILLATOR CIRCUIT
-
INTERNAL OPERATION.
4.3.1 GENERAL.
In Figure 4-2, the PRF switch
is
shown in the
EXT DRIVE position. When this switch
is
set to any of
the other positions, the voltage amplifier and Schmitt
circuits are converted to
a
prf oscillator.
e
PLATE
HYSTERESIS
L-
----_
11211-18
Figure
4-3.
Diagram showing operation
of internal oscillator.

Table of contents
Popular Pulse Generator manuals by other brands

HP
HP 8082a Operating and service manual

Keysight Technologies
Keysight Technologies 81100 Series Technical overview

Quantum Composers
Quantum Composers Sapphire 9212 specification

Tektronix
Tektronix PG 501 instruction manual

LeCroy
LeCroy 9210 Operator's manual

C&H
C&H Pulse Generator Module VX462B Specifications