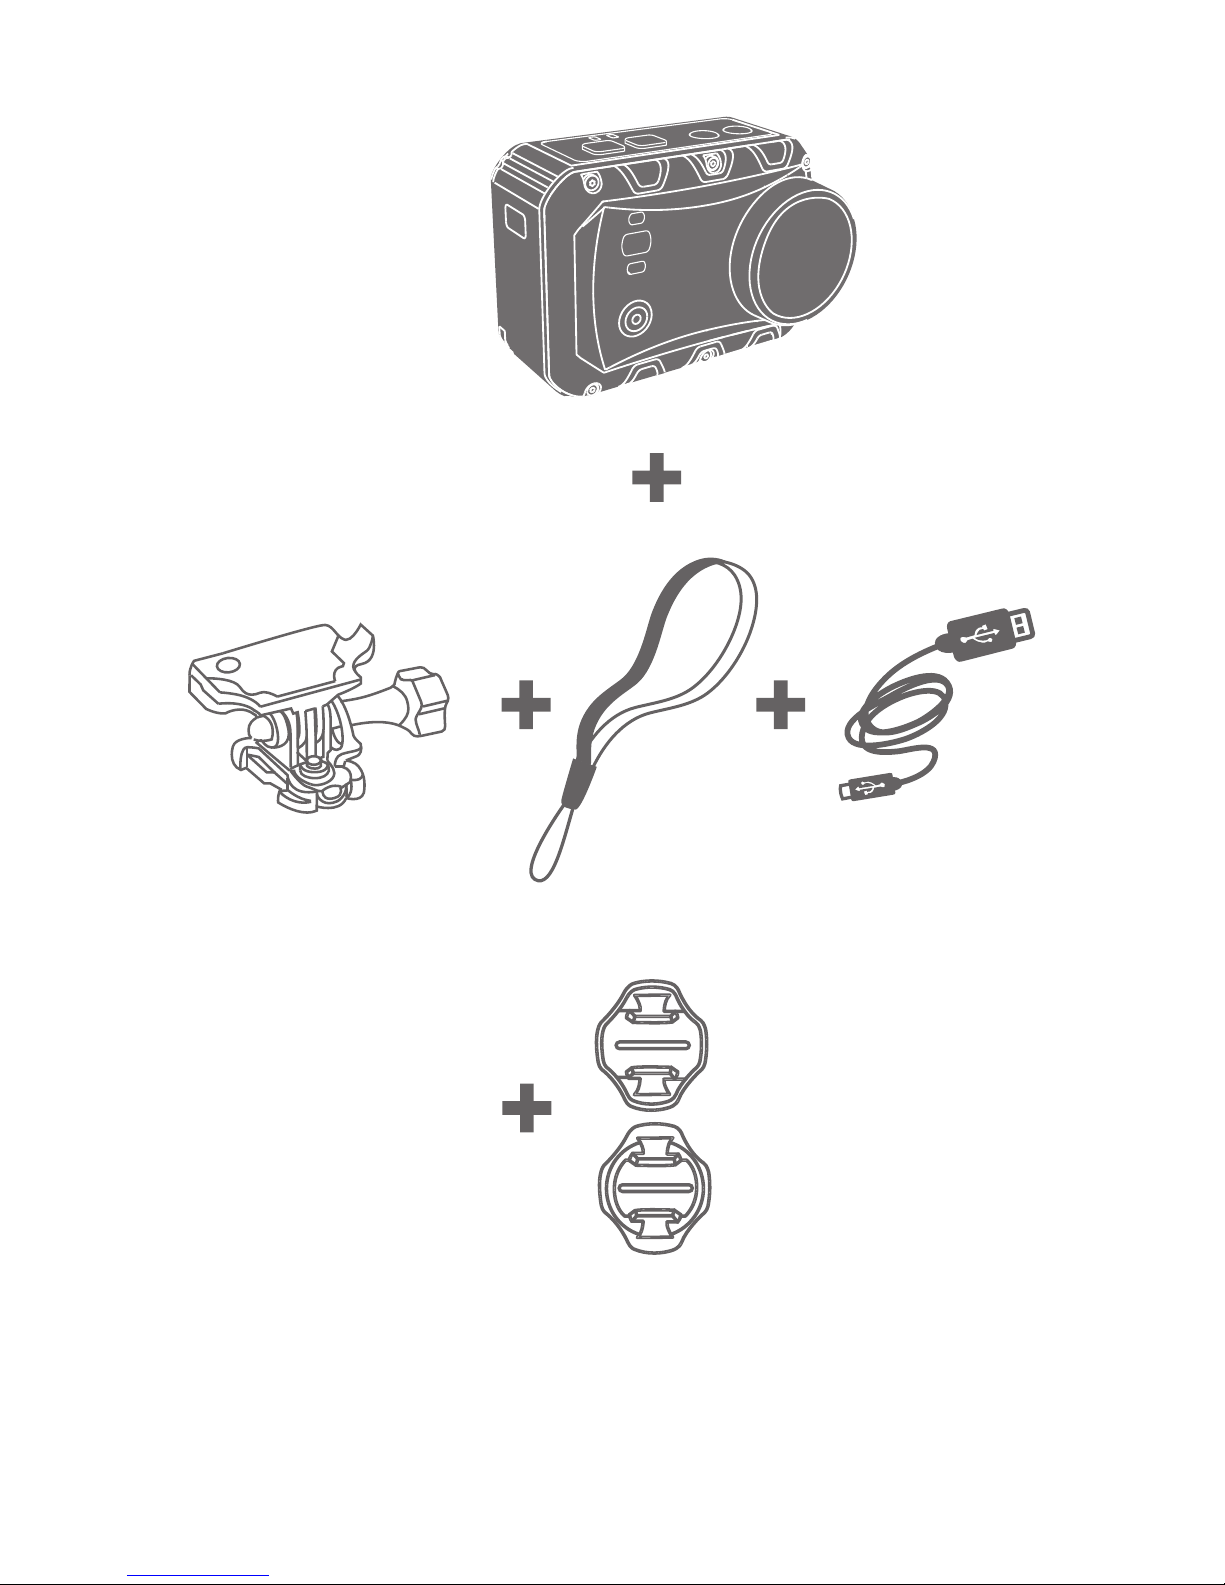
GEONAUTE G-Eye 700 User manual

EN
G-Eye 700
TABLE OF CONTENTS
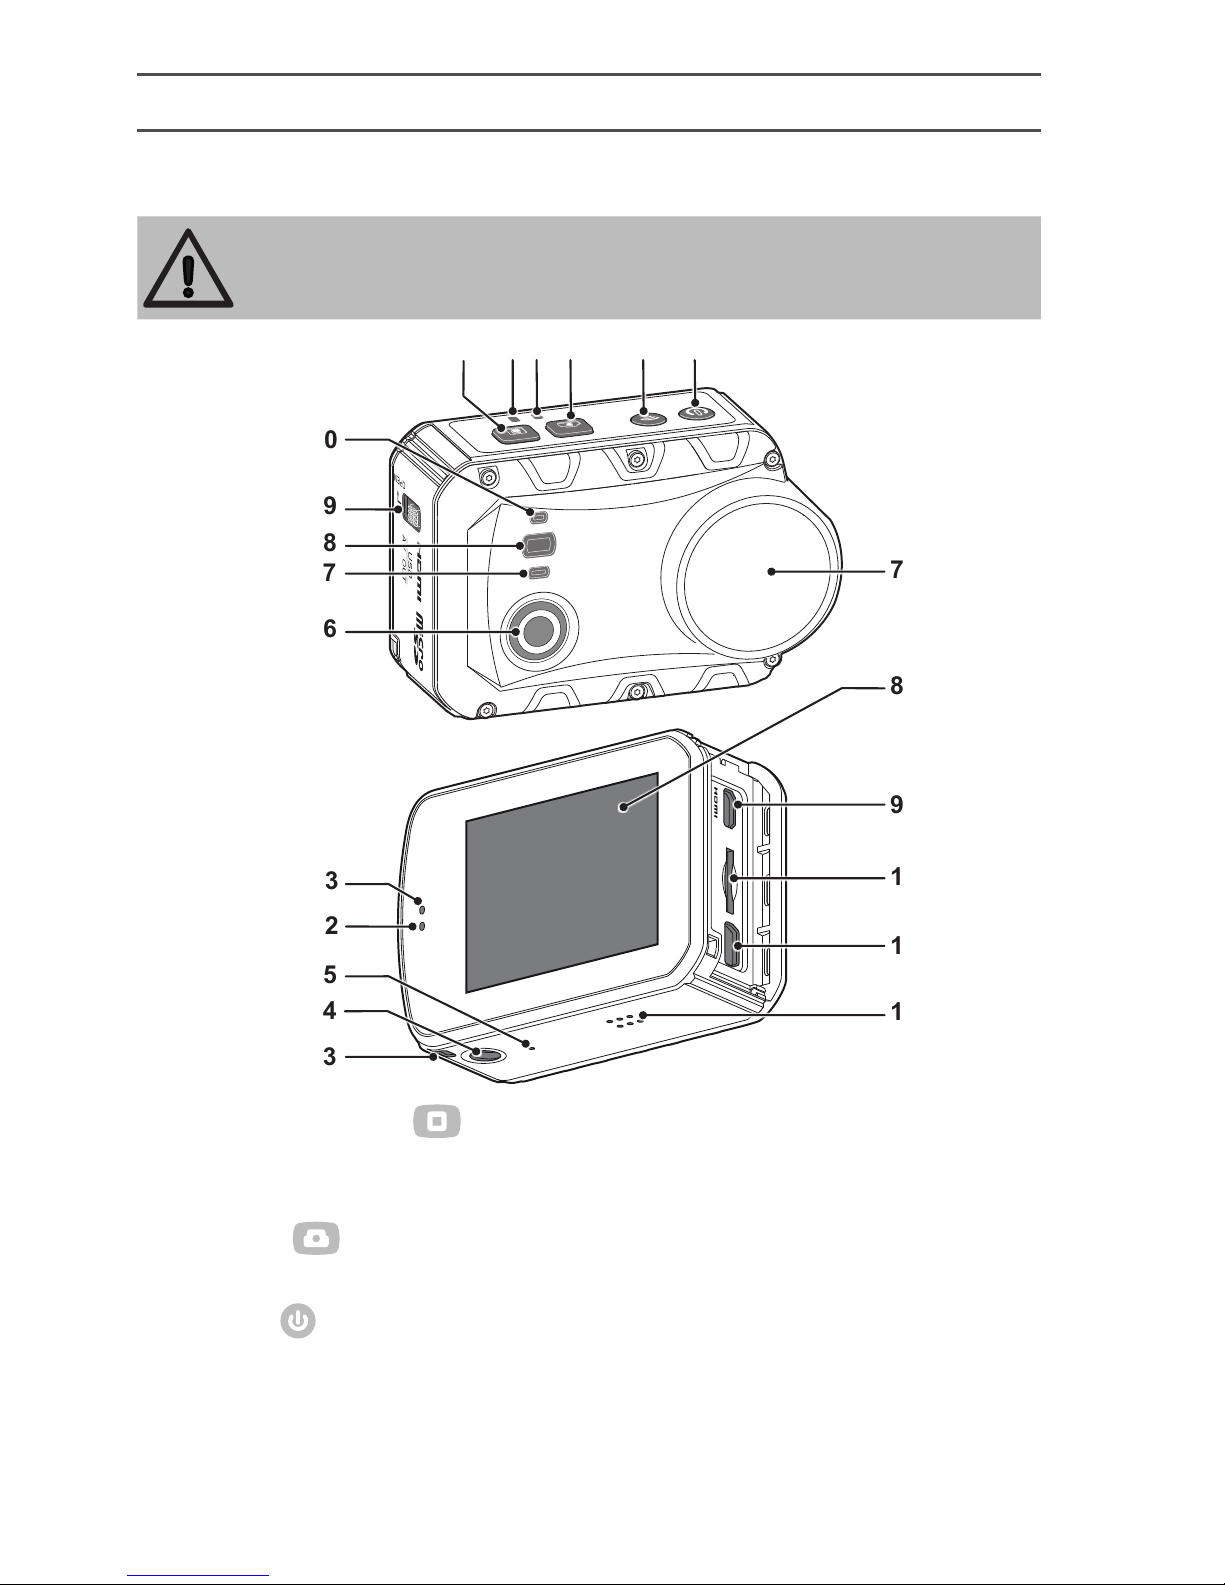
CAMERA OVERVIEW ........................................................ 2
FIRST STEPS .................................................................... 4
Charging the battery ......................................................................... 4
Inserting the micro SD card.............................................................. 4
USING THE CAMERA ....................................................... 4
On/off .................................................................................................. 4
Recording a video.............................................................................. 5
Taking photos .................................................................................... 5
Enabling/Disabling Wi-Fi .................................................................. 5
CONFIGURING THE CAMERA .......................................... 6
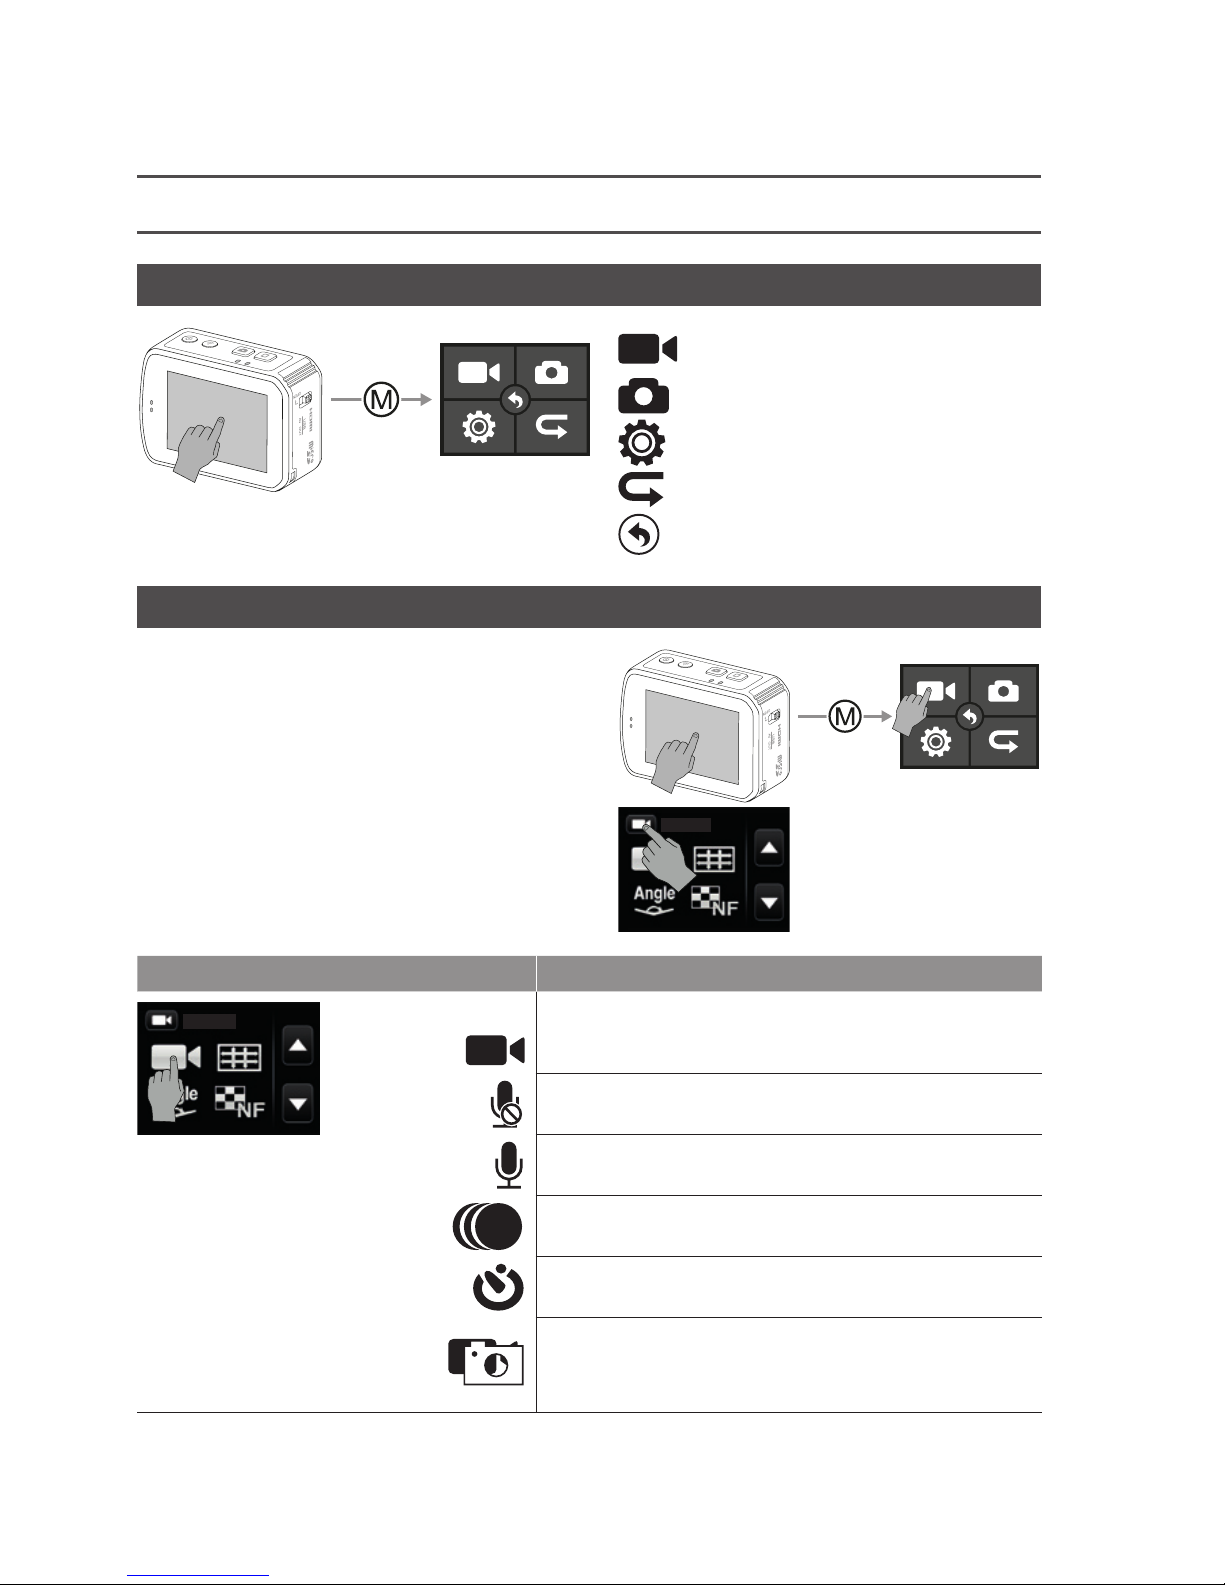
ACCESS SETTINGS ........................................................................... 6
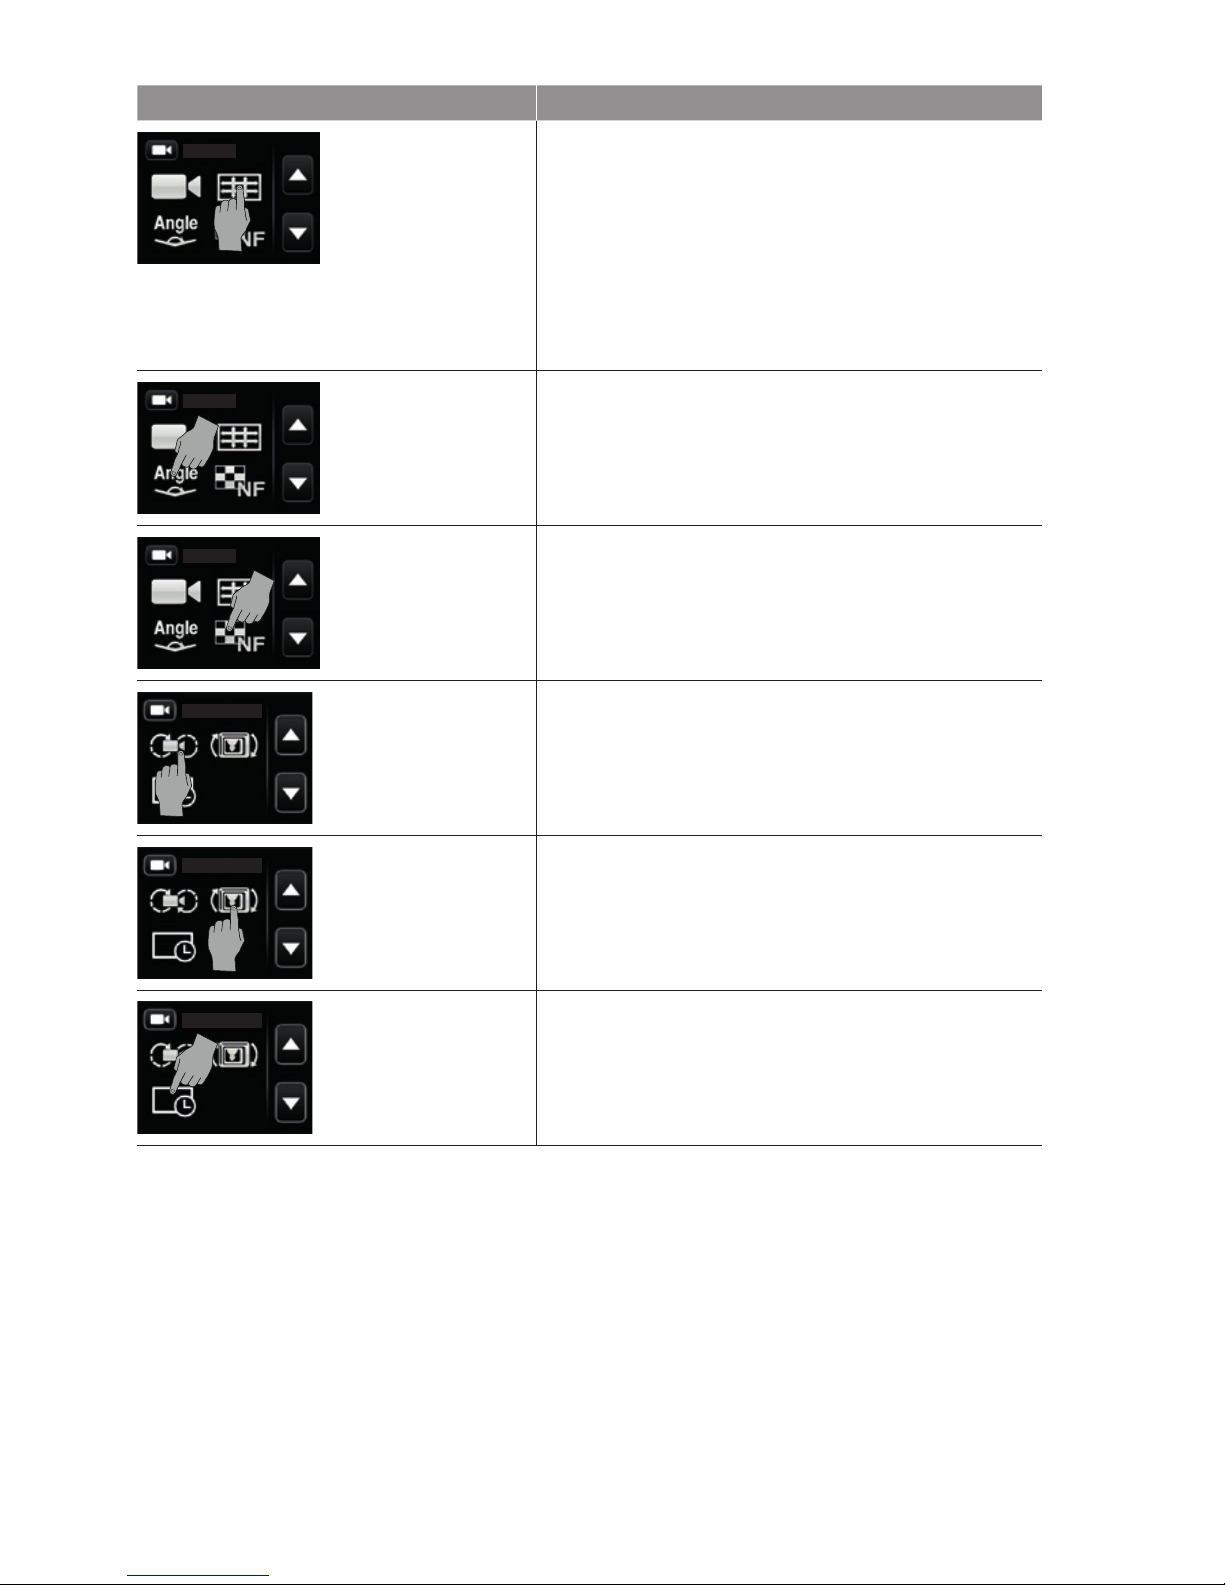
Conguring video modes ................................................................. 6
Conguring photo modes................................................................. 8
General settings ................................................................................ 8
Default settings................................................................................ 10
VIEWING PHOTOS AND VIDEOS.................................... 11
Access viewing menus ................................................................... 11
Photo auto-playback ....................................................................... 12
Protect les ...................................................................................... 12
Delete les........................................................................................ 12
TRANSFERRING FILES .................................................. 12
DISPLAYING PHOTOS / VIDEOS ON A TV...................... 13
ATTACHING A STICKER PAD ......................................... 13
PRECAUTIONS FOR USE................................................ 13
WARRANTIES, LEGAL NOTICES .................................... 14
Limited liability ................................................................................ 14
Warranty ........................................................................................... 14
Legal notices.................................................................................... 14


2
CAMERA OVERVIEW
The GEONAUTE G-EYE 700 camera is waterproof up to 1 m without a waterproof
case.
When diving or if using the camera for more than 30 minutes underwater
at one time, you must use a specic waterproof case (sold separately).
7
8
9
10
11
12
13
14
15
=2
=3
16
17
18
19
20
1 2 3 4 5 6
1Stop video recording
2Red battery charge LED
3Green video recording LED
4Shutter
5
Enable/Disable Wi-Fi
6On/off
7Lens
8Touchscreen
9Micro-HDMI port
10 MicroSD card slot
11 Mini-USB port
12 Speaker
13 Strap eyelet
14 Standard screw thread (Kodak)
15 Microphone
16 Video recording button
17 Battery charge indicator
18 Recording indicator light
19 Compartment tab
20 Wi-Fi indicator light

3
TOUCHSCREEN
The GEONAUTE G-EYE 700 camera features a touchscreen which allows you to
access menus by tapping the centre of the screen lightly.
2H30 1080P/60
000:00:33
1 2 3
4
567
8
Icons Functions
1
Video mode activated
APhoto mode activated
2Wi-Fi
300:00:01 Recording time
4Zoom
5Battery level
6
1080P-60 Video resolution
16 MP Photo resolution
7
02:30 Remaining recording time
1888 Remaining number of photos
8Menu access

4
FIRST STEPS
CHARGING THE BATTERY
4h
12
6
39
INSERTING THE MICRO SD CARD
Compatible cards: Class 10 MicroSD cards from 8Gb to 64Gb.
USING THE CAMERA
ON/OFF
Press once Press and hold
> 5 sec

5
RECORDING A VIDEO
1. START
2. STOP
2. STOP
1. START
The GEONAUTE G-EYE 700 camera is equipped with 2 TV standards, PAL and
NTSC, which you can choose between in the general settings (see page 9).
TAKING PHOTOS
ENABLING/DISABLING WI-FI
10 s 10 s
This camera features Wi-Fi technology. Once this feature is activated, you can
choose to:
Control and congure your camera from your smartphone by downloading the
'G-Eye APP', available on GOOGLE PLAY (Android) and APPLE STORE (iOS)
.
When the Wi-Fi is activated, the camera broadcasts a Wi-Fi hotspot. The
network name (SSID) is the name of the camera, and the default password is:
00000000.

6
Control your camera using the GEYE 2 REMOTE control, sold separately.
Follow the instructions provided with the remote control.
CONFIGURING THE CAMERA
ACCESS SETTINGS
Video settings
Photo settings
General settings
View photos/videos
Exit the settings menu
CONFIGURING VIDEO MODES
CAUTION
To congure the various VIDEO
modes you must rst be on VIDEO
mode.
Return to the previous screen:
Settings Description/Options
Video modes
Classic video mode (sound and image).
Video mode without sound.
Audio recording only.
Time-lapse video mode (1) (2).
Options: 1/2/5/10/30 sec.
Video self timer.
Options: 5/10/20 sec.
Video mode with photos taken at regular
intervals.
Options: 5/10/30/60 sec.

7
Settings Description/Options
Video resolution
(3)
1920 x 1080 (16:9) 60 fps
1920 x 1080 (16:9) 48 fps
1920 x 1080 (16:9) 30 fps
1920 x 1080 (16:9) 24 fps
1280 x 960 (4:3) 60 fps
1280 x 960 (4:3) 48 fps
1280 x 720 (16:9 ) 120 fps
1280 x 720 (16:9 ) 60 fps
Viewing angle (4) Wide/Medium/Narrow/Small.
Video bitrate (5) Standard video bitrate/High video bitrate.
Continuous
recording (6)
Enable/disable continuous recording.
Self-righting
image (2)
Enable/disable vertical image self-righting.
Insertion of the
date (2)
Enable/disable insertion of the date into the
video.
(1) The video time-lapse mode creates a sped-up lm by recording images at regular
intervals (mp4 format).
(2) Feature not available in 720 p 100/120 FPS.
(3) The number of frames per second (fps) can change depending on the TV standard
selected. The higher FPS given is for the NTSC TV standard. If you select PAL, 30 fps
becomes 25 fps, for example.
(4) Some viewing angle options may be unavailable depending on the video resolution
settings.
(5) A high video bitrate will give better image denition but will use more memory space.
(6) When the memory card is full, the camera overwrites the oldest le in order to continue
recording.

8
CONFIGURING PHOTO MODES
CAUTION
To congure the various PHOTO
modes you must rst be on PHOTO
mode.
Return to the previous screen:
Settings Description/Options
Photo modes
A
Single photo mode.
A
Burst photo mode.
Options: 3/6/8 photos per second.
ATime-lapse photo mode (1).
Options: 0.5/1/2/3/5/10/20 sec.
A
Photo self timer.
Options: 3/5/10 sec.
Photo resolution 16 MP, 4:3 , 4608 x 3456
12 MP, 4:3, 4000 x 3000
8 MP, 4:3, 3200 x 2400
Insertion of the
date
Enable/Disable insertion of the date into the
photo.
(1) Automatically takes photos at regular intervals (jpeg format).
GENERAL SETTINGS

9
Settings Description/Options
Beep Enable/disable beep:
OFF: no sound
MIDDLE: 50% volume
STANDARD: 100% volume
LED indicators Enable/disable camera status indicators.
Options: OFF/2/4.
Display info Enable/disable display of contextual
information on the screen when taking
photos.
Automatic
standby
Enable/Disable automatic standby.
Options: OFF/2 min/5 min/10 min.
TV standard Select the TV standard.
Options: PAL (50 Hz)/NTSC (60 Hz) (1).
Brightness
settings (2)
Enable/disable ambient light measurement
in the central area of eld of vision.
G-sensor (3) Enable/disable the G-sensor.
Language Select the language.
Date Set the date and time.

10
Settings Description/Options
Delete les Allows you to delete les or format the micro SD
card.
RESET Return to default settings (see page 10)
Firmware version Camera software version number.
(1) In PAL format (50 Hz) the frame rate (images per second) will be 25/50/100 FPS
depending on the chosen resolution.
In NTSC format (60 Hz) the frame rate (images per second) will be 30/60/120 FPS
depending on the chosen resolution.
(2) The camera automatically adjusts the ISO sensitivity based on the amount of ambient
light.
(3) Starts recording when the camera detects movement or stops recording if no movement
is detected for 3 min.
DEFAULT SETTINGS
Video
Resolution 1920 x 1080 @ 60 fps
Angle of vision Wide-angle
Video bit rate High
Loop recording Deactivated
180° image ipping Deactivated
Displaying the date Deactivated
Photo
Resolution 16 megapixels
Shooting mode Single
Displaying the date Deactivated
General
Beep sound 100%
LED indicator Activated
Automatic standby Deactivated
TV output NTSC

11
VIEWING PHOTOS AND VIDEOS
ACCESS VIEWING MENUS
1
2
3
4
5
6 7 8
1View videos
2View photos
3View all le types
4Return to the previous screen
5Next/previous le
6Delete a le
7Protect a le
8Photo auto-playback
000:00:40
100-0033 000:00:02
000:00:40
100-0033 000:00:02
When viewing photos or videos, access the following contextual menus by tapping
the touchscreen gently:
Play
Pause
Previous/Next
Rapid advance forwards/
backwards
Zoom / Volume +/-
Rotate photos
Move the image
Zoom out to the original view
Photo auto-playback

12
PHOTO AUTO-PLAYBACK
Pause.
Return to the previous menu.
PROTECT FILES
Protect/unlock the selected le.
Protect/unlock all les.
DELETE FILES
Delete the selected le.
Delete all les.
TRANSFERRING FILES
4h
12
6
39
Then retrieve the les as if they were on a USB drive.
When the rst photo is displayed, tap the middle
of the screen then press .

13
DISPLAYING PHOTOS / VIDEOS ON A TV
Cable not provided
HDMI
ATTACHING A STICKER PAD
The sticker pads are meant to be used to afx your
camera to smooth, hard, rigid surface. 3MTM stickers
provide highly resistant adhesion. However, the
precautions for afxing the pad must be respected.
Clean and dry the surface upon which you will be afxing the pad.
Make sure that the surface is as smooth as possible.
Afx the pad in a dry environment with a moderate temperature, preferably
indoors.
Let set for 24 hours before use.
NOTE: This pad cannot be used a second time, be can be cleanly removed by
heating with a hair dryer, for example.
PRECAUTIONS FOR USE
-10°C
-50°F
45°C
113°F
Handle the device with care. Do not drop or expose it to serious impacts.
For greater safety, do not touch the buttons while in use. Losing concentration
can be dangerous.
Do not disassemble this product as this could cause damage and void the
warranty.
Using this device in extreme cold (at temperatures below -10°C) could cause a
decrease in the battery’s capacity, and hence reduce the product’s battery life.
When diving or if using the camera for more than 30 minutes underwater at one
time, use the waterproof case (sold separately).
After using the camera in salt water, rinse it well with fresh water and dry it.

14
WARRANTIES, LEGAL NOTICES
LIMITED LIABILITY
• GEONAUTE is not responsible for accidents or injuries that result from handling or use
of this product while participating in high-risk sports. Specically, GEONAUTE wishes
to inform the user about the possible risk of losing concentration due to handling the
product in dangerous conditions.
• The user is warned that s/he assumes all legal responsibility for the shooting, sharing,
and publishing of images captured by this product.
WARRANTY
• GEONAUTE guarantees the original buyer that this product is free of defects due to
materials or manufacture for two years starting from the date of purchase. Please
ensure that you keep the invoice as proof of purchase.
• The warranty does not cover damage resulting from misuse, from a failure to respect
the precautions for use, from accidents, from improper maintenance or from commercial
use of the product.
• The warranty does not cover damage resulting from repairs carried out by persons not
authorised by GEONAUTE.
• The warranties herein expressly supersede all other warranties, including the implicit
warranty of fair marketable quality and/or tness for purpose. Under no circumstances
will GEONAUTE be held liable for any damage, whether direct or indirect, general or
specic, caused by or related to the use of this instruction manual or the product it
describes.
• During the warranty period, the item will either be repaired free of charge by an
authorised repair service or replaced free of charge (depending on the distributor).
• The warranty does not cover the battery or cracked or broken casings showing visible
signs of impacts.
LEGAL NOTICES
EC DECLARATION OF CONFORMITY
OXYLANE hereby declares that the G-EYE 700 device complies with
essential requirements and with other relevant stipulations of the 1999/5/
EC directive.
The EC declaration of conformity is available at the following web link:
www.geonaute.com/en/ec-declaration-conformity.
RECYCLING
The 'crossed-out dustbin' symbol indicates that this product
and the batteries it contains cannot be disposed of with
household waste. They must be disposed of via selective
waste sorting.
The product and batteries must be recycled at a collection
point at end of life. Recycling your electronic waste protects
the environment and your health.
CONTACT US
Contact us at www.support.geonaute.com.

Ref. : 1860927
IMPORTADO PARA BRASIL POR IGUASPORT Ltda
CNPJ : 02.314.041/0001-88
540-0011 大阪市中央区農人橋1-1-22 大江ビル10階
ナチュラムイーコマース株式会社
Импортер: ООО «Октоблу», 141031, Россия, Московская область,
Мытищинский район, МКАД 84-й км., ТПЗ «Алтуфьево»,
владение 3, строение 3, +7(495)6414446
для занятий спортом
台灣迪卡儂有限公司
台灣台中市408南屯區大墩南路379號
諮詢電話: (04) 2471-3612
TURKSPORT Spor Urünleri Sanayi ve Ticaret Ltd.
ŞtiOsmaniye Mahallesi Çobançeşme
KoşuyoluBulvarı No: 3 Marmara Forum Garden Oce
0B Blok 01 Bakırköy 34146 Istanbul, TURKEY
DECATHLON - 4 Boulevard de Mons - BP 299
59665 Villeneuve d’Ascq cedex - France
Производитель и адрес, Франция:
Table of contents
Other GEONAUTE Digital Camera manuals
Popular Digital Camera manuals by other brands

Panasonic
Panasonic PalmCam PV-DC1580 operating instructions

Kodak
Kodak C643 - EasyShare 6.1MP Digital Camera user guide

Panasonic
Panasonic Lumix DMC-FP7 owner's manual

Sony
Sony CSS-PHB - Cybershot Station For DSCP200 Digital... Guía del usuario

IFM Electronic
IFM Electronic O3D301 operating instructions

Nikon
Nikon CoolPix S80 user manual