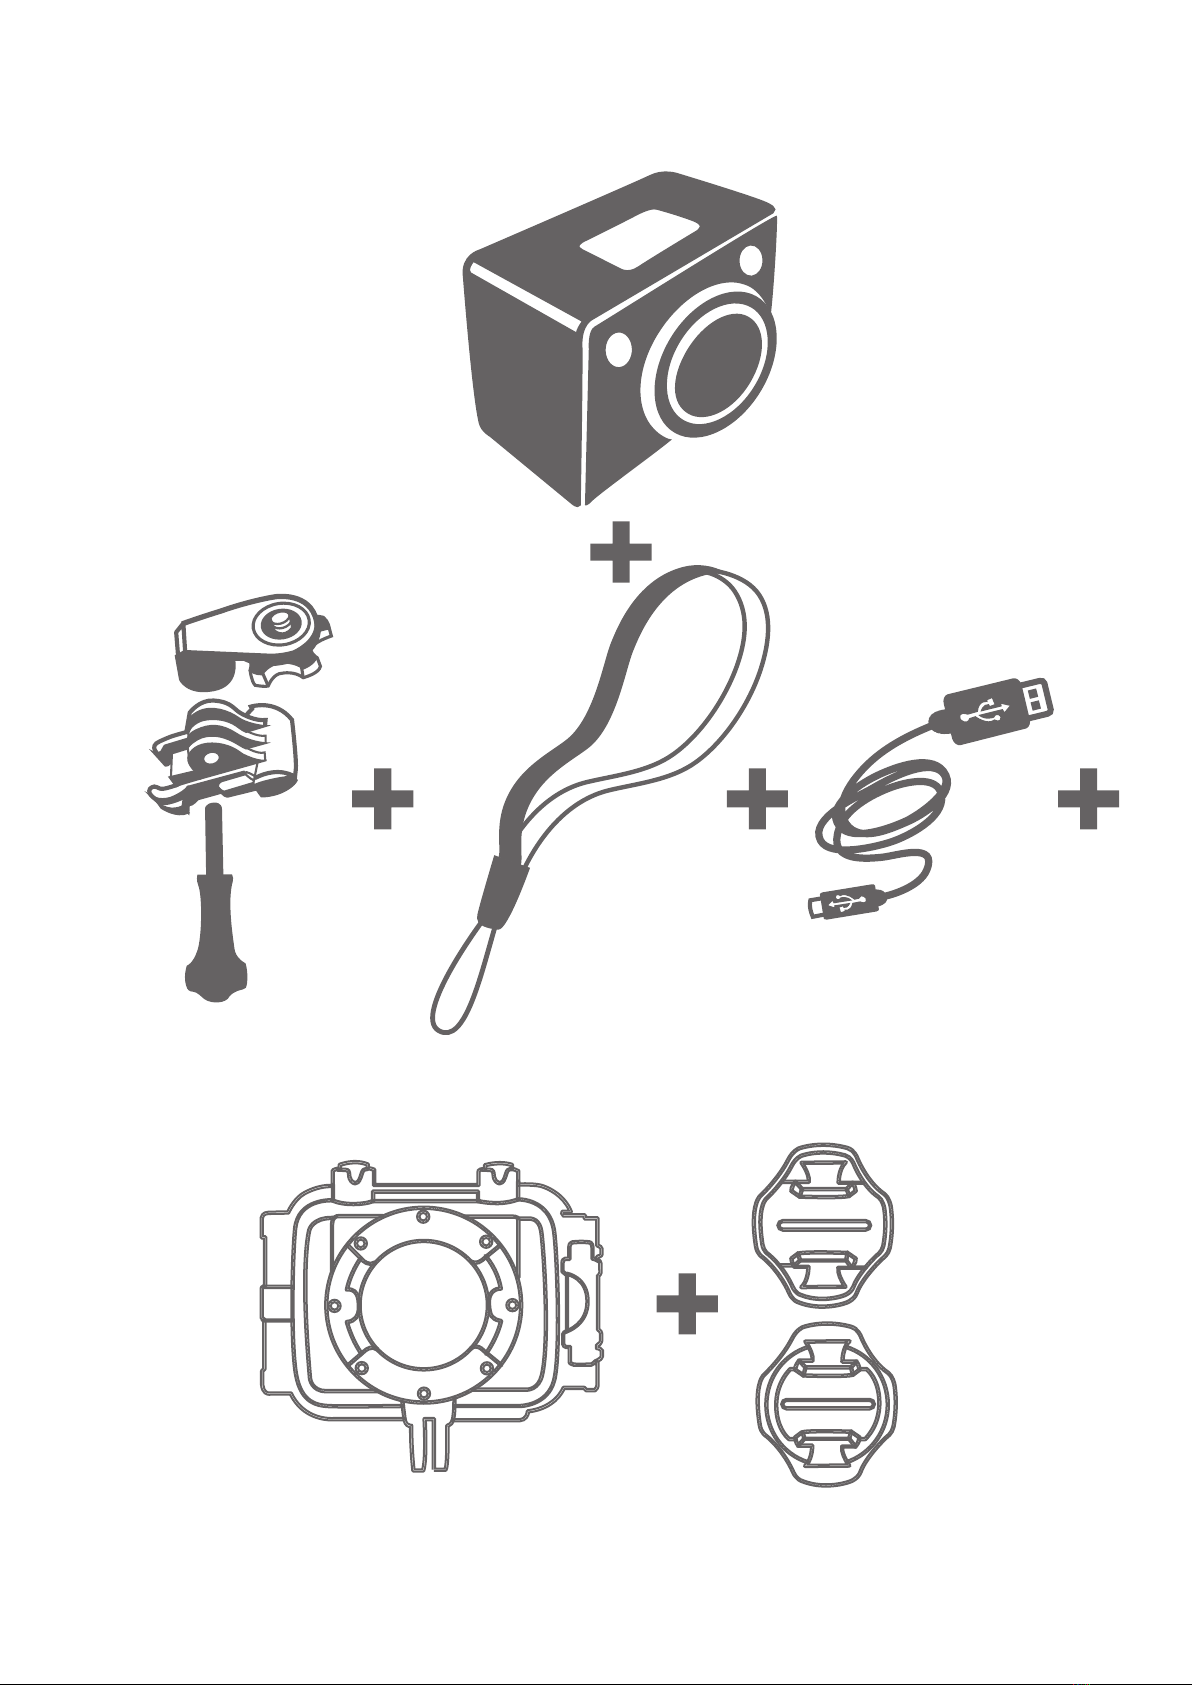
GEONAUTE G-Eye 2 Discover User manual

EN
CONTENTS
G-Eye 2 Discover
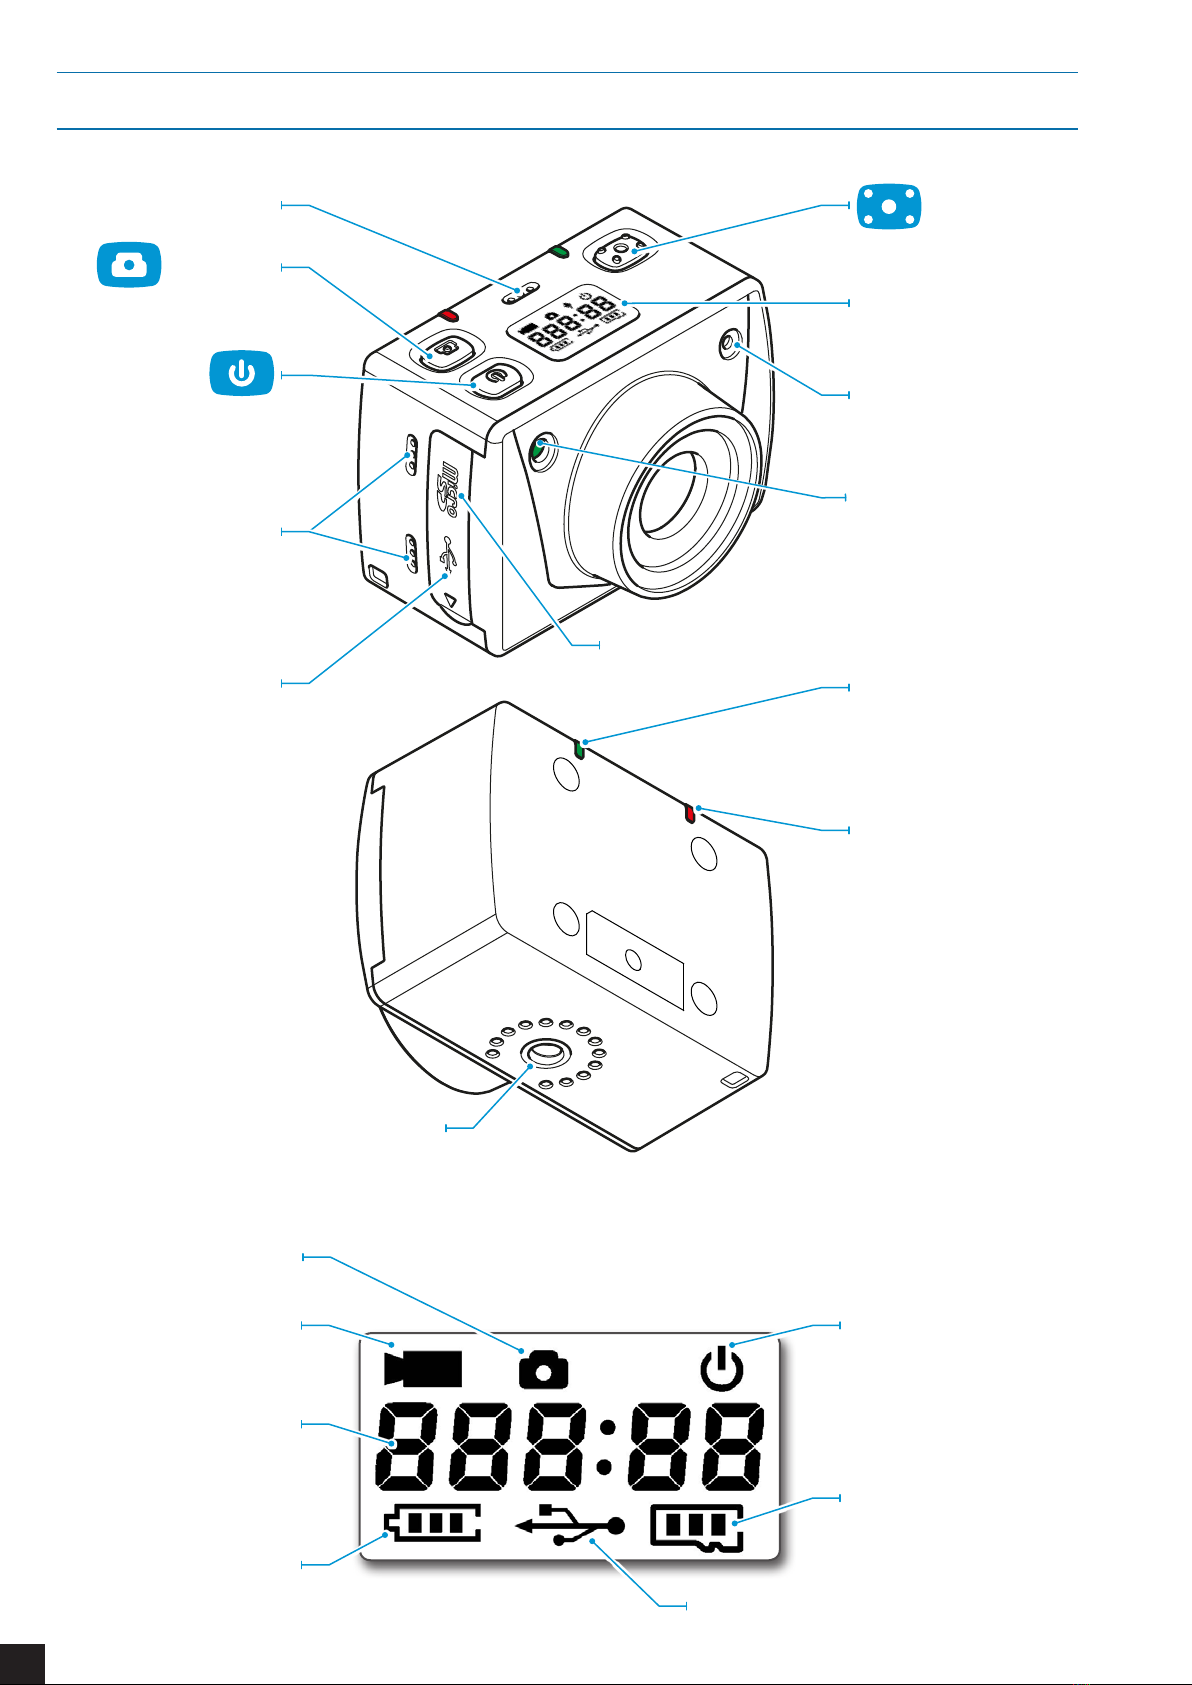
CAMERA OVERVIEW............................................................................................. 2
FIRST STEPS......................................................................................................... 3
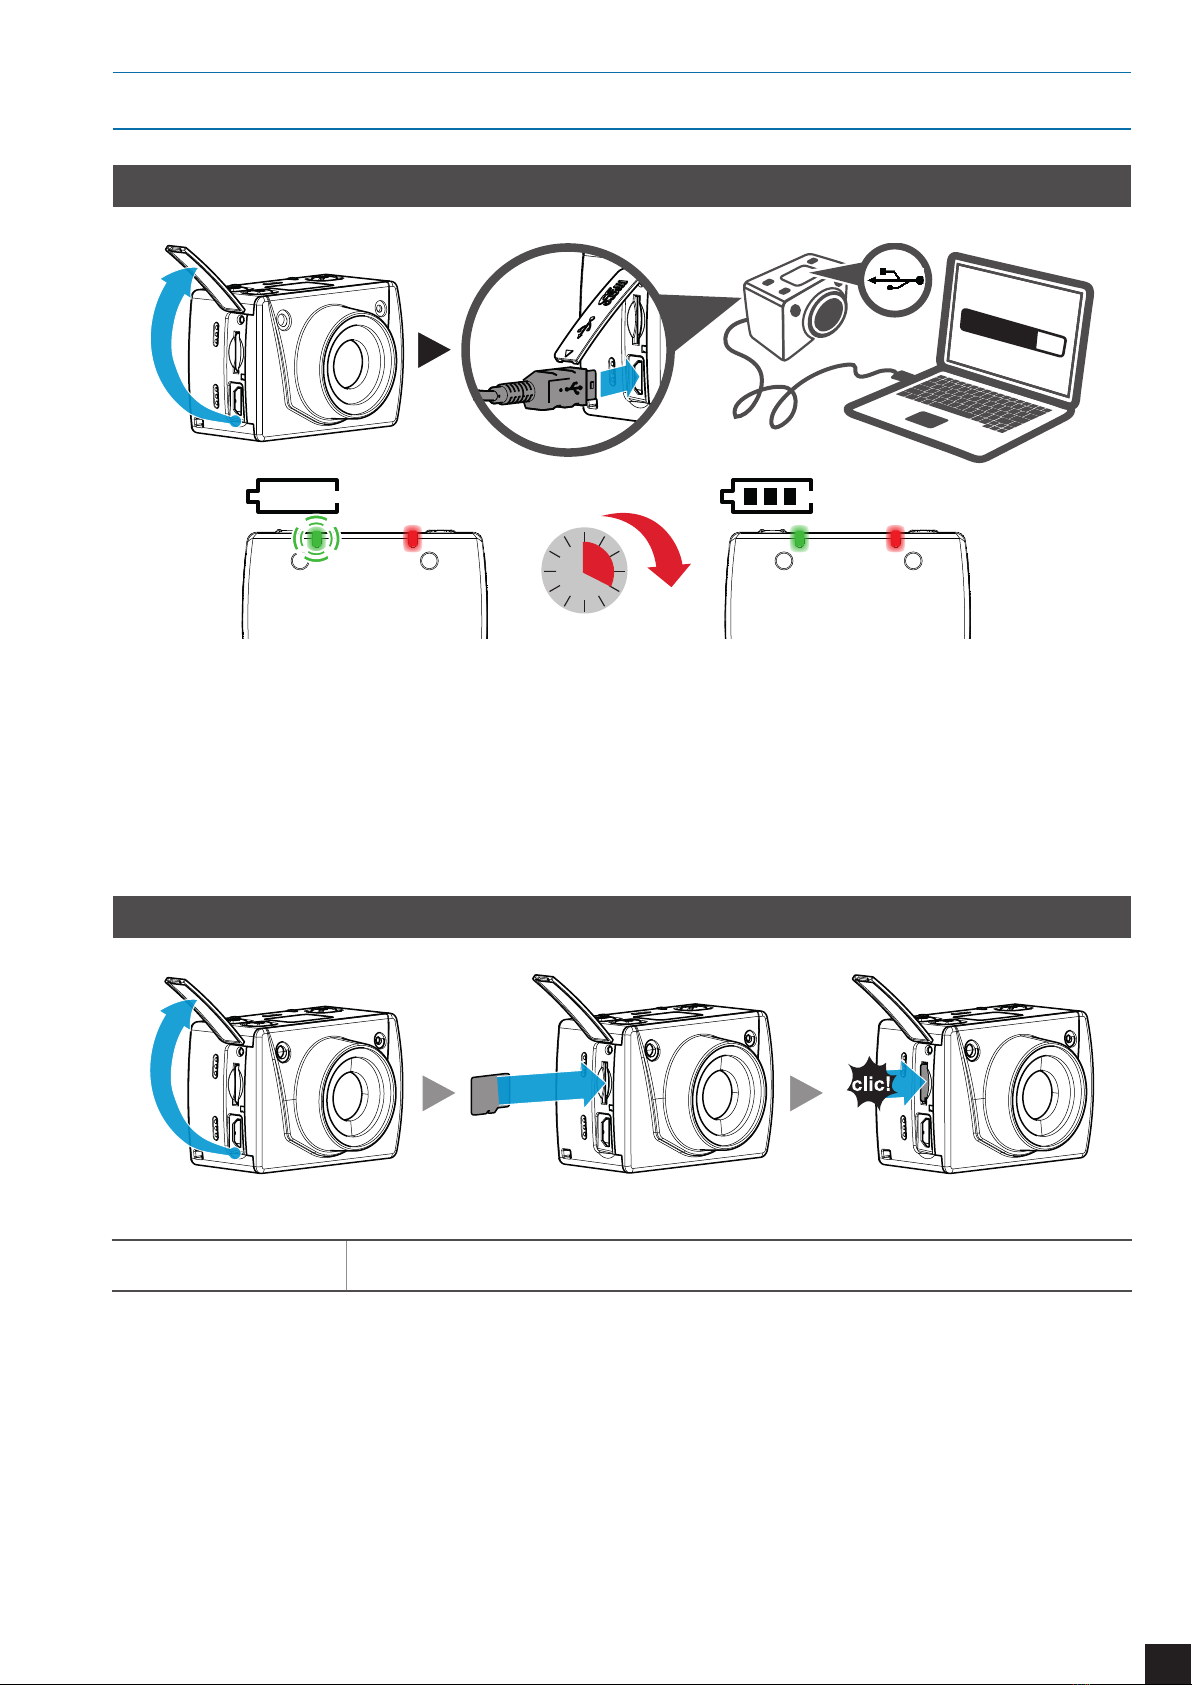
CHARGING THE BATTERY .............................................................................................................3
INSERTING THE MICROSD CARD..................................................................................................3
USING YOUR G-EYE 2........................................................................................... 4
TURNING ON / OFF..........................................................................................................................4
RECORDING A VIDEO .....................................................................................................................5
TAKING PHOTOS .............................................................................................................................5
CAMERA FUNCTIONS OVERVIEW ................................................................................................5
DEFAULT SETTINGS........................................................................................................................6
SETTINGS ............................................................................................................. 7
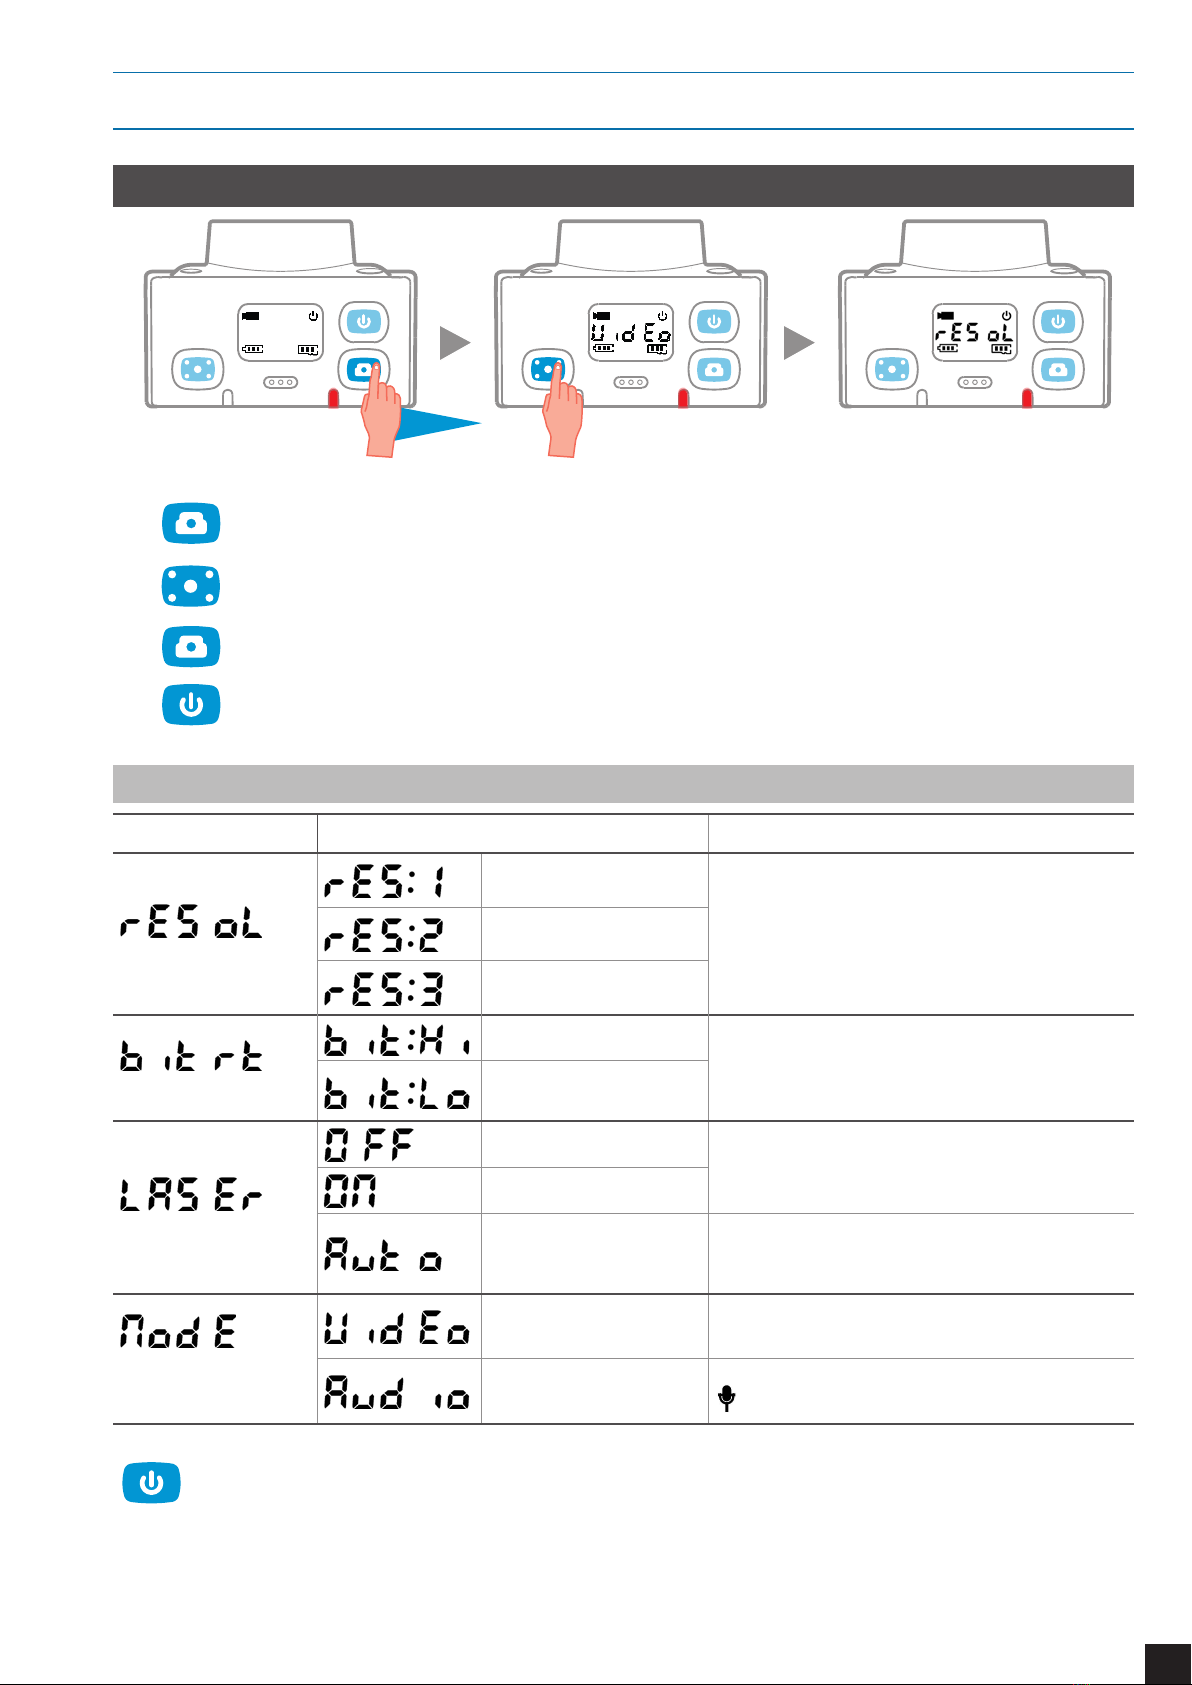
ACCESS SETTINGS .........................................................................................................................7
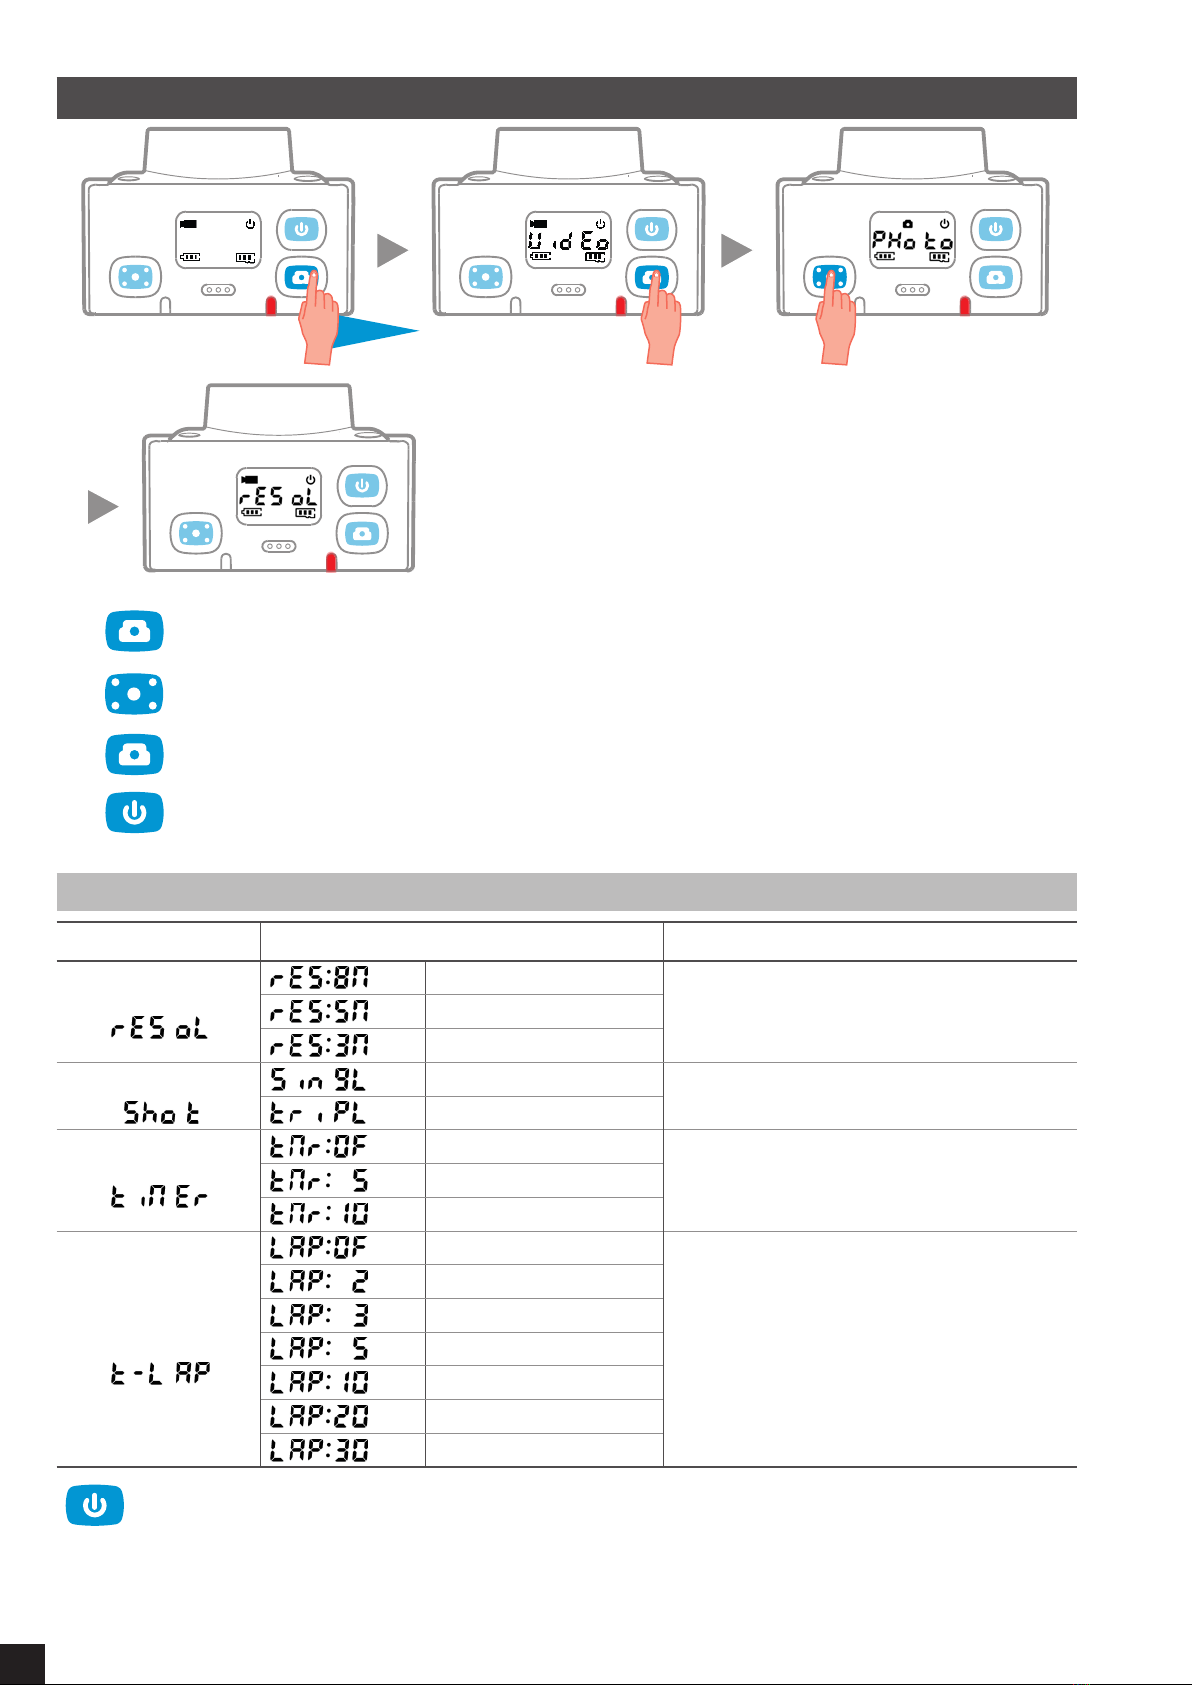
PHOTO SETTINGS ...........................................................................................................................8
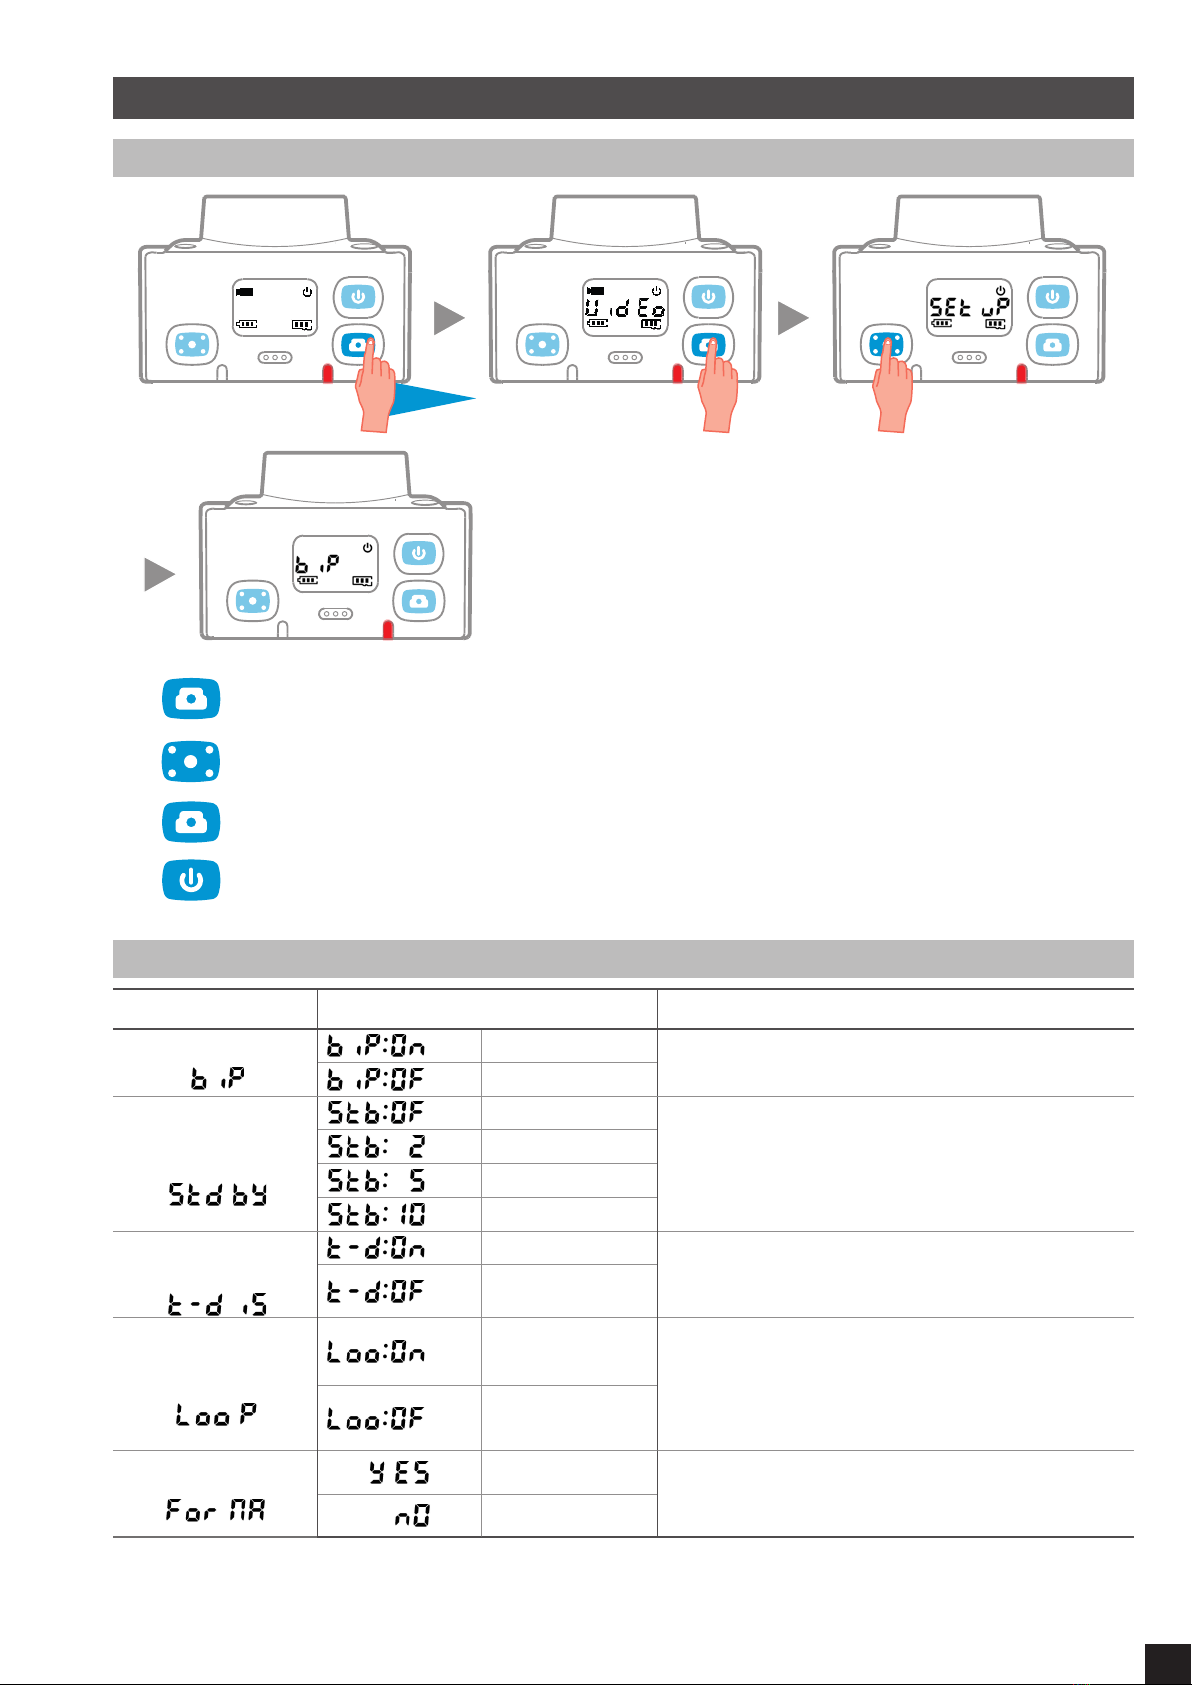
GENERAL SETTINGS......................................................................................................................9
LASER VIEWFINDE ............................................................................................. 10
TRANSFERRING FILES TO A COMPUTER .......................................................... 11
ERROR MESSAGES ............................................................................................. 11
STICKER PAD ...................................................................................................... 12
WATERPROOF CASE ........................................................................................... 12
TECHNICAL FEATURES ...................................................................................... 13
PRECAUTIONS FOR USE..................................................................................... 13
WARRANTY, LEGAL WORDING........................................................................... 14
LIMITED LIABILITY ........................................................................................................................ 14
WARRANTY.................................................................................................................................... 14
LEGAL WORDING.......................................................................................................................... 14


2
CAMERA OVERVIEW
Recording button
Photo button
LCD screen
Green light (video recording /
data transfer)
Laser
MicroSD card slot
Red light (power / charging)
Green light (video recording /
data transfer)
Microphone
Speakers
Micro-USB port
Screw thread for camera attachment (Kodak standard)
On/Off/stop recording button
Power indicator lightVideo recording
Photo capture
Duration of current recording
Battery level
Active USB connection
Remaining available memory
LCD SCREEN

3
FIRST STEPS
CHARGING THE BATTERY
4h
12
6
39
Quick charge: When the device is connected to a computer, you can press and hold the
«power» button to turn off the camera, thereby speeding up the charging process. The green
LED will turn off when this is done, and the red LED will ash while charging. The red LED
will stay lit when the battery is completely charged. Using this method charging will take
approximately three hours. (Attention: data transfer is not possible while using this charging
method).
INSERTING THE MICROSD CARD
Compatible cards
2 GB to 32 GB microSD cards (minimum Class 4, Class 10 recommended)

4
USING YOUR G-EYE 2
TURNING ON / OFF
TURNING ON
3 sec
STANDBY MODE
If the camera is not used for ve minutes, it will automatically go into standby mode.
To record a video
To take a photo
TURNING OFF
3 sec

5
RECORDING A VIDEO
START
STOP
TAKING PHOTOS
CAMERA FUNCTIONS OVERVIEW
CAMERAS MODES
Burst mode Page 8
Self timer Page 8
Time lapse Page 9

6
CAMERA SETTINGS
Video
Î Resolution Î Page 7
Î Video bitrate Î Page 7
Î Laser Î Page 7
Î Video recording mode Î Page 7
Photo
Î Resolution Page 8
General
Î Key beep Page 9
Î Date and time display Page 9
Î Continuous recording Page 9
Î Automatic sleep mode Page 9
Î TV standard Page 10
Î Frame rate Page 10
Î Date and time Page 10
OTHER FUNCTIONS
Î Laser pointer Page 10
Î Format memory Page 9
Î Return to default settings Page 10
DEFAULT SETTINGS
Video
( )
Resolution 1920 x 1080 @ 30 fps
Video bit rate High video bit rate
Laser Deactivated
Video recording mode Video + audio
Photo
( )
Shooting mode (single/triple) Single
Timer Deactivated
Interval mode Deactivated
Resolution 2592 x 1944 / 5 megapixels
General
( )
Beep Activated
Time and date display Deactivated
Content recording Deactivated
Automatic standby After 5 min
TV standard PAL
Refresh rate 50 Hz
Î Return to default settings page 10

7
SETTINGS
ACCESS SETTINGS
3 sec
1Long hold = enter the settings menu
2Enter settings
3Scroll through the setting options
4Conrm the option selection and return to the main menu
VIDEO SETTINGS LIST
SETTING SETTING CHOICES DETAILS
Resolution
1920 x 1080
30 fps, 16:9
1280 x 720
60fps, 16:9
1280 x 720
30fps, 16:9
Video bitrate
High video bitrate High video bitrate will provide a higher
denition of colours, but will use two times
more memory space than in Low bitrate
setting.
Low video bitrate
Laser
Disabled
Enabled
Automatic
The laser is automatically activated when
you record a video, and stops when you
stop recording.
Video recording
mode
Video and audio
Audio only is displayed.
Return to upper menu

8
PHOTO SETTINGS
3 sec
1Long hold = enter the settings menu
2Enter settings
3Scroll through the setting options
4Conrm the option selection and return to the main menu
PHOTO SETTINGS LIST
SETTING SETTING CHOICES DETAILS
Resolution
( )
8 MP, 4:3 3200 x 2400
5 MP, 4:3 2592 x 1944
3 MP, 4:3 2048 x 1536
Shot mode
( )
Single-shot mode In Burst Mode, the cameras takes
3 photos / second.
Burst mode
Self-timer
( )
Disabled When this function is activated,
photos are taken after 5 s or 10 s
delay.
After 5 s
After 10 s
Time lapse
( )
Disabled
When this function is activated, the
camera captures a series of photos at
2, 3, 5, 10, 20 or 30 seconds intervals.
2 seconds intervals
3 seconds intervals
5 seconds intervals
10 seconds intervals
20 seconds intervals
30 seconds intervals
Return to upper menu

9
GENERAL SETTINGS
ACCESS TO GENERAL SETTINGS
3 sec
1Long hold = enter the settings menu
2Enter settings
3Scroll through the setting options
4Conrm the option selection and return to the main menu
GENERAL SETTINGS LIST
SETTING SETTING CHOICES DETAILS
Beep
( )
Enabled Enable/Disable beeps on camera keys.
Disabled
Automatic sleep
mode
( )
Disabled
When this function is activated, the camera
turns to standby mode after 2, 5 or 10
minutes.
After 2 mn
After 5 mn
After 10 mn
Date and time
display
( )
Enabled Enable/Disable overlay of date and time on
video recording.
Disabled
Continuous
recording
( )
Enabled When this function is activated, if the
memory is full, the camera will delete the
oldest video le to free memory space
and continue recording. Deletion of les is
repeated each time it’s needed.
Disabled
Format memory
( )
Enabled This function is used to erase all les saved
on micro-SD card.
Cancel

10
SETTING SETTING CHOICES DETAILS
Delete les
( )
Conrm This function is used to delete selected les
starting with the last saved le.
Cancel
RAZ
( )
Conrm To return to default settings.
Cancel
TV standard
( )
PAL
NTSC
Frame rate
( )
50 Hz
60 Hz
Date & Time
( )
Year For each setting:
Increase the value
Decrease the value
Validate
Month
Day
Time
Minute
Return to upper menu
LASER VIEWFINDE
The laser viewnder facilitates framing. It can be used with the waterproof case.
ACTIVATING THE LASER VIEWFINDER
3 sec
DEACTIVATING THE LASER VIEWFINDER
3 sec

11
TRANSFERRING FILES TO A COMPUTER
Then retrieve the les as if they were on a USB drive.
SYSTEM REQUIREMENTS
PC MAC
Windows XP, Vista, 7, 8 OS > 10
ERROR MESSAGES
MESSAGE DESCRIPTION ACTION
No microSD card:
• Cannot begin recording/shooting.
• Able to access «Settings» menu.
Î Insert a microSD card into the camera.
MicroSD card full:
• Cannot begin recording/shooting.
• Able to access «Settings» menu. Î Transfer videos and photos to a
computer.
Low battery:
• During start-up, only the battery
icon ashes.
• The message is displayed for 2
seconds before the camera shuts
off.
Î Recharge the battery.

12
STICKER PAD
The sticker pads are meant to be used to afx your camera to smooth, hard, rigid surface. 3MTM
stickers provide highly resistant adhesion.
However, the precautions for afxing the pad must be respected.
Î Clean and dry the surface upon which you will be afxing the pad.
Î Make sure that the surface is as smooth as possible.
Î Afx the pad in a dry environment with a moderate temperature, preferably indoors.
Î Let set for 24 hours before use.
NOTE: This pad cannot be used a second time, but it can be cleanly removed by heating with a
hair dryer, for example.
WATERPROOF CASE
This waterproof case was specially designed for the G-EYE 2 Discover camera. It is waterproof
up to 100 meters, and also provides shock protection.
It is meant to be used in the following conditions:
ATTENTION:
Î
In order to guarantee that it is perfectly watertight, it is important that the seal gasket is kept clean.
Dust or grains of sand could be enough to create a leak in the case. You can easily remove the
gasket to rinse it in clean water. Dry the gasket and reinstall in the proper direction.
NOTE:
Î
Vapour may appear in the case without there being a leak. If the temperature and humidity
conditions change between when you close the case and when you begin your activity,
condensation could appear on the inside of the case. This phenomenon could also happen due to
the temperature of the camera itself. To solve this problem, you can insert a small amount of anti-
humidity foam into the case.
Products available in DECATHLON shops and on DECATHLON.COM.

13
TECHNICAL FEATURES
Battery standby Video continuous recording approximately 2 hours
Recharge time ~ 3.5 hours. Max < 4 hours
Battery type Li-ion, 3.7V, 1000 mAh
Video resolution 1080p, 30fps, 16:9, viewing angle = 110°
720p, 60fps, 16:9, viewing angle = 135°
720p, 30fps, 16:9, viewing angle = 135°
Photo resolution 8MP, 5MP, 3MP
Connectors Micro-USB, Micro-HDMI, AV-out, 32 pins for extensions
Connection to computer USB 2.0 « Full-Speed », card reader Micro-SD
Micro-SD card compatible
(sold separately) Micro-SD of 2 GB to 32 GB
Operational temperature -10°C < … < 45°C
Video format MP4
Photo format JPG
PRECAUTIONS FOR USE
-10°C
-50°F
45°C
113°F
Î Handle the device with care - do not drop it or subject it to strong impacts.
Î This product is not waterproof, do not subject it to sprays of water or immerse it.
Î For increased safety, avoid using the buttons during action. Loss of concentration can be
dangerous
Î Do not take the product apart, as this may lead to damage as well as cancellation of the
warranty.
Î Using the product in a very cold environment (temperature below -10°C) may lead to a
reduction in battery capacity, and therefore reduction of battery lifetime.
Î If you plan not to use the product over a long period of time (over 1 month), make sure the
battery is removed.

14
WARRANTY, LEGAL WORDING
LIMITED LIABILITY
• GEONAUTE is not responsible for accidents or injuries caused by handling or using the
product during high risk sports.
• In particular, GEONAUTE insists on informing the user of possible loss of concentration linked
to using the product in dangerous conditions.
• The user is warned that he assumes all legal liability for the taking, sharing, and publication of
images recorded with the product.
WARRANTY
• GEONAUTE guarantees the initial buyer of this product that it is exempt of defaults related
to the materials or fabrication and does so for a period of 2 years (inclusive) from the date of
purchase.
• Please keep your receipt as proof of purchase.
• The warranty does not cover damage caused due to improper use, non-compliance with
safety precautions, accidents, or the incorrect maintenance or commercial use of the device.
• This warranty does not cover damage resulting from repairs carried out by persons not
authorised by GEONAUTE.
• The guarantees contained herein explicitly replace all other guarantees including the
implicit guarantee of merchantability and/or suitability for use. GEONAUTE can, under no
circumstances, be held responsible for any damage, direct or indirect, of a general or specic
nature, caused by or related to use of these instructions or the product they describe.
• During the warranty period, the item will either be repaired free of charge by an authorised
repair service or replaced free of charge (depending on the distributor).
• The warranty does not cover the battery, or camera if it t is cracked, broken or presents visible
dents.
LEGAL WORDING
CE COMPLIANCE
D E CAT H LO N hereby declares that the G-EYE DISCOVER device complies
with essential requirements and with other relevant stipulations of the 1999/5/
CE directive.
The CE compliance declaration is available at the following web link:
https://www.geonaute.com/en/ec-declaration-conformity
RECYCLING
The «crossed-out bin» symbol means that this product and
the batteries it contains must not be thrown away with general
household waste. They are subject to a specic type of sorting.
Please take the batteries and your unusable electronic product
to an authorised collection point for recycling. This treatment of
your electronic waste will protect the environment and your health.
Dispose of your batteries in a place where they will be recycled.
CONTACT US
Contact us on www.geonaute.com

Made in China
Fabricado na China
Произведено в Китае
İmal edildiği yer Çin
中国 制造
中國 製造
Shanghai Xin Wei Sports. Co., Ltd.
上海莘威运动品有限公司
上海市闵行区申北路2号
IMPORTADO PARA BRASIL POR IGUASPORT LtdaCNPJ : 02.314.041/0022-02
Импортер: ООО «Октоблу», 141031, Россия, Московская область, Мытищинский район, МКАД 84-й км.,
ТПЗ «Алтуфьево», владение 3, строение 3.
台灣迪卡儂有限公司台灣台中市408南屯區大墩南路379號諮詢電話: (04) 2471-3612
TURKSPORT Spor Urünleri Sanayi ve Ticaret Ltd.ŞtiOsmaniye Mahallesi Çobançeşme KoşuyoluBulvarı No: 3
Marmara Forum Garden Oce 0B Blok 01 Bakırköy 34146 Istanbul, TURKEY
Ref. 494644
Table of contents
Other GEONAUTE Digital Camera manuals