George Home GDM001B-22 User manual

17L Digital Microwave Oven
User Guide
IMPORTANT: RETAIN FOR FUTURE REFERENCE
240V~50Hz, 1050W
GDM001B-22/GDM001W-22

2
WARNINGS:
About this guide
We’ve written this manual to help you get the most from your
microwave. Please hold on to it for future reference.
THIS PRODUCT WAS DESIGNED AND MANUFACTURED TO
MEET STRICT QUALITY AND SAFETY STANDARDS. THERE
ARE, HOWEVER, SOME OPERATION PRECAUTIONS YOU
SHOULD BE AWARE OF.
1. Read all warnings & instructions in this manual to ensure
you get the best out of your product.
2. For household use only. Only use this appliance for
its intended purpose as described in this manual. This
appliance is onlysuitable for domestic use and is not
designed for commercial use.
3. This appliance can be used by children aged from 8 years
and above and persons with reduced physical, sensoryor
mental capabilities or lack of experience and knowledge if
theyhave been given supervision or instruction concerning
use of the appliance in a safe wayand understand
the hazards involved. Children shall not playwith the
appliance. Cleaning and user maintenance shall not be
made by children without supervision.
4. WARNING: If the door or door seals are damaged, the
oven must not be operated until it has been repaired by a
competent person.
5. WARNING: It is hazardous for anyone other than a
competent person to carryout anyservice or repair
operation that involves the removal of a cover which gives
protection against exposure to microwave energy.
6. WARNING: Liquids and other foods must not be heated in
sealed containers since theyare liable to explode.

3
7. Leave a minimumof 30cm (12”) above the microwave and
never place items on top as this will block the vents.
8. Onlyuse utensils that are suitable for use in microwave
ovens.
When heating food in plastic or paper containers, keep an
eye on the oven due to the possibility of ignition.
10.
The microwave oven is intended for heating food and
beverages. Drying of food or clothing and heating of
warming pads, slippers, sponges, damp cloth and similar may
lead to risk of injury, ignition or fire.
keep the door closed in order to stifle any flames.
11.
If smoke is emitted, switch off or unplug the appliance and
12.
Microwave heating of beverages can result in delayed
eruptive boiling, therefore care must be taken when handling
the container
13.
The contents of feeding bottles and babyfood jars shall
be stirred or shaken and the temperature checked before
consumption, in order to avoid burns.
14.
Eggs in their shelland whole hard-boiled eggs should not
be heated in microwave ovens since they may explode, even
after microwave heating has ended.
15.
The oven should be cleaned regularlyand anyfood deposits
removed.
16.
Failure to maintain the oven in a clean condition could lead
to deterioration of the surface that could adverselyaffect
the life of the appliance and possibly result in a hazardous
situation.
18.
17.
The microwave oven is onlyused in freestanding; the
microwave oven shall not be placed in a cabinet.
allowed during microwave cooking.
9. Metallic containers for food and beverages are not
19. The appliance shallnot be cleaned with a steam cleaner.
20.Do not operate this appliance if it has a damaged cord or
plug. If the supply cord is damaged, it must be replaced
by the manufacturer, its service agent or similarly qualified
persons in order to avoid a hazard.

4
22.
Keep awayfrom harsh or abrasive cleaning agents or
solvents.
23.
Remove allprotective wrapping prior to use.
24.
Before connecting the microwave to the power, check
the voltage shown on the appliance corresponds with the
voltage in your home. If it doesn’t, contact your local store.
25.
The cord shouldn’t hang over the edge of a table or
counter, or touch a hot surface.
26.
Do not use the microwave when it is emptyas this could
lead to damage.
27.
children.
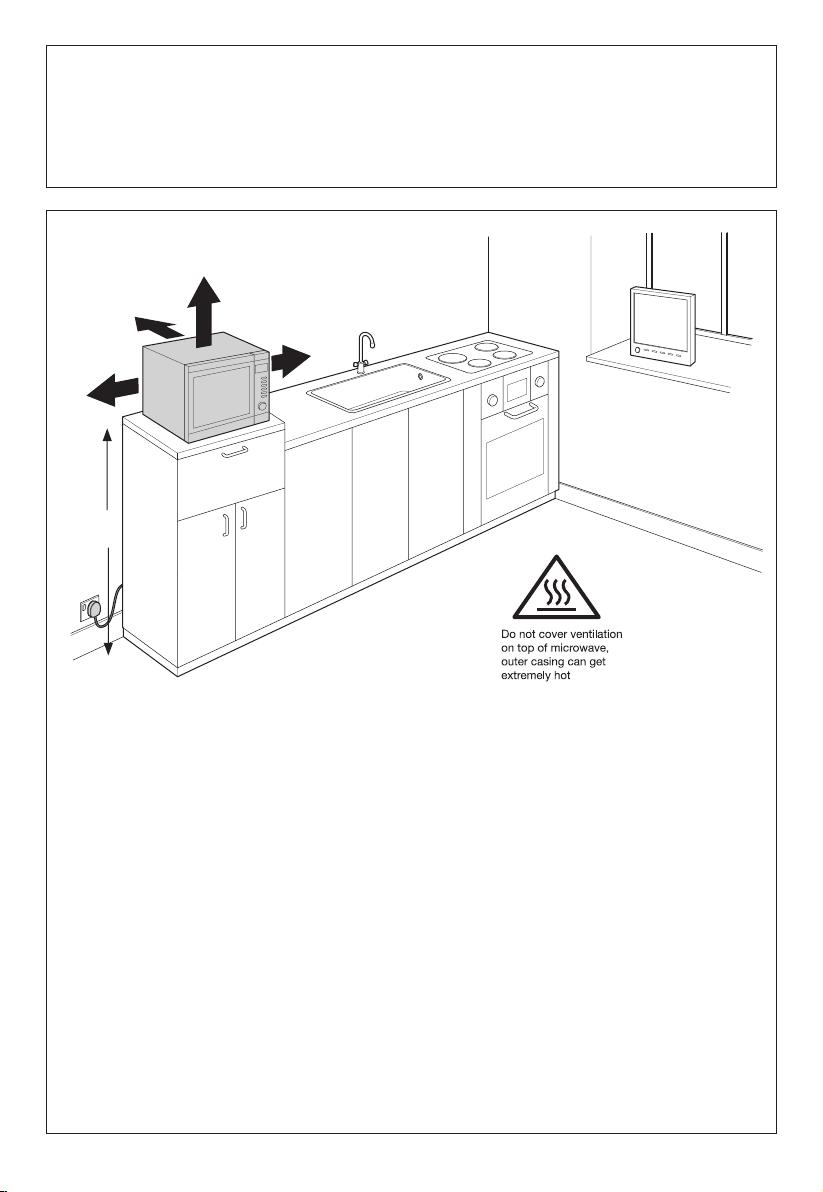
Always place on a firm, level surface, out of reach of
28.
Never put anyobjects into the outer case openings or
remove parts of the microwave (e.g. the feet and screws).
29.
Do not use the cavity for storage purposes. Do not leave
paper products, cooking utensils or food in the cavity
when not in use.
30.
The door seals are located around the window and on the
inside of the door. The seals are not airtight, but although
no microwaves are released it is normal for a small amount
of air or steamto escape when the microwave is in use.
31.
Do not use plastic containers for food that has a high
content of fat or sugar.
32.
Do not use this microwave to deep fryfoods.
33.
Avoid cooking foods surrounded bymembrane (e.g. egg
yolks, potatoes, chicken livers and ready meals) without
piercing themwith a fork several times.
34.
Always stir microwaved foods to distribute the heat evenly,
then leave to stand for a few minutes. Make sure to test
the temperature of cooked food before eating.
35.
Food containing a mix of fat and water (e.g. stock) should
be left to stand for 30-60 seconds in the microwave after it
microwave, cord, or plug in water or liquid.
To avoid fire, electric shock, or injury, never immerse the
21.
Do not use attachments not recommended by the
manufacturer. Onlyuse thermometers approved for use in
microwaves.
36.
is cooked. This allows the mixture to settle and prevents it

5
37.
Use gloves if you remove anyheated food.
38.
Do not overheat food.
39.
The outer-casing may become hot during use, so always
place on a heat-resistant surface and use with caution.
40.
Beware when opening lids as hot steam will escape.
41.
The door of the outer surface may get hot when the
appliance is operating.
42.
Keep the waveguard cover clean at all times and wipe
the interior with a damp cloth after each use. If you leave
grease or fat it may overheat, smoke or catch fire.
43.
Do not leave the microwave unattended when in use.
44.
Unplug when not in use and before cleaning.
45.
Please don’t dismantle. If a fault occurs have the
microwave inspected in a qualified repair shop or return
to us at Asda.
46.
ASDA does not recommend allowing children to operate
this appliance.
Certain foods mayheat quicker than others (e.g. jam and
puddings).
from bubbling.
47.
48. This appliance is a Group 2 Class Bequipment.
Group 2 equipment: group 2contains all ISM RF
equipment in which radio-frequency energy in the
frequency range 9 kHz to 400 GHz is intentionally
generated and used or onlyused locally, in the formof
electromagnetic radiation, inductive and/or capacitive
coupling, for the treatment of material, for
inspection/analysis purposes, or for transfer of
electromagnetic energy.
Class B equipment is equipment suitable for use in
locations in residential environments and in establishments
directly connected to a low voltage power supply network
which supplies buildings used for domestic purposes.

6
You should have
microwave oven, glass tray & turntable support

7
How to…
…recognise the parts of your digital microwave
How to…
…assemble your microwave
1. Remove any tape and place the
turntable support in the centre of the
recess on the floor of the microwave.
2. Place the glass tray onto the
turntable support, aligned with
the turntable shaft.
Tape
Oven window Waveguard cover
Turntable shaft
Door
Glass tray
Turntable support
Door latches
Control panel
Function
buttons
Door
release
Door locks

8
How to…
…best place your microwave
1. Do not place over a cooker or heat-producing appliance as this may cause damage.
2. Select a level surface that provides enough space for the outlet vents. Ensure the
surface is strong enough to support the microwave (do not place inside cabinets).
3. A minimum clearance of 20cm (8”) is required between the microwave and any
adjacent wall or surface.
4. Leave a minimum of 30cm (12”) above the microwave and NEVER place anything
on top as this will block the vents.
5. The microwave should be as far away from TVs and radios as possible. Using the
microwave may cause interference with reception.
6. The microwave must be positioned so the plug is accessible and the socket is within
easy reach.
7. Plug the microwave into a suitable 13 amp mains socket and ensure the voltage is
the same as that in your home (do not use extension cables or mains socket
adaptors).
85cm
20cm
20cm
30cm
0cm

9
How to…
…recognise the microwave control panel
DISPLAY
Shows the time countdown during use;
and functions as a digital clock when not
in use.
TIME COOK
TIME DEFROST
WEIGHT DEFROST
POWER
CLOCK
KITCHEN TIMER
POPCORN
POTATO
PIZZA
FROZEN VEGETABLE
BEVERAGE
DINNER PLATE
STOP/CANCEL
Press once to stop or pause cooking, then
again to cancel the remaining cooking time.
START/+30 SEC.
Press once to start cooking, then again to
add 30 seconds for the cooking time per
press.

10
How to…
…use your microwave
Please note
Do not use metal pans or items with a metal handle or trim (including wire twist-ties)
or melamine dishes (as they contain material that absorbs microwave energy and may
cause dishes to crack or burn). All cookware should be suitable for microwave use and
no containers with restricted openings (e.g. bottles) should be used. If baby bottles are
heated, the teat should not be left on.
1. Slot the plug into the mains socket
and switch the power on.
2. The microwave will ‘BEEP’ once and
thedisplay will show the clocksymbol
and 0:00 .

11
1. Press "CLOCK", "00:00" will display.
2. Press the number keys and enter the
current time. For example, time is 12:00
now, please press "1,2,0,0" in turn.
3. Press "CLOCK" to finish clock setting.
4. If the numbers input are not within the
range of 1:00--12:59, the setting will be
invalid until valid numbers are input.
Note:
(1) In the process of clock setting, if the
"STOP/CANCEL" button is pressed
or if there is no operation within 1
minute, the oven will go back to the
former setting automatically.
(2) If the clock need to be reset, please
repeat step 1 to step 3.
Clock Setting
":" will flash and the clock will be lit up.
The clock is in 12 hour format only.

12
Power Level
11 power levels are available.
10
9
8
7
6
5
4
3
2
1
0
100%
90%
80%
70%
60%
50%
40%
30%
20%
10%
0%
PL10
PL9
PL8
PL7
PL6
PL5
PL4
PL3
PL2
PL1
PL0
Level Power Display

13
1. Press "KITCHEN TIMER", screen will
display 00:00, and the four digital figures
will flash.
2. Press the number keys and enter the
timer time. (the maximum setting time
is 99 minutes and 99 seconds)
3. Press "START/+30SEC." to confirm
setting.
4. When the timer time arrives, the
microwave will BEEP 5 times.
Note:
(1) The kitchen timer is used to set a time
reminder e.g. timing some food cooking
on a separate hob, and is different to
the main clock function.
(2) When using the kitchen timer, other
programs cannot be set at the same
time.
Kitchen Timer

14
1. Press "TIME COOK" once, screen will
display "00:00".
2. Press number keys to input the cooking
time; the maximum cooking time is 99
minutes and 99 seconds.
3. Press "POWER" once, screen will
Now you can press number keys to
4. Press "START/+30SEC." to start cooking.
Example: to cook the food with 50%
microwave power for 15 minutes.
a. Press "TIME COOK" once."00:00"
displays.
b. Press "1","5","0","0" in order.
c. Press "POWER"once,then press "5" to
select 50% microwave power.
d. Press "START/+30SEC. " to start cooking.
Note:
(1) In the process of setting, if the
"STOP/CANCEL" button is pressed or if
there is no operation within 1 minute,
the oven will go back to the former
setting automatically.
(2) If "PL0' is selected, only the internal fan
will work with no microwave heating.
(3) During microwave cooking, "POWER"
can be pressed to change the power
you need.
After pressing "POWER",the current
power will flash for 3 seconds, now you
can press the number buttons to change
the power. The oven will work with the
selected power for the remaining time.
Microwave cook
display "PL10". This is the default power
adjust the power level.
(100%).

15
1. From standby mode, instant cooking at
"START/+30SEC." to increase the
time is 99 minutes and 99 seconds.
"START/+30SEC.". Each press on the
"START/+30SEC." button will increase
cooking time by 30 seconds. the
maximum cooking time is 99 minutes
and 99 seconds.
Note: during microwave cooking and time
defrost,time can be added by pressing
"START/+30SEC." button.
Speedy Cooking
100% power level can be started by
cooking time; the maximum cooking
power level with 30 seconds' cooking
time can be started by pressing
selecting a cooking time from 1 to 6
2. In waiting state, instant cooking at 100%
minutes by pressing number 1 to 6. Press

16
1. Press "WEIGHT DEFROST", screen
will display "dEF1".
2. Press numerical buttons to input the
weight of the food you want to defrost.
(The defrost weight range is between
100-2000g. If the food weights less than
100g or more than 2000g, you won't be
3. Press "START/+30SEC." button to start
defrosting. The defrosting program
automatically imports a defrost amount
of time based on the food weight you
input.
Note: You can pause the defrosting
by pressing the "STOP/CANCEL" button
once. This is useful if you wish to stir your
food at any point. To resume the defrosting
simply press the "START/+30SEC." button.
Weight Defrost Function
able to defrost it). Enter the weight to the
nearest 100g.

17
1. Press "TIME DEFROST", screen will
display "dEF2".
2. Press numerical buttons to input
defrosting time. The effective time range
is 00:01-99:99
3. The default microwave power is power
level 3. If you want to change the power
level, press "POWER" once, and the
screen will display "PL 3", then press the
numerical button for the power level you
wish.
4. Press "START/+30SEC." to start
defrosting.
Note: You can pause the defrosting by
pressing the "STOP/CANCEL" button once.
This is useful if you wish to stir your food at
any point. To resume the defrosting simply
press the "START/+30SEC." button.
Time Defrost Function

18
1. Press "POPCORN" repeatedly until the
"50", "100" g will display in order.
"50" appears.
2. Press "START/+30 SEC." to cook,
Note: Do not allow the popcorn bag to
come into contact with the waveguide
cover during the cooking process.
1.
triangle on each corner of the bag before
no longer rotates properly, please press
"STOP/CANCEL" button once and
open the oven door and adjust the bag
position to ensure even cooking.
Important Information About Microwave
Popcorn Feature:
POPCORN
2.
It is suggested that you fold down a
cooking. Refer to below image.
microwave will BEEP once.When cooking
and then turn back to waiting state.
finishes, the microwave will BEEP five times
For example, press "POPCORN" once,
you wish to cook appears in the display,
number showing the weight in grams
If the popcorn bag expands and

19
1. Press "POTATO" repeatedly until the
"1" appears.
microwave will BEEP once. When cooking
finishes, microwave will BEEP five times
and then turn back to waiting state.
POTATO
For example, press "POTATO" once,
number of potatoes you wish to cook
appears in the display
"1","2","3" will
display in order.
"1"SET : 1 potato (approximately 230
grams)
grams)
"2"SETS: 2 potatoes (approximately 460
"3"SETS: 3 potatoes (approximately 690
2. Press "START/+30 SEC." to cook,
grams)

20
order.
2. Press "START/+30 SEC." to cook,
microwave will BEEP once.When cooking
PIZZA
weight in grams you wish to heat shows as
and then turn back to waiting state.
a number in the display,
finishes, microwave will BEEP five times
"100", "200",
"400" g will display in
1. Press "PIZZA" repeatedly until the
This manual suits for next models
1
Table of contents
Other George Home Microwave Oven manuals
Popular Microwave Oven manuals by other brands

Toshiba
Toshiba ML2-EC10SA(BS) instruction manual

NEFF
NEFF H12WE60N0 instruction manual

CONTINENTAL EDISON
CONTINENTAL EDISON CEMO23CGM instruction manual

Sharp
Sharp R-414HS Operation manual

Hotpoint Ariston
Hotpoint Ariston MWK 431.1 X/HA Instructions for use

Amana
Amana MEW5527, MEW6527MEW5530 installation instructions