German pool WSR-2714 User manual

P.1
Please read these instructions and warranty information carefully
before use and keep them handy for future reference.
Online Warranty Registration
USER MANUAL
WSR-2714
Front Loader
Washing Machine

P.3P.2
Please register your warranty information now!
For Warranty Terms & Conditions,
please refer to the last page of this user manual.
請即進行保用登記﹗
有關保用條款細則,請看本說明書最後一頁。
Tables of Contents
Safety Notes 04
Product Structure 06
Installation Instructions 07
Control Panel 11
Operating Precautions 13
Operating Instructions 16
Care and Maintenance 21
Troubleshooting 25
Specications 27
Warranty Terms & Conditions 51

P.5P.4
1. If the supply cord is damaged, it must be replaced by the manufacturer, its service
agentorsimilarlyqualiedpersonsinordertoavoidahazard.
2. The new hose-sets supplied with the appliance are to be used and that old hose-
sets should not be reused.
3. This washing machine is for indoor use only.
4. The openings must not be obstructed by a carpet.
5. This appliance can be used by children and persons with reduced physical,
sensory or mental capabilities or lack of experience and knowledge if they have
been given supervision or instruction concerning use of the appliance in a safe
wayandunderstandthehazardsinvolved
6. Children shall not play with the appliance. Cleaning and user maintenance shall
not be made by children without supervision. This appliance is not intended for
use by persons (including children) with reduced physical, sensory or mental
capabilities, or lack of experience and knowledge, unless they have been
given supervision or instruction concerning use of the appliance by a person
responsible for their safety. Children should be supervised to ensure that they do
not play with the appliance.
7. Pull out its plug from the power socket before cleaning or maintenance.
8. Make sure that all pockets are emptied.
9. Sharp and rigid items such as coin, brooch, nail, screw or stone etc. may cause
serious damages to this machine.
10. Pull out its plug and cut off water supply after the operation.
11. Please check whether the water inside the drum has been drained before opening
its door. Please do not open the door if there is any water visible.
12. Pets and kids may climb into the machine. Check the machine before every
operation.
13. Glass door may be very hot during the operation. Keep kids and pets far away
from the machine during the operation.
14. Take care that power voltage and frequency shall be identical to those of washing
machine.
15. Do not use any socket with rated current less than that of washing machine.
Never pull out power plug with wet hand.
16. To ensure your safety, power cord plug must be inserted into an earthed three-
pole socket. Check carefully and make sure that your socket is properly and
reliably earthed.
17. Children should be kept away unless continuously supervised.
18. Packing materials may be dangerous to the kids. Please keep all packing
materials (plastic bags, foams, etc) far away from the kids.
Safety Notes
19. Be careful of burning when washing machine drain hot washing water.
20. Washing machine shall not be installed in bath room or very wet rooms as well as
in the rooms with explosive or caustic gases.
21. Makesurethatthewaterandelectricaldevicesmustbeconnectedbyaqualied
technician in accordance with the manufacturer's instructions and local safety
regulations.
22. Before operating this machine, all packages and transport bolts must be removed.
Otherwise, the washing machine may be seriously damaged while washing the
clothes.
23. Beforewashingtheclothesatrsttime,thewashingmachineshallbeoperatedin
one round of the whole procedures without the clothes inside.
24. The washing machine with single inlet valve only can be connected to the cold
water supply. The washing machine with double inlet valves can be connected to
the hot water and cold water supply.
25. Your washing machine is only for home use and is only designed for the textiles
suitable for machine washing.
26. Flammable and explosive or toxic solvents are forbidden. Gasoline and alcohol
etc. Shall not be used as detergents. Please only select the detergents suitable
for machine washing, especially for drum.
27. It is forbidden to wash carpets.
28. Neverrellthewaterbyhandduringwashing.
29. After the program is completed, Please wait for two minutes to open the door.
30. Please remember to disconnect water and power supply immediately after the
clothes are washed.
31. Do not climb up and sit on top cover of the machine
32. Do not lean against machine door.
33. Pleasedonotclosethedoorwithexcessiveforce.Ifitisfounddifculttoclose
the door, please check if excessive clothes have been distributed evenly.
34. The household washing machine is not intended to be built-in.
35. Cautions during Handling Machine:
• Transportboltsshallbereinstalledtothemachinebyaqualiedtechnician.
• The accumulated water shall be drained out of the machine.
• Handle the machine carefully. Never hold each protruded part on the
machine while lifting. Machine door can not be used as the handle during
the conveyance.
Safety Notes

P.7P.6
Product Structure
1. Detergent Container
2. Washer Door
Hole plug Inlet pipe C Inlet pipe H
(Sold separately)
Outlet hose support
(Sold separately)
3. Power Plug
4. Service Panel
5. Control Panel
6. Outlet Pipe
5
6
2
4
3
1
Accessories
Installation Instructions
Unpack the Washing Machine
Unpack your washing machine and check if there is any damage during the transportation.
Also make sure that all the items in the attached bag are received. If there is any damage to the
washing machine during the transportation, or any item is missing, please contact the local dealer
immediately.
Dispose the Packing Materials
The packing materials of this machine may be dangerous to kids. Please dispose them properly and
avoid contact with kids. Please dispose the related packing materials according to the relevant local
regulations. Please do not throw the packing materials along with daily waste.
Remove Shipping Bolts
The shipping bolts on the back of the washing machine must be
removed before using this washing machine. Please follow the
steps below to remove the bolt:
1. Loosen all bolts with spanner and then remove them.
2. Stop the holes with transport hole plugs.
3. Keep the transport bolts properly for future use
Select the Installation Location
Beforeinstallingthewashingmachine,thelocationcharacterizedasfollowsshallbe
selected:
• Rigid, dry, and level surface (if not level, please make it level with reference to the
• followinggure“AdjusttheLevelingFeet”)
• Avoid direct sunlight
• Sufcientventilation
• Room temperature is above 0℃
• Keep far away from the heat resources such as coal or gas. Make sure that the washing machine
willnotstandonpowercord.Donotinstallthewashingmachineonthecarpetoor.
Adjust Leveling Feet
1. Whenpositioningthewashingmachine,pleaserstcheck
if the feet are closely attached to the cabinet. If not, please
turn them to their original positions with hand or spanner and
tighten the nuts with spanner.
2. After positioning the washing machine, press four corners on
top cover of washing machine in sequence. If the washing
machine is not stable when being pressed, the feet shall be
adjusted.

P.9P.8
Installation Instructions Installation Instructions
3. Make sure the washing machine is properly placed. Use a spanner to loosen the lock nut and ro-
tatethefeetbyhand.Untilthefeetareinclosecontactwiththeoor.Holdthefootwithonehand
and use the other hand to hold the nut tightly on the bottom of the washing machine.
4. Onceproperlylocked,pressthefourcornersagaintomakesuretheyareproperlyadjusted.Ifthe
washing machine is still unstable, steps 2 and 3 must be repeated.
5. Place a solid cylinder (eg cans) on the top cover of the washing machine relative to the left, right,
frontandreardirections.Ifthecylinderremainsstable,thewashingmachineisplacedat.
Rolling, the washing machine is not placed properly. The direction of the rolling indicates that
the ground is low, then the two legs in this direction should be raised at the same time until the
washingmachineisat.Repeatsteps1to3tobringthebottomfeetintoclosecontactwiththe
ground. Then lock the nut.
Connect Inlet Pipe
Connecttheinletpipeasindicatedinthegure.Forthemodel
which has a hot water valve, please connect the hot water vale to
the hot water tap. It will save energy automatically for some wash-
ing programs.
Positioning the Water Pipe
Thewaterpipeshouldbeproperlyplacedtopreventtheoorfrombeingdamagedbywaterleakage.
There are two ways to place the end of the water pipe:
Install Inlet Pipe
1. Connect the elbow to tap and fasten it clockwise.
2. Connect the other end of inlet pipe to the inlet valve at the
backside of washing machine and fasten the pipe tightly
clockwise.
1. Place it next to the sink.
Max.100cm
Min.60cm
Max.100cm
Min.60cm
It can be drained up and down, and the installation height of the outlet pipe should not exceed 100 cm.
And the end should not be immersed in water.
2. Connect it to the drainage pipe of the sink.
If the washing machine has a water outlet support, please install it as shown below.
When installing the drainage pipe, use a rope to secure it properly.

P.11P.10
Installation Instructions
If the pipe is too long, do not force it into the washing machine as this will cause abnormal noises.
Max.100cm
Min. 60cm
Max.100cm
Water Sink
Fix Pipe
Tie
Min. 60cm
Electrical Connection
• Whenusingtheheatingfunction,themaximumcurrentowingthroughthewashingmachinewill
reach 10A. Please ensure that the power supply system (current, voltage and wire) can reach the
general load requirements of the washing machine.
• Connect the power plug to a properly installed and properly grounded outlet.
• Make sure that the voltage at the location of the washing machine matches the voltage indicated
on the nameplate of the washing machine.
• The power plug must be matched to the outlet and the outer box must be properly and effectively
grounded.
• Do not use a multi-function plug or outlet as an extension cord.
• Do not connect or unplug the power plug with wet hands.
• Hold the plug tightly when connecting and unplugging the power plug. Do not pull the power plug
hard.
• Please protect the power cord properly. The power cord should be secure and not tripped over to
objectsorobjectstopreventdamage.Thepowerplugshouldbeeasilypluggedintotheoutletand
special attention should be paid to the location of the outlet.
• If the cord is damaged or shows signs of damage, please contact the Customer Service Center for
replacement.
Warning:
1. This washing machine must be properly grounded. If any short circuit occurs, grounding can
reduce the risk of electric shock. The washing machine is equipped with wires, including an elec-
trical plug and a grounding edge at the ground.
2. The circuit that operates the washing machine should be separated from the circuit of other elec-
trical appliances, otherwise the power protection device may trip or the fuse may blow.
Control Panel
1 2
3 4 5 67
1. Program Dial
2. Display Panel
3. Power ON/OFF key
4. Delay Start Key
5. Spin Speed Key
6. Temperature Key
7. Start/Pause Key

P.13P.12
Program Dial Function
There are a total of 16 optional cleaning functions on the program dial.
Washer Function AdjustableTemperatures
Cotton Intensive 20℃, 30℃, 40℃, 60℃, 90℃, Cold Water
°C60 Cotton 60℃60℃
°C40 Cotton 40℃40℃
°C20 Cotton 20℃20℃
Quick:15 min 20℃, 30℃, 40℃, Cold Water
Eco Wash 20℃, 30℃, 40℃, Cold Water
Rinse & Spin Cold Water
Spin Cold Water
Drain /
Wool 20℃, 30℃, 40℃, Cold Water
Delicates 20℃, 30℃, Cold Water
Mixed Fabrics 20℃, 30℃, 40℃, Cold Water
Synthetics 20℃, 30℃, 40℃, 60 ℃
Sportswear 20℃, 30℃, 40℃, Cold Water
Baby Care 20℃, 30℃, 40℃, 60 ℃, 90℃, Cold Water
My Cycle Customized
Control Panel Operating Precautions
Operating Precautions
• Please read this method carefully to avoid washing machine malfunction and clothing damage.
• Be aware of which types of clothing will fade during initial wash.
• Use a white towel dampened with laundry detergent to clean the invisible corners of the garment,
and then check that the towel is stained with the original color of the garment.
• Separate the dark and light coloured clothing, or any garments that fade easily.
• For stains on sleeves, collars and pockets, use a laundry detergent and brush gently with a brush.
Finally, put them into the washing machine to achieve a better cleaning effect.
• For clothing that is susceptible to temperature, it should be cleaned according to the require-
ments on the clothing label, otherwise it may cause discoloration or distortion.
• Do not leave the laundry to be washed in the washing machine for too long, otherwise it may be
moldy and stained. Therefore, please wash your clothes accordingly.
• Ifitisnotcleanedaccordingtothecleaningtemperaturespeciedontheclothinglabel,thecloth-
ing may be discolored or distorted.
Clothing that Cannot Be Washed in a Washing Machine
• Clothing that may be deformed by water immersion includes ties, vests, western clothes, coats,
etc.,ifimmersedinwater,itmayshrinksignicantly.
• Blendedsyntheticbersarenotsuitableforwashingwithawashingmachine.
• Wrinkled clothing, embossed clothing, resin-based clothing, etc., may be deformed when im-
mersed in water.
• Among the cotton and wool clothing, easily distorted clothing includes wrinkled silk products, fur
products and fur decorations.
• Clothing with decorations, long dresses and traditional costumes are products that are easily
discolored.
• Do not wash clothing without the clothing label and cleaning instructions.
• Donotwashclothingthatiscontaminatedwithchemicalssuchasgasoline,petroleum,benzene,
paint thinner or alcohol.
• This washing machine is not washable with waterproof materials (ski suits, picnic mats, curtains,
etc.).
• Itisnotrecommendedtocleanberproductsthataredifculttoabsorb,suchaswaterproof
mats and clothing, picnic mats, raincoats, umbrellas, ski clothes, car covers, sleeping bags, etc.,
otherwise it will cause splashing or abnormal vibration, create danger, and pass water. Drainage
can also be affected.
Laundry Detergent Precautions
• Pleaseselect“lowbubbles”laundrydetergent,washingpowder,orspecialfordrumwashingma-
chineaccordingtothetypeoffabric(cotton,syntheticber,softclothingandwoolclothing),color,
cleaning temperature, degree of soiling and form. Washing powder, otherwise it may produce
excessivefoamandoverowthelaundrydetergentcontainer,whichmaycauseaccidents.

P.15P.14
• Bleach may damage clothing, so it is recommended to use as little as possible.
• Washing powder is easy to leave residue on the clothes, causing bad odor, so it should be thor-
oughly rinsed.
• If there are excess amounts of laundry detergent or the water temperature is too low, the laundry
detergent may not be completely dissolved, so it may remain on clothes, water pipes and washing
machines.
• Pay attention to the weight of the clothes, the degree of soiling, and the manufacturer’s recom-
mendations.
• Place laundry detergents and additives in a safe and dry place that is not accessible to children.
• Please use powdered or liquid laundry detergent. If soap is used, soap residue may get stuck in
the gaps in the clothes.
Check the Clothes that Need to Be Cleaned
• Remove the items from your pocket.
• Checkthepocketsoftheclothestobecleanedandtakeouthardobjectssuchascoins,other-
wise the washing machine may be damaged or an abnormal problem may occur.
• Clothingshouldbesortedrstandthenplacedinthewashingmachine.Theycanbeclassied
according to the following characteristics:
a. a.Symbolsontheclothingcarelabel:Theclothingtobecleanedarecotton,blendedber,
syntheticber,silk,woolandrayon.
b. b. Color: should distinguish between white and colored clothing. All new colored clothing
should be cleaned separately.
c. c.Size:Washingclothesofdifferentsizestogether,thecleaningeffectwillbebetter.
d. d. Softness: Soft clothing should be cleaned separately. For new pure wool fabrics, curtains
and silk garments, a soft material cleaning program should be selected. Please check the
labels on all the clothes you want to clean.
• For curtains with hooks, remove the hooks before cleaning.
• The decorations on the clothes may damage the washing machine. If there are buttons or embroi-
dery on the clothes, turn the clothes over and clean.
• Handlingoffasteningdevicessuchaszippers:Thezippershouldbepulledupandthebuttonsor
hooksshouldbexed.Loosesashesorribbonsshouldbetiedtogether.
• Itisrecommendedtoplacethezippedorbutton-fastenedlaundrybagtopreventthebustwire
from falling into the drum and damaging the washing machine.
• Extra-nefabricssuchaslacecurtains,straightcoats,smallitems(socks,handkerchiefs,ties,
etc.) should be placed in a laundry bag before cleaning.
• When cleaning a single large and heavy piece of clothing, such as a thick pile of thick towels,
jeans,ajacketwithaller,etc.,itmaybeeasytocreatealargecentrifugalforce,andthealarm
sounds due to excessive imbalance. Therefore, it is recommended to add one or two pieces of
clothing to clean together, and the drainage will be smoother.
• Remove dust, dirt and pet hair from clothing before cleaning.
• If dust, dirt and clothing are rubbed onto the machine, it may damage the clothes and detract
from the laundry.
• To protect baby’s skin, baby items (baby clothes and towels) should be cleaned separately. If
cleaned with adult clothing, ensure thorough water and cleansing, leaving no residual laundry
detergent.
• Itisrecommendedtorstcleanthesmudgedpartssuchaswhitesocks,collarsandsleevesby
hand and then put them into the washing machine for better cleaning results.
• Clothingthatiseasytouffshouldbeturnedoverandwashed,andshouldbeseparatedfrom
other clothing, otherwise other clothing may be stained with dust and thread.
• Black clothing is best cleaned separately from cotton clothing, because if they are cleaned to-
gether, they are easily stained with other colored threads.
Precautions During Drainage
• Drainage of general clothing:
The water for washing clothes is discharged through the drain.
• Drainageofwaterproofclothingandberproducts:
Undernormallaundryanddrainageconditions,thewaterfromwaterproofclothingandber
products cannot be discharged, and the washing water must be collected in the same direction in
order to avoid the washer from moving.
• Defoam function:
When there is too much detergent, it will produce excessive foam, which will affect the effect of
washing and water. The laundry program automatically checks and automatically adds a defoam-
ing procedure to remove the foam when too much foam is detected, and reminds the user to
reduce the laundry detergent the next time a similar cleaning is performed.
The Weight of the Laundry
Do not place too much clothing, as it may affect the cleaning effect. Please use the following table to
determine the laundry weight that the washing machine can withstand.
Operating Precautions Operating Precautions
Fiber type Maximum load
Cotton 7.0 kg
Synthetic Fiber 3.5 kg
Wool 2.0 kg
Fine clothing 2.5 kg

P.17P.16
Operating Instructions
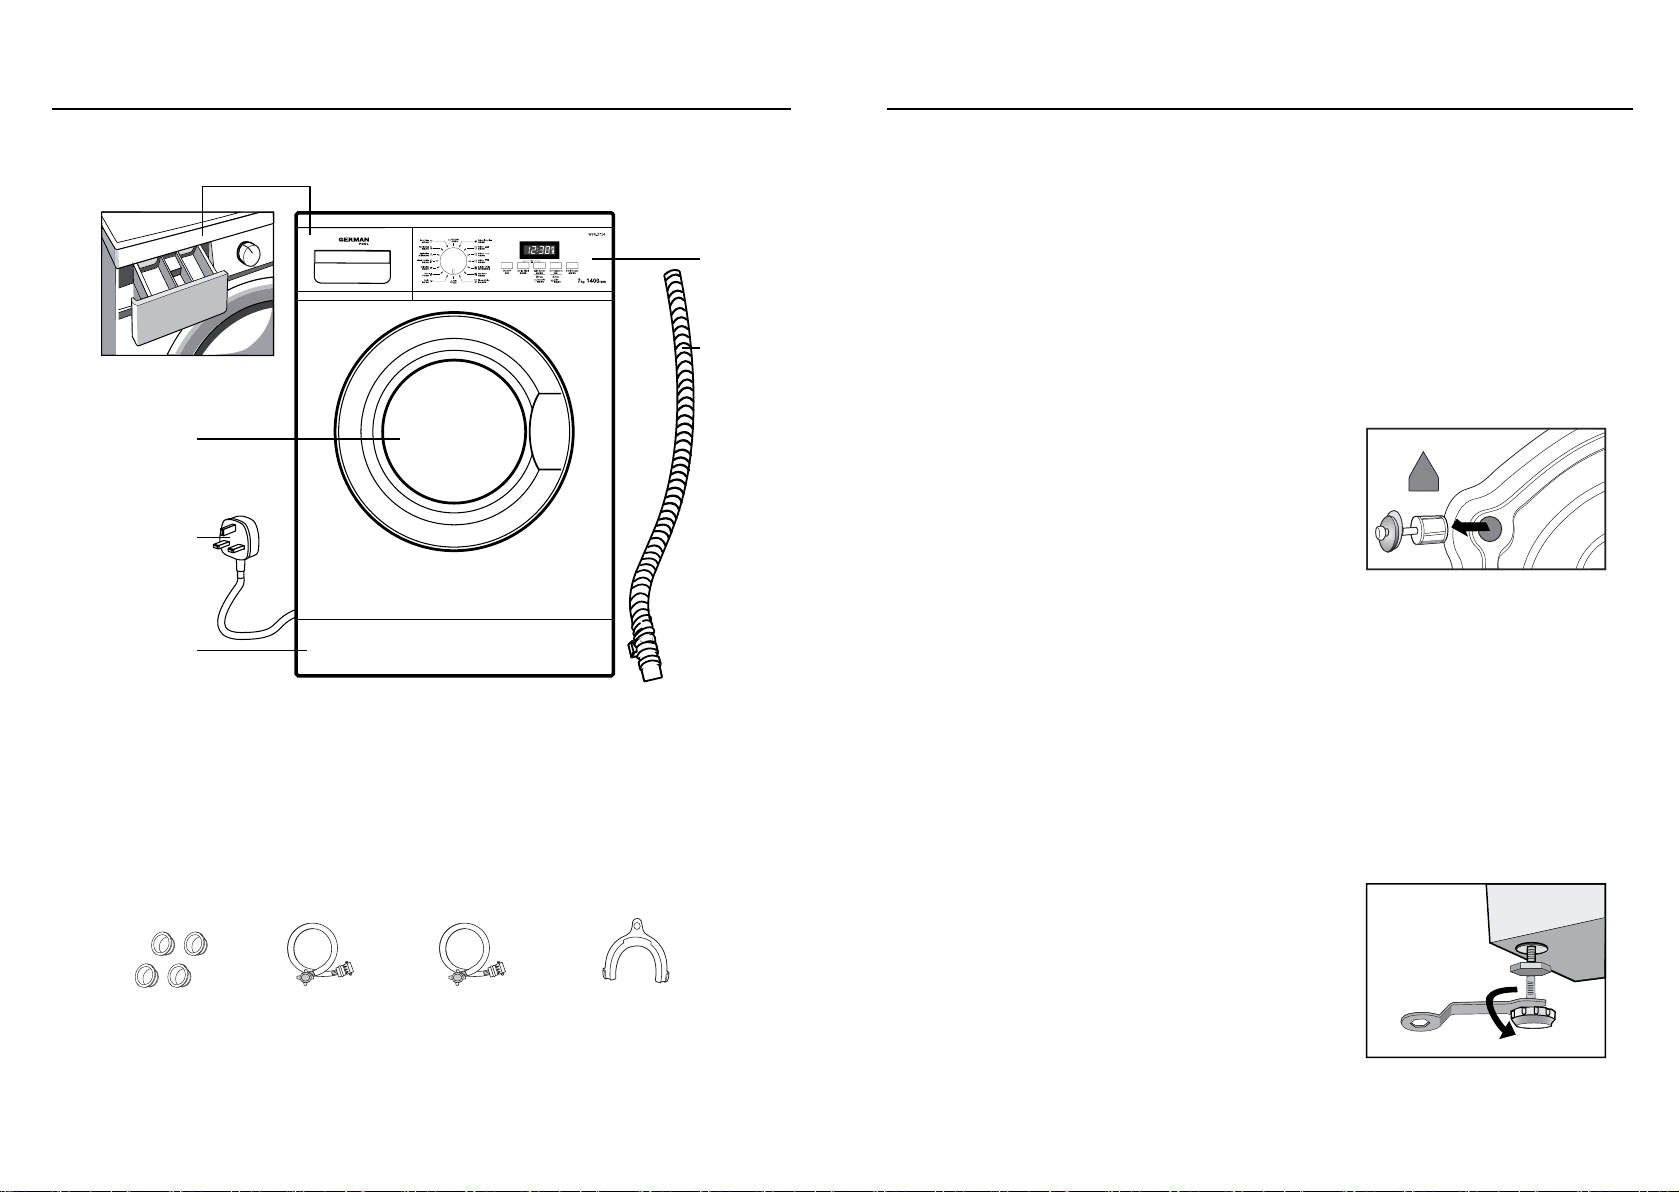
First Time Using the Washing Machine
Beforewashingclothesforthersttime,letthewashingmachineruntheentire
program once without putting in the clothes.
1. Connect the power and water sources.
2. Put the laundry detergent in the laundry detergent container and close the
laundry detergent container.
3. Press the Power ON/OFF key.
4. Press the Start/Pause key.
Laundry Detergent Containers
The laundry detergent container is divided into three compartments:
I: pre-wash detergent or washing powder (if needed)
II: Main wash detergent, softener, pre-dip, bleach or decontamination
products
:specialadditives,suchasbersoftenersortackier(ifneeded)
• For viscous laundry detergents or additives, it is recommended
todissolvetheminwaterbeforeinjectingthedetergentcon-
tainertopreventtheinletofthedetergentcontainerfrombeingblockedandoverowingduring
waterinjection.
• Please select the appropriate detergent type for various cleaning temperatures to achieve the
best cleaning results and save water and electricity.
Using the Washing Machine
1. Connect the power supply and make sure the water pipes are properly connected, then fully open
the faucet.
2. Putthelaundrytobewashedinthewashingmachineandadddetergentandtackiertothe
laundry detergent container.
3. Press the power button to start the washing machine and select the appropriate program and
function, then press the Start/Pause key to start the machine.
Choose a Laundry Program
Please select the appropriate laundry program according to the type, quantity and dirtiness of the
clothes and the following cleaning thermometer.
1. Turn the program dial to select the appropriate program for the type of clothing.
2. Select the appropriate water temperature, the higher the water temperature the greater the power
consumption.
3. Select the appropriate rate of spin. The higher the rotation speed, the dryer the clothes will be,
but the noise will also become larger. The surface of the slender clothes will wrinkle, and the
service life of the washing machine will be shortened.
Toprotectyourclothing,choosealowerspinspeedforyourneclothing.Themaincleaningprogram
depends on the clothes to be cleaned. You can select the program according to the following instruc-
tions:
• My Cycle: Press and hold the dehydration speed button for 3 seconds, My Cycle will remember
yourpersonalizationsettings,andyoucanselectMyCycleforthenextlaundry.
• Cotton 60°C/40°C/20°C: This program is suitable for cleaning clothes that can be cleaned daily.
The laundry time is long and the cycle is quite strong. It is recommended to use this program to
clean everyday cotton products such as sheets, duvet covers, pillowcases, underwear and more.
• Cotton Intensive: This program adds extra cleaning time for better cleaning results. For infants or
skin allergies, it is recommended to use this program for cleaning.
• Quick: 15min: This program is suitable for quickly cleaning small quantities of clothing that are
not too dirty.
• Eco Wash: Use a energy-saving washing mode to clean a small amount of clothing, and the maxi-
mum water temperature will be set to 40 ° C or below to save energy.
• Wool:Thisprogramissuitableforwashingwoolgarmentswiththelabel“machinewash”.Please
select the appropriate water temperature according to the label on the clothes. In addition, ap-
propriate laundry detergents should be selected for wool clothing.
• Synthetics: This program is suitable for cleaning synthetic fabrics and fairly slender clothing. The
cleaning time is shorter than that of cotton clothing, and the cleaning power is milder. This pro-
gram is recommended for cleaning shirts, outerwear, blended clothing, curtains or lace products.
When washing knitted garments, the amount of laundry detergent should be reduced because
the textile construction of the garment is loose and therefore foams easily.
• Delicates:Thisprogramissuitableforcleaningveryneclothingandclothingthatneedstobe
gently cleaned. Compared to the Synthetics program, the cleaning power is gentler and the rota-
tion speed is lower.
• MixedFabrics:Thisprogramissuitableforcleaningdifcultlaundryitemsthatrequiremoretime
and effort. It is suitable for everyday cotton products such as bed sheets, chained clothing, pil-
lowcases, bathrobes and underwear.
• Sportswear: This program is suitable for cleaning sports clothes.
• Baby Care: This program is suitable for cleaning baby clothes. It takes a long time to make the
baby’s clothes cleaner and the water effect is better to protect the baby’s skin.
• Spin: Before spin, drain soapy water or water is drained.
• Drain: Program that drains water
Clothing type Recommended cleaning temperature
Severely soiled, white cotton or linen (eg coffee tablecloths,
tablecloths, towels, sheets) 90℃
Moderately dirty, tinted and possibly slightly faded linen, cot-
tonandsyntheticfabrics(egshirts,pajamas);slightlydirty,
white, pure linen (eg underwear)
60℃
Lightly dirty products (such as synthetic or wool products) 40℃、30℃、20℃or Cold Water
Watch the video clip
Operating Instructions

P.19P.18
Operating Instructions
Delay Start Function
Press the delay start key to set the delay start time, the time can be set to 0-24 hours.
Set the delay to start:
1. Choose a laundry program.
2. Press the Delay Start key to select the time.
3. PresstheStart/Pausekeytoconrm.
Cancel the delay start:
To cancel the delayed start, press and hold the delayed start button until the time becomes 0 hours
before the program starts.
If the program has started, press the Start/Pause button to cancel the program.
During the operation of the washing machine, if there is a power failure, the washing machine will au-
tomatically store the program of your choice. When the power is turned back on, press the start/pause
key and the washing machine will continue the remaining time of the program.
Child Lock Function
In order to prevent children from operating incorrectly during the laundry process and the laundry
program does not work properly, you can choose to activate the child lock function. After the lock, in
addition to the power switch key, all other function keys are suspended. If the power is turned on, the
washing machine will shut down. The washing machine will remember the child lock function and the
program before turning off the power. When the machine is turned on again, the washing machine will
continue to execute the program.
Locking: While the program is running, press the delay start key and the spin speed button for 3 sec-
onds at the same time, the alarm will beep once, and the start/pause key and the program dial will be
locked.
Unlock: After locking, press the delay start key and the spin speed key for 3 seconds at the same time,
the alarm will beep and then unlock. The child lock will also be unlocked after the power is turned off.
When all programs are completed, the child lock function will be cancelled.
Alarm Bell Function
Turn off the alarm function: After starting the washing machine, press and hold the spin speed key for
3 seconds, you will hear a click and the alarm will turn off. If the bell function is turned off, the bell will
not sound unless it is reset again.
Resume the alarm function: You should press the spin speed key for 3 seconds again to resume the
alarm. Your settings will be maintained until the next reset.
Program chart
Operating Instructions
Program
description
Load
(kg)
Preset Temperature
(℃)
Preset Time
(minutes)
Preset Speed
(rpm)
Cotton Intensive 7.0 40 1:58 1000
°C60 Cotton 60℃7.0 60 3:36 1400
°C40 Cotton 40℃7.0 40 3:31 1400
°C20 Cotton 20℃7.0 20 1:13 1000
Quick: 15 min 2.0 Cold 0:15 800
Eco Wash 2.0 30 1:06 800
Rinse & Spin 7.0 - 0:31 1000
Baby Care 7.0 60 1:39 1000
Sportswear 3.5 40 1:19 800
Synthetics 3.5 40 1:33 1200
Mixed Fabrics 7.0 40 1:13 1000
Delicates 2.5 30 1:00 600
Wool 2.0 40 1:06 400
Drain - - 0:01 0
Spin 7.0 - 0:12 1000

P.21P.20
Clothing Care Label
Operating Instructions
Hand wash Not machine washable
Washing includes
machine wash and
hand wash
Not washable
Dry clean Do not dry clean
Warm dry cleaning Do not wring out
Bleach Do not bleach
Machine dry Do not machine dry
Ironing Do not iron
Steam iron Cloth ironing
Medium temperature
and maximum tem-
perature 150℃
Dry after washing
Hang dry Hang in the shade
Care and Maintenance
Cleaning the Washing Machine Exterior
• Proper maintenance of the washing machine can extend its service life. A
diluted non-corrosive neutral detergent can be used to clean the surface of
the washing machine when needed.
• Ifthewateroverows,wipeitoffwithadampclothimmediately.
• Sharpobjectsmustnottouchthewashingmachineexterior.
• Do not use formic acid and its diluted solvents or similar products for cleaning.
Cleaning the Washing Machine Drum
• Ifmetalobjectsleaverustinthedrum,cleanthemimmediatelywithachlorine-freedetergent.
• Do not use steel wool to clean.
Handling a Frozen Washing Machine
Whenthetemperaturedropsbelow0°C,thewashingmachinewillfreeze,thenyoucan:
1. Turn off the power to the washing machine.
2. Rinse the faucet with warm water to allow the inlet pipe to relax.
3. Remove the inlet pipe and immerse it in warm water.
4. Injectwarmwaterintothewashingdrumandwaitfor10minutes.
5. Reconnect the inlet pipe to the faucet and check that the water inlet and outlet are normal.
6. When reusing the washing machine, make sure that the ambient temperature is above 0 °C.
Warning:
• Unplug the power cord or turn off the power and turn off the faucet before starting cleaning or
maintenance.
• After using the washing machine, unplug the power cord and close the washing machine door to
avoid danger to children.
• Do not use solvents to prevent damage to the washing machine and to prevent the generation of
toxic gases or explosions.
• Do not use a sprinkler to clean the washing machine.
• Do not use detergents containing chloroxylenol to clean the washing machine.
Watch the video clip

P.23P.22
Cleaning the washing machine lter
1. Loosen the inlet pipe from the
back of the washing machine.
2. Use long nose pliers to remove
thelterfromthewashing
machine and reinstall it after
washing.
3. Reconnect the inlet pipe.
4. Turn on the faucet and make sure there are no leaks.
5. Turn off the faucet.
Note: Ingeneral,thefaucetltershouldbecleanedrst,followedbythewashingmachinelter.
Ifonlythewasherlteriscleaned,repeatsteps1-3ofthefaucetlter.
Care and MaintenanceCare and Maintenance
Cleaning the Washing Machine Exterior
• Proper maintenance of the washing machine can extend its service life. A diluted non-corrosive
neutral detergent can be used to clean the surface of the washing machine when needed.
• Ifthewateroverows,wipeitoffwithadampclothimmediately.
• Sharpobjectsmustnottouchthewashingmachineexterior.
• Do not use formic acid and its diluted solvents or similar products for cleaning.
Cleaning the Washing Machine Drum
• Ifmetalobjectsleaverustinthedrum,cleanthemimmediatelywithachlorine-freedetergent.
• Do not use steel wool to clean.
Handling a Frozen Washing Machine
Whenthetemperaturedropsbelow0°C,thewashingmachinewillfreeze,thenyoucan:
1. Turn off the power to the washing machine.
2. Rinse the faucet with warm water to allow the inlet pipe to relax.
3. Remove the inlet pipe and immerse it in warm water.
4. Injectwarmwaterintothewashingdrumandwaitfor10minutes.
5. Reconnect the inlet pipe to the faucet and check that the water inlet and outlet are normal.
6. When reusing the washing machine, make sure that the ambient temperature is above 0 °C.
Prevent Washing Machine From Freezing
If your washing machine is placed in a room that is prone to frost, drain the remaining water from the
drain and inlet pipes to prevent frost formation.
1. Turn off the faucet.
2. Loosen the inlet pipe from the faucet and place the end into the container.
3. Inadditionto“laundry”and“drainage”,pleasestartanyotherprogram.Ifthereiswaterinthe
inlet pipe, let the water drain for about 40 seconds.
4. Reconnect the inlet pipe to the faucet.
Warning: To avoid burns, wait until the hot water in the washing machine has cooled down.
Cleaning the Detergent Container and the Groove
1. Press the arrow position on the soft cover of the laundry detergent box.
2. Lift the clip and remove the soft cover, then rinse all the grooves with water.
3. Replace the soft cover and replace the detergent box.
Cleaning the Faucet Filter
Whenthefaucetisturnedon,thereisnowaterowingintothewashing
machineortheamountofwaterisinsufcient,thatis,theinletwater
ltershouldbecleaned.
1. Turn off the faucet.
2. Inadditionto“cleaning”or“drain”,pleaseselectanyother
program.
3. Press the Start/Pause button to keep the program running for about 40 seconds.
4. Remove the inlet pipe from the faucet.
5. Cleanthefaucetlterwithwater.
6. Reconnect the inlet pipe.

P.25P.24
Clean Drainage Pump
Thedrainagepumpcanlteryarnandsmallforeignobjectsthatisproducedwhenwashingclothes.
Regularcleaningofthedrainpumplterensuresthatthewashingmachineisfunctioningproperly.
Theltermustbecheckedandcleanedregularlyaccordingtothedegreeofcontaminationinthewash-
ing machine and the frequency of the washing machine.
If the washing machine cannot be emptied or rotated, the drain pump should be checked. If the drain
pump is blocked by pins, coins, etc., the washing machine will emit abnormal noise during drainage.
Please clean the drain pump as follows:
1. Turn off the power to the washing machine.
2. If necessary, wait until the water has cooled.
3. Open the service panel and place a container next to it to collect the spilled water.
4. Whennowatercontinuestoow,loosenthepumpcoverandremovethepumpcover.When
removing the pump cover, be sure to put a piece of cloth nearby to absorb the spilled water.
5. Rotate the impeller of the pump to remove any foreign matter from it.
6. Tighten the pump cover.
7. Cover the service panel.
Open the service panel Loosen the pump cover Tightening the pump cover Cover the service panel
Care and Maintenance
Warning︰
When the washing machine is in use, depending on the program selected, there may be hot water in
the pump. Do not remove the pump cover during the laundry cycle. Be sure to wait until the washing
machine has completed the entire cycle and empty it before removing the pump cover.
When reinstalling the pump cover, make sure that the pump cover is securely fastened to prevent water
leakage or contact with children.
First use a drain pump to drain, then open the drain pump to remove foreign matter from the drain
pumplter.
Be careful if the drained water is hot.
Problem Cause Possible Solution
The wash-
ing machine
could not be
started
Check that the washing machine door is
closed.
Check that the power plug is plugged in.
Check that the faucet is turned on.
Check if the start/pause button has been
pressed.
Check if the power switch has been
pressed。
The washing
machine door
cannot be
opened
The safety protection design of the
washing machine is working.
Cut the power.
Heating failure The NTC is damaged and the heat-
ing tube is old.
The clothes can be washed normally.
If you are unable to use hot water for laundry,
please contact Customer Service and Repair
Center.
Leaking water The connection between the
inlet or outlet pipe and the faucet
or washing machine is not fast
enough.
The drain pipe in the room was
blocked.
Check and tighten the hose.
Clean the outlet pipe and seek professional
maintenance if necessary.
Water over-
owsfrom
the bottom of
the washing
machine
The inlet pipe is not tight. The
outlet pipe leaks.
Secure the inlet pipe.
Replace the drain.
Indicator or
display is
not lit
The power is cut off.
There is a problem with the PC
board.
There is a connection problem with
the wires.
Check that the power is off and plug it in
properly.
If you cannot solve it, please contact cus-
tomer service and repair center.
Laundry deter-
gent remains
in the laundry
detergent
container
The washing powder became wet
and agglomerated.
Clean and dry the laundry detergent box.
Use a liquid laundry detergent or a special
detergent for the drum.
Troubleshooting

P.27P.26
Specications
Specicationsaresubjecttochangewithoutpriornotice.
If there is any inconsistency or ambiguity between the English version and the Chinese version, the English version shall prevail. Refer to
www.germanpool.com for the most up-to-date version of the Operating Instructions.
Model WSR-2714
Max Load(Dry Clothes)7.0 kg
Water Pressure 0.05MPa~1MPa
Voltage/Frequency 220-240V~50Hz
Power (Max) 2,000 W
Product Dimensions (H) 850 (W) 595 (D) 495 mm
Net Weight 61 kg
Product Disposal:
Do not dispose of discarded electrical appliances with domestic waste, and avoid
harmful toxic substances that penetrate into the food chain and affect health. In
order to protect the health of you and others, and maintain a good living environ-
ment, please contact the professional recycling department to deal with!
Problem Cause Possible Solution
Cleaning
effect is not
ideal
The clothes are too dirty.
The detergent dose is not enough.
Choose the appropriate program.
Add an appropriate amount of laundry de-
tergent according to the instructions on the
laundry detergent package.
Abnormal
noise, big
vibration
Checkifthexingboltsareremoved.
Check that the washing machine is installed
onahard,atoor.
Check the inside of the washing machine for
hairclipsormetalobjects.
Check that the feet of the washing machine
areat.
Troubleshooting
Display Description Reason Possible Solution
E30 Door lock problem The washing machine door is
not closed
Restart after closing the
washing machine door
E10 There is a problem with wa-
terinjectionduringwashing
(waterinjectiontimeismore
than 7 minutes)
The faucet is not open or the
waterowistooslow.
Thefaucetlterisblocked.
The inlet pipe is twisted.
Unable to supply water.
Turn on the faucet or wait
until the water supply
returns to normal.
Checkthefaucetlter.
Straighten the inlet pipe.
Check the other taps in
the room.
E21 There is a problem with
drainage
The drain is blocked or
twisted.
The drain pump is blocked.
Clean and straighten the
drain.
If you have any other questions or problems that cannot be resolved, please contact Customer Service
and Repair Center.

P.29P.28
目錄
安全注意事項 29
產品結構 31
安裝說明 32
控制面板 35
操作注意事項 37
操作說明 40
清潔與保養 45
常見故障及處理 48
技術規格 50
保用條款 51
1. 如果供應的電線損壞,必須由製造商、其服務經銷商或具備類似資格的人員來
更換,以避免發生危險。
2. 應使用隨洗衣機供應的新水管組,而不應使用舊水管組。
3. 本洗衣機僅適合室內使用。
4. 洗衣機開口不可被地毯堵住。
5. 如果有人看管或指導如何安全地使用本洗衣機,且了解使用洗衣機所涉及的危
險,兒童以及肢體、感官或心智能力減退或缺乏經驗和知識之人,亦可使用本
洗衣機。兒童不得將洗衣機當作玩具玩耍。如果無人看管,洗衣機的清潔和維
護不得由兒童進行。
6. 除非有負責其安全之人看管或指導如何使用本洗衣機,否則肢體、感官或心智
能力減退或缺乏經驗和知識之人(包括兒童),不得使用本洗衣機。兒童應受
到看管,確保他們不將洗衣機當作玩具玩耍。
7. 在清潔或維修保養之前,務必從電源插座拔掉插頭。
8. 把衣物放進洗衣機前,請確保取出所有衣物口袋裏的物品。
9. 硬幣、胸針、釘子、螺絲或石頭等尖銳或堅硬的物體,可能嚴重損壞洗衣機。
10. 使用完洗衣機後,請拔掉電源插頭,並切斷供水。
11. 打開洗衣機門前,請確定滾桶裏面的水已全部排出。如果可看見裏面仍有水,
請勿打開洗衣機門。
12. 寵物和兒童可能爬進洗衣機。請在每次操作之前檢查洗衣機。
13. 玻璃門蓋在操作期間可能變得高熱,因此務必確保兒童和寵物遠離洗衣機。
14. 請注意使用的電壓和頻率必須與洗衣機要求者相同。
15. 請勿使用額定電流小於洗衣機要求者的插座。切勿用濕手拔掉電插頭。
16. 為確保您的安全,電線插頭必須插入接地的三腳插座。請小心確保您的插座已
適當且可靠地接地。
17. 除非受到持續看管,否則兒童應遠離洗衣機。
18. 包裝材料可能對兒童造成危害。請將所有包裝材料(塑膠袋、發泡膠等)遠離
兒童。
19. 當洗衣機在排放熱洗衣水時,小心不要被燙傷。
20. 洗衣機不應安裝在浴室或非常潮濕的房間,亦不應安裝在有爆炸性或腐蝕性氣
體的房間。
21. 確保供水和電氣裝置是由合格的技師根據製造商的指示及當地的安全法規來連
接。
22. 操作本洗衣機之前,所有包裝和運送螺栓都必須移除,否則在清洗衣物時,洗
衣機可能嚴重受損。
安全注意事項

P.31P.30
23. 第一次清洗衣物之前,應先讓洗衣機在未放入衣物的情況下,先運轉整個程序
一次。
24. 有單一進水閥的洗衣機僅能連接到冷水龍頭。有雙進水閥的洗衣機可連接到熱
水和冷水龍頭。
25. 您的洗衣機僅適合家庭使用,且僅為適合洗衣機清洗的衣物而設計。
26. 禁止使用可燃及爆炸性或有毐溶劑。汽油或酒精等不得當作洗衣劑。請只選擇
適合洗衣機清洗、尤其必須適合滾桶式洗衣機的洗衣劑。
27. 禁止清洗地毯。
28. 在洗衣期間,切勿以人手加水。
29. 程式完成後,請等候兩分鐘再打開洗衣機門。
30. 衣物清洗完畢後,請記得關閉水源和電源。
31. 請勿爬上洗衣機或坐在頂蓋上。
32. 請勿倚靠洗衣機門。
33. 請勿過度用力關閉洗衣機門。如果發現洗衣機門難以關閉,請檢查是否放置過
多衣物,或衣物放置不平均。
34. 本家用洗衣機非嵌入式洗衣機。
35. 搬運洗衣機時的注意事項︰
• 由專業人士將運送螺栓重新安裝到洗衣機上。
• 應排出洗衣機中的積水。
• 小心搬運洗衣機。在抬起洗衣機時,切勿握著洗衣機上每個突出的部分。在
搬運期間,不可將洗衣機門當作把手使用。
安全注意事項 產品結構
1. 洗衣劑盒
2. 洗衣機門
運送孔塞 進水管C 進水管H(可選購) 出水管支座(可選購)
3. 電源插頭
4. 維修面板
5. 控制面板
6. 出水管
5
6
2
4
3
1
配件

P.33P.32
安裝說明
拆裝洗衣機
將洗衣機的包裝拆掉,檢查洗衣機在運送期間是否受損。同時要檢查附上的袋子確定已收到所有配
件。如果洗衣機在運送期間受到任何損傷,或有任何配件遺失,請立即聯絡當地的經銷商。
處置包裝材料
本洗衣機的包裝材料可能對兒童造成危害。請適當處置這些材料,避免讓兒童輕易碰觸。請根據當
地的相關法規來處置這些包裝材料。請勿將這些包裝材料與日常垃圾一起丟棄。
移除運送螺栓
使用本洗衣機之前,必須移除洗衣機背面的運送螺栓。請依照以
下步驟移除螺栓︰
1. 使用扳手鬆開所有螺栓,接著移除它們。
2. 使用運送孔塞堵住洞孔。
3. 妥善保存運送螺栓,以便日後使用。
選擇放置地點
安裝洗衣機前,應選擇具備以下特徵的地點︰
• 地面堅硬、乾燥且平整(如地面不平整,請參照“調整支腳"的方法來處理)。
• 避免直接日照。
• 有適當通風。
• 室溫在0℃以上。
• 遠離熱源,例如燃燒煤炭或熱氣處。
• 確保洗衣機不壓住電線。
• 請勿將洗衣機安裝在鋪設地毯的地板上。
調整支腳
1. 在放置洗衣機時,請先檢查支腳是否緊附於洗衣機底部。
若非如此,請用手或扳手將它們轉到原始位置,並使用扳
手拴緊螺絲。
2. 放置洗衣機後,請依序壓下洗衣機頂蓋上的四個角。在按
下後,如果洗衣機不穩定,應調整這個支腳。
3. 確定洗衣機已放置妥當。使用扳手鬆開鎖螺帽,並用手旋
轉支腳,直到支腳貼緊地板。用一隻手按住支腳,並用另
一隻手將螺帽緊緊拴在洗衣機底部上。
4. 適當鎖定後,應再次按下四個角,確定它們已調整妥當。如果洗衣機仍不穩定,必須重複第2
和第3步驟。
5. 在洗衣機的頂蓋上,相對於左邊、右邊、前面和後面的方向,放置一個實心的圓筒 (例如易拉
罐〉。如果圓筒可保持穩定,洗衣機的放置便是平整的。如果圓筒滾動,洗衣機的放置便不平
整。滾動的方向表示地面較低,那麼這個方向的兩個支腳應同時抬高。直到洗衣機平整。重複
第1到第3步驟,讓底部支腳貼緊地板,接著鎖緊螺帽。
安裝說明
連接進水管
按圖所示,連接進水管。對於有熱水閥的機款,請將熱水閥連
接到熱水龍頭。在設定某種程式時,會自動節能。
安裝進水管
1. 將肘形件連接到水龍頭,並以順時針方向將它拴緊。
2. 將進水管的另一端連接到在洗衣機背面的進水閥,並以順
時針方向將進水管拴緊。
在連接後,如果水管漏水,應重複上述步驟,重新連接進水
管。應使用最普遍的水龍頭類型來供水。如果水龍頭是方形或
太大,應更換成標準水龍頭。
放置出水管
應適當放置出水管,以避免地板因漏水而受損。放置出水管的末端有兩種方式︰
1. 放在水槽旁。
最高100cm
最少60cm
最高100cm
最少60cm
可上下排水,出水管的安裝高度不應超過100厘米。且末端不應浸在水中。
2. 將它連接到水槽的排水分管 。

P.35P.34
安裝說明
如果洗衣機有出水管支座,請依照下圖來安裝。
在安裝出水管時,請使用繩索將它適當固定。
如果出水管太長,請勿強行塞入洗衣機,因為這會造成異常噪音。
最高100cm
最少60cm
最高100cm
水槽
水管固定
綁緊
最少60cm
電氣連接
• 使用加熱功能時,流經洗衣機的最大電流會達到10A,請確保供電系統(電流、電壓和電線)
可達到洗衣機的一般負荷要求。
• 請將電源插頭連接到正確安裝且適當接地的插座。
• 確保洗衣機所在地點的電壓符合洗衣機銘牌上標示的電壓。
• 電源插頭必須與插座相配,且外箱必須適當且有效接地。
• 請勿使用多功能插頭或插座來當作延長線。
• 請勿用濕手連接或拔掉插頭。
• 在連接和拔掉插頭時請緊握插頭,請勿用力拉扯插頭。
• 請適當保護電源線。電源線應固定妥當,不絆倒人或物體,以防止受損。電源插頭應容易插入
插座,而且應特別注意插座的位置。
• 如果電線受損或有破損跡象,請聯絡客戶服務中心來更換。
警告:
1. 本洗衣機必須適當接地。如果發生任何短路,接地可降低觸電危險。本洗衣機配備電線,包括
電插頭、在接地端的接地緣。
2. 操作洗衣機的電路應與其他電器的電路分開,否則電源保護裝置可能跳脫,或保險絲也可能
燒斷。
控制面板
1. 程式旋鈕
2. 顯示屏
3. 電源開關鍵(ON/OFF)
4. 延時啟動鍵(Delay Start)
5. 脫水速度鍵(Spin Speed)
6. 溫度鍵(Temperature)
7. 啟動/暫停鍵( Start/Pause )
1 2
3 4 5 67

P.37P.36
程式旋鈕功能
程式旋鈕上總共有16種可選擇的清洗功能。
清洗功能 可選清洗溫度
棉質衣物深層洗滌 (Cotton Intensive) 20℃、30℃、40℃、60℃、90℃、冷水
°C60 棉質衣物60℃ (Cotton 60℃) 60℃
°C40 棉質衣物40℃ (Cotton 40℃) 40℃
°C20 棉質衣物20℃ (Cotton 20℃) 20℃
15分鐘快速洗滌15' (Quick: 15 mins) 20℃、30℃、40℃、冷水
節能洗滌 (Eco Wash) 20℃、30℃、40℃、冷水
過水及脫水 (Rinse & Spin) 冷水
脫水 (Spin) 冷水
獨立排水 (Drain) /
羊毛衣物 (Wool) 20℃、30℃、40℃、冷水
纖細衣物 (Delicates) 20℃、30℃、冷水
混合衣物 (Mixed Fabrics) 20℃、30℃、40℃、冷水
合成纖維衣物 (Synthetics) 20℃、30℃、40℃、60 ℃
運動衣物 (Sportswear) 20℃、30℃、40℃、冷水
嬰兒衣物 (Baby Care) 20℃、30℃、40℃、60 ℃、90℃、冷水
我的模式 (My Cycle) 自定
控制面板 操作注意事項
洗衣前注意事項
• 請仔細閱讀此操作方法,可避免洗衣機故障和衣物損壞。
• 檢查第一次清洗的衣物是否會褪色。
• 使用沾有洗衣液的白毛巾來清洗衣物看不見的邊角,接著檢查毛巾是否沾有衣物原本的顏色。
• 在清洗前,請先分開清洗圍巾以及其他衣物當中容易褪色的衣物。
• 對於袖子、衣領和口袋上的的污漬,請使用洗衣液,並使用刷子輕輕刷洗。最後再將它們放入
洗衣機,便可達到較理想的清洗效果。
• 對於易受溫度影響的衣物,應依照衣物標籤上的要求來清洗,否則可能造成變色或扭曲。
• 切勿將欲清洗的衣物放置在洗衣機中太長時間,否則可能發霉並造成污點。因此,請及時清洗
衣物。
• 如未根據衣物標籤上指定的清洗溫度來清洗,衣物可能變色或扭曲。
不能用洗衣機清洗的衣物
• 浸水可能變形的衣物包括領帶、馬甲、西式衣物、外套等,如果浸入水中,可能明顯縮水。
• 混紡人造纖維衣物等會褪色的衣物,亦不適合用洗衣機清洗。
• 皺摺類衣物、有浮雕圖案的衣物、樹脂類衣物等,浸入水中可能變形。
• 棉質和毛料衣物之中,容易扭曲的衣物包括皺摺類絲製品、皮草產品及皮草裝飾品。
• 有裝飾品的衣物、長洋裝及傳統服飾等,是容易變色的產品。
• 請勿清洗沒有衣料標籤和清洗要求說明的衣物。
• 請勿清洗沾有汽油、石油、苯、油漆稀釋劑或酒精等化學物質的衣物。
• 本洗衣機不可清洗防水材料(滑雪衣、野餐墊、窗簾等)。
• 不建議清洗難以吸水的纖維產品,例如防水墊和衣物、野餐墊、雨衣、兩傘、滑雪衣、汽車蓋
布、睡袋等,否則會造成濺水或異常震動,製造危險,而且過水和排水也可能造成衣物損壞。
洗衣劑注意事項
• 請根據布料類型(棉質、合成纖維、軟料衣物及毛料衣物)、顏色、清洗溫度、髒污程度和形
式來選擇「低泡沫」洗衣劑、洗衣粉,或專用於滾桶式洗衣機的洗衣粉,否則可能產生過多泡
沫,並溢流出洗衣劑盒,可能會造成意外。
• 漂白劑層於鹼類,可能損壞衣物,因此建議盡量少用。
• 洗衣粉容易在衣物上留下殘餘物,產生不良氣味,因此應徹底過水。
• 如果洗衣劑太多或水溫太低,洗衣劑可能不易完全溶解,因此可能殘留在衣物、水管和洗衣機
上,造成衣物污染。
• 洗衣時應遵守衣物重量、髒污程度,以及洗衣劑製造商的建議。
• 請將洗衣劑和添加劑放置在安全乾燥之處,讓兒童無法觸及。
• 請使用粉末或液狀的洗衣劑。如果使用肥皂,肥皂殘餘物可能卡在衣物縫隙中。
檢查需要清洗的衣物
• 請將口袋中的物品取出。
• 請檢查欲清洗的衣物的口袋,將裝飾品或硬幣等堅硬物體取出,否則洗衣機可能受損,或發生
異常問題。

P.39P.38
操作注意事項
• 衣物應先分類,再放入洗衣機。可根據以下特徵來將它們分類︰
a. 衣物保養標籤上的符號︰將欲清洗的衣物分類為棉質、混紡纖維、合成纖維、絲質、毛
料及人造纖維。
b. 顏色︰應區分白色和有色衣物。所有新的有色衣物應先分開清洗。
c. 尺寸︰不同尺寸的衣物一起清洗,清洗效果會較佳。
d. 軟硬度︰軟料衣物應分開清洗。對於新的純羊毛織物、窗簾和絲質衣物,應選擇軟料清
洗程式。請檢查所有欲清洗的衣物上的標籤。
• 對於有鉤子的窗簾,應先取下鉤子再清洗。
• 衣物上的裝飾品可能損壞洗衣機。如果衣物上有鈕扣或繡花,應將衣物翻轉再清洗。
• 拉鍊等緊固裝置的處理︰拉鍊應拉上,鈕扣或鉤子應固定。鬆散的飾帶或緞帶應綁在一起。
• 建議將胸圍放入有拉鍊或鈕扣可封起的洗衣袋中,以防止胸圍的鋼絲掉到滾桶中並損壞洗衣
機。
• 蕾絲窗簾、挺直的外套、小物品(襪子、手帕、領帶等)等特別纖細的織品,應先放入洗衣袋
中再清洗。
• 清洗單一大件又厚重的衣物時,例如長絨厚毛巾、牛仔褲、有填充料的外套等,可能容易製造
大離心力,並因過度不平衡而導致警鈴響起。因此建議加入一兩件衣物一起清洗,排水便會比
較順利。
• 清洗前先將衣物上的灰塵、髒物和寵物毛髮清除掉。
• 如果灰塵、髒物和衣物摩擦,可能損壞衣物,並減損洗衣效果。
• 為保護嬰兒皮膚,嬰兒物品(嬰兒衣物和毛巾)應分開清洗。如果與成人的衣物一起清洗,應
增加過水時間,以確保徹底過水和清潔,不留下殘餘的洗衣劑。
• 建議先將白襪、衣領和袖子等易髒污的部分先用手清洗,再放入洗衣機中,可達到更理想的清
洗效果。
• 容易起毛的衣物應翻轉清洗,而且應與其他衣物分開,否則其他衣物可能沾上毛塵和線頭等。
• 黑色衣物最好跟棉質衣物分開清洗,因為如果一起清洗,它們容易沾上其他顏色的線頭。
清洗衣物的重量
不可放置過多衣物,否則可能影響清洗效果。請根據下表來決定洗衣機可承受的洗衣重量。
纖維類型 最大洗衣重量
棉質衣物 7.0公斤
合成纖維衣物 3.5公斤
羊毛衣物 2.0公斤
纖細衣物 2.5公斤
操作注意事項
排水期間的注意事項
• 一般衣物的排水︰
清洗衣物的水是經由排水口來排放。
• 防水衣物和纖維產品的排水︰
在正常洗衣和排水狀態下,防水衣物和纖維產品的水無法排放,且洗衣水必須在同一個方向搜
集,讓洗衣機的離心力不至於太太,以免造成震動或移動。
• 去泡沫功能︰
當洗衣劑太多時,會產生過多泡沫,影響洗衣和過水的效果。洗衣程序會自動檢查,且會自動
加入一個去泡沫程序,以便在檢查到過多泡沫時去除泡沫,同時提醒使用者在下一次進行類似
清洗時,應減少洗衣劑。
Table of contents
Other German pool Washer manuals